1
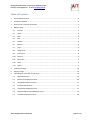
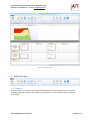
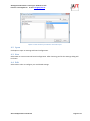
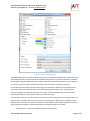
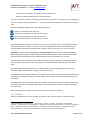
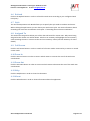
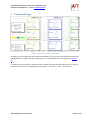
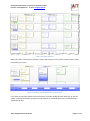
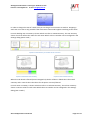
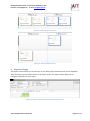
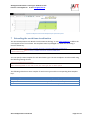
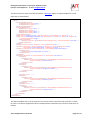
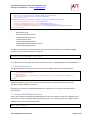
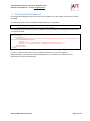
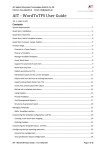
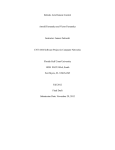
AIT Applied Information Technologies GmbH & CO. KG Internet: www.aitgmbh.de E-mail: [email protected] AIT TeamSystemPro Task Board Quick Start Copyright This documentation is provided by AIT Applied Information Technologies GmbH & Co. KG, Leitzstr. 45, 70469 Stuttgart, Germany. The content of this document is the intellectual property of the AIT AG and its involved customer respectively. © 2010 AIT GmbH & Co.KG AIT TeamSystemPro Task Board Page 1 of 18 AIT Applied Information Technologies GmbH & CO. KG Internet: www.aitgmbh.de E-mail: [email protected] AIT TeamSystemPro Task Board Page 2 of 18 AIT Applied Information Technologies GmbH & CO. KG Internet: www.aitgmbh.de E-mail: [email protected] Table of Contents 1 System Requirements ..................................................................................................................... 4 2 Installation Manual ......................................................................................................................... 4 3 General user interface description ................................................................................................. 4 4 Ribbon Usage .................................................................................................................................. 5 4.1 Connect ................................................................................................................................... 5 4.2 Open........................................................................................................................................ 6 4.3 New ......................................................................................................................................... 6 4.4 Edit .......................................................................................................................................... 6 4.5 Publish ..................................................................................................................................... 8 4.6 Refresh .................................................................................................................................... 9 4.7 Style......................................................................................................................................... 9 4.8 Assigned To ............................................................................................................................. 9 4.9 Full Screen ............................................................................................................................... 9 4.10 Zoom In ................................................................................................................................... 9 4.11 Zoom Out ................................................................................................................................ 9 4.12 Help ......................................................................................................................................... 9 4.13 About....................................................................................................................................... 9 5 Task board Usage .......................................................................................................................... 10 6 Reports Usage ............................................................................................................................... 13 7 Extending the work item visualization .......................................................................................... 14 7.1 BlockedConverter.................................................................................................................. 16 7.2 BooleanToVisibilityConverter ............................................................................................... 16 7.3 StringNullVisibilityConverter ................................................................................................. 17 7.4 TimeInStateConverter ........................................................................................................... 17 7.5 UserNameToImageConverter ............................................................................................... 17 7.6 WorkItemNumericFieldValueConverter ............................................................................... 17 7.7 FieldValueVisiilityConverter .................................................................................................. 18 AIT TeamSystemPro Task Board Page 3 of 18 AIT Applied Information Technologies GmbH & CO. KG Internet: www.aitgmbh.de E-mail: [email protected] 1 System Requirements Windows XP SP2 or later, Windows Vista Business edition or higher, x86 (32bit) and x64 (64bit) editions, Windows 7 Team Foundation Explorer 2010 Team Foundation Server 2010 2 Installation Manual To install the AIT TeamSystemPro Task Board, unpack the file AIT.Task board.zip and execute AIT.Task board.Application.application. The following screen will appear: Click on Install to start the setup. When the installation succeeds the AIT Task Board application will start. 3 General user interface description The task board consists of three areas: - Ribbon which allows interaction with the task board Report control to display reports from projects reporting portal Task board control to visualize work items. Between report and task board area is a splitter that allows hiding either the report area or the task board area. The ribbon can be minimized and maximized by double clicking the Home ribbon tab. AIT TeamSystemPro Task Board Page 4 of 18 AIT Applied Information Technologies GmbH & CO. KG Internet: www.aitgmbh.de E-mail: [email protected] Caption 1: Task board view 4 Ribbon Usage 4.1 Connect Click on Connect to connect to your Team Foundation Server. When clicking Connect to TFS the following dialog will be shown which allows you to select your Team Project Collection and your Team Project. AIT TeamSystemPro Task Board Page 5 of 18 AIT Applied Information Technologies GmbH & CO. KG Internet: www.aitgmbh.de E-mail: [email protected] Caption 2: Select Team Project Collection and Team Project 4.2 Open Click Open to open an existing task board configuration. 4.3 New Select New to create a new task board configuration. After choosing your file the Settings dialog will be shown. 4.4 Edit Select Edit in order to configure your task board settings. AIT TeamSystemPro Task Board Page 6 of 18 AIT Applied Information Technologies GmbH & CO. KG Internet: www.aitgmbh.de E-mail: [email protected] Caption 3: Task board Settings Dialog In the Backlog Items list choose the work item types you consider as backlog items. These work item types will be shown on the left side in the task board. By default your process template is checked for categories Bugs and Requirements in order to determine the work item types. If the categories do not exist no pre-selection will be done and you need to choose your items manually. In the Child Items list choose the work item types you consider as children of your backlog items. These work item types will be shown in the task board grouped by their state. By default your process template is checked for Task work item types. If Task work item types exists the will be preselected, otherwise you need to choose your items manually. In the States section you can define your own states (we refer to these states as Custom States). For each state you configure which work item states it should refer to. Because it is possible to select different work item types as child items which can have different state models multiple work item state assignments might be required. By default the following states are created: - Pending state is created if a Proposed work item state exists AIT TeamSystemPro Task Board Page 7 of 18 AIT Applied Information Technologies GmbH & CO. KG Internet: www.aitgmbh.de - E-mail: [email protected] In Work state is created if an Active work item state exists Done is created if a Resolved work item state exists You can rename the states by selecting it with the mouse and enter a new name. You can change the color of a state by choosing the Button “…” which will open a color picker that allows you to select a color. The buttons between the lists have the following purpose: Adds a new Custom State to the list. Removes the selected Custom State from the list. Moves the selected Custom State up in the list. Moves the selected Custom State down in the list. The drop down Query allows you to select a query from your Team Project. Any filtering or sorting should be applied in the query. In order to correctly leverage the features of the task board you should consider selecting a hierarchical query which is either a tree query or a direct link query. Attention: If the query does not return any link information the task board visualization will not work. Additionally the query defines the fields that could be edited in the work item edit bar. Some numeric fields are black listed 1in the software and will never be editable in the edit bar. The drop down Link Type allows you to select a specific work item link type. If a specific work item link type is defined then only links of that type are considered between backlog items and child items. The drop downs Item Sorting allow you to define a specific item sorting together with the sort direction. If None is defined the sorting from the query is kept. The drop down Row Summary allows you to define which values to choose in order to determine the Row Summary (see Row Summary for more details). Only numeric fields returned by the query are considered. The drop down Column Summary allows you to define which values to choose in order to determine the Column Summary (see Column Summary for more). Only numeric fields returned by the query are considered. When clicking OK your changes are accepted and the task board is refreshed. 4.5 Publish Click on the Publish icon to save changes you made to any of the work items in the task board. 1 Black listed fields are "Iteration ID", "IterationID", "Area ID", "AreaID", "ParentWI", "FirstChildWI", "NextWI", "Proposed Enter Completed Work", "Development Enter Completed Work", "Test Enter Completed Work", "Deployment Enter Completed Work", "Proposed Leave Completed Work", "Development Leave Completed Work", "Test Leave Completed Work", "Deployment Leave Completed Work" AIT TeamSystemPro Task Board Page 8 of 18 AIT Applied Information Technologies GmbH & CO. KG Internet: www.aitgmbh.de E-mail: [email protected] 4.6 Refresh Click on the Refresh button in order to refresh the work items according to your configured work item query. 4.7 Style The AIT TeamSystemPro Task Board allows you to specify the style used to visualize work items. When clicking the Style button you can choose your work item styles. For more information about extending the work item visualization see chapter 7 “Extending the work item visualization”. 4.8 Assigned To The combo box Assigned To allows you to filter the task board for certain users. Only items being assigned to the chosen user will be shown. Also the row summary will highlight the row summary value matching the user in contrast to the total row summary values (see Row Summary for more details). 4.9 Full Screen Click the Full Screen button in order to switch to full screen mode. Press ESC key to return to normal screen mode. 4.10 Zoom In Click the Zoom In button in order to zoom in which means to increase the size of the work item visualizations. 4.11 Zoom Out Click the Zoom Out button in order to zoom out which means to decrease the size of the work item visualizations. 4.12 Help Click the Help button in order to show this document. 4.13 About Click the About button in order to show information about the application. AIT TeamSystemPro Task Board Page 9 of 18 AIT Applied Information Technologies GmbH & CO. KG Internet: www.aitgmbh.de E-mail: [email protected] 5 Task board Usage Caption 4: Work Items visualized in Task board According to you configuration the task board visualizes your work items. The task board comes with a predefined set of work item type visualizations. For customized work item visualizations contact us. In order get more overview of the whole bunch of work items the task board allows you to zoom via buttons in the ribbon or via keyboard shortcuts (CTRL-‘+’ to zoom in, CTRL-‘-‘ to zoom out) AIT TeamSystemPro Task Board Page 10 of 18 AIT Applied Information Technologies GmbH & CO. KG Internet: www.aitgmbh.de E-mail: [email protected] Caption 5: Zoomed Task board When you select a work item an edit bar is shown which allows you to quickly modify numeric values returned by your query. Caption 6: Task board with the selected work item and edit bar If you want to edit more details of a work item you can either double click the work item or use the “More” link from the edit bar to open the work item form. An edited work item is visualized with a dashed border line AIT TeamSystemPro Task Board Page 11 of 18 AIT Applied Information Technologies GmbH & CO. KG Internet: www.aitgmbh.de E-mail: [email protected] In order to change the state of a work item you can drag it from one state to another. Dropping a work item on a state is only possible if the work items state model supports switching to that state. For each backlog item a summary is shown which we refer to as Row Summary. The row summary shows a bar that reflects the values for each state. Which value to consider can be configured in the Settings dialog (See 4.4 Edit ) Caption 7: Row Summary to visualize values from state Caption 8: Unfiltered Row Summary Caption 9: Filtered Row Summary When the task board is filtered (see 4.8 Assigned To) the bar reflects in faded colors the overall summary and in normal colors the values for the person currently filtered. For each state a summary is shown which we refer to as Column Summary. The column summary shows a numeric value for each state. Which values to consider can be configured in the Settings dialog (See 4.4 Edit ). AIT TeamSystemPro Task Board Page 12 of 18 AIT Applied Information Technologies GmbH & CO. KG Internet: www.aitgmbh.de E-mail: [email protected] Caption 10: Unfiltered Column Summary Caption 11: Filtered Column Summary 6 Reports Usage The reports control allows you to select any of your team project related reports via the dropdown. After choosing a report it will be shown in the report viewer. The report viewer allows you to configure parameters for your report. Caption 12: Report control with expanded report parameter panel AIT TeamSystemPro Task Board Page 13 of 18 AIT Applied Information Technologies GmbH & CO. KG Internet: www.aitgmbh.de E-mail: [email protected] Caption 13: Report control with collapsed report parameter panel 7 Extending the work item visualization The AIT TeamSystemPro Task Board is built on WPF technology. It uses Data Templates to define the visual appearance of a work item. The templates must be packaged in a XAML file containing a resource dictionary: <ResourceDictionary xmlns="http://schemas.microsoft.com/winfx/2006/xaml/presentation" xmlns:x="http://schemas.microsoft.com/winfx/2006/xaml" </ResourceDictionary> You can specify a Data Template for each Work Item Type. The Data Templates must be named using the following naming schema: [WorkItemTypeName]WorkItemTemplate Where WorkItemTypeName is the name of the work item type with no white spaces The following table shows some samples for work item types and the corresponding data template keys: Work Item Type Name User Story Requirement Task AIT TeamSystemPro Task Board Data Template Key UserStoryWorkItemTemplate RequirementWorkItemTemplate TaskWorkItemTemplate Page 14 of 18 AIT Applied Information Technologies GmbH & CO. KG Internet: www.aitgmbh.de E-mail: [email protected] The data context for each work item template is a WorkItem object. A simple template for a task work item is shown below: <DataTemplate x:Key="TaskWorkItemTemplate"> <Grid> <Grid.ColumnDefinitions> <ColumnDefinition Width="Auto" /> <ColumnDefinition Width="*" /> </Grid.ColumnDefinitions> <Grid.RowDefinitions> <RowDefinition Height="Auto" /> <RowDefinition Height="*" /> <RowDefinition Height="Auto" /> <RowDefinition Height="Auto" /> </Grid.RowDefinitions> <Image Source="Images\Task.png" Grid.ColumnSpan="2" Grid.RowSpan="2" Opacity=".2" /> <Image Source="SmallImages\forbidden.png" Grid.Column="1" Margin="2" Width="16" Height="16" HorizontalAlignment="Right" > <Image.Visibility> <Binding Converter="{StaticResource BlockedConverter}" ConverterParameter="Blocked" /> </Image.Visibility> </Image> <TextBlock Grid.Column="1" Margin="2" Text="{Binding Path=Id}" /> <TextBlock Grid.Row="1" Grid.ColumnSpan="2" Margin="2" Text="{Binding Path=Title}" TextTrimming="CharacterEllipsis" TextWrapping="Wrap" /> <TextBlock Grid.Row="2" Grid.ColumnSpan="2" TextTrimming="CharacterEllipsis"> <TextBlock.Text> <Binding Path="Fields[Assigned To].Value" /> </TextBlock.Text> </TextBlock> <StackPanel Grid.Row="3" Grid.ColumnSpan="2" Orientation="Horizontal"> <TextBlock> <TextBlock.Text> <Binding Converter="{StaticResource WorkItemNumericFieldValueConverter}" ConverterParameter="Baseline Work" /> </TextBlock.Text> </TextBlock> <TextBlock> <TextBlock.Text> <Binding Converter="{StaticResource WorkItemNumericFieldValueConverter}" ConverterParameter="Original Estimate" /> </TextBlock.Text> </TextBlock> <TextBlock Text=" / " /> <TextBlock> <TextBlock.Text> <Binding Converter="{StaticResource WorkItemNumericFieldValueConverter}" ConverterParameter="Remaining Work" /> </TextBlock.Text> </TextBlock> <TextBlock Text=" / " /> <TextBlock > <TextBlock.Text> <Binding Converter="{StaticResource WorkItemNumericFieldValueConverter}" ConverterParameter="Completed Work" /> </TextBlock.Text> </TextBlock> </StackPanel> </Grid> </DataTemplate> The above template uses a set of converters to retrieve certain values from the work item. In order to use the converters shipped with the AIT TeamSystemPro Task Board you need to include those as follows: AIT TeamSystemPro Task Board Page 15 of 18 AIT Applied Information Technologies GmbH & CO. KG Internet: www.aitgmbh.de E-mail: [email protected] <ResourceDictionary xmlns="http://schemas.microsoft.com/winfx/2006/xaml/presentation" xmlns:x="http://schemas.microsoft.com/winfx/2006/xaml" xmlns:converter="clrnamespace:AIT.Taskboard.Application.Converter;assembly=AIT.Taskboard.Application"> <converter:BlockedConverter x:Key="BlockedConverter" /> <converter:TimeInStateConverter x:Key="TimeInStateConverter" /> <converter:UserNameToImageConverter x:Key="UserNameToImageConverter" /> <converter:WorkItemNumericFieldValueConverter x:Key="WorkItemNumericFieldValueConverter" /> </ResourceDictionary> The AIT TeamSystemPro Task board is shipped with the following set of converters: - BlockedConverter BooleanToVisibilityConverter StringNullVisibilityConverter TimeInStateConverter UserNameToImageConverter WorkItemNumericFieldValueConverter FieldValueVisibilityConverter In order to control the size of the work items elements in the task board you can add two double resources to you resource dictionary as follows: <s:Double x:Key="TemplateWidth">160</s:Double> <s:Double x:Key="TemplateHeight">120</s:Double> It’s important to use the right names for those two resources – TemplateHeight and TemplateWidth. 7.1 BlockedConverter The BlockedConverter is used to convert the values of the Blocked field into a Visibility value. <Image Source="SmallImages\forbidden.png" Grid.Column="1" Margin="2" Width="16" Height="16" HorizontalAlignment="Right"> <Image.Visibility> <Binding Converter="{StaticResource BlockedConverter}" ConverterParameter="Blocked" /> </Image.Visibility> </Image> The BlockedConverter requires as ConverterParameter the name of the field to evaluate. The field specified should have Yes or No as value. If the field’s value is Yes Visibility.Visible is retruned, otherwise Visibility.Hidden is returned. Although the converter is named BlockedConverter it allows you to work with any field that has Yes/No values. 7.2 BooleanToVisibilityConverter As the name implies the BooleanToVisibilityConverter converts a Boolean value into a Visibility value. The converter can be used when binding to Boolean value. The converter allows to configure which visibility to return for which Boolean value: <converter:BooleanToVisibilityConverter x:Key="HiddenIfNotTrue" Inverted="True" Not="False" OnTrue="Vi sible" OnFalse="Hidden" /> The BooleanToVisibilityConverter has the following parameters: AIT TeamSystemPro Task Board Page 16 of 18 AIT Applied Information Technologies GmbH & CO. KG Internet: www.aitgmbh.de Parameter Inverted Not OnTrue OnFalse E-mail: [email protected] Description A Boolean value. When set to True the conversion is from Visibility to Boolean which means the value bound is a Visibility value and the converted value will be a Boolean. Otherwise the conversion will be from Boolean to visibility. The default value is False A Boolean value. If set to true the bound Boolean value is logical negotiated before using it to determine the visibility. The default value is False. The visibility to return when the input value – after applying the Not configuration – is evaluated as True. The visibility to return when the input value – after applying the Not configuration – is evaluated as False. 7.3 StringNullVisibilityConverter The StringNullVisibilityConverter can be used when binding to strings. It returns Visibility.Visible when the bound string value is neither null nor empty. Otherwise it returns Visibility.Hidden. 7.4 TimeInStateConverter The TimeInStateConverter is a sample that shows how a converter can be used to perfrom specifc calculation logic for the visualization based on the bound work item. It can be sued as follows: <TextBlock Text="{Binding Converter={StaticResource TimeInStateConverter}, ConverterParameter=TotalHours, StringFormat={}{0:F0} }" /> The Converter is looking for fields in the work item that track the Enter Time for a state. These fields are named [StateName] Enter Time. The State Name is evaluated on the bound work item using the work items current state. If an Enter Time field is found for the current state the difference between that field’s value and DateTime.Now is calculated. Based on the ConverterParameter Minutes, Hours or Days are returned. The allowed ConverterParamters are TotalDays, TotalHours and TotalMinutes. If no parameter is specified or an invalid parameter is specified the Timespan value is returned. 7.5 UserNameToImageConverter The UserNameToImageConverter tries to find images for users. It can be used when being bound to a string value. The converter is looking for user images in the execution directory. The images should be named [UserName].png where UserName matches the bound string value. If no user image is found the converter returns one of the default images. 7.6 WorkItemNumericFieldValueConverter The WorkItemNumericFieldConverter converts a numeric field value. Its fails safe if the field does not exist or the field has no value. If the field exists but has no value 0 (zero) is returned. <TextBlock> <TextBlock.Text> <Binding Converter="{StaticResource WorkItemNumericFieldValueConverter}" ConverterParameter="Original Estimate" /> </TextBlock.Text> </TextBlock> The converter must be bound to the work item instance and expects as ConverterParamter the name of the field. AIT TeamSystemPro Task Board Page 17 of 18 AIT Applied Information Technologies GmbH & CO. KG Internet: www.aitgmbh.de E-mail: [email protected] 7.7 FieldValueVisiilityConverter The FieldValueVisibilityConverter allows you set the visibility of an item based on the value of a work item field. The following shows how the FieldValueVisibilityConverter is integrated: <converter:FieldValueVisibilityConverter x:Key="FieldValueVisibilityConverter" MatchedVisibility="Visible" UnmatchedVisibility="Hidden" /> The following shows how the converter is applied to set the visibility of an image based on the value of a work item field. Image Source="SmallImages\forbidden.png" Grid.Column="1" Margin="2" Width="16" Height="16" HorizontalA lignment="Right"> <Image.Visibility> <MultiBinding Converter="{StaticResource FieldValueVisibilityConverter}" ConverterParameter="M icrosoft.VSTS.CMMI.RequirementType"> <Binding /> <Binding Source="{StaticResource AllowedRequirementTypeFunctional}" /> <Binding Source="{StaticResource AllowedRequirementTypeBusiness}" /> </MultiBinding> </Image.Visibility> </Image> The first value in the multi binding is always the work item. The following bindings refer to the values to check. If either of the values is set in the field the visibility is set to the configured MatchedVisibility, otherwise the UnmatchedVisibility is set. The field that should be check is specified via the ConverterParameter. AIT TeamSystemPro Task Board Page 18 of 18