1
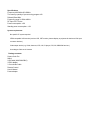
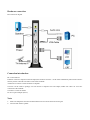
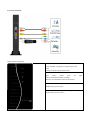
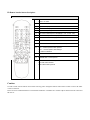
Supera Color Pro
Welcome to use Super Color Pro, the perfect TV BOX for LCD/CRT monitors can turn your monitor to a TV set,
Quick Installation Guide on Supera Color Pro TV Box
Step 1: Choose input on remote control
Press “AV/TV” button to choose from TV Input Mode/ Composite Video Mode/S-Video Mode /Component Video
Mode. Or you can press the “Source” button on the box to choose the same.
Step 2: Watching TV
a. Choose TV mode first and press the “Menu” button
b. Under the “OSD Setting” section, highlight “Color SYS” and select “Auto” or “NTSC”.
c. Under “Picture” section, highlight the “TV system” and select <Cable>. Press the “Vol+” button to select
and press “Menu” button again to return to the main menu.
d. Do “Full scan” channels from your Analog cable box.
e. “Fine Tune” is to adjust a specific channel in a limited range for best picture quality.
Step 3: Watching DVD
a. Choose Video mode first and press the “Menu” button
b. Under the “OSD Setting” section, highlight “Color SYS” and select “Auto” or “NTSC”.
Step 4:
plug in a 3.5mm speaker plug into the Audio-Out jack on the back of the TV box.
Step 5:
Connect “VGA in” with provided VGA cable to PC Desktop. (optional)
Supera Color Pro User Manual
Mygica Supera Color Pro LCD TV Box is a state-of-the-art TV to PC monitor converter box, up to 1920X1200
resolution and PIP function. The compact unit easily turns your LCD, CRT monitor, plasma display or projector all
that has a VGA input connector devices into a multimedia center with small desktop space. With a built-in NTSC TV
tuner and multiple video ports, you can connect DVD players, digital video cameras, VCRs or even game consoles to
your PC, and view high quality video in full-screen, high-resolution images
Features
Watch TV on a monitor, no software or driver required
Up scaling technology on chipset, perfect color enhancement and motion compensation
Full function remote control, OSD(on-screen-display),easy to use
Supports 4:3 16:9 and 16:10 aspect ratio, the resolution reaches as high as 1920×1200
The support resolution:800×600 1024×768 1280×1024 1400×1050 1440×900 1680×1050 1920×1080
1920×1200
Full channel television reception
Picture-in-Picture: Watch live TV in a small window while let the OS window as the background
Easy to connect the LCD or CRT to the DVD/Camera/Video recorder/Game BOX via Video or S-Video port
Specifications
Frequency:48.25MHz-863.25MHz
The memory quantity of pre-set tuning program:100
Refresh |Rate:60Hz
Frequency range:31.5KHz-48KHz
RF Input: IEC 75 ohm
Power consumption: <5W
Standby power consumption: <1W
System requirements
No specific PC system required
VESA compatible VGA monitor (such as LCD, CRT monitor, plasma display or projector all that has a VGA input
connector devices.)
Video output device (e.g. Cable, Antenna, VCR, V8, LD player, PS3, Wii, XBOX360 and etc.)
An analogue Cable or air Antenna
Package contents:
Supera Color Pro
Stand
VGA Cable (MiniDIN8-DB15)
YPbPr adapter
3.5 mm Audio Cable
Remote Control
User’s Manual
Power adapter
Hardware connection:
Rear connection diagram
Connection introduction:
RF: To the cable box
LINE IN: Connect to computer sound card output, the sound will switch to the PC status automatically when switch to the PC
status by remote control PC/TV button or turn off the TV BOX.
AUDIO OUT: Connect to sound enclosure or amplifier
VGA IN: Use the cables in package, one side connect to computer VGA card output, another side connect to “VGA IN”
connection of the TV BOX
VGA OUT: Connect to monitor
DC IN: To power adaptor (5V/1A)
Note:
1、 Please use multiplexer when the TV BOX and the television use the same television signal.
2、 Connect audio cable to speaker..
Front side connection:
Button function explanation:
MENU/POWER
Power ON/OFF: Long press(3 seconds) for power off
Menu
Short press for showing the system menu
INPUT/OK
Input
source
switch:
press
for
source(TV-AV-SVideo-YPbPr) switching.
OK: Press for confirmation under the menu status.
input
CH+/-: Under menu status, press for up/down choosing.
Normal status, press for CH+/-.
VOL+/-: Under menu status, press for left/right choosing.
Normal status, press for VOL+/-.
IR Remote handset button description:
1
Turn on/off: Power on/off button, turn off switch to PC status, turn on
switch to TV status.
2
Mute: ON/OFF volume mute
3
Digital Buttons (0~9):Choose channel.
4
Return button: Jump to previous channel
5
Single/Double/triple digital button
6
SYS: Press for default picture switch(Bright – soft – normal - user)
7
TIME: Press for System time display
8
DISPLAY: Press for current program channel number and info display
9
MENU: Enter/Exit menu
10
AV/TV: Video source switch(TV-AV-SVideo-YPbPr)
11
CH+/—:Channel up/down, Menu up/down
VOL+/—:Volume up/down, Menu left/right
OK: Switch confirmation.
12
STILL: Switch resolution
13
BROWSE: Multi – Picture preview
14
PIP: Press enter PIP function, press return to TV Status
LEFT: PIP window left shift
RIGHT: PIP window right shift
Caution:
In order to make sure the remote control works correctly, please change the batteries when remote control can not work stable
or have no function.
Please do not use exhausted batteries or mixed brand of batteries. And make sure no block subjects between remote control and
IR receiver.
Main Menu
Picture →
TV Function →
Sub items
↓
Enter picture sub manual setting
Brightness
Adjust picture brightness
Contrast
Adjust picture contrast
Saturation
Adjust picture saturation
Tint
Adjust picture tint
Sharpness
Adjust picture sharpness
Reset
Restore the default factory settings
↓
Enter TV sub manual setting
TV CH
Current program number
TV System
Channel edit
Resolution →
Input Source →
OSD Setting →
Description
AIR
Antenna
Cable
Cable
Add
Restoration current channel
Skip
Skip current channel
Fine Tune
Fine tune current channel
Full Scan
Full channel scan
↓
Enter Resolution manual setting
800 X 600
800 X 600
1024 X 768
1024 X 768
1280 X 1024
1280 X 1024
1400 X 1050
1400 X 1050
1440 X 900
1440 X 900
1680 X 1050
1680 X 1050
1920 X 1080
1920 X 1080
1920 X 1200
1920 X 1200
↓
Enter input source manual setting
TV
TV Input
Video
Video Input
S-Video
S-Video Input
YPbPr
YPbPr Input
↓
Language
OSD Position
Enter OSD setting and Video Standard
English
English language
Chinese
Chinese language
Up
OSD to the up Move
Down
OSD to the down Move
Left
OSD to the left Move
Right
OSD to the right Move
Transparency
Color System
Version
Transparency of OSD menu background
Auto
Video standard auto
PAL
Video standard PAL
NTSC
Video standard NTSC
PAL-N
Video standard PAL-N
PAL-M
Video standard PAL-M
SECAM
Video standard SECAM
1.7
Software version info
FAQ
Q1. No image (video), no audio
A1. Power is not switched on. Connection did not make correctly
Q2. No image, with audio
A2. The resolution is over the boundary of the monitor range. Try to adjust the output resolution and brightness contrast. It also
may occur by bad TV signal.
Q3. Snow point or interference
A3. Bad connection for Coaxial cable , Do micro channel adjust. Also may occur by bad TV signal
Q4. With video but no audio
A4. Speaker setting is in mute, try to increase audio volume. Or it may caused by audio cable which is not connected correctly
Q5. No color
A5. Adjust color, and make sure that it is not a black & white only program
Q6. No PC image, bad color wave signal on monitor
A6. Make sure that PC work correctly, and VGA cable is connected correctly.
Q7. Remote control failure or not sensitive
A7. Make sure that the remote control battery is installed correctly or battery power is good for working. Do not block the IR
receive and interference