1
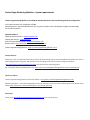
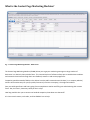
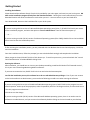
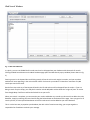
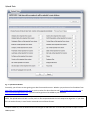
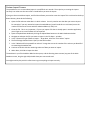
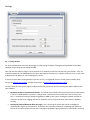
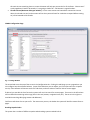
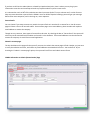
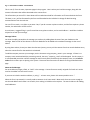
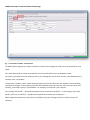
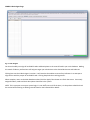
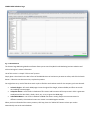
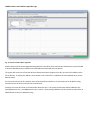
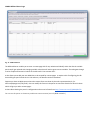
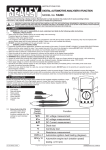
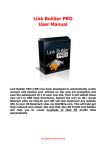
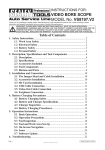
Contact Page Marketing Machine User's Manual Updated April 1, 2014 Contact Page Marketing Machine – System requirements Contact Page Marketing Machine runs Windows based architectures with the following minimum configuration: A PC based computer with 4‐Gigabytes of RAM. Operating System ‐ Microsoft Windows XP SP‐1 or greater (a 64‐bit version of Windows is highly recommended.) An internet connection. Optional Software: Death By Capchta Account ‐ deathbycaptcha.com Hide My Ass VPN Pro ‐ hidemyass.com Data collecting software/scraper B2BMarketingMagic.com Business Data – http://www.opt‐in‐email‐marketing‐lists.com Contact Page Marketing Machine ‐ http://ContactPageMarketingMachine.com Weekly Webinar Please join us for an informative live webinar where we walk through using Contact Page Marketing Machine as well as other lead generation programs. We typically touch on finding your perfect customer using business data (http://www.opt‐in‐email‐marketing‐lists.com) and share our best marketing ideas. For a complete webinar schedule please visit http://secure.contactpagemarketingmachine.com/live‐qa‐webinar/ Quick Start Videos Contact Page Marketing Machine Quick Start Videos ‐ http://secure.contactpagemarketingmachine.com Business Data Query – need help navigating the business data query on opt‐in‐email‐marketing‐lists.com? Watch these videos: http://www.opt‐in‐email‐marketing‐lists.com/sample_data.php Need help? Please email [email protected] with your questions. What is the Contact Page Marketing Machine? Fig. 1 ‐ Contact Page Marketing Machine ‐ Main Screen The Contact Page Marketing Machine (CPMM) allows you to get your marketing message to a large number of businesses in a relatively short period of time. This innovative piece of software allows you to comb business websites and contact the businesses through their own feedback, contact‐us and contact page forms. Companies spend thousands of dollars to be able to have the public communicate with them (i.e. a company website) and one of the easiest ways for you (the public/consumer) to contact a company, is through their website. Sure you could spend hours and hours going from one website to another and filling out and submitting their contact forms. But, let's face it, how many could you do in a day? How long would it take you to contact one hundred companies, how about one thousand? It's time to work smarter, not harder, and the CPMM is here to help. Getting Started Installing the Software: Please download the software directly from the link provided by your sales agent, and save it to your local system. DO NOT run the installation program directly from the download website. Running the install routine directly from the download location will cause the software to crash when you run it. You must save it to your local hard drive. Once downloaded, browse to the installation file on your local system. If you are running a 64‐bit version of a Microsoft Windows operating system (Vista, 7, 8) RIGHT CLICK with your mouse on the installation program, and select the option to "Run as Administrator" from the menu that opens up. ‐ ‐ ‐ or ‐ ‐ ‐ If you are running an older (32‐bit) version of a Microsoft operating system (XP or 2000), double click on the installation icon as usual to start the installation process. If after initiating the installation process, you are presented with the Windows User Access Control pop‐up, click YES to start the installation. Once the installation starts, follow the prompts (you can take the default settings) and complete the installation. When you get to the end, DO NOT click the Finish button yet. To avoid a system error, you much uncheck the "Launch Full Featured Version" checkbox BEFORE clicking Finish. Running the Software: After installation, you should have an icon on your desktop resembling a satellite dish labeled "Full Featured Version", this is your new Contact Page Marketing Machine software. If you want to rename the icon, RIGHT CLICK in the icon and select the Rename option. Just like the installation process, this software has to be run with Administrator privileges. Even if your user account on the local machine is an administrator, you must do the following to avoid errors when running the software. If you are running a 64‐bit version of the Microsoft Windows operating system, RIGHT‐CLICK on the program icon and select Properties. At the top of the pop‐up box, select Compatibility and in the Privilege Level box, click the check box to "Run this program as an administer." Click OK to save the change. If you are running an older (32‐bit) version of the Microsoft Windows operating system, there is no need to run the software as an administrator, and you can start the software by double clicking on the icon located on your desktop. Welcome to the Program When you start the Contact Page Marketing Machine software, you will find yourself on the Main Database page. If you receive any error messages when starting the software, please review the Installing the Software section above and make sure you installed and are running the software as a system admin. Let's take a few minutes to introduce you to this nifty little bit of software. CPMM: Main Database Page Fig. 2 ‐ Main Database menu options The options on the Main Database tab are used mainly for database management and upkeep. In addition to being where you upload data sets to the system, this is where everything is put into motion and the submission routines are started. We will start with a brief overview of each buttons function, then we will continue with a detailed description of a few of the more complex action buttons (Web Search, Upload Data, and Settings.) Overview ‐ Main Database Buttons: The Version Number ‐ Located in the upper left corner of the screen, the version number tells you the date the software was last updated or upgraded. In the unlikely event you need to contact customer support due to a software malfunction, please include your version number in your email. Start ‐ starts the submission. When starting the submission you have the option to select where in your list (what records number) the routine will start and where it will stop. Stopping options are the end of the list, a desired item (record) number, or the next X number of records. Unless you are doing some kind of testing, you will probably run your jobs from record ID 1 to the end. Stop ‐ stops the current running submission. If for some reason you need to stop the current submission routine, click the Stop button. The sites already in the process of being examined will complete, and the system will halt further processing. Add ‐ adds a single record to the database. Clicking the Add button will allow you to add a single record to the database. Edit ‐ edit a selected (single) database record. You have the ability to edit a single record by clicking on the desired record to select it, then clicking the Edit button. When you are done click OK or Cancel to close the edit window. NOTE: You can also edit a single record by double clicking on it. Delete ‐ delete the selected (single) database record. If you wish to delete a single record, click the desired record to select it, then click Delete. You can also delete a record by selecting it, then pressing the Delete key on your keyboard. Delete All ‐ delete all database records (no need to select all). Clicking this button will delete all of the records in your database. Web Search ‐ use the built‐in web search tool to populate the database. Click this button to activate the built‐ in web search tool. Though not as robust as other data collection tools, this mini search feature can be used to populate the main database with websites to examine. Upload Data ‐ upload (import) data obtained from an outside source to the database. If you have a list of websites collected in another piece of software, or downloaded from a website, import them using this button. Export Data ‐ export the contents of the database to a .csv file. From time to time, it is a good idea to back‐up your database files and store them in a safe place. Click the Export Data button and follow the directions to create your backup. You can select to export only certain fields or all fields in the database. Compact DB ‐ remove the duplicate records from the database. To help ensure you do not double send to a website, click the Compact DB button to run a duplicate removal routine. Settings ‐ configure the system settings. Use the Settings button to adjust the number of websites you scan at one time, and set system time outs. Web Search Window Fig. 3 ‐ Web Search Window In a pinch, you can use CPMM's built‐in web search tool to help populate your database with thousands of records. Clicking the Web Search button on the Main Database page opens the Web Search pop‐up window (shown above in Fig. 3.) Entering a term in the keyword box and clicking search will set the mini search engine in motion, and your resultant websites will start appearing in the main window. NOTE: Each search you conduct is limited to a maximum of 1,000 results per search term used. Results from sites with any of the Keywords listed in the left side column will be dropped from the results. If you are doing a search for pizza shops, you really don't need to include Wikipedia articles about the "origins of pizza" or results from Google Maps. Feel free to add to the Exclude list as you see fit. When your search is complete, you can examine your results and delete any records you do not wish to add to the main database, simply by selecting the record and clicking the Delete button at the bottom of the page. Once you get a list of results you like, click the Upload Data button to have the web search results added to your main database. This is not the best way to populate your database, but with a bit of creative searching, you can put together a respectable list of websites to submit your message. Upload Data Fig. 4 ‐ Upload Data Window Eventually, you will want to start getting your data from outside sources. Whether you purchase a list of websites from http://Opt‐in‐Email‐Marketing‐lists.com or use the results of a data collection tool ( http://b2bmarketingmagic.com or http://facebookleadgenerator.com ) you will need to get these lists added to your database. NOTE: The upload tool works with .csv files, and .csv files compressed with the .bz2 compression logarithm. If your data file is in another format, it must first be converted to one of these formats. To import a data file, click the Browse button and navigate to and select the .csv of .bz2 file you wish to import into the CPMM system. Next, select the type of file you will be importing, (that is, what software was used to create the file), from the drop down selector. By telling the importer what software tool was used to product the file, it will know how to map the fields and ensure everything gets in the proper column of the database. For business data downloaded from http://Opt‐in‐Email‐Marketing‐lists.com select “Company Issued Data” Yellow Pages Lead Finder select “Yellow Pages Data” (http://B2BMarketingMagic.com B2B Lead Generator select “Google Maps Data” (http://B2BMarketingMagic.com White Pages Lead Finder select “White Pages Data” (http://B2BMarketingMagic.com) Facebook Lead Generator select “Facebook Scraper” (http://FacebookLeadGenerator.com) LinkedIn Lead Finder (extracts business information from LinkedIn) http://Opt‐in‐Email‐Marketing‐lists.com Manta Business (Download business data from Manta) select “Manta Scraper” http://Opt‐in‐Email‐Marketing‐ lists.com Thomas Registry Business Data select “Hardware Suppliers and Manuf. Finder” http://Opt‐in‐Email‐Marketing‐ lists.com Valpak Business Finder (for marketing to businesses who advertise in Valpak) “Valpak Parser” http://Opt‐in‐ Email‐Marketing‐lists.com Before finalizing the import, make sure to check the box labeled "Strip off subpages from main URL." By doing this, you are making sure the tool starts as high on the website as possible, and give the system the greatest chance of finding the contact pages as it drills down through the site. If you do not see your collection tool listed here, you may need to do a custom import. (Please see box below for more information on the custom import procedure.) Custom Import Process The procedure to run a custom data import is not a difficult as it sounds. The major key to running the import correctly is to make sure the source file is closed before you start the import. If you go to do a normal data import, and find the software you used to create the import file is not listed on the drop down selector, please do the following. 1. Open the file and note what data is in which column. You only need to note the data you want to import. For example, if you only wanted to import the web address (you will need this at a minimum) count the number of columns to the one with the website address (or URL) in it. 2. Close the file. This is very important. If you try to import a file that is already open in another application, you will get an error and no data will be imported. 3. Open the Upload Data window by clicking the Upload Data button on the Main Database window. 4. Navigate to and open the file you want to import in the File Open... window. 5. In the "Choose the type of data to import..." drop down, select the "Zero Values" option. 6. The field listings should all have 0 (zero) as the field number. 7. In the "Website will be imported from column" change the zero to the number of the column you identified as containing the website URL. 8. Continue to do this with the remaining columns of data you want to import. 9. When done, click OK to import the data. The websites in your file should be added to the system, and the Showing Items counter (top part of the Main Database screen, long the right side) should show your new record total. You might need to play with this a few times to get everything to import correctly. Settings Fig. 5 ‐ Settings Window For all the software does, there are surprisingly very few settings to adjust. Clicking the Settings button on the Main Database screen brings up the Settings window. Here you have the option to plug in a proxy account if it is needed to access the internet from your location. Since, for all practical purposes, the CPMM appears just like a web browser if the activity is traced or sniffed, there is no real need to disguise your IP address or use a rotating proxy service. If you are nervous about running without any proxy service, it is suggested you use a virtual private network (VPN) service, like Hide My Ass VPN Pro, available for purchase at http://hidemyass.com/vpn/r7676/ The real reason we come to this page is to adjust the threads (processes) used for searching the website URLs listed in your database. Maximum number of simultaneous threads ‐ This is how many websites the system will process simultaneously. If you have 10,000 websites to process, it will go faster if you process 24 at a time than if you ran only 6 at a time. I recommend running 3 threads per gigabyte of RAM in your system. Setting this number too high will cause your system to be slugging and slow to respond if you are trying to do other work while the CPMM is running. Connection timeout (Maximum delay per page) ‐ This is how long the system will wait for a webpage to respond before it gives up and moves on. By default, the transaction timeout for a web page (the maximum amount of time your browser will wait for a web page to load before giving a 404 error is 30 seconds. Lowering this wait time to something closer to a normal timeout will help you process the list of site faster. Chances are if a web page doesn't load in 20 seconds, it's not going to load at all. A 20 timeout is a good number. Thread timeout (Maximum delay per website) ‐ For the same reasons we lowered the connection time out above, the thread time out (or the amount of time the system will wait for a website to respond before moving on) can be lowered to 20 seconds. CPMM: Configuration Page Fig. 5 ‐ Settings Window The second tab across the top of the screen is the Configuration tab. Clicking this tab brings you to a page where you can configure how the software behaves. Some of the behaviors you can adjust, are if the system will use a Captcha service, if the software will harvest emails if it finds them, and even where to look for links to contact pages. If desired, you can edit the list of terms the system will use in its search for contact pages. The terms in the left column will be used while examining anchor tags (links in the text, buttons, navigation items, &c.) The terms in the right are used while searching URLs (page names and addresses.) Feel free to edit these lists as you see fit. The more terms you use, the harder the system will look for contact forms or pages. Breaking Captcha Codes The system has a number of different captcha code breaking system methods built in. If you have an OCR service subscription or a Death By Captcha subscription, here is where you can plug in your information to use the service attempt to break any captcha codes the system comes across. It is estimated as much as 50% of the websites out there have some kind of "are you a human test" on their forms to help stop mass submission systems like the CPMM. Use of an OCR of Captchs breaking system will get your message delivered to more companies, and in the long run, more responses. Extract Emails You can choose if you want to extract any emails the system finds as it searches for a contact form. Not all contact pages will have a form to fill out and submit. Some contact pages are a street address, phone number and maybe an email address to contact the company. Though not very common, these types of contact forms do exist. By checking the box to "Extract Email" the system will collect any email associated with a website and record it in the database. These email addresses can then be used to contact the company via email from an email application. Submit in contact pages The last checkbox on this page tells the system if you want it to submit the contact pages it finds. Maybe, you just want to verify the websites are active, and collect any email addresses associated with the site. You can do that. By un‐ checking the "submit in contact page" option, the system will not fill out and submit contact forms. CPMM: Information to Submit (Customization) Page Fig. 6 ‐ Information to Submit ‐ Customization This is one of, if not the most, important pages in the program. Here is where you load the message, along with the contact information that will be submitted to the contact form. The information you use to fill in these boxes will be used when asked for information to fill out and submit the form. This data, in turn, will be formatted by the form and forwarded to the individual in change of administrating communications from the web site. You can fill in as much, or as little as you want. But, if you do not enter a phone number, and the form requires a phone number, the submission will fail to send. At a minimum, I suggest filling in your first and last name, phone number, and an email address. I would also include a subject line as well your message. Message Tokens: You have the ability personalize the message you send out, by adding data elements from your database to the message. Date from all of the columns in the main database can be added to the outbound message via the use of tokens. By using these tokens, shown just above the data entry boxes, you can pull the content from that records database entry when the contact form for that web site is submitted. To add the company name to your message, use the character string company_name in your message. If there is no company name associated with the processing records, the entry "company_name" will be dropped. For this reason, it is recommended you either craft the message to read correctly with (and without) the company name, or use Default Values for the tokens you are placing n the system. Please see the next section for details on using the Default Values page. Notes on the Message: Do not include any images, HTML, or "code" in the message. Contact forms are usually stripped of all code as it can be used as a backdoor to hack into the server. If you want to include a web site address, try using "... to learn more, please visit www.mywebsite.com...". When the form is processed, it is usually send to someone via in house email. Most email clients are smart enough to see the web address and render it as a hotlink, thus making it clickable to the recipient. The same holds true for adding email addresses. CPMM: Information To Submit (Default Values) Page Fig. 7 ‐ Information to Submit ‐ Default Values The Default Values tab gives you a place to make sure each of the messages you send out are personalized, to some extent. Fill in these boxes with the values you would like to use if the data field in the main database is blank. For instance, you want to use the company name in your message, but not all of the records in your database have a company name. No problem. Use the token "company_name" (minus the quote marks) to insert the value from your database in that field when creating your message. In the Company Name box of the Default Values tab, insert the value you want to use if the company_name field is empty in your database. For example, you could use "your company". Your message would read "... would like the opportunity to market Johnson Steel to..." if the company name were present, and if not, it would be "... would like the opportunity to market your company to...". When using these substitutions, please be sure to double check your verbiage to ensure it reads correctly in all situations. CPMM: Code Assigner Page Fig. 8 ‐ Code Assigner You have the ability to assign SIC and NAICS codes and descriptions to the records listed in your main database. Making this match of industry and business will help you target your submissions to the desired businesses and industries. Clicking Start sets the Code Assigner in motion. It will examine the website name and key indicators in an attempt to align the site with the proper SIC and NAICS code. Clicking Stop halts the matching process. When complete, return to the Main Database tab and click the Apply Filters button to refresh the screen. Your newly assigned industry codes and their descriptions should be in the system. NOTE: This is a process run on pure system logic, it is not 100% correct all of the time, it is always best to double check the results before filtering or deleting records based on the indicated SIC or NAICS.. CPMM: MLM Submitter Page Fig. 9 ‐ MLM Submitter The Contact Page Marketing Machine software allows you to search key Multi‐Level Marketing business websites and collect their agent's contact information. Use of this service is a simple "click to start" process. Simply place a check mark in the box in front of the MLM business or businesses you want to collect, and click the Search button. Collection can take some time, so please be patient. You might have to try each of the three search styles to find the one that best works for the company you have selected. In Search Engine ‐ will search MLM pages in search engines like Google, Yahoo and MSN, and filter out results not including a contact pages. In Popular Names ‐ use the built‐in database of first names and last names of the top names in USA. It generates combinations like John Smith, JSmith, JohnS, etc...to try to guess the MLM page. In Roll MLM Names ‐ use a built‐in database of MLM usernames. Usually people use same usernames in different networks, this examines known user names in one MLM against another. When you have collected all the names you want, click Stop, then the “Add to DB” button to have your results automatically sent to the main database. CPMM: Business Email Address Appender Page Fig. 10 ‐ business Email Address Appender Another feature of the Contact Page Marketing Machine is the ability for the tool to take the domains you have loaded in the main database and try to determine email addresses associated with the domain. The system will use the list of common business department names (support, help, &c.) and check if an address exists for the domain. If verified, the address can be written to an external file, or added to the main database entry for the domain tested. Or, the system will use the first and last name values listed for the domain to try and create an email address using common variants of the first and last name combination. Example: The name John Smith is associated with bluetruck.com. The system would create and test addresses like [email protected], [email protected], et cetera. Those passing validation can be saved to an external file, or added directly to the main database listing. CPMM: Wildcard Parser Page Fig. 11 ‐ Wildcard Parser The Wildcard Parser enables you to enter a contact page URL for any website and identify within the URL the variable part that will get replaced with changing variable values that will seek to guess correct variables. The code goes through a series of alpha and numerical values on the URL until it hits accurate URL’s. It also allows you to add your own MLM sites to be scraped for contact pages. It requires a bit of configuring, but for those willing to spend a little time in trial and error, the benefits can be tremendous. Suppose you have an MLM system where the contact forms are shown by the sales representatives ID, (i.e. www.samplepage.com/?id=jsmith). You can modify this format in the parser to search the domain for other ID values which will give you other contact pages. A short video showing the parser's configuration and use can be found here http://screencast.com/t/SpXHIQc8uTZo You can use this parser on almost any website to extract contacts (not only MLM networks.) Weekly Webinar Please join us for an informative live webinar where we walk through using Contact Page Marketing Machine as well as other lead generation programs. We typically touch on finding your perfect customer using business data (http://www.opt‐in‐email‐marketing‐lists.com) and share our best marketing ideas. For a complete webinar schedule please visit http://secure.contactpagemarketingmachine.com/live‐qa‐webinar Quick Start Videos Contact Page Marketing Machine Quick Start Videos ‐ http://secure.contactpagemarketingmachine.com Business Data Query – need help navigating the business data query on opt‐in‐email‐marketing‐lists.com? Watch these videos: http://www.opt‐in‐email‐marketing‐lists.com/sample_data.php Need help? Please email [email protected] with your questions. Thank you, Tom Mack 888‐450‐2659