1
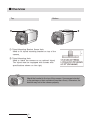
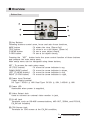
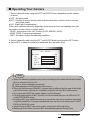
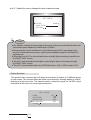
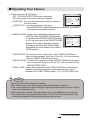
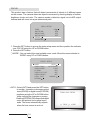
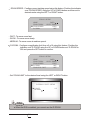
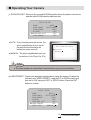
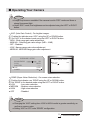
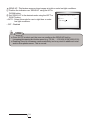
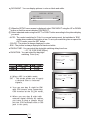
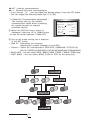
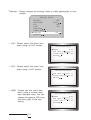
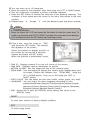
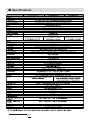
AUTO FOCUS ZOOM CAMERA
TRUE DAY & NIGHT
User's Manual
27X/33X/37X ZOOM
■ Contents
Features
---------------------------------------------------- 4
Warning & Cautions
---------------------------------------------------- 5
Precautions
---------------------------------------------------- 6
Components and Accessories
---------------------------------------------------- 7
Overview
---------------------------------------------------- 8
Connection
--------------------------------------------------- 10
1) Connecting to Monitor
------------------------------------------------------------------ 10
2) Connecting to Power
3) Connecting to 8P Control Terminal
AUTO FOCUS ZOOM CAMERA
2
--------------------------------------------------------------------- 11
---------------------------------------- 11
Operating Your Camera
--------------------------------------------------- 13
1) Menu Configuration
2) Menu Setup
------------------------------------------------------------------------ 13
----------------------------------------------------------------------------------------- 14
▪ SSDR (Super Dynamic Range)
▪ White Bal (White Balance)
▪ Backlight
------------------------------------------------------- 15
-------------------------------------------------------------------------------------------- 16
▪ Motion Detection
▪ Focus
---------------------- 15
--------------------------------------------------------------------------- 18
-------------------------------------------------------------------------------------------------- 20
▪ Exposure ------------------------------------------------------------------------------------------ ▪
25
Special ------------------------------------------------------------------------------------------------ 29
▪ Reset -------------------------------------------------------------------------------------------------- ▪ Exit
36
-------------------------------------------------------------------------------------------------------- 36
Trouble Shooting
--------------------------------------------------- 37
Specifications ---------------------------------------------------------------------------------------- 38
3
AUTO FOCUS ZOOM CAMERA
■ Features
27x, 33x, 37x Optical Zoom
The built-in 27x, 33x and 37x optical zoom
lens are a highly durable component. It features auto focus, iris, and zoom functions.
Miscellaneous Functions
HLC (High Light Compensation), SENS-UP,
FLP (H/V-REV), D-Zoom, Sharpness, Motion
Detection and Privacy functions are provided.
SSNR 3
(Super Noise Reduction)
The high-performance W-5 DSP chip effectively removes low-light gain noise and
ghosting to provide clear images even in dark
environments.
DIS (Digital Image Stabilizer)
The DIS function compensates for any
camera movement, to produce more stable
pictures.
SSDR
(Super Dynamic Range)
For images with high contrast between bright
and dark areas from difficult lighting conditions such as backlighting, this camera selectively illuminates darker areas while retaining
the same light level for brighter areas to even
out the overall brightness. (it is an optional
function for WDR product)
Day & Night (ICR)
This camera has a function that automatically
selects the mode that is appropriate for daytime or night-time conditions.
The COLOR mode operates in daytime conditions to provide optimum colors, and BW
mode operates in night-time conditions to
enhance the definition of the image.
Communication
Fine Picture Quality under Ultra Low Lighting
1/4” high density CCD allows the user to capture bright, high-quality images under ultra
low lighting conditions.
RS-485, Coaxial communication methods
are supported.
- RS-485 Protocols : Samsung-T, Samsung-E,
Pelco-P, Pelco-D, Vicon,
Panasonic, Bosch,
Honeywell, AD
- Coaxial Communications: Pelco Coaxitron
High Resolution
OSD
Featuring 600TV lines horizontal resolution in
color mode and 700TV lines horizontal resolution in BW mode, the camera features Sony’s 410,000 pixel CCD and captures clean,
noiseless, high-quality images.
AUTO FOCUS ZOOM CAMERA
4
The camera’s OSD is complimented by 18
foreign languages.
- NTSC : Korean, English, French, Spanish,
Japanese, Portuguese, Taiwanese
- PAL : English, Italian, Chinese, Spanish,
German, Russian, French, Polish,
Portuguese, Turkish, Czech, Romanian,
Serbian, Swedish, Danish
We care for the environment at all product manufacturing stages
to preserve the environment and are taking a number of steps to
provide customers with more environment-friendly products. The
eco mark represents our will to create environment-friendly products and indicates that the product satisfies the EU RoHS Directive.
■ Warning & Cautions
This information is provided to ensure your safety and to prevent any losses, financial or
otherwise. Please read it carefully and use the product accordingly.
● For product inquiries, please contact the retail shop where you bought the camera.
The use of equipment such as an aerial ladder while providing after-sales service
shall be at your expense.
● Separate the power plug during a thunder storm.
● This product is only part of a surveillance system. Therefore, we can’t compensate
for material loss and/or personal injuries by robbery, fire, natural disaster or some
thing like this type.
Warning/Attention/Special Mark Messages
Ignoring this information may result in material loss and/or serious
personal injuries including death.
Ignoring this information may
result in material loss and/or as
light injuries.
Indicates “Never Allowed”
Indicates “No Disassembling”
5
AUTO FOCUS ZOOM CAMERA
■ Precautions
Do not install under extreme
temperature conditions.
Use only under temperature conditions
between -10 ℃ and +50 ℃. Provide good
ventilation when using in high temperature
conditions.
Do not install under unstable
lighting conditions.
Severe lighting changes or flickering may
hinder normal camera operation.
Do not drop the camera or subject
it to physical shock.
May cause a product malfunction.
AUTO FOCUS ZOOM CAMERA
6
Do not install in high humidity
environment.
May lower image quality
Avoid touching the camera lens.
The lens is the most important component of the camera. Be careful not to
smear it with fingerprints.
Never keep the camera face to
strong light directly.
May damage the CCD.
Do not install under extreme
temperature conditions.
May cause a product malfunction. Wipe dry
any liquid. Liquids may contain minerals that
are corrosive to electronic components.
Do not install in high humidity
environment.
Radioactivity expose may damage the
CCD.
Notes
● Exposure to a spotlight or an object emitting strong light may cause smear or blooming.
● Ensure that the power source complies with normal specifications before supplying it
to the camera
■ Components and Accessories
①
②
③
④
⑤
⑥
⑦
27x (33x or 37x) Zoom Color Camera
Instruction Manual
8-PIN Cable ASSY
Jumper cable for CDS Terminal
CDS Sensor
Foot
Screws for foot
④
⑤
⑥
7
⑦
AUTO FOCUS ZOOM CAMERA
■ Overview
Top
Bottom
① Tripod Mounting Bracket Screw Hole
Used to fix tripod mounting bracket on top of the
camera.
② Tripod Mounting Hole
Used to install the camera on an optional tripod.
The tripod must be equipped with screws with
specifications shown on the right.
Attach the bracket to the top of the camera. Use screws included
in the package or their equivalent (less than 6mm). Otherwise, the
bracket may not to the camera properly.
AUTO FOCUS ZOOM CAMERA
8
■ Overview
Bottom View
③ Key Buttons
Following buttons control zoom, focus and auto focus functions.
WIDE button
: To widen the view. (Zoom Out)
TELE button
: To close in on a far object. (Zoom In)
F-NEAR button
: To see a near object clearly.
F-FAR button
: To see a far object clearly.
Pressing the ‘SET’ button locks the zoom control function of these buttons
and prompts the main setup menu.
Main setup menu can be navigated using these buttons.
SET : To access the main setup menu.
UP (TELE button)
: To move the arrow
DOWN (WIDE button) : To move the arrow
LEFT (F-NEAR button) : To move the arrow
RIGHT (F-FAR button) : To move the arrow
indicator
indicator
indicator
indicator
to
to
to
to
up.
down.
left.
right.
④ Power Input Terminal
Power supply terminal
DC Type : DC12V ± 10% Dual Type: DC12V ± 10% / AC24V ± 10%
⑤ Power LED
Illuminates when power is supplied.
⑥ Video Output Jack
Used to connect an external video monitor in jack.
⑦ RJ-45 Jack
Terminals, such as RS-485 communications, MID OUT, ZOOM, and FOCUS,
EX_DN are included.
⑧ CDS Sensor Jack
Terminals for CDS sensor at the EX_DN condition.
9
AUTO FOCUS ZOOM CAMERA
■ Connection
Connecting to Monitor
Connect video out jack to the monitor’s video in jack as shown below.
● Connection methods may vary depending on the video equipment. Please
refer to the model specific instruction manual.
● Connect cables with the unit powered down.
AUTO FOCUS ZOOM CAMERA
10
■ Connection
Connecting to Power
DC12V, 500mA / Dual: DC12V/AC24V, 500mA (Option)
Notes
● Connect the power once the installation is complete.
● The wire is polarized. Match ‘+’ and ‘-‘ terminals properly.
Connecting to 8P Control Terminal
The camera can be controlled by using external controllers like a remote controller.
(RS-485 Communication)
● 8P Control Terminal Configuration
11
AUTO FOCUS ZOOM CAMERA
Notes
● MD(Motion Detection) Output format is open collector.
● When using the MD function, the ‘GND’ should be connected to the frame ground.
● Do not simultaneously connect the RS-485 (+) (-) communication line when you use
voltage control ZOOM and FOCUS, using the RECEIVER BOX.
● Match the communication setup between devices when you use the wired
controller (SPC-200A) or SCC-3100A.
Notes
● Contact an authorized
technician for inspection.
AUTO FOCUS ZOOM CAMERA
12
■ Operating Your Camera
Menu Configuration
13
AUTO FOCUS ZOOM CAMERA
Menu Setup
Use the five buttons on back of the camera.
1. Press the SET button for 2 seconds. (Short-pressing the button activates the AUTO FOCUS)
● Main Setup menu is displayed on the monitor screen.
Select feature using
the UP or DOWN
button.
MAIN SETUP
►SSDR
WHITE BAL
BACKLIGHT
MOTION DET
FOCUS
EXPOSURE
SPECIAL
RESET
EXIT
ON
ATW
OFF
OFF
Change the status
using the LEFT or
RIGHT button.
2. Select the desired feature using the UP or DOWN button.
● Each pressing of the UP or DOWN button moves the indicator to the next or previous feature.
● Move the arrow indicator to the desired feature item.
3. Change the status of the selected feature using the LEFT or RIGHT button.
4. When completed, move the arrow indicator to ‘EXIT’ and press the SET button.
Notes
● Features marked with a
have an accessible submenu.
● Access the submenu by pressing the SET button.
AUTO FOCUS ZOOM CAMERA
14
■ Operating Your Camera
SSDR (Super Dynamic Range)
SSDR illuminates darker spots of an image while retaining the same level for brighter
sports to even out the overall brightness of images with contrast between bright and
dark sports.
MAIN SETUP
►SSDR
WHITE BAL
ON
ATW
1. When the SETUP menu screen is displayed, select ‘SSDR’ by using the button so that
the arrow indicates ‘SSDR’.
2. Use the button to change the SSDR level according to the contrast between bright
and dark areas.
White Bal (White Balance)
Use the White Balance function to adjust the screen color.
1. When the SETUP menu screen is displayed. Select ‘white Bal’ by using the UP and
DOWN buttons so that the arrow indicates ‘White Bal’.
2. Select a desired mode using the UP and DOWN buttons.
MAIN SETUP
SSDR
► WHITE BAL
BACKLIGHT
ON
ATW
OFF
15
AUTO FOCUS ZOOM CAMERA
※ Select one of the following 5 modes, as appropriate for your purpose.
● ATW
: Select this when the color temperature is between 1,800°K
and 10,500°K.
● MANUAL : Select this to fine-tune White Balance manually. Set White
Balance first by using the ATW or AWC mode. After that
switch to MANUAL mode, fine tune the White
Balance and then press the function setup switch.
● AWC → SET : To find the optimal luminance level for the current environment, point the camera towards a sheet of white paper
and press the function setup switch, if the environment
changes, readjust it.
● OUTDOOR
: Select this when the color temperature is between 1,700°K
and 11,000°K. (sodium light inclusion)
● INDOOR
: Select this when the color temperature is between 4,500°K
and 8,500°K.
Notes
● White Balance may not work properly under the following conditions. In this case
select the AWC mode.
① When the color temperature of the environment surrounding the subject
is out of the control range (e.g. clear sky or sunset).
② When the ambient illumination of the subject is dim.
③ If the camera is directed towards a fluorescent light or is installed in a
place where illumination changes dramatically, the white balance operation may become unstable.
BACKLIGHT
Unlike conventional cameras, this camera is designed to deliver a distinctive subject
and background at the same time, even when the subject is backlight, by using the
features of the proprietary W5 DSP chip.
1. When the SETUP menu screen is displayed, select ‘BACKLIGHT’ by using the UP
and DOWN buttons so that the arrow indicates ‘BACKLIGHT’.
MAIN SETUP
SSDR
WHITE BAL
►BACKLIGHT
MOTION DET
AUTO FOCUS ZOOM CAMERA
16
ON
ATW
OFF
OFF
■ Operating Your Camera
1. Select a desired mode using the LEFT and RIGHT button depending on the camera
purpose.
● OFF : Not being used
● BLC : Enables a user to directly select a desired area from a picture and to view the
area more clearly.
● HLC (High Light Compensation) :
If the scene contains extremely bright light areas such as; from car headlight, the light
can mask out much of the on-screen detail.
- LEVEL : Adjust level of the HLC function (LOW, MIDDLE, HIGH).
- MASK TONE : Change the brightness
- LIMIT : Enable to change the operating condition.
2. Select a desired mode using the LEFT and RIGHT button and press the SET button.
● Select ‘BLC’ to adjust the area to be enhanced then adjust the level.
BLC SETUP
► LEVEL
TOP
BOTTOM
LEFT
RIGHT
RETURN
LOW
30
75
30
70
Notes
● Since the following symptoms may occur according to the ambient illumination when
BLC is selected, set it to OFF.
① Color or screen changes unnaturally.
② Noise appears in the bright part of the screen.
● Since the performance of the BLC function may be affected by the area of the bright
part of the screen, optimize the installation angle for the best BLC performance.
● If you increase LIMIT, the screen display may be distorted.
● For high performance of BLC function, we recommend that you set IRIS to AUTO
in the EXPOSURE setup.
● Activating BLC may cause the camera to repeat the auto focus operation depending
on lighting conditions. It is recommended that you use the focus setup menu in ONEPUSH or MANUAL mode.
● Smart Zoom and BLC cannot be used in conjunction with each other.
● Setting up Smart Zoom and then BLC automatically cancels Smart Zoom.
17
AUTO FOCUS ZOOM CAMERA
● HLC : Enable the user to change the level, mask tone area.
HLC SETUP
► LEVEL
MASK TONE
RETURN
MIDDLE
7
Notes
● For effective viewing of license plates, there is a minimum required illumination and
the shutter speed needs to be faster than 1/200sec.
● Because there can be a difference in the effectiveness of HLC according to the
amount of light area in the screen, optimize the installation angle for the best HLC
performance.
● When dark, the HLC is only activated when a bright light exceeding a specific size.
(In NIGHT ONLY mode)
● The HLC is not activated in day light or when bright light is not present at night
(In NIGHT ONLY mode)
● The HLC is not activated when the D-ZOOM mode is ‘ON’ or ‘DIS’ mode is ‘ON’.
Motion Detection
This product has a feature that will detect movements of objects in 8 different areas
on the screen. The camera detect an object’s movement by sensing display of outline,
brightness levels and color. The camera sends a detection signal out via MD output
terminal and will zoom into a pre-determined point.
MAIN SETUP
SSDR
WHITE BAL
BACKLIGHT
►MOTION DET
FOCUS
AUTO FOCUS ZOOM CAMERA
18
ON
ATW
OFF
OFF
■ Operating Your Camera
1. Please press the SETUP button.
HLC SETUP
- OFF : MOTION DETECTION mode is cancelled.
AREA SEL
AREA 1
- ON : Any motion in the selected areas is objected.
AREA MODE
ON
SENSITIVITY
LOW
AREA SEL : You can select the area you wish to observe
SMART ZOOM
OFF
RETURN
from the 8 area.
SENSITIVITY : You can select low or high level.
When SENSITIVITY is high, Motion detection sensitivity is increased
to recognize even small movement.
● SMART ZOOM : Smart zoom is operated in connection with
MOTION. When the SMART ZOOM function
is ‘ON’ while the MOTION DETECTION mode
is ‘ON’, the zoom goes to the TARGET ZOOM
position once motion is detected. Once the
zoom action is finished and ‘DWELL TIME’
has passed, the zoom returns to the ‘SMART
ZOOM’ position.
SMART ZOOM SETUP
SMART ZOOM
X1
TARGET ZOOM
X5
DWELL TIME
5 SEC
RETURN
- START ZOOM : By moving the left or right button in the ‘START ZOOM’ item to
select the zoom position from 1x to 27x (or 33x, 37x) to be returned
after the ‘SMART ZOOM’ action is over.
- TARGET ZOOM : Use the left or right button in the ‘TARGET ZOOM’ item to select
the zoom position from 1x to 27x (or 33x, 37x) to be used during
MOTION DETECTION.
- DWELL TIME : Use the left or right button in the ‘DWELL TIME’ item to select a time
between 5 and 60 seconds for the dwell time before the zoom is
returned to the ‘START ZOOM’ position. (5,7,10,15,20,30,40,60 sec)
Notes
Tips on using the Motion Detection Feature:
● The feature may not function property under flickering light conditions.
● The camera interprets sudden changes in lighting and subsequent change in brightness of an object as motion.
● With the feature enabled, other algorithms may require additional time to operate.
● This system does not guarantee prevention of fire or theft. The manufacturer shall
not be held responsible for any accident or damage incurred.
19
AUTO FOCUS ZOOM CAMERA
FOCUS
This product has a feature that will detect movements of objects in 8 different areas
on the screen. The camera detect an object’s movement by sensing display of outline,
brightness levels and color. The camera sends a detection signal out via MD output
terminal and will zoom into a pre-determined point.
MAIN SETUP
SSDR
WHITE BAL
BACKLIGHT
MOTION DET
► FOCUS
EXPOSURE
ON
ATW
OFF
OFF
1. Press the SET button to access the main setup menu and then position the indicator
over FOCUS using the UP or DOWN button.
2. Press the SET button.
MODE : You can select the most suitable zoom mode. Move the arrow indicator to
‘MODE’ using UP or DOWN button.
FOCUS SETUP
AUTO
►MODE
ZOOM TRACK
AUTOTRACK
ZOOM SPEED
FAST
D-ZOOM
OFF
ZOOM POS INIT
OFF
USER PRESET
OFF
LENS INIT
MANUAL
RETURN
- AUTO : Select AUTO and press the SET button
to confirm. Increase or decrease optical
zoom(ZOOM) or digital zoom(D-ZOOM)
positions using the UP or DOWN button
while verifying the changes on screen.
Enabling D-ZOOM (ON) means that digital
zoom will activate once optical zoom
ends. The focus automatically adjusts
when the lens zooms in and out.
AUTO FOCUS ZOOM CAMERA
20
ZOOM POS SETUP
↑: TELE ↓: WIDE
■ Operating Your Camera
- ONE PUSH : Focus is automatically adjusted
just one, after Zoom position is
changed. Select ‘ONE PUSH’ and
the SET button to confirm.
Increase or decrease optical
zoom(ZOOM) or digital zoom
(D-ZOOM) positions using the
directional buttons while verifying
the changes on screen.
Press the SET button once the
desired image quality is obtained.
- MANUAL : Select ‘MANUAL’ and press the
SET button to confirm. Increase or
decrease optical zoom (ZOOM) or
digital zoom (D-ZOOM) positions
moving directional buttons while
verifying the changes on screen.
Press the SET button once desired
image quality is obtained.
Focus can be manually adjusted,
independent of moving zoom
ZOOM/FOCUS POS SETUP
↑ : TELE ↓ : WIDE
← : NEAR → : FAR
ZOOM/FOCUS POS SETUP
↑ : TELE ↓ : WIDE
← : NEAR → : FAR
ZOOM TRACK : Select ‘ON’ for the ‘SMART ZOOM’ item in the MOTION DETECTION menu
and press SET button to change the settings for the ‘SMART ZOOM’ function.
Use the left or right button in the ‘ZOOM’ item to select ‘AUTOTRACK’ or ‘TRACK’ and press
SET button to activate the zoom action focus function.
- AUTO TRACK : Zooming in while deciding or adjusting the status of the focus.
- TRACK : The camera moves the focus track which is established.
- OFF : Only the zoom lens moves.
FOCUS SETUP
MODE
►ZOOM TRACK
ZOOM SPEED
AUTO
AUTO TRACK
FAST
21
AUTO FOCUS ZOOM CAMERA
ZOOM SPEED : Configure zoom tracking speed using this feature. Position the indicator
over ‘ZOOM SPEED’ using the UP or DOWN button and then set to
desired mode using the LEFT or RIGHT button.
FOCUS SETUP
MODE
ZOOM TRACK
► ZOOM SPEED
D-ZOOM
AUTO
AUTO TRACK
FAST
OFF
- FAST : To move zoom fast.
- SLOW : To move zoom slowly.
- MEDIUM : To move zoom at medium speed.
D-ZOOM : Configure magnification limit from x2~x16 using this feature. Position the
indicator over ‘D-ZOOM’ using the UP or DOWN button set ‘D-ZOOM’ to
‘ON’ and press the SET button to confirm.
FOCUS SETUP
MODE
AUTO
ZOOM TRACK
AUTO TRACK
ZOOM SPEED
FAST
OFF
► D-ZOOM
ZOOM POS INIT
OFF
- Set ‘ZOOM LIMIT’ to the desired level using the LEFT or RIGHT button.
D-ZOOM LIMIT SETUP
► LIMIT
RETURN
X2
Notes
● When the DIS is enabled, you cannot use the D-ZOOM.
AUTO FOCUS ZOOM CAMERA
22
■ Operating Your Camera
ZOOM POS INIT : Moves to the controlled ZOOM position when the power is turned on
and the initial ZOOM position has been set.
FOCUS SETUP
MODE
AUTO
ZOOM TRACK
AUTO TRACK
ZOOM SPEED
FAST
D-ZOOM
OFF
OFF
► ZOOM POS INIT
USER PRESET
OFF
● AUTO : If you turn the power off and on, the
zoom magnification level is set to
the previous level that was set
before the power went off.
INIT ZOOM POS SETUP
► POS INIT
RETURN
X1
● MANUAL : The zoom magnification level can
be set from 1x to 27x(or 33x, 37x)
Notes
● The zoom position is saved after 5 seconds when you set zoom function.
USER PRESET : Preset user-designed configurations using this feature. Position the
indicator over ‘USER PRESET’ using the UP or DOWN button and
then set to ‘ON’ using the LEFT or RIGHT button. Press the SET
button to confirm.
FOCUS SETUP
MODE
AUTO
ZOOM TRACK
AUTO TRACK
ZOOM SPEED
FAST
D-ZOOM
OFF
ZOOM POS INIT
OFF
OFF
► USER PRESET
LENS INIT
MANUAL
23
AUTO FOCUS ZOOM CAMERA
- PRESET NO : Up to 128 preset configurations are supported.
- SAVE : Save configured preset.
- CLEAR : Clear configured preset.
- RETURN : Revert to the FOCUS SETUP
menu.
LENS INIT : Use the left or right button in
the ‘Lens Initialization’ item
select ‘Automatic’ or “Manual’
and then press the SET button.
- AUTO : the lens can automatically be set
by a pre-selected day, from 1-day
to 7-days. This will start from
when the time is set.
ZOOM POS SETUP
↑ : TELE ↓ : WIDE
1X
USER PRESET
► PRESET NO
SAVE
CLEAR
RETURN
||||||||||||||||||||||||||
1
PRESET NOT DEFINED
- Manual : The lens will reset when you press
FOCUS SETUP
MODE
AUTO
ZOOM TRACK
AUTO TRACK
ZOOM SPEED
FAST
D-ZOOM
OFF
ZOOM POS INIT
OFF
USER PRESET
OFF
► LENS INIT
MANUAL
RETURN
AUTO FOCUS ZOOM CAMERA
24
LENS INIT SETUP
► DAY
RETURN
1
■ Operating Your Camera
EXPOSURE
MAIN SETUP
SSDR
WHITE BAL
BACKLIGHT
MOTION DET
FOCUS
►EXPOSURE
SPECIAL
ON
ATW
OFF
OFF
1. Press the SET button to access the main setup menu and then possible the indicator
over ‘EXPOSRE’ using the UP or DOWN button.
2. Press the SET button to confirm.
BRIGHTNESS : Use this feature to adjust image brightness. Position the indicator over
‘BRIGHTNESS’ using the UP or DOWN button. Then increase or
decrease brightness level using the LEFT or RIGHT button while
verifying the changes on screen. Set END
EXPOSURE SETUP
►BRIGHTNESS
IRIS
50
AUTO
||||||||||||||||||||||||||
IRIS : Set ‘IRIS’ to ‘AUTO’ or ‘MANUAL’. Position the indicator over ‘IRIS’ using the UP
or DOWN button and then select the desired iris mode using the LEFT or
RIGHT button.
EXPOSURE SETUP
BRIGHTNESS
►IRIS
SHUTTER
50
AUTO
---
||||||||||||||||||||||||||
25
AUTO FOCUS ZOOM CAMERA
- AUTO : The iris is automatically activated upon illumination.
- MANUAL : Manual iris configuration. Set ‘IRIS’ to ‘MANUAL’ using the LEFT or RIGHT
button and then Press the SET button. Increase or decrease iris level using
the LEFT or RIGHT while verifying the changes on screen.
IRIS MANUAL SETUP
►IRIS F-No
RETURN
F1.6
SHUTTER : Control image brightness by adjusting shutter speed.
① Position the indicator over ‘SHUTTER’ using the UP or DOWN button. Then select
the desired shutter mode (A.FLK, ESC, MANUAL) using the LEFT or RIGHT button.
EXPOSURE SETUP
BRIGHTNESS
IRIS
►SHUTTER
AGC
50
AUTO
--HIGH
||||||||||||||||||||||||||
- MANUAL : Manual shutter speed setting.
- A.FLK (NTSC: 1/100, PAL: 1/120) : Flicker-free mode
- ESC : Automatic shutter speed setting (optional).
Auto operation is possible only when the IRIS
is set to MANUAL.
② If you choose ‘MANUAL’, select the optimal
shutter speed.
- In MANUAL mode, the optimal shutter speed needs
to be designed. Select from 1/60 to 1/120,000 (NTSC)
or from 1/50 to 1/120,000 (PAL). * ‘Sens-Up’ mode
can be configured manually (2x to 512x).
- Verifying changes made to the shutter speed by
referencing to changes the ‘on-screen’ brightness.
③ Press the SET button to complete.
AUTO FOCUS ZOOM CAMERA
26
SHUTTER MANUAL SETUP
►SHUTTER VAL
RETURN
1/50
■ Operating Your Camera
Notes
● Image may become unstable if the camera is set to ‘ESC’ mode and faces a
strong fluorescent light.
● Under ‘ESC’ mode, the brightness can be adjusted using the LEFT or RIGHT
button.
AGC (Auto Gain Control) : For brighter images.
① Position the indicator over ‘AGC’ using the UP or DOWN button.
② Set ‘AGC’ to the desired mode using the LEFT or RIGHT button.
- HIGH : Wide range gain value adjustment.
- MANUAL : Selecting gain value range. (5dB ~ 41dB)
- OFF : Disabled
- LOW : Narrow range gain value adjustment
- MEDIUM : MEDIUM range gain value adjustment.
EXPOSURE SETUP
GAIN MANUAL SETUP
BRIGHTNESS
IRIS
SHUTTER
►AGC
SSNR3
||||||||||||||||||||||||||
50
AUTO
--HIGH
ON
►AGC VAL
RETURN
5dB
SSNR (Super Noise Reduction) : On screen noise reduction.
① Position the indicator over ‘SSNR’ using the UP or DOWN button.
② Set ‘SSNR’ to the desired mode using the LEFT or RIGHT button.
● LOW
: Low noise reduction
● MEDIUM : Medium noise reduction
● HIGH
: High noise reduction
● OFF
: Disabled
Notes
● Changing the ‘AGC’ setting from LOW to HIGH results in greater sensitivity, as
well as on screen noise.
● Setting ‘AGC’ to OFF locks ‘SSNR3’ configuration.
27
AUTO FOCUS ZOOM CAMERA
SENS-UP : This feature ensures clear images at night or under low light conditions.
① Position the indicator over ‘SENS-UP’ using the UP or
DOWN button.
② Set ‘SENS-UP’ to the desired mode using the LEFT or
SENS-UP LIMIT SETUP
RIGHT button.
►LIMIT
2X
- AUTO : Select this mode for use in night time or under
RETURN
low light conditions.
- OFF : Disabled
Notes
● Once ‘AUTO’ mode is set, the user can configure the SENS-UP limit by
increasing/decreasing the shutter speed (e.g.: X2,X4... ...X32,X64,X128,X256,X512).
● Enabling Sens-Up increases camera sensitivity and may result in additional noise
and/or other phenomenon. This is normal.
AUTO FOCUS ZOOM CAMERA
28
■ Operating Your Camera
SPECIAL
MAIN SETUP
SSDR
WHITE BAL
BACKLIGHT
MOTION DET
FOCUS
EXPOSURE
►SPECIAL
RESET
ON
ATW
OFF
OFF
1. Press the SET button to access the main setup menu and then position the indicator
over ‘SPECIAL’ using the UP and DOWN button.
2. Press the SET button to confirm.
PRIVACY : Hide an area you want to hide on the screen.
SPECIAL SETUP
►PRIVACY
DAY/NIGHT
① When the SPECIAL menu screen is
displayed, using the UP or DOWN button
so that the arrow indicates ‘PRIVACY’.
OFF
AUTO
PRIVACY SETUP
AREA1
► AREASEL
AREA MODE
ON
MASK COLOR
GREEN
||||||||||||||||||||||||||||||||||
TOP
39
||||||||||||||||||||||||||||||||||
BOTTOM
79
||||||||||||||||||||||||||||||||||
LEFT
15
||||||||||||||||||||||||||||||||||
RIGHT
54
RETURN
② Set the mode using the 4 direction buttons.
- AREA SEL : You can select up to 12 areas.
- AREA MODE : Determine whether to use the area selected in the AREA SEL.
- MASK COLOR : Determine area color. You can select Green, Red, Blue,
Black, White, Gray.
29
AUTO FOCUS ZOOM CAMERA
DAY/NIGHT : You can display pictures in color or black and white.
SPECIAL SETUP
PRIVACY
► DAY/NIGHT
DIS
OFF
AUTO
OFF
① When the SETUP menu screen is displayed, select ‘DAY/NIGHT’ using the UP or DOWN
button so that the arrow indicates ‘DAY/NIGHT’.
② Select a desired mode using the LEFT or RIGHT button according to the picture display
you want.
- AUTO : The mode is switched to ‘Color’ in a normal environment, but switches to ‘B/W’
mode when ambient illumination is low. To set up the switching time or speed for
AUTO mode, press the SET button.
- COLOR : The picture is always displayed in color.
- B/W : The picture is always displayed in black and white.
● DWELL TIME : You can select the day/night switching delay time from.
→ 5,7,10,15,20,30,40,60(sec)
● DURATION : You can select the day/night
switching Point (Lux).
AUTO SETUP
►DWELL TIME
DURATION
RETURN
→
7 SEC
SLOW
→
※ When AGC is middle mode.
EXT : This mode allows you to apply
a desired filter to external
signals.
BURST LEVEL SETUP
►BURST LEVEL
RETURN
|||||||||||||||||||||||||||||||
50
※ You can use day & night for BW
with CDS sensor once connecting
CDS terminal at the EX_DN mode.
※ When you use day & night with
external signal directly by cables,
you have to plug a jumper block
into the CDS terminals with a CDS
jack in the pack.
AUTO FOCUS ZOOM CAMERA
30
BURST MODE SETUP
►BURST MODE
RETURN
ON
■ Operating Your Camera
Notes
● You cannot control the DAY/NIGHT menu when AGC in the EXPOSURE menu is
‘OFF’. At this time, the exchange between DAY mode and NIGHT mode operates
as like selecting ‘COLOR’ mode.
● The OSD key does not work for 3 seconds when switching to Color or B/W to
ensure stable camera operation.
● The camera may focus less under infrared illumination than under normal
illumination.
● The brightness of illumination is changeable by installed environment.
DIS : The DIS mode can compensate for vibration of the camera.
SPECIAL SETUP
PRIVACY
DAY/NIGHT
►DIS
OFF
AUTO
OFF
Notes
● When DIS is operating, D-ZOOM does not operate.
SYNC : Two synchronization modes are available INTERNAL and EXTERNAL
LINE-LOCK. In LINE-LOCK mode, it synchronizes the camera’s video out
signal to the external SYNC signal.
SPECIAL SETUP
PRIVACY
DAY/NIGHT
DIS
►SYNC
COMM ADJ
OFF
AUTO
OFF
INT
31
AUTO FOCUS ZOOM CAMERA
● INIT : Internal synchronization
● LL : External line-lock synchronization
- If you choose ‘LL’, you can adjust the desired phase. Press the SET button.
- You can adjust the desired phase from 0 to 359.
COMM ADJ (Communication Adjustment) :
This function sets up the camera
communication status when controlling
the camera though an external
controlled device.
① When the SPECIAL menu screen is
displayed, using the UP or DOWN button
so that the arrow indicates 'COMM ADJ'.
COMMUNICATION SETUP
SAMSUNG-T
►PROTOCOL
||||||||||||||||||||||||||||||||||||||||
CAM ID
1
BAUD RATE
9600
UART MODE
8-N-1
RET PKT
DISABLE
RETURN
② Set up the mode moving the 4 direction
of the SET button.
- CAM ID : Determines the camera's
identification number (between 0 and 256).
- Protocol : Select the communication PROTOCOL (SAMSUNG-T/PELCO-D/
PELCO-P/BOSCH/HONEYWELL/VICON/AD/SAMSUNG-E/PANASONIC)
- BAUD RATE : You can select 2400 / 4800 / 9600 / 19200 / 38400 / 57600 bps.
- UART MODE : You can select NONE, EVEN or ODD for the parity bits.
AUTO FOCUS ZOOM CAMERA
32
■ Operating Your Camera
- RET PKT : You can choose whether to send an ACK signal when the
communication control command is issued to the camera.
IMAGE ADJ : Includes image quality or special function factors.
SPECIAL SETUP
PRIVACY
DAY/NIGHT
DIS
SYNC
COMM ADJ
►IMAGE ADJ
MONITOR
OFF
AUTO
OFF
INT
CRT
① When the SETUP menu screen is displayed, select ‘IMAGE ADJ’, using the
UP or DOWN button so that the arrow indicates ‘IMAGE ADJ’.
② Select desired mode using the LEFT or RIGHT button.
- H-REV : You can flip the picture horizontally on the screen.
- V-REV : You can flip the picture vertically on the screen.
- SHARPNESS : As you increase this value, the picture outline
becomes stronger and clearer.
IMAGE SETUP
►H-REV
V-REV
SHARPNESS
RETURN
OFF
OFF
ON
SHARPNESS SETUP
►LEVEL
RETURN
|||||||||||||||||||||||||||||||
16
33
AUTO FOCUS ZOOM CAMERA
Monitor : Please change the settings value of video appropriate to your
monitor.
SPECIAL SETUP
PRIVACY
DAY/NIGHT
DIS
SYNC
COMM ADJ
IMAGE ADJ
►MONITOR
DISPLAY
- LCD : Please select this menu item
when using an LCD monitor.
OFF
AUTO
OFF
INT
CRT
LCD MONITOR SETUP
0.45
►GAMMA
PED LEVEL |||||||||||||||||||||||||||||||||||||||| 17
||||||||||||||||||||||||||||||||||
COLOR LEVEL
50
RETURN
- CRT : Please select this menu item
when using a CRT monitor.
CRT MONITOR SETUP
►PED LEVEL |||||||||||||||||||||||||||||||||||||||| 17
COLOR LEVEL |||||||||||||||||||||||||||||||||| 50
RETURN
- USER : Please use this menu item
when using a monitor other
than standard ones. You can
change the gamma, PED level,
and color gain in the sub
menus.
AUTO FOCUS ZOOM CAMERA
34
USER MONITOR SETUP
0.55
►GAMMA
PED LEVEL |||||||||||||||||||||||||||||||||||||||| 17
COLOR LEVEL |||||||||||||||||||||||||||||||||| 50
RETURN
■ Operating Your Camera
DISPLAY : Use this feature to designate for the camera, which will display
on the monitor screen.
SPECIAL SETUP
PRIVACY
DAY/NIGHT
DIS
SYNC
COMM ADJ
IMAGE ADJ
MONITOR
►DISPLAY
RETURN
OFF
AUTO
OFF
INT
CRT
CAM TITLE
① Press the SET button to display the main setup menu and more the arrow
indicator to ‘CAM TITLE’ using the IP or DOWN button.
② Set ‘CAM TITLE’ to ‘ON’ using the UP or DOWN button.
Notes
DISPLAY SETUP
● If the CAM TITLE feature is set to
‘OFF’, the name will not displayed in
the monitor.
③ Press the SET button.
►CAM TITLE
CAM ID
CAM INFO
MOTION ALARM
ZOOM MAG
FONT COLOR
LANGUAGE
RETURN
OFF
ON
ON
OFF
ON
WHITE
ENGLISH
CAMERA TITLE SETUP
ABCDEFGHIJKLM
NOPQRSTUVWXYZ
abcdefghijklm
nopqrstuvwxyz
-. 0123456789
←→ CLR POS END
---------------
35
AUTO FOCUS ZOOM CAMERA
④ You can enter up to 15 characters.
a. Move the cursor to the character entry field using the LEFT or RIGHT button.
b. Use the 4 direction of buttons to select a desired character.
c. Press the SET button to confirm the selection of the blinking character. The
character is then saved and the cursor in the entry field moves to the next
position.
d. Repeat steps ‘a’ though ‘c’ until the desired name has been entered.
Notes
● Correcting Mistakes
Move the cursor the ‘CLR’ and press the Set button to clear the entire entry. To
modify one character, use LEFT or RIGHT to position the cursor above the character
to be modified and click the SET button after selecting to enter.
⑤ Enter a title, move the cursor to ‘POS’
and press the SET button. The entered
title appears on the screen.
Select the position to display the title on
the screen by moving the 4 direction
buttons and press the SET button.
When the position is determined, select.
-
CAM ID : Displays camera ID on top left corner of the screen.
CAM INFO : Displays camera information on screen.
MOTION ALARM : You can toggle the use of the camera alarm.
ZOOM MAG : Use this feature to display the current zoom magnification level
on screen. Position the indicator over ‘ZOOM MAG’ using the
UP or DOWN button. Then set to ON using the LEFT or
RIGHT button.
- FONT COLOR : You can select the font color (white, yellow, green, red, bule).
- LANGUAGE : You can select the menu language according to your
requirements(Korean,Espanol,Francais,Italiano,Deutsch,English,
Japanese,Chinese,Russian,Cesky,Polski,Portuguese,Taiwanese,
Romanian,Serbian,Swedish,Danish,Turkish)
- END : Select this to save the SPECIAL menu setting and return to the
SPECIAL menu.
RESET
To reset your camera to factory default condition.
EXIT
To finish setup menu.
AUTO FOCUS ZOOM CAMERA
36
■ Troubleshooting
If you have trouble operating your camera, refer to the following table.
If the guidelines do not enable you to solve the problem, contact an authorized
technician.
● Nothing appears on the screen.
▶ Check that the power cord and line connection between the camera and
monitor are fixed properly.
▶ Check that you have properly connected VIDEO cable to the camera
VIDEO output jack.
● The image on the screen is dim.
▶ Is lens stained with dirt? Clean your lens with soft, clean cloth.
▶ Set the monitor to proper condition.
▶ If the camera is exposed to too strong light, change the camera position.
● The image on the screen is dark.
▶ Adjust the contrast feature of the monitor.
▶ If you have an intermediate device, set the 75Ω / Hi-z properly.
● The camera is not working properly, and the surface of the camera is hot.
▶ Check that you have properly connected the camera to an appropriate
power source.
● The SENS-UP function does not work.
▶ Check that AGC of EXPSURE SETUP menu is ‘OFF’.
▶ Check that SHUTTER of EXPOSURE SETUP menu is ‘A.FLK’ or ‘MANUAL’.
● The Motion Detection function does not work.
▶ Check that MOTION DET of SPECIAL SETUP menu is ’OFF’.
● Color is not correct.
▶ Check the setting of WHITE BAL SETUP menu.
● The screen flickers continually.
▶ Check that direction of camera turns toward the Sun.
● When coaxial communication is not available:
▶ Make sure that the camera and monitor are installed within the recom
mended distance.
▶ Use the video amplifier equivalent to coaxitron if the recommend
installation distance is exceeded.
37
AUTO FOCUS ZOOM CAMERA
■ Specifications
M
AUTO FOCUS ZOOM CAMERA
38
Distributed by