1
●This guide is intended for users of DOCOMO mobile phones with a DOCOMO UIM Card (or otherwise a FOMA Card or DOCOMO
mini UIM Card. Hereinafter the same applies).
Regarding ●If the SIM lock system of a DOCOMO mobile phone is disabled and a non-DOCOMO SIM card is inserted, the services described in
this guide will not be available. If a DOCOMO UIM Card is used for a non-DOCOMO mobile phone, some of the services described
Use of
in this guide may not be available.
guide, the term "FOMA or Xi" refers to a FOMA or Xi handset in which your DOCOMO UIM Card is inserted. *The operational procedures cited
This Guide *inInthisthisguide
cannot be used when the phone is out of service range. Android is a trademark or registered trademark of Google Inc. The names and
*
logos of services and products included in this publication are the trademarks or registered trademarks of their respective owners.
*
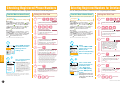
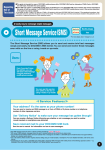
Automatically block prank calls and repetitive wrong number calls
Nuisance Call Blocking Service
Application
Monthly Charge
Not Required
Free
*For more details, refer to "Charges" on p. 12.
This service blocks prank phone calls, repeat wrong number calls, and other nuisance
calls. Once you carry out the simple procedure to register the number of the person
calling (block number), subsequent calls from that number will not be put through, and
the caller will hear a recorded announcement.
Uses:
Shut out those repetitive
nuisance calls!
Service Features
The caller is answered by an
announcement informing them
their call has been refused.
You can register up to 30
numbers from mobile, landline
phones, and other phones.
The following announcement is played to callers;"Your call cannot
be connected to this number. " The call is then automatically
disconnected. Your phone never rings during this process.
You can register up to 30 numbers to be blocked, and not just
from mobile and landline phones, but from IP phones and
other types of phones as well.
You can block calls even
when out of range.
Stop Caller ID Blocking!
Even when the subscriber's phone is out of
range or turned off, an announcement is played
explaining that the call has been rejected.
You can easily register numbers to be blocked, even
numbers besides those you have specified,
immediately after receiving a call from a number you
cannot recognize due to Caller ID Blocking.
[With smartphones (only models running AndroidOS)]
Use the following procedure to make the settings.
*Procedures may differ depending on handset.
●From the dmenu Screen
Select " お客様サポート"(Customer Support)from dmenu.
Select " 各種設定の一覧を見る"(View
Various Settings List).
Select " 迷惑電話ストップサービス"(Nuisance Call Blocking Service)from " あん
しん・安全"(Assurance and Safety)menu.
●From the Handset Screen
Select "Settings."
Select "Call settings."
Select "Network service."
Select "Nuisance call blocking service."
! To Customers Using the Nuisance Call Blocking Service
When registering a specified number for rejection, please double check the number to ensure that it is correct.
1
68
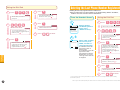
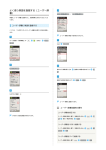
Registering a Specified Phone Number for the Nuisance Call Blocking Service
Specify a phone number to add to the Call Blocking list. You can register the number in advance for blocking.
can register up to 30 numbers. If the number of entries reaches 30,
the oldest number is erased when the next one is registered.
●Only one incoming number can be registered for blocking each time the procedure is carried out.
●Take care to avoid mistakes in entering numbers for incoming calls to be rejected.
●Incoming calls with the caller ID blocked are rejected if the phone number has been registered.
With the 902i series and later models, you can register numbers for incoming calls to be rejected using the Phonebook and outgoing and incoming call
*histories.
For more details, refer to the user's manual.
●You
From the i-Menu or dmenu Screen
*Use of the service requires an i-mode or sp-mode subscription.
To navigate to 1
Nuisance Call Blocking Service Settings Site
●From i-Menu
Select "お客様サポート"(Customer Support).
Select
"各種設定(確認・変更・利用)
"(Various Settings[Checking,
Changes, Use]).
Select "その他サービス設定・確認"
(Setting and Checking of Other Services).
Select
"迷惑電話ストップサービス"(Nuisance Call Blocking
Service).
Enter the Network Password.
●From dmenu
Select "お客様サポート"(Customer Support).
Select
"各種設定の一覧を見る"(View Various Settings List).
Select "迷惑電話ストップサービス"(Nuisance Call Blocking
Service)from "あんしん・安全"(Assurance and Safety)
menu.
Enter the Network Password.
From the Handset Screen
Nuis. call blocking
Register caller
Register selected No.
Delete last entry
Delete all entries
Check No. of entries
2
登録
登録したい番号を入
力してください。
※番号はハイフンなしで
入力してください。
×××××××××××
登録
キャンセル
2
XXXXXXXXXX
Set
3
Enter the phone number
to be rejected, and
select "登録"(Register).
YES
NO
4
4
4
Press
2
Announcement
Announcement
"Please enter the phone number."
"Please enter your network password."
-
5
2
(Network Password)
Announcement
(Phone Number for Call Blocking)
"You are in the main menu. To register
phone numbers, press 1 . To check or
delete the registered phone numbers,
press 2 . To exit, press the ♯ key."
With landline phones, register the number starting from
*the
area code; with mobile phones, start with 090 or
similar mobile phone prefix.
Announcement
"Operation completed."
See p. 5 if there are more than 30 numbers
registered for call blocking.
3
Press
1
To P. 5
Announcement
"XX phone numbers are currently
registered for the Nuisance Call Barring
Service. To register the number of the
last call received, press 1 . To register a
selected number, press 2 . To return to
the main menu, press the
key."
Enter the
phone number
to be rejected,
and select "Set."*1
XXXXXXXXXXX
Register?
2
Display the Nuis. call
blocking Service
menu, and select
"Register selected No.."
1
*1 When registering specified numbers,
note that when
is pressed before the
phone number is completely input, only
the numerals input prior to
is
registered. (Example) If when
attempting to register the number 0X0XXXX-△△△△, you actually press
"0
,"
0
then the numbers ("0X0-XXXX")
input prior to
are registered.
When using the dial pad for these procedures, you can still use it
*the
procedure you want to perform.
6
Press
to finish.
while announcements are playing if you happen to know how to carry out
Nuisance Call
Blocking Service
Nuisance Call
Blocking Service
確認
登録
■最後に着信して通話
した番号の登録
■番号を指定して登録
削除
■リストから選択して削除
■番号を指定して削除
■全件削除
Select
"番号を指定して登録"
(Registering a Specified
Number)
on the Nuisance Call
Blocking Service
settings site.
Press
1
Call rejection number?
迷惑電話ストップサービス
1
●These settings cannot be made from the handset screen on models prior
to the 902i series. Please refer to the sections on From the i-Menu
Screen or Using the Dial Pad.
*The screens shown demonstrate i-Menu procedures.
1
Using the Dial Pad
Select "Yes"
to complete the
registration.
See p. 4 if there are more than 30
numbers registered for call blocking.
To P. 4
If the Call Blocking list
registration is successful, a
message to this effect will
be displayed.
See p. 4 if there are more than 30
numbers registered for call blocking.
To P. 4
●
The set up procedure may differ depending on the handset. See the user's manual of your handset for details. ● Actual screen may be different.
3
68
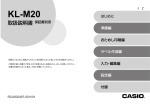
Registering the Last Incoming Number
Using the Dial Pad
Register the last number to call you.
●After the nuisance call has ended, perform the following operation:
●The last answered incoming call or the last call recorded in the Voice Memo function can be registered for call blocking.
●When an incoming call is received but not answered; when the call is made by you; when the caller, using the Voice Mail Service,
Short Message Service (SMS), or other service, leaves a message at the Center; or when the call is made from overseas or the
caller otherwise cannot be identified, you cannot register the phone number of the other party in the call blocking system.
●You can easily set call blocking for the phone number of the most recent incoming call by following a simple
procedure immediately after receiving the call, even if the call was made from a phone with its caller ID blocked.
●If an incoming call made with a blocked caller ID is received and the phone number has been registered,
subsequent incoming calls from that phone number will always be rejected, even when its caller ID is on.
From the i-Menu or dmenu Screen
From the Handset Screen
*Use of the service requires an i-mode or sp-mode subscription.
To navigate to 1
Nuisance Call Blocking Service Settings Site
●From i-Menu
Select "お客様サポート"(Customer Support).
Select
"各種設定(確認・変更・利用)"(Various Settings[Checking,
Changes, Use]).
Select "その他サービス設定・確認"
(Setting and Checking of Other Services).
Select
"迷惑電話ストップサービス"(Nuisance Call Blocking
Service).
Enter the Network Password.
●From dmenu
Select "お客様サポート"( Customer Support).
Select
"各種設定の一覧を見る"(View Various Settings List).
Select "迷惑電話ストップサービス"(Nuisance Call Blocking
Service)from "あんしん・安全"(Assurance and Safety)
menu.
Enter the Network Password.
1
Nuis. call blocking
Register caller
Register selected No.
Delete last entry
Delete all entries
Check No. of entries
*
4
3
1
Press
Announcement
Announcement
"...To register the number of the
last call received, press 1 ..."
"Please enter your network
password."
See below if there are more than
30 numbers registered for call blocking.
See below
2
Display the Nuis.call
blocking Service
menu, and select
"Register caller."
(Network Password)
4
Announcement
"…To register phone numbers,
press 1 …"
1
Press
Announcement
"Operation completed."
A confirmation screen will appear.
Select "YES" to register the last number
to call you on your Call Blocking list. A
reconfirmation screen will appear.
Select "OK." If the Call Blocking list
registration is successful, a message to
this effect will be displayed.
5
Press
to finish.
See below if there are more than 30
numbers registered for call blocking.
See below
Select "登録"(Register) on the
"登録"(Register) screen.
If the Call Blocking list registration
is successful, a message to this
effect will be displayed.
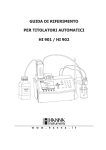
If you want to register a new phone number for blocking when
there are 30 numbers already registered, follow the following procedure.
If the total number of phone numbers registered using "Registering a Specified Phone Number" and "Registering the Last Incoming
Number" exceed the limit of 30, the "Procedure When the Amount of Blocked Numbers Exceeds the Limit" screen will appear.
This operation automatically registers the new number by deleting the oldest registered number.
The dmenu screen and the handset screen for a smartphone running the AndroidOS use the same procedures as shown below. Procedures may
*differ
depending on handset.
● From the i-Menu or dmenu Screen
登録
登録可能な件数(30
件)
を超えるため、現
在 登 録されている番
号から下 記の番 号を
削除して登録します。
よろしいですか?
×××××××××××
登録日:××年×月×日
登録
キャンセル
4
4
A confirmation screen will appear.
Select "登録"(Register) to delete
the oldest entry and add either a
specified phone number or the
phone number of the most recent
incoming call to the Call Blocking
list. If the entry is successfully
deleted, a message to this effect
will be displayed.
The screens shown demonstrate i-Menu
*procedures.
● From the Handset Screen
Overwrite
oldest entry?
YES
NO
A confirmation screen will appear. Select
"Yes" to delete the oldest entry and add
either a specified phone number or the
phone number of the most recent
incoming call to the Call Blocking list. If
the entry is successfully deleted, a
message to this effect will be displayed.
With FOMA or Xi, even if fewer than 30 calls are registered, you can
*delete
the oldest incoming call number registered for blocking by using
the service code
.
1 2 2
3
In addition, you can delete incoming call numbers registered for blocking,
in sequence from the oldest number by repeating this procedure.
If you want to register a new phone number for blocking when
there are 30 numbers already registered, follow the following procedure.
If the total number of phone numbers
registered using "Registering a
Specified Phone Number" and
"Registering the Last Incoming
Number" exceed the limit of 30, the
"Procedure When the Amount of
Blocked Numbers Exceeds the Limit"
screen will appear.
This operation automatically
registers the new number by deleting
the oldest registered number.
●
● Using the Dial Pad
1
Nuisance Call
Blocking Service
Nuisance Call
Blocking Service
確認
登録
■最後に着信して通話
した番号の登録
■番号を指定して登録
削除
1
See below
Select "最後に着信して通話した番号の
登録"(Registering the last Incoming
Number) on the Nuisance Call
Blocking Service settings site.
迷惑電話ストップサービス
Press
See below if there are more than
30 numbers registered for call
blocking.
The screens shown demonstrate i-Menu procedures.
1
1
Announcement
"The maximum register number has been exceeded.
Delete the oldest registered number and register this
number. To register, press 1 . To cancel, press 2 ."
1
Press
Announcement
"Operation completed."
2
Press
to finish.
The set up procedure may differ depending on the handset. See the user's manual of your handset for details. ● Actual screen may be different.
5
Checking Registered Phone Numbers
You can confirm phone numbers registered for the Nuisance Call Blocking Service.
From the i-Menu or dmenu Screen
Using the Dial Pad
●From i-Menu
Select "お客様サポート"(Customer Support).
Select
"各種設定(確認・変更・利用)
"(Various Settings[Checking,
Changes, Use]).
Select "その他サービス設定・確認"
(Setting and Checking of Other Services).
Select
"迷惑電話ストップサービス"(Nuisance Call Blocking
Service).
Enter the Network Password.
●From dmenu
Select "お客様サポート"(Customer Support).
Select
"各種設定の一覧を見る"(View Various Settings List).
Select "迷惑電話ストップサービス"(Nuisance Call Blocking
Service)from "あんしん・安全"(Assurance and Safety)
menu.
Enter the Network Password.
*The screens shown demonstrate i-Menu procedures.
1
4
4
To navigate to 1
Nuisance Call Blocking Service Settings Site
"Please enter your network password."
2
(Network Password)
Announcement
"You are in the main menu...To check
or delete the registered phone
numbers, press 2 ..."
3
Press
2
Announcement
2
4
"The first registered number is XXXXXXX-XXXX. The registered date is...To
delete this number, press 1 . To check
the next registered number, press 2 ..."
the phone numbers were registered on or before November 5,
* If2009,
and if they are Caller ID-blocked numbers, public phones,
(1)
×××××××××××
××年×月×日
(2)
番号表示不可
××年×月×日
(3)
番号表示不可
--年--月--日
*
All Caller ID-blocked numbers, public phone
*1 numbers,
and non-displayable phone
numbers registered on or before November
5, 2009:Indicated with "--(Y)--(M)--(D)" for
the date and "番号表示不可"(Number
Unidentified)for the registered number.
All Caller ID-blocked numbers, public phone
numbers, and non-displayable phone
numbers registered on or after November 5,
2009: Indicated with the date registered and
"番号表示不可"(Number Unidentified)for
the registered number.
With the 902i series and later models, you can check the number of
*registered
telephone numbers by selecting "Check No. of entries" in
the handset's "Nuis. call blocking" menu.
*The screens shown demonstrate i-Menu procedures.
or phone numbers that cannot be shown for any other reason,
the following announcement is played: "The X registered
number and the registered date cannot be announced."
If the phone numbers are registered on or after November 5,
2009, and if they are Caller ID-blocked numbers, public phones,
or phone numbers that cannot be shown for any other reason,
the following announcement is played: "The X registered
number cannot be announced. The registered date is..."
Press
Announcement
"The second registered number is XXXXXXX-XXXX. The registered date is..."
same announcement will be repeated until the last
* Then
registered number is read.
確認
登録
■最後に着信して通話
した番号の登録
■番号を指定して登録
削除
■リストから選択して削除
■番号を指定して削除
■全件削除
6
to finish.
4
2
(Network Password)
Announcement
"You are in the main menu...To check
or delete the registered phone
numbers, press 2 ..."
3
Press
2
Select
"リストから選択して削除"
(Select from List and
Delete) on the
Nuisance Call Blocking
Service settings site.
"XX phone numbers are currently
registered for the Nuisance Call
Barring Service...To check and
delete the registered numbers,
press 2 . To delete a selected
number, press 3 . To clear all
registered numbers, press 9 ..."
4
登録番号・登録日
□(1)
×××××××××××
××年×月×日
□(2)番号表示不可
××年×月×日
次へ
Press
2
Announcement
"The first registered number is...
To delete this number, press 1 . To
check the next registered number,
press 2 ..."
2
戻る
Press
4
Announcement
1
削除したい番号を選択してください。
2
1
Announcement
削除
5
Press
"Please enter your network password."
●From dmenu
Select "お客様サポート"(Customer Support).
Select
"各種設定の一覧を見る"(View Various Settings List).
Select "迷惑電話ストップサービス"(Nuisance Call Blocking
Service)from "あんしん・安全"(Assurance and Safety)
menu.
Enter the Network Password.
迷惑電話ストップサービス
2
Announcement
A list of registered numbers
and dates appears. *1
確認
Press
●From i-Menu
Select "お客様サポート"(Customer Support).
Select
"各種設定(確認・変更・利用)
"(Various Settings[Checking,
Changes, Use]).
Select "その他サービス設定・確認"
(Setting and Checking of Other Services).
Select
"迷惑電話ストップサービス"(Nuisance Call Blocking
Service).
Enter the Network Password.
1
Place a check mark
next to the number to
be deleted, select
"次へ"(Next), then
select "削除"(Delete)
on the "削除"(Delete)
screen.
If the removal from the Call
Blocking list is successful,
a message to this effect will
be displayed.
5
Press
1
Nuisance Call
Blocking Service
Nuisance Call
Blocking Service
確認
登録
■最後に着信して通話
した番号の登録
■番号を指定して登録
削除
■リストから選択して削除
■番号を指定して削除
■全件削除
登録番号・登録日
6
1
Announcement
1
Select "確認"(Confirm)
on the Nuisance Call
Blocking Service
settings site.
Using the Dial Pad
*Use of the service requires an i-mode or sp-mode subscription.
Press
"XX phone numbers are currently
registered for the Nuisance Call
Barring Service...To check and delete
the registered numbers, press 2 ..."
迷惑電話ストップサービス
You can select phone numbers to delete from a list of registered phone numbers.
From the i-Menu or dmenu Screen
*Use of the service requires an i-mode or sp-mode subscription.
To navigate to 1
Nuisance Call Blocking Service Settings Site
Selecting Registered Numbers for Deletion
*
*To go to the number after that, press 2 .
Announcement
"Number deleted from list. To check the
next registered number, press 1 ..."
6
Press
to finish.
●
Actual screen may be different.
7
Entering a Registered Number for Deletion
You can enter a registered phone number to delete it from the list.
From the i-Menu or dmenu Screen
Deleting all entries from the Call Block list.
● This procedure deletes all telephone numbers in the Call Block list simultaneously.
The procedure does not allow numbers to be checked during deletion, or specific
numbers to be entered for deletion. In addition, numbers cannot be restored to the
list after deletion.
Using the Dial Pad
*Use of the service requires an i-mode or sp-mode subscription.
To navigate to 1
Nuisance Call Blocking Service Settings Site
●From i-Menu
Select "お客様サポート"(Customer Support).
Select
"各種設定(確認・変更・利用)
"(Various Settings[Checking,
Changes, Use]).
Select "その他サービス設定・確認"
(Setting and Checking of Other Services).
Select
"迷惑電話ストップサービス"(Nuisance Call Blocking
Service).
Enter the Network Password.
1
1
4
4
Announcement
"Please enter your network password."
(Network Password)
Announcement
"You are in the main menu...To check
or delete the registered phone
numbers, press 2 ..."
3
Press
2
Announcement
1
迷惑電話ストップサービス
"XX phone numbers are currently
registered for the Nuisance Call
Barring Service...To check and
delete the registered numbers,
press 2 . To delete a selected
number, press 3 . To clear all
registered numbers, press 9 ..."
Press
3
Announcement
"Please enter the phone number."
2
削除
削除したい番号を入力
してください。
※番号はハイフンなしで入
力してください。
×××××××××××
削除
キャンセル
Enter the phone number
to be deleted, and
select "削除"(Delete).
*Use of the service requires an i-mode or sp-mode subscription.
●From i-Menu
Select "お客様サポート"(Customer Support).
Select
"各種設定(確認・変更・利用)
"(Various Settings[Checking,
Changes, Use]).
Select "その他サービス設定・確認"
(Setting and Checking of Other Services).
Select
"迷惑電話ストップサービス"(Nuisance Call Blocking
Service).
Enter the Network Password.
●From dmenu
Select "お客様サポート"(Customer Support).
Select
"各種設定の一覧を見る"(View Various Settings List).
Select "迷惑電話ストップサービス"(Nuisance Call Blocking
Service)from "あんしん・安全"(Assurance and Safety)
menu.
Enter the Network Password.
-
5
1
Nuis.call blocking
Register caller
Register selected No.
Delete last entry
Delete all entries
Check No. of entries
Delete all entries?
1
YES
確認
登録
■最後に着信して通話
した番号の登録
■番号を指定して登録
削除
■リストから選択して削除
■番号を指定して削除
■全件削除
Select "全件削除"
(Deleting All Phone
Numbers) on the
Nuisance Call
Blocking Service
settings site.
Display the Nuis. call
bloking Service
menu, and select
"Delete all entries."
2
*The screens shown demonstrate i-Menu procedures.
迷惑電話ストップサービス
4
From the Handset Screen
NO
Select "YES" to clear
the Call Blocking list,
or "NO" to cancel it.
A confirmation screen will
appear. Select "YES" to
delete all entries from the
Call Blocking list.
A reconfirmation screen will
appear. Select "OK."
If the removal from the Call
Blocking list is successful,
a message to this effect will
be displayed.
Nuisance Call
Blocking Service
Nuisance Call
Blocking Service
確認
登録
■最後に着信して通話
した番号の登録
■番号を指定して登録
削除
■リストから選択して削除
■番号を指定して削除
■全件削除
Select
"番号を指定して削除"
(Specify Number and
Delete) on the Nuisance
Call Blocking Service
settings site.
From the i-Menu or dmenu Screen
To navigate to 1
Nuisance Call Blocking Service Settings Site
2
●From dmenu
Select "お客様サポート"(Customer Support).
Select
"各種設定の一覧を見る"(View Various Settings List).
Select "迷惑電話ストップサービス"(Nuisance Call Blocking
Service)from "あんしん・安全"(Assurance and Safety)
menu.
Enter the Network Password.
*The screens shown demonstrate i-Menu procedures.
Press
Deleting All Registered Phone Numbers
(Phone Number to Delete)
If the removal from the Call
Blocking list is successful,
a message to this effect will
be displayed.
With landline phones, register the number starting from
*the
area code; with mobile phones, start with 090 or
similar mobile phone prefix.
2
Select "削除"(Delete).
Announcement
削除
"Number deleted from list."
全件削除します。
よろし
いですか?
6
Press
to finish.
削除
キャンセル
If the removal from the Call
Blocking list is successful,
a message to this effect will
be displayed.
*If a caller calls from a number registered in the Nuisance Call Blocking Service by activating the Caller ID-blocking function, the number cannot be deleted by entering the specific phone number.
8
●
The set up procedure may differ depending on the handset. See the user's manual of your handset for details. ● Actual screen may be different.
9
Deleting the Last Phone Number Registered
Using the Dial Pad
1
Press
1
4
4
4
Press
9
Announcement
Announcement
"All registered numbers will be
deleted. To delete, press 1 ..."
"Please enter your network
password."
5
2
1
From the Handset Screen
Using the Dial Pad
1
1
Announcement
(Network Password)
"Number deleted from list."
Announcement
"You are in the main menu...To
check or delete the registered phone
numbers, press 2 ..."
3
Press
Deleting the last entry registered in the Call Block list.
● This procedure does not allow numbers to be checked during deletion. In addition,
numbers cannot be restored to the list after deletion.
Press
6
Press
Nuis. call blocking
Register caller
Register selected No.
Delete last entry
Delete all entries
Check No. of entries
Display the Nuis.
call blocking Service
menu, select
"Delete last entry."
4
4
Announcement
2
(Network Password)
to finish.
Announcement
"You are in the main menu...To check
or delete the registered phone
numbers, press 2 ..."
Announcement
"XX phone numbers are currently
registered for the Nuisance Call
Barring Service...To clear all
registered numbers, press 9 ..."
1
"Please enter your network password."
2
2
Press
Delete last entry?
YES
NO
Select "YES" to delete
the last entry to be
added, and "NO" to
cancel the operation.
Press
2
Announcement
"XX phone numbers are currently
registered for the Nuisance Call
Barring Service. To delete the last
number registered, press 1 .
To check and delete the registered
numbers, press 2 ..."
4
Press
1
Announcement
"The last registered number will be
deleted. To delete, press 1 ..."
5
Press
Nuisance Call
Blocking Service
Nuisance Call
Blocking Service
A confirmation screen will
appear. Select "YES" to
delete an entry.
A reconfirmation screen will
appear. Select "OK."
If the removal from the Call
Blocking list is successful,
a message to this effect will
be displayed.
3
1
Announcement
"Number deleted from list."
6
Press
to finish.
can repeat this procedure to delete registered numbers in sequence from the most recent incoming call number registered for blocking
* You
(the last number registered).
10
●
The set up procedure may differ depending on the handset. See the user's manual of your handset for details. ● Actual screen may be different.
11
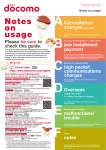
Charges
Monthly Charge
No Application Required
Free
The caller is charged for dialing and communications
Dialing and
charges starting the moment the Call Blocking
Communications Charges
announcement begins playing.
No dialing and communications charges apply for
Charges for Settings "Registering Call Blocking" or "Deleting the Registered
Phone Number" and similar operations.
Notes on Use
●How
calls from phone numbers using the Call Blocking list are handled with other services.
Service name
Handling of calls from phone numbers on the Call Blocking list.
Voice Mail Service
Call Blocking announcement is played ( message not accepted ) .
Call Forwarding Service
Call Blocking announcement is played ( the call is not forwarded to the forwarding number ) .
Call Waiting Service
Call Blocking announcement is played.
Caller ID Display Request Service
Call Blocking announcement is played.
Public Mode
Call Blocking announcement is played ( the Public mode announcement is not played ).
﹇
Nuisance Call
﹇
Blocking Service
﹈
Charges
﹈
Notes on Use
●You cannot check a phone number registered for call blocking added to the list on or before November
5, 2009. Even if you ask one of our service representatives, we are unable to give out that information.
●Calls blocked by this service do not appear in your call history.
●When an incoming call from a caller registered as blocked is received on a Videophone, a message
in graphic format is displayed stating the call is being rejected.
●If you receive a data transmission from a phone number on your Call Blocking list, the communication is
cut off without playing an announcement.
●It is only possible to add entries to the Call Blocking list, and remove entries from it, from your
subscribed handset. Remote Access is not available from landline phones, NTT public phones, other
mobile phones, etc.
●If you try to add to the Call Blocking list an incoming call that was only received but not answered,
please be aware that the phone number for the voice or videophone call last answered* before the
current call will be the number registered for blocking.
●When a Nuisance Call Blocking Service registration is made under unstable reception conditions, a
number that has been partially entered when the connection is interrupted could be registered as a
complete number.
●If you are using the Call Waiting Service, the Call Blocking Service will block the telephone number
of the last call.
●In order to block international calls, input the number without the "+" symbol. There may be cases,
however, when you cannot block incoming calls from a particular international number, even when
the number is registered for blocking with or without the "+" symbol.
●Call Blocking cannot be set from messages held for you at Voice Mail Service, Short Message Service
(SMS), or other Service Centers.
●This service may not be available on some handsets.
●DOCOMO assumes no responsibility for any damages arising from the use of this service.
incoming call" means that you were the one who received the call, and that the call was answered. Therefore, the other party's number
* "Answered
cannot be registered for the blocking service if you were the caller, or if the call was not answered.
12