1
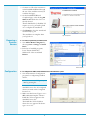
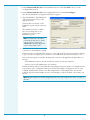
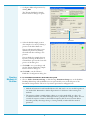
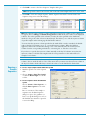
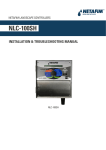
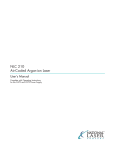
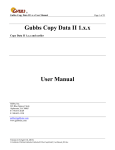
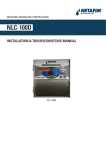
EASY-nLC Virtual Instrument for Xcalibur Quick Reference
This guide describes how to install, configure, and use
the Thermo EASY-nLC™ Virtual Instrument (VI)
software with the Thermo Xcalibur™ 1.1.0.3 data
system. You must be familiar with the Xcalibur
application to proceed. For further guidance on
Xcalibur specific operations, refer to the Xcalibur user
manual.
Contents
•
•
•
•
•
•
•
•
•
•
•
Prerequisites
Installation
Removing a Previous Version
Configuration
Creating Methods in Xcalibur
Creating Sequence Runs in Xcalibur
Running a Sample Sequence
Monitoring the Status
Sample Information
Additional Support
Trademarks
Note When creating EASY-nLC methods and executing sample sequence runs, you must use the
EASY-nLC Virtual Instrument (VI) application with the Xcalibur data system. For all other
operations, such as configuration and maintenance tasks, use the touch monitor on the EASY-nLC
instrument itself.
Prerequisites
Before installing the EASY-nLC Virtual Instrument software, ensure the following:
• Installation of Xcalibur version 1.4 or 2.0 prior to installation of the EASY-nLC VI software
• Administrator rights to install the EASY-nLC VI software for the Xcalibur application
• Removal of any earlier version of the EASY-nLC VI from the target computer prior to installing
the new version
(For guidance on how to remove the EASY-nLC VI software, see “Removing a Previous Version” on
page 3.)
• A network connection between the EASY-nLC instrument and the computer running the Xcalibur
application
(To set up this connection, contact local IT support and consult the EASY-nLC user manual.)
IMPORTANT Avoid IP conflicts with other units on the network, especially the mass
spectrometer. Refer to your mass spectrometer vendor for assistance in setting up the network
connection between the host computer and additional peripheral units to the mass
spectrometer.
• Access through port 6666 for connection to the EASY-nLC instrument.
• Connecting the EASY-nLC instrument and the mass spectrometer with the contact closure cable,
and configuring the EASY-nLC system for one-way contact closure
(For further assistance, refer to the EASY-nLC or mass spectrometer manual as appropriate.)
Revision A 60053-97001
© 2010 Thermo Fisher Scientific Inc.
All rights reserved.
Thermo Fisher Scientific is not responsible for problems that occur as a result of failure to comply with
these instructions.
Installation
Y To install the EASY-nLC Virtual Instrument software
1. Close all running programs before
starting the installation. Remember
to remove earlier versions of the
EASY-nLC VI for the Xcalibur
application before installing the new
version of the software.
2. Locate the new version from the Start
menu (choose Start > Run and
browse to the location of the
EASY-nLC VI Installer.exe file).
3. Select EASY-nLC VI Installer.exe and
click Open.
4. When the Welcome page of the
Thermo EASY nLC Xcalibur VI 1.1
InstallShield Wizard opens, click
Next.
5. Carefully read the License Agreement
before accepting it. Click Next.
6. On the Destination Folder page, do
one of the following:
• Click Next.
–or–
• Click Change to specify a different
folder location, and then click Next.
Thermo Fisher Scientific
recommends that you install the
EASY-nLC VI software for the
Xcalibur data system in the default
destination folder.
Change button
2
7. Continue to follow the instructions
in the InstallShield Wizard through
the rest of the installation until you
reach the final page.
8. On the InstallShield Wizard
Completed page, select the Log Off
Windows Now check box if it is not
already selected.
Thermo EASY-nLC for Xcalibur VI
requires you to log off and log back
on to complete the installation.
9. Click Finish to close the wizard and
automatically log off.
The installation is complete when
you log back on.
Removing a
Previous
Version
Log off required
Y To remove a previously installed version
1. Start Add or Remove Programs by
choosing Start > Settings > Control
Panel.
2. In the list of installed programs,
locate Thermo EASY-nLC
Xcalibur VI. Select it and click
Remove.
Remove button
Configuration
Y To configure the EASY-nLC VI software for the Xcalibur data system
1. Start the Instrument Configuration
program for configurating Xcalibur
devices.
Note You can access Help at any
time by pressing F1.
All available devices are listed in the
Available Devices box; all configured
devices are listed in the Configured
Devices box.
2. Make sure that Device Types is set to
All or AS (AutoSampler). Thermo
EASY-nLC VI now appears in the
Available Devices box.
The EASY-nLC VI for Xcalibur
device does not appear if the device
type is set to LC.
3
3. Select Thermo EASY-nLC VI in the Available Devices box and click Add to move it to the
Configured Devices box.
4. Select Thermo EASY-nLC VI in the Configured Devices box and click Configure.
The Thermo EASY-nLC Configuration dialog box appears.
5. Type the IP address of the EASY-nLC
system and your user name in the
appropriate boxes.
You must have an account on the
EASY-nLC system with the same user
name.
The default user name is “admin,”
but you can change this to any
existing user account on the
EASY-nLC system.
Note The EASY-nLC IP address
is listed in the About box, which
you can open by pressing the
THERMO logo in the upper left
corner of the touch screen.
6. Click Test Connection to test the
connection to the EASY-nLC system.
If the connection is established, the status box to the right of the Test Connection button changes
to green (see the next figure). If a connection is not established, the status bar changes to red.
If an antivirus program or firewall is blocking the connection, the application displays this error
message:
An established connection was aborted by the software in your host machine.
Contact your local IT administrator for assistance.
Default parameter values for the EASY-nLC autosampler and solvent names are configured in the
lower portion of the configuration dialog box. In the Autosampler Configuration area, you can
configure the EASY-nLC system to use Autosampler ASA or Autosampler ASC. You can also
configure the selected autosampler for 96 or 384 well plates, and a 4×6 (ASA) or 6×8 (ASC) vial
layout.
Note All plate formats for the Autosampler ASC have six extra vial positions (1-V1 to 1-V6) on
the side.
4
7. Configure additional parameters by
clicking Edit.
The Thermo EASY-nLC Sample
Position Selector dialog box opens.
Edit button
8. Select the default sample position
(first sample to be run) by clicking a
position in the Plate Rack area.
You can subsequently define a new
default start position by clicking
Clear All and then selecting a new
position.
You can define the sample selection
layout by selecting the Row First or
Column First option in the lower left
portion of the dialog box.
9. Click OK to save your changes and
exit the Thermo EASY-nLC Sample
Position Selector dialog box.
10.Click OK to exit the Thermo
EASY-nLC Configuration dialog box.
Creating
Methods in
Xcalibur
Y To create EASY-nLC methods in the Xcalibur data system
1. Choose GoTo > Instrument Setup, or click the large Instrument Setup icon on the Xcalibur
Roadmap Home Page. All installed devices are represented by icons in the left pane of the
Instrument Setup window. The icon of your mass spectrometer will appear here.
Notes
• Method information from all installed devices (LC, MS, and so on) are saved all together in
one method file. Remember to define all parameters for all devices when creating new
methods.
• The injection volume (sample pickup volume) is set in the method file, as it has to be
coordinated with the rest of the method parameters, primarily the loading volume. You can
override the injection volume in the Xcalibur sequence table; however, Thermo Fisher
Scientific generally discourages doing so, having carefully considered all the method
parameters.
5
2. Click the Thermo EASY-nLC icon
and create your method.
The Xcalibur method editor is
essentially similar to the method
editor installed in the EASY-nLC
software. For instructions on how to
set up methods, refer to the
EASY-nLC user manual.
3. Save the method before exiting the
Instrument Setup window.
Creating
Sequence
Runs in
Xcalibur
Y To create sample sequence runs in the Xcalibur data system
1. Choose View > Sequence Setup View
or click the large Sequence Setup
icon on the Roadmap Home Page.
2. Choose File > New, or click the New
icon in the toolbar to create a new
sequence template.
For guidance on how to set up
parameters in the New Sequence
Template dialog box, refer to the
Xcalibur user manual or press F1 to
access the Help.
3. In the Samples area, click Select Vials
to change the default well or vial
selection.
The Thermo EASY-nLC Sample
Position Selector dialog box appears.
4. Select the specific wells or vials that
you want to run in any order. The
wells or vials will run in the order that
you marked them.
5. Specify a starting position by clicking
the plate. Type the number of
additional samples to select in the
Number of Samples to Select box and
click Select. The consecutive wells
and vials are then selected according
to the option set in the Sample
Selection Layout area.
You can change the layout by
selecting the Row First or Column
First option.
6
6. Click OK to return to the New Sequence Template dialog box.
Note The position codes for the six extra vials on the side (Autosampler ASC) are 1-V1 to 1-V6.
7. Click OK to create the sample sequence. All the sequence information is then listed in the
Sequence Setup view on the Home Page.
Note The sequence table contains a column called Inj Vol (injection volume). If the column does
not appear, choose Change > Column Arrangement and add the Inj Vol column to the displayed
columns. The value specified in this column overrules the value specified in the EASY-nLC
method, as long as the value is between 0 and 48 μL. This allows you to edit the injection volume
of specific samples without changing the EASY-nLC method.
To ensure that the injection volume specified in the method file is used as intended, the default
value in the Inj Vol column is set to –1, an invalid injection volume. When the Xcalibur
application detects the invalid value during a run, it automatically takes the actual injection
volume from the corresponding method file, overwriting the –1 with the correct value.
If you choose to specify the injection volume manually in the Inj Vol column, ensure that the
injection volume is sensible and complies with the other parameters in the method file (for
example, load volume).
IMPORTANT The Xcalibur 2.1 data system does not accept the –1 value in the Inj Vol
column—that is, methods will not start). This means that you must enter the injection volume in
the Inj Vol column, which will always overrule the value set in the EASY-nLC method file.
Running a
Sample
Sequence
Y To run a single sample in the Xcalibur data system
1. Mark the specific row in the sequence
table.
2. Choose Actions > Run This Sample,
or click the Run Sample icon in the
toolbar.
Y To run a sequence in the Xcalibur data
system
Choose Actions > Run Sequence, or
click the Run Sequence icon in the
toolbar.
Prior to execution of the sample or
sequence run, the Run Sequence
dialog box opens. For guidance on
how to set up this dialog box, refer to
the Xcalibur user manual or press F1
to access the Help.
7
Monitoring
the Status
Y To monitor EASY-nLC status in the Xcalibur data system
• After installing and configuring the
EASY-nLC VI software, and
connecting the instrument to the
Xcalibur data system, check the status
in the Status pane of the Xcalibur
Roadmap Home Page. A status
message also appears.
• To check EASY-nLC method progress
information and other EASY-nLC
hardware readouts in real time, click
Ready To Download at the top of
the Status pane.
Sample
Information
Using the Qual Browser application, you can access sample information and EASY-nLC method
information in the raw MS data. Use any of these methods:
• On the Xcalibur Roadmap Home Page, click the Qual Browser icon.
• Open the MS raw file that you want to access method information from.
• Choose View > Report > Sample Information to view sample information.
• Choose View > Report > Instrument Method to view method information from all devices used
to acquire the data (typically the EASY-nLC instrument and a mass spectrometer).
• Navigate through the pages using the arrow buttons in the toolbar or the arrow keys on the
keyboard.
Additional
Support
Trademarks
Visit www.thermofisher.com to find your local Thermo Fisher Scientific representative.
EASY-nLC is a trademark and Xcalibur is a registered trademark of Thermo Fisher Scientific Inc. in
the United States.
8