1
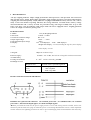
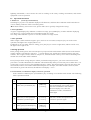
XK3190-A16( E)
WEIGHING INDICATOR
USER MANUAL
V1.1
-1-
I Brief Introduction:
A16 (E) weighing indicator adopts a high performance microprocessor, with precision A/D conversion
chip 24 high and a unique digital filter algorithm, high weighing precision, operation humanization,
weighing fast and stable quality. A16(E) indicator is equipped with built-in battery and AC / DC, with as
many as 99 total amount of pricing function, the storage function, overload alarm, battery voltage
detection function and a variety of mode for powerful saving. The longest standby time is up to 100
hours even more. A16 (E) indicator with proper load cell can be equipped with a weighing platform
scale to be a high cost effective pricing scale.
II. Main Parameter
1. Model:
2. Precision:
3. Load cell excitation voltage:
4. Input signal range:
5. The minimum input voltage
6. Display:
A16 (E) Weighing indicator
3 Grade、n=3000
DC +3.3V
-10mV ~+13mV
2uV/e
A16 LCD displayer; A16E LED displayer
Weight value display:5 LCD (including the sign bit); Price display:
5 LCD;
Value display: 6 LCD
7. Keypad:
Adopt 25 mechanical keys
8. Power supply`:
4V/4AH battery
9. Using environment:
10. Margin of error
AC220V,49~51Hz; The built-in rechargeable without maintenance
0~40℃
Margin of error
±0.25e
±0.5e
±0.75e
Relative humidity ≤85%RH
Division value e represents signal M
0≤m≤500
500<m≤2000
2000<m≤10000
III. The connection of load cell and indicator
Definition for 9 pin load cell connector: 1 is excitation power line -; 5 is shielded cable; 6 is excitation
power line +; 8 is load cell output signal -; 9 is load cell output signal +
▲When you install the load cell, the power supply must be cut off. The wiring must be reliable, and it’s not
allowed to pull the load cell’s plug out when the power is on. During thunderstorm season, it must implement
reliable measures for lightning protection in order to prevent damaging load cell and indicator that caused by
-2-
lightning. Meanwhile, it also ensures the staff is working in the safety working environment, and relative
equipment is safe in operation.
IV. Operation instruction
1. Power on (warm-up 15-30 minutes)
Switching key to power on, indicator displayers all characters, and then shows indicator model and software
version. Finally, indicator will be on working status.
▲The built-in battery is first time to use, please make sure to get fully charge before using!
2. Zero operation
As gross weight displayed by indicator is within zero range, press [ZERO] key to make indicator displaying
zero. However, it can not make Zero when indicator has tare setting.
Zero range when indicator is power on: 10%FS, manual zero range: 2%FS.
3. Tare operation
When weight is stable with non-negative gross, and it is not zero status, Press[tare] key can work on tare
operation, and light of net weight symbol is on.
If indicator is on zero status with tare setting, press [tare] key to exit net weight status, and tare will be zero,
the light of net weight is off.
4. Pricing operation
In the pricing model, please enter into unit price by keyboard. The total amount will be shown on the amount
column, which is calculated by unit price. ( put into integer part, and the press decimal point to enter into
number). The weight is minus, whatever unit price is, the total amount is always zero. The accumulating total
amount does work under stable condition.
Press [clean] to delete wrong unit price. When you finish setting unit price, you can re-enter into new unit
price after 6 seconds. Meanwhile, the indicator will automatically delete previous unit price. Further more, it is
not necessary to press any keys after finishing unit price setting. The decimal point is fixed for unit price and
total amount, which is two number behind decimal point. For example, max total amount is 9999.99, if the
total amount is greater tan 9999.99, the indicator will display “-over-“.
5. Total amount, accumulative display and clear operation
In the valuation condition press [accumulative] key according to accumulate total amount. The following
table is operation method
STE
P
OPERATION
DISPLAY
After get a correct accurate
results, Pres [accumulate] key
[ ****** ]
[Add ***]
[ ******]
The accumulate operation: weight data
showed unchanged, monovalent display
shows the accumulative total number,
amount of display rows show the
accumulative results, accumulation
symbol light.
Let indicator back to zero (or
under zero), or tare operation,
accumulate operation again
[ ****** ]
[ ******]
[ ******]
Indicator weight data back to zero or
under zero, or after tare operation can
accumulate operation again
After get a correct valuation
results, press [accumulate] key
[ ****** ]
[Add ***]
[ ******]
……
Accumulation again
1
2
3
…… Several accumulate operation
-3-
INSTRUCTION
……
5
[ ****** ]
[Add ***]
[ ******]
The indicator has accumulated
but not return to zero, or return
to zero but did not add weight
again, press[accumulate] key
Press[accumulate clear] key
Accumulate display function: weight data
showed unchanged, monovalent display
shows the accumulate amount, total
number of lines shows the ultimate
accumulate results
Displayed
date unchanged
6
Removal of accumulated results: Clean
the accumulative number and
accumulative result , accumulative total
indicator goes out
Note: If the accumulate times not beyond the max accumulation times ,Max accumulate is 999999(not
including decimal points);Max accumulation time is 99;If beyond this value, the unit price windows or the
amount windows of the indicator will display "Over"
6. Unit price save ,alteration and call.
Save :Press 【save】button, and then input the unit price by the 0-9 numbers on the keypad, and then press
【M x】button(x=1-6), and then this unit price was saved in the M x button(and the last unit price in the
【M x】 button was replaced by the new one)
Call:Press【M x】button and then can call the unit price saved in it.
7. Change function
Press【change】function after the weighing operation, the windows in the weighing indicator display
“-CHA-”,and input the amount the user get in the unit price window, and the third window will display the
change amount. The change amount calculated by the accumulate amount in the accumulate status.
8. Inner code check
Input unit price 123.45 and then press 【Tare】 button in the weighing status and then come into inner
code display status,and then press【Tare】again or press【Clear】button to exit.
9. Backlight display
A16E:Press【lightness】button can adjust LCD back light
A16:Press【B.L】button can open and close the LED back light
V . Information indication
A16E indicator prompt message and solutions:
Display
[Err 0]
Problem
Cannot tare
[ LobAt ]
Calibration parameter setting
error
Analog signal too weak while
adding
weights
when
calibration
Voltage too low
[ CHAO ]
Weight over loaded
[Err
1]
[Err
2]
Solution
Weight not stable or minus tare value so
that cannot tare
Follow calibration instruction setting the
right range of parameter
Choose small capacity load cell or more
sensitive load cell, or use heavier weights
Battery low, please charge
1 . Re-calibration if the indicator without
calibration yet.
2.Reduce the weight on the platform and
make the indicator working in the normal
capacity range.
3.Re-set the full capacity of the indicator.
VI Battery
-4-
Be sure to fully charge the battery before using the built-in battery for the first time!
1. Once the power plug connect to the AC the battery will be charged. Note: The cable connect to the battery
can not be wrong connection(Red line is + and the black line is -), or else that the indicator will be burned .Be
sure to fully charge the battery before using the built-in battery for the first time! And the first time charge
should be over 24 hours , and to make sure that the battery come into the safe and stable working status.
2.On the right lower conner there is a battery voltage indicate symbol, and it is display the voltage of the
battery and once it consume the battery it will display in the same time , and if it is used out means the user
should charge the battery as soon as possible.
3.During the indicator working time the user should charge the battery when found that the battery voltage is
low to protect the battery life , each charge time should be over 12 hours . In case that long time do not use the
indicator the user should charge the battery every 2 months and each charge time should around 20-24 hours to
protect the battery life .
▲ Above charge time all mention AC power is 220V, if less than this power the user should charge the battery
for longer time .
VII Maintenance and attention
1. To guarantee its clarity and service life, the indicator should not be placed directly under sunshine and
should be set in the plain space.
2. It is not suitable to place the indicator in the dusty and vibration environment and also avoid using in the
moist environment.
3. Signal source and weighing indicator should be reliably connected, and system should be well grounding. It
should be far away with strong electric field, strong magnetic field. Load cell and indicator should be far away
with strong corrosive, inflammable, explosive object.
▲ Do not use under inflammable gas or inflammable steam; do not use under pressure container
canning system.
▲ Lightning frequent areas, it must be installed reliable lightning arrester, to ensure operators
safety and prevent damage of instruments and relevant equipment due to lightning.
▲ Signal source and indicator are static sensitive equipments, when using must earnestly adopt
anti-static measure. It is prohibited in measuring device for welding operation or other strong electric
field operation; in thunderstorms season, we must implement the reliable lightning-protection measures
to prevent signal source and the indicator damage caused by lightning strike, ensure operators safety of
weighing equipment and related equipment safety operation.
4.
Never use strong solvents (e.g., benzene, nitro class oil) to clean the housing.
5. Liquid or electricity conducting particles should not be poured into the indicator, in case the indicator
damage and electric shock.
6. You should cut off power supply of indicator and relevant device before you pull-in and out the connecting
cable of indicator and external device.
1). You should cut off power supply before pull-in and out connecting cable of signal source.
2). You should cut off power supply of indicator and scoreboard before pull-in and out connecting cable of
signal source.
3). You should cut off power supply of indicator and PC software before pull-in and put out connecting
cable of signal source.
7. Company advice for customers: start to use our indicator after testing. The company is only responsible for
-5-
the quality of the indicator. The biggest compensation is not more than twice of indicator value, the company
is not responsible failure of the whole system.
8. Output interfaces of indicator must be strictly in accordance to the user's manual, you should not alter any
connection. If there is failure when using the indicator, you should immediately unplug it, and send to
manufacturers for repairing. Ordinary non-professional manufacturers should not repair it to avoid bigger
damage.
9. Since invoice date, the indicator has a one-year free repairing period. If any non-artificially failure happens
under regular using conditions within this period, the user can send the indicator with its guarantee card (of the
correct number) back to our service station or supplier for repairing. The indicator should not be open without
authorization, otherwise free guarantee will be canceled.
10. Indicator power should be well connected with ground, line of platform and load cell must be bigger than
10mm ² to connect with ground, and the resistance should be smaller than 4Ω. power outlet protective earthing
terminal and system ground wire must be connected together.
-6-