1
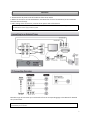
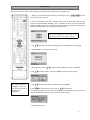
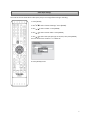
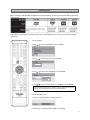
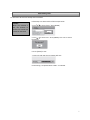
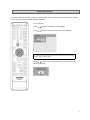
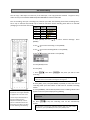
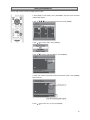
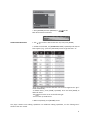
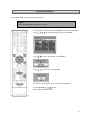
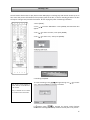
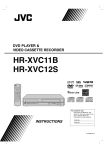
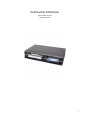
Hammacher Schlemmer VHS to DVD Converter Quick Start Guide 1 Contents Connection ........................................................................................................................................................... 3 Initial Setting ......................................................................................................................................................... 4 Video Input Settings ............................................................................................................................................. 5 Formatting a Disc .................................................................................................................................................. 6 Reformatting a Disc .............................................................................................................................................. 7 Setting a Disc to Protect ....................................................................................................................................... 8 VHS to DVD Dubbing ............................................................................................................................................. 9 Naming Recorded Material ........................................................................................................................... 10-‐11 Deleting Recorded Material ............................................................................................................................... 12 Basic Playback .................................................................................................................................................... 13 Finalizing a Disc .................................................................................................................................................. 14 Undo Finalization of a DVD ................................................................................................................................ 15 2 Connection 1. Disconnect the AC power cords of the devices from the AC outlet. 2. Make the connection as illustrated below or see Manual for full list of connections (see TV Connection Overview section for help). 3. After making all the connections, connect the AC power cords of the devices. Connect this unit directly to the TV. If the RCA audio/video cables are connected to a VCR, DVD playback pictures may be distorted due to the copy protection system. Review the type of connection your TV has and refer to the corresponding page in the Manual for detailed set-‐up instructions. A RCA audio cable (L/R) and a RCA video cable are included with this unit. All other cables for additional set-‐up’s can be purchased at your local store. 3 Initial Setting When you turn on this unit for the first time, you need to follow these steps to set up the unit. 1. After you have made all the necessary connections, press to turn on the unit. Turn on your TV. 2. Press the button on the TV’s remote control that accesses the external input channel. It may be labeled “SOURCE,” “AV,” or “SELECT” (refer to your TV’s manual for additional help). Or press “2” on the TV’s remote control, then press the channel down button repeatedly until you see the “Initial setting” menu. Setting the language will only need to be completed the first time the recorder is set up. 3. Use to select your desired language, then press [ENTER] to set language. 4. Press [ENTER] to activate “Clock setting.” 5. Press [SETUP] and use to select “General Setting,” then press [ENTER]. 6. Use to select “Clock,” then press [ENTER]. Clock menu will appear. Any time the recorder is unplugged or there is a loss of power, steps #5-‐9 will have to be completed. 7. Use to select calendar or time and then press [ENTER]. 8. Use to select an item to set, and use to select the month/day/year/hour/minute, then press [ENTER]. For setting the day, year, hour and minute, the Number buttons on your remote can also be used. 9. Press [SETUP] to exit. 4 Video Input Settings You must let the unit know which video input jack you are using before making a recording. 1. Press [SETUP]. 2. Use to select “General Settings.” Press [ENTER]. 3. Use to select “Video.” Press [ENTER]. 4. Use to select “Select Video.” Press [ENTER]. 5. Use to select the input jack type to connect, then press [ENTER]. You can choose from “Video In” or “S-‐Video In.” 6. Press [SETUP] to exit. 5 Formatting a Disc When inserting a new DVD-‐RW, the DVD may require formatting. All other types of DVD’s will be formatted automatically. If your DVD is automatically formatted, when you insert the DVD into the recorder, the screen will display “Initializing.” 1. Press [SETUP] 2. Use to select “DVD Menu.” Press [ENTER]. 3. Use 4. Use to select “Format.” Press [ENTER]. to select “Format Mode.” Press [ENTER]. 5. Use to select “Video Mode” or “VR Mode.” Press [ENTER]. The recording format setting is effective only for DVD-‐RW. You cannot change the recording format for a DVD-‐R and DVD+RW/+R. 6. Press [SETUP] to exit. 7. Insert a brand new disc. Formatting will start. 8. Formatting is completed when “100%” is indicated. 6 Reformatting a Disc To reformat a disc that has already been formatted. Follow Steps 1-‐3 above and then follow steps below. Caution: When you reformat a 4. Use to select “Start.” Press [ENTER]. disc, the contents of the disc are erased and cannot be recovered. 5. Use to select “Yes.” Press [ENTER]. Click “No” to cancel formatting. 6. Press [SETUP] to exit. 7. Insert a brand new disc. Formatting will start. 8. Formatting is completed when “100%” is indicated. 7 Setting a Disc to Protect To prevent accidental recording, editing or erasing of titles, you can protect a disc by setting the disc protect. This can only be done on DVD-‐RW, DVD+RW, or DVD+R. 1. Press [SETUP]. 2. Use to select “DVD Menu.” Press [ENTER]. 3. Use to select “Disc Protect Off→On.” Press [ENTER]. If a disc is already set to protected mode, the disc protection mode will appear “Disc Protect On→Off. 4. Use to select “Yes.” Press [ENTER]. This operation may take awhile to complete. 8 VHS to DVD Dubbing You can copy a VHS tape to a DVD only if the VHS tape is not copy-‐protected material. “Copy-‐once only” video can only be recorded to CPRM compatible DVD-‐RW formatted in VR mode. Prior to recording, note your recording time, listed on your DVD. The following chart shows recording times, but is only an estimate and should only be used for reference. Actual recording times will be on the DVD packaging or on the front of the DVD. Recording Mode XP Recording Time 60 Min SP 120 Min LP 240 Min EP 360 Min SLP 480 Min Video/Sound Quality 1. Press [SETUP] and use to select “General Settings.” Press [ENTER]. 2. Use to select “Recording.” Press [ENTER]. 3. Use to select “Dubbing Mode.” Press [ENTER]. 4. Use to select “VCR→DVD.” Press [ENTER]. -‐This unit will automatically stop duplication if no image is available on playback for more than 3 min. -‐Picture may be distorted due to the auto tracking function. Playback the VHS tape until the picture is stabilized and then set the starting point where you wish to start recording. Start dubbing. 5. Press [SETUP] to exit. 6. Press [VCR]. 7. Press . Then Press at the point you wish to start recording. Since it takes a few seconds before the actual dubbing begins, please allow an extra 5 seconds when selecting the starting point. 8. Press [DVD], then press [REC MODE] repeatedly to select the desired recording mode (see chart above or DVD case for available recording modes. 9. Press [DUBBING]. VCR to DVD duplication starts. Dubbing indicator will appear on the front panel display during dubbing. An error message will appear on screen if copy-‐protected material is detected. 10. Press to stop the recording. Title list will automatically appear. If you want to watch the duplicated material after the VCR to DVD duplication, press [TOP MENU] first then press [ENTER] twice. 9 Naming Recorded Material You can add a name to each recorded title on a DVD. 1. Press [DVD]. In stop mode, press [TOP MENU]. The title list of recorded material will appear. 2. Use to select a desired title, then press [ENTER]. 3. Use 4. Use to select “Edit.” Press [ENTER]. to select “Edit Title Name.” Press [ENTER]. 5. Enter title name. See Guide to Edit Title Names below. Press [ENTER] when finished. 6. Use to select “Yes,” then press [ENTER]. 10 Guide to Edit Title Names 7. Press [RETURN] and then [RETURN] or to exit. Data will be written to the disc. This operation may take awhile to complete. 1. Use to select a desired character set, then press [ENTER]. 2. Follow the list below, use [NUMBER BUTTONS] repeatedly until desired letter appears (e.g.: press the [3 BUTTON] 2 times to get the letter “E.” -‐Press the [1 button] and the character set will be changed to the “@!?” mode automatically -‐To delete letters, press [CLEAR] repeatedly. Press and hold [CLEAR] to delete all letters. to move the cursor to the left and right. -‐Use -‐You can enter up to 30 letters. 3. When completed, press [RETURN] to exit. This player contains more editing capabilities. For additional editing capabilities, see the “Editing Discs” section of the user manual. 11 Deleting Recorded Material You can delete titles which you do not need anymore. Caution: Once a title is deleted, it cannot be recovered. 1. Press [DVD]. In stop mode, press [TOP MENU]. The title list will appear. 2. Use to select a desired title, then press [ENTER]. 3. Use 4. Use to select “Title Delete.” Press [ENTER]. to select “Yes.” Press [ENTER]. “Are you sure?” will appear. Select “Yes” and press [ENTER]. 5. Press [RETURN] or to exit. Data will be removed from disc. 12 Basic Playback The recorded DVD can be played back on the unit. To play back the DVD on another DVD player, you must first finalize the DVD. See “Finalizing a CD” in the next section. 1. Press Turn on the TV and be sure to select the input to which the unit is connected. 2. Press [DVD]. 3. Press to open the disc tray and insert your disc with its label facing up. 4. Press to close the disc tray. 5. Press to start playback. The title menu may appear. to make a selection and If the title menu appears, use press [ENTER] to enable your selection. 6. Press to stop playback. 13 Finalizing a Disc You will need to finalize discs to play back on other DVD players. Finalizing may take several minutes up to an hour. Since the process of finalization fills up empty space of the disc, a shorter recording period on the disc will require a longer time period for finalization. Do not unplug the power cord during finalization. 1. Press [SETUP]. 2. Use to select “DVD Menu.” Press [ENTER]. The DVD menu will appear. 3. Use to select “Finalize,” then press [ENTER]. 4. Use to select “Yes,” then press [ENTER]. -‐You cannot cancel finalizing a DVD-‐R, DVD+R, or DVD+RW once it has started. -‐Only a DVD+RW can be edited or recorded on after finalization. This operation may take awhile to complete. 5. Finalizing completed. To cancel finalizing: Press during finalizing. Use “Yes,” then press [ENTER]. Finalizing is canceled. to select If appears when is pressed, you cannot cancel finalizing because the finalizing had already reached a critical point in its process. 14 Undo Finalization of a DVD You can only undo the finalization of a DVD+RW and a DVD-‐RW. All other types of DVD’s, once finalized, you cannot edit or record anything else on that disc. To undo finalization of DVD+RW... 1. Make an additional recording onto the disc. You must finalize again in order to watch DVD’s contents on another DVD player. To undo finalization of 1. Press [SETUP]. DVD-‐RW... 2. Use to select “DVD Menu.” Press [ENTER]. The DVD menu will appear. 3. Use to select “Undo Finalization,” then press [ENTER]. For additional help, please call Hammacher Schlemmer Customer Service at: (800) 321-‐1484 15