1
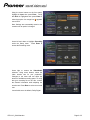
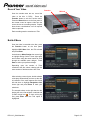
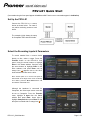
PRV-LX1 Quick Start
(Commands using the front panel appear in bold text while Function menu commands appear in bold-italics)
Set Up the PRV-LX1
Connect the PRV-LX1 to a source
device as shown below. For ease of
use, add a monitoring screen to each
device.
The example (right) shows the setup
for Composite Video with RCA Audio.
Select the Recording Inputs & Parameters
To record material from a source device
directly to disc, select a target. Press the
Function button on the PRV-LX1’s front
panel. Using the arrow buttons to highlight
Drive in the Status window. Continue using
the arrow buttons to highlight DVD1 in the
Drive submenu and press Enter until an
orange box ( ) appears next to the drive.
Insert a blank DVD disc into the drive.
Note: Another option is to use the front panel to
select DVD1 as the target. If the unit is not already
set to DVD1, press the Drive Select button until
the indicator under DVD1 is lit.
Although the hardware is connected for
Composite, the Video Input source must also
be set to Composite. From the Function
menu, highlight V Input from the Status
window then press Enter. Arrow right to
highlight Composite then press Enter so that
the option is marked with an orange box ( ).
PRV-LX1_QuickStart.doc
Page 1 of 5
Using the arrow buttons on the front panel,
highlight A Input then press Enter. Verify
that RCA is highlighted then press Enter to
select that option. An orange box ( ) appears
next to RCA.
Note: Settings are automatically saved to the
recorder until an option is changed.
Arrow left and down to highlight Recording
under the Setup menu. Press Enter to
access the Recording menu.
Arrow right to access the Video/Audio
submenu. Using arrow buttons, select the
video encode rate for your production.
Changes to the video rate can affect the
amount of available recording space. To verify
that your recording fits on the disc, monitor
the Remain information while adjusting the
encode rate. Press Enter to select an encode
rate.
Leave Audio set to the default, Dolby Digital.
PRV-LX1_QuickStart.doc
Page 2 of 5
Record Your Video
Function
RECord
Once the encode rates are set, record the
video to the disc in DVD1.
Press the
Function button to exit the Function menu.
Press the Record button on the front panel or
the remote control to capture video from the
source device as a recording session. Repeat
these button combinations until all required
video is captured.
Each recording session encodes as a Title.
Build A Menu
Once the video is recorded to the disc, press
the Function button on the front panel.
Highlight DVD Menu from the Edit window
and press Enter.
Arrow down to Menu Design then arrow right
to highlight Design Select. Arrow right again
and continue using the arrow buttons to scroll
through the available menu designs. Press
Enter to select your preferred design.
Depending upon the number of Titles
recorded to the disc, select a design with the
same number of buttons as there are Titles.
After selecting a menu layout, decide whether
a title plays automatically as soon as the disc
is inserted or if the menu appears first. Arrow
left and down to highlight Navigation Cmd.
Arrow right and press Enter to mark your
selections.
The example shown to the right has the disc
playing the menu first as Menu is marked with
a small orange box ( ). To have a title play
first, press Enter when the Title option is
highlighted.
PRV-LX1_QuickStart.doc
Page 3 of 5
Select the next action after a Title is played. If
a menu is available, you can program
playback to return to that menu. The other
options are to continue playing through the
following Title(s) or to stop playback then wait
for another command.
Arrow to the Preview button then press Enter
to view a menu with your current selections.
Each time the menu is changed, activate the
Preview button to view the new menu.
To return to the Function menu from DVD
Menu preview, hit the Function button on the
PRV-LX1 front panel or the Setup button on
the remote control.
Burn & Finalize the Disc
Arrow left and down to the Back button then
press the Enter button. Arrow down to DVD
Disc under the Edit menu then press Enter.
Confirm that DVD1 is listed on the right side of
the Finalize window. Arrow to the Finalize
button then press Enter.
The system prompts you to confirm the
finalization command to protect against an
accidental finalization.
PRV-LX1_QuickStart.doc
Page 4 of 5
Finalization times vary depending upon the
amount of material being burned to the disc.
The drive tray automatically opens when the
finalization process is complete.
PRV-LX1_QuickStart.doc
Page 5 of 5