1
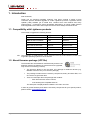
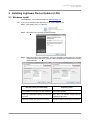
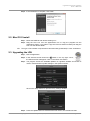
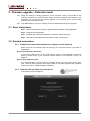
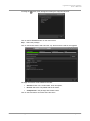
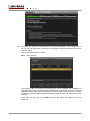
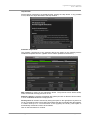
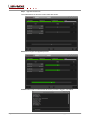
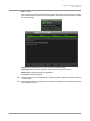
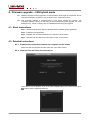
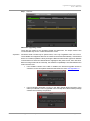
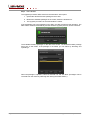
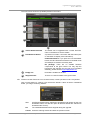
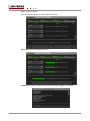
Lightware Device Updater (LDU) User’s Manual Lightware Device Updater User’s Manual Table of contents 1. INTRODUCTION ...................................................................................................................... 4 1.1. 1.2. 2. INSTALLING LIGHTWARE DEVICE UPDATER (LDU) ......................................................... 5 2.1. 2.2. 2.3. 3. COMPATIBILITY WITH LIGHTWARE PRODUCTS........................................................................ 4 ABOUT FIRMWARE PACKAGE (LFP FILE) ............................................................................... 4 W INDOWS INSTALL .............................................................................................................. 5 MAC OS X INSTALL ............................................................................................................. 7 UPGRADING THE LDU ......................................................................................................... 7 FIRMWARE UPGRADE – EXTENDER MODE ....................................................................... 8 3.1. SHORT INSTRUCTIONS ......................................................................................................... 8 3.2. DETAILED INSTRUCTIONS..................................................................................................... 8 3.2.1. Establish the connection between the computer and the device(s) ......................... 8 3.2.2. Start the LDU and follow the instructions.................................................................. 8 4. FIRMWARE UPGRADE – 25G HYBRID MODE ................................................................... 14 4.1. SHORT INSTRUCTIONS ....................................................................................................... 14 4.2. DETAILED INSTRUCTIONS................................................................................................... 14 4.2.1. Establish the connection between the computer and the matrix ............................ 14 4.2.2. Start the LDU and follow the instructions................................................................ 14 5. VERSION APPLICABILITY ................................................................................................... 20 6. DOCUMENT REVISION HISTORY ....................................................................................... 20 Section 1. Introduction Page 3 / 20 1. Introduction Dear Customer, Thank You for choosing Lightware products. This User’s manual is meant to help customers perform firmware upgrade of certain Lightware products. Lightware Device Updater (LDU) software got a unified look, contains some new features and many improvements – compared to former bootloader applications. An online update function was integrated into the LDU which helps the users to have always the latest version. 1.1. Compatibility with Lightware products LDU is able to upgrade the following devices: Device name Upgrade interface Operating system DP-OPT-TX/RX150 USB Windows HDMI-3D-OPT-RX150RA USB Windows UMX-OPT-TX150R USB Windows UMX-TPS-TX100 series Ethernet Windows, Mac HDMI-TPS-TX200 series Ethernet Windows, Mac MODEX family Ethernet Windows, Mac 25G Hybrid matrices Ethernet Windows, Mac Info: The upgrading via USB interface can be performed securely under Windows, which is the supported operating system for those devices. 1.2. About firmware package (LFP file) The firmware files are handled on a different way and the new approach means new features. If a device has to be upgraded, only one file is necessary (LFP file): The structure allows to use the same LFP package for different devices (e.g. MODEX units have only one common package). The package contains all the necessary components, binary and other files; You do not have to get further files. There is a descriptor file in the package that contains: - Each firmware with version number, - A list showing the compatible devices. The descriptor is displayed after loaded the LFP file in the LDU. In order to get the firmware pack with the necessary components for your specific product, please contact [email protected]. Page 4 / 20 Section 1. Introduction Lightware Device Updater User’s Manual 2. Installing Lightware Device Updater (LDU) 2.1. Windows install The application can be downloaded from www.lightware.eu. Info: LDU can be installed under Windows XP or newer Windows OS. Step 1. Run install_LDU_v1.1.0b0.exe. Step 2. Click Next in the opening Welcome window. Step 3. Select the type of the installation: normal or snapshot install. Select the optional components then click Next. (Using the Normal install as the default value is highly recommended.) Normal install (recommended) Snapshot install The installer can update only this instance. Cannot be updated. One only updateable instance can exist for all users. More than one different version can be installed for all users. Does not contain the version in its name. Version number is displayed in the name. Section 2. Installing Lightware Device Updater (LDU) Page 5 / 20 Step 4. Select the destination folder and click Next. (Using the default path is highly recommended.) Step 5. Select the Start menu folder and click Next. Using the default folder is highly recommended. Step 6. Verify the settings and click Install, or click Back and change the settings. Step 7. After the installation of the last component the Next button is activated – click on it. Page 6 / 20 Section 2. Installing Lightware Device Updater (LDU) Lightware Device Updater User’s Manual Step 8. If the installation is complete, click Finish. 2.2. Mac OS X install Step 1. Mount the DMG file with double clicking on it. Step 2. Drag the LDU icon over the Applications icon to copy the program into the Applications folder. If you want to copy the LDU into another location just drag the icon over the desired folder. Info: This type of the installer is equal with the Normal install (updateable) in case of Windows. 2.3. Upgrading the LDU Step 1. Run the application. Step 2. In the welcome screen click on the ? button in the top right corner; the About window will appear. Click on the Check now button. Step 3. The program checks the available updates on Lightware website and shows its version. Set the desired update settings in the Options section. Click on the Setup button to open the Proxy settings window: Step 4. Press the Update button to download the new version; the installer will start. Section 2. Installing Lightware Device Updater (LDU) Page 7 / 20 3. Firmware upgrade – Extender mode Info: While the firmware is being upgraded, normal operation mode is suspended as the extender is switched to bootload mode. Signal processing between the extenders is not performed. Do not interrupt the firmware upgrade. If any problem occurs, switch off the extender and restart the process. Info: User EDID memory, events or settings are not modified/erased during the upgrade. 3.1. Short instructions Step 1. Get the firmware pack and the Lightware Device Updater (LDU) application. Step 2. Install the LDU application. Step 3. Establish the connection between the computer and the device(s). Step 4. Start the LDU and follow the instructions shown on the screen. 3.2. Detailed instructions 3.2.1. Establish the connection between the computer and the device(s) Make sure that the computer and the device(s) are connected and the connection is established. Devices with Ethernet connection If you have a DHCP server on your local network, then it is recommended to switch the device to DHCP mode. If you connect the device directly to the computer, set a fix IP address. Devices with USB connection It is recommended to connect only one Lightware device to the PC directly at the same time. Close all other programs which may conflict on the USB (especially the Lightware Device Controller or Lightware Matrix Controller). 3.2.2. Start the LDU and follow the instructions The welcome screen will appear: Page 8 / 20 Section 3. Firmware upgrade – Extender mode Lightware Device Updater User’s Manual Pressing the button a list will appear showing the supported devices: Click on the EXTENDER button on the main screen. Step 1. Select the package. Click on the Browse button and select the “.lfp” file that will be used for the upgrade. Package information will be loaded to the tabs: General version info, creation date, short description, Devices which are compatible with the firmware, Components in the package with release notes. Click on the Next button and follow the instructions. Section 3. Firmware upgrade – Extender mode Page 9 / 20 Info: Files with “.lfp” extension are associated to LDU during installation. If you double click on the “.lfp” file, the application is launched, the package is loaded automatically and above screen is shown. Click on the Next button to continue. Step 2. Select devices. The following step is to select the device(s) which will be updated. The available and supported devices are searched and listed automatically. If the desired device is not listed, update the list by clicking the Refresh button (devices with Ethernet connection: type the IP address in the line). Select the desired devices: highlight them with yellow cursor, then click OK. A tick mark can be seen in the Added column if the device was added by the user previously. Page 10 / 20 Section 3. Firmware upgrade – Extender mode Lightware Device Updater User’s Manual Help window Device-specific instructions are displayed after clicking the Help button. If any problem occurs, follow the steps described in the Help window. Firmware components The firmware components of the selected devices are listed on the following screen: installed and update versions. (Update version will be uploaded to the device.) Add a device by clicking on the Add device button. The previous screen will be shown; select the desired device(s) and click on OK. Remove a device by selecting it (highlight with yellow) and click on Remove device button; or click on Remove all button to empty the list. Factory reset can be also executed by ticking the option on the right (device by device or for all). The settings has the same effect as resetting the device manually after the upgrade. In certain cases (if it is a must because of the upgrade) the Factory reset option is automatically marked and cannot be unmarked. Click on the Next button to continue. Section 3. Firmware upgrade – Extender mode Page 11 / 20 Step 3. Upgrade the devices. The selected devices and the current status are shown. Start button begins the upgrade process. Details button opens a new window where the process is logged – see below. Page 12 / 20 Section 3. Firmware upgrade – Extender mode Lightware Device Updater User’s Manual Step 4. Finish. If the upgrade of a device is finished, the log can be opened by the View button on the right. When all the tasks are finished, a window appears. Click OK to close and Next to display the summary page. Repeat button starts the process again with the selected device(s). Open logs button opens the temporary folder where the logs can be found. Export logs by saving the files as a zipped file. Press Exit to close the program. Info: However the device is rebooted after the firmware upgrade, switching it off and on again is recommended. Info: If the upgrade failed, the progress bar of the device is changed to red; restart the device(s) and repeat the process. Section 3. Firmware upgrade – Extender mode Page 13 / 20 4. Firmware upgrade – 25G hybrid mode Info: While the firmware is being upgraded, normal operation mode might be suspended. Do not interrupt the firmware upgrade. If any problem occurs, restart the process. Info: 25G Controller software is recommended to close before starting the upgrade. The Controller software running on SBC may be disconnected during the upgrade, too. User EDID memory, events or settings are not modified/erased during the upgrade. 4.1. Short instructions Step 1. Get the firmware pack and the Lightware Device Updater (LDU) application. Step 2. Install the LDU application. Step 3. Establish the connection between the computer and the matrix. Step 4. Start the LDU and follow the instructions shown on the screen. 4.2. Detailed instructions 4.2.1. Establish the connection between the computer and the matrix Make sure that the computer and the matrix are in the same subnet. 4.2.2. Start the LDU and follow the instructions The welcome screen appears, click on the 25G HYBRID button on the main screen. (The button to list the supported devices.) Page 14 / 20 Section 4. Firmware upgrade – 25G hybrid mode Lightware Device Updater User’s Manual Step 1. Connect About the upgrading modes There are two modes for the upgrade: Simple and Advanced. The simple mode is the recommended way since it covers almost all the cases. Important: Advanced mode is made only for special cases, use it only if Lightware asks You to do so. The available and supported devices are searched and listed automatically. If the desired device is not listed, update the list by clicking the Refresh button and/or type its IP address in the bottom line. Select the desired device: highlight it with yellow cursor, then click Next. Before moving forward to the next step, the software-compatibility is checked between the matrix and the LDU: If the software version of the LDU is outdated, the firmware upgrade cannot be continued. In this case please download the latest LDU from www.lightware.eu. If the bootloader application running on the SBC (Single Board Computer of the matrix) is outdated, it can be upgraded in the next step since the firmware package contains the necessary components. Section 4. Firmware upgrade – 25G hybrid mode Page 15 / 20 Step 2. Select Boards The upgrade procedure differs a bit from the extenders’ at this point: 1. Upload the desired firmware package to the matrix. 2. Browse the available packages in the matrix; select the desired one. 3. The upgrade procedure is executed inside the matrix. If the bootloader has to be upgraded on the SBC, the LDU will perform this operation. The SBC will be restarted automatically and the firmware upgrade process can be continued. The available firmware packages on the device are shown. The desired firmware package has to be on the matrix. If the package is not listed, you can add it by browsing and uploading it. When the package is uploaded, select the desired one and click Next. (Packages can be removed from the matrix by selecting and clicking the Delete button.) Page 16 / 20 Section 4. Firmware upgrade – 25G hybrid mode Lightware Device Updater User’s Manual The next screen shows the (available) boards in the matrix: 2 1 3 4 1 Yellow-bordered board The board can be upgraded with a newer firmware. Click on the button to see the details. 2 Red-bordered button A problem occurred in connection with the board (click on the button to display more information): Unidentified board: If you press the Use bootloader button, the LDU will switch the device to bootload mode and attempts to read the necessary data. No package: There are no suitable firmware components to the given board. You may skip the board from the upgrade, but if it has to be upgraded definitely, please contact [email protected]. 3 Empty slot No board is installed in the slot. 4 Skipped board There is no newer firmware to the given board. Info: Please note that if the board is in bootload mode, normal operation mode is suspended. Click on Next button to continue; LDU checks the boards. If there is still an unidentified board, you will get a warning window: Yes: All affected boards will be switched to bootload mode (similar as the Use bootloader button, but with this option all affected boards are switched to bootload mode at once). No: The unidentified boards will be skipped during the upgrade. Cancel: Close the warning window and back the previous screen. Section 4. Firmware upgrade – 25G hybrid mode Page 17 / 20 Step 3. Upgrade Boards The selected boards and the current status are shown. Start button begins the upgrade process. Details button opens a new window where the process is logged – see below. Page 18 / 20 Section 4. Firmware upgrade – 25G hybrid mode Lightware Device Updater User’s Manual Step 4. Finish If the upgrade of a board is finished, the log can be opened by the View button on the right. When all the tasks are finished, a window appears. Click OK to close and Next to display the summary page. Repeat button starts the process again with the selected board(s). Open logs button opens the temporary folder where the logs can be found. Export logs by saving the files as a zipped file. Press Exit to close the program. Section 4. Firmware upgrade – 25G hybrid mode Page 19 / 20 5. Version applicability This User’s Manual applies to the following versions of the mentioned software: version Lightware Device Updater software 1.1.0b0 6. Document revision history Document Release Date Changes Editor Rev. 1.0 16-06-2015 Initial version Laszlo Zsedenyi Page 20 / 20 Section 5. Version applicability