1
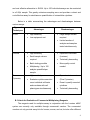
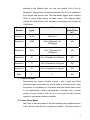
ASHI Lab Manual Volume 2.2: Serologic Assays, Solid Phase Antibody Detection Assays (include ELISA & Microbead Luminex Platform) & Flow Cytometry Assays Section 3: Microbead Luminex Platform Module Name: Quantification of Cytokines using xMAP Technology Authors: Jonathan Barone, American Red Cross – Penn Jersey: [email protected] Susan H. Hsu, American Red Cross – Penn Jersey: [email protected] Date Prepared: 04/2010 Date Updated: 09/30/2011 Date Updated: 11/20/2012 Section 2: Comparison of Technical Alternatives A. Advantages and Disadvantages Between Assays Recently, many HLA laboratories have implemented various solid-phase immunoassay systems for either HLA typing or antibody workups. These immunoassays are all applicable for measuring human cytokines in both biological fluids and tissue culture specimen. These assays include Enzyme Linked Immunosorbent Assay (ELISA), Mosaic ELISA, Enzyme-linked immunosorbent spot (ELISPOT), quantitative PCR and flow cytometry (1-6). Each of these techniques suffers one or more significant limitations. ELISA is sensitive and specific; however, it only measures one cytokine at a time. It requires large sample volume and is also time consuming when more cytokines need to be assayed. Although, Mosaic ELISA combines aspects of both the ELISA and multi-analyte profiling assays, it is still limited to detect up to 8 cytokines per sample. In addition, it requires the use of a digital imaging system. ELISPOT is an assay which will quantify the secreted cytokines at the single cell level. While quantitative PCR offers high sensitivity and specificity as well as the capability of multiplexing, it does not, however, quantify proteins. Flow cytometry evaluates cytokine secretion on an individual cell basis and correlates with cell phenotypes simultaneously, but it does not quantify the amount of secreted cytokines. Other platforms that enable multiple analyte measurements are based on planar modules, as in slide arrays or plate spotting. However, these methodologies are limited by the number of analytes or samples that can be tested simultaneously. Consequently, a technique that is capable of quantifying multiple cytokines simultaneously in biological fluids, including serum, lavage, urine, tears, tissue culture supernatant or cell and tissue homogenates, will not only be useful in any laboratory setting but also further enhance our understanding of immune responses, disease pathogenesis and the outcomes of therapeutic targets. LUMINEX Corporation introduced a novel protein array system (xMAP for Multi Analyte Profiling and x for variable e.g. cytokines, ligands, or enzymes etc.), which allows for simultaneous quantification of up to 100 soluble analytes in one sample (2, 5). xMAP technology uses polystyrene microspheres internally dyed with differing ratios of two spectrally distinct fluorophores to create a family of 100 bead sets, each 2 with its own unique signature. Each of the 100 spectrally addressed bead sets can be covalently conjugated with a capture antibody specific for an analyte (i.e. target protein) of interest. In a multiplexed assay, antibody-conjugated beads are allowed to react with an unknown sample (plasma, serum or cell culture supernatant), along with standards of known analyte and controls in a 96 well microtiter plate. During this first incubation, the specific analyte binds to the primary captured antibodies on the beads. After removing the unbound sample or analyte, the secondary analyte specific biotinylated detection antibody is added which binds to a different epitope on the appropriate immobilized analyte. This is followed by addition of the fluorescently labeled reporter molecule, streptavidin-phycoerythrin (SA-PE) to form a capture fourmember sandwich. After removing the unbound SA-PE, the resuspended beads are analyzed by the Luminex™ fluorometric array reader, which obtains two fluorescence readings for every single bead. The red classification laser identifies each bead in the suspension, in each well as a member of one of the 100 possible sets and thus the analyte being assayed. The green reporter laser measures the amount of fluorescent dye, phycoerythrin (PE) bound to each of these beads, thus quantifying the amount of analyte bound to each bead. Since the reporter fluorescence is measured only in conjunction with the classification florescence, unbound reporter molecules in solution are not measured. The amount of green fluorescence is directly proportional to the amount of analyte captured in the immunoassay. Luminex software correlates each bead set to the assay reagent that has been coupled to it. Extrapolating to a standard curve allows quantitation of each analyte in the sample. Using the xMAP assay, thousands of beads can be analyzed in seconds, allowing up to 100 analytes to be measured in each well of a 96-well microplate in less than three hours. In addition, since the fluorescence from each bead is measured independently, enough statistics are accumulated to allow for assaying each sample in one well and not in duplicate. The xMAP technology is basically an ELISA assay on a bead. As such, the multiplex bead assays have all of the strengths of ELISA technology: sensitivity, specificity and reproducibility along with the added advantages of multiplexing and a significantly increased dynamic range of four logs (1pg-10ng), whereas ELISA technology has at most a two log range. Further enhancements to this technology, will enable up to 500 analyte measurements using a magnetic bead format, all accomplished in a much shorter read time. These features make the Luminex xMAP technology a highly robust 3 and cost effective alternative to ELISA. Up to 100 individual assays can be conducted in a 5-25μl sample. This greatly minimizes sampling error and provides a robust and cost effective assay for simultaneous quantification of extracellular cytokines. Below is a table summarizing the advantages and disadvantages between various assays. Types of Advantages Techniques ELISA High sensitivity Low equipment cost Disadvantages Large sample volume required Limited number of analytes and samples tested simultaneously Luminex High Sensitivity Small sample volume Expensive instrument (Luminex) required Technically demanding Batch testing possible More quality control Multiplexing - Up to 100 needed analytes quantified per sample Flow High sensitivity Cytometry Evaluates cytokine secretion on an individual cell basis (Flow Cytometer) Doesn’t quantify secreted cytokines and correlates with cell phenotypes simultaneously Expensive instrument Technically demanding B. Criteria for Evaluation of Commercial Multiplexing Reagents The reagents used for multiplex assay in conjunction with the Luminex xMAP system are currently only available through commercial vendors. The commercial vendors not only provide assay kits for human, mouse, and rat, but also offer different 4 panels of cytokine/chemokine and growth factors etc. to meet investigator’s needs. The different analytes may be prepackaged either as a single plex or mixed in combinations for multiplex kits. Investigators may also order customized kits prepared and packaged by the vendors or purchase only analytes of interest individually to customize one’s own kit. Each vendor provides protocol booklets for the assay kits manufactured. There are however, protocol variations accompanying each vendor’s assay kits. Most commercially available cytokine measuring immunoassay kits are comparable, robust and have intra-and inter-assay coefficients of variation (CV) under 20% (1, 7, 8). Nevertheless, it is up to the users to evaluate kits from multiple manufacturers critically, thoroughly and make comparisons of sensitivity and specificity obtained (9) before selecting the kits from vendor of choice. The major considerations that should be assessed when evaluating and selecting the commercial multiplexing kits are analytical sensitivity/specificity, precision, simplicity, and cost. The vendors should provide data on the performance characteristics of the test kits with respect to the above listed criteria. The analytical specificity/sensitivity must be comparable to ELISA technology with a correlation coefficient (r2) above 0.98 from the vendor’s own internal comparison and validation studies. There must be no cross reactivity with any other analyte included in a panel. The inter-assay variability (precision between assays) and the intra-assay variability (within an assay) should be within 10% S.E. to ensure accurate and reproducible results. The assay kits must be validated for serum, plasma, and tissue culture supernatant as sample matrix for both in vitro and in vivo models. The standard for each analyte should be calibrated against National Institute for Biological Standards and Control (NIBSC) standard whenever it is available. Most importantly, the standard for each analyte must be standardized with fixed ranges from lot to lot. The standards provided should not vary more than 20% between lots in order to minimize large variations when studies are going to be conducted over a period of time. 5 Section 3: Specimen Requirements Collect serum specimen in red top tube and plasma sample in an ethylenediaminetetraacetic acid (EDTA) tube. Centrifuge serum or plasma sample within 30 minutes of collection at 1000xg for 10 minutes. To avoid more than two freeze thaw cycles, aliquot appropriate volume of serum or plasma into each prelabeled polypropylene microfuge tube and store at -20۫C or below. After tissue culture supernatant is collected, spin it down immediately at 1000xg to remove debris and aliquot appropriate volume into pre-labeled polypropylene tubes and store at -20۫C or below. Do not use grossly hemolyzed or lipemic samples. 6 Section 4: Procedures The multiplex kits from one manufacturer are used here as an example to outline the general procedure steps for the Material and Methods section. Discussions relating to data analysis/interpretation, quality assurance/quality control, troubleshooting, procedure notes and limitations are also applicable to all commercial multiplex reagent kits using xMAP technology (10, 11). A. Reagents and Supplies Provided by the Multiplex Kit 1. Antibody-Immobilized Beads (50X concentrated): Antibody conjugatedbeads are supplied either premixed or in individual vials for customization. 2. Human Cytokine / Chemokine Standard, lyophilized 3. Human Cytokine / Chemokine Quality Controls (I and II) 4. Serum Matrix, lyophilized 5. Bead Diluent 6. Mixing Bottle 7. Human Cytokine / Chemokine Detection Antibodies diluted in assay buffer, ready for use 8. Streptavidin-Phycoerythrin diluted in assay buffer, ready for use 9. Assay Buffer 10. 10X Wash Buffer 11. Microtiter Filter Plate 12. Plate Sealers B. Reagents and Supplies Required but not Provided 1. Luminex Instrument 100™ 2. Luminex Sheath Fluid 3. Adjustable Pipettes with tips to deliver 25ul to 1000ul 4. Multichannel Pipettes to deliver 5ul to 200ul 5. Reagent Reservoirs 6. Polypropylene Microfuge Tubes 7. Aluminum Foil 8. Absorbent Pads or Paper Towels 9. Vortex 10. Sonicator 11. Microplate Shaker 7 12. Vacuum Filtration Unit (Using a vacuum regulator, the vacuum pressure should be adjusted such that 200uL of buffer is removed in 3 to 5 seconds, approximately 100 mmHg) 13. Vacuum Regulator 14. Software for data analysis with the Luminex 100™ (STarStation v.2.0, Applied Cytometry Systems or similar application software) C. Reagent Preparation for Immunoassay 1. Prepare the 1x wash solution from 10x wash buffer The working wash solution may be prepared ahead by mixing 1 part of the 10x wash buffer and 9 parts of deionized water and stored at 2-8۫C for up to one month. 2. Prepare Antibody-Immobilized Beads Sonicate the bottle containing premixed beads for 30 seconds then vortex for 1 minute before use. For customized kit, sonicate individual antibody-bead bottle for 30 seconds and then vortex for one minute. Pipette 90ul from each antibody-bead bottle into the mixing bottle and then bring the final volume to 3.0ml with bead diluent. Prior to use, vortex the mixed beads for 30-60 seconds. Unused beads maybe stored at 2-8۫C for up to one month. 3. Prepare and Reconstitute Cytokine Standards a. Prepare the standards within one hour of performing the assay. b. Pre-label 6 polypropylene tubes at 2000, 400, 80, 16, 3.2 and 0pg/ml. Pipette 200ul of assay buffer into each tube. c. Reconstitute the lyophilized human cytokine standard with 250ul deionized water to give a 10,000pg/ml stock standard. d. Invert the stock standard vial several times then vortex for 10 seconds and allow the proteins to re-hydrate for 10 minutes. e. Prepare serial dilutions by transferring 50ul of the 10,000pg/ml stock standard to the 2000pg/ml tube, mix well and transfer 50ul of the 2000 standard to the 400pg/ml tube, mix well and transfer 50ul of the 400 8 standard to the 80pg/ml tube, mix well and transfer 50ul of the 80 standard to 16pg/ml tube, mix well and transfer 50ul of the 16 standard to the 3.2pg/ml tube and mix well. The tube labeled 0pg/ml which contains 200ul of assay buffer serves as blank control. The diagram below outlines the serial dilution of the standard curve ranging from 3.2pg/ml to 10,000pg/ml. Standard Number Concentration pg/ml Add Into Assay Buffer (ul ) Standard 1 10,000 250ul dH20 0 Standard 2 2,000 50ul of Standard 1 at 10,000pg/ml 200 Standard 3 400 50ul of Standard 2 at 2,000pg/ml 200 Standard 4 80 50ul of Standard 3 at 400pg/nl 200 Standard 5 16 50ul of Standard 4 at 80pg/ml 200 Standard 6 32 50ul of Standard 5 at 16pg/ml 200 Blank 0 0 200 5. Prepare Controls Reconstitute the Human Cytokine Control I and II each with 250ul deionized water. Invert each vial several times to mix then vortex. Allow the proteins to re-hydrate for 5-10 minutes and then transfer each control to an appropriately labeled polypropylene microfuge tube. Unused portions may be stored at -20۫C for up to one month. Include in-house controls in each assay whenever possible. 6. Prepare Serum Matrix Add 1.0ml of deionized water to the vial containing the lyophilized serum matrix. Mix well and allow for complete re-hydration. The serum matrix is 9 used for assaying serum or plasma specimens. Store unused serum matrix at -20۫C or below for up to one month. D. Assay Steps (Flow Chart in Appendix) 1. Prepare worksheet in advance for the placement of standards, controls I and II, and unknown samples in a vertical configuration on the well map. Always run the standards in duplicate and the unknowns singly or in duplicate as desired (attachment 1). 2. Allow reagents to warm to room temperature (20-25۫C) before use in the assay. 3. Pre-wet the filter plate by pipetting 200ul of assay buffer into each designated well. Seal and agitate on a plate shaker for 10 minutes at room temperature (20-25۫C). 4. Remove assay buffer with the vacuum manifold. Blot the residual liquid from the bottom of the plate on an absorbent pad or paper towels. 5. Add 25ul of assay buffer to the unknown sample wells. 6. Add 25ul of each blank, standard and controls into the appropriate wells. 7. Add 25ul of appropriate matrix to the blank, standard, and control wells. When assaying serum or plasma, use serum matrix provided in the kit. When assaying tissue culture or other supernatant, use appropriate culture medium as the matrix. 8. Add 25ul of each unknown sample into the appropriate wells (for steps 3-9, see attachment 1) 9. Vortex bead bottle for 30-60 seconds. Add 25ul of the mixed beads into each well while intermittently shaking the bead mix to avoid settling. 10. Gently,seal plate and cover with aluminum foil without pressing down, in order to avoid liquid leaking through bottom of filter plate which will cause inaccurate reaction volume. Incubate with agitation on a plate shaker for one hour at room temperature (20-25۫C). Tray may be incubated overnight (16 to 18 hours) to improve assay sensitivity. Note: If assay is incubated overnight, same series of assays must be incubated overnight. 11. Gently remove fluid with vacuum manifold. 10 12. Wash plate 2 times with 200ul /well of wash buffer. Remove wash buffer by vacuum filtration between each wash. Blot the residual liquid from the bottom of the plate on an absorbent pad or paper towels. 13. Add 25ul of detection antibody into each well. (Note: allow the detection antibody to warm to room temperature prior to addition.) 14. Seal, cover with aluminum foil, and incubate with agitation on a plate shaker for 30 minutes at room temperature (20-25۫C). Note: If first incubation was overnight, incubate this step for 1 hour at room temperature. 15. Add 25ul streptavidin-phycoerythrin to each well. 16. Seal, cover with aluminum foil, and incubate with agitation on a plate shaker for 30 minutes at room temperature (20-25۫C). 17. Pre-warm the Luminex 100™ instrument during the above incubation step. 18. Gently remove all fluid with the vacuum manifold. 19. Wash plate 2 times with 200ul/well of wash buffer. Remove wash buffer by vacuum filtration between each wash. Blot the residual liquid from the bottom of the plate on an absorbent pad or paper towels. 20. Add 150ul of sheath fluid to all wells. Seal, cover with aluminum foil and resuspend the beads on a plate shaker for 5 minutes. 21. Uncover the plate; insert the plate into the XY platform of the Luminex 100 ™ instrument and analyze the samples. 22. Prior to data acquisition, the multiplex assay must be set up in STarStation. The number of analytes and standard points being tested must be entered. The analyte information must be entered correctly. This includes bead sets, units of interest (pg/ml), MFI calculation (MFI minus blank), curve fit, data axes, and expected concentration values. In addition, the percent acceptance criteria may be determined. Refer to software manual for specific instructions. 23. The work list must be created prior to reading. The work list stores all sample information, including the well location of each standard, control, and sample, sample IDs, and necessary dilution factors. 24. Set the instrument as follows: a. 50 events/bead (some vendors may use 100 events/bead) b. Sample Size: 100uL c. Refer to product insert or data sheet specific to the kit for bead regions 11 d. Double Discriminator gate settings: 8,000 to 15,000 (This may vary among instruments with different software e.g. STarStation, Bioplex, LiquiChip) Procedure Notes A. There are assay protocol variations among reagents vendors concerning the multiplex bead reagents, sample requirements, preparation of standards, matrix and incubation time etc. In order to obtain consistent and reproducible test results, one must read the protocol booklet from vendor of choice thoroughly to understand every technical aspect of the immunoassay procedures. B. Protect the antibody-immobilized beads from photobleaching by covering the bottle and the assay plate containing beads with aluminum foil during all incubation steps. C. Place the filter plate on the non-flat side of the plate cover to avoid direct contact of the bottom of the filter plate with an absorbent material during assay steps. D. Pipette reagents with care to prevent tearing of the filter plate. E. Maintain a consistent order of adding reagents from well-to-well to ensure equal incubation time for all wells. F. Do not invert the filter plates during assay. The filter plate should always be used in conjunction with a vacuum manifold to remove fluid or wash buffer. Keep the vacuum suction as low as possible (empty 200ul in about 3 seconds) on the plate. Use a vacuum regulator to monitor the pressure. G. After each washing step, ensure complete removal of excess liquid from bottom of plate by blotting the bottom of the plate on clean paper towels. Excess liquid will cause inaccurate reaction volumes due to capillary action through the pores in the bottom of the filter plate wells. Excessive wetness may indicate tearing of the filter bottom plate. H. Standards prepared by serial dilution should be used within one hour. Discard ۫ up to any unused standards and store the standard stock (10ng/ml) at -80C several months. I. It is recommended to assay standards, controls, and unknown samples in duplicate until one becomes highly proficient with the assay system. 12 J. Keep the microplate shaker at a speed between 500-600 rpm to provide strong agitation without causing liquid splashing from the wells. K. The plate should be read immediately after the assay is completed. The plate may be read within 24 hours if sealed, covered with aluminum foil, and stored at 2-8۫C. Before reading, return the plate to the shaker for 10 minutes at room temperature. L. Delay in plate reading may result in decreased sensitivity for certain cytokines/chemokines. M. Depending on unknown specimen to be assayed, (serum, plasma, or tissue culture supernatant) use the appropriate matrix for blank, standard curve, and controls. For example, for tissue culture supernatants, the culture medium supplemented with 5% FCS used for culture should be used as matrix diluent. N. If controls are not provided by the reagent vendor, in house controls must be included for each batch of assay. O. Select proper equipment settings, ensure needle probe is clean and adjust probe height to the filter plate prior to reading the assay. Protocol Flow Chart for Human Cytokine Panel Add 200 µL Assay Buffer per well Shake 10 min, RT Vacuum Add 25 µL Standard or control to appropriate wells Add 25 µL Assay buffer to background and sample wells Add 25 µL Sample to sample wells Add 25 µL Matrix to background, standards and control wells Add 25 µL Beads to each well Incubate 1 hr or overnight at 4°C with agitation. Vacuum and wash 2X with 200 µL wash buffer. Add 25 µL Detection antibody per well 13 Incubate 1 hour Do not vacuum Add 25 µL Streptavidin-phycoerythrin per well Incubate for 30 minutes at RT Vacuum and wash 2X with 200 µL Wash Buffer Add 150 µL Sheath fluid per well Agitate for 10 minutes at RT Read on Luminex (100 µL, 50 beads per bead set) 14 Procedure Limitations 1. One should not extrapolate the standard curve beyond the highest standard point. The dose response is non-linear beyond this point. 2. The influence of various drugs may not be thoroughly validated with the test kit. 3. Excessively hemolyzed, hyperlipidemic, and jaundiced sera are inappropriate specimen. 4. Biological fluids other than serum, plasma, tissue cultured supernatant, and buffer may not have been validated by the test kits. 15 Section 5: Interpretation/Reporting/Troubleshooting A. Data Analysis / Interpretation 1. The median fluorescence intensity (MFI) values are evaluated using curve fitting software. Some of the software programs combine instrument controls, data acquisition, and analysis on the same program. 2. Generally, the best curve fit is a five parameter logistic and the data axes set as Y linear and X linear or Y linear and X logarithmic. 3. The blank or zero standards should be subtracted from the MFI values giving each sample well a final net MFI. 4. The concentration of each standard point should match the expected values. The coefficient of variation (CV) should not exceed 20%. Samples run in duplicate should not exceed 20% CV. Prior to becoming proficient with the assay system, all samples should be run in duplicate or triplicate to exclude any outliers. Check all controls to confirm that the expected values were obtained. R-squared values for each curve should be close to 1. 5. Samples below the lowest point of the standard curve cannot be measured using this assay. The lowest standard point is the lowest concentration that can be measured accurately and precisely. If samples are below detectable levels, one may want to re-test those samples using a higher sample volume. Samples above the highest point on the curve must be diluted and re-tested. 6. Check that each sample is acceptable. Users can reject unacceptable or outlier samples. The percent acceptance criteria are different for standards and unknown samples. For standards, it is the percent deviation allowed between observed and expected concentrations (i.e. <20% CV). For unknowns, it is the %CV for replicates. Both standards and unknown samples may need to be repeated if CV exceeds 20%. 16 7. When all data is evaluated; a final report can be printed and should include the plate layout, the standard curve for each analyte being tested, summary of results and acceptance criteria. B. Trouble Shooting 1. When removing fluid or wash buffer with the vacuum manifold, the liquid cannot be aspirated. This is due to clogging of the filter plate. Use the closed end of a latex rubber bulb to gently push the bottom of the plate under the clogged well. To prevent plate clogging, centrifuge specimen at 10,000xg for 10 minutes to remove debris or fine particles prior to assay. 2. Excessive wetness at the bottom of the filter plate is most likely due to piercing the filter membrane with the pipette during dispensing reagents for the assay. In order to prevent this from happening, always pipette to the side of well. Applying excessive vacuum pressure may also cause tearing of the filter bottom plate. Adjust vacuum pressure such that 200uL of buffer can be removed in 3 to 5 seconds. To check if the plate is pierced, place the plate containing reagents or wash buffer on a stack of dry paper towels. 3. If the bead count is low, this could be due to photobleaching of the embedded dyes. Always store beads in the dark, protected from light. Other possibilities include that the beads may form aggregates during storage or settle while dispensing for the assay. The test may need to be repeated. Sonicate the beads in a sonicating water bath for at least 30 seconds followed by vortex for 30-60 seconds to prevent the aggregates. When dispensing the beads for assay, one should intermittently shake the bead bottle to avoid settling of the beads. 4. Erratic bead count during sample analysis may be due to an insufficient volume of sheath fluid delivered into each well or the height 17 of the probe is incorrectly adjusted to allow the entry of air into the instrument. To prevent this problem, always aliquot 150 l of sheath fluid into each well or adjust the probe height appropriately. Keep the instrument needle probe clean to avoid crystal formation from the sheath fluid. A clogged probe may also contribute to this problem. 5. If the background is too high, this indicates that the wash steps were not properly performed after each incubation step. It is important to follow proper washing and removing of fluid with the vacuum manifold. 6. During data analysis, the beads appear as a diagonal line on the bead map instead of in the appropriate map region. This is due to beads forming aggregates. The assay needs to be repeated. To prevent such problem, one must always sonicate the beads for 30 seconds followed by vortexing for 30-60 seconds prior to performing the assay. 7. Discrepancies between observed and expected standard concentrations for the analytes could be due to inaccurate pipetting while performing the serial dilutions. If the percent CV exceeds 20% for more than 3 points of the standards, the test needs to be repeated. Inappropriate matrix diluent used may also contribute to the discrepancies. 8. The Luminex 100™ instrument fails the calibration test or other malfunctions. Contact an equipment service representative for diagnosis and repair if referring to the user’s manual does not help. 18 Section 6: Quality Control/Quality Assurance/Validation Quality Assurance and Quality Control of Reagents and Equipment 1. The recommended storage for kit components is 2-8۫C. Follow instructions on individual vials for temperature requirements for long-term storage. 2. After the standards and controls are reconstituted, transfer the re-hydrated proteins immediately into properly labeled polypropylene tubes and store at or below -20۫C. Do not freeze/thaw these reagents more than twice. 3. Store the antibody-immobilized beads, the detection antibody, and the streptavidin-phycoerythrin at 2-8oC ۫ and do not freeze. 4. Perform QC of each new kit received using at least two previously quantified in-house controls or controls included in the kit along with the standards in duplicate. The concentrations obtained with the new kit for each cytokine for these controls must be comparable to those obtained with previous lot (<20% CV). 5. The concentrations (pg/ml) obtained for each standard (excluding the lowest concentration point) for each analyte must be within 20% CV of the expected values provided from the manufacture’s insert. 6. If greater than 20% CVs are observed for 3 points (excluding the lowest concentration point) on the standard curve for a particular analyte, repeat the test for the analyte in question. Since this is a multiplexed system, one needs to repeat the test for both the standards and the unknowns. 7. If repeat test of standards is still not acceptable for a particular analyte, contact the vendor and request a new lot for further testing. 8. When each point (excluding the lowest concentration point) along the standard curve obtained for each analyte is comparable (CV within 20%) to the expected value provided by the manufacture’s insert, one can then proceed to analyze the unknown samples. 9. For preventive maintenance and QC of the Luminex 100™ instrument, refer to the user’s manual and section on Trouble Shooting in this Teaching Module). 10. Consult and follow ASHI Standards for additional QA/QC required. 19 Section 7: Clinical Considerations 20 Since cytokines and their receptors are intimately involved in nearly all facets of host immunity as well as the pathogenesis of a variety of disease conditions, tremendous progress in the clinical applications of cytokines has recently been made in the following major areas (12): 1. To use select panels of cytokines as biomakers of disease (13) and provide clues for the underlying mechanisms of disease. 2. To measure cytokine production in vivo or in vitro for monitoring immune status (14). 3. To use recombinant cytokines as therapeutic anti-viral, neoplastic and anti-cancer agents. The most well-known example is the IFNs which are licensed in more than 40 countries for their proven efficacies in many disease conditions (12, 15). 4. To use cytokine antagonists and cytokine receptor antagonists as therapeutic targets to treat a variety of acute and chronic conditions or to downregulate pathogenic responses to endogenous cytokine production (12,15). 5. To use cytokines as a new class of adjuvants in vaccine formulations to enhance protection or to stimulate immunity (12,15-17). The continued expanding applications of cytokines and their receptors in both health and disease states will undoubtedly increase the need for monitoring cytokine levels or gene expressions in research and clinical laboratories. There are three basic types of methodologies currently in use to measure cytokines: molecular assays; immunoassays and bioassays (1). Section 8: Challenges/Future Direction 21 Due to the intensive research conducted in the cytokine field coupled with the continued expanding applications of cytokines and their receptors in health and diseases, many new cytokines and receptors are expected to be identified in the future. Commercial reagent kits may not always be readily available to assay these new cytokines on the xMAP platform. If one’s project dictates the need to quantify newly identified cytokines, one may have to use the “developmental” ELISA kits available through some commercial vendors. In order to use such developmental kits appropriately, investigators must have prior expertise in the ELISA method. The developmental kit typically contains the capture and detection antibodies, standards, streptavidin-HRP and the basic solutions used in an ELISA test. The investigator will have to coat the plate first with diluted capture antibody overnight at room temperature for subsequent down stream assay steps. Prior to using the protocol, and depending on the sample types (plasma, serum and tissue culture supernatant, etc.), the protocol must be validated first on untested samples by performing spike/recovery and linearity experiments to determine whether sample results obtained from the un-validated sample types are accurate. It is important to use properly selected diluent (matrix) to reconstitute and dilute the standards to reflect the sample type being measured. For example, diluent used to quantify tissue culture supernatant samples is not the appropriate diluent to quantify plasma or serum samples. In the spike/recovery assay, a known quantity of ELISA standard is spiked into a sample. The recovery of the spiked material verifies whether a sample component interferes with the ELISA test. The spiked and un-spiked samples need to be serially diluted to test for linearity to determine if sample component interferes with the accurate determination of a specific analyte at a given dilution. For both the spike/recovery and linearity experiments, the recovery should be in the range of 80-120%. When the range of recovery is consistently achieved in the repeated validation tests, one can then use the development kit proficiently to quantify a particular cytokine of interest for a specific sample type. 22 Another immediate challenge facing the lab interested in implementing a cytokine assay is that proficiency testing (PT) is currently not available from any PT agency. For the time being, labs that are actively engaged in assaying cytokines using xMAP technology may want to organize inter-lab cytokine panel comparison on a mutually agreed time interval. Labs can also follow ASHI Standard C.1.1.5. when a graded external PT program is not available. The future direction of the clinical applications of cytokines and cytokine receptors is expected to continue to advance in the major areas of academic and clinical medicine, biotech/pharma, and cancer research discussed in Section 6. 23 References 1. Maecker, Holden T. Measuring Human Cytokines. Ch17 from Handbook of Human Immunology, 2nd Edition. CRC Press, 2008. 2. Prabhakar, U., Eirikis, E., Miller, B.E. et al. Multiplexed cytokine sandwich immunoassays: clinical applications. Methods Mol. Med. 114:223-232, 2005. 3. Kalyuzhny, A. E. Chemistry and biology of the ELISPOT assay. Method Mol. Biol. 302:15-31, 2005. 4. Tassignon, J., Burny, W., Dahmani, S. et al. Monitoring of cellular responses after vaccination against tetanus toxoid: comparison of the measurement of IFN-gamma production by ELISA, ELISPT, flow cytometry and real-time PCR. J. Immunol. Methods 305:188-198, 2005. 5. Hill, H.R., and Martins, T.B. The flow cytometric analysis of cytokines using multi-analyte fluorescence microarray technology. Methods 38:312-316, 2006. 6. Elshal, M.F., and McCoy, J.P. Multiplex bead array assays: performance evaluation and comparison of sensitivity to ELISA. Methods 38:312-316, 2006. 7. Khan, S.S., Smith, M.S., Reda, D. et al. Multiplex bead array assays for detection of soluble cytokines: comparisons of sensitivity and quantitative values among kits from multiple manufacturers. Cytometry B Clin. Cytom. 61:35-39, 2004 8. De Jager, W. and Rijkers, G.T. Solid-Phase and bead-based cytokine immunoassays: a comparison, Methods 38:294-303, 2006. 9. ASHI Standards, 2013. 10. Human Cytokine 30-Plex Panel, Invitrogen User Manual, Rev. 0.2, June 2009. 11. Human Cytokine / Chemokine Kit, 96 Well Plate Assay, Millipore User Manual, Dec. 2009. 12. Detrick, B., Chandrasekharam, N. and Hooks, J. Cytokines: Regulators of Immune Responses and Key Therapeutic Targets. Ch16 from Handbook of Human Immunology, 2nd edition., 2008. 24 13. Lokshin, A. Multiplexed Serum Assay. Ch18 from Measuring Immunity. Elsevier Science, 2005. 14. Djoba Siawaya, J.F., Chegou, N.N., Van Den Heuvel, M.M. et al. Differential cytokine/chemokines and KL-6 profiles in patients with different forms of tuberculosis. Cytokine.47:132-136, 2009. 15. Vilcek, J., and Feldmann, M. Historical review: Cytokines as therapeutics and targets of therapeutics. Trends Pharmacol Sci 25:201-209, 2004. 16. Lori, F., Weiner, D.B., Calarota, S.A. et al. Cytokine-adjuvanted HIVDNA vaccination stragies. Springer Semin Immunopathol. 28:231-238, 2006. 17. Gonzales, G., Crombet, T., Neninger, E. et al. Therapeutic vaccination with epidermal growth factor (EGF) in advanced lung cancer: analysis of pooled data from three clinical trials. Hum Vaccin. 3:8-13, 2007. 25