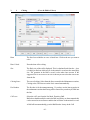
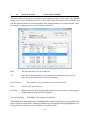
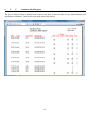
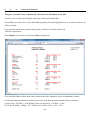
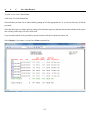
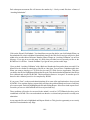
1
cattledata
Cattle Recording System
Reference Manual
Version 11
Documentation and Software by farmdata Limited
© 1997-2009 farmdata Limited
Copyright Information
© 1997-2009
Farmdata Limited
Westertown
Rothienorman
Aberdeenshire
AB51 8US
The information contained in this manual and the accompanying software program are copyrighted and all rights are reserved by
Farmdata Ltd.
Farmdata Ltd reserve the right to make periodic modifications of this product without the obligation to notify any person or entity
of such revision. Copying, duplicating, selling or otherwise distributing any part of this product without the prior written consent of
an authorised representative of Farmdata Ltd are prohibited.
Information contained in this document is subject to change without notice and does not represent a commitment on the part of
Farmdata Ltd. The software described in this manual is furnished under a license agreement. The software may be used or copied only
in accordance with the terms of this agreement.
Limitations of Liability
In no event will Farmdata Ltd or any other person involved in the creation, production or distribution of the Farmdata software be
liable to you on account of any claim for any damages, including any lost profits, lost savings, or other special, incidental,
consequential, or exemplary damages, including but not limited to any damages assessed against or paid by you to any third party,
arising out of the use, inability to use, quality or performance of such Farmdata software and user manual, even if Farmdata Ltd or
any such other person or entity has been advised of the possibility of such damages, or for any claim by any other party. In addition,
Farmdata Ltd or any other person involved in the creation, production, or distribution of Farmdata software shall not be liable for
any claim by you or any other party for damages arising out of the use, inability to use quality or performance of such Farmdata
software and user manual, based upon principles of contract warranty, negligence, strict liability for the negligence of Farmdata Ltd
or other tort, branch of any statutory duty, principles of indemnity or contribution, the failure of any remedy to achieve its essential
purpose, or otherwise.
This does not affect your statutory rights.
Preface
This document describes the operation of Cattledata, the Suckler Cow, Beef and Youngstock
Recording System produced by Farmdata Limited. The system runs on the Windows 2000, XP &
Vista operating system.
‘Windows 2000', ‘Windows XP', ‘Windows Vista’ and ‘Visual Basic .Net’ are registered trademarks
of Microsoft Corporation Inc.
Related Documents.
Cattledata Quickstart Guide
Windows Manual.
Windows Tutorial.
-3-
-4-
Table Of Contents
INTRODUCTION . . . . . . . . . . . . . . . . . . . . . . . . . . . . . . . . . . . . . . . . . . . . . . . . . . . . . . . . . .
I
1
What the System does . . . . . . . . . . . . . . . . . . . . . . . . . . . . . . . . . . . . . .
I
2
The information it needs . . . . . . . . . . . . . . . . . . . . . . . . . . . . . . . . . . . . .
I
3
The information it can provide . . . . . . . . . . . . . . . . . . . . . . . . . . . . . . . . .
I
4
Finding your way around . . . . . . . . . . . . . . . . . . . . . . . . . . . . . . . . . . . .
I
5
If you get Stuck . . . . . . . . . . . . . . . . . . . . . . . . . . . . . . . . . . . . . . . . . . .
I
6
Using this Manual . . . . . . . . . . . . . . . . . . . . . . . . . . . . . . . . . . . . . . . . . .
Chapter 1
1
Maintenance Routines . . . . . . . . . . . . . . . . . . . . . . . . . . . . . . . . . . . . . . . . . . .
1
Business Parameters . . . . . . . . . . . . . . . . . . . . . . . . . . . . . . . . . . . . . . .
1
1
A
Business . . . . . . . . . . . . . . . . . . . . . . . . . . . . . . . . . . . .
1
1
B
Premium Statistics . . . . . . . . . . . . . . . . . . . . . . . . . . . .
1
1
C
Miscellaneous Parameters . . . . . . . . . . . . . . . . . . . . . .
1
1
D
Other Parameters . . . . . . . . . . . . . . . . . . . . . . . . . . . . .
Code Lists . . . . . . . . . . . . . . . . . . . . . . . . . . . . . . . . . . . . . . . . . . . . . . . . . . . . . . . . . .
1
2
Breeds . . . . . . . . . . . . . . . . . . . . . . . . . . . . . . . . . . . . . . . . . . . . . . . . .
1
3
Calving Codes . . . . . . . . . . . . . . . . . . . . . . . . . . . . . . . . . . . . . . . . . . .
1
4
Colours . . . . . . . . . . . . . . . . . . . . . . . . . . . . . . . . . . . . . . . . . . . . . . . .
1
5
Cull Codes . . . . . . . . . . . . . . . . . . . . . . . . . . . . . . . . . . . . . . . . . . . . . .
1
6
Drugs . . . . . . . . . . . . . . . . . . . . . . . . . . . . . . . . . . . . . . . . . . . . . . . . . .
1
7
Health . . . . . . . . . . . . . . . . . . . . . . . . . . . . . . . . . . . . . . . . . . . . . . . . .
1
8
Locations . . . . . . . . . . . . . . . . . . . . . . . . . . . . . . . . . . . . . . . . . . . . . . .
1
9
Pharmacy . . . . . . . . . . . . . . . . . . . . . . . . . . . . . . . . . . . . . . . . . . . . . . .
6
6
6
6
6
7
8
11
12
12
13
14
16
17
17
18
19
20
21
22
23
24
Chapter 2
2
2
2
2
2
2
2
2
2
2
2
Animal Records . . . . . . . . . . . . . . . . . . . . . . . . . . . . . . . . . . . . . . . . . . . . . . . .
1
Animal Records
(Cows, Calves & Bulls) . . . . . . . . . . . . . . . . . .
2
Tags
(Cows, Calves & Bull) . . . . . . . . . . . . . . . . . . .
3
A
Premium
(Cows) . . . . . . . . . . . . . . . . . . . . . . . . . . . . . .
3
B
Premium
(Calves & Bulls) . . . . . . . . . . . . . . . . . . . . . . . .
4
Health
(Cows, Calves & Bulls) . . . . . . . . . . . . . . . . . . . . . . . .
5
Movements
(Cows, Calves & Bulls) . . . . . . . . . . . . . . . . . .
6
A
Services
(Cows & Heifers) . . . . . . . . . . . . . . . . . . . . . .
6
B
Services
(Bulls) . . . . . . . . . . . . . . . . . . . . . . . . . . . . . . .
7
Calvings
(Cows) . . . . . . . . . . . . . . . . . . . . . . . . . . . . . .
8
Weighing
(Cows, Calves & Bulls) . . . . . . . . . . . . . . . . . .
9
Sale
(Cows, Calves & Bulls) . . . . . . . . . . . . . . . . . .
26
27
30
31
32
33
34
35
36
37
38
39
CHAPTER 3
3
3
3
3
3
3
OCCURRENCES . . . . . . . . . . . . . . . . . . . . . . . . . . . . . . . . . . . . . . . . . . . . . .
1
Calving
(Cows & Heifer Calves) . . . . . . . . . . . . . . . . . .
2
Service
(Cows & Calves) . . . . . . . . . . . . . . . . . . . . . . .
3
P D Result
(Cows & Calves) . . . . . . . . . . . . . . . . . . . . . . .
4
Health Treatment
(Cows, Calves & Bulls) . . . . . . . . . . . . . . . . . .
5
Movements
(Cows, Calves & Bulls) . . . . . . . . . . . . . . . . . .
6
Purchase
(Cows) . . . . . . . . . . . . . . . . . . . . . . . . . . . . . .
-5-
40
41
43
45
46
48
49
3
3
3
3
3
3
3
3
3
3
3
3
3
Chapter 4
4
4
4
4
4
4
Chapter 5
5
5
5
5
5
5
5
5
Scanning Purchases . . . . . . . . . . . . . . . . . . . . . . . . . . . . . . . . . . . . . . . . . . . . .
7
Purchase
(Calves & Bulls) . . . . . . . . . . . . . . . . . . . . . . . .
8
Sale
(Cows, Calves & Bulls) . . . . . . . . . . . . . . . . . .
9
Cull/Casualty
(Cows, Calves & Bulls) . . . . . . . . . . . . . . . . . .
10
ReTagging
(Cows , Calves & Bulls) . . . . . . . . . . . . . . . . . .
11
Weaning
(Cows, Calves & Bulls) . . . . . . . . . . . . . . . . . .
12
Premium
(Calves & Bulls) . . . . . . . . . . . . . . . . . . . . . . . .
13
Sales Returns
(Cows, Calves & Bulls) . . . . . . . . . . . . . . . . . .
14
External Transfer
(Cows, Calves & Bulls) . . . . . . . . . . . .
15
Internal Transfer
(Cows) . . . . . . . . . . . . . . . . . . . . . . . . . . . . . .
16
Internal Transfer
(Calves) . . . . . . . . . . . . . . . . . . . . . . . .
17
Internal Transfer
(Bulls) . . . . . . . . . . . . . . . . . . . . . . . . . . . . . . .
18
Weighing
(Cows, Calves & Bulls) . . . . . . . . . . . . . . . . . .
19
Castration
(Calves) . . . . . . . . . . . . . . . . . . . . . . . . . . . . . .
50
51
52
54
55
56
57
59
60
61
62
63
64
65
Reports . . . . . . . . . . . . . . . . . . . . . . . . . . . . . . . . . . . . . . . . . . . . . . . . . . . . . .
1
Cow Reports . . . . . . . . . . . . . . . . . . . . . . . . . . . . . . . . . . . . . . . . . . . .
4
1
A
Herd / Ex Herd Cow Report . . . . . . . . . . . . . . . . . . . .
2
Calf Reports . . . . . . . . . . . . . . . . . . . . . . . . . . . . . . . . . . . . . . . . . . . .
3
Bull Reports . . . . . . . . . . . . . . . . . . . . . . . . . . . . . . . . . . . . . . . . . . . . .
4
Code Lists
..........................................
5
Statutory Reports . . . . . . . . . . . . . . . . . . . . . . . . . . . . . . . . . . . . . . . . .
4
5
A
Health Book . . . . . . . . . . . . . . . . . . . . . . . . . . . . . . . .
4
5
B
Pharmacy Book . . . . . . . . . . . . . . . . . . . . . . . . . . . . . .
4
5
C
Movement Book . . . . . . . . . . . . . . . . . . . . . . . . . . . . .
4
5
D
ReTagging Book . . . . . . . . . . . . . . . . . . . . . . . . . . . . .
4
5
E
Herd Registers. . . . . . . . . . . . . . . . . . . . . . . . . . . . . . .
4
5
F
Continuous Herd Registers . . . . . . . . . . . . . . . . . . . . . .
6
Management Reports . . . . . . . . . . . . . . . . . . . . . . . . . . . . . . . . . . . . . .
4
6
A
Census and Valuation . . . . . . . . . . . . . . . . . . . . . . . . . .
4
6
B
Stock Listing . . . . . . . . . . . . . . . . . . . . . . . . . . . . . . . .
4
6
C
Live Sales Returns . . . . . . . . . . . . . . . . . . . . . . . . . . . .
4
6
D
Dead Sales Returns . . . . . . . . . . . . . . . . . . . . . . . . . . .
4
6
E
Stock Audit . . . . . . . . . . . . . . . . . . . . . . . . . . . . . . . . .
4
6
G
Cattle on Holding . . . . . . . . . . . . . . . . . . . . . . . . . . . . .
66
67
68
69
70
71
72
73
74
75
76
77
78
79
80
81
82
83
84
85
BCMS . . . . . . . . . . . . . . . . . . . . . . . . . . . . . . . . . . . . . . . . . . . . . . . . . . . . . . 92
1
BCMS Parameters . . . . . . . . . . . . . . . . . . . . . . . . . . . . . . . . . . . . . . . . 93
2
1
BCMS Movements (Web Services) . . . . . . . . . . . . . . . . . . . . . 94
2
2
BCMS Movements (SIS Email) . . . . . . . . . . . . . . . . . . . . . . . . 96
2
3
BCMS Movements (CTSOnline) . . . . . . . . . . . . . . . . . . . . . . . 98
3
1
BCMS Registrations (Web Services) . . . . . . . . . . . . . . . . . . . . 99
3
2
BCMS Registrations (SIS Email) . . . . . . . . . . . . . . . . . . . . . . 102
3
3
BCMS Registrations (CTSOnline) . . . . . . . . . . . . . . . . . . . . . 104
4
1
BCMS Audit (Web Services) . . . . . . . . . . . . . . . . . . . . . . . . . 106
-6-
5
5
5
4
5
6
2
BCMS Audit (CTSOnline) . . . . . . . . . . . . . . . . . . . . . . . . . . . 108
Beef Calf Premium . . . . . . . . . . . . . . . . . . . . . . . . . . . . . . . . . . . . . . . 109
CTS Web Services Application . . . . . . . . . . . . . . . . . . . . . . . . . . . . . 110
Appendix A
Selective Reporting Headings . . . . . . . . . . . . . . . . . . . . . . . . . . . . . . . . . . . . . 112
Appendix B
Metal Tag Formats . . . . . . . . . . . . . . . . . . . . . . . . . . . . . . . . . . . . . . . . . . . . . 115
Appendix C
Backup & Restore Routines . . . . . . . . . . . . . . . . . . . . . . . . . . . . . . . . . . . . . . 116
INTRODUCTION
I
1
What the System does
Welcome to Cattledata by Farmdata. The program described in this manual is one of the Farmdata
family of computerised management information systems for agricultural businesses.
Cattledata uses the power of a computer to record and organise the complex information which
accumulates during the life of an animal and presents it in an easy to read format.
Once the information is entered it can be edited at any time. The full information is retained for all time
or until you decide to delete it.
I
2
The information it needs
From the recording point of view, the Cattledata system requires no more daily input than you would
enter onto manual stock recording sheets.
Initially there is a bit of work involved in setting up the system with animals, locations, drugs, health and
other information unique to your farm.
Day to day entry of stock purchases, sales and calvings, along with what you do to the stock will
produce all of the basic information you will require thereafter.
I
3
The information it can provide
Run at its simplest the system will provide a calving, purchase and sale record as well as stock on the
farm at any time. You can however run it at much more detailed levels.
The Movement Book (both internal and external) is maintained. The Health book and Pharmacy Book
are available. Any number of weighings can be recorded for each animal. Purchase and sale price are
recorded as well as weights and grades, this allows margins and daily liveweight gain to be calculated.
Electronic Tags can be used for data capture and movements sent direct to BCMS.
-7-
The reporting flexibility is particularly useful. There are a series of preset reports within the system but
any information held on an animal record can be produced in report formats you can create yourself.
Full Historical information is held in complete detail. There is no summarising in the History section. All
details are retained for reference.
I
4
Finding your way around
The program is written in ‘Microsoft Visual Basic.net’ to run in the ‘Microsoft Windows’ operating
system. This gives it all the flexibility and function now available with this type of programming. It is
designed to be used with the mouse and to have the minimum of keyboard input.
Clicking into one option on the screen will often take you to another screen with further options. You
may need to take time at first to find out where everything is. If you go into the wrong option, simply
exit out again and you will be back to the previous stage.
Within a screen you should use the Tab Key to move between data fields, not the return key. Shift +
Tab goes back through the fields.
If a field has a box with a down arrow at the end, it has a predefined list from which to pick. Once in
the field you can scroll down the list and select the required item. Alternatively type the first letter of the
item you wish, this will give you the first item with this initial letter. Press the same letter again to move
to the next item on the list with that initial letter.
If a field has a box with Add in it at the end this button can be used to add an option to the list.
I
5
If you get Stuck
Something somewhere is sure to catch you out. It is often just a matter of taking a step back to the
previous section and starting again.
Switching the machine off is never a good option but it is unlikely that you would cause real damage if
you did. You are likely to lose any unsaved entries which will have to be re-entered.
Should you get totally stuck you can call up Farmdata’s help line which is manned during office hours
for assistance.
It is absolutely necessary that you take regular backups of your work. (See Appendix C for more
information on backup routines). You should keep at least three sets of backup and use them in
rotation. Set A should be used on Day 1, Set B on Day 2, Set C on Day 3 and on day 4 you should
return to Set A. You should also format your Backup disks from time to time to ensure their continuing
good condition. Should all else fail Farmdata can resurrect your system from your backup if it is
correctly done.
-8-
I
6
Using this Manual
Each of the sections shown in the Screen below is explained in an individual chapter.
They are headed:
1.
2.
3.
4.
5.
Maintenance
Animal Records
Animal Occurrences
BCMS
Reports
Each of these sections can contain a number of further options, each of these is described in a numbered
section within the chapter. Each option available within a section is described in the order in which it
appears. Each option is listed then its operation described.
The three drop down menus contain the following options:
A
File
(i)
(ii
New Business
This option allows the creation of a New Business on the system. The information
required at this point consists of Business Name, Address, Telephone and Fax
Number, CPH Number and Password, if required. Other information on Premiums,
Livestock Units etc.can be entered at your convenience. Click on Save
Change Business
This option allows you to change from one business to another. A list of available
-9-
Businesses is displayed from which you choose the one that you require (using the
mouse or arrow keys) and then click OK or Enter to confirm your choice and return
to the main menu. Each business is a unique herd on its own with no connection to any
other business.
and you will then be returned back to the main menu of the new Business.
(iii)
Delete Business
If you have accidentally created a new business or wish to remove a business
completely use this option. You will be asked twice to confirm the deletion.
Once deleted a business cannot be reinstated except from a backup.
(iv)
Setup
Printer Setup
This gives access to the windows options for the printer setup such as changing
printers, paper size, etc.
Folder for Data Files
Sets the path to locate the data files. Used where the data is stored in locations other
than C:\farmdata\cattle32. This may be a networked drive for example.
Install Sample Files
Used when the installation is for evaluation. Installs a set of sample data which can be
used for demonstration and evaluation
B
(v)
Copy Data
Used to create a duplicate set of data as another business.
(vi)
Backup Option
This accesses the backup routines for saving your data. Please refer to Appendix C for
further details. On first use you may have to configure before backing up, Farmdata
can help if you are unsure.
(vii)
Restore Option
This accesses the restore facility if you need to take your data back from disk. Please
refer to Appendix C for further details.
(viii)
Exit
This takes you out of the program.
Utilities
-10-
(i)
Compact & Repair Database
This is a utility which allows you to repair the database should it ever become
corrupted. It will also reduce the size of the database should it become extremely large
(ii)
Import
These routines are used to initially populate the program with animals from various
different sources. They should all be done into an empty program following consultation
with Farmdata.
From BCMS
Imports the text file produced by the download from the BCMS web site or through
CTS Webservices. Again used for initial setup of a business only.
(iii)
C
Run
Gives access to external maintenance programs used by Farmdata.
Help
(i)
This offers the usual windows help facilities and the on line help facilities for Cattledata.
(ii)
Download Latest Update
(iii)
Register
Enter the Activation Key from your FARMdata Certificate of
Authenticity. Without this you will not be able to access the program
after 60 days have elapsed from date of installation. You will not have
an Activation Key if you have a demonstration copy of the program.
(iv)
Change
Change the Address of the licenced owner of the software.
(v)
About
This gives details of the Serial Number and Version Number of the
program.
Use this to check if program updates are available on
the Farmdata web site. Requires the Auto-Update
software to be loaded from the CD.
The images used in this manual have been generated on Windows Vista. Other versions may appear
slightly different on the screen but the operation and function will be exactly the same.
-11-
Chapter 1 Maintenance Routines
This section contains the basic information needed to set up and run the system. Some adjustment will
be required when the system is started or a new business created to tailor it to your requirements. The
Pharmacy section only appears if the ‘Perform Stock Control in Pharmacy’ option is activated in the
miscellaneous section of the Business Parameters.
All of the lists in this section can be edited to meet your requirements. It is not advisable to delete an
item once you have used it in an entry. This may leave blanks in the data in your historical records. If
you amend a code, all records with that code will change to the new.
Many of the lists can be added to as you are entering data by clicking on the Box with three dots to the
right of the drop down lists.
-12-
1
1
Business Parameters
This section has to be filled in when a new business is created. All the entries can be amended in this
section if required.
1
1
A
Business
A. Business Name and Address:
The trading name and address of the business to which all official communications should be addressed.
B. Telephone and Fax Numbers:
The telephone and fax numbers of the business.
C. Holding Number:
The official Ministry of Agriculture code under which the herd is registered, the herd extension to the
CPH Number can be added where there is more than one herd registered on a holding.
D. Password:
This is the password needed to get into the business when you try to access it. Each individual business
can have its own password, but it is not compulsory to have one.
-13-
1
1
B
Premium Statistics
A. Region
This changes the form layout for claims and reports for SEERAD or DEFRA. If Scottish is selected the
Beef Calf Scheme options are available.
B Check for Claims on Startup
If this is selected you will get a list of outstanding cllaims and warnings each tile you start the program.
This shows unregistered Calves, Animals approaching 30 months, Bulls approaching 16 months and in
Scotland, calves due for a Beef Calf Scheme claim.
C. Enable Beef Calf Premium.
Only available in Scotland. When selected all the required routines and reports are enabled.
Limit :
The upper limit on the number of animals that you wish to claim in the Premium
year. Set to 0 if you have no limit.
Claimed:
The number of animals that have actually been claimed since these numbers
were last zeroed.
These boxes have to be Zeroed at the beginning of each Premium Year.
Value:
The value of the premium per head.
-14-
D Print Bar Codes on Claim Forms
Where the claim for is produced by the system a bar code for each animal will be printed.
1
1
C
Miscellaneous Parameters
These figures in the first section are mainly used in the Census and Valuation report.
A. Weights
The average weight of a calf at its birth.
B. Values
The average value of a calf at its birth.
C. DLWG Males/Females/Bulls
The budgeted daily liveweight gain for each class of fattening/growing animal. ( In Kgs.)
D. Kill Out
The Default Kill Out percentage used to calculate estimated liveweight at slaughter.
E. Price / Kg LWG
The value of each Kilogram of livewight put on by growing and fattening animals. ( In £s)
F. Cow / Bull Price
The average value of the cows/bulls in the Herd.
G. Verify Official Tags on Entry
When selected, verifies that an Official Tag number is in the correct format for reporting to BCMS and
-15-
for claim forms. (See Appendix B for acceptable Metal Tag Formats.)
H. Show Official Tags on Reports
If selected then both Management and Official Tags are shown on reports. This can lengthen reports.
I. Sort Animals By Official Tag
When Selected the animals in lists will be sorted by Official Tag rather than management number.
L. Double Spaced Selective Reports
When selected the selective reports are double spaced making them easier to read but longer.
J. Perform Stock Control In Pharmacy
When selected purchases of drugs can be entered and usage is recorded against these purchases to give
a detailed audit of the pharmacy stock. The Pharmacy and drug section will appear in Maintenance with
the drugs being removed from the code list section.
K. Go Directly to Animal Records from Main Menu
When selected the list of animals will not be displayed when a type of animal within Animal Records is
selected. You will go directly to the record of the first animal instead.
L. Automatically Generate Next Official Tag in Calvings.
This section holds the last official tag number used in a calving. The next will be used at the next calving.
Up to three different runs of tags can be held. Each can then be associated with locations. When a cow
calves at a location it will use the next number associated with that location. See section 8 below.
-16-
1
1
D
Other Parameters
These are the various limits and Livestock Unit equivalents in force at any time. They can be edited as
necessary. Forage Area and Number of Sheep claimed can be entered later.
-17-
Code Lists
The Code Lists can be added to or edited in this section. To print Code Lists go the Reports section.
Omit this Code from Occurrences allows you to switch of redundant codes from appearing in dropdown list in occurrences. This shortens the working lists without removing the code with the consequent
loss of historical information.
2
Breeds
The list of breeds available for animals on the system. The system comes with the standard breed codes
as per the BCMS eligible breeds list.
To add a new breed, click New on the bottom button bar. Enter the code (up to four characters).
Enter the Description as required and click Save.
-18-
3
Calving Codes
These are the codes for ease of calving, you enter these to your own specification although a list is
present on creating a business.
To create a new Calving code, click New on the bottom button bar. Put in the code, up to four
characters and put in the Description, up to 20 characters. It is best to have Normal as the first code
on your list as it will come up as the default when you calve cows. Click Save to store on the system.
Delete will remove a code but will leave blanks in animals’ records.
-19-
4
Colours
These can be used in animal records to give some idea of colouring to aid identification.
To create a new Colour code, click New on the bottom button bar. Put in the code, up to four
characters and put in the Description, up to 20 characters. Click Save to store on the system. Delete
will remove a code but will leave blanks in animals’ records.
-20-
5
Cull Codes
These codes are used to record the reason for the sale or culling of animals. You build the list to your
own specification and can add new ones as you enter occurrences.
To create a new Cull/Sale Code, click New on the bottom button bar. Put in the code, up to four
characters and put in the Description, up to 20 characters. It is best to have Sale as the first code on
your list as it will come up as the default when you sell animals. Click Save to store on the system.
Delete will remove a code but will leave blanks in animals’ records.
-21-
6
Drugs
These are the drugs used in health treatments. You create your own list and add new ones as you enter
treatments.
To create a new drug code click New on the bottom button bar. Put in the code, up to four characters
and put in the Description, up to 20 characters.
Select the Units in which the drug is used (this list is created in G. below). Click Save to store on the
system.
Delete will remove a drug but will leave blanks in animals’ records, use the Omit option instead.
-22-
7
Health
These are the reasons to treat animals, either an illness or a routine treatment. You create your own list
as required and add new ones as you enter treatments.
To create a new health code, click New on the bottom button bar. Put in the code, up to four characters
and put in the Description, up to 20 characters. Click Save to store on the system. Delete will remove
a health code but will leave blanks in animals’ records.
-23-
8
Locations
Locations can be either Internal or External.
Internal locations are groups or locations where the animals are held on the farm. You may simply have
one internal location called the farm or business name. If you keep animals in distinct groups or locations
on the farm you can record movements between them. It also allows for the batch treatment of animals
in a particular group.
External locations are where animals are bought from or sold to or where animals are moved to and
from ( summer grazings, winterings etc.). Live animals at External Locations are excluded from
Livestock unit counts unless specifically included.
It is particularly important to get this detail correct if movements are to be e-mailed to the BCMS. The
CPH number is vital to this operation.
Create your locations by clicking New on the bottom button bar. Put in the code, up to four characters.
Put in Name and Address, and select external or internal location. The CPH Number of the holding
should be entered. Your own CPH for internal locations or the CPH number of the external location.
For Abattoirs this is the MHS (Meat Hygiene Service) Number.
The Herd Number is used where a business has more than one herd and there is a suffix (usually -01
or -02 ) to the CPH number
Click Save to store on the system. Delete will remove a location but will leave blanks in animals’
records.
-24-
Herd Number is used to identify which batch of Official Tags is to be used when calving cows.
9
Pharmacy
Only Available when Perform Stock Control in Pharmacy is activated in the Miscellaneous Section in
the Maintenance Section.
This section maintains the Drugs which may be used in Health Treatments. New drugs can also be
added within the Health Treatment occurrence.
To create a new drug code click the Add button. Put in the code, up to four characters and put in the
Description, up to 20 characters. Select the Units in which the drug is used. Click Save to store on the
system. Delete will remove a drug but will leave blanks in animals’ records, use the Omit option instead.
To enter a new purchase, enter the Date of Purchase, the quantity purchased, the Current Stock should
be the same as the Purchase, Cost can be entered, Batch Number, Batch Number, Withdrawal Periods
and any comment such as supplier. Click Save to store on the system.
New purchases can also be entered during the Health Treatment Occurrence.
-25-
10
Units
These are the units used in the drug section to describe the quantities.
To create a new Unit code click New on the bottom button bar. Put in the code, up to four characters
and put in the Description, up to 20 characters. Click Save to store on the system. Delete will remove
a code but will leave blanks in animals’ records.
-26-
Chapter 2 Animal Records
The Animal Record section holds all the detail on the individual Animals. It accesses both In Herd (live
animals) and Ex Herd (animals which have left the farm) records. If you want to find out about an
individual animal this is the place to come.
All records are editable here (except for the Official Tag Number) therefore any mistakes can be
corrected here.
Also Included are Inseminators. These are people who do A.I. These can also be included in a service
record and reported on.
-27-
2
1
Animal Records
(Cows, Calves & Bulls)
When a category of animal is selected a list is displayed in the right hand section. This list can be ordered
by the various column headings (either up or down) by clicking on the heading. For example if you wish
the animals listed by Status click on the gray Status title at the top. Click again on Status and the order
of sort will be reversed.
The list can be printed as it appears on the screen by clicking the print button on the top button bar.
The screen can be refreshed by clicking on the Lightning Icon on the top button bar.
An individual Animal Record can be opened by clicking on it.
-28-
Both In Herd and Ex Herd Animal Record displays are the same. The Sale Section is only available Ex
Herd record.
Ear Number
The Management ID of the animal. (Does not have to be unique.)
Date of Birth
The animal’s date of birth.
Sex (Cow, Calf)
Unavailable in a cow record, always Female.
Bull, Male Or Female in Calf Record
or Type (Bull)
Stock Bull: A bull, on the farm, used to serve cows and heifers.
Inseminator: An AI Bull.
Other Bull: A fattening bull.
Breed
The breed of this animal.
Colour
Official Tag
The colouring of this animal.
The Official Ministry ID of this animal. Can only be changed by Retagging in
the Animal Occurrence.
Electronic Tag The number held by this animal’s electronic tag.
Name
The Name of this animal. Pedigree or otherwise. (Optional)
Comment
Anything which you may wish to record. Free Text.
-29-
Status (Cow, Heifer)
The stage the animal is in the Lactation. The options in the first box are:
1.
2.
3.
4.
5.
6.
7.
8.
9.
Unserved
Served Awaiting PD
In Calf - Vet
For Culling
Not in Calf - Vet
PD Inconclusive
Dry - In Calf
Dry - Not In Calf
Culled
These are automatically updated as occurrences are entered.
The Bottom Button Bar
Save
If changes have been made to an animal’s record, this saves them to the
record. You should click Save before moving on to the next animal. If you have
not saved the changes and try to exit you will be asked if you wish to save
them.
New
This lets you add a new animal to the records.
Delete
This completely removes an animal’s record. You will be asked to confirm the
deletion.
Find
You can use this to find animals, either by their management ID or their official
ID. It searches alpha-numerically, it will find the closest match it can. Use next
and previous to move through the records.
Print
This gives a complete print of the animal’s record.
Next
Moves to the next animal on record.
Previous
Moves to the previous animal on record.
Exit
Leave the animal record section. If you have not saved the changes you will be
prompted to do so.
Help
Accesses the help menu.
-30-
2
2
Tags
(Cows, Calves & Bull)
This gives access to all the
tag records of the animal.
Genetic Sire/Dam
The management and official ID of the sire and dam of this animal. If the animal
was home-bred these may have been filled in automatically at birth. They can
be edited if required.
Surrogate Tag
The Management and official ID of the surrogate dam if this animal was
fostered.
Previous Tags This is a record of any previous Official ID tags this animal has had. It is normally
updated through the Retagging Occurrence option.
New tags can be entered by clicking New and filling in the detail.
Old tag records can be changed by clicking on the line to highlight it, click
Edit and make the required changes.
Highlighting a line and clicking Delete will remove that retagging record.
-31-
2
3
A
Premium
(Cows)
The record of the Premium Claims (SCP
and HLCA) of the animal
Only entries made up to the 2004 Year will be available.
This shows the passport application detail and a list of all the premium claims made in the life of the
animal and which types of premium have been claimed. Any comment recorded at the time of claim is
also shown.
To Edit a record, click on it to highlight it, the detail of that claim can then be changed and resaved.
Highlight a line and click Delete to remove that claim from the record.
Exit will take you out of the screen and save any changes.
-32-
2
3
B
Premium
(Calves & Bulls)
The record of the Premium Claims
of the animal.
This gives a list of the passport application and premium details made in the life of the animal.
If the Region is set to Scottish then Calf Premium becomes visalable.
Animals born after the 2nd December 2005 will not have 1st and 2nd premium details available.
Heifers have no 1st and 2nd premium details. Bulls do not have a second premium claim at the time of
writing.
Passport Type indicates whether the passport is Old Style (very old animals), New Style (Cheque
Book Type) or CTS Style (older animals)
Method Used indicates whether the Registration was made Manually or Electronically. Electronically
can only apply to new style passports and indicates that the registration has been made by e.mail.
Putting a tick in the Show SCPS check box will display the details of any claims for a heifer.
This page is normally updated by the Premium Routine in the Calf Occurrence section.
Date Castrated is updated from the Castration Occurrence.
The record can be edited in this screen.
-33-
2
4
Health
(Cows, Calves & Bulls)
This is the complete
record of all health
treatments.
This record is updated through the Health option in the Cow Occurrence section.
New allows treatments to be entered directly into the record. Click New and fill in the detail on the
screen.
To edit an existing record click on the line to highlight the section to be changed. Type the new detail,
or if you type the first character and press return, the list of options will drop down.
To delete an existing record click on the line to highlight it and then click Delete. The record will be
removed.
-34-
2
5
Movements
(Cows, Calves & Bulls)
This is a record of all the
movements of the animal,
both Internal (group
changes) and External.
Owning Herd. This allows for animals to be identified by herd within the same business. Autumn and
spring calvers may be an example.
Purchase Price.
If purchased the price is displayed.
Invoice Number.
The Purchase Invoice Number.
This record is updated through the Purchase, Movement, Sale and Cull Options in the Cow Occurrence
section. The status indicates whether the movement has been electronically registered with BCMS by
e.mail or not.
New allows movements to be entered directly into the record. Click New and fill in the detail on the
screen.
To edit an existing record click on the line to highlight it and make the required changes.
To delete an existing record click on the line to highlight it and then click Delete. The record will be
removed.
-35-
-36-
2
6
A
Services
(Cows & Heifers)
This holds the service record of
this animal.
This record is updated through the Service and PD result options in the Cow Occurrence section.
New allows services and PD results to be entered directly into the record. Click New and fill in the
detail on the screen.
To edit an existing record click on the line to highlight it and make the required changes.
To delete an existing record click on the line to highlight it and then click Delete. The record will be
removed.
-37-
2
6
B
Gestation.
Services
(Bulls)
This holds the service record of this
animal.
The Gestation period for this bull. Normally 283 days.
Current Stock/ Stock Price. Applies to AI bulls.
Services.
The number of cows this bull has served.
Positive / Negative
PD results recorded for services
Wastes
Number of service recorded to cows sold before outcome known.
Males.
The number of male calves produced so far by his services.
Females.
The number of females calves produced so far by his services.
Twins.
The number of twins produced by his services so far.
Stillborns.
The Number of stillborn calves produced by his services.
Omit this Bull from Services.
Use this to stop a bull appearing on the list of sires in occurrences.
-38-
2
7
Calvings
(Cows)
This holds the records of all the
calvings of this animal.
This record is updated through the Calvings options in the Cow Occurrence section.
New calvings should ideally be entered through the occurrence screen.
To edit an existing record click on the incorrect entry and change the detail. Where a list is available you
should select the required entry.
This however does not change the calf’s record, that must be done in the calf record section.
-39-
2
8
Weighing
(Cows, Calves & Bulls)
All recorded weighings are
held in this section.
This record is updated through the Weighing options in the Cow Occurrence section.
New allows weight recordings to be entered directly into the record. Click New and fill in the detail
on the screen.
To edit an existing record click on the line to highlight the error and correct it.
To delete an existing record click on the line to highlight it and then click Delete. The record will be
removed.
-40-
2
9
Sale
(Cows, Calves & Bulls)
Available in a dead
animal’s record only.
Type
Either Sold or Culled depending on which occurrence type was used.
Cull Code
The reason why the animal was sold / culled.
Dead Weight
The dead weight of the animal. Entered through the Sale Returns occurrence.
Sale Price
The sale price of the animal.
Invoice No.
The sales invoice number.
Grade
The Kill Grade if Sold Dead. Entered through the Sale Returns occurrence.
Replaced By
Is the Official ID number of the animal which replaced this one for SCPC
purposes. This will show on the Premium Schedule report.
Date Replaced The date the cow was replaced. Shows on the Premium Schedule.
Premium
The date and value of any Slaughter premium claim made on this animal.
Data is best entered through occurrence routines. The record section is generally used for information
only.
Mistakes in Occurrence entry have to be corrected through the individual animal record.
-41-
CHAPTER 3
OCCURRENCES
The occurrence sections (cow, bull and calf) are where all the day to day recording should be done.
These are the normal means of updating animal records and are designed in a way which allows for
group treatment. This means many animals can be updated from one entry.
This chapter is organised in such a way that, where an occurrence routine is common to more than one
section, it is indicated in the heading. Purchases are therefore dealt with once, although they appear in
the cow, bull and calf section.
-42-
3
1
Calving
(Cows & Heifer Calves)
Dam
The list of served heifers or cows is listed here. Click on the one you want to
calve.
Date Calved
Enter the date of the calving.
Sire
The likely sire of the calf is displayed. This is calculated back from the date
of calving to find out which service in the animal’s record was the most likely
sire. The gestation in the Bull’s record is also taken into account. If the
suggested sire is not correct or no sire is shown you can select the correct one
from the list.
Calving Score
The ease of calving. Select from the list as created in the Maintenance routines,
Calving codes. The first one on the list is entered automatically.
Ear Number
The first box is for the management tag. I f you have set the last tag option in
the maintenance section the next tag will be entered for you when you click into
the line.
Calf’s sex
Select the calf’s sex from the list, Male, Female or Bull.
Bull calves should usually be entered as Bull, and if they are then castrated this
can be entered as an occurrence and the date will show in the animal’s record.
A Bull will not automatically go to the Bull Section. It stays in the Calf
-43-
Section until it is transferred in the Calf Transfer option in the Bull
Occurrences.
Colour
The colouring of the animal.
Official Tag
The official tag give to the animal. Can be read by barcode from the passport
application form. Will be entered automatically if set in maintenance.
Stillborn
If a calf is stillborn use the check box to indicate this.
If there is no eartag number entered then no calf record is created; the cow’s
calving record is updated accordingly.
If an ear number is entered for the stillborn calf, the calf is created in the dead
calf records and the cow’s record updated accordingly.
Name
Enter name if required.
If twins or triplets were born enter a line for each calf.
Once you have filled in all the detail click the Save button.
If it is a heifer which has calved it will be removed from the calf section and entered as a cow.
The calf or calves born will automatically be created in the calf section. They will be given the same
location as the cow. Until they are weaned, moving the cow will also move the calf.
-44-
3
2
Service
(Cows & Calves)
This is where all services of both cows (cow section) and heifers (calf section) are entered.
There are two ways of serving cows and heifers.
The first will be the more common with beef herds. This is where a bull is put in with a particular group
of cows or heifers and taken out again at a later date. This means you cannot be sure when the cow was
served but you know it was between two dates.
The second is an actual service. This is where the service is seen as happening. This may be by A.I. or
when the bull is actually observed serving an animal. Both of these can be recorded on a specific date.
It is possible to use a combination of the two, an actual service followed by a bull going in for a period
and then being taken out again. One bull can be put in for a period, taken out and another put in for a
further period.
Where two bulls have been used on a cow or heifer, the most likely sire is chosen at the time of calving.
This is calculated by counting back from the calving date to find which was the bull used on the cow.
The number of days calculated back depends on the gestation period set in the bull records.
Date
Bull In
This is the date of the occurrence, when the Bull went in or came out or the
date of the actual service.
If you are recording a Bull going into a group select this.
-45-
Bull Out
If you are recording a Bull coming out of a group select this. Only cows in the
selected group that have previously had a Bull In recorded will be shown.
Service
If this an observed service or an A.I. use this option.
Bull
Select the bull used from your list of sires.
Inseminator
Where AI is being used the Inseminator can be entered.
By Group
If ticked then select the group of animals that the occurrence is to be recorded
against. All the animals in the group will be displayed in Bull In and Actual
Service options. Only those with a previous Bull In will be displayed in the Bull
Out option.
If Group not ticked,
Will display all the cows or heifers in the business. Again the Bull Out option
only displays those with a previous Bull In.
You can then select the animal or animals served from the list by clicking on them to highlight them.
Select all the animals on the list by clicking Select on the bottom button bar. Individuals can then be
deselected by clicking on them to take the highlight off.
Once you have selected the animals to be served on the date, click Save on the bottom button bar. The
service is then added to the animals’ record and they will be removed from the display.
To bring all the animals back to the display, click Restore on the bottom button bar.
-46-
3
3
P D Result
(Cows & Calves)
This is for the entry of P D results against Cows and heifers.
Date
The date of the P D test.
Result
Select the result you wish to record. Positive, Negative or Inconclusive.
Group
Individual
Select the group of animals which were tested.
Shows all the cows or heifers in the business.
You can then select the animal or animals with the selected result from the list by clicking on them to
highlight them. Select all the animals on the list by clicking Select on the bottom button bar. Individuals
can then be deselected by clicking on them to take the highlight off. Click Save to record the results in
the animals record. The animals will be removed from the list.
Change the Result and then select the animals with this result and save them as above. Continue until
all the results have been recorded.
To bring all the animals back to the display, click Restore on the bottom button bar.
-47-
3
4
Health Treatment
(Cows, Calves & Bulls)
Health treatments are recorded in this option. These may be drug treatments for disease, illness or injury
or routine treatments for inoculation, worming, castration, etc.
Date
The date of the treatment.
Reason
The reason for the treatment. Select from the list of health codes in maintenance utilities.
Drug
The Drug used in the treatment. If a drug has several valid batches then all will be
shown in the list. Can be None where no drug is used. New Drug Purchases can be
entered by clicking on the button at the end of the Batch number drop-down.
Rate
Use this where a rate given to each animal is to be recorded.
Quantity
Use this where a total quantity is to be recorded against a number of animals. This
quantity is then divided by the number of animals to work out the dosage per animal.
Comment
Any free text comment you wish to record.
Person
The individual who administered the treatment
By Group
If ticked then select the group of animals that the occurrence is to be recorded against.
All the animals in the group will be displayed
-48-
If Group not ticked,
Will display all the animals in the business.
You can then select from the list the animal or animals to be treated by clicking on them to highlight
them. Select all the animals on the list by clicking Select on the bottom button bar. Individuals can then
be deselected by clicking on them to take the highlight off.
Once you have selected the animals to be treated on the date, click Save on the bottom button bar. The
treatment is then added to the animals’ record and they will be removed from the display.
To bring all the animals back to the display, click Refresh on the bottom button bar.
To bring back only those animals selected, click Restore. This is useful where more than one treatment
or drug has been given to the same animals, possibly on subsequent days.
-49-
3
5
Movements
(Cows, Calves & Bulls)
This is used to move animals between Internal Locations where an animal is to remain live in the herd.
It is not used for sales or purchases, they create their own movements.
Date
The date of the movement.
To
Which internal or external location the animal or animals were moved to. If you use an
external location, this will be entered in the external movement book but the animals will
not be sold out of the business. This can be used for moving animals to summer
grazing, wintering, to shows etc.
By Group
If ticked then select the group of animals that the occurrence is to be recorded against.
All the animals in the group will be displayed
If Group not ticked,
Will display all the animals in the business.
You can then select from the list the animal or animals to be moved, by clicking on them to highlight
them. Select all the animals on the list by clicking Select on the bottom button bar. Individuals can then
be deselected by clicking on them to take the highlight off.
Once you have selected the animals to be moved on the date, click Save on the bottom button bar. The
movement is then added to the animals’ record and they will be removed from the display.
To bring all the animals back to the display, click Refresh on the bottom button bar.
-50-
3
6
Purchase
(Cows)
Cow purchase has the ability to enter a calf at foot at the same time. This will create the appropriate
records. They can either be manually filled in or a barcode scanner can be used to read the data from
the passports.
The entries should be made as follows Date
Is the date of purchase or movement onto the farm.
From
Is where the animals were bought or moved from.
To
Is the group the animals were added to on the farm.
Weight, Price, Invoice No. Enter as appropriate for the animals being entered.
Ear Number
The Management ID No. of the Animal.
Born
The cow’s date of birth.
Sex
The Sex of the animal. Not accessible in cows.
Breed
Select from the list as set up in Maintenance Utilities above.
Official Tag
The Official Ministry ID of the Animal.
-51-
Is a calf
Tick if this is a calf being bought with its dam
Calvings
Is the number of calvings this cow has had.
Genetic Dam
Can be entered if known
Name
The name of the animal if required.
Click Save on the button bar when you have finished. You will move to the Tags section, this may be
filled in if required.
Scanning Purchases
Details of the purchased animals can now be scanned in from the Barcode on the new style cheque
book passports.
Go to the purchase routine as normal.
Put the cursor in the Ear number box.
Scan the Bar-code on the bottom right of the cover of the passport. This will fill in much of the detail
on the screen.
The Ear Number is entered as the last 5 digits of the Official Number. You may change this if required.
Continue with entry of the other details as above.
-52-
3
7
Purchase
(Calves & Bulls)
This section is designed for rapid entry of calf purchases using a bar-code scanner but can also be used
for manual entry.
Date
is the date of purchase (and the date of movement)
From
is where the cattle were purchased from.
To
is the location within the herd the cattle were moved to.
Weight, Price and Invoice No.
Should be filled in for this batch of cattle. (Optional)
Now click into the Ear Number of the first row. Read the bar-code on the bottom right of the passport
and the details will be filled in on the first row.
The cursor will move to the second row and another passport can be read. Repeat untill all the cattle
in the batch are entered. Should you wish to change ear numbers or add Dam ID or comment these can
be amended by clicking into the field on the screen and re-entering. Once all is entered click save.
If you are not using a barcode scanner simply fill in each line manually.
-53-
3
8
Sale
(Cows, Calves & Bulls)
This routine should be used for all sales of animals including culling where money is received. It is the
same for all three classes of animals with the exception which cows have no grade.
Date
The date of the sale.
Reason
Why the animals were sold. Usually an ordinary sale but you can select other
reasons from the cull codes as set up in Maintenance Routines.
Sold To
Where or to whom the animals were sold. From the list of external locations.
Weight The weight of the animal being sold. Where a Grade is entered this is assumed to be the
dead weight.
Price
The price the animal was sold for.
Grade
(Not in cow sale routine) The slaughter grade of the animal.
Comment
Free text for any remarks.
By Group
If ticked then select the group of animals that the occurrence is to be recorded
against. All the animals in the group will be displayed
If Group not ticked,
Will display all the animals in the business.
-54-
Vet Column
Will display an x if the animal is in withdrawal for drugs.
OTM Column Will display an x if the animal is over thirty months but is eligible for the food chain
OCD Column Will display an x if the animal is too old to enter the food chain.
You can then select from the list the animal or animals to be sold, by clicking on them to highlight them.
It is likely that animals will have to be individually selected and saved with their own unique price, weight
and grade. Groups of store animals sold together can be selected and the average price and weight
entered.
If you have a barcode scanner click the find button and read the barcode from the passport, repeat until
all the animals have been selected.
The Print Button can be useful to get a list of animals pre-sale. Highlight the animals you want to sell,
and click the print button. This will give a list of the animals with their Numbers, Date of Birth, Sex,
Premium Status and Dam Number if available. Do not use the save option at this point, you will want
to wait till after the sale to record price, etc.
Once an animal has been sold its record is transferred to the Ex Herd Section of the records. If this is
done by mistake you can “resurrect” them. Go into the appropriate Dead Record of this animal, select
Sales, tick the “Undo Sale of this Animal” box. Click Save. The animal will return to the live records
and its record can be corrected from there, particularly remove the incorrect off movement and change
the status back from Culled..
-55-
3
9
Cull/Casualty
(Cows, Calves & Bulls)
This section is used to record deaths of animals. The cow section also has a Declared option. This
allows the intention to cull to be recorded.
This is essentially the same as Sales above with the exception of Type in the cow occurrence.
Cows Only - Type
Actual
This is an actual removal from the herd. The record will pass to the dead section.
Declared
This changes the status of a live cow to “To Be Culled”. This status can then be used
in selective reporting to find all the animals that are to be culled at the end of a season.
-56-
3
10
ReTagging
(Cows , Calves & Bulls)
This option allows you to change an animal’s Official ID Number. It cannot be edited in the animal
record.
Date
The date of the retagging.
New Tag
The new Official Tag Number being given to the animal.
Options
This lets you select Dead records for retagging.
Comment
The reason for the retagging. Free text for your own use.
You can then select the animal to be retagged from the list by clicking on it to highlight it.
Once you have selected the animal to be retagged on the date, click Save on the bottom button bar.
The animal’s record will be updated. The old tag number can be found in the Tags Option of the
animal’s record.
-57-
3
11
Weaning
(Cows, Calves & Bulls)
Weaning should preferably be entered through the cow section. It is for “disconnecting” the cow and
the calf. Before weaning, if you move the cow, the calf is moved as well to the same location. Weaning
stops this and changes the status of both the cow and the calf from Suckling to Weaned. A movement
for the calves to a different location may have to be entered at the same time.
Date
The date of the weaning.
Comment
Free text for any remarks.
By Group
If ticked then select the group of animals that the occurrence is to be recorded against.
All the animals in the group will be displayed
If Group not ticked,
Will display all the animals in the business.
You can then select from the list the animal or animals to be weaned, by clicking on them to highlight
them. Select all the animals on the list by clicking Select on the bottom button bar. Individuals can then
be deselected by clicking on them to take the highlight off.
Once you have selected the animals to be weaned on the date, click Save on the bottom button bar.
-58-
3
12
Premium
(Calves & Bulls)
This section allows, in Scotland, claims under the Beef Calf Scheme. Only available when selected in
the maintenance section.
Animals which have not previously been claimed will be displayed.
Animals which have already been registered by using the Beef Calf Scheme routine in the Mail section
will not be displayed.
Only animals which qualify under the rules of the scheme will be displayed. Qualifying animals may be
live or dead.
1. They were born within your business and remained within the business for the first 30 days of their
lives.
2. They lived for 30 days.
3. They are 3/4 beef animals. The criteria used are; the Sire is a recognised beef breed and the Dam
is a cross of a recognised beef breed. These breed codes are as set out by BCMS & SEERAD. Any
other breed code will not qualify.
By Group
If ticked then select the group of animals that the occurrence is to be recorded against.
All the animals in the group will be displayed
-59-
If Group not ticked,
Will display all the animals in the business.
The animals are listed in Official Tag No. order. Click Select on the Bottom Button Bar to highlight all
the animals. Individuals not to be claimed can then be clicked to remove them.
Alternatively animals can be individually clicked to highlight them.
When you are happy that the list is correct, click print and the list for claim will be printed. Click Save
and this will update the individual animal records with the claim.
If you have made errors these have to be corrected in the individual animal record.
-60-
3
13
Sales Returns
(Cows, Calves & Bulls)
This section allows for the entry of details of the sale of an animal which may be received some time
after the actual sale.
Date
Enter the date on which the animals were sold.
Grade
The slaughter grade of the animal.
Price
The total price received for the animal or the per kilo price.
Live Weight
The liveweight of the animal sold if known.
Dead Weight
The deadweight of the animal sold if known.
Kill Out %
Where you want to calculate the liveweight from the dead weight enter an assumed kill
out %
By Group
If ticked then select the location where the animals were sold. Only animals sold to the
selected location on the selected date will be displayed.
If Group not ticked,
Will display all the animals sold on the selected date.
Individual animals should be highlighted by clicking on them. Their details should be entered in the above
boxes and then click Save to record the detail in the animal record.
-61-
3
14
External Transfer
(Cows, Calves & Bulls)
This section allows for the transfer of animals between separate businesses on the system. The complete
animal record is moved without the need to re-enter all the detail. The transfer can be recorded as a
sale, this effectively shows as a sale and purchase in the separate businesses, or a simple transfer, where
the animal record simply moves from one business to the other.
Date
The date the transfer is to be recorded on.
To
Select the business the animal is to be transferred to, from the list in the top box.
Select the group in that business from the second box.
Record as Sale
If the transfer is to be recorded as a sale, click in this box.
Price
If this is a sale, enter the price.
By Group
If ticked then select the group of animals that the occurrence is to be recorded against.
All the animals in the group will be displayed
If Group not ticked,
Will display all the animals in the business.
Click Select on the Bottom Button Bar to highlight all the animals. Individuals not to be transferred can
then be clicked to remove them. Alternatively animals can be individually clicked to highlight them. The
price can then be entered for each, click Save to record the transfer.
-62-
-63-
3
15
Internal Transfer
(Cows)
This section allows for the transfer of Served Heifers from the Calf Section to the Cow Herd. These
will then be regarded as cows.
Date
The date the transfer is to be recorded on.
From
Which section of the records to move from.
To
Which location to move to.
Comment
This is free text in which you can enter any comment you wish.
By Group
If ticked then select the group of animals that the occurrence is to be recorded against.
All the animals in the group will be displayed
If Group not ticked,
Will display all the animals in the business.
Click Select on the Bottom Button Bar to highlight all the animals. Individuals not to be transferred can
then be clicked to remove them.
Alternatively animals can be individually clicked to highlight them.
When you are happy that the list is correct, click Save. This will update the individual animal records
and the heifers are then moved from the calf section to the cow herd.
-64-
3
16
Internal Transfer
(Calves)
This section allows for the transfer of Bulls to the calf section or uncalved cows back to the calf section.
This may be done when a bull in the bull section is castrated or a heifer has been moved to the cow
section by mistake.
Date
The date the transfer is to be recorded on.
From
The type of animal being transferred.
To
The group the animal is to be transferred to.
Comment
This is free text in which you can enter any comment you wish.
By Group
If ticked then select the group of animals that the occurrence is to be recorded against.
All the animals in the group will be displayed
If Group not ticked,
Will display all the animals in the business.
Click Select on the Bottom Button Bar to highlight all the animals. Individuals not to be transferred can
then be clicked to remove them.
Alternatively animals can be individually clicked to highlight them.
-65-
When you are happy that the list is correct, click Save. This will update the individual animal records.
-66-
3
17
Internal Transfer
(Bulls)
This section allows for the transfer of animals from the calf section to the bull section. It allows for only
the first premium claim at the higher rate to be claimed for uncut animals. This may be used where bull
calves are to be regarded as stock bull, either for use in the farm or sale later. Fattening bulls should also
be transferred.
Date
The date the transfer is to be recorded on.
To
The group the animal is to be transferred to.
From
The type of animal being transferred.
Type
The type of bull to be created, Stock Bull or Other Bull
Comment
This is free text in which you can enter any comment you wish.
By Group
If ticked then select the group of animals that the occurrence is to be recorded against.
All the animals in the group will be displayed
If Group not ticked,
Will display all the animals in the business.
Only animals in the calf section with the sex set as Bull (uncastrated) will be shown on lists.
Click Select on the Bottom Button Bar to highlight all the animals. Individuals not to be transferred can
then be clicked to remove them.
Alternatively animals can be individually clicked to highlight them.
When you are happy that the list is correct, click Save. This will update the individual animal records
-67-
and the calves are then moved from the calf section to the bull section.
3
18
Weighing
(Cows, Calves & Bulls)
This routine is used to enter weights of animals.
Date
The date of the weighing.
Method
Manually - type the entries into the screen by entering the animal number followed by
the weight.
Manually into a List - Shows a list of the animals in a group or all if individual is
selected. Type the weights into the weight column.
Comment
Free text to enter any comment you wish to record.
By Group
If ticked then select the group of animals that the occurrence is to be recorded against.
All the animals in the group will be displayed
If Group not ticked,
Will display all the animals in the business.
To enter a weight, type the animal management number, enter its weight in the weight box, continue until
all the weights have been recorded.
The import button allows you to import weigh files from electronic weighers
-68-
3
19
Castration
(Calves)
Used to identify the date of castration. Calves recorded as ‘bulls’ are shown and changed to ‘male’.
Only calves with the sex set as Bull will be displayed.
Date
The date of castration.
Comment
Free text to enter any comment you wish to record.
By Group
If ticked then select the group of animals that the occurrence is to be recorded against.
All the animals in the group will be displayed
If Group not ticked,
Will display all the animals in the business.
Any medication used will have to be entered separately in Health Occurrences.
-69-
Chapter 4 Reports
This chapter describes the various reports which can be produced by the system.
Common to all Screen reports are some Button Controls on the Screen Display.
At the top left is the Export button which exports the displayed report to file. This may then
be imported into other applications. Next is the Print button which sends the displayed report
to the printer.
Next is shown which page of the report is on the screen. At each side are start and end page
buttons, inside these are page forward and back buttons. The next button is a stop loading
button. This is useful if you want to stop a large report being formatted. The Refresh button
(rotating arrows) refreshes the report if the data has been changed.
The Binoculars icon next is for searching . For example, it can be used for searching for a
particular animal. Click on the Binoculars button, enter the required characters, click Find
Next, and the first item containing the characters chosen will be outlined, click again and the
next item containing those characters will be shown.
The next box shows the magnification factor, this is usually set at 100% but can be changed
to magnify or compress what is shown on the screen or printer, or it can be made to fit the page
width or the whole page.
The side scroll bar allows you to scroll up and down the report and the bottom scroll bar from
side to side.
Reports on the various headings shown in the Options Box can be printed or shown on the screen. The
screen displays are exactly the same as the printed reports. Printed reports can be created directly from
-70-
4
the screen display. If you have a colour printer the reports will print in the same colours as the screen
display.
1
Cow Reports
These are pre-formatted reports to give information from the Cow records.
Herd/ Ex Herd Cows A listing of live or dead cows with basic detail, status and location.
Detailed Herd / Ex Herd Cows
A listing of live or dead cows showing all their calving details.
Calving Schedule
A listing of when cows are due to calve and to which sires.
Service Schedule
A listing of which cows are due to be served showing their last calved date and the days
since calving.
P D Schedule
A listing of cows due for P D.
Selling Schedule
A listing of cows showing their status and when any retention period ends.
Premium Register
A listing of cows claimed for premium in a selected year. Shows sales, deaths and
replacements.
All these reports can be created for groups or a range of groups, and can be shown on the screen or printed.
-71-
4
1
A
Herd / Ex Herd Cow Report
This gives a summary report of all the cows either live or dead depending on which you choose.
If you wish to show all the cows as one list do not select any groups.
If you want a particular group, select it as the start and end group.
If you want the cows shown in a range of groups select the start and end groups you wish.
If you want all the cows in their group, select the first group as the start group and the last group on the list as the end group.
If you want to see the report on the screen, click Display.
If you want to send the report straight to the printer, click Print.
-72-
4
2
Calf Reports
These are pre-formatted reports to give information from the Calf records.
Herd / Ex Herd Calves A listing of either live or dead calves. It shows basic details, location and status.
Calving Schedule
A list of served heifers and when they are due to calve. Can be used as an input document for
entering the calving details.
Registration Schedule A listing of calves due to be registered.
Calf Premium Schedule
(Only available when the Premium Region is set to Scottish.) Lists eligible unclaimed
animals.
Selling Schedule
A listing of the status of animals and when any retention period ends.
30 Month Schedule
A listing of dates animals will be 30 months old.
Premium Claimed
A listing of all calves claimed for premium in the selected year and what has happened to them.
All these reports can be created for groups or a range of groups.
All the reports can be shown on the screen or printed.
-73-
4
3
Bull Reports
These are pre-formatted reports to give information from the Bull records.
Herd / Ex Herd Bulls
A basic listing of all bulls, either live or dead.
Detailed Herd / Ex Herd Bulls A listing of all bulls, either live or dead. This report shows the
Statistical details of the bulls services.
Inseminators
A basic listing of all Insemination bulls. This report shows the statistical details of the bulls
services.
Registration Schedule A listing of calves due to be registered.
Calf Premium Schedule
(Only available when the Premium Region is set to Scottish.) Lists eligible unclaimed
animals.
Selling Schedule
A listing of the status of animals and when any retention period ends.
Premiums Claimed
A listing of all bulls claimed for premium in the selected year and what has happened to
them.
All these reports can be created for groups or a range of groups.
All the reports can be shown on the screen or printed.
-74-
4
4
Code Lists
This option gives the facility to print the Code Lists as set up in the Maintenance Parameters.
Select the list you want by clicking on the dot beside it. Select Display if you want to view the list on screen, or Print
to print the list.
-75-
4
5
Statutory Reports
These are the prints of the records which are required by statute.
-76-
4
5
A
Health Book
To print or view the health book Click in the Health Book Dot.
Select whether you want Cows, Calves and/or Bulls by putting an X in the appropriate box. If you do not select any, all
will be presented.
Select the date range you want to print by putting an X in the date range box and enter the start and end date for the
report. Not selecting a date range will select all records.
Select Display if you want to view the list on screen, or Print to print the list.
-77-
4
5
B
Pharmacy Book
This report list each drug by batch, what has been purchased, where it has been used and what is left.
To print or view the pharmacy book - Click in the Pharmacy Book Dot.
Select whether you want Cows, Calves and/or Bulls by putting an X in the appropriate box. If you do not select any, all
will be presented.
Select the date range you want to print by putting an X in the date range box and enter the start and end date for the report.
Not selecting a date range will select all records.
Select Display if you want to view the list on screen, or Print to print the list.
-78-
4
5
C
Movement Book
To print or view the Movement book Click in the Movement Book Dot.
Select whether you want Cows, Calves and/or Bulls by putting an X in the appropriate box. If you do not select any, all
will be presented.
Select the date range you want to print by putting an X in the date range box and enter the start and end date for the report.
Not selecting a date range will select all records.
Select External or Internal Movements by putting an X in the appropriate Box. If you leave both blank, all are shown.
Select Display if you want to view the list on screen, or Print to print the list.
-79-
4
5
D
ReTagging Book
To print or view the ReTagging book Click in the ReTagging Book Dot.
Select whether you want Cows, Calves and/or Bulls by putting an X in the appropriate box. If you do not select any, all
will be presented.
Select the date range you want to print by putting an X in the date range box and enter the start and end date for the report.
Not selecting a date range will select all records.
Select Display if you want to view the list on screen, or Print to print the list.
-80-
4
5
E
Herd Registers.
This is an animals listing as required by DEFRA & SEERAD
These reports differ depending on the region set in the Premium Parameters. English Region gives one Herd Register,
Scottish gives Male & Female Herd Registers.
Select the types of animals required and set the date range. The start date should be no earlier than 01/01/2000 as this was
the date of introduction.
All animals alive on that date, and purchased or born after that date will be displayed along with details of their sale or
death.
-81-
4
5
F
Continuous Herd Registers
This gives a listing of totals of animals in each class on each date. It shows the Date, Event, Animal Numbers and
Adjustment to cumulative. Totals in each class on the date are then shown.
-82-
4
6
Management Reports
These reports are designed to aid management, to provide useful information at the touch of a button.
Census and Valuation Produces a summary list of animals in the business on any selected date, either
as a whole or by groups. It gives the numbers in each age group and approximate value.
Stock Listing
Live Sales Returns
Gives a list of Births, Purchases, Sales and Deaths/Culls between selected
dates.
A listing of sales of live animals (Calves and Bulls) with a breakdown of prices
and weights.
A listing of deadweight sales (Calves and Bulls) with a breakdown of Weights,
Dead Sales Returns
Grades and Prices.
Stock Audit
A reconciliation listing of Opening Numbers, births, purchases, transfers, deaths, sales and
closing numbers within the herd or by group. The animals are listed by sex and age group.
Cattle on Holding
This report replicates the list of animals produced by BCMS in their statement. A date can
be selected and all the animals on the holding on that date will be listed. Females are
shown first followed by males. Within each sex the animals are sorted by the date they
moved onto the holding.
-83-
4
6
A
Census and Valuation
This gives a livestock count, valuation and Livestock Unit Calculation on any date.
To print or view a Census and Valuation, click in the Census and Valuation Dot.
Select whether you want Cows, Calves and/or Bulls by putting an X in the appropriate box. If you do not select any, all
will be presented.
If you want the animals to be presented in their groups, click the Locations box Show All.
Select the required date.
Select Display if you want to view the list or Print to print the list.
Cows and Stock Bulls are taken at the values entered in the Misc. Parameters section of maintenance routines.
Growing and Fattening animals are worked out as below, again from the figures entered in Misc. parameters.
(((Days of Age X DLWG) + Calf Weight) X Price per Kg LWG) + Calf Price = Value
(((150 days X 0.8Kg= 120Kg) + 45 = 165Kg) X £1 per Kg =£165) + £80 = £245
-84-
4
6
B
Stock Listing
To print or view a Stock ListingClick in the Stock Listing Dot.
Select whether you want Cows, Calves and/or Bulls by putting an X in the appropriate box. If you do not select any, all
will be presented.
Select the date range you want to print by putting an X in the date range box and enter the start and end date for the report.
Not selecting a date range will select all records.
Select Display if you want to view the list or Print to print the list.
The report lists all Births, Purchases, Sales and Culls/Casualties in date order within your specified date range.
-85-
-86-
4
6
C
Live Sales Returns
To print or view a Live Sales ReturnClick in the Live Sales Return Dot.
Select whether you want Calves and/or Bulls by putting an X in the appropriate box. If you do not select any, all will be
presented.
Select the date range you want to print by putting an X in the date range box and enter the start and end date for the report.
Not selecting a date range will select all records.
If you want the animals to be presented by the sale location click the Locations box Show All.
Select Display if you want to view the list or Print to print the list.
-87-
4
6
D
Dead Sales Returns
To print or view a Dead Sales ReturnsClick in the Dead Sales Returns Dot.
Select whether you want Calves and/or Bulls by putting an X in the appropriate box. If you do not select any, all will be
presented.
Select the date on which you wish the animal’s age to be calculated, this should be entered in the Date Valued box.
Select the date range you want to print by putting an X in the date range box and enter the start and end date for the report.
Not selecting a date range will select all records.
If you want the animals to be presented by the sale location click the Locations box Show All.
Select Display if you want to view the list or Print to print the list.
-88-
4
6
E
Stock Audit
To print or view a Stock AuditClick in the Stock Audit Dot.
Select whether you want Cows, Calves and/or Bulls by putting an X in the appropriate box. If you do not select any, all
will be presented.
The Date Valued is the date on which ages will be calculated for the classifications. Select the date range you want to print
by putting an X in the date range box and enter the start and end date for the report. Not selecting a date range will select
all records.
If you want the animals to be presented in their groups click the Locations box Show All.
Select Display if you want to view the list or Print to print the list.
-89-
4
6
G
Cattle on Holding
A Listing of animals on the holding on any date.
Enter the date you wish the report to be based on. Only animals alive on the holding on that date will be displayed.
-90-
-91-
4
7
Selective Reports
This section allows you to create reports to your own specification. Any information held within an animal record can be
incorporated into a report in this section. These report formats can be saved and reproduced at any time.
-92-
To create a new report:
Click New on the Bottom Button Bar.
Enter the Name of the new report. This is the name the report will be stored as.
You may now pick the parameters of the report from the scrolling screen as shown below.
There are three stages to creating the report layout. There are at present 85 Headings to choose from which are shown
in full in Appendix A.
Firstly, set the limits on what you want to include in the report. Click in the Lower box of the item you wish to limit, you
will be asked to select the bottom limit and the upper limit of your selection. You may also be given a list to select from
where there are a limited number of preset options. As an example you may wish to limit one sire or breed, or from one
date of birth to another.
Secondly, to include headings in the report click the box under Incl to show Yes. The order in which you click this
selection is the order in which the headings are laid out across the paper. The number of columns each heading takes in
a report is shown in the Len Column. The total columns of all selected headings is shown at the top of the report.
Thirdly, the Sort order of the report is set by the end column under Rank. If you want the report sorted by a particular
heading click in the rank box of that heading. This will be the first sort criteria. Should you wish to sort further within the
first choice then click in your second chosen option rank box. An example of this may be to sort firstly by Breed and then
within the breed, by the Sire.
Click OK to save your report format.
-93-
To display or print a report:
Highlight the report you wish from the list. Select which type of animals you wish to include - live and/or dead - cows,
calves, and/or bulls.
Click Display or Print on the Bottom Button Bar.
To change the format of an old report:
Highlight the report you wish from the list. Click Edit on the Bottom Button Bar and the report format will be displayed
for editing.
To delete an old report:
Highlight the report you wish to delete and click Delete on the Bottom Button Bar.
-94-
4
8
Weighing Reports
This section allows you to produce reports on the weighings entered into the system.
-95-
4
8
1
Weighings
This report displays the weights on a specific date.
The Daily Liveweight Gain displayed is the gain from the last weighing date.
-96-
4
8
2
Expected Dead Weights
This report projects the predicted dead weight.
The predicted dead weight is based on the last weighing and the kill out % set in the Maintenance Section, Business
Parameter, Miscellaneous.
The daily liveweight gain is the gain from the previous weighing.
-97-
Chapter 5 BCMS
This section deals with the communication of information to BCMS.
There are three ways of communicating with BCMS, CTS Webservice, SIS (email) and CTS
Online.
Each is described in a following section.
The settings in BCMS Parameters determines which will be used when you opt to do Movements,
Registration or an Audit.
Where the Scottish Beef Calf Scheme is enable the option to create the xml file is also available.
-98-
5
1
BCMS Parameters
This section determines which type of communication will be used with BCMS. It also holds the
credentials used to authenticate the link.
Directory for files
This is the directory used to store the files created by the various routines. It is
initially set as C:\farmdata\cattle32\mail. Unless you have good reason it is best
not to change it. Other directories may not be automatically backup by the
Backup routine in the program.
Select the method you wish to use and complete the required credentials.
Webservices
Requires your BCMS User ID and password. All cattle keepers were issued
with a BCMS Used ID and Password in 2002. If you have lost these they can
be re-issued by BCMS on request.
SIS Email
Unless you are already using SIS to communicate we recommend you use
Webservices. The SIS Number is issued by the SIS section at BCMS. You
require to register with them and pass a conformance test.
Create Files for CTSOnline This routine creates files which can be imported into the CTS website.
-99-
5
2
1
BCMS Movements (Web Services)
This section is only available if CTSdata has been loaded from the CD.
Used to send movements by Webservices.
Start Date, End Date. This sets the range of dates of movements that will be included in the report.
On entry the routine the start date is set 1 day later than the end date of last usage.
Type Default will only display movements on and off of the holding relating to that holding.
All will display both sides of a movement, that is the on or off of your holding and on or off of
the other party involved in the movement.
Click Refresh and the eligible animals will be displayed. If errors are encountered these can be displayed.
Errors may include incorrect eartags or invalid or missing CPH number in the movement location.
Select the animals in the list by clicking on them individually or all the animals by clicking on Select. You
may then deselect some by clicking on them.
Once all are selected click Save.
You will be asked if you require a printed copy.
You will then be asked if you want to send the file now.
At this point the Web Service Application will run. The first movement file is named MOVE0001.xml
-100-
Each subsequent movement file will increase the number by 1. Newly created files have a Status of
“Awaiting Submission”.
Click on the file and Click Submit. (You should have an open line before you click Submit) When you
first submit the file, a basic validation is immediately done by the Web Service and you will receive back
within a few seconds either a Reference Number (Status Changes to “Awaiting Validation”) or an Error
Message. If you get an error at this stage it is likely that you either have not opened your line or the
BCMS Server is off line. Consult Farmdata if you get the error persists at this stage.
If you get back “Awaiting Validation” with a Reference Number the first part has been successful. You
then need to do a further re-submission of the file at a later time. You can leave Cattledata at this time.
When you return to check go to CTS Web Services and CTS Web Services Application, This takes
you back to the file list. Highlight and Submit the file again. This checks that the information in the file has
been validated and accepted by BCMS. This then turns the Status to “Accepted”. It can take up to 24
hours for this validation process to be completed by BCMS.
If you get an “Error” on the second submission then all or some of the applications have been rejected
by BCMS. You can then display a report which will show the problem animals and a note of why they
were not accepted. Do this by highlighting the file and clicking Report. Select Error in the report screen.
From this you can see which animals have been rejected and why.
These problems will need to be corrected in the animal’s record in CATTLEdata before they can be
resubmitted to BCMS. The corrected animals can then be re-selected and processed in a totally new
submission.
At any stage the file can be highlighted and Report clicked on. This gives the opportunity to see exactly
what has been submitted at any stage.
-101-
5
2
2
BCMS Movements (SIS Email)
This creates the e-mail file of movements to send to the BCMS.
Before this is done you should register with BCMS for electronic mail. You will then be given
an Originator ID and instructed to perform a conformance test for verification purposes.
To do this you should have set your Originator ID in BCMS Parameters. Ensure your CPH Number and
Herd Number are correct, select Test and the program will create a file, which will be sent by e-mail
to the BCMS.
Type
Default selects only on movements to this holding and off movements from this
holding. These are the ones you are required to send to BCMS.
All shows both sides of a movement, the off movement from the seller and the
on movement to you when you purchase an animal and similarly both sides of
a sale. To do this you will need the appropriate CPH numbers in the external
locations.
Start Date
The date this batch of movements is to begin. It will always be one day after the
end date of the last batch. You can over-ride this if necessary.
End Date
The end date for this batch of movements, usually today’s date.
Once you have set the above click Refresh. The eligible movements will be displayed on the screen.
You may at this point get an error message. Displaying this error list will show the animal movements with
tag formats which are incorrect or movements with no CPH Number in the record.
-102-
This list can be printed and the necessary adjustments made to the animal records. Re-tagging is the only
way to change the format of a tag. Refer to Appendix B for acceptable metal tag formats.
Once you are happy with the list you can click Select to highlight all the movements. If any movements
have already been registered you will be warned.(They have an R on the line) You can over-ride this
but it is not to be recommended. Deselect them by clicking on them and taking the highlight off.
Refresh will deselect all the animals on the list.
Save will create the e-mail and store a copy in the folder C:\FARMDATA\CATTLE32\ MAIL\SIS.
The file is called MOVE0001. The second e-mail will create MOVE0002 and so on.
If you have problems with Mail, Farmdata can give assistance.
-103-
5
2
3
BCMS Movements (CTSOnline)
This section creates a file of movements for importing into the CTS Online web site.
Type
Default selects only on movements to this holding and off movements from this holding.
These are the ones you are required to send to BCMS.
All shows both sides of a movement, the off movement from the seller and the on
movement to you when you purchase an animal and similarly both sides of a sale. To do
this you will need the appropriate CPH or MHS numbers in the external locations.
Start Date
The date this batch of movements is to begin. It will always be one day after the end
date of the last batch. You can over-ride this if necessary.
End Date
The end date for this batch of movements, usually today’s date.
Once you have set the above click Refresh. The eligible movements will be displayed on the screen. You
may at this point get an error message. Displaying this error list will show the animal movements with tag
formats which are incorrect or movement locations with no CPH Number in the record.
This list can be printed and the necessary adjustments made to the animal records. Re-tagging is the only
way to change the format of a tag. Refer to Appendix B for acceptable metal tag formats.
Once you are happy with the list you can click Select to highlight all the movements. If any movements
have already been registered you will be warned.(They have an R on the line) You can over-ride this but
it is not to be recommended. Deselect them by clicking on them and taking the highlight off. Click save
to create the file.
This file is saved on the hard disk in a sub directory of your computer. The first file is called
MOVE0001.CSV, the second MOVE0002.CSV and are usually located in the folder
C:\FARMDATA\CATTLE32\ MAIL\CTSOnline.
-104-
5
3
1
BCMS Registrations (Web Services)
This section sends Calf Registrations to BCMS Using CTS Web Services.
Go into BCMS and then Registrations by CTS Web Services.
Start Date, End Date. This sets the range of dates of birth that will be included in the report. On entry
the routine the start date is set 1 day later than the end date of last usage.
For registrations there is no prior need to use the registration routine in the Premium Occurrence. This
routine will change the status to Registered.
Click Refresh and the eligible animals will be displayed. If errors are encountered these can be displayed.
Errors may include invalid eartags in the calf or dam or invalid or missing CPH number in the birth
location.
Select the animals in the list by clicking on them individually or all the animals by clicking on Select. You
may then deselect some by clicking on them.
Once all are selected click Save.
You will be asked if you require a printed copy.
You will than be asked if you want to send the file now.
At this point the Web Service Application will run. The first registration file is named PASS0001.xml
Each subsequent registration file will increase the number by 1. Newly created files have a Status of
“Awaiting Submission”.
-105-
Click on the file and Click Submit. (You should have an open line before you click Submit) When you
first submit the file, a basic validation is immediately done by the Web Service and you will receive back
within a few seconds either a Reference Number (Status Changes to “Awaiting Validation”) or an Error
Message. If you get an error at this stage it is likely that you either have not opened your line or the
BCMS Server is off line. Consult Farmdata if you get the error persists at this stage.
If you get back “Awaiting Validation” with a Reference Number the first part has been successful. You
then need to do a further re-submission of the file at a later time. You can leave Cattledata at this time.
When you return to check go to CTS Web Services and CTS Web Services Application, This takes
you back to the file list. Highlight and Submit the file again. This checks that the information in the file has
been validated and accepted by BCMS. This then turns the Status to “Accepted”. It can take up to 24
hours for this validation process to be completed by BCMS.
If you get an “Error” on the second submission then all or some of the applications have been rejected
by BCMS. You can then display a report which will show the problem animals and a note of why they
were not accepted. Do this by highlighting the file and clicking Report. Select Error in the report screen.
From this you can see which animals have been rejected and why.
These problems will need to be corrected in the animal’s record in CATTLEdata before they can be
resubmitted to BCMS.
-106-
An example of an error report.
The above report shows a series of 22 registrations. All have been accepted except No 5 which has
been given an eartag number which has not yet been issued.
This animal will need to be retagged with the correct number and can then be re-submitted on its own
in a new file.
At any stage the file can be highlighted and Report clicked on. This gives the opportunity to see exactly
what has been submitted at any stage.
-107-
5
3
2
BCMS Registrations (SIS Email)
This creates the file of new births to be registered for passports by e.mail with the BCMS.
Before this is done you should register with BCMS for electronic mail. You will then be given
an Originator ID and instructed to perform a conformance test for verification purposes.
To do this you should enter your Originator ID, ensure your CPH Number and Herd Number are
correct, select Test and the program will create an e-mail to be sent to the BCMS.
You do not have to run through the registration routine in the Premium Section of Calf Occurrences to
declare the animals which are to be registered. Animals selected and saved here will be declared as
registered on today’s date.
Start Date
The date that this batch is to begin with, this is the date of birth. It will
always be one day after the end date of the last batch. You can override this if necessary.
End Date
The end date for this batch of registrations, usually today’s date.
Once you have set the above click Refresh. The eligible registrations will be displayed on the screen.
You may at this point get an error message. Displaying this error list will show the animal births with tag
formats which are incorrect, births with no CPH Number in the birth movement record or Dam Tags
which have an unacceptable format. Refer to Appendix B for acceptable metal tag formats.
This list can be printed and the necessary adjustments made to the animal records. Re-tagging is the
-108-
only way to change the format of a tag for the calf. If the Dam tag needs to be edited, this can be done
in the Tags Section of the Calf Record for a bought in calf. For a home-bred calf, you should probably
also Re-Tag the Dam so that it will be correct for future calf registration.
The CPH number can be corrected in the Location Option of the Maintenance Section.
You can now go back into Mail Registration. Check that your dates are correct, Refresh again and the
list will be recreated, hopefully now with no errors.
Once you are happy with the list you can click Select to highlight all the births for registration. If any
Births have already been registered you will be warned. (They have an R on the line). You can over-ride
this but it is not to be recommended. Deselect them by clicking on them and taking the highlight off.
You may also get animals with an L. These are more than 27 days old and will be declared by BCMS
as late applications.
Refresh will deselect all the animals on the list.
Save will create and send the file by e-mail and mark the animals as registered.
This file is saved on the hard disk in a sub directory of your computer. The first file is called PASS0001,
the second PASS0002 and are usually located in the folder C:\FARMDATA\CATTLE32\ MAIL\SIS.
-109-
5
3
3
BCMS Registrations (CTSOnline)
This section creates a file of newly born calves for importing into the CTS Online web site.
You do not have to run through the registration routine in the Premium Section of Calf Occurrences to
declare the animals which are to be registered. Animals selected and saved here will be declared as
registered on today’s date.
Start Date
The date that this batch is to begin with, this is the date of birth. It will
always be one day after the end date of the last batch. You can override this if necessary.
End Date
The end date for this batch of registrations, usually today’s date.
Once you have set the above click Refresh. The eligible registrations will be displayed on the screen.
You may at this point get an error message. Displaying this error list will show the animal births with tag
formats which are incorrect, births with no CPH Number in the birth movement record or Dam Tags
which have an unacceptable format. Refer to Appendix B for acceptable metal tag formats.
This list can be printed and the necessary adjustments made to the animal records. Re-tagging is the only
way to change the format of a tag for the calf. If the Dam tag needs to be edited, this can be done in
the Tags Section of the Calf Record for a bought in calf. For a home-bred calf, you should probably also
Re-Tag the Dam so that it will be correct for future calf registration.
The CPH number can be corrected in the Location Option of the Maintenance Section.
You can now go back into Mail Registration. Check that your dates are correct, Refresh again and the
-110-
list will be recreated, hopefully now with no errors.
Once you are happy with the list you can click Select to highlight all the births for registration. If any
Births have already been registered you will be warned. (They have an R on the line). You can over-ride
this but it is not to be recommended. Deselect them by clicking on them and taking the highlight off.
You may also get animals with an L. These are more than 27 days old and will be declared by BCMS
as late applications.
Refresh will deselect all the animals on the list.
Save will create the file.
This file is saved on the hard disk in a sub directory of your computer. The first file is called
PASS0001.CSV, the second PASS0002.CSV and are usually located in the folder
C:\FARMDATA\CATTLE32\ MAIL\CTSOnline.
-111-
5
4
1
BCMS Audit (Web Services)
This section is used to compare the animals currently held on BCMS with those held on Cattledata and
show the differences.
Click the Update button. You will be taken into the CTS Web Services screen.
A file HOLD0001.XML will be created. Highlight this file and click submit. (Your line should be open
before clicking Submit).
The system should process for a few seconds and the status should change to “Success”
-112-
Click Exit at this point.
This will take you back to the Audit by CTS Web Services screen, Click Ok on the Download
Complete screen and then click either Display or Print.
The animals with errors will then be presented.
The Animals with Errors section highlights animals with differences in their Date of Birth, Sex, Breed,
On Movement Date and Genetic Dam.
The Animals on Cattledata only section shows those animals on Cattledata for which no animal can
be found in the BCMS file with the same Official ID Tag.
The Animals on BCMS only section shows those animals in the BCMS file for which no animal can
be found in the Cattledata with the same Official ID Tag.
Duplicate Animals may also be shown where duplicates exists on BCMS.
-113-
5
4
2
BCMS Audit (CTSOnline)
This allows for the comparison of the live animals on Cattledata with the live animals currently held by
BCMS. Any differences will be displayed.
Before doing the audit you must get the file of animals from the CTS On-line web-site. This is the same
routine as is used when starting up a new business and is explained fully in the Quickstart Guide.
Once you have the file of animals saved on the computer go to Audit with BCMS. Browse to the file and
click Display or Print as required. An error list will be produced.
The Animals with Errors section highlights animals with differences in their Date of Birth, Sex, Breed,
On Movement Date and Genetic Dam.
The Animals on Cattledata only section shows those animals on Cattledata for which no animal can
be found in the BCMS file with the same Official ID Tag.
The Animals on BCMS only section shows those animals in the BCMS file for which no animal can
be found in the Cattledata with the same Official ID Tag.
-114-
5
5
Beef Calf Premium
Only available when Region is set to Scottish and Beef Calf Premium is enabled in
Maintenance, Business Parameters, Premium.
Used to create the xml file which can be imported into the Scottish Government Web site.
Start Date
The date this batch of claims is to begin. It will always be one day after the end
date of the last batch. You can over-ride this if necessary.
End Date
The end date for this batch of claims, usually today’s date.
Once you have set the above click Refresh. The eligible calves will be displayed on the screen. You may
at this point get an error message. Displaying this error list will show the animals with tag formats which
are incorrect or locations with no CPH Number in the record.
This list can be printed and the necessary adjustments made to the animal records. Re-tagging is the only
way to change the format of a tag. Refer to Appendix B for acceptable metal tag formats.
Once you are happy with the list you can click Select to highlight all the animals.
Click save to create the file.
This file is saved on the hard disk in a sub directory of your computer. The first file is called
SCBS0001.XML, the second SCBS0002.XML. The files are located in the folder which is set in the
-115-
Mail Parameters. This is usually C:\FARMDATA\CATTLE32\ MAIL\SEERAD.
-116-
5
6
CTS Web Services Application
This section gives access to the all the functions and saved files from CTS Web Services.
You come here to pick up files for the second submission, check status and report on previously created
files.
Product
Which Farmdata program is being run, only those installed on the computer will be
available.
Type
Dictates which files are displayed in the list. All excludes archived files.
Any file can be archived by clicking on it and clicking the Archive Button. Archived files can be viewed
by the correct option under Type.
Any file can be deleted by clicking on it and clicking the Delete Button
-117-
The three stages, submission, receipt and result, can be viewed by clicking on any file and clicking on
the Report Button.
-118-
Appendix A
Selective Reporting Headings
The following is a list of headings available in selective reporting, along with the number of character
positions each item occupies on a report. This list is subject to change without notice.
No.
1
2
3
4
5
6
7
8
9
10
11
12
13
14
15
16
17
18
19
20
21
22
23
24
25
26
27
28
29
30
31
32
33
34
35
36
37
38
39
Description
Ear Number
Date of Birth
Age in Days
Days on Farm
Sex
Sire
Sire Tag
Dam
Dam Tag
Dams Sire
Dams Dam
Surrogate Dam
Surrogate Dam Tag
Breed
Sire Breed
Dam Breed
Dam’s Sire Breed
Dam’s Dam Breed
Colour
Official Tag
Electronic Tag
Name
Comment
Status
Sub Status
CCD Status
CCD Number
Date Registered
Passport Type
Method Used
1st Premium Due
1st Premium Date
1st Premium Value
2nd Premium Due
2nd Premium Date
2nd Premium Value
24 Month Date
30 Month Date
SCP Claim
-119-
Width
10
8
6
7
8
10
20
10
20
10
10
20
20
20
20
20
20
20
20
20
20
30
30
12
12
12
25
10
10
15
8
8
8
8
8
8
8
8
5
40
41
42
43
44
45
46
47
48
49
50
51
52
53
54
55
56
57
58
59
60
61
62
63
64
65
66
67
68
69
70
71
72
73
74
75
76
77
78
79
80
81
82
83
84
HLCA Claim
Replaced By
Cond. Score
Calving No.
Date Calved
Last Calf’s Ear Tags
Last Calf’s Metal Tags
Last Calf’s Sire
Last Calf’s Sex
Calving Score
Date Weaned
Date Castrated
Times Served
Last Served
Last Bull
Expect Calving
Calv. To Concept
Service Dates
Service Dates + Bulls
Service intervals
Current Group
Current location
Date moved
Location History
Health Dates
Health Treatments
Health + Drugs
Date Bought
Bought From
Purchase Age
Purch. Price
Purch. Inv. No.
Date Sold
Sold To
Sale Type
Cull Code
Dead Weight
Sale Price
Sale Price/Kg
Sales Inv. No.
Grade
Slaughter Premium Date
Slaughter Premium Value
Weighings
Weights + Dates
-120-
5
20
9
7
8
20
41
10
20
20
8
8
6
8
10
8
10
54
100
30
20
20
8
80
84
84
114
8
20
8
8
10
8
20
8
20
7
7
8
10
7
9
10
48
102
85
86
87
88
89
90
91
92
93
94
95
96
97
98
99
100
101
Weighing Intervals
Latest Weight
Target Weight
DLWG
DLWG - On Cow
DLWG - Off Cow
DLWG - Purchase
DLWG - All Weights
Margin
Margin/Day
Bull Type
Gestation
Services
Males
Females
Twins
Stillborns
-121-
30
7
7
7
7
7
8
36
7
7
6
9
8
6
8
6
10
Appendix B
Metal Tag Formats
When a new Metal Tag is entered the system will automatically verify it against acceptable formats.
These include :
i)
ii)
iii)
iv)
v)
vi)
vii)
viii)
ix)
UK~ADDDD~DDDDD
UKAADDDD~DDDDD
UK~~~DDD~DDDDA
UK~~DDDD~DDDDA
UK~DDDDD~DDDDA
UKDDDDDD~DDDDA
UKDDDDDDDDDDDD
~~DDDDDD~DDDDD
~~ZZZZZZZZZZZZ
(Northern Ireland)
(All Numeric Tags)
A represents a letter (A - Z)
~ is a space
D is a number (0 - 9)
Z is a letter or a space or a number.
Note : There are variations of iii) to vi) in which there may be only 1, 2 or 3 numbers before the last
letter. e.g UK~~~DDD~DA.
-122-
Appendix C
Backup & Restore Routines
You are strongly advised to make backup copies of your data. To do a backup you can use the utility
supplied with the program which is located under the File menu.
You may select to backup all data, in which case all businesses within the system will be saved, this
business which saves only the business in which you are currently working or selected business. If you
choose selected businesses you must highlight those you wish to save by clicking on the list.
Click Next and you will be asked where you wish to put the backup. The default is A:\CATTLEdata.zip,
if you want to change the location you can click the browse button and select your location. If you are
using a USB memory stick select the drive letter of the stick.
Click next and the backup will begin.
-123-
To restore data from a backup created by the above routine use the utility supplied with the program
which is located under the File menu. If you are restoring data it is advisable to do take a backup of the
current data first.
Click on Restore Data
The default is again A:\CATTLEdata.zip. If your backup file is located elsewhere you can use the
browse button to locate it.
Select the businesses you wish to restore by clicking on them. Click Start to begin the restore.
-124-