1
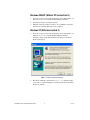
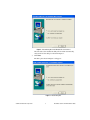
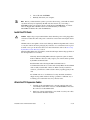
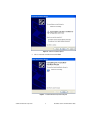
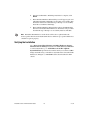
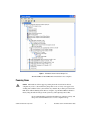
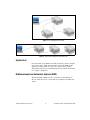
INSTALLATION GUIDE
NI CardBus-8310-to-PXI
Expansion Kit
This document provides instructions on the installation of the
NI CardBus-8310-to-PXI Expansion Kit.
Before Installation
Before installing the NI CardBus-8310-to-PXI expansion system you
should perform the following steps.
•
Inventory the shipping carton contents for all of the required parts.
•
Gather all of the necessary tools required for installation.
•
Read the rest of this document. The installation instructions must be
followed closely. For information on hardware specs and
troubleshooting, refer to the NI CardBus-8310-to-PXI Expansion User
Manual, which is included in PDF format on the driver CD included
with this kit.
Follow these suggested guidelines and cautions while installing.
•
Use only the cables provided by National Instruments.
•
Use keyed connectors (to prevent connecting a cable backwards).
•
Be careful when routing signal cables to your devices.
•
Avoid sharp bends or folds in the cables.
•
Provide enough slack to allow easy device placement.
•
Avoid things that might cause scuffing and abrasion damage to the
cables.
•
Secure the devices in their shelves using the appropriate hardware.
•
Use the screws or brackets supplied with the device. Suitable mounting
brackets, adapters, and hardware are available from your local
computer dealer or retailer.
Parts List
Table 1 lists the components included with your kit.
Table 1. CardBus-8310 Kit Components
Quantity
Item
1
NI CardBus-8310
2
3 meter CAT5-e cables with 4 ferrites (two ferrites for each cable).
10-meter and 14-meter cables may be purchased separately.
1
NI PXI-8310
1
Software Installation CD (will contain the software driver, full user
manual, and Documents of Conformity)
1
Installation Guide
Caution In order to complete the installation of the CardBus-to-PXI expansion system you
will need perform the installation in a suitable electrostatic discharge (ESD) protective
environment.
Protecting Against Electrostatic Discharge
You can take the following steps to prevent damage from electrostatic
discharge (ESD):
•
When unpacking a static-sensitive component from its shipping
carton, do not remove the anti-static packaging material until you are
ready to install the component in a computer. Just before unwrapping
the anti-static packaging, be sure you are at an ESD workstation, or
that you are electrically grounded.
•
When transporting a sensitive component, first place it in an anti-static
container or package.
•
Handle all sensitive components at an ESD workstation. If possible,
use anti-static floor pads and workbench pads.
•
Handle components and boards with care. Don’t touch the components
or contacts on a board. Hold a board by its edges or by its metal
mounting bracket.
The NI-CardBus-8310 driver is intended for use only with Windows 2000 and
Windows XP.
Note
NI CardBus-8310-to-PXI Kit Installation Guide
2
ni.com
Installation Instructions
It is highly recommended that Microsoft Windows users follow the
software driver installation instructions exactly, in the order in which the
instructions are presented in this document. If you do not follow the driver
installation instructions, you will greatly increase your chances of failure
while configuring your system.
Install the Software Driver
Cautions You will be prompted to reboot after the software installation. Each shut down
and reboot is important and is required for correct installation. If you shut down and reboot
when requested, it may save you from having to make a call to NI technical support.
You must be logged in as a system administrator while installing the software. You must
remain logged in as system administrator until installation is complete.
Notes Under Windows XP, you must install the NI CardBus-8310 driver before
connecting or inserting the hardware into the CardBus slot.
If you are using Windows XP, the Found New Hardware dialog box will only appear if you
have Service Pack 2 installed. This dialog appears by default under Windows 2000.
© National Instruments Corporation
3
NI CardBus-8310-to-PXI Kit Installation Guide
Windows 2000/XP (Without XP Service Pack 2)
1.
If you do not have your system configured to allow autorun CDs, you
must run SETUP.EXE to install the NI CardBus-8310 driver.
2.
Follow the prompts to install the software.
3.
When the software prompts you reboot, do so. When the system has
been rebooted, the installation process is complete.
Windows XP (With Service Pack 2)
1.
If you do not have your system configured to allow autorun CDs, you
must run SETUP.EXE to install the NI CardBus-8310 driver.
After the software setup utility launches, the dialog box shown in
Figure 1 will appear.
Figure 1. Software Installation Dialog Box
2.
The driver will make a small change to boot.ini, and then prompt
you to reboot, as shown in Figure 2. You must do this before the driver
install can continue.
NI CardBus-8310-to-PXI Kit Installation Guide
4
ni.com
Figure 2. Reboot Dialog Box Under Windows XP Service Pack 2
After the reboot, the installation utility will re-launch automatically,
and you will see the dialog box shown in Figure. 1.
3.
Click Next.
The dialog box shown in Figure 3 will appear.
Figure 3. Reboot Dialog Box
© National Instruments Corporation
5
NI CardBus-8310-to-PXI Kit Installation Guide
4.
Choose No and click Finish.
5.
Manually shut down your computer.
Before you shut down the system to proceed to the next step, you should also install
any drivers that may be required by the PXI cards. For instance, if you are using a
PXI-GPIB card in your expansion chassis, install the latest NI-GPIB driver, etc. Driver
CDs are shipped with each PXI card. It is recommended that you install the
NI CardBus-8310 driver first, then the PXI drivers.
Note
Install the PXI Cards
Cautions High voltages are present inside the chassis when the power cord is plugged into
an electrical outlet. Disconnect the power cord from its source before removing the chassis
cover.
All PXI cards are susceptible to electrostatic discharge. When moving PXI cards, it is best
to carry the cards in anti-static packaging. If you need to set a card down, be sure to place
it inside or on top of an anti-static surface. For more information, refer to the Protecting
Against Electrostatic Discharge section.
When installing PXI cards or hard drives, ensure that the input current rating specified on
the AC input label is not exceeded.
Generally, when installing PXI cards in the expansion system, it should
make no difference what slot order you place your cards in, unless specified
by the PXI card manufacturer.
Install the PXI cards following the PXI card manufacturer’s
recommendations. Be sure to seat the cards securely. Make sure that all PXI
cards are fully seated in their connectors. When correctly seated in its
connector, you will notice a firm resistance when you pull up gently on the
card.
Not all PXI cards are as “well-behaved” as they should be. Sometimes
simply moving a PXI card that is having a problem to a different slot, or
reordering your cards in their slots, may alleviate issues.
Attach the PXI Expansion Cables
1.
Carefully position the PXI chassis so that the supplied cables will
conveniently reach from the connector of the NI CardBus-8310 card to
the connectors on the NI PXI-8310.
2.
Install one of the provided ferrites on each end of each of your cables.
All four ferrites should be installed.
NI CardBus-8310-to-PXI Kit Installation Guide
6
ni.com
3.
For each cable, Receive (RX) on one card attaches to Transmit (TX)
on the other card. Attach one CAT5-e cable to the Receive (RX) port
on the NI CardBus-8310 card. Attach the other end to the
Transmit (TX) terminal on the NI PXI-8310 card. Attach one CAT5-e
cable to the Transmit (TX) port on the NI CardBus-8310 card, then
attach the other end to the Receive (RX) port on the NI PXI-8310 card.
The LEDs on the NI PXI-8310 will light up if the cables are connected
properly.
If the LED lights flash continuously, reboot the laptop.
Install the NI CardBus-8310
This step can only be completed after the NI CardBus-8310 software has
been installed.
CardBus cards can only be used in systems that support CardBus. A special keying
mechanism prevents insertion into systems that do not support 32-bit CardBus cards.
Note
1.
Power down your laptop computer. Use the procedures for shutting
down your operating system and shutting off power to your system that
have been provided in your owner’s manual or host computer
documentation.
2.
Insert the NI CardBus-8310 with the NI logo side up (gold strip up)
into the host computer CardBus slot. Gently push the card until it is
seated firmly.
3.
For more information on using CardBus cards, refer to your host
computer’s user manual.
Powering Up
Apply power to the PXI chassis first, and then power up your host
computer. This will allow the higher-numbered buses in your hierarchy to
stabilize before the host computer issues its master power-on bus reset. In
systems that perform automatic bus configuration, this will allow the
configuration code to recognize the bus hierarchy and the attached devices.
The driver allows you to hot-plug your CardBus-8310 card into the CardBus slot on
your laptop, but you should never hot-plug a PXI card into a PXI chassis as it will cause
physical damage to the board, and possibly the backplane.
Note
1.
© National Instruments Corporation
Make sure your CAT5-e cables are connected correctly, then turn on
the PXI chassis, and plug the NI CardBus-8310 card into the laptop.
Power up the host computer.
7
NI CardBus-8310-to-PXI Kit Installation Guide
2.
Both LEDs should be lit on the NI PXI-8310. Flashing LEDs indicate
that the wires are reversed. If the LEDs are flashing, switch the wires
and begin again at step 1.
3.
The dialog box shown in Figure 4 will appear the first time you boot
your computer with the PXI chassis connected.
Figure 4. Found New Hardware Wizard Dialog Box (Windows 2000/XP SP2 Only)
4.
Choose No and click Next.
NI CardBus-8310-to-PXI Kit Installation Guide
8
ni.com
Figure 5. Software Installation Options
5.
Choose automatic installation and click Next.
Figure 6. Installation Wizard Completion Dialog Box
© National Instruments Corporation
9
NI CardBus-8310-to-PXI Kit Installation Guide
6.
Once the StarGen PCI to PCI bridge installation is complete, click
Finish.
7.
The Found New Hardware Wizard dialog box will appear again, and
will find another PCI to PCI bridge, because there are two bridge chips.
Follow the instructions outlined in steps 4 through 7 to successfully
install the second PCI to PCI bridge.
8.
The Found New Hardware Wizard will now detect the PXI modules
that have been installed in the PXI chassis. Follow the same procedure
described in steps 4 through 7 to successfully install each module.
Note Remember that PXI devices in the chassis will not be recognized unless the
device-specific driver has been installed. The devices will show up as generic PCI devices
and will not operate properly.
Verifying the Installation
Go to Start»Control Panel»Printers and Other Hardware»System»
Hardware»Device Manager and make sure View device by connection
is selected. From there, go to ACPI»Microsoft ACPI-Compliant
System»PCI Bus. Open the device branches until you reach the CardBus
bridge. Under this entry you should see any hardware that is installed in the
PXI chassis. In Figure 7, a PXI-GPIB card has been installed in a PXI
chassis.
NI CardBus-8310-to-PXI Kit Installation Guide
10
ni.com
Figure 7. PXI Module Shown In Device Manager Tree
The NI CardBus-8310 CardBus Driver installation is now complete.
Powering Down
Caution The hardware will not support powering down the chassis before the host
computer. If you do so, the machine may hang, blue screen, or it may even appear to be
working. The condition of the system will be very unstable. If you must power down the
PXI chassis without shutting down the host computer, stop the NI CardBus-8310 device
first by using the undock manager in the system tray and requesting removal first.
It is recommended that you first shut down the host computer correctly, and
then power down the PXI chassis to avoid a computer lock-up.
© National Instruments Corporation
11
NI CardBus-8310-to-PXI Kit Installation Guide
Running the System
Cautions High voltages are present inside the chassis when the chassis power cord is
plugged into an electrical outlet. Disconnect the power cord from its source.
Before touching anything inside the chassis, move to an ESD station and follow proper
ESD procedure. Failure to do so may result in electrostatic discharge damaging the
computer or its components. For more information, refer to the Protecting Against
Electrostatic Discharge section.
If there is a problem, be sure to turn off the power before making any
changes. If you are having trouble with the system, turn off the host
computer and the chassis, then check that all cards are seated properly and
all cables are connected.
If you are still having problems, refer to Appendix B, Troubleshooting
NI PXI-CardBus-8310 Cards, of the NI CardBus-8310-to-PXI Expansion
User Manual for more information.
Uninstalling the NI CardBus-8310 Driver
Go to Start»Settings»Control Panel»Add/Remove Programs. Select the
NI CardBus-8310 driver, and then select Add/Remove.
Additional Notes
The following notes are observations made during the testing of the
CardBus-8310 and the PXI-8310.
System Hierarchy
To connect additional PXI chassis through MXI-4, please connect them to
the first PXI bus segment in the first chassis as shown in Figure 8. The
preferred connection style is a Star configuration, rather than a daisy-chain,
which is shown in Figure 9. The system will support daisy-chaining, but
only to a certain depth of PCI bus segments. Systems connected in a Star
configuration will also exhibit lower latency.
NI CardBus-8310-to-PXI Kit Installation Guide
12
ni.com
Figure 8. Star Configuration (Preferred)
Figure 9. Daisy-Chain Configuration (Non-Preferred)
System Boot
In systems with a large number of modules and chassis, the host computer
may appear to hang, taking more than 20 seconds at the Windows XP
splash screen. This operation is expected, as the operating system is
enumerating all the devices in the PCI bus hierarchy, which can take time
in a complex configuration.
NI Measurement and Automation Explorer (MAX)
The initial launch of MAX may take a long time (several minutes) to
discover all the devices in a system with a large number of modules and
chassis.
© National Instruments Corporation
13
NI CardBus-8310-to-PXI Kit Installation Guide
Compliance with FCC/Canada Radio Frequency
Interference Regulations
Determining FCC Class
The Federal Communications Commission (FCC) has rules to protect
wireless communications from interference. The FCC places digital
electronics into two classes. These classes are known as Class A (for use in
industrial-commercial locations only) or Class B (for use in residential
or commercial locations). All National Instruments (NI) products are
FCC Class A products.
Depending on where it is operated, this Class A product could be subject
to restrictions in the FCC rules. (In Canada, the Department of
Communications (DOC), of Industry Canada, regulates wireless
interference in much the same way.) Digital electronics emit weak signals
during normal operation that can affect radio, television, or other wireless
products.
All Class A products display a simple warning statement of one paragraph
in length regarding interference and undesired operation. The FCC rules
have restrictions regarding the locations where FCC Class A products can
be operated.
Consult the FCC Web site at www.fcc.gov for more information.
FCC/DOC Warnings
This equipment generates and uses radio frequency energy and, if not
installed and used in strict accordance with the instructions in this manual
and the CE marking Declaration of Conformity1, may cause interference to
radio and television reception. Classification requirements are the same for
the Federal Communications Commission (FCC) and the Canadian
Department of Communications (DOC).
Changes or modifications not expressly approved by NI could void the
user’s authority to operate the equipment under the FCC Rules.
1
The CE marking Declaration of Conformity contains important supplementary information and instructions for the user or
installer.
NI CardBus-8310-to-PXI Kit Installation Guide
14
ni.com
Class A
Federal Communications Commission
This equipment has been tested and found to comply with the limits for a
Class A digital device, pursuant to part 15 of the FCC Rules. These limits
are designed to provide reasonable protection against harmful interference
when the equipment is operated in a commercial environment. This
equipment generates, uses, and can radiate radio frequency energy and,
if not installed and used in accordance with the instruction manual, may
cause harmful interference to radio communications. Operation of this
equipment in a residential area is likely to cause harmful interference in
which case the user is required to correct the interference at their own
expense.
Canadian Department of Communications
This Class A digital apparatus meets all requirements of the Canadian
Interference-Causing Equipment Regulations.
Cet appareil numérique de la classe A respecte toutes les exigences du
Règlement sur le matériel brouilleur du Canada.
Compliance with EU Directives
Users in the European Union (EU) should refer to the Declaration of
Conformity (DoC) for information1 pertaining to the CE marking. Refer to
the Declaration of Conformity (DoC) for this product for any additional
regulatory compliance information. To obtain the DoC for this product,
visit ni.com/certification, search by model number or product line,
and click the appropriate link in the Certification column.
A copy of the DoC is available on the NI CardBus-8310-to-PXI Expansion
Kit driver CD.
Where to Go for Support
The National Instruments Web site is your complete resource for technical
support. At ni.com/support you have access to everything from
troubleshooting and application development self-help resources to email
and phone assistance from NI Application Engineers.
1
The CE marking Declaration of Conformity contains important supplementary information and instructions for the user or
installer.
© National Instruments Corporation
15
NI CardBus-8310-to-PXI Kit Installation Guide
National Instruments corporate headquarters is located at
11500 North Mopac Expressway, Austin, Texas, 78759-3504.
National Instruments also has offices located around the world to help
address your support needs. For telephone support in the United States,
create your service request at ni.com/support and follow the calling
instructions or dial 512 795 8248. For telephone support outside the United
States, contact your local branch office:
Australia 1800 300 800, Austria 43 0 662 45 79 90 0,
Belgium 32 0 2 757 00 20, Brazil 55 11 3262 3599,
Canada 800 433 3488, China 86 21 6555 7838,
Czech Republic 420 224 235 774, Denmark 45 45 76 26 00,
Finland 385 0 9 725 725 11, France 33 0 1 48 14 24 24,
Germany 49 0 89 741 31 30, India 91 80 51190000,
Israel 972 0 3 6393737, Italy 39 02 413091, Japan 81 3 5472 2970,
Korea 82 02 3451 3400, Lebanon 961 0 1 33 28 28,
Malaysia 1800 887710, Mexico 01 800 010 0793,
Netherlands 31 0 348 433 466, New Zealand 0800 553 322,
Norway 47 0 66 90 76 60, Poland 48 22 3390150,
Portugal 351 210 311 210, Russia 7 095 783 68 51,
Singapore 1800 226 5886, Slovenia 386 3 425 4200,
South Africa 27 0 11 805 8197, Spain 34 91 640 0085,
Sweden 46 0 8 587 895 00, Switzerland 41 56 200 51 51,
Taiwan 886 02 2377 2222, Thailand 662 278 6777,
United Kingdom 44 0 1635 523545
For additional information, such as troubleshooting tips, hardware
specifications, and system overviews, refer to the NI CardBus-8310-to-PXI
Expansion User Manual included as a PDF document on your driver CD.
National Instruments, NI, ni.com, and LabVIEW are trademarks of National Instruments Corporation.
Refer to the Terms of Use section on ni.com/legal for more information about National
Instruments trademarks. Other product and company names mentioned herein are trademarks or trade
names of their respective companies. For patents covering National Instruments products, refer to the
appropriate location: Help»Patents in your software, the patents.txt file on your CD, or
ni.com/patents.
© 2005 National Instruments Corporation. All rights reserved.
371625A-01
Aug05