1
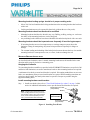
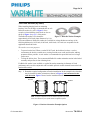
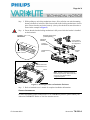
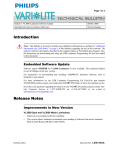
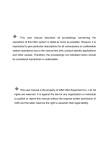
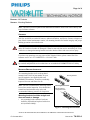
Page 1 of 4
PRODUCT: All Products
SUBJECT: Mounting Brackets
Note: This notice has been updated with additional information. Please read it in its entirety and
keep for future reference.
OVERVIEW
Vari-Lite would like to remind all owners, Authorized Dealers, and Service Centers to inspect, as
part of their normal maintenance routine, all mounting brackets for bracket integrity and proper
latching operation as described herein.
WARNING: Defective or damaged mounting brackets must NOT be used for hanging luminaires. If a bracket is found to be damaged, it must be removed from service and destroyed. Using
a defective or damaged mounting bracket can lead to bracket failure and cause serious injury.
If you have any questions as to any aspect of this Technical Notice, please contact Vari-Lite
customer service at 1-877-VARILITE or +1-214-647-7880.
WARNING: Any repairs or maintenance to VARI❋LITE luminaires should only be performed
by a trained and qualified service technician or at an Authorized VARI❋LITE Service facility.
MOUNTING BRACKET INSPECTION
Two mounting brackets (refer to the product’s
manual for the Vari-Lite part number for your
specific luminaire) are supplied with some
VARI❋LITE luminaires, should be periodically
inspected for wear and fitness for use.
Note: Vari-lite recommends the following criteria
be used in a routine inspection. Users should also
consult local and national safety codes and
recommended industry practices for inspection.
Mounting Brackets
Mounting Bracket Detail
Mounting Bracket
Locking Mechanism
Mounting bracket should be straight and
show no bends or damage.
• Any mounting bracket that has been bent,
should be discarded and replaced with a new
unit (sold individually).
Figure 1: Mounting Bracket Detail
Vari-Lite ❋ 10911 Petal Street Dallas, Texas 75238 USA ❋ 1.877.VARILITE ❋ 1.214.647.7880 ❋ www.vari-lite.com
17 OCTOBER 2014
NOTICE NO.
TN-291A
Page 2 of 4
Mounting bracket locking springs should be in proper working order.
• Often, Vari-Lite has found that the locking mechanism on the mounting brackets has been bent
with a tool.
•
Locking mechanisms are to be operated by hand only (without the use of any tools).
Mounting brackets should not be altered or modified.
• Mounting brackets should not be altered in any way. Drilling, welding, cutting, etc. can lessen
the ability of the mounting bracket to work as designed.
•
Any mounting bracket that has been altered should be discarded and replaced with a new unit.
Mounting brackets should be inspected more frequently if used during transport.
• If mounting brackets are used on transport truss or carriage transport system where the
luminaire is hung for transporting, they must be inspected more frequently for fatigue or
damage.
•
The constant loading and unloading of the bolted joint (between the truss hook or claw and the
mounting bracket) in a transport truss can, over time, weaken or damage the rail.
MOUNTING BRACKET INSTALLATION
As described in the luminaire owner’s manual, mounting brackets must be installed in the same
direction and be properly locked over mounting posts.
Hanging the Luminaire
Two mounting bracket assemblies (as provided with all VARI❋LITE luminaires except Series 500
and Series 1000 luminaires) are used to attach truss hooks or other mounting hardware as required.
A minimum of one hook per truss hook bracket is required. If mounting method does not use truss
hooks, two attachment points per truss hook bracket are required. When attaching more than one
point on a single bracket, the attach points must be spaced as far apart as possible using the
supplied mounting holes.
Install mounting hardware and brackets:
Step 1. Install truss hooks (also refer to “Truss Hook Hardware (by others)” on page 3 of this
notice for additional information) on two provided truss hook brackets as required.
Note: Various types of truss hooks can be
used. The Mega Claw truss hook (as shown in
this example) as well as many other standard
hooks, can be ordered separately from VariLite or your Authorized VARI*LITE Dealer.
Mega Claw Truss Hook
(not provided)
Bracket
Example Truss
Hook Installation
Truss Hook Hardware
(not provided)
Figure 2: Installing Truss Hooks
17 OCTOBER 2014
NOTICE NO.
TN-291A
Page 3 of 4
Truss Hook Hardware (by others)
When installing hanging hooks on mounting
brackets, Vari-Lite strongly recommends the use of a
Belleville washer (by others, Figure 3 shows
examples) when installing a truss hook or claw as
shown in Figure 2 on page 3 of this notice.
Figure 3: Belleville Washer Examples
The Belleville washer’s size should be
approximately 0.505-inch (inner diameter) by 1.00inch (outer diameter). Belleville washers are available in various thicknesses and any of the
following thicknesses (0.035-inch, 0.043-inch, 0.050-inch, 0.073-inch) are acceptable for the
application described herein.
The washer serves two purposes:
•
To spread out the load. When a washer IS NOT used, the bolt head (without a washer)
concentrates the load in a smaller area, creating focused stress on the steel bracket, making
premature failure possible. A steel washer is recommended to spread this load over a larger
surface area.
•
To keep the bolt in place. The recommended Belleville washer maintains tension in the bolted
assembly and prevents it from vibrating loose.
If a Belleville washer is not available, a regular flat washer measuring in diameter of 1inch
(minimum) can be used in conjunction with a suitable split lock washer situated between the bolt
head and flat washer.
Step
2. Determine required configuration of bracket installation. In the example below, brackets
may be installed in either orientation as shown in Figure 4, but both must face the
same direction. Figure 5 shows bracket installation details.
Bracket
Bracket
Note: Example configuration shown for reference purposes only. Refer
to the user’s manual for your specific model’s configuration options.
Figure 4: Bracket Orientation Example Options
17 OCTOBER 2014
NOTICE NO.
TN-291A
Page 4 of 4
Step
3. While pulling up on locking mechanism release, fit keyed holes onto raised mounting
buttons at bottom of enclosure. Slide forward and release locking mechanism to lock in
place. Ensure brackets are locked securely. (Always face brackets in same direction as
shown in the example in Figure 5.)
Step
4. Ensure that the bracket locking mechanism is fully seated after the bracket is installed
on the luminaire.
Example Truss Hook
(sold separately)
Locking
Mechanism
Mounting
Bracket
Face brackets in
same direction for
all configurations
Locking
Mechanism
Raised Mounting
Button
Press up to
install or release
Keyed
Hole
Fit over buttons and
slide forward to lock
Locked
Note: Example configuration shown for
reference purposes only. Refer to the user’s
manual for your specific model’s
configuration options.
Figure 5: Installing Brackets on Luminaire Enclosure
Step
5. Refer to luminaire user’s manual for complete installation information.
CONTACT INFORMATION
For more information on this technical notice or on VARI❋LITE products, please contact your
Authorized VARI❋LITE Dealer or Vari-Lite customer service.
17 OCTOBER 2014
NOTICE NO.
TN-291A