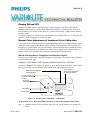
1
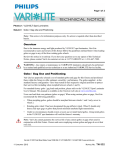
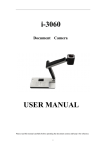
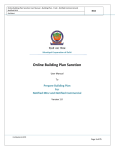
Page 1 of 6
SUBJECT: VLX
Wash Luminaire Software Release
DISTRIBUTION: Service
SERIES: VLX
Centers, End Users
STATUS: Routine
Introduction
Embedded Software Release
Vari-Lite has a new software release for VLX Wash Luminaires. Software version 07/16/10 (file
name, VLX_071610.bin) is now available for download and installation. Vari-Lite strongly
recommends all owners and users of the VLX Wash Luminaire download and install this new
version of software from the Support section of the Vari-Lite web site (www.vari-lite.com). Please
review this bulletin in its entirety before downloading and installing the software.
VLX Wash Luminaires manufactured on and after 07/26/10 will have this software installed.
Note: Programming adjustments may be necessary. Please contact your console manufacturer for
any profile updates.
For instructions on downloading and installing VARI❋ LITE luminaire software, refer to
luminaire’s user manual.
For more information on the USB Luminaire Programming Kit (Vari-Lite part number
28.8500.0054), please contact your Authorized VARI❋ LITE Dealer or Vari-Lite customer service.
If you have any questions regarding this release or your VARI❋ LITE product, please contact VariLite Customer Service at 1-877-VARILITE (or +1-214-647-7880) or via e-mail at
[email protected].
Release Notes & Updated Channel Map
Updates to VLX Wash software (07/16/10):
Fixture ID
This version of VLX software introduces the use of Fixture ID. Fixture ID is used to generate the
random functions in the strobe. Fixture ID is normally set to match the serial number of the
fixture. It is, however, changeable via the menu system as follows:
Configure -> Change Lum ID -> XXXXXX
.
26 JULY 2010
BULLETIN NO.
LSW-053
Page 2 of 6
IMPORTANT! Each VLX wash must have a unique and different Fixture ID (no matter what the
number happens to be). Because Random Strobe function is linked to the unit’s Fixture ID, luminaires with the same Fixture ID will operate the same when random strobing is desired.
Status Indicator LEDs
This version of VLX software introduces the "data transmit and receive status indicator" LEDs on
the display board. When DMX is present, the Rx (data receiving) LED will flash rapidly. When
no DMX is present, the Rx will flash slowly. The Tx (transmitting data) LED will flash rapidly
when sending software or fixture data from the sending fixture. Conversely, the receiving fixtures
will flash Rx LED.
Status LEDs can be turned ON or OFF via the Control Channel (in conjunction with the LCD
Display - see “Display ON and OFF”). For Control Channel information, please refer to “Updated
Channel Map”.
Pan & Tilt Operation
The pan/tilt operation has been modified to support more effectively the use of a top hat and/or
other accessories mounted to the nose of the fixture.
Menu Button Shortcuts
In this version of VLX wash software, Vari-Lite has implemented some useful menu button shortcuts. These shortcuts are:
Action
Buttons
Comments
LUMINAIRE RESET
[ESC] and [UP ARROW]
(simultaneously)
Resets luminaire.
DISABLE PAN/TILT
[UP ARROW] and [DOWN
ARROW] (simultaneously)
Disables pan and tilt operation. Luminaire will not respond to any
DMX pan or tilt commands until pan and tilt is enabled by user.
LED QUICK TEST*
[ENTER] and [UP ARROW]
(simultaneously)
LED Quick Test is a useful tool to check the operation of all LEDs.
The fixture will check operation of all 28 individual LEDs, one color at
a time, in the order of each driver board. For example, the test will
scroll Red LED 1, Red LED 2, Red LED 3, Red LED 4, Red LED 5,
Red LED 6, Red LED 7, Pause, Green LED 1, Green LED 2, Green
LED 3, and so on through all LEDs.
DISABLE MOTORS ON
POWER UP
Power up fixture and press/
hold [ESC] until DMX
address appears in LCD display.
Temporarily disables all motors in Luminaire (during power up routine only). Useful for addressing fixtures in their cases.
Tilt Sensor Software Issue Fix
This version of VLX software has fixed an issue discovered in a previous version (01/27/10) of
software. The issue involved the tilt sensor, which the sensor would intermittently send an error
message after a fixture re-calibration. This issue is now resolved and tilt operation will calibrate
properly.
26 JULY 2010
BULLETIN NO.
LSW-053
Page 3 of 6
Display ON and OFF
Vari-Lite has added a feature to the luminaire’s Control Channel to turn ON or turn OFF the
backlight on the luminaire’s LCD Display AND Status LEDs (see “Status Indicator LEDs” for
their operation) via a control console. Refer to “Updated Channel Map” of this technical bulletin
for more details.
To change display ON / OFF setting, set control channel (23) to DMX value of 3 - 4, hold value for
at least 3 seconds, and then give a discreet 0 value.
Manual Color Adjustment of Luminaire Color Calibration
This version of VLX software allows for a manual adjustment of the color calibration that is stored
within the fixture's Main Control Board (MCB). Manual color adjustments will provide the user
the ability to "visually match" the color and intensity between multiple fixtures should they desire
to. LED Correction must be turned ON for the manual color adjustment to be applied. There are
two ways to access the manual color and intensity adjustment as described herein.
Manual Color Adjustment Through the Luminaire Menu System
The first way to adjust colors is manually through the menu system. The manual color adjustment
is located in the menu path:
Configure -> LED Modes -> LED Correction (Must be turned ON) -> Field Adj
As shown in Figure 1-1, a window will appear in the LCD Display that will allow access to Red
(R), Green (G), Blue (B), and Dimmer (D) parameters that can be adjusted as desired.
Arrow Indicator
(shows which parameter
is currently selected)
DMX Value of Parameter
(being adjusted)
R, G, B, and Dimmer
Parameter Adjustment
Window
Arrow Keys
(Left/Right/Up/Down)
65535
POWER
R
G
Enter Button
TX
B
D
ENTER
RX
ERROR
Escape (ESC)
ESC
Figure 1-1: Manual Color Adjustment - LCD Display
To adjust Red, Green, Blue, and Dimmer (Intensity) values in through the menu system:
Step
26 JULY 2010
1. Luminaire must be powered and all values (R, G, B, and D) should be set manually to
100%
BULLETIN NO.
LSW-053
Page 4 of 6
Step
2. Access Field Adj section of menu system as follows:
Configure -> LED Modes -> LED Correction (Must be turned ON) -> Field Adj
Step
3. Using UP and DOWN arrow keys, select parameter to adjust.
Step
4. Using LEFT and RIGHT arrow keys, adjust parameter.
Step
5. Repeats Steps 3 and 4 as desired for each parameter until preferred color is achieved.
IMPORTANT! Pressing ESC (escape) while in this menu will automatically store the adjusted
values with the LED correction. When LED Correction is turned ON, any adjustments you’ve
made will be reflected. To return back to the factory calibration, simply adjust the R, G, B, and D
back to the values of 65535.
Manual Color Adjustment Through a Control Console
Note: Before adjustment through the fixture control channel can be done, a proper console profile
is required. Please contact your console manufacturer for any profile updates.
The other way to manipulate the color adjustment is via the control console. After making sure
color calibration is ON, set control channel (23) to a DMX value of 121-122, hold value for at least
3 seconds then set control channel to a DMX value of 0 (discreet value, without scaling). This will
set the fixture into a color calibration "adjustment mode".
While in Adjustment Mode modify Red, Green, Blue and/or Dimmer channels to desired color /
intensity. Once color is determined, set control channel to a DMX value of 124-125, hold for at
least 3 seconds, then give a DMX value of 0. This will store the values into the color calibration.
IMPORTANT NOTES:
• After the value of "0" is given during control console adjustment, the color or output of the
fixture - as the user has adjusted it - will suddenly change. If the user returns Red, Green,
Blue, and/or Dimmer values for the luminaire back to full from the desk, the fixture will then
match the color (s) and/or intensity values that they have adjusted.
•
Any adjustments to the calibration that have been made through the menu system or via the
control channel may be viewed via the adjustment window on the luminaire itself as values of
less than 65535 on the display bars for each of the four parameters. Values of less than 100%
on any of these parameters indicate that a manual adjustment has been performed on the
fixture and stored.
•
To return back to the factory calibration, simply adjust the R, G, B, and D back to the values of
65535.
Note: See “Updated Channel Map” of this technical bulletin for the additional Control Channel
values for this functionality.
26 JULY 2010
BULLETIN NO.
LSW-053
Page 5 of 6
Updated Channel Map
Below is an updated channel map for the VLX wash luminaire. Note, changes/additions (for this
version of software) are indicated in bold.
DMX
Channel
Parameter
1
Intensity - High Byte
2
Intensity - Low Byte
3
Pan - High Byte
4
Pan - Low Byte
5
Tilt - High Byte
6
Tilt - Low Byte
7
Red - High Byte
8
Red - Low Byte
9
Green - High Byte
10
Green - Low Byte
Range DMX
Range%
Default ***
Description
0 - 65535
0 - 100%
0
16 bit control for intensity of LED settings
0 - 65535
0 - 100%
32768
16 bit control for Pan - 540o of movement
0 - 65535
0 - 100%
32768
16 bit control for Tilt - 270o of movement
0 - 65535
0 - 100%
0
16 bit control of Red LEDs from 0 to full
0 - 65535
0 - 100%
0
16 bit control of Green LEDs from 0 to full
0 - 65535
0 - 100%
0
16 bit control of Blue LEDs from 0 to full
0 - 65535
0 - 100%
0
16 bit control of White LEDs from 0 to full
11
Blue - High Byte
12
Blue - Low Byte
13
White - High Byte
14
White - Low Byte
15
Not used
N/A
N/A
N/A
For Future Use
16
Not used
N/A
N/A
N/A
For Future Use
17
Beam Spreader
0 - 255
0 - 100%
0
Controls beam angle from 23° (DMX 0) to 58° (DMX 255)
18
Strobe
0 - 255
0 - 100%
0
Controls strobe operations as follows:
Open = DMX 0 - 2
Closed = DMX 3 - 5
Slow Rand = DMX 6 - 7
Med Rand = DMX 8 - 10
Fast Rand = DMX 11 - 12
Strobe Range = DMX 13 - 127 (fastest)
Pulse + Slow Rand = DMX 128 - 129
Pulse + Med Rand = DMX 130 - 131
Pulse + Fast Rand = DMX 132 - 133
Pulse + Range = DMX 134 - 191
Pulse - Slow Rand = DMX 192 - 193
Pulse - Med Rand = DMX 194 - 195
Pulse - Fast Rand = DMX 196 - 197
Pulse - Range = DMX 198 - 255
19
Intensity Time
0 - 255
0 - 100%
255
Allows for luminaire timing of intensity. Profile should
default to DMX 255 for smoothest console fade times. See
user manual for more information.
20
Focus Time
0 - 255
0 - 100%
255
Allows for luminaire timing of pan and tilt. Profile should
default to DMX 255 for smoothest console fade times. See
user manual for more information.
21
Color Time
0 - 255
0 - 100%
255
Allows for luminaire timing of LEDs. Profile should default
to DMX 255 for smoothest console fade times. See user
manual for more information.
22
Beam Time
0 - 255
0 - 100%
255
Allows for luminaire timing of zoom and intensity. Profile
should default to DMX 255 for smoothest console fade
times. See user manual for more information.
Note, Updated Channel Map continued on next page.
26 JULY 2010
BULLETIN NO.
LSW-053
Page 6 of 6
23
Control
0 - 255
0 - 100%
0
Used to set different modes, parameters, and functions of
the VLX wash. Set control channel value for desired
action. Hold value for at least 3 seconds. Set control channel value to 0 without any scaling. See User Manual for
more info or examples.
Default Setting on Console = DMX 0
Display On/Off = DMX 3-4
Reset All to Defaults* = DMX 5 - 7
Quiet Mode† = DMX 11 - 13
Level Light Mode† = DMX 14 -16
Constant Fans Mode† = DMX 17 - 19
Normal Mode† = DMX 20 - 22
Dimmer Curve LINEAR† = DMX 31 - 32
Dimmer Curve SQUARE LAW† = DMX 34 - 35
Full Luminaire Reset = DMX 81 - 87
Color Calibration OFF† = DMX 116 - 117
Color Calibration ON† = DMX 118 - 120
Manual Color Adjust ENABLE† = DMX 121 - 122
Manual Color Adjust STORE† = DMX 124 - 125
Fixture Sleep = DMX 245 - 249
Fixture Wake Up* = DMX 250 - 255
Notes:
* When resetting to defaults (DMX 5 - 7), the following will be enabled on the luminaire - Normal
Mode, Dimmer Curve SQUARE LAW, and Color Calibration ON.
**Please note that Fixture Wake Up will completely re-calibrate the fixture.
† These settings require the Command Lock in Menu to be set to OFF in order to change on Control Channel. Resetting to defaults (DMX 5 - 7) will turn Command Lock OFF.
*** Defaults values are recommended console default values
26 JULY 2010
BULLETIN NO.
LSW-053