1
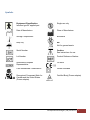
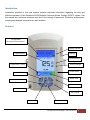
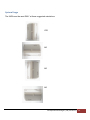
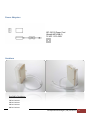
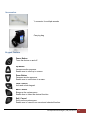
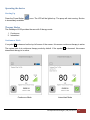
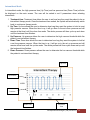
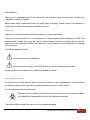
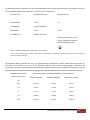
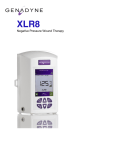
XLR8 Negative Pressure Wound Therapy TABLE OF CONTENTS WARNINGS ................................................................................................................................ 4 SAFETY STANDARDS ................................................................................................................... 4 SYMBOLS ................................................................................................................................... 5 INDICATION FOR USE ................................................................................................................. 6 CONTRAINDICATIONS ................................................................................................................ 6 PRECAUTIONS ............................................................................................................................ 6 STANDARD PRECAUTIONS ......................................................................................................................................................................... 6 CONTINUOUS VERSUS INTERMITTENT THERAPY .......................................................................................................................................... 6 PATIENT SIZE AND WEIGHT ...................................................................................................................................................................... 7 SPINAL CORD INJURY ................................................................................................................................................................................ 7 BRADYCARDIA .......................................................................................................................................................................................... 7 ENTERIC FISTULAS ................................................................................................................................................................................... 7 PROTECT PERIWOUND SKIN ...................................................................................................................................................................... 7 CIRCUMFERENTIAL DRESSING APPLICATION ............................................................................................................................................... 8 PHYSICIAN ORDERS .................................................................................................................... 8 INTRODUCTION.......................................................................................................................... 9 FEATURES .................................................................................................................................. 9 SYSTEM USAGE ........................................................................................................................ 10 POWER ADAPTERS ................................................................................................................... 11 CANISTERS ............................................................................................................................... 11 ACCESSORIES ........................................................................................................................... 12 KEYPAD FEATURE ..................................................................................................................... 12 OPERATING THE DEVICE .......................................................................................................... 13 STARTING UP........................................................................................................................................................................................... 13 THERAPY MODES ..................................................................................................................... 13 CONTINUOUS MODE ................................................................................................................................................................................. 13 INTERMITTENT MODE................................................................................................................................................................................ 14 THERAPY SELECTION ................................................................................................................................................................................. 15 ADJUSTING THE PRESSURE ...................................................................................................... 16 Genadyne Biotechnologies | EN (V 6.0511.1) 2 ALARMS ................................................................................................................................... 16 ENABLE / DISABLE .................................................................................................................................................................................... 17 TARGET TIMEOUT ..................................................................................................................................................................................... 18 ALARM LOG ............................................................................................................................................................................................ 19 ADVANCE MENU ...................................................................................................................... 20 PREFERENCES .......................................................................................................................................................................................... 20 SYSTEM INFO ........................................................................................................................................................................................... 21 LANGUAGE SELECTION ............................................................................................................................................................................... 21 BATTERY POWER...................................................................................................................... 22 MAINTENANCE ........................................................................................................................ 23 CLEANING ............................................................................................................................................................................................... 23 RETURNING THE DEVICE ............................................................................................................................................................................. 23 ELECTROMAGNETIC COMPATIBILITY........................................................................................ 24 ELECTROMAGNETIC COMPATIBILITY.............................................................................................................................................................. 25 ELECTROMAGNETIC COMPATIBILITY.............................................................................................................................................................. 26 LIMITED WARRANTY ................................................................................................................ 27 TECHNICAL SPECIFICATIONS .................................................................................................... 28 CONTACT INFORMATION ......................................................................................................... 29 ADVANCE FEATURES ................................................................................................................ 30 LOCK / UNLOCK KEYPAD ............................................................................................................................................................................ 30 ALARM LOG CLEARING .............................................................................................................................................................................. 30 TREATMENT TIME RESET (BOTH CONTINUOUS AND INTERMITTENT) ................................................................................................................... 31 Genadyne Biotechnologies | EN (V 6.0511.1) 3 Warnings DO NOT OPERATE THIS EQUIPMENT WITHOUT FIRST READING AND UNDERSTANDING THIS MANUAL. IF YOU ARE UNABLE TO UNDERSTAND THE WARNINGS, CAUTIONS AND INSTRUCTIONS, CONTACT A HEALTHCARE PROFESSIONAL, DEALER OR TECHNICAL PERSONNEL IF APPLICABLE BEFORE ATTEMPTING TO USE THIS EQUIPMENT. OTHERWISE INJURY OR DAMAGE MAY RESULT. BEFORE PERFORMING ANY MAINTENANCE TO THE CONSOLE, DISCONNECT THE POWER CORD FROM THE WALL OUTLET. REFER SERVICING TO QUALIFIED PERSONNEL ONLY. GROUNDING RELIABILITY DEPENDS UPON A PROPERLY GROUNDED WALL OUTLET. DO NOT USE THE POWER UNIT IN THE PRESENCE OF FLAMMABLE GASES SUCH AS ANESTHETIC AGENTS. WARNING/CAUTION NOTICES USED IN THIS MANUAL APPLY TO HAZARDS OR UNSAFE PRACTICES WHICH COULD RESULT IN PERSONAL INJURY OR PROPERTY DAMAGE. PLEASE MAKE SURE THAT THE POWER ADAPTER IS PLUGGED INTO THE WALL BEFORE PLUGGING INTO THE UNIT. FAILURE TO FOLLOW THIS PRECAUTION MIGHT CAUSES DAMAGE TO THE UNIT. Safety Standards This system has been designed to comply with the regulatory safety standards including UL 60601-1, CAN/CSA C22.2 No. 601.1-M90, CE 93/42/EEC Class IIa. This system is internally powered with battery and externally powered with an approved Class II power adapter. Genadyne Biotechnologies | EN (V 6.0511.1) 4 Symbols Equipment Classification Isolation type BF applied part Single use only Date of Manufacture Place of Manufacture Storage Temperature Biohazard Keep Dry EU: Not for general waste Serial Number Caution: See instructions for use Lot Number Product Reference Number Authorized European Representative CE Mark CSA International Classification Double insulated Recognized Component Mark for Canada and the United States (Power adapter) Certified Body (Power adapter) Genadyne Biotechnologies | EN (V 6.0511.1) 5 Indication for use The Genadyne XLR8 Wound Vacuum System is indicated for use in patients who would benefit from negative pressure wound therapy particularly as the device may promote wound healing by the removal of excess exudates, infectious material and tissue debris. Contraindications Genadyne XLR8 Therapy is contraindicated for patients with: o o o o Malignancy in the wound Untreated osteomyelitis (NOTE: Refer to Clinical Guide for Osteomyelitis information.) Non-enteric and unexplored fistulas Necrotic tissue with eschar present (NOTE: After debridement of necrotic tissue and complete removal of eschar, Genadyne XLR8 Therapy may be used.) CAUTION: Do not place dressing directly in contact with: o o o o Exposed blood vessels Anastomotic sites Organs Nerves NOTE: Refer to Clinical Guide for additional information concerning Bleeding. Precautions Precautions should be taken for patients who are or may be: receiving anticoagulant therapy, suffering from difficult hemostasis, untreated for malnutrition and non-compliant or combative. Standard Precautions To reduce the risk of transmission of blood borne pathogens, apply standard precautions for infection control with all patients, per institutional protocol, regardless of their diagnosis or presumed infection status. In addition to gloves, use gown and goggles if exposure to body fluid is likely. Continuous versus Intermittent Therapy Continuous, rather than intermittent, Genadyne XLR8 Therapy is recommended over unstable structures, such as an unstable chest wall or non-intact fascia, in order to help minimize movement and stabilize the wound bed. Continuous therapy is also generally recommended for patients at Genadyne Biotechnologies | EN (V 6.0511.1) 6 increased risk of bleeding, highly exudating wounds, fresh flaps and grafts, and wounds with acute enteric fistulae. Patient Size and Weight The size and weight of the patient should be considered when prescribing Genadyne XLR8 Therapy. Infants, children, certain small adults and elderly patients should be closely monitored for fluid loss and dehydration. Also, patients with highly exudating wounds or large wounds in relation to the patient size and weight should be closely monitored, as they may have a risk of excessive fluid loss and dehydration. When monitoring fluid output, consider the volume of fluid in both the tubing and canister. Spinal Cord Injury In the event a patient experiences autonomic hyperreflexia (sudden elevation in blood pressure or heart rate in response to stimulation of the sympathetic nervous system), discontinue Genadyne XLR8 Therapy to help minimize sensory stimulation and seek immediate medical assistance. Bradycardia To minimize the risk of bradycardia, the Genadyne XLR8 Therapy dressing must not be placed in proximity to the vagus nerve. Enteric Fistulas Wounds with enteric fistulas require special precautions to optimize Genadyne XLR8 Therapy. In certain circumstances, the Genadyne XLR8 Therapy may help to promote healing in wounds with an enteric fistula. When the physician orders the Genadyne XLR8 Therapy, it is recommended that support from an expert clinician is sought. Genadyne XLR8 Therapy is not recommended or designed for fistula effluent management or containment, but as an aid to wound healing. Genadyne XLR8 Therapy is not recommended if enteric fistula effluent management or containment is the sole goal of this therapy. Protect Periwound Skin Consider use of a skin preparation product to protect periwound skin. Do not allow wound filler to overlap onto intact skin. Protect fragile/friable periwound skin with additional hydrocolloid or other transparent film. • Multiple layers of the transparent film dressing may decrease the moisture vapor transmission rate, which may increase the risk of maceration. • If any signs of irritation or sensitivity to the film dressing, wound filler or tubing assembly appear, discontinue use and consult a physician. • To avoid trauma to the periwound skin, do not pull or stretch the transparent film over the wound filler dressing during film application. • Extra caution should be used for patients with neuropathic etiologies or circulatory compromise. Genadyne Biotechnologies | EN (V 6.0511.1) 7 Circumferential Dressing Application Avoid use of circumferential dressings except in the presence of anasarca or excessively weeping extremities, where a circumferential film technique may be necessary to establish and maintain a seal. Consider using multiple small pieces of transparent film rather than one continuous piece to minimize the risk of decreased distal circulation. Extreme care should be taken not to stretch or pull the film when securing it, but let it attach loosely and stabilize edges with an elastic wrap if necessary. When using circumferential film techniques, it is crucial to systematically and recurrently palpate distal pulses and assess distal circulatory status. If circulatory compromise is suspected, discontinue therapy, remove dressing and contact a physician. Physician Orders Prior to placement of the Genadyne XLR8, the medical professional treating the wound must assess how to best use the system for an individual wound. It is important to carefully assess the wound and patient to ensure clinical indications for Negative Pressure Wound Therapy (NPWT) are met. All orders should include: - Wound location, size and type Dressing kit type Vacuum settings Frequency of dressing changes Adjunctive dressings Genadyne Biotechnologies | EN (V 6.0511.1) 8 Introduction Information provided in this user manual contains important information regarding the safe and effective operation of the Genadyne XLR8 Negative Pressure Wound Therapy (NPWT) system. Use this manual as a personal reference and also in the training of personnel. Preventive maintenance, cleaning and disposal information are also included. Features Therapy Mode (Continuous or Intermittent) Battery Indicator Target Pressure USB Plug Actual Pressure Keypad Lock / Unlock Suction Strength System Status On / OFF Button Date & Time Lock / Unlock Button Menu / Select Power Jack Inlet Exit / Cancel Up Button Down Button Genadyne Biotechnologies | EN (V 6.0511.1) 9 System Usage The XLR8 must be used ONLY at these suggested orientations. YES NO NO NO Genadyne Biotechnologies | EN (V 6.0511.1) 10 Power Adapters IEC-320 C8 Power Cord (Model# MPU30B-5) 19 VDC 1.57A 30W Canisters Available Canisters: 200 cc Canisters 400 cc Canisters 600 cc Canisters 800 cc Canisters Genadyne Biotechnologies | EN (V 6.0511.1) 11 Accessories Y connector for multiple wounds Carrying bag Keypad Feature Power Button Turns the device on and off. Up Button Increase suction pressure. Enable user to scroll up in a menu. Down Button Decrease suction pressure. Enable user to scroll down in a menu. Lock / Unlock Lock and unlock keypad. Menu / Select Brings up the system menu. Enable user to select the desired function. Exit / Cancel Exit from the system menu. Enable user to cancel from current and selected function. Genadyne Biotechnologies | EN (V 6.0511.1) 12 Operating the device Starting Up Press the Power Button is immediately available. once. The LCD will be lighted up. The pump will start running. Suction Therapy Modes The Genadyne XLR8 provides the user with 2 therapy mode. 1. Continuous 2. Intermittent Continuous Mode If a symbol C is observed on the top left corner of the screen, this means continuous therapy is active. The system sets it at continuous therapy mode by default. If the symbol intermittent therapy is in active. Continuous Mode I is observed, this means Intermittent Mode Genadyne Biotechnologies | EN (V 6.0511.1) 13 Intermittent Mode In intermittent mode, the high pressure time (Up Time) and low pressure time (Down Time) will also be displayed on the main screen. The user will be asked to set 5 parameters when selecting intermittent:1. Treatment time. Treatment time allows the user to set how long they want the patient to be on intermittent therapy mode. Once the treatment time ended, the system will automatically switch back to continuous therapy mode. 2. Up Time. Up time allows the user to determine how long they want the system to hold at a set high pressure vacuum. When the time is up, it will go down to the set down pressure and will remain at that level until the down time ends. The whole process will then cycle up and down until the treatment time finishes. 3. Up Pressure. Up pressure allows the user to determine the high vacuum threshold while the patient is on intermittent therapy. 4. Down Time. Down time allows the user to determine how long they want the system to hold at a set low pressure vacuum. When the time is up, it will go up to the set up pressure and will remain at that level until the up time ends. The whole process will then cycle down and up until the treatment time finishes. 5. Down Pressure. Down pressure allows the user to determine the low vacuum threshold while the patient is on intermittent therapy. Up Time Up Pressure Down Pressure Down Time Treatment Time Genadyne Biotechnologies | EN (V 6.0511.1) 14 Therapy Selection To select which therapy to use at anytime 1. Press the Menu / Select button. 2. Scroll using the Up button or Down button and choose the Treatment Mode function by pressing the Menu / Select button once. 3. Choose either Continuous or Intermittent by pressing the Menu / Select button once. 4. For Continuous selection, after Step 3, exit to the main screen by holding on to the Exit / Cancel button for 5 seconds. The user can also press the Exit / Cancel button 2 times or more to exit to the main screen. 5. For Intermittent selection, after Step 3, press Menu / Select button one more time to enter into the intermittent setting screen. a. Treatment Time. Press the Menu / Select button to enter the desired treatment time. Use the Up button or Down button to increase or decrease the desired time. All settings are in hours. Once the treatment time is set, press the Menu / Select button again to confirm selection. It will then bring you back to the Intermittent setting screen. b. Up Time. Press the Menu / Select button to enter the desired up time. Use the Up button or Down button to increase or decrease the desired time. All settings are in minutes. Once the up time is set, press the Menu / Select button again to confirm selection. It will then bring you back to the Intermittent setting screen. c. Up Pressure. Press the Menu / Select button to enter the desired high pressure threshold. Use the Up button or Down button to increase or decrease the desired vacuum pressure. All settings are in mmHg. Once the vacuum pressure is set, press the Menu / Select button to confirm selection. It will then bring you back to the Intermittent setting screen. d. Down Time. Press the Menu / Select button to enter the desired down time. Use the Up button or Down button to increase or decrease the desired time. All settings are in minutes. Once the down time is set, press the Menu / Select button to confirm selection. It will then bring you back to the Intermittent setting screen. e. Down Pressure. Press the Menu / Select button to enter the desired low pressure threshold. Use the Up button or Down button to increase or decrease the desired vacuum pressure. All settings are in mmHg. Once the vacuum pressure is set, press the Menu / Select button to confirm selection. It will then bring you back to the Intermittent setting screen. 6. To exit the intermittent setting screen and return to the main screen, hold on to the Exit / Cancel button for 5 seconds. The user can also press the Exit / Cancel button 3 times or more to exit to the main screen. Genadyne Biotechnologies | EN (V 6.0511.1) 15 Adjusting the pressure At any given point in time (except when the keypad is locked), whether the system is On or Off, whether it is on a therapy or not, the user can adjust the pressure by pressing the Up button to increase the vacuum pressure or the Down button to decrease the down pressure. Alarms There are 4 alarm notifications in the XLR8. Target Timeout (Leakage) Whenever there is a leak in the dressing or the canister, the Target Timeout alarm will occur. Low Battery Whenever the battery level is less than 2%, which typically it will have less than 30 minutes of operating time, the low battery alarm will occur. Blockage Blockage alarm occurs when there is a blockage in between wound dressing and the canister. Canister Full Canister Full alarm occurs when the canister is filled with exudates. Genadyne Biotechnologies | EN (V 6.0511.1) 16 Unverified/Unacknowledged alarm(s) present User needs to refer to Alarm Log verify the problem. The alarm bell will not stop until the user acknowledges the notification by pressing the Menu/Select button when the alarm log screen is up. In the event when the alarm screen is not present, please follow the instructions on how to find the alarm log in this manual. Enable / Disable The XLR8 provides the option for the user to enable or disable which alarm notifications they want to have turned on. To Enable / Disable the Alarm 1. Press Menu/Select button, use the Up/Down button to navigate to Alarm Setup, press the Menu/Select button again to enter into the Alarm Setup function. 2. Press Menu/Select button to select the Enable/Disable function. 3. Genadyne Biotechnologies | EN (V 6.0511.1) 17 Target Timeout Low Battery Blockage Canister Full Arrows on the side means enabled. To select the desired alarm, navigate to the desired alarm and press the Menu/Select button once. The arrow will appear on the side. Target Timeout Low Battery Blockage Canister Full Disabled (No arrows). To disable the alarms, navigate to the desired alarm and press Menu/Select once to have the arrow disappear. 4. To exit to the main screen, press and hold the Exit/Cancel button for 5 seconds. Target Timeout The target timeout function is to enable the user to determine how soon after should the device start alarming to notify the user of a leakage event occurring. For example, if the target timeout is set at 30 seconds, this means that in the event of a target timeout, it will have to last for at least 30 seconds continuously before the system starts alarming. Use the Up/Down button to increase or decrease the desired time limit and press the Menu/Select button to confirm setting. Genadyne Biotechnologies | EN (V 6.0511.1) 18 Alarm Log All alarms are logged and saved in the XLR8 memory. To enter into the alarm log 1. Press Menu/Select button 2. Navigate to Alarm Setup by using the Up/Down button and press the Menu/Select button to enter into the Alarm Setup function 3. Navigate to the Alarm Log by using the Up/Down button and press the Menu/Select button to enter into the Alarm Log screen 4. All the past alarms will be shown on the screen 5. To acknowledged them scroll to the desired alarm notification and press the Menu/Select button 6. The alarm bell will stop once acknowledged. 7. The asterisk (*) on the left side of the notification WILL NOT disappear until the problem is fixed. To exit to the main screen, press and hold on to the Exit/Cancel button for 5 seconds. Genadyne Biotechnologies | EN (V 6.0511.1) 19 Advance Menu The advance menu is for system setups and therefore untrained users should not be navigating into this part of the system unless being authorized to do so. Preferences In preferences, there are 2 functions for user to choose from Time This function will enable the user to change the time accordingly to the local time. To set the time, go to: 1. Menu > Advance Menu > Preference > Time 2. Use the MM, and YYYY. (menu/select) button to toggle between HH, MM, SS, DD, 3. Use the (up) button to increase the value and decrease the value. (down) button to 4. After the correct time and date is entered, press the button to store the vale. 5. Hit the Backlight (lock/unlock) (exit/cancel) button to exit to the main screen. This function allows the user to set the backlight to either brighter or dimmer according to the user’s preference. Genadyne Biotechnologies | EN (V 6.0511.1) 20 System Info System info provides information about the system. Software version, serial number and the usage meter is included in this function. Language Selection This function allows the user to choose which language to use. To select the desired language, navigate using the Up/Down button in the Language and press the Menu/Select button. The words in system will then automatically change to the selected language. Genadyne Biotechnologies | EN (V 6.0511.1) 21 Battery Power The XLR8 can run on both battery powered and / or while plugged in with the power adapter. ONLY USE THE POWER ADAPTER THAT CAME IN THE BOX. DO NOT USE AN UNKNOWN POWER ADAPTER. Battery life is between 2% to 25% Battery life is between 25% to 50% Battery life is between 50% to 75% Battery life is between 75% to 100% Battery life is between 0% to 2% (Alarm notification will occur, user needs to plug in the power adapter to recharge the battery) Battery is charging Battery is fully charged and system is running on while the power adapter is plugged in Genadyne Biotechnologies | EN (V 6.0511.1) 22 Maintenance There are no serviceable parts in the device. Do not attempt to open the enclosure. Contact your distributor if service is required. Before each usage, inspect the device for visible signs of damage. Please contact your distributor if visible signs of abuse and damage have been observed. Cleaning Adherence to facility directives concerning hygiene is of prime importance. Only use low level diluted form of disinfectants or cleaning agents when cleaning the XLR8. Use damped cloth to clean the pump. Be cautious when cleaning because no liquids should enter the power unit. If the liquid goes inside of the power unit, it might cause the unit to malfunction or damage the mechanics. Dry with a separate soft cloth. Do not use solvents or abrasives. Do not immerse any part of the XLR8 in fluid or use an unnecessarily wet cloth. Please contact your distributor if any liquids penetrated the device. Returning the device For any returns or rental returns, prior to returning the device to your representative, the device must be cleaned in line with the steps laid out under the cleaning section of this manual. All used canisters have to be disposed. Disposal of used canisters should follow facility protocols or local ordinances relating to the handling of potentially infected or bio-hazardous materials. The device will also need to be returned in the original packaging. Genadyne Biotechnologies | EN (V 6.0511.1) 23 Electromagnetic Compatibility Guidance and manufacturer’s declaration – electromagnetic emissions The Genadyne XLR8 is intended for use in the electromagnetic environment specified below. The customer or the user of the Genadyne XLR8 should assure that it is used in such an environment. Emission Test RF emissions Compliance Electromagnetic environment - guidance Group 1 The Genadyne XLR8 uses RF energy only for its internal function. Therefore, its RF emissions are very low and are not likely to cause any interference in nearby electronic equipment. Class B The Genadyne XLR8 is suitable for use in all establishments including domestic establishments and those directly connected to the public low-voltage power supply network that supplies buildings used for domestic purposes. CISPR 11 RF emissions CISPR 11 Harmonic emissions Class A IEC 61000-3-2 Voltage fluctuations/ flicker emissions IEC 61000-3-3 Complies Genadyne Biotechnologies | EN (V 6.0511.1) 24 Electromagnetic Compatibility The Genadyne XLR8 is intended for use in the electromagnetic environment specified below. The customer or the user of the Genadyne XLR8 should assure that it is used in such an environment. Immunity test Electrostatic discharge (ESD) IEC 61000-4-2 Electrical fast transient / burst IEC 60601 Test level +/- 6 kV contact +/- 8 kV air IEC 61000-4-4 Surge +/- 2 kV for power supply lines +/- 1 kV for input / output lines +/- 1 kV line(s) to line(s) IEC 61000-4-5 +/- 2 kV line(s) to earth < 5% Ut (>95 % dip in Ut) for 0.5 cycle 40% Ut (60% dip in Ut) for 5 cycles 70% Ut (30% dip in Ut) for 25 cycles IEC 61000-4-11 <5% Ut (>95% dip in Ut) for 5 sec Power frequency (50/60 3 A/m Hz) magnetic field Voltage dips, short interruptions and voltage variations on power supply input lines Compliance level Passed Below Maximum permissible limit Acceptable Performance Acceptable Performance Non Applicable IEC 61000-4-8 Note Ut is the a.c. mains voltage prior to application of the test level Electromagnetic environment – guidance Floors should be wood, concrete or ceramic tile. If floors are covered with synthetic material, the relative humidity should be at least 30%. Mains power quality should be that of a typical commercial or hospital environment. Mains power quality should be that of a typical commercial or hospital environment. Mains power quality should be that of a typical commercial or hospital environment. If the user of the Genadyne XLR8 be powered from an uninterruptable power supply or a battery. Power frequency magnetic fields should be at levels characteristics of a typical location in a typical commercial or hospital environment Genadyne Biotechnologies | EN (V 6.0511.1) 25 Electromagnetic Compatibility The Genadyne XLR8 is intended for use in the electromagnetic environment specified below. The customer or the user of the Genadyne XLR8 should assure that it is used in such an environment. Immunity Test IEC 60601 test level Compliance level Conducted RF 3 Vrms 3V IEC 61000-4-6 150 kHz to 80 MHz Radiated RF 3 V/m IEC 61000-4-3 80 MHz to 2.5 GHz 3 V/m Interference may occur in the vicinity of equipment marked with the following symbol: Note 1: At 80 MHz and 800 MHz, the higher frequency range applies. Note 2: These guidelines may not apply in all situations. Electromagnetic propagation is affected by absorption and reflection from structures, objects and people. The Genadyne XLR8 is intended for use in an electromagnetic environment in which radiated RF disturbances are controlled. The customer or the user of the Genadyne XLR8 can help prevent electromagnetic interference by maintaining a minimum distance between portable and mobile RF communications equipment (transmitters) and the Genadyne XLR8 as recommended below, according to the maximum output power of the communications equipment. Rated maximum output power of transmitter Separation distance according to frequency of transmitter (m) 150 kHz to 80 MHz 80 MHz to 800 MHz 800 MHz to 2.5 GHz 0.01 0.12 m 0.12 m 0.23 m 0.1 0.37 m 0.37 m 0.74 m 1 1.17 m 1.17 m 2.33 m 10 3.69 m 3.69 m 7.38 m 100 11.67 m 11.67 m 23.33 m W Genadyne Biotechnologies | EN (V 6.0511.1) 26 Limited Warranty Genadyne Biotechnologies warrants its products, as listed below for one year on the machine. This warranty does not cover damage or breakdown to Genadyne units due to misuse or improper handling. The company will repair the system outside of the warranty coverage and shall bill the customer for parts and labor. Items sent in for repair outside of warranty period that are paid shall have a limited 90 day warranty commencing from the date the product is shipped back to the customer. Items sent in that are covered under the warranty period shall not have their warranty extended, other than having the time remaining on the warranty continue once the repaired product is shipped back to the customer. The company also reserves the right to revise the warranty policy from time to time and to issue different warranty policies for different products. This warranty shall supersede and replace all warranties of merchantability and fitness applicable to the fullest extent allowed under the laws of State of New York. ---- Warranted Products ---Genadyne A4 Negative Pressure Wound Therapy System Genadyne XLR8 Negative Pressure Wound Therapy System Genadyne Biotechnologies | EN (V 6.0511.1) 27 Technical Specifications VACUUM PUMP Service Life (est.) Minimum Vacuum Maximum Vacuum Suction capacity : Unlimited (Brushless motor) : 50mmHg : 230mmHg : ~4 Liters per Minute DIMENSIONS/WEIGHT Dimension : 5.9” (L) x 3.9” (W) x 2.1” (H) (150 mm x 99 mm x 53 mm) Weight : 1.5 lbs (0.68 kg) ELECTRICAL REQUIREMENT Power : 19 VDC, 1.58A 30W (Min) : 20 VDC (Max) Model : MPU30B-5 Battery Type : Li-Ion rechargeable batteries Recharge Time : ~ 3 Hours Safety : EN55011 Class B : UL/cUL 60601-1 : TUV/GS EN60601-1 : CE Mark (LVD) ENVIRONMENTAL CONDITIONS Operating Conditions : 18°C to 34°C, 65°F to 94°F Relative Humidity : 10% to 95% STORAGE AND SHIPPING CONDITIONS Ambient Temperature : 0°F to 110°F, -18°C to 43°C Relative Humidity : 10% to 95 % PATIENT PROTECTION Type BF COMPLIANCE UL 60601-1 IEC 60601-1 IEC 60601-1-2 CAN/CSA C22.2 No. 601.1 Genadyne Biotechnologies | EN (V 6.0511.1) 28 Contact Information Genadyne Biotechnologies 16 Midland Ave, Hicksville, NY 11801 USA Toll Free 1.800.208.2025 Tel. 1.516.487.8787 Fax 1.516.487.7878 www.genadyne.com Genadyne Canada Genadyne Europe 31 Tamara Pl, Unit #1 Zuiveringweg 94 Obelis S.A. EU Representative Bd. General Wahis 53 Brantford ON N3P 1M8 CANADA 1.888.787.2811 (Toll Free) 1.877.487.7878 (Fax) www.genadyne.ca NL8243 PE Lelystad THE NETHERLANDS +31.36.522.1744 (Tel) +31.36.522.6665 (Fax) www.genadyne.eu 1030 Brussels BELGIUM +32 (0) 2.732.59.54 (Tel) +32 (0) 2.732.60.03 (Fax) www.obelis.net Distributed by Genadyne Biotechnologies | EN (V 6.0511.1) 29 Advance Features Lock / Unlock Keypad To lock the keypad 1. Press and hold the (down) and (menu / select) button, press a sequence of buttons (lock / unlock), then release 2. When the icon changes to 3. To unlock the keypad, repeat step 1 above. 4. The icon will then change from to (Up), (menu / select). , the keypad is locked. . Alarm Log Clearing To clear the alarm log, the user needs to go to the main screen. 1. Press and hold button. (menu / select) 2. Press the (lock / unlock) and release while holding onto number 1. 3. Press the (exit / cancel) and release while holding onto number 1. 4. Release the (menu / select) button. Genadyne Biotechnologies | EN (V 6.0511.1) 30 Treatment Time Reset (Both Continuous and Intermittent) To reset the treatment time, the user needs to go to the main screen. 1. Press and hold (menu / select) button. 2. Press and release in sequence, the 3. Release the (on / off) button, and the (lock / unlock) button. (menu / select) button. 4. The treatment time will be reset to 00:00:00. Genadyne Biotechnologies | EN (V 6.0511.1) 31