1
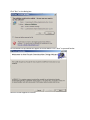
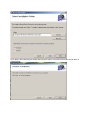
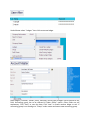
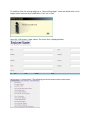
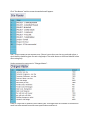
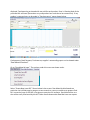
REACH- ACCOUNTANT
CONSTRUCTION SOFTWARE
USER MANUAL
To facilitate new user of this software the following guidelines are enumerated for easy access to the
software. To download Construction software please follow the procedures laid down.
First go to the website www.reachaccountant.com and click “ Builders and Constructions” under the
heading “Industry Vertical (B2C)- found at bottom –left hand side of the opening page as shown below.
The Reach Construction software download page will appear as screened below.
Now click “Download free trial” for downloading construction software on your desktop.
Either open or place it in the“show in folder”option.Then right click on the icon as shown above
Click “Run” on the dialog box.
An installation-set up Wizard will appear as shown below. Click “Next” to proceed further.
Now the screen appears as follows.
Click “Next” after selecting the folder and everyone option. Now the next screen can be seen as
shown below.
Click “Next” to install the software. The installation will start as shown below.
After installed successfully an i-con will appear for construction software as screened below.
Double click on the I-Con. The screen shown below will appear. Go to the “new user” & click.
Fill all the columns in the box that appears and click “Post”. Mail id should be valid email id.
Partner id just put 123 or any number. Select any accounting plan. Till final process is over
Internet connection is mandatory. After all process is over Internet connection is not required
either at the time of opening construction software or entering data into it. Construction
software can be worked in offline mode.
Now go to the “existing user” column and type user id and password as entered in new user
box. Click “Post” to save email id and password.
Then go to “Try” button and click it. A dialog box will appear as shown below. Type same email
id and password as done earlier and click “Login” button. Now the main page of the
construction software will appear on your desktop.
Now the installation process completes.
Hereafter Internet connection is not required. As this is a trial version it is valid for ten days
from the date of installation. The time frame can be extended if this software is purchased.
Find below is the main screen of the Reach Construction Software. The main menus are shown
on the top of this page. Menus displayed on the left hand side are highlights of main menu.
First go to “Master” in the main menu and click it. The following sub menu can be seen.
Select “Company Information” and click. The screen shot is displayed below. Type all company
information against each field and save it. Exit from this menu as well as main menu. Login
again by clicking i-con. Now you can find your company name with financial year on the top of
main menu.
Now select “user” under master. The screen will appear as shown below.
Click “Create New User” and the screen will appear as displayed below.
User Id and password for different personnel can be created and saved here. While opening the
software instead of email id the user id and password created here can be used to open the
software. If any restrictions selected here the software will function with the same restrictions
for the particular id. The user id and password may be changed if required in the following field.
Double click on the name to alter. Save after alteration.
Under Master-select “Ledgers” then click create new ledger.
Bank Ledgers, Customer, Vendor ,Salary, Stationary and all type of ledgers can be created in this
field. Accounting group has to be selected in”Under Group” option. Other fields are self
explanatory. Click “Save” to save the data. Click “new” to create another ledger or exit. If
accounting group is not found go to “Group” under master and create new accounting group.
To modify or alter the existing ledger go to “Alter existing ledger” menu and double click on the
ledger to alter and save after modification. Click “ok” to save.
Now click “staff master” under master. The screen shot is displayed below.
Here enter staff/employee name with other details and save it.
Next menus is “Construction”. The following are the sub menus under construction.
Click “Site Names” and the screen shown below will appear.
Site / Project names can be entered here. If there is more than one site at a particular place, a
clear identity should be given for each site/project. The serial shown on left hand side will come
after saving only.
Under construction next menu is “Charges Master”.
Either it is sqft rate or material rate or labour rate- all charges that are involved in construction
work has to be entered here with exact specifications and save it.
Fill all the column on the top ,then go down to fill working details. A drop up box will appear at
“particular”column. Select desired product and press “Enter” twice. Product followed by rate
will appear. Select “Unit” and use “arrow” to move on. Prepare, save it & select “print” if
necessary.
After quotation select “ Work order Estimation Entry “. Prepare work to be done. Save it.
Now go the main screen. Select “work issue Entry” under “Construction”.
Ascertain work force , expenditure by comparing total estimate in this field for a particular
party either enroute or at the end. Fill all the columns and compare total expenditure.
Others are reports of what we have seen above. Select the respective report and view.
Next screen is the Raw Material Management. Select “Raw material” and the options are:
Select “New Category”. Enter the common products-like Cement, Sand, Iron, Jally , etc.,
In the new group add the sub name or items under the category selected above like Vajram
Cement, Dalmia Cement, etc., Under Iron- 10mm rod, 8 mm rod, etc.,
Now select “Create New Product”. The item code is default. Enter individual product name, sub
name ( if necessary), opening quantity, etc., except tax column. Save it. Now “0” will appear in
the tax column. Item code has to be created for each product at the stock level. If a new
product is purchased then create a product code first & go to purchase screen.
Reorder shown above is the level to place order or has to purchase to maintain stock at
constant level to run the work smoothly & without any deficiency. It may vary depends on
work.
Other options shown under “Raw Material” are report to view wherever needed.
It is better to view “Raw Material Purchase” now. Displayed below is the options available
under Raw Material Purchase.
Under “Create New Supplier” feed Vendor’s data one by one and create vendor master. Save it.
Go to “Raw Material Purchase” & select “Create New Purchase Bill” as displayed.
Fill columns with required input, select –cash or credit , select either “Code” or “Product Name”
and select products by pressing “Enter” twice- now code No, product name, rate, etc., will be
displayed. Feed quantity purchased with tax paid for each product. Save it. Likewise feed all the
purchase bills and save. (Remember-any new product item code has to be created first). If any
product is returned entry to be made in “Purchase entry” menu shown below.
Cash payment, Bank Payment, Purchase tax, supplier’s outstanding report can be viewed under
“Raw Material Purchase”
Go to “Raw Material Issue”. The options under this menu are shown under.
Select “Create New Issue Bill”. Shown below is the screen. Raw Materials distributed to a
particular site is billed stage by stage or at one stretch to a party to enable us to prepare final
bill. In practical copy of this bills is not given to party but for accounts. Stock distribution to a
site can be easily monitored by this bill. Other menu shown under Raw Mat issue are reports.
Under “Reports” the following menu can be viewed.
Ledger, Bank, Receipt, Payment, Journal, Day Book &Expense Abstract can be viewed by
selecting the particular option under Reports.
Under Voucher the following menu will appear.
Select “ Create New Voucher Entry”. Options under this menu is screened here.
In this menu-Receipt, Payment, Journal, withdraw, deposit, credit note, Bank Receipt & Bank
Payment options are there. Select desired option and fill column with relevant data. Save it.
Under “Tools” following options can be seen.
Back up can be taken up & Accounting period can be changed by selecting proper menu. Other
fields are technical fields.
Left hand side of the main screen (shown below) the highlights of the Menu which are
explained above are enumerated.
Under Transaction “Issue Bill” is meant for final Bill or Settlement Bill either at a particular stage
or on completion of construction activities. The menu is displayed here.
Like quotation after filling all the relevant columns on the top of this bill, code or prod column
to be selected and bill prepared. Any discount after preparation may be fed at discount column
shown below with advance amount if any. The remaining amount to be collected will be shown
at the “Balance Amount “ column. Save it & take print if required.
For easy access some highlighted menus are shown at the left hand side under three heads
namely Master, Transaction & Reports. This is a user friendly software and can be utilized in all
the construction, real estate, plot selling and other allied activities of your choice.
The total data can be viewed through online by selecting the “
“Synchronize” option. An on-line account has to opened with the same email id & password
utilized for the construction software. It can’t be viewed through any other email id. The online
account is meant only to view data fed at construction software. The data once synchronized
cannot be transferred to online again. Transacted date only will move to online during
synchronization. Ledgers and accounting heads without any transaction won’t be transferred
to online during synchronization. Any data fed or modification made at online software
cannot be reverted to Construction software.
Now click “Synchronize” button to sink. Make sure that internet connection is available before
proceeding synchronization. The screen will appear as shown below.
Do not select any columns under sales filter. Select all boxes under settings as shown above.
Then click “Post”. Now all the data at construction software will automatically get transferred
to Online Account. After the process is completed, a completion message will come. Click ok.
Now you can check data under “Reports” in Online software. Likewise repeat the same process
while transferring data from construction software. The data fed after last synchronization and
just before the current synchronization will only be get transferred not the whole data or data
transferred already by the same process.
Thank you for choosing Reach Construction Software.