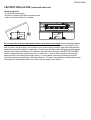
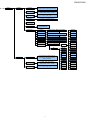
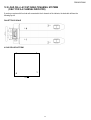
1
WEIGHT INDICATORS
DFW06
and
DFWK06
Technical manual
DFWDFWK06_01.00_06.10_UK_T
DFW06/DFWK06
INDEX
1 REQUIREMENTS FOR AN EFFECTIVE INSTALLATION .......................................................................... page 2
2 CONNECTION TO TRANSDUCER ............................................................................................................. page 3
3 BATTERY INSTALLATION ......................................................................................................................... page 4
SECTION FOR TECHNICAL PERSONNEL ONLY
4 SETUP ENVIRONMENT .............................................................................................................................. page 5
4.1 SET-UP ENVIRONMENT BLOCK DIAGRAM ...................................................................................... page 6
4.2 DESCRIPTION OF THE STEPS .......................................................................................................... page 9
5 CALIBRATION............................................................................................................................................. page 19
5.1 SCALE CONNECTED TO A SINGLE CHANNEL................................................................................. page 20
5.2 SCALE CONNECTED TO 4 CHANNELS (ONLY WITH 4-CHANNEL INSTRUMENT)........................ page 21
5.3 MODIFYING A CALIBRATION ZONE IF DIFFERENT FROM THE ZONE OF USE ............................ page 21
5.4 QUICK CALIBRATION OF ZERO ........................................................................................................ page 22
6 DISPLAY OF THE GEOGRAPHICAL UTILISATION AND CORRECTION ZONE OF THE WEIGHING ERROR
DUE TO THE DIFFERENT GRAVITATIONAL ATTRACTION BETWEEN THE CALIBRATION AND UTILISATION
ZONE. ............................................................................................................................................................. page 22
6.1 INDICATION AND/OR DISPLAY OF THE GEOGRAPHICAL ZONE OF USE..................................... page 22
6.2 CORRECTION OF THE WEIGHING ERROR INTRODUCED BY A DIFFERENT GRAVITATIONAL
ATTRACTION VALUE BETWEEN THE CALIBRATION AND UTILISATION ZONE.................................. page 22
7 SERIAL OUTPUTS ...................................................................................................................................... page 23
7.1 PC SERIAL PORT................................................................................................................................ page 23
7.2 PRN SERIAL PORT ............................................................................................................................. page 23
7.3 SERIAL PORT TRANSMISSION MODES .......................................................................................... page 24
7.3.1 PC PORT.................................................................................................................................. page 24
7.3.2 PRN PORT ............................................................................................................................... page 26
7.4 SERIAL COMMANDS FORMAT .......................................................................................................... page 26
7.5 TRANSMISSION PROTOCOLS .......................................................................................................... page 31
7.5.1 STANDARD STRING ............................................................................................................... page 31
7.5.2 EXTENDED STRING................................................................................................................ page 32
8 ANALOGUE OUTPUT (OPTIONAL) ........................................................................................................... page 33
9 PROGRAMMING THE PRINTOUTS............................................................................................................ page 34
9.1 SAVING LABEL IN THE PERMANENT MEMORY OF THE LP542PLUS LABELLER......................... page 44
10 HEADING PRINTING................................................................................................................................. page 45
11 ERROR MESSAGES ................................................................................................................................. page 47
12 CONNECTION SCHEMES......................................................................................................................... page 48
12.1 I/O OPTIONAL EXPANSION CARD WITH 2 INPUTS AND 2 OUTPUTS ....................................... page.50
12.2 LOAD CELL LAY-OUT IN MULTICHANNEL SYSTEMS
(ONLY FOR A 4 CHANNEL INDICATOR) ....................................................................................... page.52
NOTE FOR THE TECHNICIAN:
Please take note that when the “StEP…. (USER MAN.REF.) is mentioned, this refers to the user manual.
1
DFW06/DFWK06
1 REQUIREMENTS FOR AN EFFECTIVE INSTALLATION
To obtain the best results it is recommended to install the indicator and the platform (or transducer) in a place with
the following conditions:
A flat, level surface on which to rest
Stable and vibration free
Moderate temperature and humidity (15-30°C and 40-70%).
No dust or strong vapours
No draughts
Mains power supply is restricted to within ± 10% of the rated voltage
Make sure the platform is level or that the loading cells are resting evenly
Avoid welding with load cells installed.
When the load cells are used with assembling kits under storage bins or the like, connect
the upper and lower supporting plate with a copper wire cable and then earth all the
upper plates.
Use waterproof sheaths and couplings in order to protect the load cell cables.
Use a waterproof junction box to connect the cells.
The extension leads of the load cells or signal amplifiers must be screened. In addition
they must be laid on their own in a raceway or metal pipe as far away as possible from
the power supply cables.
Connection of the cell or amplifier cables on the electrical panel shall be independent
and, if possible, connected directly to the indicator’s terminal board without laying other
cables in the raceway.
Install “RC” filters on the contactor coils, on the solenoid valves and on all devices
producing electric disturbances.
If it is possible that condensation could form inside the weight transmitter it is advisable
to leave the instrument powered at all times.
Electric protections (fuses etc.) are provided by the technician installing the instrument.
Do not install anywhere where there is the risk of explosion.
2
DFW06/DFWK06
2 CONNECTION TO TRANSDUCER
After having followed the instructions regarding the platform or the load receiver, the screened cable leading from the
load cell(s) must be connected to the instrument through the CELL1 terminal board and the CELL1 (see
“CONNECTION SCHEME” section) through the relative input ( “INSTALLATION”, USER MAN. REF.).
The CELL1 terminal board of the indicator may be connected to the 6-wire load receiver (with use of SENSE), or
simply 4-wire; for this, through jumper J10 and J11 it is possible to choose whether to short-circuit the SENSE with
the POWER SUPPLY (jumpers closed) or not (jumpers open).
The sense allows compensating for any drops in voltage in the part of the cable that connects the instrument to the
transducer. It is useful when the distance between the indicator and the transducer is greater than 10 m.
The 4-pin connectors instead allow just the 4-wire connection.
To make the connection qualified personnel must open the instrument (see paragraph 10 “CONNECTION SCHEME”).
Normally the indicator comes already connected to the scale and is ready to use.
If the instrument is approved for table mounting, the access to the connection will be bound by SEAL. If the
connection is not sealed, like in the case of the model for panel mounting, the load receiving device will have an
identification label that shows the indicator it is connected to.
Technical Note: on the external power cable, on the battery cable (near the terminal on the CPU card), and on
the connection cable to the load receiving device (near the cable entrance of the instrument) some ferrite rings are
installed or, at times, supplied together with the instrument to reduce possible radio frequency disturbances.
All cables must be wound at least once around the ferrite ring before being connected to the terminal board; the
cable screen must be left outside of the ferrite and should be connected to the relevant ground pin.
6-WIRE CONNECTION
4-WIRE CONNECTION
3
DFW06/DFWK06
3 BATTERY INSTALLATION (version with table case)
Necessary materials:
- 6v 4,5Ah lead storage battery.
- Bracket for the battery with relative washers and nuts.
- cable to connect the battery to the indicator.
BATTERY
BATTERY
Do not remove the front panel with weight indicator connected to power supply. Position the battery between
the two studs on the floor of the indicator’s case, cover with metal strap and clamp battery by tightening the 7mm
bolts as shown in the above figure. If the indicator is to be used on moving structures, apply some ribbon adhesive
between the case and the battery for added safety. Connect the power supply cable to the battery and the terminal
marked VB (for Voltage from Battery) on the indicator’s electronic circuit board (see “CONNECTIONS SCHEMES”
section), maintain the polarity (red wire goes to the +, black to the -). Pass the cable through the ferrite ring (the
same one used for the external power supply) making 1 or 2 turns before connecting to the battery through the
special fast connecting insulated clips to the battery terminals. The battery charges when the external power supply
is inserted and it automatically powers the unit when the power supply cord is removed.
4
DFW06/DFWK06
Technical Personnel Only
4 SETUP ENVIRONMENT
With "SETUP ENVIRONMENT" we intend a specific menu, inside which it’s possible to set all the functioning
parameters of the indicator.
To enter it, turn on the instrument and, while the firmware version is displayed, press the TARE key for an
instant.
The indicator shows the first parameter “tYPE”.
NOTE: THE METROLOGICAL PARAMETERS of the SETUP ARE normally NOT ENABLED and therefore are just
displayed. To enable them, open the instrument and activate the special microswitch (see “CONNECTIONS
SCHEMES” section) and then turn it on.
If the instrument is LEGAL FOR TRADE one must first remove the legal seal on the front panel.
In the Set-Up condition, the instrument keys allow the user to perform the following functions:
ZERO
Scrolls the programming steps forward in sequence.
If one needs to enter a numeric value, this decreases the digit to be modified (blinking).
TARE
Allows to scroll backwards through the programming steps.
In the case in which one enters a numeric value, the selected digit (blinking) increases.
MODE
Allows to quickly position on the first step of a menu.
In the case in which one needs to enter a numeric value, select the digit to be modified
(blinking) from left to right.
ENTER/PRINT
Allows to enter a step or confirm a parameter inside a step.
C
Allows to exit a step without confirming the possibly modified parameter and go to the
preceding level.
When entering a numeric value it quickly zeros the displayed value.
NUMERIC KEYS
In the 17-key indicator one can enter numeric values, from right to left.
The display indicates the abbreviation of the step whose meaning is described below. The values indicated
with the (!) symbol at the end of the step, are values set by DEFAULT.
The (§) symbol shows that the parameter is visible only in certain programming conditions; see the explanation of the
parameter for the details.
The (*) symbol shows that with an approved instrument the parameter could be not visible or not enterable; see the
explanation of the parameter for further details.
TO EXIT THE SET-UP ENVIRONMENT, PRESS THE C KEY MANY TIMES UNTIL THE INDICATOR SHOWS
“SAVE? IN THE DISPLAY: CONFIRM WITH ENTER/PRINT TO SAVE ANY CHANGES MADE OR PRESS
ANOTHER KEY TO NOT SAVE.
5
DFW06/DFWK06
4.1 SET-UP ENVIRONMENT BLOCK DIAGRAM
Std
(!) ntGS
StPG
StPn
tYPE (§)
Ind.Ch (!), dEP.Ch
inout
G. t., 1St.2nd, in.out
MAStr,
nuMSL (01...04)
Alibi
F.Mode
FunCt.
UiSS
hLd
PEAk
tot o
tot.Mod
norM.t, FASt.t, Auto
MAx.tot
tot S
Coun
uM.APW
g, kg, t, lb
Wait.t
SCr.SAV (§)
(!) no, YES
Ir.ConF
(!) Ir no, Ir 1, Ir 4
rEACt (§)
(!) ZEro,inSt,ALWAyS
LAMP
(!) LAM 1, LAM 0, LAM 2
L.int
(!) Lint1…Lint5
CLoCK (§)
SETUP
ENVIRONMENT
tArE
(!) LoCK, unLoCK, diSAb
AutoFF
(!) diSAb, EnAb
SEtuP
ConFiG
SEriAL
(*) Ini.AL (§)
DiAG.
PrGVEr
(*) d.SALE
no, YES
inPutS
inP.b1
diV.int (§)
inP.b2
AdC.uV (§)
inP.b3
AdC.Pnt (§)
inP.b4
(!) none, ZEro, tArE,
ModE, EntEr, diS.KEY
diSPLA
kEyb.
rEL.b.1
FunC
SEr
rEL.b.2
no / nC
(!) no, nC
CtS.St
rEL.b.3
onStAt
(!) drCt, StbL
btAdC
outPut (§)
deFAu (§)
rEL.b.4
PWAdC
outPut (§)
KEYb
(!) norM, EXt
inPutS
Anout
Ser.nuM
LEGEND
= USER & TECH MENU’
= ONLY TECH MENU’
(*) = METROLOGICAL PARAMETER
(§) = CONDITIONED STEP
(!) = DEFAULT VALUE
6
(!) rEL.no, iSt., no.ISt
DFW06/DFWK06
SeriAL
CoM.Prn
Pr ModE
(!) Pr-no, tPr, LP542P, ALL.Std,
ALL.Ext, PrPC.St, PrPC.EX, rEPE.6,
bAud.Pr
(!) 9600, 1200, 2400, 4800,
19200, 38400, 57600, 115200
Bit.Pr
(!) n - 8 - 1, n - 8 - 2, n - 7 - 2,
E - 7 - 1, E - 7 - 2
PWr.Prn
(!) PWr.Ext, Ext.oFF, PWr.int
On.Prin (§)
Prn.CtS (§)
PrConF (§)
(!) noCtS, CtSL,
CtSh, EMuCtS
LAnG
(!) itAL, EnGL, dEut, FrAn, ESPA
bLinE
(!) YES, no
IntES
FiLdS
(!) Int no, Int Si, Int Fi, Int.SuM
nuMWEi (§)
dEFAuL
(!) both, no, tot, SuM
ChAr.t
LAbELW
doM
(!) dt. no,dt.in.1,dt.in,2,dt.EX.1, dt.EX.2
LAbELh
ntik
(!) no, YES.tot, SuM, both, rESEt
ChAr 1
(!) YES.tot, SuM, both, no
ChAr 2
EndPAG
tErM
(!) Cr, CrLF, no tErM
PForM
tMArG
LP542P
LMArG
dEFAuL
UdbArC
FiLdS
LMbArC
hEiGt
hbArC
bArC
tPr
CoM.PC
PCModE
bAud
bit
(!) ondE, rEPE.4, rEPE.6, Prin.St,
Prin.EX, 485, ALL.Std, ALL.Ext,
StAb.St, StAb.EX
(!) 9600, 1200, 2400, 4800,
19200, 38400, 57600, 115200
(!) n - 8 - 1, n - 8 - 2, n - 7 - 2,
E - 7 - 1, E - 7 - 2
7
bArC
bArFs
VdbAr
PntUb
LMbAr
PEEL
WbAr
GAP
hbAr
dirECn
bArWS
dWn.EXt
bArFs
doWnLd
PntVb
LALinG
PtESt
PtESt
DFW06/DFWK06
ConFiG (§)
nChan (*)(§)
(!) Ch2 ... Ch4
Param.
Stabil.
(!) FLt 3, FLt 0..3,
doS.0..3, h.r.0..7,
dyn.0..3, SLW.0..5
Auto-0 (*)
(!) EnAb, diSAb
0trACk (*)
(!) ½, ¼, 1, 2, no
diV.Stb. (*)
(!) 2, 1...19
GrAV. (*)
Calib (*)
9,75001 … 9,84999
rAnGE 1
rAnGE 2
rAnGE 3
diV
1, 2, 5, 10, 20, 50
dECi
1, 2, 3, no
u.M.
G, Lb, t, kG
CALib.P
EquAL (§)
n tP
tP 0
ddt 1
0.CALib (*)
tp 1
ddt 2 (§)
tp 2 (§)
ddt 3 (§)
tp 3 (§)
An.out
ModE
(!) Ao no, Ao G, Ao n
AoMA
xxxxxx
AoZE
xxxxxx
AoMi
xxxxxx
8
DFW06/DFWK06
4.2 DESCRIPTION OF THE STEPS
(*) tYPE TYPE OF APPLICATION (§)
Here one selects the type of application: scale with a single channel or scale with dependent channels (eventually
digitally equalised).
ind.Ch. Instrument connected to 1 single-cell scale, or 1 scale with various cells equalised externally through the
junction box.
dEP.Ch. Instrument connected to 1 scale with 2, 3 or 4 dependent load cells (eventually equalised digitally through a
specific software procedure).
(!) ind.Ch
(*) In case of approved instrument the parameter is read only.
(§) The parameter is not displayed if one has selected the MASTER/SLAVE functioning mode, FmodE >> FunCt >>
MAStr parameter.
F.ModE SCALE FUNCTIONING
FunCt FUNCTIONING MODE
Std
Unit of measure conversion.
ntGS
Net weight / gross weight conversion.
StPG
Setpoint on the GROSS weight.
StPn
Setpoint on the NET weight.
inout
Input / output weigh.
Once the in / out mode is selected, “tYPE” is displayed for an instant and then one is asked to select with PRINT
the print mode of the acquired data:
- “G.t.” gross/tare:
- “1st.2nd” first weigh/second weigh:
- “in.out” input/output:
MAStr
Multiscale Repeater.
By selecting with PRINT this functioning mode, one is asked to enter the number of SLAVES to be used: for an
instant “nuMSL” is displayed; then enter the number (between 01 and 04).
ALibi
Alibi memory.
UiSS
Sensitivity times ten.
hLd
Freezing the weight on the display.
PEAK
Peak detector.
tot o
Horizontal totalizer.
Once the horizontal totaliser functioning mode is selected, one needs to select the type of totalisation: normal
(t.norM), fast (t.FASt) or automatic (Auto).
tot S
Vertical totalizer.
Once the vertical totaliser functioning mode is selected, one needs to select the type of totalisation: normal
(t.norM), fast (t.FASt) or automatic (Auto).
Coun
Counting.
By selecting this functioning mode, one is asked to enter the Unit of Measure of the average unit weight
(uM.APW) and the sampling interval (Wait.t).
(!) ntGS
For the functioning details, refer to section 11 “SELECTABLE FUNCTIONING MODES”, USER MAN.REF.
Once the functioning mode has been selected, if there is a printer, the standard printout relative to the printer
selected in the SEtuP >> SErIAL >> PrMODE parameter is automatically enabled. It’s possible to load the default
parameters by carrying out the default of the selected printout (see section 9).
9
DFW06/DFWK06
Scr.SAv: SCREEN SAVER (§)
If the indicator has the date/time option, it is possible to enable the “Screen Saver” function: after a programmable
time (from 1 to 255 minutes) that the scale is unloaded, the time is shown on the display, in the “HH-MM.SS”
format. As soon as a weight variation is detected, or a key is pressed, the indicator displays the current weight
once again.
no
Disabled.
yES Enabled: one is asked to enter the time which the indicator waits to activate the screen saver, after the
weight has become stable and keys are not pressed.
(!) no
(§) The parameter is not displayed if there is no date/time option.
irConF REMOTE CONTROL CONFIGURATION
If the instrument has an infrared ray interface, with the 4-key remote control (optional) it is possible to remote the
ZERO, TARE, MODE and ENTER/PRINT keys, or just the TARE key.
ir no
Remote control disabled.
ir 1
All the remote control keys work as the TARE key.
ir 4
The remote control keys work as ZERO, TARE, MODE and ENTER/PRINT.
(!) ir no
rEACt REENABLING OF THE PRINTOUTS AND THE INDICATOR FUNCTIONS (§)
While using the indicator, it is possible to incur in the “no.0.unS” error shown on the display accompanied by an
acoustic signal; this means that the printout or the function which one wants to carry out must be renabled (in
order to avoid accidental executions).
It is possible to set the reenabling in the following modes: “passage of the net weight by zero”, “weigh instability”
or “always”.
ZEro
passage of the net weight by zero
inSt
instability
ALWAyS
always
(!) ZEro
(§) The parameter is not displayed if one has selected the MASTER/SLAVE functioning mode, FmodE >> FunCt
>> MAStr parameter.
LAMP DISPLAY BACKLIGHTING
Through this StEP one programmes the backlight functioning (optional):
LAM 0
backlighting disabled
LAM 1
The backlight turns on if the weight changes and it turns off automatically after stability (no change)
has been maintained for at least 10 seconds.
LAM 2
The background light is always on.
(!) LAM 0
L.int DISPLAY BACKLIGHT INTENSITY
Through this step one selects the intensity of the backlighting or of the LED display:
Lint 1 (minimum), Lint 2, Lint 3, Lint 4, Lint 5 (maximum).
(!) Lint 1
CLoCK DATE/TIME ADJUSTMENT (OPTIONAL) (§)
In this step one sets the date and time of the indicator; by pressing ENTER/PRINT one is asked to enter, in this
order, the day, month, year, hour and minute.
The entry of each parameter must be confirmed with ENTER/PRINT.
(§) the parameter is not displayed if there is no date/time option.
10
DFW06/DFWK06
tArE LOCKED / UNLOCKED / DISABLED TARE SELECTION (§)
LoCK
unLoCK
diSAb
locked tare
unlocked tare
disabled tare
See the “TARE OPERATIONS” section for further functioning details, USER MAN. REF.
(!) LoCK
(§) The parameter is not displayed if one has selected the MASTER/SLAVE functioning mode, FmodE >> FunCt
>> MAStr parameter.
AutoFF AUTO SWITCH-OFF
It is possible to enable the automatic switch off of the indicator (from 1 to 255 minutes), or disable it; the auto
switch-off starts working when, with unloaded scale, the weight has not been moved or a key has been pressed
during the set time: the display shows the blinking “- oFF – “ message and an acoustic signal es emitted; then the
indicator turns off.
disAb
auto switch-off disabled.
EnAb
auto switch-off enabled (one will be asked to enter the number of minutes after which the indicator
must turn off: enter a number from 1 to 255).
(!) disAb
SEtuP SCALE CONFIGURATION
ConFiG METRIC ONFIGURATION (§)
(§) The parameter is not displayed if one has selected the MASTER/SLAVE functioning mode, FmodE >> FunCt
>> MAStr parameter.
(*) nChAn SELECTION OF NR. OF INDICATOR CHANNELS (§)
2÷4 in SCALE WITH DEPENDENT CHANNELS functioning mode (“DEP.CH”)
(!) 2
(*) With approved instrument the parameter is read-only.
(§) The parameter is not displayed in case of INDEPENDENT CHANNELS functioning mode, tYPE parameter.
Param. METRIC PARAMETERS
StAbiL FILTER INTEGRATION
By pressing the ENTER/PRINT key one accesses the selection of the type and degree of filter intervention for the
stability of the weight indication:
FLt 0 – 3 filter for simple weighing
doS.0 – 3 filter for dosage
h.r.0 – 7
filter for high resolution
dyn.0 – 3 filter for crane scale
SLW.0 – 5 filter very slow
The higher the filter value, and greater is its intervention relative to the type of filter used.
(!) FLt 3
11
DFW06/DFWK06
(*) Auto-0 AUTOZERO AT THE START UP
By pressing ENTER/PRINT one chooses whether to enable (EnAb) or disable (diSAb) the automatic acquisition
of the gross zero upon start-up. By choosing EnAb, if upon start-up a detected weight is within +/- 10% of the
capacity, it is zeroed; if the weight is not within this tolerance, the non approved instrument’s display will show the
present weight after a few instants, while an approved instrument will continuously show “ZErO” on the display,
until a weight within tolerance is placed.
(!) EnAb
(*) With approved instrument the parameter is read-only.
If there is a value greater than ½ (entered with a non approved instrument) this remains stored in the set-up but
the value is set at 2 in the weighing phase.
(*) 0trACk ZERO TRACKING
This menu allows setting the zero tracking, in other words, the compensation parameter of the scale’s thermal
drift; the set value corresponds to the number of divisions that is reset in the fixed time of 1 second.
tr. ½ +/- half division.
tr. ¼ +/- one fourth of a division
tr. 1 +/- one division.
tr. 2 +/- two divisions.
tr. no
tracking disabled.
(!) tr. ½
(*) With approved instrument the parameter is read-only.
If with an approved instrument there already is a value greater than 2 (entered with a non approved instrument)
this remains stored in the set-up but the divisions for the instrument’s stability are set at 2 in the weighing phase.
diU.Stb DIVISIONS BY STABILITY
In this step one enters the number of divisions by which the instrument detects the weight stability; the higher the
number of divisions, less is the sensitivity, and consequently the stability is more easily detected. The possible
values are 1…19.
(2)
(*) With approved instrument, it is possible to enter just the values 1 or 2; if one enters a higher value, it will be
confirmed, but when returning to the step, the last stored value (acceptable) is reproposed.
(*) GrAV GRAVITY ZONE AND ZONE OF USE
Through this step one selects the acceleration value of calibration and of use of the instrument:
Manual entry of the g value: one may manually enter the gravitational acceleration value; one must modify the 6
decimal digits of the gravitational acceleration.
In case one enters a wrong g value: the minimum decimal value is suggested (9,75001); a wrong value is any
decimal number that is not between 9,75001 and 9,84999 (inclusive).
(!) g = 9,80655
(*) With approved instrument the parameter is read-only.
12
DFW06/DFWK06
(*) CALib. SCALE CALIBRATION
See paragraph “SCALE CALIBRATION” section.
(*) With approved instrument the parameter is read-only.
(*) 0CALib. ZERO CALIBRATION
See paragraph “SCALE CALIBRATION” section.
(*) If the indicator is approved, the step is not displayed.
An.out ANALOGUE OUTPUT (OPTIONAL)
ModE OPERATING MODE
Ao no = analogue output disabled.
Ao G = analogue output on the gross weight.
Ao n = analogue output on the net weight.
(!) Ao no
AoMA MAXIMUM VALUE
Setting of the maximum value of the analogue output.
AoZE SCALE ZERO VALUE
Setting of the analogue output value when the scale displays zero weight.
AoMi MINIMUM VALUE
Setting of the minimum value of the analogue output.
See the “ANALOGUE OUTPUT (OPTIONAL)” section for configuring it.
SeriAL SERIALS, PRINTOUTS, ETC…
CoM.Prn PRINTER SERIAL
PrModE TRANSMISSION UPON THE PRINTER SERIAL
Pr- no
transmission disabled.
tpr
enables the printing with ASCII printer (for example DP190 or TPR).
LP542P
enables to print with labelling machine LP542PLUS
ALL.Std
continuous transmission with standard string.
ALL.Eht
continuous transmission with extended string.
PrPC.St
transmission of the standard string upon the pressing of the ENTER/PRINT key.
PrPC.EH
transmission of the extended string upon the pressing of the ENTER/PRINT key.
NOTE: The transmission of the standard or extended string upon the pressing of the PRINT key is
confirmed by “trAnSM” on the display. If the “TOTALIZER” mode (horizontal or vertical) is active, the
transmission through the key is carried out by pressing the MODE key or takes place automatically in case
of automatic totalisation.
rEPE.6
transmission to 6-digit remote display.
Note: By selecting the REPE6 protocol the serial output at 4800,N,8,1 is automatically set; in any case one
may set these differently.
(!) Pr-no
For the protocol and transmission mode specifications, see section 7.3 “SERIAL PORT TRANSMISSION
MODES” and 7.5 “TRANSMISSION PROTOCOLS”.
13
DFW06/DFWK06
bAud.Pr SET BAUD RATE
By pressing the ENTER/PRINT key one accesses the selection of the data transmission speed (measured
in Baud = bit/second). The possible values are: 1200, 2400, 4800, 9600, 19200, 38400, 57600, 115200.
(!) 9600
bit.Pr SET PARITY, WORD, STOP BIT
By pressing the ENTER/PRINT key one accesses the selection of the available values: n-8-1, n-8-2, n-7-2,
E-7-1, E-7-2.
(!) n-8-1
PWr.Prn SETTING AUXILIARY OUTPUT AND PRINTER MANAGEMENT
On the indicator board there is a terminal board called V-AUX (auxiliary output), thanks to which it is
possible to power the devices (for example a printer); refer to the electric scheme for the characteristics.
In this step one programmes the functioning of the auxiliary output and the management of a possible
connected printer:
PWr.EXt
with instrument on, printer managed and auxiliary output always active.
PWr.int
printer managed, auxiliary output active only when the instrument executes a printout.
Ext.oFF
printer managed and auxiliary output always active; the start-up characters are sent to the
printer, because the printer is considered to be configured in the energy saving mode.
(!) PWr.EXt
onPrin INSTANTANEOUS ACTIVATION OF AUXILIARY OUTPUT (§)
If the auxiliary output has been configured as “PWr.int” in the preceding step, by pressing ENTER/PRINT it
is enabled instantaneously (the “onPri” message is blinking on the display); in this mode it is possible, for
example, to power a printer to carry out the upkeep operations.
To exit this step (and therefore disable the auxiliary output), press any button. The enabling may be carried
out quickly also during the weighing, by pressing the ZERO key for a few seconds (except in the
REPEATER IN RADIO FREQUENCY functioning mode).
(§) the parameter is not displayed if “PWr.EXt” has been selected in the “PWr.Prn” step or “Pr- no”
in the “PrModE” step.
Prn.CtS RTS/CTS STATUS CONFIGURATION (§)
On the printer serial line the indicator has a CTS input (Clear To Send). A device (like a printer) that is slow
in processing the data received, can interrupt the transmission temporarily using this signal.
noCtS
no signal
CtSL
CTS active low (for LP542, TPR, DP24 printers)
CtSh
CTS active high (for DP190 printers)
EmuCtS
emulation of the CTS signal: one is asked to enter the number of characters (nChrS), in 3
digits, which will be transmitted to the printer upon each transmission; then one needs to
enter the waiting time in milliseconds (tiME), in 4 digits, between a transmission and
another.
The TIME OUT of a printout is a minute, in other words, after a minute that the printout is blocked, it is
cancelled.
(!) noCtS
(§) The parameter is not displayed unless “tPr” or “LP542P” has been selected in the “PrModE” step.
PrConF CONFIGURATION OF THE PRINTOUTS (§)
See the “Print Programming” section for the description of all the menu’s parameters.
(§) The parameter and all its submenus are not displayed if “Prno” has been selected in the “PWr.Prn” step
or “Pr- no” in the “PrModE” step.
14
DFW06/DFWK06
CoM.PC PC SERIAL
PCModE TRANSMISSION ON THE PC SERIAL
ondE
transmission on external command PC (given from PC or PLC, for example)
rEPE.4
transmission to 4 digit remote display.
rEPE.6
transmission to 6 digit remote display.
Prin.St.
transmission of standard string when the ENTER/PRINT key is pressed.
Prin.EX
transmission of extended string when the ENTER/PRINT key is pressed.
NOTE:
The transmission of the standard or extended string upon the pressing of the PRINT key is
confirmed by “trAnSM” on the display. If the “TOTALIZER” mode (horizontal or vertical) is
active, the transmission through the key is carried out by pressing the MODE key or takes
place automatically in case of automatic totalisation.
485
transmission with 485 protocol, by confirming with ENTER/PRINT, one is required to enter the
machine code (the message “Ad485” appears for an instant): enter a value between 0 and 98.
ALL.Std
continuous transmission with standard string.
ALL.EXt
continuous transmission with extended string.
StAb.St
transmission with each weigh with standard string.
StAb.EX transmission with each weigh with extended string.
Note: By selecting the REPE6 or REPE4 protocol the serial output at 4800,n,8,1 is automatically set; in any
case one may set these differently.
(!) OndE
For the transmission modes and protocol specifications, see the 7.3 “SERIAL PORTS TRANSMISSION
MODES” and 7.5 “TRANSMISSION PROTOCOLS” sections.
bAud SET BAUD RATE
By pressing the ENTER/PRINT key one accesses the selection of the data transmission speed (measured
in Baud = bit/second). The possible values are:
1200, 2400, 4800, 9600, 19200, 38400, 57600, 115200.
(!) 9600
bit SET PARITY, WORD, STOP BIT
By pressing the ENTER/PRINT key one accesses the selection of the available values: n-8-1, n-8-2, n-7-2,
E-7-1, E-7-2.
(!) n-8-1
(*) ini.AL INITIALIZES ALIBI MEMORY (§)
The initialisation cancels all the data stored in the Alibi memory; by pressing ENTER/PRINT one is asked to confirm
the operation. The display shows “iALib?”; press ENTER/PRINT again to confirm or another key to cancel.
At the end the " AL.OK " message appears if the operation is made with success; otherwise the " AL.ERR"
message is displayed.
(§) The parameter is displayed only if the ALIBI functioning mode is selected, FmodE >> FunCt >> Alibi
parameter.
(*) The parameter is not displayed with an approved instrument.
(*) dSALE LIMITATION OF THE SCALE FUNCTIONS
no
limitations disabled
yES
limitations enabled
Refer to the user manual for the description of its functioning (USER MAN.REF.).
(!) no
(*) With approved instrument the parameter is read-only.
15
DFW06/DFWK06
inPutS INPUT CONFIGURATION
In this step one sets the function to link to each input (optional, up to 4).
inP.b1 INPUT 1
nonE
Disabled
ZEro
ZERO Key
tArE
TARA Key
ModE
MODE Key
EntEr
ENTER/PRINT Key
diS.kEy
DISABLING OF KEYBOARD
(!) nonE
inP.b2: INPUT 2
inP.b3: INPUT 3
inP.b4: INPUT 4
The programming of the 2, 3 and 4 inputs is done as described for input 1.
NOTE: In case various inputs are simultaneously enabled just the one with the lower number is taken into
consideration.
outPut RELAY CONFIGURATION (§)
In this step one sets the function to be linked to each relay (optional, up to 4).
(§) the parameter is displayed only if the “StPG” or “StPn” parameter has been selected in the “FunCt”
step.
rEL.b.1 RELE’ 1
FunC RELAY FUNCTION
rEL.no relay not managed.
iSt.
relay managed with hysteresis.
no.iSt relay managed without hysteresis
(!) rEL.no
no/nC NO/NC CONTACTS
no
relay 1 normally opened.
nC
relay 2 normally closed.
(!) no
onStAt SWITCHING CONDITION
drCt the relay is activated as soon as the weight reaches the set threshold, (independently from the
stability).
StbL the relay is activated in the moment in which the weight, after reaching the set activation thresholds,
becomes stable.
(!) drCt
The same configurations are valid for:
rEL.b.2 RELE’ 2
rEL.b.3 RELE’ 3
rEL.b.4 RELE’ 4
16
DFW06/DFWK06
dEFAu INITIALIZATION OF THE INSTRUMENT (§)
Through this step one can initialize the instrument with the subsequent activation of the default parameters. By
pressing ENTER/PRINT, a confirmation message (“dFLt?) will appear: confirm again with ENTER/PRINT or exit
with any other key.
NOTE: The initialization of the instrument causes a cancellation of the present calibration and the
activation of the default parameters. In any case if one exits the setup environment WITHOUT CONFIRMING
the modification made, all the parameters of the last saving made will remain (including the calibration).
(§) In case of approved instrument, the default DOES NOT HAVE EFFECT on the metrological parameters
(those marked with (*)).
KEYb SETTING 5 OR 17-KEY KEYBOARD
By pressing ENTER/PRINT the display shows the last saved configuration, which may be:
norM
5-key keyboard
EXt
17-key keyboard
NOTE: For a correct functioning, it is necessary to set the type of keyboard in relation to the model one
has.
(!) norM
diAG DIAGNOSTICS MENU
It is a submenu inside which it is possible to check the software components and the scale hardware.
PrG.Ver CHECKING THE SOFTWARE VERSION
By pressing ENTER/PRINT the instrument shows the software version in the XX.YY.ZZ. format.
diV.int CALIBRATION INTERNAL DIVISIONS (§)
By pressing ENTER/PRINT the instrument shows the calibration internal divisions.
(§) The parameter is not displayed if one has selected the MASTER/SLAVE functioning mode, FmodE >>
FunCt >> MAStr parameter.
AdC.uV MICROVOLTS (§)
By pressing ENTER/PRINT the instrument shows the microvolts relative to the weight on the selected scale.
With the ZERO and TARE keys it is possible to switch the visualisation of the microvolts for each configured
channel of the scale in dependent channels “DEP.CH.” and in independent channels “inDEP.CH.” functioning
modes.
Note: The maximum voltage that the instrument accepts in input is 30 mV (30000 mV); the weighing system is
powered by the indicator at 5 Vdc.
A correct operation will have a value less than 30000 with a weight of full scale capacity on the weighing
system.
(§) The parameter is not displayed if one has selected the MASTER/SLAVE functioning mode, FmodE >>
FunCt >> MAStr parameter.
AdC.Pnt CONVERTER POINTS (§)
By pressing ENTER/PRINT the instrument shows the A/D converter points relative to the weight on the selected
scale.
With the ZERO and TARE keys it is possible to switch the visualisation of the A/D converter points for each
configured channel of the scale in dependent channels “DEP.CH.” and in independent channels “inDEP.CH.”
functioning modes.
(§) The parameter is not displayed if one has selected the MASTER/SLAVE functioning mode, FmodE >>
FunCt >> MAStr parameter.
diSPLA DISPLAY TEST
By pressing ENTER/PRINT the instrument turns on all the display segments one at a time, after which it exits
automatically from the step.
17
DFW06/DFWK06
KEYb. KEYBOARD TEST
By pressing ENTER/PRINT the instrument displays 0000; by pressing the keys one at a time, the relative codes
are rebrought to the display. One exits pressing the same key three times.
SEr SERIALS TEST
By pressing ENTER/PRINT the instrument displays “
S xy” in which x indicates the status of the printer
serial port while y indicates the status of the PC serial port. Both can take on two values:
0
Serial port does not work
1
Serial port works
During the test one should shortcircuit TX2 with RX2 (in the PC terminal board) and TX0 with CTS (in the PRN).
Furthermore the ASCII “TEST”<CRLF> string is continuously transmitted on both the serial lines.
CtS.St TEST OF THE CTS STATUS
By pressing ENTER/PRINT one views the status/level of the CTS signal of the printer (on) connected to the PRT
serial port.
bt.AdC
Diagnostic check for use of the manuafacturer.
PW.AdC
Diagnostic check for use of the manuafacturer.
outPut TEST OF THE I/O EXPANSION BOARD RELAYS (OPTIONAL) (§)
By pressing ENTER/PRINT the instrument displays “rEL.b.1” and enables relay 1 of the expansion board; press
the ZERO or TARE key to enable the other relays of the connected expansion boards.
(§) the parameter is displayed only if the “StPG” or “StPn” parameter has been selected in the “FunCt”
step.
InPutS TEST OF THE I/O EXPANSION BOARD INPUTS (OPTIONAL)
By pressing ENTER/PRINT the instrument displays “ i.bx-y” in which x, y indicate:
x – the input which is controlling 1, 2, 3, 4; to change the input which one wants to control press the ZERO or
TARE keys.
y - the input status:
0
Disabled input
1
Enabled input
communication error with I/O expansion board or board not present.
Anout ANALOGUE OUTPUT TEST
If the instrument is fitted with the analogue output, through this step one can test if the values of the D/A
converter (to be entered at time of calibration) correspond with the relative values of the analogue output (in
voltage or in current), see “ANALOGUE OUTPUT (OPTIONAL)” section.
By pressing ENTER/PRINT the display shows 00000; enter a value between 00000 and 65535 and confirm with
ENTER/PRINT; the instrument will supply the corresponding analogue value in output.
To exit the test confirm twice with ENTER/PRINT the same entered value.
Ser.nuM
Diagnostic check for use of the manuafacturer.
18
DFW06/DFWK06
5 CALIBRATION
There are two possible types of calibration, depending on the type of application chosen for the instrument: for
(“IND.CH.”) type (independent channels) and for (“DEP.CH.”) type (dependent channels, which could eventually be
digitally equalized) (see section 3.2: tYPE – Application type).
SEtuP
ConFiG (§)
GrAV. (*)
9,75001 … 9,84999
Calib (*)
rAnGE 1
rAnGE 2
rAnGE 3
diV
1, 2, 5, 10, 20, 50
dECi
1, 2, 3, no
u.M.
G, Lb, t, kG
CALib.P
EquAL (§)
n tP
tP 0
ddt 1
0.CALib (*)
tp 1
ddt 2 (§)
tp 2 (§)
ddt 3 (§)
tp 3 (§)
IMPORTANT: with Approved Instrument, the following parameters:
- are read only: “GrAV”, “rAnGE 1”, “rAnGE 2”, “rAnGE 3”, “diV”, “dECi”, “u.M”, “ntP”, “ddt1”, “ddt 2”, ddt 3”.
- are not displayed: “0Calib.”, “tP0”, “tP1”, “tP2”, “tP3”.
19
DFW06/DFWK06
5.1 SCALE CONNECTED TO A SINGLE CHANNEL
Premise: this procedure is to be followed if one needs to calibrate a single-cell scale, or a scale with various cells
equalized externally using a junction box; the scale is connected to a single channel on the board.
1) Enter the SET-UP environment of the scale (when turned on, press the TARE key for an instant while the
firmware version is displayed).
2) Select the SEtuP >> ConFiG >> CALib step and press ENTER/PRINT.
3) Select the “rAnGE1” step and press ENTER/PRINT;
Set the total capacity of the scale or the first range in case of multirange functioning:
ZERO
TARE
MODE
C
NUMERICAL KEYS
Decreases the selected digit (blinking).
Increases the selected digit (blinking).
Selects the digit to be modified (blinking), from left to right.
Quickly zeros the displayed value.
In the 17-key indicator, allow to enter the numerical value, from right to left.
Confirm with the ENTER/PRINT key.
4) Select the “rAnGE2” (only in the case of a dual range scale) and press ENTER/PRINT;
Set the capacity of the second range and press ENTER/PRINT.
5) Select the “rAnGE3” (only in the case of a triple range scale) and press ENTER/PRINT;
Set the capacity of the triple range and press ENTER/PRINT.
6) Select the “diV” step and press ENTER/PRINT;
Set the scale’s minimum division or the first range in case of n ranges and press ENTER/PRINT (selectable
values: 1, 2, 5, 10, 20, 50).
(!) 1
7) Select the “dECi” step and press ENTER/PRINT;
The selectable values are 1.0 (a decimal), 1.00 (two decimals), 1.000 (three decimals), 100000 (no decimal);
confirm with ENTER/PRINT.
(!) 1.000
8) Select the “u.M.” step and press ENTER/PRINT.
Set the unit of measure (g, Lb, t, kg) and press ENTER/PRINT.
(!) kg
9) Select the “CALib.P” step and press ENTER/PRINT.
10) Select the “ntP” step and press ENTER/PRINT.
11) With the ZERO or TARE keys set the number of points with which one wants to calibrate (from 1 to 3, with 1
one does the zero point and one weight point) and press ENTER/PRINT.
12) Select the “tP0” (scale zero point) step: unload the scale and wait a few seconds, then press ENTER/PRINT.
13) Select the “ddt1” (setting first sample weight) step; press ENTER/PRINT, enter the weight value and confirm
with ENTER/PRINT.
14) Select the “tP1” (acquisition of first sample weight) step: put the weight on the scale, wait a few seconds and
press ENTER/PRINT.
15) If a calibration point has been set, once the weight acquistion has been made, the display shows for an
instant the value of the internal divisions and then the “ntP” step.
If there are various calibration points, repeat the operations for the “ddt2”, “tP2”, “ddt3”, “tP3”
points.1
16) Once the calibration has been made of all the necessary points, press the C key various times until the
indicator shows “SAVE? in the display: confirm with ENTER/PRINT to memorize and return to weighing.
N.B.: the calibration points must be increasing (point 1 < point 2 < point 3).
20
DFW06/DFWK06
5.2 SCALE WITH DEPENDENT CHANNELS (could eventually be digitally equalised)
Premise: this procedure is to be followed if one needs to calibrate a scale with various cells (up to 4) and if one
wants to equalize these directly from the indicator without using external junction boxes.
In this case one should connect each cell to one of the channels on the board.
Note: it is always better to carry out the equalisation procedure (steps from 4 to 9), but it isn’t compulsory (in some
applications, it can not be done); if one wants to avoid it, “EquAL” appears; press the “ZERO” key once to supersede
this step and continue with the calibration.
1) Enter in the SET-UP ENVIRONMENT of the indicator (when turned on, press for an instant the TARE key
while the firmware version is displayed).
2) Nr. of connected Cells
Select the number of cells (in other words, the number of channels, from 2 to 4) connected to the indicator
SEtuP >> ConFiG >> nChan >> 2, 3, 4 and press PRINT.
3) Repeat the points from 3) to 9) previously described in the “SCALE MODE CONNECTED TO A SINGLE
CHANNEL”.
4) Select the “EquAL” step and press ENTER/PRINT: one proceeds to the equalisation of the 4 cells.
If one does not want to carry out the equalisation proceed with point 11)
5)
6)
7)
8)
9)
10)
11)
12)
13)
14)
Cell Equalisation Procedure (steps from 5 to 10):
Select the “Eq 0” step (equalisation of zero): unload the weighing system and press the ENTER/PRINT key;.
Select the “Eq 1” step (equalisation of the first cell): position a calibration weight on the cell connected to
input 1 of the indicator and press the ENTER/PRINT key.
Select the “Eq 2” step (equalisation of the second cell): position the same calibration weight on cell
connected to input 2 of the indicator and press the ENTER/PRINT key.
If nChan > 2: Select the “Eq 3” step (equalisation of the third cell): position the same calibration weight on
cell connected to input 3 of the indicator and press the ENTER/PRINT key.
If nChan > 3: Select the “Eq 4” step (equalisation of the fourth cell): position the same calibration weight
on cell connected to input 4 of the indicator and press the ENTER/PRINT key.
Once the equalisation is finished the 'EQ OK' message appears; the instrument emits an acoustic signal and
exits the equalisation submenu.
Select the “ntP” step and press ENTER/PRINT.
With the ZERO or TARE keys set the number of points with which one wants to calibrate (from 1 to 3, with 1
one does the zero point and one weight point) and press ENTER/PRINT.
Select the “tP0” (scale zero point) step: unload the scale and wait a few seconds, then press ENTER/PRINT:
if the equalisation of the channels has not been made the 'no Eq?' message appears and the instrument
emits an acoustic signal; press the ENTER/PRINT key to proceed anyways with the acquisition of the weight
or the C key to exit the step.
Repeat the points from 13) to 16) previously described in the “SCALE MODE CONNECTED TO A SINGLE
CHANNEL”.
5.3 IN CASE THE ZONE OF USE IS DIFFERENT FROM THE CALIBRATION ZONE ONE
SHOULD:
1) Enter in the SET-UP environment of the scale (when turned on, press for an instant the TARE key while the
firmware version is displayed).
2) Enter in the SEtuP >> ConFiG >> GrAV step and set the gravity acceleration value for the
CALIBRATION ZONE
3) Carry out the calibration as previously described.
4) Save and exit from the SET-UP environment (press many times the C key until the indicator shows “SAVE?
in the display and confirm with ENTER/PRINT.
5) Enter the SET-UP environment of the scale and enter the SEtuP >> ConFiG >> GrAV step and set the
gravity acceleration value for the ZONE OF USER.
6) Save and exit the SET-UP environment.
7) The weight error caused by the error of a different gravitational attraction value between the calibration zone
and the zone of use is corrected automatically.
21
DFW06/DFWK06
With APPROVED instrument, when turned on, the value of the zone of use or the gravitational acceleration value is
displayed.
5.4 QUICK CALIBRATION OF ZERO
It is useful to calibrate just the point of ZERO when a permanent tare weight is put onto the platform (for example a
roller unit).
1) Enter in the SET-UP environment of the scale (when turned on, press for an instant the TARE key while the
firmware version is displayed).
2) Enter in the SEtuP >> ConFiG >> 0.CALib step and press ENTER/PRINT key (the display shows “CAL.0?”).
3) Put the tare on the scale and press ENTER/PRINT key to confirm the operation.
4) Once the zero calibration is made, press many times the C key until the indicator shows “SAVE? in the
display: confirm with ENTER/PRINT to store and return to weighing.
6. DISPLAY OF THE GEOGRAPHICAL UTILISATION AND CORRECTION ZONE
OF THE WEIGHING ERROR DUE TO THE DIFFERENT GRAVITATIONAL
ATTRACTION BETWEEN THE CALIBRATION AND UTILISATION ZONE.
6.1 INDICATION AND/OR DISPLAY OF THE GEOGRAPHICAL UTILISATION ZONE
(Compulsory for the legal type instruments)
This instrument conforms to the laws currently in force regarding non-automatic weighing instruments. Such gsensitive instruments are influenced by the gravitational acceleration value “g” of the utilisation zone hence it is
compulsory to indicate, with a label or on the display, the coded name of the utilisation zone where the weighing
machine can be used.
6.2 CORRECTION OF THE WEIGHING ERROR INTRODUCED BY A DIFFERENT
GRAVITATIONAL ATTRACTION VALUE BETWEEN THE CALIBRATION AND UTILISATION
ZONE (compulsory for legal type instruments).
This instrument conforms to the laws currently in force regarding non-automatic weighing instruments. Such gsensitive instruments are influenced by the gravitational acceleration value “g” of the utilisation zone so a special
programme has been created to compensate for any differences in the gravitational attraction between the place
where the weighing machine is calibrated and the place of utilisation.
During configuration the “g” values relative to the utilisation zone and to the zone of calibration are entered at a
certain programming step which eliminates the weight error introduced by the different gravitational attraction value.
22
DFW06/DFWK06
7 SERIAL OUTPUTS
The instrument has two bidirectional serial outputs, which have the output in ASCII code compatible with the majority
of printers, remote displays, PCs and other devices.
7.1 PC SERIAL PORT
It is bi-directional (full duplex) and uses an RS232/TTL for transmitting data. It is mainly used to connect computers,
PLCs, additional remote displays, and it can be converted into RS485 (options). The transmission speed may be
selected in the SET UP among these: 1200, 2400, 4800, 9600, 19200, 38400, 57600, 115200 Baud (bit/sec.).
RS232 CONNECTIONS FROM PC TO INDICATOR:
PC
PC
|
INDICATOR
STANDARD
9pin
25pin |
Serial line
CABLE
(male)
(male) |
----------------------------------------------------------------------------------------------------------------RX
2
3
|
TX2
Pink
TX
3
2
|
RX2
Yellow
GND 5
7
|
GND
Grey
Below is shown the connection in RS232 between the GLH60R WEIGHT REPEATER and the indicator:
GLH60R
|
DFW03
STANDARD
Serial line
|
Serial line
CABLE
--------------------------------------------------------------------------------------------------------------------RX
2
|
TX2
Pink
GND 4
|
GND
Grey
Please find below the connection between the radio frequency module and the indicator powered at 12 Vdc:
RF MODULE |
INDICATOR INDICATOR
CABLE
9pin
|
Serial line
12 Vdc POWER
STANDARD
(female)
|
-----------------------------------------------------------------------------------------------------------------------------------------RX
3
|
TX2
Pink
TX
2
|
RX2
Yellow
GND
5
|
Grey
GND
5
|
0 Vdc
White
(8-30 Vdc)
9
|
12 Vdc
Green or Brown
The transmission of data through the PC serial port can be configured in different ways, according to the setting of
the “PCMode” step in the SET-UP environment: on request, continuous, on stability or in RS485 mode.
Refer to the “TRANSMISSION MODES OF THE SERIAL PORTS” section for the functioning specifics.
7.2 PRN SERIAL PORT
It is bi-directional (full duplex) and uses an RS232 for transmitting data, selectable through the jumper on the board; it
is mainly used to connect to printers, computers and PLCs. The transmission speed may be selected in the SET UP
among these: 1200, 2400, 4800, 9600, 19200, 38400, 57600, 115200 Baud.
23
DFW06/DFWK06
CONNECTIONS FROM LP542PLUS, DP24, DP190 PRINTER TO INDICATOR:
DP24/LP542PLUS
DP190
|
INDICATOR
CABLE
9pin (female)
Terminal Board
|
Serial line
STANDARD
----------------------------------------------------------------------------------------------------------------------------------------GND 5
GND
|
GND
Grey
CTS 8
BU
|
CTS
Brown
RX
3
RX
|
TX0
Pink
Please find below the connection between the TPR printer and the indicator:
TPR
|
INDICATOR STANDARD
Terminal board |
Serial line
CABLE
------------------------------------------------------------------------------GND
|
GND
Black
RTS
|
CTS
Yellow
RX
|
TX0
Grey
|
Blue (not connected)
Printer power supply
+ VP
|
+ V AUX
Red
GND
|
- V AUX
Black
Below is the connection in RS232 between the PC and the indicator:
PC
PC
INDICATOR
STANDARD
9pin
25pin
Serial line
CABLE
(male)
(male)
-----------------------------------------------------------------------------------------------------------------------GND 5
7
GND
Grey
RX
2
3
TX0
Pink
Below is shown the connection in RS232 between the GLH60R WEIGHT REPEATER and the indicator:
GLH60R
INDICATOR
STANDARD
Serial line
Serial line
CABLE
-----------------------------------------------------------------------------------------------------------------------RX
2
TX0
Pink
GND 4
GND
Grey
7.3 SERIAL PORT TRANSMISSION MODES
7.3.1 PC PORT
Please find below the various selectable serial weight transmission modes of the PC serial port through the
corresponding “PCModE” StEP of the SET-UP environment.
TRANSMISSION REQUESTED FROM AN EXTERNAL DEVICE “ondE” parameter)
In this case the indicator waits for a command before transmitting (see the section “SERIAL COMMANDS
FORMAT”).
With Baud rate at 9600, through the READ command, it is possible to make up to 10 requests per second,
while with Baud rate at 115200 through the READ command, it is possible to make up to 14 requests per
second.
The transmission works with weight <, =, > 0 with approved or unapproved instrument.
NOTE: This protocol is active also in the other functioning modes, only on the PC serial output.
- 4 – 6 DIGIT REMOTE DISPLAY TRANSMISSION (“rEPE.4” and “rEPE.6” parameter)
The weight displaying takes place both in the indicator as well as in a weight repeater of 4 or 6 digits, (normally
the capacity will be properly set up for a correct displaying).
N.B. When either transmission mode is selected, the relative serial output is automatically set to 4800, N-8-1. In any
-
24
DFW06/DFWK06
case it’s possible to set it differently.
Independently from the set transmission speed it’s possible to obtain up to 6 transmissions per second.
- TRANSMISSION WHEN THE PRINT KEY IS PRESSED (“Prin.Std”, “PrinEX” parameter)
The instrument communicates the weight data through the serial port when the ENTER/PRINT key is pressed
(except for in the TOTALIZER mode where one should press the MODE key or takes place automatically in case
of automatic totalisation).
For non approved instruments:
- The transmission takes place if the weight is stable and the net weight is > 0, otherwise the display shows the
“LOW” message.
- Reenabling the transmission depends on how the “rEACt” step has been set in the SET-UP environment
(passing by zero of the NET weight, weight instability or always).
For approved instruments:
- The transmission takes place if the weight is stable and the net weight is > 20 divisions, otherwise the display
shows the “LOW” message.
- Reenabling the transmission depends on how the “rEACt” step has been set in the SET-UP environment
(passing by zero of the NET weight, weight instability or always).
The data is transmitted using the standard string (Prin.Std) or the extended string (PrinEX); see the
“TRANSMISSION PROTOCOL” section for the description of the two strings.
Notes:
- The transmission is confirmed by the the “trAnSM” message on the display or from the “Print” or “tot” messages
in the case in which the transmission takes place at the same time of the printing or totalisation.
- In any case it’s possible to receive data through the transmission commands upon request.
- With an unstable weight the display shows the “unStAb” message.
- If the transmission has not been reenabled the display shows the “no.0.unS” message.
- In any case it’s possible to receive the data through the transmission commands upon request.
- TRANSMISSION IN RS 485 SERIAL MODE (“485” parameter)
The protocol is the same as the transmission upon request (ondE parameter), except that the instrument
responds only if its machine code is the one requested (before the request the machine code must be put, I.E.
00READ<CRLF>).
If a broadcast address command (99) is received no answer is given. If the command is correct it is executed
anyways.
- CONTINUOUS TRANSMISSION (“ALL.Std” and “ALL.EXt” parameter)
This mode is used for interfacing to the PC, remote displays and other devices which request a constant updating
of the data independently from the weight stability.
If one selects this mode for the PC, independently from the set transmission speed one can obtain up to 4
transmissions per second.
If one selects this mode for the PRINTER port, the instrument transmits the data in relation to the set transmission
speed:
- With Baud rate at 1200 one can obtain up to 4 transmissions per second.
- With Baud rate at 115200 one can obtain up to 8 transmissions per second.
The transmission works with weight <, =, > 0 with approved or unapproved instrument.
The data is transmitted using the standard string (ALL.Std) or the extended string (ALL.EXt); see the
“TRANSMISSION PROTOCOL” section for the description of the two strings.
25
DFW06/DFWK06
-
TRANSMISSION ON STABILITY (“StAb.St” and “StAb.EX” parameter)
Each time a weight on the scale becomes stable, a communication string is transmitted on the PC serial port.
For non approved instruments:
- The transmission takes place if the weight is stable and the net weight is > 10 divisions.
- Reenabling the transmission depends on how the “rEACt” step has been set in the SET-UP
environment (passage by zero of the NET weight or instability of the NET weight of 10 divisions; by
choosing “always” it works upon instability).
For approved instruments:
- The transmission takes place if the weight is stable and the net weight is > 20 divisions.
- Reenabling the transmission depends on how the “rEACt” step has been set in the SET-UP
environment (passage by zero of the NET weight or instability of the NET weight of 20 divisions; by
choosing “always” it works upon instability).
The data is transmitted using the standard string (StAb.St) or the extended string (StAb.EX); see the
“TRANSMISSION PROTOCOL” section for the description of the two strings.
7.3.2 PRN PORT
Please find below the various selectable serial weight transmission modes of the PRN serial port through the
corresponding “PrModE” StEP of the SET-UP environment.
-
TRANSMISSION TO PRINTER (“dP190” and “LP542” parameter): requests the use of the print key on the
indicator (prints upon request of the operator). The print command is inhibited if the weight is in motion and in all
other circumstances in which the data is not valid (see “EXECUTION OF THE PRINTOUTS” section, USER
MAN.REF.).
-
CONTINUOUS TRANSMISSION (“ALL.Std” and “ALL.EXt” parameter): see the “ALL.Std” and “ALL.EXt” modes
of the PC port.
-
TRANSMISSION OF THE PC STRING UPON PRESSURE OF THE PRINT KEY (“PrPC.St” and “PrPC.EX”
parameter): see the “Prin.St” or “Prin.EX” mode of the PC port
-
TRANSMISSION TO 6-DIGIT REMOTE DISPLAY (“rEPE.6” parameter): see the “rEPE.6” mode of the PC port.
NOTE: In the MASTER/SLAVE functioning mode (see section 11.6 MULTISCALE REPEATER (MAStr), USER
MAN.REF.) only the transmission modes to the printer and the “rEPE.6” transmission mode are enabled for the
printer port.
THE CONNECTION AND THE SOFTWARE CONFIGURATION OF THE SERIAL OUTPUTS MUST BE CARRIED
OUT BY TECHNICAL PERSONNEL WHO KNOW THE PROCEDURES ON THE BASIS OF THE NEEDS OF THE
USER.
7.4 SERIAL COMMANDS FORMAT
Version reading command
[CC]VER<CR LF>
Instrument response:
In which:
[CC]VER,vvv,DFW06bbb<CR LF>
vvv is the firmware version
b space character, ascii 32 decimal character.
Extended weight read command
[CC]REXT<CR LF>
Instrument response: EXTENDED STRING (see “TRANSMISSION PROTOCOLS” section).
Weight read command
[CC]READ<CR LF>
Instrument response: STANDARD STRING (see “TRANSMISSION PROTOCOLS” section).
26
DFW06/DFWK06
Weight reading command with sensitivity times 10
[CC]GR10<CR LF>
Instrument response: STANDARD STRING (see “TRANSMISSION PROTOCOLS” section).
Reading command of microvolts relative to the weight
[CC]MVOL<CR LF>
Instrument response: STANDARD STRING (see “TRANSMISSION PROTOCOLS” section).
Reading command of converter points relative to the weight
[CC]RAZF<CR LF>
Instrument response: STANDARD STRING (see “TRANSMISSION PROTOCOLS” section).
Tare command
[CC]TARE<CR LF> or [CC]T<CR LF> (short command).
Instrument response: [CC]OK<CR LF> if the command has been RECEIVED; the instrument’s response does not
mean necessarily that the instrument executes the tare.
Zero command
[CC]ZERO<CR LF> or [CC]Z<CR LF> (short command)
Instrument response: [CC]OK<CR LF> if the command has been RECEIVED; the instrument’s response does not
mean necessarily that the instrument executes the zero.
ESC or C command
[CC]C<CR LF>
Instrument response: [CC]OK<CR LF> if the command has been RECEIVED; the instrument’s response does not
mean necessarily that the instrument executes the command.
The command works also within the SET-UP environment.
Test Command
[CC]ECHO<CR LF>
Instrument response: [CC]ECHO<CR LF>.
Reading command of power supply status
[CC]ALIM<CR LF>
Instrument response: [CC]PW: p BT: b
In which: instrument’s type of power supply:
0 if powered by battery
1 if powered by the mains
b: battery level (from 0 to 9).
[CC]ALIMN<CR LF>
Response of the instrument:
[CC]PW:bpppbBT:bvvvv
in which:
b
space character, ascii decimal 32 character.
ppp: power supply level of the instrument
vvvv: battery level expressed in mV.
Setpoint command
[CC]STPTntxxxxxxtyyyyyy<CR LF>
in which:
n indicates the SETPOINT number (1, 2, 3, 4)
t à F if the following weight value indicates the DISABLING of the relays (OFF).
t à O if the following weight value indicates the ENABLING of the relays (ON). xxxxxx and yyyyyy take on the
setpoint value of disabling or enabling: the digits must be entered WITHOUT the decimal point, omitting the NON
significant zeros.
Instrument responses: [CC]OK<CR LF> in case of syntax and correct values.
[CC]NO<CR LF> in case of correct syntax but wrong values.
27
DFW06/DFWK06
Example of instrument with capacity 10,000 kg and division 1 g:
Command: STPT1F5000O6500 (Disabling first relay at 5 kg and enabling at 6,5 kg)
Response: OK
NOTE: The negative response of the instrument (NO), happens in the following cases:
- one of the two entered values is greater than the capacity.
- one of the two entered values has a minimum division that is inconsistent in comparison to the one set in the
instrument.
- the disabling value is greater than that of enabling.
Net/Gross switch command
[CC]NTGS<CR LF>
Response of the instrument: [CC]OK<CR LF> if the command has been RECEIVED; the OK response does not
mean that the instrument has executed the conversion.
NOTE: The command is executed only if one is in the “Net / Gross switch” functioning mode, FModE >> FunCt >>
ntGS step.
Print Command
[CC]PRNT<CR LF> or [CC]P <CR LF> (short command).
Instrument response: [CC]OK<CR LF> if the command has been RECEIVED; the instrument’s response does not
mean necessarily that the instrument executes the printout.
Tare insertion command
[CC]TMANVVVVVV<CR LF> or [CC]WVVVVVV <CR LF> (short command)
in which: VVVVVV: manual tare value with the decimal point, from 1 to 6 characters; the non significant zeros can be
omitted.
Instrument response: [CC]OK<CR LF> if the command has been RECEIVED; the instrument’s response does not
mean necessarily that the instrument executes the tare.
Command for viewing temporary message on the display
[CC]DISPNNVVVVVV <CR LF>
in which: NN: is the indicator display number, standard 00 (ascii hex)
V is the message: - if present it is shown on the NN display.
- if not present, it interrupts the visualisation activated through a previous DISP command.
NOTES
In the case in which the display shown in the command is of the numeric type (for example the standard display 00),
if in the transmitted message there are two consecutive points the message is stopped after the first of the two
points. When the display is showing a message transmitted serially through the DISP command, the indicator does
not display those messages usually shown in the scale status (ZERO, TARE, HOLD, ...).
Instrument response: [CC]OK<CR LF>
The message remains for the time set through the DINT command:
The ASCII characters having the decimal code greater than 31 are accepted.
With approved instrument:
One needs to wait the end of the current visualisation before being able to view the next one.
Command for setting display visualisation interval
[CC]DINTNNNN<CR LF>
in which: NNNN is the visualisation interval (in milliseconds), expressed in ascii hex character; for example, in order
to set a visualisation time of 2 seconds (2000 milliseconds, which converted into hex it becomes 07D0), the
command becomes DINT07D0<CR><LF>.
By setting a time equal to zero, the message transmitted with the DISP command remains permanently shown on the
display.
Instrument response: [CC]OK<CR LF>
With approved instrument:
28
DFW06/DFWK06
The minimum settable time is 1 millisecond (0001HEX), and maximum settable time is 5 seconds (5000 milliseconds,
1388 HEX).
PC confirmation command
[CC]PCOK<CR LF>
The indicator shows on the display the "-PCOK-" message for about 2 seconds.
Instrument response: [CC]OK<CR LF>.
Serial command for setting the apw (only for the conuting operating mode)
[CC]SPMUvvvvvvvv <CR LF> or [CC]Xvvvvvvvv<CR LF> (short command).
in which: vvvvvvvv is the apw (up to 8 characters with decimal point); maximum value: 9999.999
System response: [CC]OK<CR LF>.
For example, to set a APW of 1.55 g, the command is the SPMU1.55<CR LF> or SPMU0001.550 <CR LF> and all
the various combinations adding zeros to the right or to the left but taking into consideration that the maximum length
of the APW field is 8 characters.
NOTES:
- The APW are not accepted in the SPMU.12<CRLF> format; these must be in the SPMU0.12<CRLF> format.
- the APW are not accepted equal to zero.
Serial command which supplies the indicator status
[CC]STAT<CR LF>
Instrument response:
[CC]STATXX<CR LF>
in which XX is a decimal value which supplies the status of the indicator; the possible values are:
XX
indicator status
00
normal scale status
01
normal scale status in input
02
instrument in technical set-up
03
instrument in boot phase
04
instrument in rx/tx set-up phase
05
instrument in test phase of the serial ports
06
instrument in print test
07
instrument in firmware update phase
08
instrument in stand-by
09
instrument in automatic zero phase
11
instrument in optoisolated inputs test phase
Key pressure simulation command
[CC]KEYPXX<CR LF>
in which XX is the code of the pressed key:
00: MODE key; 01: F key; 02: ENTER key; 03: TARE key; 04: scale ZERO key; 05: numeric 0 key; 06: numeric 01
key; 07: numeric 2 key; 08: numeric 3 key; 09: numeric 4 key; 0A: numeric 05 key;
0B: numeric 06 key; 0C: numeric 07 key; 0D: numeric 08 key; 0E: numeric 09 key; 0F: INFO key;
10: C key.
Instrument response: OK<CR LF>: accepted command.
In case the simulated key has two linked functions (key briefly pressed or at length, like the TARE key), if the KEYP
command is followed by the release command of the (KEYR) key within a maximum time of 1,5 seconds, the simple
function will be executed (key briefly pressed); otherwise the second function will be made (key pressed at length).
Key pressure simulation command
[CC]KEYR<CR LF>
Response: [CC]OK<CR LF>
NOTA: The instrument does not transmit the OK answer to the following short commands: P, Q, T, W, X, Z.
29
DFW06/DFWK06
Key disabling command
[CC]KEYEt<CR LF>
t à E to enable the keys
t à D to disable the keys
Response:
[CC]OK<CR LF>
Status command of the keys
[CC]KEYE<CR LF>
Response:
[CC]KEYEE<CR LF> if the keyboard is enabled
[CC]KEYED<CR LF> if the keyboard is disabled
Tare block command
[CC]TLCKt<CR LF>
t à E to lock the tare
t à D to unlock the tare
Response:
[CC]OK<CR LF>
Tare status command
[CC]TLCK<CR LF>
Response:
[CC]TLCKE<CR LF> if the tare is locked.
[CC]TLCKD<CR LF> if the tare is unlocked.
LEGEND
[CC]= instrument code, e.g.. 00 (only with RS485 protocol).
<CR LF>= Carriage Return + Line Feed (ASCII characters 13 and 10).
30
DFW06/DFWK06
SERIAL ERRORS
Upon each serial command received the instrument transmits a response which may be a response to a command
(see the command description) or the indication of the command error:
ERR01<CR LF> it is shown when a correct command is transmitted from the PC to the indicator however it is
followed by letters inserted involontarily (I.E.: READF TARES…).
ERR02<CR LF> it is shown when a correct command is transmitted from the PC to the indicator, but containing
wrong data.
ERR03<CR LF> it is shown when an unallowed command is transmitted. It may be a command not used in the
selected functioning mode or the command reaches the indicator in the instant in which the keyboard buffer is
already occupied by another command.
ERR04<CR LF> it is shown when an inexistent command is transmitted.
7.5 TRANSMISSION PROTOCOLS
The weight data transmission on the PC and PRT serial ports may take place in two formats:
7.5.1 STANDARD STRING
[CC]hh,kk,pppppppp,uu + CR + LF
in which: [CC] INSTRUMENT CODE IN THE FORMAT OF TWO ASCII DECIMAL DIGITS
ONLY IN THE CASE THAT THE 485 PROTOCOL IS SELECTED (FOR EXAMPLE 00).
hh UL
OL
ST
US
TL
Underload
Overload
Stability of the display
Unstability of the display
Active inclination input
kk NT
GS
GX
VL
RZ
Net Weight
Gross Weight
Gross weight with sensitivity times 10
Value in microvolts relative to the weight
Value in converter points relative to the weight
pppppppp 8 digits (including any sign and decimal point) which identify the weight. The insignificant
digits are filled with spaces. Through the MVOL and RAZF command the indicator transmits
the relative value on 10 digits instead of 8.
uu
CR
LF
Unit of measurement "kg" "bg" "bt" "lb" "mv" (microvolts) "vv" (converter points)
Carriage Return (13 ascii decimal character).
Line Feed (10 ascii decimal character).
The transmitted weight is the GROSS weight (GS) if no TARE WEIGHT has been entered; otherwise, the NET
WEIGHT (NT) will be transmitted.
31
DFW06/DFWK06
7.5.2 EXTENDED STRING
[CC]B,hh,NNNNNNNN,YYTTTTTTTT,PPPPPPPP,uu + CR + LF
in which:
[CC]
INSTRUMENT CODE IN THE FORMAT OF TWO ASCII DECIMAL DIGITS
JUST IN CASE THE 485 PROTOCOL IS SELECTED (FOR EXAMPLE 00)
B
scale number (always 1).
hh
UL
OL
ST
US
TL
Underload
Overload
Stability of display
Instability of display
Active inclination input
NNNNNNNN
net weight on 8 characters including possible sign and decimal point
YY
"PT" if the tare is manual, otherwise YY = " " (two empty spaces) if the tare is
semiautomatic.
TTTTTTTT
tare weight on 8 characters including possible sign and decimal point.
PPPPPPPP
number of pieces on 8 characters, equal to 0 if the indicator is in a functioning mode
other than the counting mode.
uu
Unit of measure "Kg" "bg" "bt" "lb
CR
Carriage Return (13 ascii decimal character)
LF
Line Feed (10 ascii decimal character)
The insignificant digits of the net, tare, gross tare weights and the pieces of the various channels will be filled with
spaces (space character, 32 decimal ascii code character)
LEGEND:
b
space character, 32 decimal ascii character.
32
DFW06/DFWK06
8 ANALOGUE OUTPUT (OPTIONAL)
In all the functioning modes, through an optional interface, it is possible to use an analogue output configurable at 0 –
10V, 0 – 20 mA or 4 – 20 mA. The voltage and the output current from the interface are proportional to the gross
weight or net weight present on the scale. In regards to the electrical connection scheme, refer to the “ELECTRICAL
SCHEMES” section.
Note: The analogue output is updated every 50ms and takes on the value corresponding to the weight converted in
that instant; therefore, if the filter is slowed on the weight also the analogue output is slowed.
For configuring the parameters, one should enter the setup environment:
through the SEtuP >> ConFiG >> Anout >> Mode step one selects the type of analogue output:
Ao no = analogue output disabled.
Ao G = analogue output on gross weight.
Ao n = analogue output on net weight.
Once the functioning mode is confirmed, one sets the values of the analogue output; in other words, the
digital/analogue converter values are entered (between 0 and 65535) to which corresponds a certain output value in
voltage or in current.
In this configuration the instrument keys take on the following meanings (functions):
ZERO
It decreases the selected digit (blinking).
TARE
It increases the selected digit (blinking)
MODE
It selects the digit (blinking) from left to right.
ENTER
By pressing once after have a value has been entered, it enables the corresponding output
analogue value, (allowing the check) but remains still inside the step in case of a new
modification. By pressing a second time (on the same entered value), it confirms and exits
the step.
C
It allows to quickly zero the present value.
NUMERIC KEYS
In the 17-key indicator, these allow to enter values, from right to left.
AoMA
By entering this step, one sets the maximum value of the analogue output, in other words the corresponding value of
the full scale capacity and in the overload condition. This value can be anywhere between 0 and 65535 (values of the
digital/analogue converter); if a higher digit is entered, the instrument emits a prolonged sound, after which it zeros
the value just entered.
Ao2E
By entering this step, one sets the analogue output value when the scale displays zero weight (supplied when the
scale is in underload). This value can be anywhere between 0 and 65535 (values of the digital/analogue converter); if
a higher digit is entered, the instrument emits a prolonged sound, after which it zeros the value just entered.
AoMi
By entering this step, one sets the minimum value of the analogue output.
APPROXIMATE VALUES BETWEEN THE D/A CONVERTER AND ANALOGUE OUTPUT
D/A CONVERTER VALUES
1200
11250
52200
62300
VOLTAGE VALUE (V)
0
CURRENT VALUE (mA)
0
4
20
10
33
DFW06/DFWK06
9 PROGRAMMING THE PRINTOUTS
If in the set-up environment the presence of the printer has been configured correctly, the indicator carries out the
print functions; each functioning mode has specific printouts, shown in the “Print examples” section in the user
manual (USER MAN.REF.). In any case, it is possible to define some printing fields, the size of the characters, a
heading and other options depending on the printer and the predefined functioning mode.
In the “Pr.Mode” step of the set-up environment it is possible to select whether to print on the DP190 / TPR printer or
the LP542PLUS labeller; see the following steps for all the printing options.
1) Enter the SET-UP environment of the scale (when turned on, press for an instant the TARE key while the
firmware version is displayed).
2) Select the SEtuP >> SEriAL >> Com.Prn >> PrMode step and press ENTER/PRINT.
3) Select the desired printer (“tPr” or “LP542P) and press ENTER/PRINT.
4) In the “SET-UP ENVIRONMENT” section see the descriptions of the “baud.Pr”, “Bit.Pr”, “PWr.Prn”, “on.Prin”
and “Prn.CtS” steps for configuring the baud rate, the number of transmission bits, the printer’s power supply
and the CTS signal.
5) Select the “Pr Conf” step and press ENTER/PRINT: one enters the PROGRAMMING MENU OF THE
PRINTOUTS. Below is the description of the steps.
6) Once the setting have been made, press the C key various times until the indicator shows “SAVE? In the
display: confirm with ENTER/PRINT to memorize and return to weighing.
34
DFW06/DFWK06
SeriAL
CoM.Prn
Pr ModE
(!) Pr-no, tPr, LP542P, ALL.Std,
ALL.Ext, PrPC.St, PrPC.EX, rEPE.6,
bAud.Pr
(!) 9600, 1200, 2400, 4800,
19200, 38400, 57600, 115200
Bit.Pr
(!) n - 8 - 1, n - 8 - 2, n - 7 - 2,
E - 7 - 1, E - 7 - 2
PWr.Prn
(!) PWr.Ext, Ext.oFF, PWr.int
On.Prin (§)
Prn.CtS (§)
PrConF (§)
(!) noCtS, CtSL,
CtSh, EMuCtS
LAnG
(!) itAL, EnGL, dEut, FrAn, ESPA
bLinE
(!) YES, no
IntES
(!) Int no, Int Si, Int Fi, Int.SuM
nuMWEi (§)
(!) both, no, tot, SuM
doM
(!) dt. no,dt.in.1,dt.in,2,dt.EX.1, dt.EX.2
ntik
(!) no, YES.tot, SuM, both, rESEt
EndPAG
(!) YES.tot, SuM, both, no
tErM
(!) Cr, CrLF, no tErM
PForM
LP542P
dEFAuL
dEFAuL
ChAr.t
FiLdS
LAbELW
hEiGt
LAbELh
bArC
ChAr 1
FiLdS
tPr
VdbAr
ChAr 2
LMbAr
tMArG
WbAr
LMArG
hbAr
bArC
bArWS
UdbArC
bArFs
LMbArC
PntVb
hbArC
PtESt
bArFs
PntUb
PEEL
GAP
dirECn
dWn.EXt
doWnLd
LALinG
PtESt
35
DFW06/DFWK06
PrConF CONFIGURATION OF THE PRINTOUTS (§)
In this step one enters the print programming submenu.
(§) The parameter and all its submenus are displayed only if the “tPr” o “LP542P” parameter has been
selected in the “PWr.Prn” step or “Pr- no” in the “PrModE” step.
LanG PRINTING LANGUAGE
One selects the language in which the printouts are carried out:
ItAL italian.
EnGL
english.
dEut
german.
FrAn
french.
ESPA
spanish.
(!) ItAL
bLinE EMPTY LINE AT THE BEGINNING OF THE PRINTOUT
YES
at the beginning of each printout an empty line is inserted.
no
no empty line.
(!) YES
IntES PRINTING OF HEADING
Int no
no heading.
Int Si
prints the heading; in the totalizer mode it is printed only upon the first totalisation (in other words if
the partial total is zero).
Int Fi
prints the heading; in the totalizer mode it is printed in all the totalisations.
Int.SuM
prints the heading; in the totalizer mode it is printed in all the totalisations and in the partial total.
NOTE: With a 17-key indicator, the selection of the “Int Si”, “Int Fi”, “Int.SuM” allows the heading configuration
(see later on the “HEADING PRINTING” section).
(!) Int no
nuMWEi PRINTING OF NUMBER OF WEIGHS (ONLY FOR TOTALIZER MODE)
no
does not print the number of weighs.
tot
prints the number of weighs only in the single totalisation.
Sum
prints the number of weighs only in the partial total.
both
prints the number of weighs in the totalisations as well as in the partial total.
(§) The parameter is displayed only if the “totalizer” functioning mode has been selected.
(!) both
doM PRINTS DATE AND TIME
dt. no
the date and time are not printed.
dt.in.1
the date and time are printed using the clock inside the printer; in the totalizer functioning mode the
date and time are printed just in the total and not in the single totalizations
dt.in.2
as above, but in the totalizer functioning mode the date and time are printed also in the single
totalizations.
dt.EX.1
like “dt.in.1” but the indicator’s date and time board (optional) is used.
dt.EX.2
like “dt.in.2” but the indicator’s date and time board (optional) is used.
NOTE: The date and time is printed, if programmed, before the possible barcode, which is always at the end of
the printout
(!) dt. No
36
DFW06/DFWK06
ntik PRINTS TICKET NUMBER
The ticket number is a sequence number which increases upon each printing made, this number, between 1 and
65535, is kept in memory also when the instrument is turned off.
no
does not print the ticket number.
yes.tot
prints the ticket number; in the totalizer functioning mode it is printed only in the single totalisations.
SuM
prints the ticket number; in the totalizer functioning mode it is printed just in the partial total.
both
prints the ticket number; in the totalizer functioning mode it is printed in the totalisations as well as in
the partial total.
rESEt
by pressing ENTER/PRINT the sequence number in the ticket is zeroed.
(!) no
NOTE: The ticket number, if programmed, is printed after the weight data.
EndPAG SELECTION OF PAGE END PRINTING
This step allows to print 2 emptly lines at the end of each printout (if “DP190” is selected in the “PrModE” step) or
an end label (if “LP542” is selected in the “PrModE step).
no
does not print the page end
yes.tot
prints the end page; in the totalizer functionig mode it is printed just in the single totalisations.
SuM
prints the end page; in the totalizer functioning mode it is printed just in the partial total.
both
prints the end page; in the totalizer functioning mode it is printed in the totalisations as well as in the
partial total.
(!) yes.tot
tErM SETTING TERMINATOR
When connecting a printer it is often necessary to transmit one of the following protocols in order to define the end
of the print line.
Cr
CR (for DP190, LP522/542P, TPR)
CrLF
CR LF (for EPSON LX300 and TMU295).
(!) Cr
PForM PRINT FORMATTING
In this step one enters a submenu for selecting the weight data which one wants to print and the print layout.
Depending on the type of printer selected in the PrModE step (LP542P or tPr), the parameters which are
suggested, change:
PForM
tPr
LP542P
37
DFW06/DFWK06
tPr
*****************************************************************************************************************************
DEFAuL PRINTOUT DEFAULT
Through this StEP one enables the default printing relative to the selected functioning mode.
The default sets, in each of the following steps, the value marked with the (!) symbol.
FiLdS PRINTING FIELDS (§)
Through this StEP it is possible to select which fields to be printed among those available:
G; n; t; G n; G t; n G; n t; t G, t n; G n t; G t n; n G t; n t G; t G n, t n G (in which G is the gross weight, n the net
weight and t the tare weight).
(!) G t n
(§) The parameter is not displayed if one has selected the MASTER/SLAVE functioning mode, FmodE >>
FunCt >> MAStr parameter.
hEiGt
FONT HEIGHT SELECTION FOR PRINTING THE WEIGHT DATA, DATE AND TIME,
PROGRESSIVE NUMBERS AND ID’S (§)
h.LoW normal height
h.high double height
(!) h. LoW
(§) The parameter is not displayed if one has selected the MASTER/SLAVE functioning mode, FmodE >>
FunCt >> MAStr parameter.
bArC PRINTS THE BAR CODE (§)
In this step one programmes the printing of the 39 CODE (if “TPR” has been selected in the “PrModE” step),
which will be printed before the printing of the date and time:
no
does not print the bar code.
yes.tot prints the bar code; in the totalizer functioning mode it is printed just in the single totalisations.
SuM
prints the bar code; in the totalizer functioning mode it is printed just in the partial total.
both
prints the bar code; in the totalizer functionig mode it is printed in the totalizations as well as in the
partial total.
(!) no
(§) The parameter is not displayed if one has selected the MASTER/SLAVE functioning mode, FmodE >>
FunCt >> MAStr parameter.
NOTES:
- the weight values are expressed in 6 digits without decimal point and with the possible non signficant zeros
present.
- between a weight value and the following one a space is inserted.
- the bar code is printed as the last data, after the weight values, possible numeric codes and ticket number,
but before the date and time (with DP190 or TPR printer).
VdbAr SELECTING THE BAR CODE’S VERTICAL DISTANCE OF THE PRECEDING TEXTS (§)
In lines with normal height font, programmable value: 0…9. (!) 0
GROSS
TARE
NET
LMbAr SELECTION OF LEFT MARGIN (§)
Expressed in 1/8 of a mm (from 0 to 99).
(!) 00
LMbAr
WbAr SELECTION OF BAR CODE FONT WIDTH (§)
Programmable value: W1…W3
(!) W1
VdbAr
001000
hbAr
001000
hbAr SELECTION OF BAR CODE FONT HEIGHT (§)
Expressed in 1/8 di mm (from 0 to 255) (!) 000
38
1.000kg
0.000kg
1.000kg
DFW06/DFWK06
bArFS SELECTION OF PRINT FIELDS IN THE BAR CODE (§)
Programmable value:G; n; t.
In which G is gross weight, n is net weight and t is tare weighing.
(!) G
PntVb PRINTING OF THE BAR CODE’S NUMERIC FIELD (§)
This step allows to select the printing of the bar code’s numeric field:
no
the numeric field is not printed.
undEr
under the bar code
AboVE
above the bar code
Ab/un
both above as well as below the bar code.
(§) The previous parameters are not displayed if one has selected “no” in the SEtuP >> SEriAL >> CoM.Prn >>
Pr.ConF >> PForM >> bArC step.
PtESt PRINTING TEST
By pressing ENTER/PRINT, a test label is printed of previously selected fields, but with fixed weight values.
The print test depends on the selected functioning mode:
- STD mode: the first time the fields with the kg unit of measure are printed, the second time the fields with
the lb unit of measure are printed, and so on.
- NTGS, STP G, STP N, VISS, Alibi, INOUT modes: simple printing.
- MASTER mode: not settable.
- HOLD mode: the first time the fields without the “HOLD” message are printed, the second time the ones
with the “HOLD” message are printed, and so on.
- PEAk mode: the first time the fields without the “PEAK” message are printed, the second time the ones
with the “PEAK” message are printed, and so on.
- Tot o and tot s mode: when the ENTER/PRINT is pressed a selection menu appears with the following
items:
" TOT.1.0": simulates the printing of the first totalisation relative to the zero registry.
" TOT.2.0": simulates the printing of a further totalisation relative to the zero registry.
" SUM 0": simulates the printing of the partial total relative to the zero registry.
" TOT.1.1": simulates the printing of the first totalisation relative to the one registry.
" TOT.2.1": simulates the printin of a futher totalisation relative to the one registry.
" SUM 1": simulates thr printing of the partial total relative to the one registry.
“ GtotAL”: simulates the printing of the general total.
- COUN mode: the first time the fields with the pieces number and apw are printed, the second time the
ones without the pieces number and apw are printed.
LP542P
*****************************************************************************************************************************
PREMISE: the purpose is to create the label directly onto the indicator, by configuring the parameters
described below.
Once the programming is done, one will need to download the label onto the printer (doWnLd step) and then
save it in its permanent memory; carefully read section 9.1.
39
DFW06/DFWK06
DEFAuL: PRINTOUT DEFALUT
In this step one enables the default printout relative to the selected functioning mode.
The default sets, in each of the following steps, the value marked by the (!) symbol.
FiLdS: PRINT FIELDS (§)
In this step it is possible to select which fields to print among the available ones:
G; n; t; G n; G t; n G; n t; t G, t n; G n t; G t n; n G t; n t G; t G n, t n G (in which G is the gross weight, n is the net
weight and t is the tare weight).
(!) G t n
(§) The parameter is not displayed if one has selected the MASTER/SLAVE functioning mode, FmodE >> FunCt >>
MAStr parameter.
ChAr.t: FONT TYPE WITH WHICH THE WEIGHT DATA, DATE AND TIME, PROGRESSIVE NUMBERS AND ID’S
ARE PRINTED.
ChAr.1: the data is printed by using the font which will be programmed in the ChAr 1 step.
ChAr.2: the data is printed by using the font which will be programmed in the ChAr 2 step.
SEE EXAMPLE 1.
(!) ChAr 1
LAbELH: LABEL HEIGHT
Enter a value with 3 digits, expressed in mm.
(!) 80
LAbELW
LAbELH
LAbELW: LABEL WIDTH (IN MM)
Enter a value with 3 digits, expressed in mm.
(!) 63
ChAr 1: SELECTING THE FONT WITH WHICH THE DATA LINKED TO THIS CHARACTER WILL BE PRINTED
(!) Font. 3d
ChAr 2: SELECTING THE FONT WITH WHICH THE DATA LINKED TO THIS CHARACTER WILL BE PRINTED.
(!) Font. 3d
It is possible to select for each letter one fo the following fonts:
PARAMETER
TYPE OF FONT
(WIDTH X HEIGHT)
Font. 1
1 x 1,5 mm
Font. 1d
1 x 3 mm
Font. 2
1,5 x 2,5 mm
Font. 2d
1,5 x 5 mm
Font. 3
2 x 3 mm
Font. 3d
2 x 6 mm
Font. 4
3 x 4 mm
Font. 4d
3 x 8 mm
Font. 5
4 x 6 mm
Font. 5d
4 x 12 mm
40
DFW06/DFWK06
EXAMPLE 1: one wants to print 4 heading lines, of which the first two are double the height in respect to the second
two, GROSS, TARE, NET, DATE and TIME.
One will programme:
in the heading,
LinE 1 and LinE 2 = ChAr 2
LinE 3 and LinE 4 = ChAr 1
ChAr.t = ChAr 1
ChAr 1 = Font. 3
ChAr 2 = Font. 3d
Result:
DIMENSION = ChAr 2 à
DIMENSION = ChAr 1 à
DIMENSION = ChAr 1 à
HEADING 1
HEADING 2
HEADING 3
HEADING 4
GROSS
TARE
NET
10:20
L.MArG: DISTANCE OF THE DATA PRINTED FROM THE LABEL’S LEFT
Enter a value with 3 digits, expressed in mm
(!) 6
25/11/2004
t.MarG
L.MArG
t.MarG: DISTANCE OF THE DATA PRINTED FROM THE LABEL’S UPPER
Enter a value with 3 digits, expressed in mm
(!) 10
1.000kg
0.000kg
1.000kg
HEADING 1
HEADING 1
HEADING 1
…
MARGIN
MARGIN
bArC: PRINTING THE BAR CODE (ONLY CODE 39 TYPE) (§)
no
does not print the bar code.
yes.tot
prints the bar code; in the totalizer functioning mode it is printed just in the single totalisation.
SuM
prints the bar code; in the totalizer functioning mode it is printed just in the partial total.
both
prints the bar code; in the totalizer functioning mode it is printed both in the totalisations as well as in
the partial total.
(!) no
(§) The parameter is not displayed if one has selected the MASTER/SLAVE functioning mode, FmodE >> FunCt >>
MAStr parameter.
NOTES:
- the weight values are expressed with 6 digits without decimal point and possibly with non significant zeros.
- between a weight value and the following one a space is inserted
- the bar code is printed as the last data, after the weight values, numeric codes and ticket number, but before the
time and date
41
DFW06/DFWK06
V.d.bArC: SELECTING THE VERTICAL DISTANCE OF THE BAR CODE FROM THE PREVIOUS TEXTS (§)
Enter a value with 3 digits, expressed in mm
(!) 5
GROSS
TARE
NET
L.M.bArC: SELECTING THE LEFT MARGIN (§)
Enter a value with 2 digits, expressed in mm
(!) 15
1.000kg
0.000kg
1.000kg
VdbArC
LMbAr
h.bArC: SELECTING BAR CODE HEIGHT (§)
Enter a value with 2 digits, expressed in mm
(!) 10
001000
hbAr
001000
bArFS: SELECTING THE PRINT FIELDS IN THE BAR CODE (§)
Selectable fields: G; n; t; G n;G t; n G; n t; t G; t n; G n t; G t n; n G t; n t G; t G n; t n G.
(!) n
In which G is the gross weight, n is the net weight and t is the tare weight.
PntVb: PRINTING THE NUMERIC FIELD OF THE BAR CODE (§)
no:
the numeric field is not printed.
Si:
the numeric field is printed under the bar code
(!) Si
(§) The previous parameters are not displayed if one has selected “no” in the SEtuP >> SEriAL >> CoM.Prn >>
Pr.ConF >> PForM >> bArC step.
PEEL: CONFIGURATION OF THE SENSOR WHICH PEELS OFF THE LABEL
on: sensor active
oFF: sensor not active
(!) oFF
GAP SETTING THE VERTICAL DISTANCE BETWEEN A LABEL AND THE FOLLOWING ONE
Enter the value in mm.
NOTE: if one uses a continuous form, set the value 00.
dirECn: SETTING THE PRINT DIRECTION
dirECt:
rEvErSE:
(!) direct
direct printing
upside down printing
GROSS
TARE
NET
Direct
1.000kg
0.000kg
1.000kg
Upside down
dWn.EHT: SETTING OF THE TYPE OF FORMAT
FdFW: format created through the indicator
FEHtn: format created with the programme or tool on PC
doWnLd: TRANSMISSION & TEMPORARY SAVING OF THE LABEL PROGRAMMED IN THE LABELLER
This step temporarily saves the label in the labeller memory; by turning it off it causes the loss of the saved data.
Carefully read section 9.1.
42
DFW06/DFWK06
L.ALinG: ALIGNMENT OF THE LABEL IN THE PRINTER
PtESt PRINTING TEST
By pressing ENTER/PRINT, a test label is printed of previously selected fields, but with fixed weight values.
The print test depends on the selected functioning mode:
- STD mode: the first time the fields with the kg unit of measure are printed, the second time the fields with
the lb unit of measure are printed, and so on.
- NTGS, STP G, STP N, VISS, Alibi, INOUT modes: simple printing.
- MASTER mode: not settable.
- HOLD mode: the first time the fields without the “HOLD” message are printed, the second time the ones
with the “HOLD” message are printed, and so on.
- PEAk mode: the first time the fields without the “PEAK” message are printed, the second time the ones
with the “PEAK” message are printed, and so on.
- Tot o and tot s mode: when the ENTER/PRINT is pressed a selection menu appears with the following
items:
" TOT.1.0": simulates the printing of the first totalisation relative to the zero registry.
" TOT.2.0": simulates the printing of a further totalisation relative to the zero registry.
" SUM 0": simulates the printing of the partial total relative to the zero registry.
" TOT.1.1": simulates the printing of the first totalisation relative to the one registry.
" TOT.2.1": simulates the printin of a futher totalisation relative to the one registry.
" SUM 1": simulates thr printing of the partial total relative to the one registry.
“ GtotAL”: simulates the printing of the general total.
- COUN mode: the first time the fields with the pieces number and apw are printed, the second time the
ones without the pieces number and apw are printed.
43
DFW06/DFWK06
!! IMPORTANT !!
9.1 SAVING THE LABEL IN THE LABELLER’S PERMANENT MEMORY
Once the programming of the label has made, one should:
1. Download the label created in the labeller à press ENTER when the display shows the "doWnLd" step.
2. Press the C key; the display shows the message "L.SAVE?": press the ENTER key to save the label
created in the labeller’s permanent memory.
When saving the data on the labeller, the (*) green led blinks; while this happens do not do anything with the
indicator or the labeller.
The saving of the label ends when this led (*) does not blink any more.
(*)
The labeller has the label saved and is ready to print it; turning off the labeller does not cause the loss of the
saved data.
REPEAT THESE SAVING OPERATIONS EACH TIME THAT ONE MODIFIES THE LABEL OR THE DATA
IN IT OR IF IT IS NECESSARY TO CHANGE THE FUNCTIONING MODE AFTER HAVING PROGRAMMED
THE LABEL.
It is also possible to create or customize the label, by using the label creation programme supplied together
with the labeller; refer to the labeller manual for further information.
44
DFW06/DFWK06
10 PRINTING THE HEADING
It is possible to programme from the indicator or from PC, 4 alphanumeric heading lines of 24 characters each, which
will be printed in the manner which has been programmed until these are cancelled or substituted.
If one has a 5-key indicator, one configures the heading by using the DINI TOOLS software on the PC; by following
the instructions of the relative manual.
If one has a 17-key indicator, in order to configure the heading one may also follow the procedure below:
Enter in the TECHNICAL SET-UPàSetup >> SeriAL >> CoM.Prn
CoM.Prn
PrConF
IntES
int no
int Si
nr
x
int F1
Lin
1
int SuM
CoM.Prn
2. Enter in the step:
PrConF
3. Enter in the step:
IntES
10
...
Lin
1. Enter in the step:
Char 1
1
...
x
Char 2
10
24
4. Select the heading printing mode:
int no
= does not print the heading
int Si
= prints the heading (only with the first totalisation if a totalizer mode has been selected)
int F1
= if a totalizer mode is selected, it prints the heading in all the totalisations
int.SuM = if a totalizer mode is selected, it prints the heading in all the totalisations in the total.
By selecting a mode different than the int no, if one has set the “EXt” parameter in the SEtuP >> kEYb step,
one will be asked to enter the number of heading lines; the display shows
number of set lines (from 0 to 4).
nr
x
, in which x is the
5. Select the number of lines, using the ZERO key and press ENTER to confirm.
Lin
1
6. The
message appears on the display for a few seconds indicating which line one is
programming (in this case it’s line 1).
7. Then the instrument asks to select the height of the print character:
ChAr 1 = prints line at a normal height (for tpr) or character 1 (for LP542PLUS).
ChAr 2 = prints line at double the height (for tpr) or character 2 (for LP542PLUS).
(see section 9 for further information)
Use the ZERO key to select the character height, then press ENTER to confirm
8. The instrument is ready to programme the first heading line, which consists in entering a sequence of
numeric two digit codes, corresponding to the fonts (see Table 3). A line can have up to 24 characters
(including the empty spaces).
45
DFW06/DFWK06
LIST OF THE CODES AND CORRESPONDING PRINTED CHARACTERS
CODE
00
01
02
03
04
05
06
07
08
09
10
11
12
13
14
15
16
17
18
19
20
Table 3
CHARACTER
0
1
2
3
4
5
6
7
8
9
SPACE
A
B
C
D
E
F
G
H
I
J
CODE
21
22
23
24
25
26
27
28
29
30
31
32
33
34
35
36
37
38
39
40
41
CHARACTER
K
L
M
N
O
P
Q
R
S
T
U
V
W
X
Y
Z
+
*
!
(
CODE
42
43
44
45
46
47
48
49
50
51
52
53
54
CHARACTER
)
&
%
$
#
:
,
.
?
@
[
]
/
In the entry mode, the display is managed in the following way:
on the left one enters the character (10 is the default character), while the
number on the right indicates the position of this character on the line.
10 01 01
Use the numeric keyboard to enter the various characters.
For example:
To write “ROSSI GIUSEPPE S.R.L.”, one should set the following codes:
28 / 25 / 29 / 29 / 19 / 10 / 17 / 19 / 31 / 29 / 15 / 26 / 26 / 15 / 10 / 29 / 49 / 28 / 49 / 22 / 49 / 10 / 10 / 10
9.
when one has finished programming the heading line, the instrument automatically passes to the
programming of the following line
10. repeat the operations from point 6 for all the set lines.
11. once the programming of the heading is done, the instrument automatically passes to the following step
nuMWEi (§)
.
12. to save the entered heading, press the C various times until the display shows the message "SAVE?":
press ENTER to save.
46
DFW06/DFWK06
When entering the codes, it is possible to carry out the other functions by pressing the F key and a keyboard number:
F + 0: prints the HELP ON LINE: summarizes the codes of the alphanumeric codes and the list of the
other functions.
F + 1: cursor forwards: while one is programming a print line, it allows to scroll the set characters and
modify them.
F + 2: cursor backwards: while one is programming a print line, it allows to scroll the set characters and
modify them.
F + 3: while one is programming a print line, it carries out this command; all the codes of this line are
cancelled.
F + 8: while one is programming a print line, by carrying out this command, the test printing of the line
is carried out.
F + 9: once the programming or the modifcation of a print line has been made, by carrying out this
function the new programming is memorised.
11 ERROR MESSAGES
While using the indicator, it is possible to incur in the following errors:
MESSAGE
PREC.
ERMOT
ERPNT
Er – 11
Er – 12
Er – 39
DESCRIPTION
It is displayed if one tries to calibrate a point without first having confirmed the number of
calibration points
Weight unstable during the acquistion of a point during calibration.
During the acquisition of a calibration point a null value has been read by the converter.
Calibration error: a too small sample weight has been used; it is advisable to use a weight
equal to at least half of the scale capacity.
Calibration error: the acquired calibration point (tP1 o tP2 o tP3) is equal to the zero point
(tP0).
It is displayed when the instrument has not yet been calibrated and initialized.
press the TARE key when the instrument displays “ERR – 39” to enter the technical set-up
environment (with the standard procedure it is not possible). Carry out the initialization of the
indicator (“dEFAu” parameter) and the selection of the type of keyboard (“KEYb” parameter)
and finally the programming of all the parameters of the set-up environment and the
calibration.
47
DFW06/DFWK06
12 CONNECTION SCHEMES
ANALOGUE OUTPUT
(optional)
48
DFW06/DFWK06
MEANING OF MOTHER BOARD TERMINAL BOARDS AND JUMPERS
VB 6 Vdc BATTERY POWER SUPPLY
2BATT – (0 Vdc) GND
1+
BATT + (6 Vdc)
VE 12 Vdc POWER SUPPLYc
20 Vdc (GND)
1+
+12 Vdc
AUX and PRNAUX AUXILIARY OUTPUT
10 Vdc (GND)
2+
5,3 –7,3 Vdc 400 mA max
AUX and PRNAUX (OUTPUT VOLTAGE): It is used to power an external device and its functioning mode depends
on the “PWr.Prn” parameter of the set-up environment;
PWr.EXt with instrument on, printer managed and auxiliary output always active.
PWr.int
printer managed, auxiliary output active only when the instrument prints.
Ext.oFF
printer managed and auxiliary output always active; the start-up characters are transmitted to the
printer, because the printer is considered to beconfigured in energy saving mode
AUX-ON = if closed, the auxiliary output is always active independently from the “PWr.Prn” parameter of the set-up
environment.
BATT = If closed, it enables the indication of the battery level; see section 9.5 - “LOW BATTERY WARNING”, USER
MAN.REF.
CELL LOAD RECEPTOR
1 EXC POWER SUPPLY –
2 EXC +
POWER SUPPLY +
3 SENS REFERENCE 4 SENS +
REFERENCE +
5 SIG SIGNAL 6 SIG +
SIGNAL +
J6 and J7 = if closed, REFERENCE + and POWER SUPPLY +, REFERENCE – and POWER SUPPLY –are
jumpered on the board
J1 = if closed, it enables the access to the metrological parameters
ON = if closed it enables the loading of the software
BOOT = connector for the connection of the first I/O expansion board or for the ALIBI MEMORY board.
ANALOGUE OUTPUT (optional)
1 + 20 mA
2 0 mA
3 + 10 V
4 0V
Note: the maximum resistance applicable on the
output current is 350 Ohm and the minimum resistance
applicable on the output voltage is 10 kohm.
49
DFW06/DFWK06
PC SERIAL PORT
PC JUMPERS
4 TX2 TX
5 RX2 RX
6 GND GND
PNR SERIAL PORT
1 TX0 TX
3 CTS CTS
6 GND GND
1 and 2 all closed = RS232 serial output
2 and 3 all closed = TTL serial output
12.1 I/O OPTIONAL EXPANSION CARD WITH 2 INPUTS AND 2 OUTPUTS
It is possible to connect two expansion cards having 2 inputs and 2 relay outputs each. The first I/O board is
connected through a 350 mm cable which connects the IO/BOOT connector (on the indicator board) and the BOOT
BUS connector (on the I/O board); the second board instead is connected “in cascade” to the first one with a 350 mm
cable (equal to the previous one) which connects the two BOOT BUS connectors. Since the two BOOT BUS
connectors are connected in parallel, it does not matter which one is used in the connections.
With the jumper J1 in two positions (OPEN and CLOSE) one selects whether the board should manage inputs 1 and
2 and relays 1 and 2 (J1 in OPEN position) or whether it should manage inputs 3 and 4 and relays 3 and 4 (J1 in
CLOSE position). Therefore the correct configuration with two cascade boards is:
BOARD 1
J1 on OPEN (therefore Input 1, Input 2, Relay 1, Relay 2)
BOARD 2
J1 on CLOSE (therefore Input 3, Input 4, Relay 3, Relay 4)
J1
OPEN
CLOSE
Management of Inputs and Relays
IN1, IN2, RL1, RL2
IN3, IN4, RL3, RL4
50
DFW06/DFWK06
The inputs will be put outside the instrument with a 12 X 0,5 mm multipolar cable connected in this way:
MEANING
RL1
RL2
CMR (common relay)
IN1
IN2
CMI (common input)
+ VB (+5,3 - +7,3 Vdc)
- VB (GND)
COLOUR
WHITE
GREY
BLACK
RED
BLUE
BROWN
WHITE - GREEN
WHITE - BROWN
ONLY WITH SECOND CONNECTED I/O CARD:
RL3
PINK
RL4
GREEN
IN3
YELLOW
IN4
PURPLE
The maximum power of the relays is 24 Vdc 1A, the maximum voltage applicable to the optoisolated inputs is
between 5 – 24 Vdc with maximum current of 40 mA.
The optoisolation of the inputs is not correct any more if these are activated with a voltage available on the indicator
(for example the battery voltage VB), an external voltage must be used instead; however, for convenience the VB of
the indicator (battery voltage) is brought onto the multipolar cable.
!!!WARNING!!!
Be careful not to shortcircuit the wires of the VB (WHITE – BROWN and WHITE – GREEN whires) since this
would cause permanent damages to the electronic card.
51
DFW06/DFWK06
12.2 LOAD CELL LAY-OUT IN MULTICHANNEL SYSTEMS
(ONLY FOR A 4 CHANNEL INDICATOR)
If one buys a system with four load cells connected to the 4 channels of the indicator, the load cells will have the
following lay-out:
PALLET TRUCK SCALE
4 LOAD CELLS PLATFORM
3
2
4
1
LEVEL
52