1
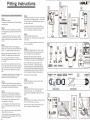
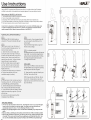
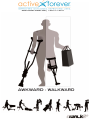
.o
-r.1WAL
USER MANUAL
Easy as 1-2-3
Easy, quick, tool free
Self fit in minutes
Learn in minutes,
On/Off in seconds
Video tutorials avai Iable
[S]I~I
PG 1
~
IWAL
Assembly
Instructions
Step 3 - Attach the Lower Assembly to the Knee PI atform by
pressing in the silver button on the Height Adjustment Tube
and inserting the tube into the socket of the Knee Platform.
Tug on the tube to confirm that it is securely locked in.
comlinstruction-videos
a. Upper Assembly
c. Lower Assembly
e. Clamp Bolt and Nut
b. Knee Platform
d. Support Tubes
f. Straps
~ --Step 4- Position the Clamp so it aligns between the ends of
the support tubes. You can use gentle pressure to move the
Support Tubes while you rotate the Clamp into position. Gently
push the support tube ends and align all 4 holes, then insert
the Clamp Bolt through the holes. Thread the nut onto the end
of the bolt. Do not tighten completely yet.
Step 1 -With the Handle facing forward, insert the
tubes of the Upper Assembly into the sockets of
the Knee Platform . If the hole at the bottom of the
Left tube does not align with the hole in the
Platform, simply rotate the tube until it does.
0
0
0
0
Step 2- Identify the Right side Support Tube by the small "R" stamped near the top. Press
in the small silver button and insert the Support Tube into the bottom of the Knee Platform
socket until the button springs into the hole. Make sure the two tubes and the Knee Platform
are securely locked together. Next, insert the Left Support Tube.
PG2
Step 5- Before attaching the Thigh Support to
the Handle, note that there are raised "teeth" on
the upper surface of each Thigh Support and on
the lower surface of the Handle. These teeth
must interlock to prevent rotation of the Thigh
Supports when the crutch is in use.
Insert the Thumb Screw into the slot on either
side of the Handle. Align the hole in the top of
the Thigh Support with the threaded end of the
Thumb Screw. Thread the Thumb Screw into
the nut located below the surface of the Thigh
Support. As you tighten, ensure that the
interlocking teeth mesh correctly. Finish
tightening the Thumb Screw by hand. Repeat on
other side. Flex the Thigh Supports in and out
to make sure they are secure.
Step 6- Align the hole in the Strap T Lock Buckle with the raised "T" lock
on the Thigh Support. Pull back on the buckle to lock it in. Repeat for the
other side of the strap. To remove the buckle, simply push forward on the
buckle until it releases. The Gray buckle should be located on the outside
of your leg. Crutches ship configured for right leg use. To change to left
leg use, simply remove and reverse the straps and rotate the foot 180
degrees.
Note - If one of the 3 straps has white Velcro on its end, install this strap at
the front of the Knee Platform.
1---....!...---~!.!;:::2:::::=1
Fitting
PLEASE FOLLOW ALL INSTRUCTIONS CAREFULLY
STEP 1:
A) Remove the 3 straps
B) Loosen the Thumb Screws so that Thigh Supports
can rotate freely.
STEP 2:
Position the Foot for left or right leg use by pressing
in the adjustment spring heads and rotating the Foot
into position.
! Improper orientation of the Foot can cause an unstable
condition which could result in a fall and injury Check the
printing on the front of the Foot to make certain it is oriented
correctly
STEP 3:
Adjust the height of lower crutch by aligning the
bottom of the "V" at the back of the Knee Platform with
a point 1-1.5' below the bottom of your kneecap.
Make sure the adjustment spring heads are FULLY
ENGAGED, then tighten the Clamp Nut and Bolt.
Note- For learning, the Knee Platform is intentionally
positioned slightly lower than optimum. Later, you will raise
it to full height.
Grasp the Handle and carefully kneel on the crutch.
At this point DO NOT rely on the crutch for balance or
support! With feet side by side and shoulder width
apart, you should have a slight bend in your good
knee.
' Both adjustment spring heads must be fully engaged in the
adjustment holes before putting weight on the crutch.
Failure to do so could result in a fall and injury
STEP 4:
Position the Thigh Supports as high as possible on
your leg by pulling up or pushing down on the Handle
while pressing the adjustment spring button.
STEP 5:
A) 1ilt the crutch slightly inward by pushing the
handle toward your body center Iine unti I both Foot
Treads are contacting the ground. Hold this position.
71WAL
STEP 6:
The Straps are composed of 2 sections. The side with
Black buckles is for length adjustment. The side with
the Gray buckles is for final tensioning only (to put on
and take off the crutch)
Fully extend both sections of the Strap by lifting on
the lip of the Tension Lock Buckles while pulling out
on the T Lock Buckles. Repeat for all 3 straps.
STEP 7:
Install the 3 Straps onto the Crutch.
Install the Black T Lock Buckles on the inner leg side
of the crutch.
Note- if one of the straps has White Velcro, install it at the
front of the Knee Platform.
B) Position your knee at the front of the Knee
Platform and pull on the end of the Adjustment side
of the Strap until it's snug (but not fully tightened).
C) Cinch down the strap by pulling down on the
Tension end of the strap. If tensioned properly, it
should be difficult to push a finger between the strap
and your leg. When finished, secure the strap end by
connecting the Velcro tab at the end of the strap to the
Velcro strip between the Black and the Gray buckles.
D) Repeat for the other two Straps.
VELCRO
STEP 10:
Slide the Comfort Pads so that they are centered on
the back of your legs. You can tuck any excess
Adjustment Strap underneath the logo section of the
Pad.
C) Firmly tighten the Thumb Screw to lock in this
position, then repeat this step for the outer Thigh
Support.
B) Once tension is relieved, remove the Gray T Lock
buckle. Repeat for the other two Straps.
PG 3
T-LOCK BUCKLE
TENSION LOCK
COMFORT PAD
STEP 9:
Slide the Knee Strap up or down so that it's tight
against your lower thigh.
STEP 11:
A) To remove the crutch, detension the strap by Iifting
the lip of the Gray Tension Lock buckle.
! Make sure that the interconnecting teeth of the Thigh
Supports and Handle are fully engaged and that the Thumb
Screws are firmly tightened.
\
STEP 8:
A) Holding the Handle, kneel on the crutch. Drape
the Strap over the back of your knee and install the
Gray T Lock Buckle onto the Knee Platform.
B) Next, rotate the inner Thigh Support until it's
firmly against your inner thigh.
Note- It's not uncommon for the inner Thigh Support to be
rotated further in than the outer one.
I
LENGTH ADJUSTMENT
::lii.ll
,.--
rJ
w
.v
\\1m
JJ.
T-LOCK BUCKLE
BLACK
Use Instructions
tWAL
Learning iWALK2.0 is surprisingly easy! Most people are proficient in a couple minutes or less. But everyone
is different, so be realistic in your expectations and use good judgement to insure your safety and success.
Before using your iWALK2.0 for the first time :
1.
2.
3.
4.
5.
You've assembled and fit th e iWALK2 .0 accord ing t o our instru cti ons.
You do not have strength or ba lance im pa irments.
Your good leg is free of conditions th at would limit your success (example, arthritic knee, hip replacement, etc.).
If you don't have an assistant, you do have a rail , wa ll , sofa back, or similar th at you ca n rely on should you lose your ba lance.
You're ready to experi ence a whole new leve l of freedom during your recovery !
A quick note on using canes or crutches during learning: If you're more comfortable using a cane
or crutch as a training aid, then feel free to do so, however, our experience is that these devices
usually increase the time it takes to become proficient on the iWALK2.0.
PLEASE FOLLOW ALL INSTRUCTIONS CAREFULLY
STEP 1:
Stand with your iWALK foot directly beside your
uninjured foot. Pl ace your feet shoulder width apart.
STEP 2:
Take a co upl e minutes t o lea rn th e balance of
the crutch by doing th e following exercises. Your
feet should remain stati onary.
a. Stand erect with yo ur arm s straight , pa lms
touching th e outside of yo ur thi ghs. Bending at
th e wa ist , slid e either hand down yo ur leg until it's
beside yo ur kn ee . Return t o erect positi on, and
repeat with yo ur oth er hand. Continue t o altenate
lea ning both ways for several repetiti ons.
b. With arm s straight, pl ace yo ur palms aga in st
yo ur thi gh. Bend at th e wa ist until your hands
touch yo ur kn ees, th en return t o erect position.
Repeat several tim es .
c. Expe riment with slighl y lea ning in all directi ons.
d. Continue th ese exercises until yo u feel
co mfortabl e en ough to try wa lking.
STEP 3 :
a. Pl ace your feet as in Step 1 and pl ace your hand on
th e handle as shown in 3A. Your first step will be with
your UNINJURED leg, your iWALK leg will follow.
b. Stand erect with good posture and look forward (not
down). Slowly push down and forwa rd on the handle.
c. As you continue to tilt th e crutc h forwa rd , it will feel
natural to take a step with yo ur good foot. Try to start
with short steps.
d. As soon as you step with your good leg, follow
immed iately with yo ur iWALK leg.
STEP 4:
Continue to practi ce. Once you've gained basic skill ,
yo u ca n th en adjust th e Knee Pl atform up to th e
optimum height.
Proper Knee Pl atform height makes your ga it more
effi cient and red uces fatigue.
STEP 5: (no iII ustrati on provided)
After wearing the straps for a few minutes, the straps may
loosen initially. If you ca nnot obtain enough tension by
pulling on the tension side (Gray Buckles) of the Straps,
then re-adjust the adjustment side (black buckl es)
- See Fitting instructions for details.
STEP 6: STAIR S
Stairs are easy on the iWALK2.0, however, stairs should
NOT BE ATIEMPTED until you've gained full proficiency.
Always hang onto the rail (s) when using stairs.
UP- Always lead with yo ur good leg, foll owed by yo ur
iWA LK leg. Take one step at a tim e.
DOWN - Always lead with yo ur iWA LK leg. Take one
step at a time. On steeper stairs yo u may need to
slighl y rotate your body so th at th e foot of yo ur injured
leg ca n clear the step.
TIPS AND TRICKS :
1. The more you relax, the easier it will be to learn . Don't fight the crutch or try to muscle through it.
Learn to rely on it and allow it to hold your weight. Your body is smart and will quickly and
automatically adapt to the device. You'll be iWALKing efficiently in no time.
2. Fatigue in your good leg and glutes is normal. This will reduce substantially as your body learns the
device.
3. Keep your head up, maintain good, erect posture, and don't look down. Walk as normally as possible.
4. After you gain confidence in the device, you'll start to "stub your toe" during the swing thru phase
of your gait. This is normal, and it shows that you're getting very comfortable with the crutch. Very
soon, you will automatically adapt your gait by hip hiking to clear the iWALK during swing through.
PG 4
A
B
c
LEVEL
SHOULDERS
UPSTAIRS
LEVEL
HIPS
STRAIGHT
KNEE
DOWNSTAIRS
D
www.ActiveForever.com | 1-800-377-8033