1
WHO CARES IF IT'S ILLEGAL?
IT'S JUST BAD FOR BUSINESS.
You're the most sought-after mercenary in four frontier systems, known for your
many uni que ta lents. You're a smuggler, a kidnapper, a terrorist, an assass in, and a
guerri lla warfare spec ialist. Your serv ices are for sa le - fo r the right price - and
you have a very lucrative business.
You start hearing rumors. Peop le you've never worked for are ta lking about th e
great jobs you did fo r them. And the best part, these peop le say, is th at you work
for free. Your investigative ski ll s were never as big an asset as your body, but it
doesn't take you long to uncover a mo nstrous conspi racy.
Someo ne cloned you from a strand of ha ir you dropped on a bar stoo l. They're
sendi ng hundreds of these clones into the frontier systems to be mercenaries just
like you. The clones are as good as you, no one can tell you apa rt, and they all
work fo r free.
Sudde nly, no one wa nts to pay fo r your bra nd of mayhem anymore. You' re out of
business. You leave the system to fi nd bus iness elsewhere, and soon you r old
cl ients fi nd that the clones are obso lete. They can onl y do the jobs you've alrea dy
do ne, and they ca n't lea rn how to do anyth ing new. And since you've left the
systems to find clients who' ll pay for your work, your o ld cl ients are stu ck. But they
brought it on themse lves by not paying you w hat you were worth .
The above cena ri o also app lies to computer software. Hard ova was prod uced
by many peop le associated w ith Electronic Art : des igners, program mers, art ists,
writers, and others. We're depending on you to pay for our software so we can
make enough money to create and develop new and better softwa re. W ho cares if
it's a violation of federa l law? It's ju st bad fo r busi ness, ours and yours.
As a member of the Software Pub lishers Associatio n (SPA), Electron ic Arts supports
the fig ht against the illega l copy ing of persona l computer software. Thank you for
he lping us in our effort to contro l software costs and stay in bus iness by eli minati ng
software theft.
CONTENTS
GETTING STARTED ..... ............................... ........•.................................................................................. 2
I N DOORS .... ......................................................•........................... ......•.•. .. .. .......................................•.. 2
Wa lking Around Using the Keypad ...... .................................................... ...................................... 3
Walking Around Using the Mouse ......... ............. ..... .. .............................. ...................................... 3
Screen Components .... .... ............ .... ........ ...... ...... ... ..... ............................ ... .................................... 3
Targeting ..... ... ...... ... .................................................... ........ ............ .... .... .. ........................•............ 7
Talking (with Special oles) ... ... .. ................ ................................................................................... 8
Crew Profi les .............................. .. ..... .. ........................................................................................ 1O
Arms Stores .................................... ... .... ...... ......... ........ ................................................................ 13
FLYING IN YOU R HOVE RSHI P ............................... ......................................................................... ... 14
Hovership Flying Procedure Using the Keypad ....... .. ................................................................... 15
Hovership Flying Procedure Using the Mouse ............................................................................. 15
Screen Components ................................................................................................................... .. 1 6
Docking at a Hoverdock ................ ................................................................................. .. .. ......... 1 7
Combat ..... ..... ... ......................................................................................... ........ ..... .. ..... ... ... ... .. .. . 17
ORBITI NG PLANETS ................ .......... ....................................... ................................. .......................... 17
Screen Components ................................................................................................. .. ......... .. .. ..... 18
Drop Procedure ........................................................................ ... ....... ... ... .... .. ... ...... ..... ............... 18
Unavailable Drop Sites ........................................................................... ............ ......................... 19
leaving Orbit .......................................................................... ....... .............................................. 19
VISITING O RBITI NG SPACE STATI ONS ...................................... ...... ................................................. 19
Screen Components .. ...... .. ........ ... .......................................... .... ... ..... ....... ... ................................ 20
FLYI NG THROUGH SPACE ................ ................. ................................................................................ 22
Spacecraft Flying Procedure Using the Keypad ............................................................................ 23
Spacecraft Flying Procedure Using the Mouse ............................................................................. 23
Screen Components .. ...... .......... ..... ... ............................................................................... ... ... ...... 24
Combat ...... .... ... ........ ................................................................................................. ......... ...... ... 25
Flying Through Stargates ...................................................................................................... ...... .. 25
Orbiting Planets ...................................... ................................................. ............... ... ...... ... .... ..... 25
Docking at a Space Station ............................................................. ...... ... .............. .. .... ... ........ .... . 26
Configuring Indoor Sq uad ............... ............................................ ................................................ . 26
USING TH E SHIP STATU S PANEL ....................................................................................................... 26
F1 .Operations ......................................... ... ... ... ... ... .... ........ .......... ............ ... ................................. 26
F2 .Software .. ............ ... ... ... ... ...... .. ....... ............. .. ................................................................ .......... 28
F3.Space Communications .... ........ .. ....................................................................... .... ........ ... .. .... . 29
F4 .Crew Assignments .................................................................................................... .... ... .. ..... . 30
F5. False Signatures .......................................................................... ..... .. ......... ..... ... ... .... .. ... .... ..... 32
F6.Weapon Bays ............................................... ... ... .. .... ... ... ..... .... ... ... ... ....... ... ........ ...... ............... 33
SPACE WEA PO NS AN D COUNTERM EASU RES ..............................................................•.................... 33
Lasers ................................. ...... ... .... .... .. ... .. ......... .................................................... .. ... ... ... .. .. ... ... 33
Missi les ..... .. ....... ... ... ............................................................................ ... ......... ............... ...... .. .... . 34
Countermeasures ()ammers) ............................................................. ...... .......... ........ ... ...... ....... .... 35
SCAN NI NG TARGETS IN SPACE ......................................................................................................... 36
APPEN DI X A: CREW MEMBER A BILITIES ............•..................... ... ..... .... ............................ ••...•• ........... 37
APPE N DI X B: WEA PON AN D ARMOR STATS .. ...... .......... ................................................................... 39
APPE N DI X C: VIEWER DI SKS .............................................................................................................. 42
APPE N DI X D : PLAY ING ZE RO-G RO ULETTE ......•............................................................................... 43
Your name is Nova.
We've got a hull breach! Main drive section!
You slam your palm on the switch to cut the alarms and li ghts, cursing the idiot who
designed the warning systems. " I'm on my way!" You turn and trip over A'kri Janr,
your navigator. The short, pale alien wails incoherently.
Pressures dropping! AutoSeal and (garbled) failing!
"Get out of there, Carter!" you shout. "E lsie, Nojer! Get to the escape pod!" You round
th e corner in time to see the pressure door to engineering close. A' kri Janr screeches
behind you: "They're trapped inside! "
The Rontgen (garbled) cascading! (garbled) losing her!
You hear the words and know your ship will be a ball of plasma in less than a minute.
You make the decision and turn to A'kri Janr. "Run, Punch! Get to the escape pod!"
The Bremar squeals, "We can't leave them! " You grab the alien by the neck and shove
it down the corridor. "We can't open the door! It's too late! Now move!'
We're trapped, Nova! Get us out of here! She's gonna blow!
You cram A'kri Janr into the pod and climb in. You jump into the crash couch and
punch the button. Your body flattens as the pod is hurled from your ship, first by its
main thruster, and then by the massive explosion as the Rontgen drive on your ship
detonates ...
You awake from the nightmare ...
Six months have passed since you and A'kri Janr got picked up in the Rouyn system.
The odds against a hu ll breech from a meteor co llision are astronomical, and bad luck
killed your who le crew except A'kri Janr. You had no choice but to leave them. Dying
with them wouldn't have helped.
The life of a front ier mercenary ...
You've been a freelance mere for the Starkiller Mercenary Group for three years.
Gerard Kendall relies on you for his most delicate and demanding jobs. After the
accident, he gave you a new ship, but it's up to you to recruit a new crew. Your last
crew was the best, but now they're gone and you have to start over. No one is
irreplaceable; not your crew, not even you. That's the life of a frontier mercenary.
And you're one of the best damn mercenaries in the Four Systems. You spend your
time doing different activities which might be cal led il legal if there were any laws on
the frontier. You smuggle cargo, you buy low and se ll high - usually arms and ammo,
and you do odd jobs for Gerard Kendall as a free-lancer in the Starkiller Mercenary
Group. You basically do anything anyone's willing to pay you for, and there's plenty of
work to keep a mere busy in the Four Systems.
Th e frontier worlds we re colonized as a commercial venture.
Yttro Enterprises, Unlimited started a subsidiary group, called Altron and Associates
after its president, Damien Altron, and colonized the gas giant Ariel - the first frontier
world in the newly surveyed sector that could become self-sufficient. The Ariel system
had three stargates leading to other systems, and other large corporations in the Core
worlds opened subsidiaries in these adjacent systems. Soon the Four Systems became a
thriving co ll ection of economical ly stab le communities, and they no longer relied
upon the bloated bureaucracy of the Core Worlds.
Th e Four Systems was born.
Arie l became the only self-sufficient wor ld, and it exercises tight control over transportation. The Rouyn System was colon ized solely by miners who now supply most of
the minera l needs of the Four Systems. The Ciberan system was abundant with
water and ice, and it supplies everyone's drinking and fusion fuel needs. The
Mastassini System became the slums of the Four systems, the home of cheap and
tawdry enterta inment, and, ultimate ly, mercenary groups.
Soon thereafter, the skirmi shes began.
Each system had staked out competing claims, and the squabbling began. Arie l
launched an attempt to take over Ciberan. The Lanta, which are divided into
two groups - the Fragmentaria lists (Frags) and the Dispossessiona lists (Disps)
- brought their philosophy wars out from the Core to the world Varon. The
various battling forces re lied increas ingly on mercenaries for everything from
border skirmishes to ful l-sca le invasions. The conflicting objectives of each
subsidiary pitted the mercenary groups against each other. Riva lries quick ly
deve loped between the three major groups, the De lta Coro, the Zero- L, and the
Starki Ilers.
Then all Hell broke loose.
Pretty soon it seemed like everybody was fighting everybody else. It
looked like the only winners would be the mercenaries, but they fought
among themselves so much the ir casualties ran high as wel I. It got so
bad , you were sure it couldn't possibly get any worse. On ly one thing
could prove you wrong: the future.
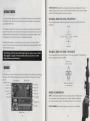
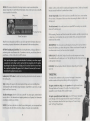
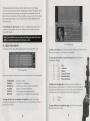
THE FLOOR PLAN displays th e area around you and your landing party. You are
marked in green, and your party is ye ll ow. Hostile sentients are red, and non-hostiles
are blue. The flashing sentient is the current target.
GETIING STARTED
To install and begin playing Hard Nova, first follow the instructions in the Install ation
and Starting Guide. A lso see the guide for information on loading and saving games,
and Quitting Hard Nova.
The interface is designed to make it easy to do what you want when you want to do it.
Most of the functions on the screen have their keystrokes I isted next to them, and most
of these functions can be activated by clicking the left mouse button on them . Therefore learn ing how to conduct yourse lf is a straightforward process.
WALKING AROUND USING THE KEYPAD
To wa lk around indoors using the keypad, press these keys to perform the actions
described.
Forward
•I
Turn Left
Throughout this manual, you're often to ld to click on parts of the screen w ith th e
mouse. All mouse clicks are assumed to be left button clicks un less specifica ll y ca ll ed
right mouse butto n cl icks.
Note: Because you'll meet many alien beings in the Four Systems, many of which
do not qualify as "people,'' the term sentients will be used to refer to sentient
beings, both human and otherwise.
--.-•
6
-t
Turn Ri ght
Backward
WALKING AROUND USING THE MOUSE
To wa lk around indoors using the mouse, c li ck the mouse button on the fo llowing
areas to perform the action s described.
Click in front
to move forward
INDOORS
You' ll do much of your work on foot, ta lking to sentients, ki ll ing sentients, and hanging
out in bars. This is the way mercenaries conduct most of their business. This is what
you see:
Status Indicators
Point (Fl ) - -
Party Members
The Floor Plan
Cl ick Anywhere Else to
Turn That Direction
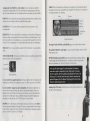
SCREEN COMPONENTS
Weapon
Armor/Pool
MAP: This floor plan disp lays th e area around you and your landi ng party.
Display Line
You are marked in green, and your party is ye llow. Hostil e sentients are
red, and non-hostiles are b lu e. The flashing senti ent is the current target.
In fo Box
PARTY MEMBERS: This column displays you and your crew members.
Indoor View
2
3
To display the Crew Profile for a crew member, cli ck on their face, or press the
function key for that sentient. The Crew Profile for that sentient appears in the In fo
Box. For more information on Crew Profiles and how to use them, see Crew Profiles.
TARGET : This is the sentient you (the player) are targeting. To see information about
the target click on its face or press F5 to see its profile in the Info Box. For information
on targeting sentients, see Targeting.
POINT (F1 ): You're always the character in the top slot (either Nova or Stark}. You're
the boss, so you ' re always in the lead, ca ll ed the Point position.
Health
Armor
Options
CENTER (F2): This is the crew member assigned to the Center pos ition in your
marching order.
RECRUIT (F3): This slot is reserved for any sentients you recruit wh il e on the ground.
When you return to your spacecraft, the recruit wil l leave your landing party. To put
that crew member in your landing party, you must specifica ll y reassign him or her (or
it}. See "F4. Crew Assignments" in Using the Ship Status Panel for more information.
Landing Party
Stats
Target Information
The target's NAME, WEAPON, and ARMOR appear next to the sentient' s picture.
TRAIL (F4): This is the crew member assigned to the Trail position in your marching
order.
STATUS INDICATORS: The two bars to the left of each crew member's picture tell the
status of a player's ski ll and weapon load.
The sentient's HEALTH is on the right. If you want to kill a sentient, attack it until its
health goes to zero.
OPTIONS include special activities, like activating elevators, picking up objects,
or performing other misce ll aneous tasks. To perform an activity, press the key
shown in paren th eses, or click on the activ ity with the mouse.
Status Ind icators
If a crew member has gained experience, the top bar lights white . For information on
improving your ab iliti es w ith experience, see the "(2} AB IL " section in Crew Profiles.
If a crew member's weapon runs out of ammunition, the bottom bar lights red. As
crew members empty their clips, the clips are automatica ll y rep laced if the crew
members have more. If they don ' t have any more ammo, you must give them new
ammunition from the poo l or equip a d ifferent weapon to keep them fighting. For
information on the poo l, see the "(3) ITEM" section in Crew Profiles.
Landing Party STATS show the health and marching order location of each
member of the landi ng party.
WEAPON : This is the weapon you (the player} are using. Click on it or press Enter to
fire your equipped weapon at the target. This icon is crossed swords if you're using a
Close Combat weapon or if you're unarmed. For in formation on equ ipp ing weapons,
see the "(4} WEAP" sect ion in Crew Profiles.
4
5
ROOM : This screen is identical to the target screen, except a room description
replaces Target Info. To see the Room Description , click on the room icon or press F6
to see its profile in the Info Box.
Description
stealthy, so they can be useful in scouting out dangerous territory. Droids can be useful
because security droids don't consider them a threat.
To enter Scout mode, click on the Scout Icon or press FB. If you have a crew member
who can scout, a list appears. Select your choice by pressing the letter to its left, or by
clicking on it.
Options
To exit Scout mode, click on the Scout Icon or press F8. The scouting crew member
returns to the landing party.
Landing Party Stats
Room Description
While scouting, Darcators and Droids cannot talk to sentients, and they cannot pick up
or drop items. And remember, they are not invisible. If they are discovered, hostile
sentients will fire at them .
Read the room description carefu ll y as you walk to get more information about you r
surroundings. Important information is often presented in the room descriptions.
ARMOR/POOL: This is the armor you (the player) are using. Or if you have items in
OPTIONS include special activities, like activating elevators, picking up objects, or
the pool , this flashing icon shows the top item. If there are no items in the pool, this
icon shows armor (even if you have no armor equipped).
performing other misce llaneous tasks. To perform an activity, press the key shown in
parentheses, or click on the activity with the mouse.
Note: Special options appear in certain location. For instance, some doors require
a magnetic key entry (Mag Card). If you have the item required, select the option
by pressing the key shown or by clicking on ii. If you don't have the correct item
for an option, the option still appears, but it's dimmed. You must gel the correct
item before the option becomes active.
Landing Party STATS show the hea lth and marching order location of each member of
the landing party.
TALK: Ta lking with people is the most important thing you do next to ki lli ng them .
Talk to peop le to get information, to get ass istance, to get them in your crew, or to get
them th e hell out of your way.
To talk to the target, se lect the Talk icon or press F7 . You must target a sentient before
you can ta lk to it. For information on targeting sentients, see Targeting. For information
on ta lking to sentients, see Talking.
SCOUT: If you have a darcator or a droid in your landing party, you can separate them
DISPLAY LINE: The left of the Display line tells you what weapon you're using.
The midd le tell s you the mode you're in. The right tells you the armor you're using,
or th e top item in the pool.
INFO BOX: This box displays different information depending on the mode
you're in.
TARGETING
To interact with a sentient or a ship, you must first target it. Interactions
include a number of things from talking to killing to giving items.
To target a sentient or a ship, press the spacebar or the right mouse button.
The target flashes on the screen if it's visible. Press the key or button
repeatedly to cycle through all the avai lable targets.
To target a spaceship beyond visual range, press I (?). Pressing I repeatedly
cyc les through al l the ship targets beyond the range of the Holo Space
Map. For information about the Holo Space Map, see " Screen Components" of Flying Through Space.
from the party and order them around at a distance. Darcators are exceptionally
6
7
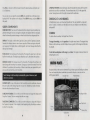
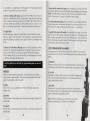
TALKING
To talk to the target, select the Talk icon or press F7 . You must target a sentient before
you can talk to it. You cannot ta lk to hostile sentients - they are too busy trying to kil l
you to ta lk.
THE DIALOG BEGINS
The sentients you talk to always get the first word. Their words are red. Your statements are green .
SPECIAL NOTES ABOUT TALKING WITH SENTIENTS
Talking with people is your main source of information, but that shou ld not
intimidate you. Here are some guidelines for role-playing in the Four Systems.
Many conversations yield useful in fo rmation, some do not. Ju st because a
character doesn't tell you anything yo u consider signi fica nt, that doesn't necessaril y mea n you chose the wrong statements. Some characters don ' t have anythin g
important to tell you unti l after certai n events occur. Other characters might say
things that seem meaning less at first but take on new signifi ca nce later. And some
characters do nothing but add to th e atmosp here of th e locations you visit.
Don't think of each conversation as a puzzle to solve. You don ' t have to choose
certai n statements to get sign ifica nt information out of characters. There are many
different paths to the information you need, and you shou ldn' t worry about which
is the " ri ght" thing to say. Conversations are not mea nt to be trial-and-error
exercises. If you sense that you r co nversation is not go ing the way you wa nt it to,
you ca n try a different approach before th e conversation is over .
You don't have to reload the game if a conversation doesn't go well. If you anger
a character too much and they end the co nversa tion , you don ' t have to reload th e
ga me to get at their information (unless you irritated th em so much th at th ey ki lled
you). If they have somethin g signi ficant to tell you, they' ll give you another
chance if you ta lk to them aga in .
Dialog Screen
Read what the sentient says in the Dialog Box, then look at your possible responses
below in the Reply Box. Choose the statement you want, and then press the letter of
that response on the keyboard or cli ck on it with the mouse. The statement you chose
is echoed in the Dialog Box, fo ll owed by the sentie nt's response.
When the conversation is over, press F1 to return to the Map and Target Profi le. You
can exit a dialog at any time by pressing F1 , but you stand to lose important information that cannot be learned from subsequent conversations. Note that pressing the right
mouse button or se lecting icons also exits you from dialog prematurely.
8
Talk to sentients more than once. If you think yo u didn 't get all the information
you could from a character because of w hat you sa id, ta lk to th em aga in. Even
though most characters don't say the sa me things the second tim e you talk to
them, they usua lly give you th e opportunity to ask th e important questions again.
Also, so me cha ra cters wi ll tell you di ffe rent things after significant events. This is
especially true of your boss, Gerard Kendall , w ho wi ll have many different
conversa tion s wi th you as you work together.
Don't worry about being a jerk. You don' t have to be nice to everyone you meet
to successfully complete yo ur missions. Feel free to be as po lite or obnoxious as
you wan t, just li sten ca refu ll y to a character's replies to see if you're goi ng too far.
Some characters resent you if you're too abus ive, but they give you th e opportunity to back off before they clam up co mpl ete ly. Other characters won ' t tel l you
what they know unless you hammer them a littl e.
9
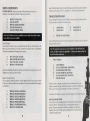
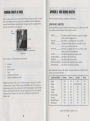
CREW PROFILES
In Crew Profile mode, you can examine the stats of each crew member, you can equip
different weapons and armor, and you can increase your skills as you gain experience .
To display the Crew Profile fo r one of your crew, click on his or her picture or press
the function key for their slot, Fl-F4. The Profile appears in the Info Box. There are
several submodes you can select from the Crew Profile screen by pressing the numbers
1-6. These selections are always available in all six submodes.
(1 ) PROF
(2) AB IL
(3) ITEM
(4) WEAP
(5) ARMR
(6) AMED
Profi le
Abi lities (check your abilities or improve them)
Item (give, take, drop, or transfer between party members)
Weapon (equip or unequip a weapon)
Armor (equip armor)
Automated Medical Lining (equip medical lining)
(1 ) PROF
The top of the Profile tells you the basics about that crew member: name, hea lth,
position in the march ing order, experience, and cash. (You - Nova or Stark - carry
the cash for the who le party. You're not stupid .)
Your rank in the Starki ller group is divided into three classifications : Starkiller Enlisted
(SE), Starki ll er Officer (SO), Starki ll er Leader (SL). You get promoted to an officer when
you reach 1Oth level, and you become a leader when you reach 20th level. You need
increasing numbers of experience points to advance to new levels, and each time you
advance a leve l, your experience drops back down to zero. For information on gaining
experience, see the following section, "(2 ) ABIL."
To see the stats regarding the equipped armor, look in the Info Box next to the armor
icon. Listed is the name of the armor, along with information regarding how effective
the crew member is with that armor.
PROTECT - how much protection the armor gives, the higher the better.
SLOWNESS - how much the armor slows you clown, the higher the slower.
STEALTH - how much noise your armor makes, the higher the louder.
(2) AB IL
This lists the crew member' s abilities, the higher the number, the greater the ability. For
an explanation of each ability, see Appendix A: Crew Member Abilities. Not all
abilities apply to all sentients.
To get experience, each crew member must gain experience by succeeding in combat
or in the performance of duties on the spacecraft. When enough experience accumulates to translate into improved abi lities, the Experience Status Indicator next to that
crew member's picture turns white. The more experience you get, the more abi lity
points you get to allocate.
To impro ve your abilities when you ha ve enough experience, press the letter of the
ability you want to improve. Because it takes time to improve abilities, it's a good
practice to improve each crew member's specialty before trying to broaden his or her
ski ll s into new areas. A crew member's specia lty is the role he or she is assigned to on
the spacecraft.
To survive in the Four Systems, you must have a tough crew. Weak meres are dead
meres. Practicing in the robomaze on Mastassini is a safe way to improve your
abil ities.
To see the stats regarding the equipped weapon, look in the Info Box next to the
weapon icon. Listed is the name of the weapon,along with information regarding how
effective the crew member is with that weapon.
(3) ITEM
This lists the crew member' s items, including weapons, ammun ition, armor, medica l
lining, and miscellaneous items. Anyone can carry any item.
TO HIT - The percent chance he or she will hit a target at close range.
SPEED - how often he or she can use the weapon.
DAMAGE - how much damage (min-max) the weapon inflicts.
The " poo l" consists of the items he ld by the landing party, but not necessarily he ld by
anyone in particular. Items in the poo l are never lost, but they cannot be used un less
they get assigned to a particu lar person .
These numbers are bas ic guidelines. They do not take into account the armor, skill , or
distance of the target. If the target has good armor, better ski ll s, or is far away, they are
harder to hit and harder to hurt.
To put an item in the pool, press the letter to the left of the item, or click on it with the
mouse. That item is taken from the inventory of the crew member and placed in the
top of the poo l.
To take the top item from the pool, press P. This places the item in the crew member' s
personal inventory so he or she can use it. You can also click on (P) FROM POOL w ith
the mouse to take the top item from the poo l.
10
11
To bring a different pool item to the top of the pool, press Alt-P. This cycles the items
in the poo l to bring a different item to the top.
To give an item from the pool to the target, press I or click on (I) GIVE TO TARGET
with the mouse. This gives the top item in the pool to the target. You must transfer an
item to the pool before you can give it away, and you must have a target. If the target
doesn ' t want the item, you fail to give it.
To drop an item from the pool, display the Room description by pressing F6 or
click ing on the Room icon. If you have an item in the pool, one of the Options in the
Info Box is (C) DROP POOLED ITEM. Press C or cli ck on the Option to drop the item
at the top of the pool. You must transfer an item to the pool in ITEMS mode and return
to the Room Description before you can drop the item.
Note: The pool does not have infinite capacity. Transfer items from the pool to
crew members as needed. Drop items you no longer need.
(4) WEAP
This lists the crew member's items, inc luding weapons, ammunition, armor, medical
lining, and miscel laneous items. Only weapons that can be used by that crew member
are highlighted.
To equip a weapon, press the letter to th e left of the weapon, or click on it with the
mouse. The crew member now uses that weapon . To see the stats on the equipped
weapon, return to the Profil e screen by pressing 1.
Note: Some armor can only be used by certain races. If a crew member has
armor only usable by another race, it's merely considered an item and cannot be
equipped.
To remove armor from a crew member, you must move the armor to the pool. You
ca n then return the armor to that crew member's personal inventory, and it will not be
equipped until you specifically equip it.
(5) AMED
This lists the crew member's items, in cluding weapons, ammunition, armor, medical
lining, and miscel laneous items. Only medical lining that can be used by that crew
member are highlighted.
To equip medical lining, press the letter to the left of the medical lining, or click on it
with the mouse. The crew member now uses that medical lining. Medical lining is an
adva nce technologica l artifact crucia l to quick healing during combat, and every effort
shou ld be made to wear better and better AMLs.
To remove medical fining from a crew member, you must move the AML to th e pool.
You can then return the AML to th at crew member's persona l inventory, and it wi ll not
be equ ipped unti l you specifica ll y equip it.
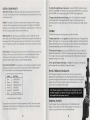
ARMS STORES
On most planets you can find arms stores to meet your weapon and ammunition
needs.
Note: Some weapons can only be used by certain races. If a crew member has a
weapon only usable by another race, it's merely considered an item and cannot
be equipped.
Items for Sale
To unarm a crew member, press I or click on (I) UNARMED with the mouse.
(5) ARMR
This lists the crew member' s items, including weapons, amm unition, armor, medica l
lining, and miscellaneous items. Only armor that can be used by that crew member are
high I ighted.
To equip armor, press the letter to the left of the armor, or click on it with the mouse.
The crew member now uses that armor. To see the stats on the equipped armor, return
to the Profile screen by pressing 1.
12
Items in Pack
Arms Store
The avai lable items are li sted next to their prices .
13
To buy an item, press the letter next to the item or click on it with the mouse. The item
goes into the pool , and th e price is subtracted from your account. The amo unt of cash
you have is shown under the list of items for sa le - check it to make sure you can
afford th e item.
To sell an item, place it in the pool, and th en press Z. Your account is cred ited th e
amount th at store thin ks the item is worth . Note that arms and ammo are bought and
so ld at different rates in every store.
Note: To access the store, you must be in ITEM mode on the Profile screen. For
more information, see the "(3) ITEM" section in Crew Profiles.
THE LANDSCAPE: A digita l 3 0 topographical map of the planet surface surrounding
your hoversh ip. A ship graphi c represents your hovership's altitude and orientation ,
and it's always above the center of the map. Other nearby spacecraft are represented
by a ship graphic of a different co lor.
HOVERSHIP FLYING PROCEDURE USING THE KEYPAD
To fly the hovership using the keypad, press th ese keys to perform the actions descr ibed.
t
Accelerate
7
To leave the store, press F6 or se lect the Room icon. Don ' t forget you must eq uip any
new weapons to use them. For information on equ ipping weapons, see th e "(4) WEAP"
section in Crew Profiles.
2
Turn Left -
.±.... -
Once you drop from orbit to the planet surface, you fl y to your destination in your
hovership.
I /
9
.!..... ........
4
_+,
6
Turn Right
J;... .......
2
Hold down SHIFT and press a key to
turn in the direction indicated
FLYING IN YOUR HOVERSHIP
8
-
~
Decelerate
HOVERSHIP FLYING PROCEDURE USING THE MOUSE
Click in an area to face th at direction
The
Increase El evation
Targeting
Computer
~Landing Info Box
14
"'- Decrease
El eva tion
To fly the hoversh ip us ing the mouse, cli ck on the fo ll owi ng areas to perform the
actions described.
Your Ship
View While in Hovership
Increase
Elevation
Decrease
El evation
Change Speed
IS
Press ESC or click on it with the mouse to leave the planet surface and rejoin your
J-21 c Delphenus.
You can also set your speed by pressing Shift and a number key on the top of your
keyboard (NOT the numbers on the keypad). Press Shift-0 to stop, and press Shift-3 for
full speed.
SCREEN COMPONENTS
LANDING INFO BOX: Lists information about the planet: the name, and the current
position of your ship in coordinates. The coordinates start at (0,0) in the upper left
corner. Moving down and to the right increases both coordinates.
DOCKING AT A HOVERDOCK
All settlements, towns, and cities have hoverdocks. They are marked by a large red
arrow. To dock, fly directly over the dock arrow (so your shadow covers the arrow),
and press D .
FORWARD VIEW: Your view of the planet from the cockpit of your hoversh ip. Any
pertinent messages from your navigation computer are displayed here; for example,
when the hovership sustains damage or when the fuel level runs dangerously low.
DISPLAY: This display is tied to the Cargo Bay Camera and the Targeting Computer.
Normally this display shows a view of your cargo bay. When you target a ship with
your weapons, this display shows a shuttle graphic, and a text message describes the
ship type and strength.
FUEL GAUGE: The fuel status of the hovership. The longer the green bar is, the more
fuel the hovership has. The higher your altitude as you fly, the more fue l you burn.
COMBAT
To attack other hoverships, first target them, then fire.
To target a hovership, press the spacebar or the right mouse button. The targeted ship
fla shes on the Landscape, and the Disp lay shows a graphic of the target and indicates
its strength.
To fire the hovership lasers at the target, press Enter . The target is destroyed when its
strength goes to zero.
1
DAMAGE GAUGE: The damage status of the hovership. The longer the red bar is, the
more damage the hovership has sustained. Damage can come from enemy fire or from
collisions. If you destroy the hovership, a lifeboat is sent from your spacecraft to pick
you up, and you must buy a new hovership.
Note: Damage to the hovership is automatically repaired whenever (and
wherever) you dock.
~r I'
t
ot,-..::1
'"~ ORBITING~PlANETS
.
.
Standard orbits are the transition between flying in deep space and landing on planets.
You can choose the planet coordinates you want to drop to, or you can visit an
orbiting space station .
Forward View
Pilot Schematic
CLOSEUP MAP: A view of the planet at the hovership's current coordinates, shown at
the same scale as the Closeup Map seen in your J-21 c Delphenus. Small white dots
indi cate other hoverships in the area.
Landing Info Box
CARGO BAY CAMERA: Click on this icon with the mouse to change the Display to the
Cargo Bay Camera. The text message describes any cargo.
TARGETING COMPUTER: Click on this icon with the mouse to change the Display to
the Targeting Computer. If the computer is not targeting a ship, the display continues
to show the Cargo Bay.
Topo Scale
Planet
Map
Closeup Map
Orbit View
16
17
SCREEN COMPONENTS
UNAVAILABLE DROP SITES
FORWARD VIEW: Your view of the planet from the bridge of your J-21 c Delphenus
Some planets have locations that are electromagnetically shielded from orbit. If you
want to reach a site under a sh ield, you must drop elsewhere and fly to the desired
coordinates under the shie ld . Note that on the planet Cascade in the Rouyn system, no
drops are possible due to the intense gravity.
spacecraft.
PLANET MAP: A digita l topographical map of the planet surface. The cross hair
indicates the currently programmed drop site. Special locations you frequently visit are
marked by red dots.
TOPO SCALE: This sca le shows the correspondence between land altitude and co lor.
The co lor at the top of sca le indicates the col or of the highest altitudes, while the co lor
at the bottom of scale indicates the color of the lowest altitudes.
Note: Shielded areas activate when they sense a ship attempting lo drop from
orbit. They do so to defend against hoverships dropping directly on an area from
orbit. Because this is a defense against invasion, the shields do not activate to
prevent hoverships from leaving the planet surface to reenter orbit.
LEAVING ORBIT
CLOSEUP MAP: A magnified view of the currently programmed drop site, as marked
on the Planet Map by the cross hair. This scanner does not detect hoverships near the
planet surface.
LANDING INFO BOX: Lists information about the planet, including the name, the
currently se lected drop coordinates, and whether or not the drop location is clear. The
coordinates start at (0,0) in the upper left corner. Moving down and to the right
increases both coordinates .
PILOT SCHEMA TIC: A co ntrol panel used to drop to the planet surface or to leave
To leave orbit and fly into space, press ESC or click on (ESC) ENTER SPACE on the
Pi lot Schematic with the mouse. You can also leave orbit by clicking the mouse on
deep space (not on the p lanet) in the Forward View.
VISITING ORBITING SPACE STATIONS
There are space stations around every planet except Cascade in the Rouyn System. At
space stat ions you can refuel , repair, or re-outfit your sh ip.
orbit.
Station
Services
DROP PROCEDURE
To drop to the planet in the hovership, you must se lect drop coordinates before you
descend.
Ship Status
Screen II
To select a drop site, press the arrow keys or click on the Planet Map with the mouse
to move the cross hair. The cross hair marks the currently selected drop site, and the
Landing Info Box displays its p lanet coordinates.
Ship Damage
To drop to the selected site, press Enter or click on (ENT) DROP HERE on the Pilot
Schematic. You can also drop by clicking the mouse on the rotating planet in the
Forward View.
Ship Weapon
Bays
Fuel Cells
I
Note: You can only change drop coordinates in increments of 20. Check the
actual coordinates lo see which direction you must fly from the drop site to get
lo your destination.
18
View While at Space Station
19
SCREEN COMPONENTS
STATION SERVICES: These services re late to the maintenance of your J-2 1c
Delphenu s. Press the letter to th e left of the service to se lect it.
Look at the Ship Status Screen II to see the damage your ship has sustained, and the
amount of cash you have. See " Fl . Operations" in Using the Ship Status Panel.
CHANGE WEAPON BAYS
A
B
c
D
E
RETURN TO YOUR SHIP
FUEL CELL SUPPLY
REPLACE DAMAGED SYSTEMS
CHANGE WEAPON BAYS
SMUGGLER TRADE OFFERS
You can change the weapon in each of the four weapon bays. Press the letter to the
left of your choice to select which bay to access.
B
D
c
CHANGE BAY A
CHANGE BAY C
E
RETURN TO STATION HUB
A
CHAN GE BAY B
CHANGE BAY D
I
Not£•: Not all station services are available on every station. Dock with a station
to see whi(h services are available.
Fuel Cell Suppl y
You ca n bu y fuel cell s, or you ca n se ll surplu s fuel ce ll s fo r cash. Press th e letter to the
left of your cho ice to se lect it. The cost (or benefit) of eac h item fo ll ows in parentheses.
(The actu al costs/benefits w ill depend on th e stati on.)
A
B
C
D
BUY 1 FUEL CELL (15 EACH)
REFUEL ENTIRE SHIP (0 TOTAL)
SELL 1 FUEL CELL (15 EACH)
RETURN TO STATION HUB
Look at the Ship Status Screen II to see how much fu el and cash you have. Your J-21c
Delphenus ca n ho ld up to 200 fu el cells.
Repl ace Damaged Systems
You ca n replace w hol e ship systems. Press th e letter to th e left of your choi ce to se lect
it. The cost of eac h item fo ll ow s in parentheses. (The actual costs/benefits w ill depend
on th e station. )
A
B
c
D
E
F
G
REPLACE AVIONICS (400 TOTAL)
REPLACE THRUSTER (400 TOTAL)
REPLACE FUELCELL (400 TOTAL)
REPLACE LASERSYS (400 TOTAL)
REPLACE MISSILES (400 TOTAL)
REPLACE COUNTERS (400 TOTAL)
RETURN TO STATION HUB
20
Look at the Ship Status Screen II to see the weapon that is loaded in each bay and the
amount of cash you have.
Note: The standard weapon for your J-21 c Delphenus is the A4 Pulser laser
cannon. All other weapons are expendable - when you use them up, they are
ejected from their weapon bay.
Select a Weapon:
A
B
C
D
E
F
CLEAR THIS BAY
BUY A7 COMET BEAM (25000 TOTAL)
BUY PIKE RADAR (300 TOTAL)
BUY D52 SHARK VIS (200 TOTAL)
BUY D91 MANTA JETC (200 TOTAL)
RETURN TO BAYS
When you select a weapon, it costs the amount of money shown. If you
rep lace a weapon, you get cred it for the weapon you return in exchange for
the new one. (The actua l costs/benefits wi ll depend on the station.)
For detai ls on the different weapons, see Space Weapons and Countermeasures.
SMUGGLER TRADE OFFERS
You can pick up jobs smuggling goods. Press the letter to the left of your
choice to select it. (The specific jobs vary from planet to planet.) In
genera l, the more money you ' re offered for a de livery run, the more
dangerous the mission. High-paying smugg ling missions usual ly resu lt in
a hostil e welcoming party.
21
The reward of each item fol lows the assignment offer.
A
B
D
TO ROUYN ...
TO ARIEL...
TOTIKORR ...
TO CIBERAN ...
E
RETURN TO STATION HUB
c
WEAP PARTS
ALIEN FOOD
FUEL CELLS
FUEL CELLS
HOLO SPACE MAP: A digital 3 D map of the region of space around your spacecraft. A
ship graphic represents your spacecraft's orientation, and it's always at the center of
the map. Other nearby spacecraft are represented by different ship graphics, depending upon ship type. The sh ip icons do not reflect the size or armament of the actua l
ships they represent.
15000
9000
5000
29000
SPACECRAFT Fl YING PROCEDURE USING THE KEYPAD
To fly your J-21 c Delphenus using the keypad, press these keys to perform the actions
described.
Accelerate
Increase Elevation
~
J'f
t
After you make your se lection, you ' re told the name of the planet and the coordinates
where you are to take your cargo. The cargo is automatically loaded onto your ship.
Press A to select a different smuggling mission, or press B to return to the hub of the
Space Station.
.I ./
8
+
+-
~
-.
5
6
--•
-+
Turn Left
2
To Drop off smuggled goods, fly to the designated coordinates. The Ship Status Panel
~
indicates that you can unload your cargo. Press U to unload. Your account is automatica lly credited with your reward.
~ ll
I
-
•
"°
.,•
"'t ·..
~ FLYING THROUGH
'll
--._
6
4
1
.;L
-
- ·1
)t
Hold down SHIFT and
press a key to turn in the
direction indicated
Turn Right
2
~
Dece Ierate
Decrease Elevation
~
:.t- ~
SPACECRAFT Fl YING PROCEDURE USING THE MOUSE
SPAC~ ~~.
To fly your J-21 c Delphenus using the mouse, click on the following areas to
perform the actions described.
Interstel lar travel is possib le because the Starkil ler Mercenary Group has licensed you
to use one of their J-21 c Delphenus spacecraft. The spacecraft is des igned to transport
you from star to star through stargates, and it can carry the weapons requi red to get
you to your destination safety.
l
l
Speed Gauge
Long Range
Scanner
Your Ship
Holo Space
Map
Space View
22
Click in an area to face that direction
You can also set your speed by pressing Shift and a number key on the
top of your keyboard (NOT the numbers on they keypad). Press Shift-0 to
stop, and press Shift-9 for full speed.
23
SCREEN COMPONENTS
SHIP STATUS PAN EL: The Ship Status Panel lets you control most of the systems on
your ship . For information on how to control ship systems using this panel , see Using
the Ship Status Panel.
D ISPLAY: This display is tied to the Communications Computer and the Targeting
Computer. When you target a ship with your weapons, this display shows different
information about the target. The level of information depends upon your Technician's
skil l. See Scanning Targets in Space for more information.
SPEE D GA UGES: The Speed Gauge above the Space View is divided into ten seg-
ments. When only the leftmost segment is lit (the only blue segment), the thrusters are
not engaged. When all the segments (green) are lit, the thrusters are set to maximum
thrust. The Speed Gauge be low the Long Range Scanner shows your speed in numeric
form.
FUEL GAUGE: The Fue l Gauge shows the number of fue l cells remaining in your J-21 c
Delphenus. When you run out of fue l cel ls, you must use the batteries to fly to an
orbiting space station where you can buy more. While flying on batteries, your
maximum speed is Speed 5 and you cannot fly through stargates.
LONG RANCE SCANNER : The Long Range Scanner disp lays the significant contents
of deep space around your spacecraft. The range of the Scanner is approximate ly 1
O.R. (Orbital Radius) The scanner displays the fo llowing features:
Feature
Size/Col or
Stars
Planets
Stargates
Missi les
Astero ids
Ships
LARGE/WH ITE
LARGE/BLUE
LARGE/MAGENTA
LARGE/RED
SMALL/GREY
SMALL/VARIOUS
To change the magnification of the scanner, click on SCANNER 1 below the actual
scanner or press ALT-L. SCANNER 1 is no magnification, SCANNER 2 is 2x magnification, SCANNER 3 is 4x magnification, and SCANNER 4 is Bx magnification.
To target a spaceship beyond visual range, press I (?). Pressing the key repeatedly
cycles through all the ship targets beyond the range of the Holo Space Map. For
information about the Space Holo Map, see "Screen Components" of Flying Through
Space.
COMBAT
To attack other spacecraft, first target them, and then fire at them.
To target a spacecraft, press the spacebar or the right mouse button. The targeted ship
flashes on the Space View. Pressing the key or button repeatedly cycles through al l the
shi ps on the Holo Space Map. The Display may show information about the target and
its strength, depending upon the skil l of the Technician in your crew .
To fire lasers at the target, press C to activate FIRE LAS. If you have a weapon bay
se lected that co nta ins an A7 COMET, it wil l fire continuously at the target as long as
it's in range. If you have a specia l miss il e se lected, the A4 Pu lsar fires at the target
repeated ly as long as it's in range.
To fire a special weapon at the target, press Enter . The weapon you fire depends
on the weapo n bay you activated in Weapon Bays mode.
FLYING THROUGH STARGATES
To fly through a stargate, fly your ship directly to it. If you have a Bremar
assigned to the post of Bremar-Nav, the Ship Status Pane l informs you that you
can enter the stargate. Press A to order your navigator to pil ot you through the
stargate. If you do not have a Bremar assigned as the Bremar-Nav, or if you
have no fuel, you cannot enter the stargate.
Note: Bremar navigators are extremely scarce. Take great care not to
needlessly endanger your Bremar A'kri Janr, because if he dies, you'll
be stranded in the solar system you're in.
Long Range Scanner Symbology
ORBITING PLANETS
The green dot in the center of the scanner represents your ship. The colors for other
ships depend on their signatures. Over time you can learn which scanner ship co lor
corresponds to which ship type.
24
To orbit a planet, fly your ship directly over it. The Ship Status Pane l
displays a list of options. Press A to orbit the planet. For information on
actions you can take while in orbit, see Orbiting Planets.
25
DOCKING AT A SPACE STATION
To dock at a space station, fly your ship directly over a planet. The Ship Status Panel
displays a list of options. Press B to orbit the planet. For information on actions you
can take whi le at a space station, see Visiting Orbiting Space Stations.
CONFIGURING INDOOR SQUAD
This mode lets you define a marching order for your drop crew, and it also lets you
reassign your crew members to different posts aboard your J-21 c Delphenus. For a
description of this process, see "Configuring Your Indoor Squad" in Flying Through
Space.
<'
GREEN ....................... No Damage - Fully Functional
GREEN/YELLOW ........ Light Damage - Some Loss of Function
YELLOW ..................... Moderate Damage - Sub tantial Loss of Function
YELLOW/RED ............ Heavy Damage - Not Functioning
RED ............................ Destroyed - Cannot be Repaired, Must be Replaced
Example: When a system sustains light damage, it begins flashing green and yel low.
More damage turns the indicator solid ye llow. Even more damage makes the light flash
ye llow and red, and so on.
~
USING THE SHIP STATUS PANEr ,
The Ship Status Panel is where yo u contro l al l of the functions of your J-21 c
De lphenus.
-
Operations (F l )
Software (F2)
Communications (F3)
Ship Status Panel
To activate any of the six system interfaces, press the key listed on the above illustration or click on the icon with the mouse. The Ship Status Panel displays the interface
for the se lected system.
F1. OPERATIONS
The ii lustration above shows the Ship Status Pane l in Operations mode. The top ha lf of
the panel shows Damage and Repairs status of the ship. The bottom ha lf shows the
Weapons and CounterMeasures status of the ship. The name of your ship is to the
upper left, and the date is to the upper right, based on Mastassini Standard Time
(DAYS: YEAR).
26
DAMAGE AND REPAIRS
The functions of your ship are divided into six categories, and each category has an
indicator light that functions as fo ll ows:
Note: Try to avoid flying too close to other spacecraft. While collisions are
uncommon, when they do occur, they tend to destroy entire systems on your
spacecraft.
To repair a system, press the letter of the system to order your engineer to begin
repairs on that system.
A
B
C
D
E
F
AVIONICS .......... Ship contro ls and hull integrity
THRUSTER .......... The Rontgen Drive unit
FUEL CELL. .......... Fuel supply (damage causes leaks)
LASERSYS ............ Laser discharge units
MISSILES ............. M issile bays and deployment units
COUNTERS ......... Weapon countermeasures
The engineer attempts repairs to the extent of his abi lity until the system is
completely repaired. The engineer can only repair one system at a time.
Systems with so lid red indicators (not flashing) cannot be repaired; they must
be rep laced at a space station.
Note: The switches on the lower half of the panel still light when
you turn them on even if they are damaged beyond repair. If the
thruster to your J-21 c Delphenus has a red indicator, the ship is
still capable of flying at Speed 1.
27
WEAPONS AND COUNTERMEASURES
The weapons and countermeasures of your ship are divided into six categories, and
each category has an indicator light that turns on when the system is turned on:
G
FIRE LAS .......... Fires A4 Pulser repeated ly on the targeted ship if it's in
range. The A4 Pu lser is a permanently mounted laser
cannon and is separate from your weapon bays.
H
SHADOW ....... Follows the targeted ship, mirroring its movements. This is
especially useful in conjunction with FIRE LAS.
RADR ECM ...... Attempts to jam the guidance systems of radar guided
missiles.
A
AVIONICS
OP
B
How quickly you can maneuver the ship. This
also affects the computer's ability to Shadow targets.
B
THRUSTER
OP
B
How quickly you can acce lerate the ship.
c
TARGET
OP
B
How quickly the computer can achieve a target lock
on another ship.
D
SPACECOM
OP
B
How well the computer helps the tech decode ship
signatures.
E
EVASIVE
OP
B
How well the computer helps the pilot evade
enemy fire.
VS FLASH ........ Attempts to confuse optically-guided missi les with
powerfu I strobe Iights.
L
To hack some ship software, press the letter of the system to order your technician to
begin hacking that system. Following the name of each system is the operating
efficiency of the system, for example as shown below, OP B means the program is
operating at efficiency rating B.
BOARDING .... Attempts to lock onto and board an enemy ship if it's
within range and has a universal airlock design.
K
The technician can hack the software and try to improve its efficiency. The efficiency
of each system is ranked on a scale of A to H, where A is minimal functioning and H is
highly efficient functioning.
JETCOLOR ....... Attempts to confuse missi les that home in on exhaust
signature by injecting various flammab le chem ica ls into
the drive exhaust.
For more information on ship signatures, see FS. False Signatures. For more information on Missi les and CounterMeasures, see Space Weapons and Countermeasures.
F2. SOFTWARE
The illustration below shows the Ship Status Pane l in Software mode.
The technician attempts to hack the software of that system to the extent of his or
her abi lity for a length of time. The technician can only hack one system at a
time. After you order the technician to hack a program, the message below the
programs changes. When the technician is done, the message returns to
TECHN ICIAN CODING NOTHING.
Note: If your technician is not very adept at hacking software (Programming Ability) he or she can actually reduce the efficiency of the program.
F3. SPACE COMMUNICATIONS
The ill ustration be low shows the Ship Status Pane l in Space Communications
mode.
Ship Software Efficiency
Space Communications
28
29
The Communications officer receives and then decodes space comm messages
received by direct transmission and by intercepting space chatter. The speed at wh ich
the communications officer decodes incoming space comms depends on hi s or her
abi lity. Whenever the technician finishes decoding a new space comm , the Ship Status
Panel automatica ll y changes to Space Communications mode to disp lay the new ly
decoded message.
To read through your space comms, press A to scro ll through the messages. They're
numbered in chrono logica l order so you can keep track of the o rder in w hich you
received the messages.
Note: If your technician is not very adept at decoding space comms (Star Comm
Ability), it could take a long time to decode space comms.
Crew Configuration
F4. CREW ASSIGNMENTS
The illustration below shows the Ship Status Panel in Crew Ass ignments mode.
O•)tJA
OOtJft
OOtJFt
To assign that crew member to a post on the spacecraft, press the letter that
corresponds to that post.
A'KF:I JAOR
Crew Assignments
You are the commander. There are five other posts to ass ign crew to on the spacecraft.
COMMANDER
STARPILOT
TECHNICIAN
ENGINEER
WEAPONS
BREM-NAV
To select a crew member, press the letter to the left of the ir name. If you have more
than six crew members, you can press X to switch pages.
You (Nova or Stark)
Pilots your J-21 c Delphenus
Decodes space comms and hacks shi p software
Repairs and maintains ship systems
A ims weapons (you must target and fire)
Navigates your J- 21 c Delphenus through sta rgates
To change the posts your crew members are assigned to, press A . You can also
change the marching order of your drop team (the crew you bring clown wi th you to
planet surface missions).
30
(R)
(S)
(T)
(U)
(V)
(W)
PIL
TECH
ENG
GUN
BNAV
HOV
Pilot
Technician
Engineer
Spacecraft Gunner
Bremar-Navigator
Hovercraft Gunner
To define a new marching order, select the pos ition you want that crew
member to assume, either Center or Trail. Note that you can on ly bring two
additiona l crew members with you on the hovership, and you (e ither Nova
or Stark) are always on the Point (at the head of the marching order) .
(X)
(Y)
CENTER
TRAIL
To chose a different crew member to assign, press Z, and then press the
letter for the next crew member.
31
To see if a crew member has gained experience, check the color of the name of the
crew member's name. If the name is blue, they haven't gained enough experience. If
it's white, you can allocate abi lity points . (This convention does not include you , the
Commander.) For information on allocating ability points, see the "(2) ABIL" section in
Crew Profiles.
F6. WEAPON BAYS
The illustration below shows the Ship Status Panel in Weapon Bays mode.
To lea ve crew configuration, press Esc.
Note: You should assign crew members to roles in accordance with their
abilities. Then you should increase their abilities in their specially as they gain
experience.
Weapon Bays
Your J-21 c Delphenus has four weapon bays in addition to the A4 Pulsar laser cannon.
(The specific weapons will depend on what you have purchased.)
FS. FALSE SIGNATURES
The illustration below shows the Ship Status Panel in False Signature mode.
A
C
D24 PIKE RADAR
D 52 SHARK VIS
B
D24 PIKE RADAR
D
D91 MANTA JETC
To select a weapon bay, press a key A through D. The weapon you select wi ll fire
when you target a ship and press Enter .
Ship Signatures
The signature of your ship is the unique way it appears on other ship scan ners. You
can change this signature artificia ll y to fool other ships into believing you have a
different ship, like a transport, or a friendly . The curren t signature you're using is
shown below the Weapons and CounterMeasures indicators on the Ship Status Panel
in Operations mode. The normal signature for your sh ip is J-21 C DELPH.
To change the signature of your ship to fool enemies, press the letter to the left of the
signature. While flying under a fa lse signature can fool enemies at a distance, they will
rea lize your true identity at closer ranges. Note that a signature that fools one kind of
ship in one so lar system may not fool that same kind of ship in anoth er system.
To acquire more signatures to use, your technician must analyze the signatures from
other sh ips. Your technician automatica ll y analyzes the signature of the targeted ship,
and learns different information about it over time. Eventually, the technician can learn
to mimic the signature of that type of ship, and the name of that ship appears in your
False Signatures Status Panel for you to se lect. If your technician is lacking Star Comm
ability, capturing a ship's signature will take a long time.
32
Note: The number of missiles left in a bay is shown by the number of
missile icons shown in that bay.
-,..
SPACE WEAPONS AND COUNTERMEASURES
Much of a spacecraft's technology is designed toward staying intact while
destroying other spacecraft. All ships have countermeasures for each type of
missile, but there is no countermeasure for laser weapons.
LASERS
Lasers are high-energy beams of coherent light. They tend to have a
devastating effect on spacecraft when dispensed in large closes. There are
two types of laser avai lab le for your spacecraft: Pulsar and Beam.
A4 PULSAR
Your J-21 c Delphenus comes equipped with a permanently mounted A4
Pulsar laser cannon. This laser cannot be removed . The advantage of the
33
A4 is that there is no countermeasure to defend against it. The disadvantage is that the
weapon isn ' t very powerful , and it uses up fue l cel ls.
To fire your A4 Pulsar at the target, make sure an A7 Comet Beam is not selected in a
missi le bay (in the Ship Status Pane l in Weapons mode). Then return to the Shi p Status
Panel in Operations mode and press G or cl ick on G FIRE LASER. The A4 wil l then fire
repeatedly until the target is destroyed. (Unless it destroys you first, or if you run out of
fuel , or if the target goes out of range - about half of the radius of the Space View.)
A7 COMET BEAM
At certain se lect space stations you can purchase an A7 Comet Beam laser cannon.
This laser is superior to the A4 in that it can fire continua lly at a target instead of just in
pu lses. The disadvantage is that the A7 uses significantly more fuel consumption than
the A4.
To fire your A 7 Comet Beam at the target, select it in the Ship Status Pane l in Weapons mode. Then retu rn to the Ship Status Pane l in Opera ti ons mode and press G or
click on G FIRE LASER. The A7 wi ll then fire rapid ly until the target is destroyed.
(Unless it destroys you first, or if you run out of fue l, or if the target goes out of range
- about ha lf of the radius of the Space View.)
Note: Since both lasers use fuel cells, they stop functioning when you run out of
fuel.
To select and fire a missile at the target, select a weapon bay in the Ship Status Panel
in Weapons mode. Then return to the Ship Status Panel in Operations mode and press
Enter. The missile will fire and track the target. The missile has a limited fuel supply,
and it will lose its track if it runs out of fuel before hitting the target.
To avoid overshooting the target, fire early. Missiles fly for some distance before they
begin tracking, so they will overshoot their targets if you fire them while you 're close
to the target (if the target is displayed on the Space View, it's way too close).
To quickly hit the target with a missile, do not fire directly at the target, fire at a slight
angle . If you fire missiles directly at the target, they often miss on the first pass because
their guidance systems think they' re on track even though they' re a bit off target. If you
fire at a slight ang le, the guidance system is forced to update the flight trajectory early,
and it homes in on the target more accurately.
COUNTERMEASURES (JAMMERS)
Countermeasures are your best defense against enemy missi les in space. You have
countermeasures for each type of missi le: Radar guided, Visual ly guided, and Jetcolor
guided.
J RADR ECM
Pressing J or clicking on this bar turns on the Radar Electronic Countermeasures.
This broadcasts radar signals which confuse the radar tracking guidance systems.
MISSILES
K VS FLASH
Missiles are guided exp losive-tipped rockets. A direct hit by one of your missiles
usual ly destroys a target comp lete ly. There are three types of guided missile: Radar
guided, Visua ll y guided, and Jetcolor gu ided.
Pressing K or clicking on this bar turns on the Visual Flash Countermeasures.
This sends out powerful strobe light pulses which saturate optical sensors of
visua l tracking guidance systems.
D24 PIKE
The 024 Pike is a radar-guided m issile. It homes in on the radar signature of its
assigned target.
L JETCOLOR
Pressing L or clicking on this bar turns on the JetColor Countermeasures.
This injects chemica ls into your ship exhaust which confuse exhaust emission
sensors of spectrum tracking guidance systems.
D5 2 SHARK
The 052 Shark is a visua ll y-guided missi le. It homes in on the optica l signature of its
assigned target.
Note: All three countermeasures use fuel. Be sure to use on ly the
necessary countermeasure at all times to avoid wasting fuel.
D91 MANTA
The 091 Manta is a jetco lor-guided missi le. It homes in on the em ission spectra of its
assigned target.
34
35
' ..
APPENDIX A: CREW MEMBER ABJLITIES
SCANNING TARGETS IN SPACE
When you target a ship in space, the technician begins analyzing the signal. Over time
(how much depends on the technician's Star Com ability), the technician discovers
more and more information about the target. The target must remain targeted for the
technician to continue his or her analysis.
Picture
-
Missile/
Countermeasures
Target Scan
This is the order in wh ich information is determined:
0.
1.
2.
3.
4.
5.
r ..,
Unknown
Picture
Status (Damage)
Type
Missi le/ Countermeasures
Signature Captured and Usable
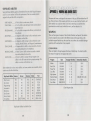
There are two types of abi lities: Land-Based , and Ship-Based.
LAND-BASED ABILITIES
Land-Based abi lities app ly to all members of the landing party. They relate to how well
crew members conduct themse lves on the surface of a planet.
AG ILITY ..................... The ability to quick ly fire multiple rounds from a weapon,
and the ability to dodge enemy fire.
STEALTH ........ ..... ....... The ability to avoid detection by nearby hostiles.
FITNESS ...... ................ The better your fitness, the more total health you have
when you gain a level of experience.
APTITUDE ..... ....... .. .... The better your aptitude, the more your abilities increase
when you gain a level of experience.
TACTICS ........ ............. The ability to fight using any weapon indoors.
CLOSE COMBAT ........ The ability to fight hand to hand.
FIREARMS ......... ......... The ability to fight using a firearm .
SPECIAL WEAPONS ... The ability to fight using high-power weapons.
DEMOLITIONS ........... The ability to use explosives (grenades).
Some sentients do not have certain abilities, and some sentients are remarkab ly able in
certain areas. See the chart below.
Land- Based Abil iti es
Missi le/Countermeasures tell you what missiles the target is carrying (if any) and the
countermeasures it's using. The three squares correspond to your three countermeasure ind icators, Radar, Flash , and Jetcolor from left to right. Engaged countermeasures
are blue, and disengaged countermeasures are magenta. Check to see which type of
countermeasures the target is not using, and fire m issiles that correspond to that
guidance type.
Agility
Stealth
Fitness
Aptitude
Tactics
Close Combat
Firearms
Specia l Weapons
Demolitions
Humans
Bremar
Darcato r
Ro bot
YES
YES
YES
YES
YES
YES
YES
YES
YES
YES
YES
YES
YES
YES
YES
NO
NO
NO
YES
EXCEPTIONAL
YES
YES
YES
YES
YES
YES
NO
YES
YES
NO
YES
YES
NO
NO
YES
NO
Land-Based Abilities Availability Chart
36
37
•
SHIP-BASED ABILITIES
Spacecraft-Based ab iliti es app ly to all members of the crew whi le flying in the spacecraft. For a crew member's sk ill to affect performance, that crew member must be
ass igned to the post the abi lity corresponds to.
SHIP EVASION ........... A Pilot's ab ility to evade enemy attacks.
STAR COMM .............. A Tech 's abi lity to decode Space Comms and to ana lyze
target ship sca ns.
PROGRAMM ING ....... A Tech's ability to improve the efficiency and fu ncti on of
ship software.
MECHANICS .............. An Engineer's abi lity to repair a ship's mechanics: avionics, thrusters, and fue l cell s.
ELECTRON ICS ............ An Engineer's abi lity to repair a ship's electronics: Laser
Track ing, Missile Delivery, and Weapon CounterMeasures.
STAR GU NER .......... A Weapons officer' s abi lity to shoot accurate ly at hostile
ships whi le piloting the J-2 1c Delphenus.
HOVER GUNNER ...... A Hover Gunner's abi lity to shoot accurately at hosti le
ships wh ile piloting the hovership .
NAVIG SONG ....... ..... A Bremar's abi lity to nav igate through stargates. Low
abi lity in thi s sk ill wastes fue l during stargate passage. Thi s
ab ility is excl usive to the Bremar race.
Some sentien ts do not have certain abi li ties, and some sentients are remarkab ly ab le in
certain areas. See the chart below.
Ship-Based Abilities Humans
Ship Evasion
Star Comm
Programming
Aerona utics
Electron ics
Star Gunner
Hover Gunner
avig Song
YES
YES
YES
YES
YES
YES
YES
NO
Bremar
Darcator
Robot
Post
NO
NO
YES
YES
YES
NO
NO
NO
NO
0
0
STARPILOT
TECH
TECH
ENGIN
ENG IN
WEAPONS
WEAPO S
BREM -NAV
0
0
NO
NO
NO
EXCEPTIONAL
0
NO
NO
NO
NO
0
NO
-'I
:..l
~.
,t., -
'
APPENDIX B: WEAPON. AND ARMOR STATS
~
W eapons and Armor are designed for one reason: to help you ki ll them before they kill
you. Here are lists of all the weapons and armor you ca n use in the Four Systems, and
all the statistics you could ever need . If you find an item that is not on these lists,
experiment to see which race (or droid ) ca n use it, and how effective it is.
WEAPONS
There are three types of weapons; Close Combat, Standard, and Specia l. The statisti cs
of each weapon do not accoun t for the defensive status of the target. Here are the
avai la b le weapons listed by type, th e races th at ca n use them, the unmodified damage
potential , and the ammunition (if any) required .
CLOSE WEAPONS
These are bladed or charged weapons that have a limited ran ge. You must be w ithin
two steps of the target (or one diagonal step) to hit.
Weapon
Stiletto
Stun Club
Power Fist
Gyro Pike
Edge Spinner
Electron Blade
Sonic Mace
Grav Blade
Race
Damage (Min-Max)
Ammunition (Rounds)
HUMAN
HUMAN
HUMAN
HUMAN
HUMAN
HUMAN
BREMAR
DARCATOR
2-6
1- 8
3 - 10
4 - 12
6 - 16
8 - 20
2 - 12
N/A
N/A
N/A
N/A
N/A
E-BLADE CELLS (SO)
N/A
N/A
5 - 15
Close Weapons Stats
Ship-Based Abi li ties Ava il abi lity Chart
38
•
39
STANDARD WEAPONS
These are mostly projectile weapons. Generally, if the target is visible on the floor
plan , they are in ran ge.
Race
Damage (Min-Max)
Ammunition (Rounds)
HUMAN
HUMAN
HUMAN
HUMAN
HUMAN
HUMAN
DARCATOR
DARCATOR
2-8
4 - 12
4 - 16
5 - 15
6 - 16
10 - 30
4 - 16
12 - 32
XL10 CLIP (20)
AMAG CL IP (20)
SPIKE SACK (50)
SMG70X BELT (90)
SL20 CLIP (30)
M23 CLIP (50)
SLUG PACK (40)
GRAV-G CLIP (50)
Weapon
Derrin XL 10
AutoMagnum
Spike Ca ter
SMG-70X
SL20 Sniper
M23-30AR
Slug Thrower
Grav Gun
Standard Weapons Stats
SPECIAL WEAPONS
These are mostly energy weapons. Genera lly, if the target is visib le on the floor plan,
they are in ran ge.
Weapon
Race
Damage (Min-Max)
Ammunition (Rounds)
M Il l Laser
JW2 Blaster
Comp Blaster
Blast Rifle
ThermoCaster
Grav Disruptor
Radiation Grenade*
HUMAN
HUMAN
HUMAN
HUMAN
HUMAN
DARCATOR
HUMAN
12 - 24
15 - 30
17 - 34
20 - 40
30 - 60
20 - 40
4 - 64
ENERGY CELLS (25)
ENERGY CELLS (25)
E ERGY PACK (5 0)
ENERGY PACK (50)
THERMO PACK (25)
GRAV BOOSTER (25)
N/A
Standard Weapons Stats
* To thro w a Radiation Grenade, press * (asterisk).
It affects everyone within one step
of the target, even if there is a wa ll between them and the grenade. Only you Nova or Stark - can throw grenades. They must be in your persona l inventory, but
they don ' t need to be equipped. You are immune to the effects, and the amount of
damage a grenade can cause is based on your DEMOL ITIONS abi lity.
40
ARMOR
Ther~ are two types of armor; Protective Armor and Automated Medical Lining. Here
are listed the availab le types of armor, the races that can use them, and other significant stats.
PROTECTIVE ARMOR
Except for bad aim, protective armor is usua lly th e only thin g between your skin an
enemy weapon. Here are the three things you need to know about armor:
PROTECT - how much protection the armor gives, the higher the better.
SLOWNESS - how much the armor slows you , the higher the slower.
STEAL TH - how much noise your armor makes, the higher the louder.
Armor
Race
Protect
Slowness
Stealth
Uniform
HUMAN
HUMAN
HUMAN
HUMAN
HUMAN
H UMAN
BREMAR
DARCATOR
DARCATOR
1
3
3
4
5
8
1
6
10
0
0
0
1
5
10
0
0
3
0
0
0
0
2
3
0
0
1
Hardened Vest
Body Armor
Flak Vest
Kevlar Suit
Battle Armor
Skin Suit
G lide Shie ld
Grav Blocker
Protective Armor Stats
AUTOMATED MEDICAL LINING
Med ica l lining is an advance techno logical artifact crucia l to quick healing during
combat, and every effort shou ld be made to wear better and better AMLs. All races can
use all types of AML.
H.EALING - how fast the AML hea ls you by injecting drugs, applying heat, and
d1rect1ng low- level radiation . The lower the number, the better the AML.
AML
Healing
Issue
Extended
Rush
4
2
1
Automated Medica l Lining Stats
41
APPENDIX C: VIEWER DISKS
Your Matrix-9 reads optica ll y encoded library disks which u ually contain historical
information and other background data. The standard library has sixteen disks, and
there are eight addit ional slots for any additiona l disks you may find.
In the bars and casinos of the Four Systems, there are many games of Zero-G Roulette.
The game is very similar to regular roulette, except for a few exceptions. In normal
roulette, there are two co lor and 38 slots: 0, 00, and 1-36. In Zero-G Roulette, there
are eight co lors and 26 slots: A-Z. The slots X & Y are not co lorecl, and they correspond to 0 and 00 on a traditional roulette whee l.
Matrix-9 Data H anel-He ld Viewer
To activate your Matrix-9 Hand-Held Viewer, press F9 from most any mode. (You
cannot use the Viewer in Hovercraft mode.)
To read a viewer disk, press the letter of the disk. When you're finished with viewer
disk I ibrary, press ESC to leave the viewer. H ere is an index for the standard disks
included in your library :
Zero-G Roulette
The " wheel" is actually a sphere, and the ball is suspended in the center of the sphere
by a magnetic field. When the sphere is spun, the ball is dropped and eventua lly stops
on one of the twenty six slots. Zero-G Roulette is otherwise p layed the same as normal
roulette, except the betting odds are different to reflect the different number of co lors
and slots.
I: MASTASSIN I (PLANET)
A: VIEWER DISK INSTRUCTIONS
B: AR IEL (PLANET)
C: TIKORR (PLANET)
D: ROUYN (PLANET)
E: CASCADE (PLANET)
F: CIBERA (PLANET)
G: VARO (PLA ET)
H: HOLBROOK (PLA ET)
J: ZERO-L MERCENAR IES
K: DELTA CORO MERCS
L: STARKILLER MERCENARY GROUP
M: BREMAR (RACE)
N: DARCA TOR (RACE)
0: LANTA (RACE)
To bet on a Jetter, press a letter A-Z to bet on that letter, or click on the letter on the
actual board. Winning pays 24 for 1.
To bet on half of the board, press 1 for the left half, 2 for the right half, or click on the
half you want above the board. Winning pays 2 for 1.
To bet on a third of the board, press 3 for the left third, 4 for the middle third, 5 for the
right third, or c lick on the third you want below the board. Winning pays 3 for 1.
42
43
To bet on a co/or, press 6 or cli ck on th e option. You're shown a list of the eight
co lors, and you select the co lor you want by pressing the letter to its left or by clicking
on it on the I ist. Winnin g pays 8 for 1.
..
ARTIST BIOGRAPHIES
To set the amount of your bet after you make it, se lect one of the Iisted options by
pressing th e letter of your choice or by click ing on it.
(A) BET MORE!
(B) BET LESS
(C) SET LAST WAGER ... 0
(D) SET BET
(E) DO NOT PLAY BET
Karl Buiter is the evi l gen iu s behind
such past products as EOS and Sentinel
Worlds. He divides his time between
programming his computer in sta rlight,
playing his drums in dim lounge light,
and riding the waves of Malibu in the
sunlight.
Increase bet by 10
Decrease bet by 10
Bet the same amount as the last bet
Set the bet and return to th e main menu
Cance l the bet and return to th e main menu
To finish betting and drop the ball, press 7 or se lect BETS PLACED. The ball is
dropped, and the results are shown on the Display Line. Any winning bets are highlighted in the Bets Pl aced area, and your account is credited or debited accordingly.
Note:
IN ORBIT AT SPACEPORT MALIBU:
If you bet the maximum number of table bets (8), the ball drops automatically.
Scott Fisher started co llege at Santa
Barbara study ing computer sc ience. He
lea rn ed 8086 assemb ly code spec ifica ll y for Hard Nova, and now he's studying law. When he isn't learning socia ll y
co nsc ious law, he tries to shoot people w ith paint guns.
To finish playing and leave the table, press 8 or se lect LEAVE THE TABLE .
Mark Dickenson was born and bred in Ten nessee, and he started co ll ege as a premed
student. Then he teamed up with Karl Buiter and headed out west. After creating the
art for Hard Nova, he's now pursuing an art degree in Southern Ca liforni a.
PLANETSIDE AT ELECTRONIC ARTS :
Eric Lindstrom was raised by wi ld dogs
in a typical Ca li fornia subu rb. At age
eighteen he left the pack and entered
mai nstream society. After serving a
four-year sentence at the UC Berkeley
Engineering School, he's now on
probation as a writer at Electroni c Arts.
Jeff Haas was born in Monterey,
California and was infected with the
sc ience fiction bug one step out of the
crad le. He also enjoys flying stunt kites, body boarding in the Pacific, and he's an
award-winning sleight-of-hand magician.
44
45
TECH NICAL SUPPORT
If you have questions about the program, our Technical Support Department can help. If your
question isn't urgent, please write to u5 at:
G ame Designer & Programmer
Karl Buiter
Tools Programm er
Scott Fi sher
Computer Art
M ark Di ckenson
Additional Computer Art
Peggy Brennan, Cynthia H ami lto n
Mic hae l Lubu guin, Karl Buiter
Music Composition
Jo n M ed ek
Music Technology
Rob Hubba rd
Sound Technology
D av id W arhol
Story Writing & Implementation
Eric Lind strom, Jeff H aas
Based on Original Concept by
Karl Buiter
Producer
Chri stoph er Erhardt
Associate Producer
Ro land Ki p penhan Ill
Assistant Producer
Jam es R. Bail ey
Technical Director
Jesse Taylor
Lead Tester
Steve Sm yth e
Quality Assurance
Steve M atu lac
Product M anager
D avid Bamberger
Package Design
Lance And erson
Package Art Direction
N ancy Fo ng
Package Illustration
Ri c hard Kri egler
Documentation Layout
Jenni e M aru ya m a
Documentation
Eric Lind stro m
46
Electronic Arts Technical Support
P.O. Box 7578
San Mateo, CA 94403-7578
Please be sure to include the fo llowing information in your letter:
Product name
Type of computer you own
Any additional system information (like type and make of monitor, video card, printer,
modem etc.)
Type of operating system or DOS version number
Description of the problem you're having
If you need to talk to someone immediately, ca ll u at (4 15) 572-ARTS Monday though Friday
between 8:30 am and 4:30 pm, Pacific Time. Plea e have the above information ready when you
ca ll. This wi ll help us answer your question in the hortest possible time.
If you live outside of the United States, you ca n co ntact one of our other offices.
In the United Kingdom , contact : Electronic Arts Limi ted, P.O. Box 835, Slough SL3 BY , UK.
Phone (044) 753 46465.
In Australia, contact: EAE (ECP), 4/52 Lawrence Drive, 1erang 4211 , Queensland , Australia.
Phone: (75) 963-488 .
Limited Warranty
Electronic Arts (" EA") provides to the original pu rchaser of the computer oftware product, fo r a
period of ninety (90) days from the date of origina l purchase (the "Warranty Period "), the
fol lowing limited warranties:
M edia - EA warrants that, under norma l use, the magnetic media and the packaging provided
with it are free from defects in materia ls and wo rkma nshi p.
Software - EA warrants that the software, as origi nall y pu rchased, wi ll perform substantia ll y in
conformance with the specifications set forth in the packaging and in the user manua l.
Warra nty Claims
To make a warranty claim under this limited warranty, please return the product to the po int of
purchase, accompanied by proof of purcha e, your name, your return address, and a statement of
the defect. OR send the di k(sl to us at the above adclres within 90 clays of purchase. Include a
copy of the dated purchase receipt, your name, your return address, and a statement of the defect.
EA or its authorized dealer will, al our option, repair or rep lace the product and return it to you
(postage prepaid) or issue you with a credit equal to the purchase price.
47
To replace defe li ve media after the 90-day warran ty period has expired, send the original disk(s)
to the above addre s. Enclo ea tatement of the defect, yo ur name, your return address, and a
check or money order for $7.50.
The foregoing states the purcha er' sole and exclusiv remedy for any breach of warranty with
respect to the oftware product.
Warranty Exclusions : EA expres ly di claims any implied warra nties with resped to the media
and the software, including warranties of merchantability or fitne s for a particular purpose. Any
wa rrantie implied by law are limited in duration to the warranty period. Some states do not allow
limi tations on the duration of an implied warranty, so the above limitations may not apply to you.
This warranty give you specific lega l rights. You may also have other rights which vary from state
to state.
Limitation on Damages
EA shall not in any case be liable for incidental, conseq uential, or other indirect damages ari sing
from any claim under this agreement, even if EA or its agents have been advised of the possibility
of uch damage . Some states do not al low the exclusion or limitation of incidental or consequential damages, o the above limitation or exclusion may not apply to you.
Unless indicated otherwise, al l oftware and documentation is
© 1990 Electronic Arts. Al l Rights Reserved.
NOTICE
ELE TRO IC ARTS RESERVES THE RIGHT TO MAKE IMPROVEMENTS IN THE PRODUCT DESCR IB ED IN
THIS MA UAL AT ANY TIME AND WITHOUT OTICE.
THI MA UAL, AND THE SOFTWARE DES RIB ED IN THIS MANUAL, IS COPYRIGHTED. ALL RIGHTS ARE
RESERVED. NO PART OF THIS MANUAL OR THE DESCR IBED SOFTWARE MAY BE COPIED, REPRODUCED,
TRANSLATED OR REDUCED TO ANY ELECTRONIC MED IUM R MACHINE-READABLE FORM WITHOUT
THE PR IOR WR ITTEN ONSENT OF ELECTRON IC ARTS, P. 0. BOX 7578, SAN MATEO, CALIFORNIA
94403 -7578, ATTN : CUSTOMER SERV ICE.
ELECTRONIC ARTS MAKES NO WARRANTIES, EXPRESS OR IMPLIED, WITH RESPECT TO THIS MA UAL,
ITS QUALITY, MERCHANTABILITY OR FITNESS FOR ANY PARTICULAR PURPOSE. THIS MANUAL IS
PR VIDEO " AS IS. " ELECTRON IC ARTS MAKES CERTAIN LIMITED WARRA TIES WITH REGARD TO THE
SOFTWARE AND THE MED IA FOR THE S FTWARE. PLEASE SEE THE ELECTRON! ARTS LIMITED
WARRANTY.
SOFTWARE © 1990 KARL BUITER
ALL RIGHTS RESERVED
MA UAL BY ERIC LINDSTROM
INSTALLATION AND STARTING GUIDE BY DAVID LUOTO
© 1990 ELECTRONIC ARTS. ALL RIGHTS RESERVFD.
342805