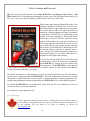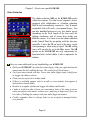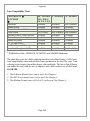
1
Table of contents and Foreword am pleased that you purchased one of our Pentax K-50/K-500 – Everything you need to know…..and then some e-book. As an enthusiastic photographer for many years, I have had many Pentax cameras. My first “new” camera was a Pentax Spotmatic, purchased when I was still in Junior High. I When Pentax stepped into the Digital SLR market, I was delighted. Their first few DSLRs (The *ist series) were the smallest DSLRs on the market but were not particularly special with the 6MP CCD. When the K10D was introduced, everything changed and Pentax was suddenly a major player. The K10D was a breakthrough, in my opinion. It had the capabilities of Professional DSLRs with the price of entry-level DSLRs. It had some unique features found nowhere else at any price. In January of 2008, Pentax announced the K20D. It was not a revolution as the K10D was, but it certainly was an evolution of the revolution. The K200D and the K2000/KM, the K-x all followed with no exceptional or marginal improvements. On May 2009, Pentax made history again by introducing the Pentax K-7. On October 2010, the K-5 is announces as the flagship of the company. As I write this e-book, the K-5/K-5II and K-5IIs are still available and so is the K-30. Pentax has just announced the K-50/K-500. It’s amazing to me how Pentax keeps breaking barriers. The K-50/K-500 has a front and rear e-dials, which are usually only found on much more expensive cameras. It is also weather sealed (K-50 only) and at the current selling price, it’s unique. This book is not about me as a photographer. It is about you and what information you will need when using this marvel of engineering that the K-50/K-500 is. The book complements the Pentax user’s manual and explains in simple terms how to use the camera. It contains techniques, shortcuts, explanations, tips, examples and photographic information applicable to the K-50/K-500 as well as other DSLRs in general. We offer the K-50/K-500 book in a downloadable e-book form only. We save production costs and you save money, and get you book much quicker. Your feedback is always important to me. Yvon Bourque I always appreciate comments from my readers, including those who let me know about typos, misspellings, and grammatical errors. However, please understand that English is not my first language. You can always let me know by emailing me directly at: [email protected] II Table of contents and Foreword Foreword Chapter 1 Chapter 2 Table of Content Know your K-50/K-500 How to use your K-50/K-500 Chapter 3 Chapter 4 Chapter 5 Processing your images The Pentax System Photography Techniques Chapter 6 Addendum Appendix HD Video Recording Additional Information Glossary III Table of contents and Foreword Yvon Bourque PENTAX K-50/K-500 Everything you need to know… and then some. Foreword IV Table of contents and Foreword All rights reserved. Printed in the United States of America. No part of this book may be used or reproduced on any form or by any means, or stored in database or retrieval system, without prior written permission. Making copies of any part of this book for any purpose other than your own personal use is a violation of the United States and International copyright laws. Text © 2013, Yvon Bourque Photography © 2013, Yvon Bourque except where noted. This book is sold as is, printed or in e-book format, without any warranty of any kind, either expressed or implied, respecting the contents of this book, including but not limited to implied warranties for book’s quality, performance, merchantability, or fitness for any particular purpose. The author nor dealers or distributors shall be liable to the purchaser or any other person or entity with respect to any liability, loss, or damage caused or alleged to have been caused directly or indirectly by this book. All terms or Company names mentioned in this book that are known to be trademarks or service marks have been carefully and appropriately noted. The author cannot attest to the accuracy of this information. The contents of this book are strictly the view of the writer. The explanation and suggestions, as to the operation of the equipment as such, is derived from the author’s own experience and conclusions. The accuracy of the instructional articles has not been verified by the respective manufacturers. This book is not associated with Ricoh - Pentax or its affiliates. The author is not endorsing any equipment manufacturers nor is the author being compensated by any manufacturer for the editorial content of this book. Any text resembling any other published material is coincidental as this book is focused on the teachings of the use of the equipment, which is derived from the manufacturer’s instructions. The book is written, whenever possible, in a nontechnical manner and is geared toward entry level and amateur photographers, although some material may be useful to professionals. Pentax is a trademark of Ricoh - Pentax Corporation and its affiliates Photoshop, Lightroom and Elements are trademarks of Adobe® Written in the USA All rights reserved Copyright © 2013 – Yvon Bourque V Table of contents and Foreword About the Author: Back when most of his classmates were dealing with growing up, the author was nurturing a serious enthusiasm for photography. Son of a Montreal carpenter, he enrolled in photography courses, soaked up theory, bought his first camera, shot rolls of film, and learned how to develop and print. All this was before leaving junior high school. He had many dreams and like many aspiring young photographers, he dreamed of getting assignments from National Geographic and traveling the world over. Decades later, the road has led him into other directions. With the responsibilities of a career and family, his plans were altered, but only slightly. The enthusiasm of the young boy and the love of photography are still strong. He never abandoned his photography dreams. One of his biggest frustrations is that he does not have enough time for more. He has used all types of photography formats, but now, uses Digital SLR cameras almost exclusively. He states “Technology is good. The freedom to unleash one’s creativity has never been greater. You either follow the flow of progress, or you are left behind”. His work has given him the opportunity to travel across the United States, Canada, Mexico and the Caribbean. His photography career never took-off as he had dreamed, but as a second career, he has spent countless hours during the past decades capturing not only the beauty and the people of America but other countries as well. He has won numerous awards, written articles and books on his beloved subject, and sold his work throughout the places he lived. Where does a tireless hobbyist go from here? Like all other areas of our modern life, photography has gone digital. As an artist, he is fascinated with all of the new digital possibilities. He is finally contemplating the idea of replacing his present career shingle for one stating Yvon Bourque, Photographer. “With perseverance, all is possible.” VI Table of contents and Foreword TABLE OF CONTENTS FOREWORD IV CHAPTER 1 ● KNOW YOUR K-50/K-500 Nomenclature Information you see in the viewfinder K-50/K-500 Technical specifications Here what’s special about the K-50/K-500 Quick rundown A little more details Highlighting some of the K-50/K-500 general features Resolution The Sony CMOS sensor Exclusive image processor Dust removal system Exceptional shake reduction system Dust and humidity resistance File formats Pentaprism viewfinder Focusing system Metering system Exposure modes AUTO Movie (P) Program mode (Sv) Sensitivity priority mode (Tv) Shutter priority mode (Av) Aperture priority mode (TAv) Shutter and Aperture priority mode (M) Manual mode (B) Bulb mode (USER) modes (U1 and U2) (SCN) Scene mode Program line setup 21 23 28 31 36 36 37 40 41 41 42 42 43 44 45 46 47 48 48 49 49 50 50 50 51 51 51 52 52 53 53 VII Table of contents and Foreword CHAPTER 2 ● HOW TO USE YOUR K-50/K-500 How to use your K-50/K-500 Guide display Status screen Control Panel Battery installation / removal Installing / removing memory card Installing / removing lenses Turning the camera on Focusing Adjusting the viewfinder diopter Language Date and time Taking pictures Picture quality Shake reduction White balance AUTO mode Your first picture Instant review The Menus Setting playback display Histograms Preview method Digital preview Image rotation Image file format JPEG file sizes and quality RAW files Why not take the plunge to RAW files? RAW Mode Explained Shooting and Saving in RAW Shooting and Saving in JPEG 55 57 58 58 59 60 60 61 62 62 63 63 64 65 65 66 67 67 70 70 72 73 75 76 77 77 78 78 79 80 80 80 80 81 Differences Between RAW and JPEG Why Shoot JPEG? Why Shoot RAW? Summary RAW/JPEG RAW/Fx Button Button Customization Setting Sensitivity (ISO) Setting EV and ISO Incremental Steps 81 82 82 83 84 85 88 VIII Table of contents and Foreword White Balance Adjustments White Balance Menu White Balance Settings Setting to AWB Setting to Daylight White Balance Setting to Shade White Balance Setting to Cloudy White Balance Setting to Fluorescent White Balance Setting to Tungsten White Balance Setting to Flash White Balance Setting to CTE White Balance Setting to Manual White Balance Setting to Color Temperature White Balance Fine Tuning White Balance Metering System in Detail 77 segment metering system Multi-segment metering Center-weighted metering Spot metering Linking AE and AF points Meter Operating Time Built-in-Flash Flash Compensation Output Allowing Flash Shooting While Charging Built-in flash distance and aperture Calculating Maximum Flash Distance from a Set Aperture Flash Modes Flash on Flash on + Red-Eye Slow-Speed Sync Slow-Speed Sync + Red-Eye Trailing Curtain Sync Wireless Mode Multiple Flashes Using the Flash in (Tv) Shutter Priority Mode Using the Flash in (Av) Aperture Priority Mode P-TTL Mode External Flash Daylight-Sync or Fill Flash Focusing System Selecting AF Point Catch-in Focus Live-View IX 89 90 91 91 91 91 92 92 92 93 93 93 94 94 96 96 96 96 96 97 97 98 99 99 100 101 101 102 102 103 103 103 104 104 104 105 105 105 106 107 108 109 Table of contents and Foreword Color Space (AE-L) Button - Memorizing Exposure Exposure Bracket Mode Using multiple exposures on the K-50/K-500 instead of neutral density filters Remote Control Drive Modes Single-Frame Shooting Continuous Shooting (Hi & Lo) Self-Timer (12 sec) Self-Timer (2 sec) Mirror Lock Remote Control Unit Remote Control Unit (3 sec delay) Interval shooting Shake Reduction Dust Removal Pixel Mapping Screen views of the menus Screen Views of the Rec. Mode Menu Screen Views of the Movie Mode Menu Screen Views of the Playback Mode Menu Screen Views of the Set-up Mode Menu Screen Views of the Custom Settings Mode Menu More on Exposure Modes (P) Program Mode (Sv) Sensitivity Priority Mode (Tv) Shutter Priority Mode (Av) Aperture Priority Mode (TAv) Shutter & Aperture Priority Mode (M) Manual Mode (B) Bulb Mode User Mode (U1 and U2) Saving settings User U1 and U2 SCN mode X 110 111 112 115 117 118 118 118 119 119 120 120 120 121 122 123 124 125 125 126 126 127 128 128 130 130 131 131 132 133 134 135 136 Table of contents and Foreword CHAPTER 3 ● PROCESSING YOUR K-50/K-500 IMAGES In-Camera Processing of Images Editing Images (One image or multiple images) Image Rotation Digital Filters Resize Cropping Index Protect Slideshow Save as manual white balance Save cross processing settings as favorite RAW development Movie edit DPOF Custom images Using digital imaging software Printing images DPOF Digital Print Order Format Pentax Supplied Software 138 139 139 140 140 144 144 144 146 146 146 147 147 147 148 148 153 155 155 156 CHAPTER 4 ● THE PENTAX SYSTEM. Short Pentax History The Pentax DSLRs Optional Accessories for the K-50/K-500 External Flash Units AF540FGZ Features AF360FGZ Features New AF540FGZII & AF360FGZII Specifications AF200FG Features AF160FC Features Remotes Remote Control-F Remote Control Waterproof O-RC1 Cable Switch CS-205 AC Adapter Viewfinder accessories Right-Angle Viewfinder Lenses Compatibility DA Lenses DA Lenses 158 159 161 165 165 166 167 168 169 172 173 174 174 174 175 175 176 177 178 179 184 XI Table of contents and Foreword FA Lenses still available D FA lenses FA J Lenses FA Lenses K-Mount Manual “A” Lenses K-Mount Manual “M” Lenses M42 Screw-Mount Manual Lenses Medium Format Lenses 186 187 188 184 193 195 197 198 CHAPTER 5 ● PHOTOGRAPHY TECHNIQUES Aperture Scale Explained Shutter Speed Scale Explained ISO Value Scale Explained Combining All Three Elements with the K-50/K-500 Adjustments to Consider Photography Techniques Rule of Thirds Close-up Flowers Leading Lines Panoramic Pictures Black & White Selective Focusing Children Slow speed blurring Silhouette Travel Photography Back Lighting Shooting at Night with a Tripod Bad Weather Commercial Photography Get Closer Automobiles Patterns Changing your point of view Action National and state parks 201 203 204 205 205 206 207 209 210 211 212 213 215 216 217 218 219 220 221 222 223 224 225 226 227 228 229 230 XII Table of contents and Foreword CHAPTER 6 ● HD VIDEO RECORDING Movie recording Settings for movie recording Exposure setting Movie capture settings Recorded pixels Frame rates Quality level Recording sound level Movie SR Interval movie Let’s record a movie 231 232 232 233 233 234 234 235 235 236 236 237 ADDENDUM Modern DSLR cameras Other K-50/K-500 functions HDR (High Dynamic Range) Programmable Embedded Copyright Composition Adjustment in Live View Electronic Distortion Adjustment Lateral Chromatic Aberrations Adjustment Autofocus Fine Adjustment Autofocus Accuracy, Back & Front Focusing Problems Solution K-50/K-500 Camera Settings Understanding the result A word about auto focus sensors Difference between 45°and 30° charts The K-50/K-500 Custom Setting Number 22 Disclaimer Select Battery Status screen color scheme Stay in level 240 241 241 242 244 245 245 246 246 246 248 250 252 253 254 254 255 255 256 257 APPENDIX Lens Compatibility Chart Pentax Lens Mount Facts Glossary 258 260 261 264 XIII Table of contents and Foreword Foreword I wrote this book for all users of the Pentax K-50/K-500. No matter what your experience level is, you will find something useful in this book. Less than a few decades ago, most amateur and professional photographers alike were using film cameras for their picture taking. Within the film cameras, several formats were used. The general public and a good number of professionals used the 35mm format. A select few preferred using medium and large format cameras mainly because of the size of the negatives. Larger negatives rendered better pictures, better colors and fantastic enlargements. Film cameras had evolved to very sophisticated instruments and took great pictures. It’s no wonder that almost every family owned a 35mm camera. When the first digital cameras started to appear, the quality was less than desirable, but the potential was certainly there. For several years, many photography magazines were debating whether or not the digital cameras would replace film based cameras. Over time, the quality has so improved, that today, in our opinion, digital cameras exceed the quality of film based cameras. Of course, we are comparing the 35mm and medium format film cameras with the new breed of Digital Single Lens Reflex (DSLR) cameras. It has taken many years to get where we are today, but digital is here to stay. Some of you probably never used a film camera before. It wasn’t all that long ago when a top DSLR with a sensor in the 2 megapixels range was costing the consumers nearly five thousand dollars or more. For a while, as soon as you spent thousands of dollars for a top-of-the-line DSLR, it was replaced within months with a new and better model. I am sure that some of you remember these times of tribulation. The market, as this book is written, has stabilized, and the norm in a nonprofessional DSLR is now around the 12 to 25 megapixels, 25 megapixels and above for most professional DSLR cameras. All are enough to produce very good enlargements up to about 16” x 20” and beyond. Full size (roughly 36mm x 24mm, or the same size as a 35mm frame) sensors are available on many DSLRs. The perceived advantage of full frame is that you can use your 35mm format lenses without any correction factor. Pentax is using a smaller sized sensor (APS-C roughly 24mm x 16mm) requiring a correction factor of around 1.5 to 35mm format lenses. If you XIV Table of contents and Foreword shoot with telephoto lenses, it works to your advantage as a 200mm f/2.8 lens acts like a 300mm f/2.8 telephoto at no additional cost. We know that a 300mm f/2.8 telephoto lens is very expensive. The downside is that wide angle lenses will no longer perform as such, but the maximum aperture will remain. Today most companies manufacture super-wide lenses that, when converted to a 1.5x factor, still gives you a nominal wide angle comparable to a 20mm on up in the 35mm format. Wide angle lenses are cheaper than telephotos. In our opinion, full-frame sensors are overrated, especially with the new K-50/K-500. The K-50/K-500 uses a Pentax/Sony 16.3 megapixels CMOS sensor, adapted by Pentax engineers for the K-50/K-500, drastically reducing the digital noise at high ISO. It also allows sizeable cropping. Unless you want to print your pictures billboard size at 300dpi resolution, the current CMOS sensor will be sufficient to produce stunning pictures and enlargements that were only dreamed of a few years ago. The CMOS sensors use less power and produce very little digital noise at higher ISO. In the past few years, we have seen many brand names in the camera field disappear. Some acquisitions and mergers took place and some companies just abandoned the competitive digital photography market altogether. In the past decade, two companies appear to have dominated the market; and indeed still do. There is no doubt that they manufacture good products, but the brand loyalty and recognition may have played an important role in their success. With Pentax introducing the K-50/K-500, the gap between these two giants is narrower and there is no doubts that Pentax will once again take a greater share of the market with good products. Pentax took a while before producing its first Digital Single Lens Reflex (DSLR). Some changes are about to happen. Pentax is not new to changing the photographic world. Pentax pioneered the Single Lens Reflex (SLR) camera in 1952 with the introduction of the Asahiflex I camera. In 1954, the Asahiflex II was introduced with the first instant mirror return. In 1964, Pentax did it again by introducing its Pentax Spotmatic camera featuring the first through-the-lens (TTL) metering system in a Pentax camera. A version of the Pentax TTL system is now found in virtually all 35mm SLR cameras and applied to the design of DSLRs as well. Many of us learned photography by using the ever popular Pentax K1000. XV Table of contents and Foreword The new Pentax K-50/K-500 is aimed at amateurs to advanced amateur photographers but can certainly be used by entry-level photographers as well. It’s a camera that will help expand your photographic expertise. It can be as easy to operate as a point and shoot, but it also has all of the professional features that you will demand as your experience grows. All Pentax lenses ever made will work with the K-50/K500. It is often said that the glass are the most important factor in taking great photographs. There are many reasons to choose the K-50/K-500 for your digital photography endeavors. We have dedicated a whole section on the camera’s features alone. This book is organized in the following way: Foreword and Table of contents Chapter 1 “Know your K-50/K-500” is dedicated to the general specifications of the K-50/K-500 and the review of the many functions of the camera in general. Chapter 2 “How to use your K-50/K-500” explains the multiple functions of the K-50/K-500, and includes many pictures and illustrations. It clarifies the use of the camera’s functions from screen menus to actual buttons and switches. There are no simple icons on this camera mode dial except for scene mode, which really makes it easy to shoot like a Pro, without being a Pro. The advantage of this camera is that you can tailor its operability to your liking or photographic skills. The three basic shooting elements; Aperture, Shutter Speed and the Sensitivity (ISO) are all adjustable with the K-50/K-500 in ways that will make the competition rethink their approach. It will not be long before other manufacturers try to mimic the K-50/K-500. Chapter 3 “Processing your K-50/K-500 Images” is a brief review on how to manipulate your images within the camera as well as with a computer. This topic alone is worthy of a book by itself, and there are indeed many books on Digital Imaging readily available. Pentax software and other digital imaging software such as Photoshop®, Lightroom®, and Elements®, as well as Apple’s Aperture® are briefly visited. The possibilities are endless and are only limited by your ability or desire to manipulate and post-process your images. XVI Table of contents and Foreword Chapter 4 “The Pentax System” is dedicated to the Pentax System. Pentax is truly the only manufacturer with 100% backward compatibility. It includes all lenses ever manufactured by Pentax, both 35mm and medium formats. There are about twenty five million plus genuine Pentax lenses out there. There are probably that many more lenses manufactured by companies such as Tamron ™, Sigma ™, Tokina ™ and other brands. Currently available accessories are also covered and explained in this chapter. Chapter 5 “Photography Techniques” is full of techniques and example pictures along with some suggestions on composition. Chapter 6 “HD Video recording” is dedicated to the HD video capabilities of the K-50/K-500. This new generation of DSLRs with still pictures and HD video capabilities is changing the digital photography landscape. It opens up new possibilities. It is going to be very popular for documenting and photojournalistic approach to your undertakings. Addendum is comprised of additional K-50/K-500 functions, last minute changes, revisions to software or firmware and any additional information found to be useful at the time of writing. Appendix section includes menu setting tables, factory default tables, lens compatibility chart, mount types, and an index to guide you through this book. XVII Table of contents and Foreword Check our Pentax Blog, “ The Blogspot ”; we constantly post articles about Pentax products and photography in general. The Blogspot XVIII Table of contents and Foreword We also have a website showcasing our e-books. You can download useful information, samples or purchase an e-book for your Pentax DSLR. e-books XIX Table of contents and Foreword © Yvon Bourque XX Chapter 1 - Know your K-50/500 Chapter 1 Know your K-50/500 Page 21 Chapter 1 - Know your K-50/500 What color scheme would you like? The K-50 is available in 120 color combinations. The K-500 is only available in black. Page 22 Chapter 1 - Know your K-50/500 Nomenclature 4 5 3 2 7 6 1 8 1. 2. 3. 4. 5. 6. Self-timer lamp Front e-dial Shutter release AF Assist Light Mirror SDM contacts 7. AF coupler 8. Lens unlock button Blinks for self-timer. Serves as remote control receiver. Changes set values. (Customizable) Press halfway to compose image, press fully to take picture Lights up when AF is difficult to attain in darker scenes Allows Through The Lens (TTL) metering and focusing Allows AF with the Supersonic Drive Motor (SDM) lenses Also used for power zoom on some older FA lenses Handles the AF drive between the lens and K-50/K-500 Press to install or remove lens Page 23 Chapter 1 - Know your K-50/500 10 13 12 14 11 15 16 24 17 22 18 9 23 9. 3” LCD monitor 10. ERASE button 11. Live-view button 12. Viewfinder 13. Diopter adjustment 14. Rear e-dial 15. AF/AE-L Button 16. Play button 17. Four-way Controller 18. Four-way Controller 19. OK button 20. Card access lamp 21. Menu 22. Four-way Controller 23. Info button 24. Four-way Controller 19 20 Displays exposed pictures, allows access to menus 21 Press to delete current picture Initiate Live-view mode If you don’t know what this is for, abandon photography ☺ Adjusts the viewfinder to suit your eyesight Changes set values. (Customizable) Select to work as AF button or to lock the exposure value Press to see pictures on LCD screen Four-way controller as up button or to change ISO Four-way controller as right button or to change shooting mode Press to save setting from menu / Selects metering point. Illuminates or blinks when SD card is accessed. Press to activate Menu modes on the LCD monitor. Four-way controller down as button or change White Balance Press to view info of current photo on the LCD. Four-way controller as left button or to access Flash settings Page 24 Chapter 1 - Know your K-50/500 26 27 28 29 25 25 30 32 25. Strap Lugs (2) 26. Built-in flash 27. Main switch 28. Green button 29. EV compensation 30. Mode dial 31. Hot shoe 32. Diopter adjustment 31 Loop for the camera strap Retractable P-TTL with guide number 12 @ 100/m Rotate to turn the camera on or off Resets the values being adjusted Press to adjust EV compensation with the rear e-dial Changes the exposure mode To mount external flash Adjusts the viewfinder to suit your eyesight Page 25 Chapter 1 - Know your K-50/500 34 33 35 36 33. Battery housing 34. 1/4” Tripod Socket 35. Battery 36. AA battery adapter Batteries are housed here. Attachment for tripod. Lithium-ion D-LI109 rechargeable battery Allows the use of easy to find AA batteries Page 26 Chapter 1 - Know your K-50/500 39 38 40 37 37. Focus mode lever 38. Raw/Fx button 39. UP button 40. USB video terminal 41. Cable release terminal 42. Memory card slot/cover Switches between AF single, continuous and manual For activating assignable function Press the UP button to pop the built-in flash up. Connects the camera to a computer Connection for remote control Uses SD, SDHC and SDXC Memory cards 42 41 Page 27 Chapter 1 - Know your K-50/500 Information you see in the viewfinder Page 28 Chapter 1 - Know your K-50/500 Viewfinder available Information in details: 44 43 45 46 47 49 50 51 48 52 53 54 57 55 43. Flash status 44. Manual Focus 45. Shutter speed 46. Aperture Value 47. Focus Indicator 48. EV Bar 49. ISO display 50. Sensitivity 51. AE Lock 52. AF point 53. Multi-exposure 54. Metering method 55. Shake reduction 56. Flash exposure comp 57. EV compensation 58. RAW/Raw+ 58 56 Appears when flash is available and blinks if flash recommended Appears when manually focusing Shutter speed, underlined when adjustable with e-dial Aperture, underlined when adjustable with e-dial Appears when image is in focus Shows EV compensation values Shows the ISO in Manual or Auto Shows the ISO being used / Number of recordable images left Appears during AE Lock Appears when AF Selections is enabled Appears when Multi-exposure enabled. Shows metering method, Multi-segment, Center-weighted or Spot Appears when Shake reduction enabled. Appears when flash compensation used. Appears when EV comp available or used, or when bracketing. Appears when shooting RAW or RAW+ Page 29 Chapter 1 - Know your K-50/500 © Yvon Bourque Page 30 Chapter 1 - Know your K-50/500 K-50/K-500 TECHNICAL SPECIFICATIONS Note: The K-500 lacks the electronic level and viewfinder AF points. TYPE SENSOR LENS FOCUS SYSTEM VIEWFINDER Digital SLR Type: CMOS w primary color filter, integrated Shake/Dust Reduction sensor movement system Size: 23.7 x 15.7mm (APS-C) Color depth: 8 bits/channel JPG, 12 bits/channel RAW Effective pixels (total pixels): 16.3 MP (16.5 MP) Dust Removal: Sensor movement w SP coating on low pass filter Pixel mapping: Yes Type/construction: PENTAX KAF2 bayonet stainless steel mount Usable lenses: PENTAX KAF3, KAF2, KAF, and KA (K mount, 35mm screw mount, 645/67 med format lenses useable w adapter and/or restrictions) SDM function: Yes Power zoom function: n/a Type: SAFOX IXi+ TTL phase-detection 11 point (9 cross) wide autofocus system w light wavelength sensor and diffraction lens Sensitivity range: EV -1 to 18 (ISO 100) Focus modes: AF.A (auto), AF.S (single, w focus lock, focus/shutter priority selectable), AF.C (continuous, w focus/FPS priority selectable), Manual Focus point adjustment: Auto 11 pt, Auto 5 pt, UserSelectable (w Expanded Area AF), Center AF assist: Yes via dedicated LED AF assist lamp Focus peaking: Yes (n/a while video is actively recording) Type: Pentaprism Coverage (field of view): 100% Magnification: 0.92X (w 50mm F1.4 at infinity) Standard focusing screen: Natural-Bright-Matte III (interchangeable) Page 31 Chapter 1 - Know your K-50/500 LCD MONITOR FLASH EXTERNAL FLASH STORAGE MEDIA INTERFACES POWER SUPPLY PHYSICAL SPECS Diopter adjustment: -2.5m to 1.5m Depth of field preview: Optical (diaphragm stopdown), digital Type: 3.0” TFT color LCD w brightness/color adjustment and AR coating Resolution: 921,000 dots Wide angle viewable: Yes Type: Retractable P-TTL popup flash Guide number: 12m (ISO 100) Coverage: 28mm wide angle equivalent Flash modes: On, Redeye, Slow Sync, Slow Sync + Redeye, Trailing Curtain Sync, Wireless Flash exposure compensation: -2 to 1 EV (1/2 steps) Type: Hot shoe (P-TTL), high speed sync and wireless w PENTAX dedicated flash Synchronization speed: 1/180 sec Internal memory: n/a Removable memory: SD, SDHC, SDXC Ports: USB 2.0 hi-speed, AV out, cable switch Video out: NTSC, PAL Microphone: Built-in monaural Power source: Rechargeable Li-Ion battery D-LI109 (included). AA batteries (sold separately) Recordable images: Li-Ion approx. 480 (410 w 50% flash, CIPA), AA lithium approx. 1600 (1000 w 50% flash, CIPA) Playback time: Li-Ion approx. 270 min, AA lithium approx. 620 min Movie recording time: 25 min max time per clip AC adapter available: Yes (sold separately) Body dimensions (W x H x D): 129mm x 96.5mm x 70mm Body weight, without battery or removable memory: 590g Loaded and ready: 650g. Primary construction material(s): Reinforced polycarbonate over stainless steel chassis Page 32 Chapter 1 - Know your K-50/500 LANGUAGE SUPPORT IMAGE STABILIZATION METERING SYSTEM ISO SENSITIVITY WHITE BALANCE SHUTTER CAPTURE MODES Operating temperature: 14-104°F (-10 to 40°C) Ruggedized features: Fully weather sealed throughout body, cold proof English, French, German, Spanish, Portuguese, Italian, Dutch, Danish, Swedish, Finnish, Polish, Czech, Hungarian, Turkish, Greek, Russian Type: Sensor-shift SR w rotational compensation (3 stops max) Type: TTL open aperture 77 segment metering Sensitivity range: EV 0 to 22 (ISO 100, 50mm F1.4) Metering patterns (multi, center, spot): Multi 77, Center, Spot Exposure compensation: +/- 5 EV (1/3 and 1/2 steps) Exposure lock: Yes Exposure bracketing: 3 frames, up to +/- 2 EV in 1/3 or 1/2 steps Auto: 100-51200 (1/1, 1/2, 1/3 steps), Manual: 10051200 (1/1, 1/2, 1/3 steps). Type: Image sensor detection w light wavelength sensor assist Auto preset modes: Auto, Daylight, Shade, Cloudy, Fluorescent (D, N, W, L), Tungsten, Flash, CTE Manual mode(s): 3 manual and 3 Kelvin temperature presets, copy WB settings from a captured image available WB fine adjustment: +/- 7 steps A-B axis or G-M axis Type: Electronically controlled, vertical-run, focal plane shutter Shutter speed: 1/6000 to 30 sec (1/3 or 1/2 steps), Bulb Mode selection: Hyper Program (P), Sensitivity Priority (Sv), Shutter Priority (Tv), Aperture Priority (Av), Shutter & Aperture Priority (TAv), Hyper Manual (M), Bulb (B), User (U1, U2), Scene (SCN), Auto Picture (AUTO), Movie Auto Picture modes: Standard, Portrait, Landscape, Macro, Moving Object, Night Scene Portrait, Night Scene, Blue Sky, Forest Page 33 Chapter 1 - Know your K-50/500 DRIVE MODES PLAYBACK MODES Scene modes: Portrait, Landscape, Macro, Moving Object, Night Scene Portrait, Sunset, Blue Sky, Forest, Night Scene, Night Scene HDR (JPG), Night Snap, Food, Pet, Kids, Surf & Snow, Backlight Silhouette, Candlelight, Stage Lighting, Museum Custom Image modes: Bright, Natural, Portrait, Landscape, Vibrant, Radiant, Muted, Bleach Bypass, Reversal Film, Monochrome, Cross Processing Green simplified mode available: n/a Face detection available: Yes PASMB: P, A, S, M, B (extended modes Sv, TAv) Date stamp: n/a Digital filters (capture): Extract Color, Toy Camera, Retro, High Contrast, Shading, Invert Color, Color Dynamic range adjustment: Highlight, shadow Digital level: Viewfinder (horizontal), LCD (horizontal, vertical), SR auto-level function File/Folder customization: Folder name (standard, date), file name (standard, customizable), embed copyright Mode selection: Single, Continuous (Hi, Lo), SelfTimer (12s, 2s), Remote (0s, 3s, continuous), Auto Bracketing (3 frames, standard, timer, remote) Continuous FPS - Continuous Hi: Approx 6.0 FPS (30 JPG, 8 RAW) - Continuous Lo: Approx 3.0 FPS (unlimited JPG, 10 RAW) Multi-exposure: 2-9 shots, auto exposure adjustment Interval: 999 shots, 3 sec to 24 hr interval, time delay HDR: Auto, HDR 1, HDR 2, HDR 3, pixel alignment, exposure bracket +/- 1-3 EV (1/1 steps) Cable switch: Yes (available separately) Mode selection: One Shot (no data, basic data, full data, color channel histogram, bright/dark indication, copyright info), Multi Image Display (4, 9, 16, 36, 81 thumbnails), Magnification (up to 16X, scrollable, Page 34 Chapter 2 - How to use your K-50/K-500 Chapter 2 How to use your K-50/K-5000 Page 55 Chapter 2 - How to use your K-50/K-500 Super Wide Angle lenses capture more in tight scenes. This image is de-saturated giving a hint of colors. Page 56 Chapter 2 - How to use your K-50/K-500 How to use your K-50/K-500 You may be a professional photographer, you may be an advanced amateur or perhaps you are just getting into digital photography. This camera has so many features that it is up the user to decide how much of the technology is needed to suit his or her needs. On one hand, it can be a fully auto-everything camera, giving effortless and excellent results every time. On the other hand, it can be a fully manual camera, challenging your photographic skills, but with the benefit of advance electronics double checking your settings, just in case. The reality is; it can be customized to fill anyone’s photographic requirements. Photography has never been this good. In this chapter, we start from the very beginning and work our way to the advanced features of the camera. Just pick and choose which sections suit your skills or preferences. No matter your level of expertise, you are apt to learn something new. You finally received your K-50/K-500 and you are understandably excited, or you are contemplating purchasing a K-50/K-500. Either way, this book can help. We believe that anyone looking for a DSLR in the K-50/K-500‘s price range will see what a great value the K-50/K-500 really is. It is, in my opinion, a semi-pro-camera available at a reasonable price. If you haven’t done so, you should perhaps read the preceding chapter first. In this way you can learn and appreciate some of the camera strongest features. As you read this book, refer to the nomenclature often until you are thoroughly familiar with all parts of your camera. Navigate through menus of the camera with the fourway controller shown here and illustrated in this book as ▲ for up, ▼ for down, ◄ for left and ► for right. The same buttons (Direct keys) are also used to access the ISO settings ▲, the Flash modes ◄, the White Balance settings ▼ and the Drive modes ►. The OK (acknowledgement) button is in the center. Page 57 Chapter 2 - How to use your K-50/K-500 ☻ indicates special notes or comments. ☻ Many of the K-50/K-500 features and functions are available directly from the status screen, without having to navigate through pages of menus. This was introduced with the K-7 and some users of the previous Pentax DSLRs will appreciate this convenient feature. The Guide Display Turn the camera on and rotate the mode dial to Av. The following screen appears for a few seconds. In this example, the Mode being used is Av. A snapshot of the current settings is shown. The front e-dial is not used and the rear e-dial changes the aperture. The RAW/Fx button is set to One Push File Format and to RAW+. The AF/AE-L is set to AF1, allowing Auto Focus by pressing the AF/AE-l button. The green button is not enabled. This initial screen is a cursory view of the current settings. You can quickly decide if this mode will work for your next picture, or change the mode using the Mode Dial. The Status Screen The settings shown in this example are from Av mode. The highlighted settings are interactive. Top left to bottom right, Av is the shooting mode, the custom bright setting is on, AF.A is on and metering is set to multi-segment. The shake reduction is off and the battery is about 75% full. The shutter speed is 1second and the front e-dial is not activated. The rear e-dial changes the aperture. The ISO is at 400. The four-way controller options are shown. The EV bar shows no over or under exposure set. You are shooting JPEG @ 16M and Best Quality (). An SD memory card is inserted and you can see how many pictures your memory card has space available for (419). Page 58 Chapter 2 - How to use your K-50/K-500 The Control Panel It doesn’t stop here. You can get in the heart of the settings by pressing the INFO button. This brings yet another screen, the Control Panel. You can navigate through this screen with the four-way controller and changes the highlighted parameters shown. If you noticed, we did not have to go through any of the menus yet. With the K-50/K-500, the menus are mostly used to change overall settings. That is a big improvement over previous Pentax DSLRs. It’s almost like having dedicated buttons for all settings. When taking pictures, the scene conditions can change rapidly. You may need to modify some setting quickly to adjust to the scene condition. This faster method of activation can make the difference between getting and missing a great photo opportunity. The items that “cannot be changed” in this camera settings are not highlighted and therefore cannot be selected. Battery The camera uses a Pentax rechargeable lithium-ion battery D-LI109, or four AA batteries (With the optional battery holder D-BH109). Other manufacturers may offer comparable batteries at a cheaper price. Make sure it is compatible with the camera and the charger before using an off-brand battery. In this writer’s opinion, it is always safer to use OEM equipment. You should recharge the battery before you use it for the first time. Connect the AC plug cord to the battery charger, and then plug the AC cord to a power outlet. Slip the battery in the charger face down. The battery will lock in place. The Pentax Charger shows a green LED while the battery is charging. The LED goes off only when the battery is fully charged. Page 59 Chapter 2 - How to use your K-50/K-500 Battery Installation / Removal The battery compartment is located under the camera body. Insert a fully recharged battery by pushing the battery compartment cover unlock lever. Once the cover is opened, a diagram on how to position the battery is affixed on the underside of the cover. The metal connectors should be inserted downward and toward the center of the camera. Push the battery in until you hear a click. Close the cover. To remove the battery, after the cover is opened, push on the white retainer inside the battery compartment. The battery will be partly ejected. Remove completely and recharge or install another fully charged battery. Installing / Removing the Memory card. The K-50/K-500 uses SD, SDHC or SDXC memory cards. To install the memory card, pull the card cover toward the back of the camera. The SD card cover will pop open. Insert the SD card with the card label toward the LCD monitor. Close the cover and you are ready to go. To remove, use the same procedures but push on the SD card to eject. ☻ I suggest using SDHC cards with the maximum read/write speed as you can afford. The SDHC cards are rated in several classes, currently from class 2 to class 10. Class 2 has a slow read/write performance and consequently class 10 has a faster read/write performance. By the time you read this book, SDHC cards will probably be even faster. Use the fastest card you can afford. As far as capacity, I don’t like to use more than an 8gig card for still pictures, as if it becomes defective and my pictures haven’t been saved to my computer yet, I risk losing a lot of pictures. For Video, I use the biggest card I have, currently a 32gig SDHC card. Page 60 Chapter 2 - How to use your K-50/K-500 Installing / Removing Lenses The K-50/K-500 uses Pentax KAF or K mount lenses. All camera exposure settings and Autofocus modes are available when using DA, DA*, D FA, and FA J lenses. In general, when using 35mm format K mount manual “A” lenses, most functions are still available in manual mode except for the autofocus. When using 35mm format K mount or K mount manual “M” lenses, most functions are available in manual mode except for the autofocus and for the auto-aperture. You will have to stop down the lens to your desired aperture before taking the picture. The M42 lenses, also known as screw-mount lenses, will work with some restrictions and will need an M42-to-K mount adapter. Medium format lenses for 645 and 67 will work, with some limitations, using an adapter as well. You can use any of the millions of lenses ever manufactured by Pentax to some degree. You can see the lens compatibility in the Appendix section of this book. To install a lens, align the red dots on the camera and on the lens. Push in and turn the lens clockwise until it clicks in position. To remove the lens, first push and hold the lens unlock button and turn the lens counterclockwise. Page 61 Chapter 2 - How to use your K-50/K-500 Turning the Camera on The main On/Off switch is located on the top right side of the camera when holding it in shooting position. You can try to sweet talk to it or stroke its top gently, but I doubt it will turn your camera on! It’s better just to turn the switch to the ON position. ☻ Don’t be too concerned if you forget to turn the camera off. It will turn itself off after 1 minute (default setting) or the shut-off time you program in the Set-up menu. It can be set between1 and 30 minutes. However, it will not turn off automatically in Live View, Slide show playback or when the camera is connected to a computer via a USB cable. Focusing You can focus manually or let the camera focus automatically. The focus mode lever is used to set the focus mode. The choices are AF-S (Autofocus single), AF-C (Autofocus continuous), and MF (Manual Focus). If the installed lens is a manual focus lens, the setting is naturally MF. If the lens installed is an Autofocus lens, you can set the AF to single or continuous. In AF-S, while pressing the shutter release halfway, focus on your subject. Once in focus, it is locked in that position as long as you keep the shutter release pressed halfway. In AF-C, while pressing the shutter release halfway, focus on your subject. As the subject moves, the focus changes accordingly. With the K-50/K-500, the Auto-Focus can be programmed to have Focus-priority or Release priority. In Focus priority, the shutter cannot be released until the subject is in focus. In Release priority, the shutter can be released even if the subject in not in focus. ☻ Focus priority is great if you are following a moving subject. Release priority is more practical when focusing on a stationary subject with all kind of movements around the subject. Page 62 Chapter 2 - How to use your K-50/K-500 Adjusting the Viewfinder Diopter Since we do not all have 20/20 vision, the K-50/K-500 has a built-in Diopter adjustment. It is easier to adjust the Diopter by removing the eye cup located over the viewfinder but it is not absolutely necessary. The Diopter Adjustment slider is located just above the viewfinder. Turn the camera on and use the Autofocus button or press the shutter release button halfway while the camera is in AF-S mode. Once the subject in the camera viewfinder is in focus, slide the adjustment slider to the left or right until your viewing eye sees a perfectly focused subject. ☻ From this point on, unless someone else uses your camera, the viewfinder will be adjusted for your unique eyesight. Language You are reading this manual written in English and you’re in luck as the default language is English, at least for the cameras sold through authorized U.S. dealers. The first time you turn the camera switch on; it will go directly to the language screen. The language setting menu is also available by pressing the menu button and by pushing the four-way controller horizontally ► until the Set-up menu appears. At that point, press the four-way controller downward ▼ until the Language option highlights. Again, using the four-way controller, push horizontally to the right ► and then vertically or downward ▲ ▼ until the language of your choice highlights. By pressing Page 63 Chapter 2 - How to use your K-50/K-500 the OK button the language will be set. It looks like sixteen languages are available. That’s plenty for me. I can handle English and French. Date and Time The Date and Time setting is available in the Set-up menu by pressing the menu button and by pushing the four-way controller horizontally ► until the Set-up menu appears. At that point, press the four-way controller downward ▼ until the Date Adjustment option is highlighted. Again, using the four-way controller, push to the right ►. Navigate up and down ▲ ▼, left ◄ and right ► until you set the year, month, day and time to your time zone (Choose a City that is in the same time zone as yours). By pressing the OK button, the Date and Time will be set. The World Time menu is located in the Set-up menu as well, just below the Date Adjust. Use the same method to set the world time to your time zone and city. This is great when traveling to other countries. The K-50/K-500 also allows setting the text size to standard or large. It’s great for tired eyes Page 64 Chapter 2 - How to use your K-50/K-500 Taking Pictures You can start taking pictures right now in the AUTO mode, with all of the camera defaults. However, sooner or later, you will want to change some of the default settings and personalize the camera to your shooting style and preferences. Still, there are some choices we should make, or at least be aware of, before we start shooting. Picture Quality We should learn to set the kind of file we want to save our picture as. Do we want RAW files or JPEG files? For now, let’s set the format to JPEG with the best resolution of 16M effective megapixels (4928 pixels x 3264 pixels). Press the menu button. Navigate to the Rec. Mode menu, page 1, press the four-way controller down ▼ to Image Capture Settings. Press the fourway controller to the right ► and choose JPEG. Press OK. Press the four-way controller down ▼ to JPEG Recorded Pixels. Press the four-way controller to the right ► and choose ▲ ▼ 16M out of the 16M, 12M, 8M, or 5M choices. Press the OK button and using the four-way controller once more, go down ▼ to the JPEG Quality ► and set it ▲ ▼to Best – . Press the OK button. Return to shooting by pressing the shutter release button halfway. ☻ The Picture quality and file type can also be set in the Control Panel. Get comfortable with the Control Panel and use it often without having to go through the menus. Page 65 Chapter 2 - How to use your K-50/K-500 Shake Reduction The shake reduction (SR) on the K-50/K-500 resides within the camera. You don’t need expensive lenses equipped with stabilization or vibration reduction built-in and extraordinary expensive. Any K-mount compatible lens will work, even manual lenses. You can take handheld pictures at very low shutter speed, depending on the focal length of the lens used, the lighting conditions, and of course how steady you hold the camera.. It is easier to set the shake reduction in the Control Panel by navigating with the four-way controller. I leave the SR on most of the time, except when panning or when using a tripod. The SR setting (on or off) can also be set in the Rec. menu. The SR system on the K-50/K-500 not only compensate for horizontal and vertical shake, it also compensate for rotation. ☻ Here are some additional tips on handholding your K-50/K-500. Hold your K-50/K-500 in a firm but relaxed grip, with your right hand on the camera and the left cradling the lens. This works for all focal lenses. Tuck your arms toward your boy. Leave your index finger ready to half press or trigger the shutter release. Plant your feet apart for a steady stand. If there is available support such as a wall or a tree nearby, lean against it and anchor yourself firmly. Breathe in a regular rhythm and trigger the shutter mid-breath. I make it a habit to take at least two consecutive shots of the same scene as when you depress the shutter release once, and keep is depressed, there are less risks of shaking the camera with your index finger movement. Finally, remember that it is always better to use a tripod or monopod whenever possible. Page 66 Chapter 2 - How to use your K-50/K-500 White Balance The K-50/K-500 has an excellent white balance system and it defaults to Auto White Balance (AWB). Essentially, when shooting under either candle light, daylight, incandescent lights, or fluorescent lights, the white balance needs to be adjusted so that white objects look white. For example, shooting under candle light, your photo would take a reddish tint. Under fluorescent lighting, the tint would shift toward green. Shooting a snow scene under a bright sun would lean toward blue tint. The white balance is just a way to adjust your camera to the ambient lighting. In the film format camera days, filters were used to achieve similar results. More information about white balance is available in this chapter. For now, let’s leave the white balance on auto. It is surprisingly accurate most of the time. AUTO mode The AUTO mode is the easiest of all modes. In this mode, the camera makes all the important shooting decisions. Set the dial mode to AUTO. The front and rear e-dials are not functioning in this mode. The AUTO mode sets the aperture, the shutter speed, and other parameters automatically, ensuring a well-balanced photograph, according to the following chart. Page 67 Chapter 2 - How to use your K-50/K-500 Standard Portrait Landscape Macro Moving Objects Night Scene Sunset Blue Sky Forest Default, if none of the following apply. For portraits and pictures of people. Renders natural skin tones. For landscapes, while increasing saturation. Used when very close to subject, like flowers, etc. Used when there is fast action such as sporting events. Used for capturing night scenes like people at dusk or at night. Renders vivid sunsets or sunrises. Produced a darker blue, similar to a polarizer filter. Enhances green and produces overall vivid colors. ☻ Aperture, Shutter speed, EV compensation, Auto bracket, AE lock, Multiexposure, and Flash compensation cannot be set in the AUTO Mode. Although many other options and settings are still available, the current settings are fine for almost any photographic situation. In fact, the current settings are similar to a very good point-and-shoot camera, only better. That is to say, that you could leave these settings as they are and just use the K-50/K-500 as a point and shoot camera. Your pictures should always be of high quality with little effort. You are now ready to take pictures in the AUTO mode. Try shooting your first picture(s) outside during daylight. That will work best. Chances are that the lighting will be sufficient and the flash will not be needed. Find your subject and while looking in the viewfinder, press the shutter release button halfway while composing your picture. The camera autofocus comes on, and confirms when in focus, with a beep and a red illuminated box in the viewfinder. The information shown next page is displayed in the viewfinder: Page 68 Chapter 2 - How to use your K-50/K-500 A B C D E F G A. If the lighting is insufficient, the flash indicator blinks. You may need to use the flash by pressing the flash up button. B. The K-50/K-500 sets the shutter speed the automatically. C. The K-50/K-500 sets the Aperture the automatically. D. The Focus indicator is on when you are in focus. You also hear a confirmation beep and the focus point illuminates. E. If the Shake Reduction (SR) is on, it will appear in the viewfinder. F. With the Electronic Level activated, it is shown in the viewfinder. G. Auto ISO is activated and the ISO number is shown in the viewfinder. Page 69 Chapter 2 - How to use your K-50/K-500 You have taken your first picture(s) with the K-50/K-500. How did your first K-50/K-500 picture(s) turned out? You can rest for a while Now, assuming that you did take your first picture(s) in the AUTO mode, did you notice that after each shot, your picture appeared on the LCD monitor for a few seconds? This is the Instant Review. It can be set to 1, 3 or 5 seconds, or turned off. It is one of the greatest advantages of digital cameras. You see your picture immediately, and if you don’t like what you see, you take another shot and another, and another, until you like the picture. You can delete the images you don’t like immediately. Page 70 Chapter 2 - How to use your K-50/K-500 The memory card, unlike film, is reusable and once you have one memory card or many memory cards, you no longer need to spend money for the film or recording media each time you shoot. In the film era, the recording media was too expensive to take numerous pictures of the same subject with the hope that one would turn out good. You couldn’t see the results until after the development of the film or slide. In addition, the quality of developing and printing was often left to a photo lab or most often, to the corner drug store that had a film development machine. The equipment was operated by employees that knew very little about photography and relied on the accuracy of the development and printing machine. Often, the chemicals weren’t changed as recommended, the machine was not cleaned, and consequently, the colors were inaccurate. The environment was not that of a modern clean room and dust on negatives would also show up on the photographic paper. Today, if you own a good photo printer and a computer with digital imaging software, you have so much more control over the final results. Page 71 Chapter 2 - How to use your K-50/K-500 The Menus Record | Movie | Playback | Set-up | Custom Top Left: Record menu Above: Movie menu Top Right: Playback menu Left: Set-up menu Right: Custom Settings menu Before continuing with the different shooting modes embedded in the K-50/K-500 let’s spend some time reviewing and understanding what the camera options are. The camera can be customized to your own preferences or shooting style. You can apply 23 custom settings to your camera via the Custom Settings menu (21 with the K-500). In addition, there are other screen accessible menus. They are the Record menu, the Movie menu, the Playback menu, and the Set-up menu. That is not counting the dozens of settings accessible directly from buttons, switches and dials, all located on the camera body and easy to reach instantly. Some options are also available through the Status Screen and the Control Panel screen. Page 72 Chapter 2 - How to use your K-50/K-500 As you get acquainted with all the menus and the camera mounted controls, you will become a better photographer. The K-50/K-500 is a great example of what modern technology can achieve. ☻ There’s never been a better time to be passionate about photography. There’s never been a better time to become a Pentaxian. Setting Playback Display The image displays can be set with many parameters. Press the Menu button. Using the four-way controller, navigate ► to the Playback menu. Navigate down ▼ to the options menu. The options are Bright/Dark area, Quick Zoom and Auto Image Rotation. The Bright/Dark area option shows the overexposed or underexposed area of the image. The underexposed (too dark and losing shadow details) area blinks in yellow and the overexposed (too bright and loosing details) area blinks in red. The options are on or off and set by using the four-way controller ◄ ► until the box is check marked. The Quick Zoom option can be set to off or x2, x4, x8, x16, x32. This sets the initial magnification when enlarging images. When the Playback button is pressed, the last image taken appears on the LCD monitor. Turn the rear e-dial to the right to start magnifying the image. As an example, with the Quick Zoon set to x8, the image magnification would jump to x8 as soon as the rear e-dial is rotated. The Slideshow, as it is written, starts a slide show on the LCD monitor. Delete all images will delete all images on the SD memory card. Be careful with that one. Page 73 Chapter 2 - How to use your K-50/K-500 Another way to check the Histogram, the Bright/Dark area or the complete information about the picture taken is to activate the Playback button [►], and then push the Info button in sequence. 1. Standard Information Display 2. Detailed Information Display 3. Histogram Display 4. RGB Histogram Display 5. No Information Display By pressing the Info button, the playback shows different information about your image. It toggles between the five different display screens. Page 74 Chapter 2 - How to use your K-50/K-500 Histograms Histograms are a digital way to see if an image is properly exposed, shown as a graph. The gadgetoriented and technical photographers will not keep an image if the exposure histogram is not perfect. An image with a less than perfect histogram may still be a prize winning picture because of its composition or subject. With that said; use the histogram as a tool to learn how to take properly exposed pictures. The composition, in our opinion, is much more important. Essentially, the exposure histogram shows the overexposed and underexposed area of your image. The histogram horizontal scale measures the brightness, from totally black (0) on the left to totally white (255) on the right. The vertical scale measures the amount of pixels of any given shade. There is no perfect histogram as images in nature are not perfectly lighted. There are shadows and bright areas. What is important is that if the black areas of the picture create a spike on the left side, part of the image is underexposed. If a spike occurs on the right side, part of the image is overexposed. The human brain is better equipped to distinguish a good image from a bad image, many times better than a digital histogram. The K-50/K-500 also shows RGB (red, green and blue) histograms. This is a way to show the distribution of color intensity. Again, humans can decipher colors much better than any digital device invented thus far. So the bottom line is that it is good to use histograms to check your image quality, but we would recommend using exposure bracketing instead as the extra shots won’t cost you anything but time and space on your memory card. You can instantly delete the pictures you don’t like. Page 75 Chapter 3 – Processing your K-50/K-500 images Chapter 3 Processing your Images Page 138 Chapter 6 – HD Video Recording Chapter 6 HD Video Recording Page 231 Appendix Appendix Page 258 Appendix Follow the Photography Road Page 259 Appendix Lens Compatibility Chart LENS MOUNT FUNCTION Autofocus Manual Focus Eleven Auto Focus Points Power Zoom Aperture Priority Auto Exposure Shutter Priority Auto Exposure Manual Exposure P-TTL Auto Flash * 16 Multi-Segment Metering Auto Focal Length with SR All - LENSES DA / D FA / FA FA J / FA Available Available Available KAF2 Lenses Available Available Available Available Available Available F - LENSES A - LENSES Available Available Available Not Available Available Available Available Available Available Available Not Available Available Center Only Not Available Available Available Available Available Available Not Available * With Built-in flash, AF360FGZ, AF540FGZ, and AF200FG flash units. The chart above can be a little confusing and does not reflect Pentax’s 100% backward compatibility claim with all their lenses produced in the last fifty years. I am referring to the twenty four million lenses sold worldwide. The fact is that all lenses can indeed be used, with the use of adapters, and a little creative use of the Pentax K-50/K-500. 1. The K-Mount Manual lenses can be used. See Chapter 4. 2. The M42 Screw-mount lenses can be used. See Chapter 4. 3. The Medium Format lenses (645 & 6x7) can be used. See Chapter 4. Page 260 Appendix Pentax lens mount facts: Pentax’s first lens mount was a screw-mount type attachment. It is now known as M42 screw-mount and was used by Pentax and many other manufacturers. The Pentax-K mount is a lens attachment standard for interchangeability of lenses on 35mm SLR cameras. It was created by Pentax in 1975-1976, and has been used on all their 35mm SLRs and now the DSLRs. A number of other manufacturers have also produced many K-mount lenses and K-mount cameras. The following represents the K-mount evolution. Original K-mount (1975) The original K mount was a simple bayonet connection with three tabs. It was introduced with the K series of cameras. The lens is locked into the camera with an approx. 70° clockwise turn. KF mount (1981) The KF mount was Pentax's first effort at an autofocus system. This autofocus system used sensors in the camera body and a motor in the lens. KA mount (1983) The KA mount allows the lens' aperture to be set by the body and allows shutter priority and program Auto Exposure Modes. These lenses have an “A” position. Page 261 Appendix KAF mount (1987) The KAF mount was Pentax's second effort at an autofocus system. It adds a small drive shaft to the KA mount, allowing adjustment to the focus by the camera body. KAF2 mount (1991) The KAF2 mount adds two extra contacts for power zooming. On the K20D, these contacts also power Supersonic Direct Drive lenses and convey Modular Transfer Function data, (MTF) through a seventh contact. KA2 mount (1997) The KA2 is identical to KAF, without the autofocus drive shaft. However, it adds a seventh contact for digital information to the KA mount. "Crippled" KAF mount (1997) The "crippled" KAF mount removed the mechanical stop-down coupler. The consequence is that most of the new camera bodies can only use lenses which have an "A" position on the aperture ring for full compatibility. The camera body cannot tell what aperture the lens is set to, hence "crippled" mount. "Crippled" KAF2 mount (Current) The "crippled" KAF2 mount is currently found on the K-30 It supports the extra features of the KAF2 mount including two power contacts for the lens. Power zoom is preserved and allows for new power Supersonic Direct Drive lenses. It lacks a mechanical stop-down coupler and can only use stop-down metering on pre-“A” lenses. Page 262 Appendix I just love my K-50/K-500. - © – Yvon Bourque Page 263 Appendix telephoto lens covers shallower angle of view Glossary A dobeRGB 1998 Color Space designed by Adobe® Systems, to cover most of the colors attainable on CMYK printers. AdobeRGB working space covers about 50% of the visible colors defined by CIE, (International Commission on Illumination) improving upon sRGB's gamut. Adobe® Photoshop Professional digital imaging software, most popular amongst photographers. A simplified version called Elements is also available. AE Automatic Exposure AE Metering The measurement of brightness to determine exposure. The K-50/K-500 has Multi-segment, Center-weighted, and Spot metering AF Autofocus AE-L Automatic Exposure Lock. Metering feature to hold the exposure setting. Angle of View The area of a scene that a lens covers, measured in degrees. Angle of view is determined by the focal length of the lens. A wideangle lens includes more of the scene or greater angle of view. In contrast, a Anti-aliasing A procedure that reduces jagged edges in a digital image. Aperture Opening formed by the diaphragm inside a lens, which light passes through, allowing a preset amount of light to reach the CCD. Aperture size is calibrated in f- numbers. The larger the f-number, the smaller the lens opening. Smaller aperture renders greater area of sharpness and larger aperture reduces the area of sharpness. Aperture Priority Mode (Av) An exposure mode on an automatic camera that lets you set the aperture while the camera automatically sets the shutter speed for proper exposure. Other than sport or action photography, aperture priority is the most common automatic preference. Aperture ring A ring located on the outside of a lens which is mechanically linked to the diaphragm to control the aperture. APO Meaning Apo chromatic; having the ability to bring all colors of the visible spectrum to a common plane of focus. Page 264 Appendix Aspect Ratio The ratio of width to height. Barrel Distortion Straight lines that are bowed in at the edges of the picture frame resembling the sides of a barrel. It is mostly present in wideangle lenses. Auto Bracket Auto exposure bracket that performs automatic exposure bracketing with varied shutter speeds or apertures. Balance See White balance Autofocus (AF) Setting by which the camera automatically focuses on a selected part of the picture. It can be any of the 11 Autofocus sensors. Automatic camera A camera with a built-in exposure system that automatically adjusts the aperture, shutter speed, or both. Automatic exposure A system that measures lighting conditions and adjust settings automatically for proper exposure. Bounce Lighting Flash or tungsten light bounced off a reflector (such as the ceiling or walls) or attachment that fits on the flash to give the effect of natural or available light. Artificial light A light source nonexistent in nature such as man-made incandescent or fluorescent lights. Av The Aperture value usually referring to aperture settings. B (Bulb) Setting A shutter-speed setting that allows for time exposures. The shutter stays open as long as the shutter release button remains depressed. Backlighting Light, behind the subject, projecting toward the camera lens. Balanced Fill-Flash A type of TTL auto flash operation which uses the camera's exposure meter to control ambient light exposure settings, integrated with flash exposure control. That is, flash output level is automatically compensated to balance with ambient light, resulting in a better exposure for both subject and background. Bracketing Taking a series of photographs of the same subject at different exposures or settings to insure the correct exposure. Useful when shooting in situations where a normal metering reading is difficult to obtain. Bulb A mode that lets you take long exposure such as night photography. C Page 265 amera shake Movement of camera caused by unsteady hold or Appendix support, vibrations. The K-50/K-500 has shake reduction feature. expressed in Kelvin (K). Daylight has a color temperature of about 5500K. CCD (Charge-Coupled Device) Electronic sensor used by many digital cameras, capable of detecting subject contrast. Some cameras use a CMOS. Composition The pleasing arrangement of the elements within a scene. Chromatic aberration The inability of a lens to bring all wavelengths of light into the same plane of focus. Can be corrected through the use of low dispersion (ED, LD SD) glass. Close-Up Lens A lens attachment placed in front of a camera lens to permit taking pictures at a closer distance. CMOS (Complementary Metal–Oxide– Semiconductor) Electronic sensor used by the K-50/K-500, capable of detecting subject contrast. Some cameras use a CCD. Coated Lens A lens covered with a very thin layer of transparent material that reduces the amount of light reflected by the surface of the lens. Contrast The range of difference in the light to dark areas of an image. CPU (Central Processing Unit) The electronic component that controls an electronic product's functions. Essentially, all automatic cameras have at least a CPU to control various functions of the cameras. Some top models have three to five CPU to handle individual task functions. Cropping Printing or saving only part of an image, usually for a more pleasing composition. D edicated Flash A fully automatic flash that works only with specific cameras. Color Balance How a media reproduces the colors of a scene. Also see White balance Depth of Field The zone of acceptable sharpness in front of and behind the subject on which the lens is focused. The wider the aperture, or the longer the focal length or the closer the focused distance, the less the depth of field. Color temperature Description of the color of a light-source. It is usually Diaphragm An adjustable device inside the lens which is similar to the iris Page 266 Appendix in the human eye. Continuously adjustable from wide open to stopped down. It controls the amount of light allowed to pass through the lens. Existing Light Existing light covers all natural lighting from moonlight to sunshine. Photographically, existing light is the light that is already on the scene including room lights, fluorescent lamps, spotlights, neon signs, candles, etc. Digital Single-Lens-Reflex (DSLR) Camera A type of digital camera that allows seeing through the camera's lens when composing a picture. Double Exposure Two pictures taken on one frame. E D Extra Low dispersion glass. Glass with ED properties are specially formulated to limit or correct light rays passing through the lens elements to achieve all spectrum of colors to falls on the same plane of focus Electronic flash Light source based on electrical discharge across two electrodes in a gas-filled tube. Modern flash have multiple TTL (Through The Lens) flash exposure control functions and even extend to autofocus control. Pentax uses the P-TTL flash which Pre-fires before taking the picture using reading Through The Lens. The Pentax 16-segment metering allows more precise control. Only the built-in flash and specially designed flash units can be used in T-TTL mode. Ev Exposure value. Method of quantifying scene brightness. Exposure The quantity of light allowed on a photographic medial such as film or a camera CCD. It amount of light is determined by a combination of aperture and shutter speed. Exposure bracket Shooting the same subject at a range of different exposures. Exposure compensation Exposure compensation for available light is activated by changing the shutter speed and/or lens aperture. In flash photography with a dedicated TTL flash unit, exposure compensation can also be performed by varying the amount of flash output. Exposure Meter An instrument with a light-sensitive cell that measures the light reflected from or falling on a subject. Extension tubes Metal tubes used to obtain the additional separation between lens and camera for close-up photography. various lens mounts. Page 267 Appendix F -number The numbers on the lens aperture ring or the camera's LCD that indicate the relative size of the lens aperture opening. The f-number series is a geometric progression based on changes in the size of the lens aperture, as it is opened and closed. As the scale rises, each number is multiplied by a factor of 1.4. The standard numbers for Calibration are f/1.0, f/1.4, f/2, f/2.8, f/4, f/5.6, f/8, f/11, f/16, f/22, f/32, etc. Each change results in a doubling or halving of the amount of light transmitted by the lens to the film or CCD plane. f-stop The increase or decrease of f/number size in available stops. Fill-flash A method of flash photography that combines flash illumination and ambient light, in order to obtain balanced exposure. Filter Colored glass or other transparent material used over the lens to emphasize, eliminate, or change the color or density of the entire scene or certain areas within a scene. Finder Also known as viewfinder. A viewing device on a camera to show the subject area that will be recorded. Fisheye lens Ultra-wide angle lens giving 180 de- grees of view. Flash Exposure Bracketing Enables a photographer to automatically bracket exposures at varied flash output levels. Flash shooting distance range The distance range over which a flash can effectively provide light. The flash shooting distance range varies with the aperture, film speed and the flash guide number. Focal Length The distance between the film and the optical center of the lens when the lens is focused on infinity. The focal length of the lens on most adjustable cameras is marked in millimeters on the lens mount. Focus Adjustment of the distance setting on a lens to define the subject sharply. Focus-Priority Shutter cannot be released until the subject is in focus. Focus Tracking Enables the camera to analyze the speed of the moving subject according to the focus data detected, and to obtain correct focus by anticipating the subject's position. Format The actual size of the image produced by a camera. In 35mm photography, the picture measures 24mm Page 268 Appendix x 36mm and is referred to full frame in digital photography. While the new APS (Advance Photo System) uses smaller CCD area in the range of 24mm x16mm. Since most DSLR can use 35mm film format lenses, the focal length has to be multiplied by a factor of approximately 1.5. A 50mm lens in the 25mm film format becomes a 75mm lens in the Pentax DSLRs, while conserving the maximum aperture. tone of average subject. The standard gray card reflects 18 per cent of the light falling on it. Foreground The area between the camera and the principal subject. Hyper focal Distance Distance of the nearest object in a scene that is acceptably sharp when the lens is focused on infinity. Front-Curtain Sync The flash fires an instant after the front curtain of a focal plane shutter has completed its travel across the film plane. I ncident light Light falling on a surface as opposed to the light reflected by it. Frame One individual picture on a roll of film or one digital capture on DSLRs. Full aperture metering TTL metering systems in which the camera simulates the effect of stopping down the lens while leaving the diaphragm at full aperture to give full focusing screen brilliance. G Infinity Infinite distance. In practice, a distance so great that any object at that distance will be reproduced sharply if the lens is set at its infinity position. Interchangeable lens Lens designed to be readily attached to and detached from a camera. N Guide number. Used to express the power output of a flash unit. It indicates the power of a flash in relation to the ISO sensibility. Grey card (18% Grey Card) Tone used as representative of mid- H ot Shoe Usually rest around the pentaprism of the camera It has electrical contacts which mate with contacts in the mounting foot of the flash unit. This allows the camera to fire the flash at the proper time without any other electrical connections between flash and camera. Iris diaphragm. Device consisting of thin overlapping metal leaves pivoting outwards to form a circular opening of variable size to control light transmission through a lens. Page 269 Appendix ISO Speed The international standard for representing sensitivity. The higher the number, the greater the sensitivity. IF Internal Focusing System K Micro lens A lens for close-up photography. Macro photography The process of taking photographs of small objects with regular photographic lenses at reproduction ratios of 1X or greater. - 50/K-500 Revolutionary Digital camera introduced by Pentax Kelvin A scale use to measure the color temperature. L CD Liquid Crystal Display. An electronically generated text, numeric, symbols and images. Lens One or more optical glass or similar material designed to collect and focus rays of light to form a sharp image film or CCD. Lens Shade A collar or hood at the front of a lens that keeps unwanted light from striking the lens and causing image flare. Lens Speed The largest lens opening at which a lens can be set. A fast lens transmits more light and has a larger maximum aperture than a slow lens. Long-focus Lens of relatively long focal length designed to provide a narrower angle of view. M Matrix Metering system An exposure metering system using a multisegment sensor pattern. Maximum aperture The widest aperture which the diaphragm is capable of opening up to. Multi-coating The depositing of multiple coats of anti-reflective materials on a lens surface. Reduce ghost images and flare produced by internal reflections and insure faithful color rendition. N D Neutral Density. Usually applies on filters that can effectively reduce the amount of light passing through the lens. It is often used for proper exposure in extremely bright scenes or where slow shutter speed is used. NTSC National Television Standards Committee. Standards for video broadcasting and recording in the US and Japan. PAL's the standard in Great Britain. acro Lens A lens that provides continuous focusing from infinity to extreme close-ups. Page 270 Appendix R verexposure A condition in which too much light reaches the CCD, producing a very bright image. O GB The red, green and blue. Black is simulated color. CMYK is the four primary colors. P aturation An attribute of perceived color, or the percentage of hue in a color. anning Moving the camera so that the image of a moving object remains in the same relative position in the viewfinder as you take a picture. The eventual effect creates a strong sense of movement. Panorama A broad view, usually scenic. PC Personal Computer. Pincushion Distortion The opposite of barrel distortion. Straight lines are bowed in toward the middle to resemble the sides of a pincushion Polarizing Filter A filter that transmits light traveling in one plane while absorbing light traveling in other planes. When placed on a camera lens it can eliminate reflections from a subject such as water. It also darkens blue skies. Print A positive picture usually on paper. Program Exposure An exposure mode on an automatic or autofocus camera that automatically sets both the aperture and the shutter speed for proper exposure. S Scale Focusing method consisting of set of marks to indicate distances at which a lens is focused. Screen In a camera, the surface upon which the lens projects an image for view finding and focusing purposes. In most DSLR cameras a fresnel screen is used. Selective Focus Choosing a lens opening that produces a shallow depth of field. It is used to isolate a subject by causing most other elements in the scene to be blurred. Self-timer Mechanism delaying the opening of the shutter for some seconds after the release has been operated. Sensitivity :Sensitivity to light and measures in ISO. Sharpness A term used to describe the ability of a lens to render fine details clearly. Shutter Blades, a curtain, or other movable cover in a camera that con- Page 271 Appendix trols the time during which light reaches the film or CCD. Shutter Priority An exposure mode on an automatic or autofocus camera that lets you select the desired shutter speed. The camera sets the aperture for proper exposure. Single-Lens-Reflex (SLR) Camera A type of camera that allows seeing through the camera's lens when composing a picture. Slow Sync A flash technique for using the flash at a slow shutter speed. Using a slower shutter speed with the flash brings out the background details in the picture. Use of a slow shutter speed with Rear-Curtain Sync is particularly effective for illustrating the movement of a stream of light. Soft Focus Produced by use of a special lens or filter that creates soft outlines. Stopping Down Changing the lens aperture to a smaller opening. T elephoto Lens that makes a subject appear larger on film than does a normal lens at the same camera-to-subject distance. A telephoto lens has a longer focal length and narrower field of view. TTL auto flash The camera's light sensor measures flash illumination, as reflected by the subject and shuts off the flash where measurement indicates a correct exposure. Time Exposure A long exposure made in seconds or minutes. Tone The degree of lightness or darkness in any given area of an image Tripod A three-legged supporting stand used to hold the camera steady. The K-50/K-500 uses shake reduction, minimizing the need for a tripod. U ltra wide-angle lens Extra-wide angle lens, usually with an angle of view greater than 90°. Underexposure A condition in which too little light reaches the film or CCD, producing a dark image. UV Ultra violet ray. Beyond the visible spectrum. It is invisible electromagnetic radiation of the sunlight. W hite balance While shooting, adjustment of color temperature to match the light source so the subject appears to have correct color. Page 272 Appendix Follow your bliss! Page 273