1
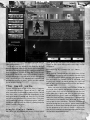
Very large-scale operations bring an added level of
complexity to the overall command. It is one thing to issue
orders to a collection of divisions all occupying the same
general location, but another thing entirely to manage multiple army groups, whole armies, or even multiple armies
assembled along a front. In such instances, you will likely
need to establish special headquarters divisions: a unit unsuited for direct combat, but one that improves the overall
supply efficiency of large numbers of forces and gives them
a greater likelihood of achieving positive results. When you
are considering massive offensives or the defence of an
entire front, this special division can have a dramatic effect
on the overall success of your operations.
In a larger sense, however, you will always be in ultimate
control of your military and it will be up to you to plan your
attacks and arrange for suitable defence of your territories.
HoI2 includes some handy features that make it as easy
as possible to coordinate your forces and use them to
maximum effect, and to assign long-term missions that
your officers will then proceed to carry out unless you
instruct them to do otherwise. Leadership and experience
simply help to determine how effective they will be in fulfilling your orders.
tification bonuses, resulting in an almost insurmountable
defence if a force remains stationary for long enough in a
province that has been heavily fortified. A good example
of this would be the French Maginot line at the onset of the
war (an obstacle that the German high command wisely
chose not to attempt with a frontal assault). The only methods of dealing with forces that man such a defence are to
bombard them over a long period of time, cut off their supply and hope to starve them into submission, or to take your
chances (which aren’t good) with a series of massive successive assaults on their position. Paratroopers: if they are
available to you: will by-pass defensive fortifications and
may be an effective component in an assault, although they
incur other penalties and are usually fairly lightly armed.
Needless to say, your best bet is to use a combination of
all of these strategies whenever possible.
Coastal fortifications are a similar series of trenches, gun
emplacements and other devices constructed along the
shoreline of a province and must also be manned by your
troops if they are to have any effect. They will present a
major obstacle to enemy troops attempting to land in the
area. Even an elite marine unit will find it hard to break
through to establish a beachhead.
Anti-aircraft guns offer a third possible means of defence.
Defences and Fortifications
Unlike land and coastal fortifications, anti-aircraft guns do
While armed forces are required to protect your territories
not need to be manned by your forces in order to operate
from the enemy’s advances, there are up to three different
(their construction includes a manpower component). Their
defence installations that you may be able to construct to
function is to provide added defence against air missions
help improve your chances of defeating an assault. You can
flown against targets in the province and to disrupt any
also build radar sites: if you have the required technology:
enemy aircraft that pass overhead. They will not in any way
to improve the effectiveness of your aerial defences.
help to defend you against the assault of a ground force
The construction of defences requires a commitment of
or naval invasion. Enemy aerial attacks against factories,
IC until their production is complete. They can be damaged
infrastructure, bases, other fortifications, or any forces
by enemy attacks: requiring further allocation of resources
stationed in that province will be subjected to withering
to repair them: and they can be captured and used against
return fire from your anti-aircraft batteries. This will not
you if they fall into enemy hands. Each of these installations
only hamper the inbound flight’s organization: thus reduccan be added to by further IC investment, increasing their
ing the impact and extent of the damage from the attack:
size, quality and effectiveness. This is a worthwhile investbut it will also most likely inflict a number of casualties as
ment and can become the difference between successfully
well. Enemy squadrons whose missions cause them to fly
warding off an enemy’s assault rather than succumbing
overhead will also be subjected to fire, although the effect
to his advance.
will be somewhat less.
Land fortifications are a network of bunkers, gun emIf you have researched the necessary technologies,
placements and minefields that you can construct in a
you will also be able to build radar sites in your territories.
province to help your army repel enemy land forces. They
These stations will greatly improve any aerial defence that
are particularly effective in protecting your infantry from
you mount in that province against enemy bombers and
tanks, mechanized units and artillery forces where they
fighters, and may also allow you to detect approaching
might otherwise be overrun or destroyed. They also offer
enemy naval vessels and aircraft in an adjacent sea zone.
some shelter from aerial bombardment although they are
Radar sites do not need to be manned by your troops to
not designed to actively counter such attacks. A land fortibe operational.
fication offers no resistance by itself and must be manned
to have any effect.
Naval and Air Basing
Entrenchment bonuses are combined with the land for- Military vessels and aircraft usually have special require-
9
ments that necessitate the construction of dedicated port instrument. All three conditions are taken into considerafacilities and air fields to fully meet their needs. Hearts of tion in Hearts of Iron II.
Iron II simulates this using a system called basing.
Weather is synthesized by the game according to a comEach squadron must be assigned to an air base that is plex random model and will play a prominent role in your
located in a province that you control or that is friendly to games. Both rain and snow will have a negative effect on
your forces, and all operations that it conducts must be your military operations, reducing units’ combat effectivelaunched from that base and then return to it after the mis- ness: in some cases, quite significantly. Combat resolution
sion has been flown. If you assign too many air wings to too also includes a “visibility” component which adverse condismall a base, then you may find that the ground staff will tions will reduce, unless specialised equipment has been
have trouble maintaining and servicing all of those aircraft discovered by your scientists and supplied to your forces.
in a reasonable period of time. You can either enlarge the
Certain types of terrain will reduce movement speeds,
base to increase its capacity (although the maximum size hamper supply, and impose penalties to combat as well.
is limited) or reassign some of the squadrons to a different The effect will vary depending on the unit type (generally
base that has sufficient space for them. If there isn’t a impacting more severely on motorised units than on foot
suitable location then you can also construct a new base to soldiers), and in most cases the terrain will give a defender
house them: although this will take some time to prepare. an advantage, reflecting his ability to make strategic deSimilarly, naval bases are needed to act as home ports fensive use of the landscape.
for your fleets. Ships are assigned to them and must return
Hearts of Iron II is played on a global stage over a period
periodically to conduct minor: or not so minor: repairs. Any of years and includes accurate modelling for both local time
number of ships may use the same naval base, however of day and for seasonal variations in the length of a region’s
a base’s size determines how rapidly it can repair those daylight hours. Most units perform very poorly in the hours
vessels and its location will affect what seas your navies between dusk and dawn when visibility is poor, so you will
will be able to patrol. Existing naval bases can be enlarged need to take this into consideration when planning your
and new ones can be built, again with certain restrictions. attacks. Certain technological advances may mitigate this
There are also many provincial ports that your fleets may somewhat, but you will probably have better success if
use as temporary moorings; however those harbours lack you plan your large-scale operations to begin shortly after
the facilities to carry out any repairs to your vessels or dawn during seasons when the daylight hours are long.
offer them supply.
Bases are susceptible to bombardment or can fall into Combat
enemy hands. Enemy aircraft can be given missions to Hearts of Iron 2 does not seek to model combat on a highly
strike at your ports or crater your runways, reducing their detailed, microscopic level. You do not control individual
basing capacity and forcing you to spend time and re- soldiers, squads, platoons, companies or even battalions.
sources to repair them. If you lose control of a province that In HoI2 you will issue orders to divisions (or whole armies)
contains a base, then any forces that used it as “home” will and your battles will represent a contest for the control of
find themselves out of supply and forced to rebase…and much larger regions of land (provinces) rather than indiyour foe will be able to use the captured facility as a new vidual beachheads or buildings. The actual hand-to-hand
base for his forces, once he has effected repairs to the fighting occurs behind the scenes: in your CPU: and your
inevitable damage it sustains during its capture. You should progress is displayed using graphic and numeric feedback
pay close attention to the locations of your enemy’s bases as each combat ensues.
and either render them inoperative or consider attemptMovement is Attack for Land
ing their capture, and you should also take precautions to
Battles
prevent the enemy from doing the same to yours.
A significant change in actual battle mechanics has been
Weather, Terrain and Time of Day introduced in Hearts of Iron II. In previous Paradox games:
Weather and terrain played significant roles in the historical and in many other strategy games, for that matter: a land
outcomes of military operations. It was the onset of winter force would be ordered to engage an enemy in a neighthat did much to halt the initial German advance into Rus- bouring province, move there, and then upon its arrival a
sia in 1941, and it was Burma’s inhospitable terrain that combat would ensue. The loser would then retreat from
added a heavy toll to the loss of life in that region. Most the province and the victor would remain. This is not the
military actions also had to be conducted during daylight case in HoI2. Instead, the game employs the concept of
hours, since target recognition was very poor in an era “movement is attack” in all land-based battles.
when human eyesight was (more or less) the only available
Combat is initiated as soon as a land force begins to
10
move towards an enemy province that is being defended.
The battle will rage on until one of the sides has gained the
upper hand, at which point either the aggressor’s movement is discontinued (if it loses) or the defending force
begins to withdraw and the victorious attacker conducts
its movement into the province and assumes control. This
system alleviates a number of common issues (such as
being unable to tell where an enemy unit is moving until it is
too late) and also offers a number of new operational possibilities for both the attacker and the defender. Forces in
adjacent provinces may support the armies involved in the
battle, and behind-the-lines reserves may be positioned to
make a last-ditch effort to shore up the defences. Air and
naval battles, however, do not use this combat method and
will contest an air or sea zone while jointly occupying it.
Orders
ders expire.
This is not to say that combat won’t occur between these
forces: it will, and quite frequently at times. When this occurs, there are special rules that govern the engagements
which take the types of units involved into consideration, as
well as the time of day and weather conditions. Aerial combat is further limited by the range of the aircraft involved,
as they will eventually need to break off and return to base
to avoid running out of fuel and ammunition.
It is vital to understand that neither sea zones nor the
air space above provinces are subject to control in the way
that the provinces themselves are. There is no “ownership”
of them, and neither aircraft nor naval vessels are capable
of capturing a province. Most often you will use them in
support of your armies, seeking to soften up an enemy’s
resistance through bombardment or to hamper: or even cut
off: his lines of supply. Combat between them will therefore
most likely be a contest to determine whether you are able
to carry out these goals.
Particularly if you play a larger nation, you will find that the
sheer number and geographic separation of the forces you
field can make them a daunting task to manage. To reduce
the micromanagement requirements and allow you to focus The Fog of War
on the zones of greatest activity, HoI2 allows you to give This doesn’t refer to a weather condition, but rather to darkstanding orders to most units. When you are initiating a ened regions of the map where the game will hide things
large-scale assault involving large numbers of units or a from you: particularly the dispositions of armed force: that
combination of land, naval and air forces, you will also need you aren’t in a position to know. It is assumed that you will
to carefully coordinate these attacks to achieve maximum have sufficient reconnaissance and intelligence sources
effect. The game’s order interface makes this surprisingly to determine some basic information about provinces:
easy to achieve.
even in your enemy’s territory: but you will be unaware
Each unit has a useful set of orders that may be given of the location of any forces that don’t belong to you and
to it beyond the basic “move here” or “attack right now” are outside your territory or beyond the sighting range of
commands. An available option: which depends on the unit your units. You will be aware of enemy units occupying
type: is selected on the order interface and then the force provinces adjacent to your troops, but you will usually have
will carry out these orders exactly as you have instructed. only a very vague idea of their complement and size until
The specific options are detailed later in the manual, but such time as you engage them. You may also wish to fly
the concept that you should understand is that the order several long-range missions deep into enemy territory prior
interface includes the ability to set a date and time that to an attack to gain additional information about possible
you would like a force to begin an action, allowing you to reinforcements and reserves that the fog of war will othcoordinate the orders of multiple units. In many cases, you erwise obscure. Keep in mind that some units: particularly
will also be able to set a date and time (or operational con- submarines: are able to hide their presence, but there are
dition) for it to discontinue operations or even give a unit a technologies you can research to assist you in detecting
set of standing orders to repeat the same mission multiple and identifying them. Fortunately, your allies will share all
times, allowing you to focus your attention elsewhere while of their knowledge of enemy positions (and also their own
it goes about its business.
force dispositions) with you as well.
Air and Naval Combat
Strategic Redeployment and the
Air and naval operations do exist, of course, but are ab- Force Pool
stracted to a greater degree in Hearts of Iron II; otherwise Any new military units you produce will enter your force
the added level of complexity would be overwhelming to pool and can then be deployed at your discretion to any
most players. You will usually assign general orders to valid location. Naval forces and air forces have an addieach air wing or flotilla: giving specific time period and tional deployment prerequisite: they must be assigned
other parameters that you would like it to follow: and you to specialised bases that are constructed to house and
may then pretty much leave it to its own devices to carry support them. These bases are limited with respect to
out these operations until it receives new ones or the or- the number of units they can effectively handle, and this
11
1
3
2
4
5
number can be temporarily reduced as a result of damage game, pitting your skills against the computer. Click “Single
from enemy attacks.
Player” on the Launch Menu and the main menu screen
Land units that are already in the field may be tem- will appear.
porarily withdrawn from active service and strategically
Selecting a Scenario or Save
redeployed elsewhere without the need to manage their
Game
exact movements. As long as they don’t have to cross
When starting a new game you will select from a list of
water (which require the use of naval transports and thus
available grand campaign games or battle scenarios (area
active management), they will arrive at their new posting
1). Grand campaigns games use the entire globe and alafter a period of time. This redeployment method is not
low you to play any available nation in the world, startpossible for naval or air forces, which must be rebased
ing with each nation’s historical position at a significant
via conventional means.
date in WWII and then progressing until the end date in
December 1947.
Battle scenarios are usually more limited in scope, foTo begin playing Hearts of Iron II click Start > Programs
cussing on short, specific engagements and often restrict> Paradox Entertainment > Hearts of Iron 2 > HoI2 and
ing the nations that may be selected and even the part
after a moment or two the opening movie will play. You will
of the globe that is being used. Many of these scenarios
then see a status screen displaying the progress as the
disable some of the game’s more complex interfaces, promain game engine is loaded and, once this has finished,
viding the player with only scripted forces, replacements,
you will be presented with the Launch Menu. This gives
and resources to accomplish their goals with, and usually
you the options of starting a single player game, starting a
having special victory conditions. The battle scenarios are
multiplayer game, playing the tutorials, viewing the game
great for playing fairly short “what if” games around major
credits, or exiting the game.
offensives, or for one-time multiplayer games of strategy.
For the purposes of this manual, though, I will assume
Single Player Games
that you have selected a grand campaign game and that
Most often you will probably be playing a single player all interfaces are available to you.
The Main Menu
12
Changing the Game Options
Game Options
At the bottom of the screen (area 5) you will see three
buttons. Click the Options button to change the settings to
suit your preference (see side bar). If you make a change
this will be displayed in the log area of the main menu
(area 4). If you don’t change anything then the game will
use the same settings as the last time you played or will
use the default settings if this is your first game. If you
made a mistake and intended to play a multiplayer game
or tutorial, you can click the Back button to return to the
start menu.
Difficulty: there are 5 levels of difficulty that will apply
global modifiers to most aspects of the game (industry,
resources, combat, movement, and more). At easy and
very easy levels, the AI nations will be handicapped and
the player will be given artificial bonuses. At hard and
very hard levels, the reverse is true. (You can see and
even change the precise modifiers used by looking at the
difficulty.csv file in the db folder).
A.I. Aggressiveness: this adjusts how the A.I. reacts
to the player’s actions during the game, ranging from
“coward” to “furious”. At furious level, the AI will tend
to declare war at the slightest provocation and will be
considerably more actively militaristic; while at coward
level the AI will tend to be more conservative and generally defensive.
Game Speed: this can be set prior to starting a game
or from within the game itself using the “ctrl” and “+”
or “-” keys. In a multiplayer game, only the host may
change the game speed.
Share Countries: Cchange this to “ON” for a multiplayer
game where you wish to allow more than one player to be
able to select the same country. This option is disabled
in single player games.
Autosave: this allows you to set how often the game will
automatically be saved and may also be changed from
within the game via the options menu. In multiplayer
mode, only the host computer will save the game.
Use Counters: by default HoI2 uses animated sprites to
display your units on the map. Enthusiasts may wish to
toggle this to “ON” to have units displayed as traditional
NATO counter pieces instead.
Launching the Game
Once you have selected a country and changed any options,
click the Start button to begin the game. This button will
remain greyed out until you have selected a country.
Multiplayer Games
Multiplayer games are started in much the same way that
a single player game is launched; however, there will be at
Connection Types
Once you have begun play you can save your game at
any time. To load a saved game, simply scroll through
the list of file names (area 2) and select the one you wish
to resume.
Selecting a Nation
After you have selected a grand campaign, battle scenario
or saved game the nation selection portion of the main
menu (area 3) will display up to ten national flags. Click
on one of these to select that nation and display a brief
overview of its historical situation during that era. If you
don’t see the flag of the nation you wish to play, right-click
on any of the flags to display a list of additional nations and
select the one you want. If you still can’t find the desired
nation, then either it doesn’t exist (it has been eliminated
from the game due to conquest) or you have selected a battle scenario where that country is not available for play.
13
You will need either a fast Internet connection (DSL/
Cable with TCP/IP protocol installed) or a connection
to a Local Area Network (LAN) to play HoI2 in multiplayer mode.
LAN: This connection is established automatically by
searching for any hosted games on your LAN. Either click
“host” or select a detected game and click “join”.
Valkyrienet: This is a service provided at no charge by
Paradox as both a meeting place for players and a connection handler to make it easier to host or join games.
HoI2 also allows the host to set a password that guests
must enter to be able to join private games.
Internet: You will need to enter the IP address of the
host computer in order to join an internet game. This
can change each time the host connects to the internet
if it is not a permanent connection. If you are hosting a
game you can determine your IP address by establishing
an internet connection and then chose Run from your
computer’s Start menu.
If you are using Win98 or WinME type winipcfg and
then click OK and make a note of the IP Address and
then communicate it to your guests (via email, IRC or
other means).
If you are using Win2000 or WinXP type cmd and then
click OK. In the new window that appears type ipconfig.
Make a note of the IP address displayed and then communicate it to your guests.
Once you’ve found a few people to join, you must designate
a host. Since vNet can be busy at times and some people have expressed a desire to be able to create “private”
games, HoI2 now allows the host to set a password that
must be entered to join a game. Once you’re ready, the
person who is hosting will click the Host button and type
in a password. The other players will soon see the game
listed and should select it and click Join and then type in
the password when prompted. Establishing the connection
will be handled by vNet for you automatically. (Note: once
you start the game the connection is handed off to the host
and the game will disappear from the vNet list.)
Once you’ve established a connection, the main menu
screen will appear, however you will notice a few differences. Saved games will now be found at the end of the
scrollable list in the game selection are (area 1) and a listleast two additional steps to perform before you may begin ing of all players will now appear in the area at the bottom
play. One player will act as the “host” of the game and the left of the screen (area 2). I hope that you never need to
other players will join as “guests”. Up to nine additional use it, but the host also has the ability to ban a guest from
players may join (HoI2 supports a maximum of ten players) the game by highlighting the player’s name and clicking
and I would recommend that the player with the fastest the Ban button. On a more positive note, you are also able
and most stable connection be chosen for internet games, to chat with other players while viewing this screen by
since this has a greater impact on performance than the typing in the space below the narrow line in the log area
host’s computer specifications. If connection speeds are of the screen (area 4).
equal, then the host should be the player who has computer
The host may now select the scenario or saved game to
with the best performance. Only the host may select the be played. If a saved game is chosen, then there will be a
scenario or saved game to be played and only the host may brief pause as the game is compressed and then the transchange the game options.
fer process will begin to send the save game file to the other
When you click the Multiplayer button on the initial menu players. You will see a status indicator beside each player’s
you will be asked to specify the type of connection you wish name, indicating whether the transfer is still in progress
to use (see sidebar) and to enter your name. Type your or whether it is complete. I strongly advise players to wait
name in the space provided and then click the button that until everyone has completed this transfer before selecting
corresponds to the connection type you wish to use. Unless countries, since this is a common source of subsequent
you are using Valkyrienet (vNet) you will then be asked problems. Most players who frequent vNet follow a protocol
whether you wish to host a game or join a game as a guest. whereby all players wait until the host has confirmed that
Note that all players must be using the same version of the everyone has completed the save game download. The
game (this is checked automatically when the connection is host will then select a nation which signals that it is safe
first established to ensure that there are no file discrepan- for the guests to do so as well. I would also advise against
cies). I also recommend that you disable any non-essential using the Windows operating system’s Alt+Tab facility dursoftware that might be running in the background on your ing download as this will almost always cause the transfer
computer as this will often affect stability.
to freeze or become corrupt. With a decent connection
The vNet connection will take you to a free service where speed, this process shouldn’t take very long and you can
players frequently meet to start new games. Since vNet safely chat with one another while waiting.
supports all of Paradox’s games, you will need to select
You will notice that the game options submenu now althe HoI2 channel from the channel listing which will take lows you to change the Share Countries setting to “yes”.
you to a chat location where you can arrange a new game. This allows more than one player to select the same nation,
Routers and Firewalls
It is common for computers to be “behind” routers or be
protected by firewalls.
Firewalls: vNet and internet multiplayer games use
ports 2300-2400, 28800-29000 and 47400-47700
for communication. You will need to make these available
to host or join a game. Note that this will result in limited
exposure to malicious internet users and that you do so
at your own risk.
Routers: since there are many different routers on the
market, each with unique software controls, please consult your user manual for details. You will also need to
have a network client installed in Windows networking. If
you’re having trouble, ask for help in the HoI2 Multiplayer
subforum on Paradox’s website.
14
which is otherwise prohibited. If two or more players play
the same nation (up to the maximum of ten may do so),
then each of these players will be able to use any interface
or control for that country. There are no limitations to this,
so I would recommend you agree on areas of responsibility
ahead of time to prevent disagreements during play.
Once all players have selected their nations, the Start
button will become active for the host. When the host
clicks this, the scenario (or saved game) will be launched
on each system and when all players have finished this
process (slower systems will take longer to complete the
launch) the game will begin. Another vNet custom that I
recommend for any multiplayer game is for each player to
use the chat feature to type “in” or “here” once the game
has launched.
You may also chat with one another during the game by
pressing the tab key, typing a message, and pressing the
enter key. You have the ability to make your chats “private”
by selecting the player (or players) you wish to have receive
your communications. For your convenience, there are several preset chat filters that allow you to quickly address
messages to the people you wish. After you press the enter
key, the chat message will display on the recipient’s main
game screen and be recorded in his history log.
There are a few other important differences between
single player and multiplayer games. The game speed
setting may be adjusted during play using the “ctrl” and
“+” or “-” keys, but this may only be done by the host. Any
player may pause the game at any time but other players
may un-pause it after a delay of 30 seconds. Any message
boxes or events that would normally cause the game to
pause automatically (depending on your message settings)
will display normally but will no longer pause the game.
Some of these will expire if you don’t respond to them and
disappear after a period of time. Others will disappear if
they are no longer valid.
Tutorials
If you select the tutorial button in the Launch Menu you can
play the HoI2 tutorials. For more details, see the Tutorial
section near the end of the manual.
Credits / Exit
Click on the Credits button in the Launch Menu to see a list
of the many people involved in the design, development,
production and betatesting of Hearts of Iron II. The Exit
button will quit the game and return you to Windows.
The General
Interface
There are very few parts of the HoI2 interface that are
visible at all times. The majority of your screen will contain
a display of context-sensitive information that will change
depending on the type of action you are taking. There is
one area: at the top of the screen: that never changes.
This provides a quick reference to some of the most critical
pieces of game information and also gives you access to
all of the principle interfaces. There are also a few other
things that aren’t directly part of any other interface but
have global impact on the game. Taken together, these are
best described as “the General Interface”.
The Top Bar
This is the area at the very top of the screen that will be
visible at all times and displays a quick overview of the state
of your nation. It also gives you access to each of the main:
and vitally important: interface screens.
Status Overview
The upper portion of the bar shows a series of icons and
values which you will refer to frequently. This allows you to
quickly review your reserves of energy, metal, rare materials, oil, supplies and cash. It also displays your manpower
pool, national dissent level, and your transport and industrial capacities. Hovering your mouse over any of these will
reveal an expanding tooltip that gives you a more detailed
summary of that item: particularly your daily income and
expenditures. If the daily change is a detrimental one, then
the value will be displayed in red. Each is described in detail
in the relevant section of the manual.
The Folder Tabs
Immediately below the status overview is a set of clickable folder tabs that give you access to the five main HoI2
interface screens which we’ll later look at one by one in the
manual. Everything displayed below the top bar depends
on which of these folders you’ve selected.
View Map: Clicking this folder tab displays the interface
that you’ll use most often: the Main Map Folder. This is
used to view the map of the world where you’ll find details
of your provinces, examine and issue orders to your units,
deploy new units, and perform most other common ingame actions.
Technology: This is the Technology Folder, where you will
15
assign specialized teams to begin working on research
projects, and where you may review the technologies that
you already have available to you and their effects.
Production: This tab displays the Production Folder where
you control your national budget, initiate the construction
of new units and industrial and defensive structures for
your provinces, and see a summary of such important
things as your current trade agreements, convoys and
resource depots.
Diplomacy: This tab takes you to the Diplomacy Folder,
where you may set your domestic policies, conduct diplomacy with other nations, and view diplomatic and political
information about the other nations in the world.
Statistics: This brings up the Statistics Folder: a set of
detailed charts that allow you to view summaries of almost
all of the important information about your nation, armed
forces, and the rest of the world. There are some very
handy “redundant” interfaces on these pages that allow
you to make a number of similar adjustments very rapidly,
and many items are hot-linked to allow you to quickly jump
to a province or unit on the Main Map without having to
search for it or use one of the other methods of locating
items.
The Date/Pause Button
Message Settings
HoI2 allows you to customise the way that messages are
displayed. For each type of message you may select it
and then set it to display in one of the following ways:
Do Not Display: use this setting to suppress this message from displaying at all.
Display in Log Only: these messages will only display
in the history log
Message Notifier: these messages display a small icon
on the right side of the screen. Clicking on it opens the
message box. (This option is not available for all message types.)
Message Box: this setting is for more important information and will cause messages to appear in a large message box as well as being recorded to the history log.
Message Box with Pause: this setting will bring up a
message box and pause the game until you click “okay”
on the box. Note that in multiplayer games the autopause function is disabled and this message will simply
bring up a message box.
Surrender: This ends your current game session (we all
have to sleep sometime). Your current game data is lost
when you exit so make sure you’ve saved first.
Return: Returns to the game.
The current date and time are displayed in a button at the
bottom right of the top bar. The time shown always reflects
Greenwich Mean Time (GMT) and, depending on what por- Message Boxes
tion of the map is presently displayed, could be significantly You will receive many messages informing you of things
different from the local time. If you click on this button, the that are happening during play. These may be notifications
game will pause for as long as you wish. Clicking on it again of foreign diplomatic offers; they could be reports from
will resume play. You can also press the pause button on your armed forces advising you that they have engaged
your keyboard to pause and resume.
in battle or arrived at a destination; they might be reports
from your scientists announcing a new technology; or they
The Game Management Menu Button
could simply be an intelligence report about international
Immediately to the right of the date/pause button is a butaffairs that may not seem to directly affect you.
ton labelled “Menu”. Clicking this will bring up the Game
Messages can be displayed in several ways, and when
Management menu where you may select from several
you first install HoI2 these will initially be set to certain
options:
defaults which you can later change to suit your preference.
Save: Allows you to save your game in its current state.
The most important ones will cause a message box to apThe default file name will be your country, date and time,
pear on the screen and will pause the game until you have
but you may change this to whatever you like by simply
acknowledged it. Ones that are somewhat less important
typing in a new name. Once the save is complete you will
will be displayed in a message box but will not pause the
be returned to the game.
game. Others will display a small message notification
Options: This brings up the in-game options submenu
symbol at the right edge of the screen, waiting for you to
(similar to the new game options) where you may change
open and respond to it. Many of these have a time limitathe game speed, toggle between sprite icons and counters,
tion and will blink for a short while before disappearing.
change your autosave settings, and adjust your sound efMessages that are probably of only minor importance will
fects and music volumes. There is also a box at the bottom
simply be written to your history log. Those that are likely
of this submenu allowing you to change your message
to be irrelevant to you: notice of a trade agreement being
settings.
signed between two nations with whom you have no ties:
Hints: This turns on the hint boxes that are displayed when
will not be displayed at all.
the game first launches..
16
in the same way that land forces are managed, but you fleet’s naval base to that sea zone.
should take particular care to ensure that you include at Denied Zones: There are several sea zones that represent
least one screening vessel for each capital ship in a fleet to very narrow straits, canals, or channels. Enemy control of
avoid incurring combat penalties. The varieties of options the adjacent province will deny your fleet passage through
for selecting fleets are virtually identical as well, except that zone. These include the Panama Canal, Suez Canal,
that the listing of all national fleets is accessed through Kiel Canal and Sea of Marmara.
the Naval Forces Hot Button. When you click on the button,
If you wish to move your fleet to a province that contains
the display in the information panel will change to provide a port or a naval base, then simply right click on the prova complete listing of all naval bases that currently belong ince. Because there are a several possible options in the
to your nation. You will see two numbers beside the base’s way that a fleet and province can “interact,” you will see
name: the base size and its current operational size. Below an abbreviated list of these orders. Select the move option
each base’s name you will see a list of the fleets that are to enter the harbour. Even if the province contains a naval
currently assigned to use this as their home port, as well base, this will not rebase your fleets; nor will a base or a
as their size and a graphic representation of their current port that you move to be able to offer you fuel or supplies
strength and organisation. Just because a fleet is listed when you arrive. Ports cannot meet the needs of military
under a base does not mean that it is currently located vessels and you must use the rebase option to allow a naval
there. It only indicates that this is their home naval base base to offer you supply.
assignment. Allied naval bases will not normally appear on
As you will soon discover (in the Naval Combat section),
this display, however if you have assigned one of your fleets opposing fleets do not necessarily engage when they are
to an allied base then it will be included in the list until such both in the same sea zone. Each zone represents a fairly
time as you reassign the fleet to a different location.
large expanse of water and it is entirely possible that two
If a fleet is carrying out a mission, then its mission box fleets may simply fail to detect one another’s presence
will provide a summary of the mission and a tooltip will give unless they have excellent spotting capabilities. Even when
you additional details of the mission’s parameters. You may you have spotted an enemy fleet, it is rarely safe to assume
click directly on the fleet name to select the fleet and center that you’ve sighted its entire complement of ships.
it on the map, or you may click on the mission box to assign
Rebasing a Fleet
it a mission directly from this interface. If a small red comYou may assign a fleet to a different naval base by issuing it
bat icon appears in this listing, then your fleet is engaged
an order to rebase. If you select a fleet and then right-click
in battle (and thus might be worth having a look at, if you
on a province that contains a naval base (it must belong to
weren’t previously aware of this).
you or to an ally) then the rebase option
Basic Naval Movement
will appear as one of the options in the
Basic naval movement is done using the
context-sensitive list of possible naval
normal game controls, but in some ways
missions. A second method of rebasing
is even easier since sea zones (the naval
is click on a fleet’s mission box in any
equivalent of a province) aren’t subject
interface that displays a mission. Select
to national control. Right-clicking in any
Rebase from the list of available missea zone will order your fleet to move
sions and then select the base you wish
there and attempt to engage any enemy
to assign from a new list that is displayed
vessels it encounters. If you move mulof all possible bases. Be careful when
tiple sea zones then your fleet will also
rebasing (using either method) because
engage any enemies it meets along the
the maximum range is ignored for this
way. There are only two limitations on sea
order. Fleets will proceed to their new
movement:
base, but if this exceeds double their
Fleet range: You cannot exceed the
range value then: depending on the total
maximum range of the “worst” flotilla in
distance travelled: they may suffer a very
the fleet. HoI2 makes this simple to avoid
large temporary organisation loss. While
by prohibiting any order that would take
it is moving to this new distant base your
a fleet out of range of its assigned base.
fleet could be attacked by enemy vesWhen a fleet is selected, you will see a
sels or aircraft (which could easily have
tooltip for each sea zone that displays the
disastrous results).
fleet’s range and the distance from the
81
Basic Naval Combat
begun and the fleet information panel will display a combat
quick-view that is similar to the one used for land combats.
The same quick view will also be added to Active Combats
When two (or more) enemy fleets are located in the same
Hot Button listing. Clicking on the quick view will display
sea zone, there is a possibility that a naval battle will enthe detailed battle view.
sue. Whether a battle occurs or not depends on whether
one of the fleets successfully spots the other and is cur- Naval Combat Resolution
rently under orders to engage. Like land combats, naval At first glance, the naval details will look very similar to the
combats represent prolonged engagements that can take land combat version: and in some respects it is. You will
some time to resolve. The method of resolving a battle is see the flags of the nations involved, the leader portraits
a bit different, however, due to naval combat’s positioning (with detailed tooltip), the battle status bar and conditions
and range concepts. As I mentioned above, both sides are icons, and a complete list of units involved on both sides
treated as “attackers” when determining the maximum (also with detailed tooltip). What won’t look familiar is the
fleet size before there are overstacking effects (see the range and positioning information displayed between the
naval leadership section above). The underlying concepts two flags, and the very small targeting icons that appears
of attack values, defence values, and combat efficiencies just below the strength and organisation bars of each unit:
are the same, but the targeting is also handled somewhat each of which is an essential component of naval combat
differently (and more selectively).
(and there are additional vital details in each one of these
When the fleets first spot one another there will be some items’ tooltips).
distance of ocean lying between them and each fleet will
Naval battles progress on an hourly basis. Each hour
have a starting positioning value. Think of this as being both commanders will try to manoeuvre their fleets into a
an indication of how well a ship is positioned relative to more favourable position and will try to attain what each
an enemy in order to bring its main weapons to bear on feels is the optimum range to achieve maximum effect.
a target. As the battle progresses, the fleets will begin to Their skill level and rank will have a great impact on their
close the distance between each other and try to manoeu- ability to achieve this, as will having a sufficient number of
vre for better positioning: something that will be seriously screening vessels to protect the capital ships.
hampered for a side that lacks sufficient screening vessels.
The starting distance between the two fleets will usually
Each ship will begin to fire at the enemy’s vessels once the (though not always) be greater than the maximum range of
distance that separates it from them is within the range of any of their vessels’ attacks capabilities, so the first hours
the ship’s weapons. Carriers will usually begin their attacks of “combat” are likely to be a succession of manoeuvres
first, since their weapons (airplanes) have the greatest with the gap between the fleets slowly closing. You can tell
range; then the battleships will open fire, and then cruisers, at a glance whether a flotilla is in range yet by looking at
and so on. At some point one side will be either sunk or will the small targeting icon. If it has a red bar through it then
wish to disengage: though it will take some time to disen- the range is still too great for it to begin attacking any vesgage, during which further damage is likely to be inflicted sels that the fleet has spotted. You can find out the unit’s
on the retreating fleet. Let’s look at the details.
maximum targeting range by looking at the tooltip that is
displayed when you hover your mouse over the icon. The
Visibility
same tooltip will also indicate the flotilla’s current attack
Before combat can begin a fleet needs to first detect the
and defence effectiveness.
enemy fleet. When (or whether) this happens is determined
The commanding officer will decide upon an overall fleet
by the visibility and detection abilities of each flotilla, is
range that he feels is the optimum separation based on
further modified by their officers’ abilities, and can then
his fleet composition and what he knows of the enemy’s
be reduced by weather conditions. A “spot check” is made
fleet composition. He will try to close to this distance and
periodically until one fleet detects the other, or one of them
then maintain it throughout the course of the battle. This
leaves the sea zone. If a spot check succeeds and the fleet
will be nearly impossible if he has insufficient screening
has orders to engage, an enemy combat will begin.
vessels to work with. At the same time, he will attempt to
Initiation of Naval Combat
manoeuvre his ships into an optimum attack and defence
When combat is first initiated, the positioning of each fleet position. The current distance between the two fleets is
will be determined as well as the distance between them. displayed in the center of the small black box between
This depends largely on the officer’s skills and on the naval the national flags. If you hover your mouse over this value,
doctrines that have been researched: though weather will a tooltip will report the separation that each commander
also have an impact. You will be notified that combat has considers to be his fleet’s optimum.
Overview
82
Each fleet’s current positioning is displayed on either side of the distance value.
Positioning will become very critical once
the fleets have come within range of one
another, so you may want to watch both
values as the fleets begin to close to get
a sense of the two commanders’ relative
skill levels as they vie for an advantage.
The positioning values will change by
small amounts each hour and if you find
that yours remains much lower than your
enemy’s then you may want to break off
the combat to avoid sustaining heavy losses.
Once a ship is in range of an enemy fleet, it will attempt
to fire upon the enemy vessels. Its ability to do this successfully is based on the positioning of its fleet (not the
enemy fleet). If your positioning is 20%, for example, then
you will have a 20% base chance of successfully hitting
an enemy vessel. If you miss by a very large margin you
might even accidentally hit one of your own fleet’s flotillas,
so the higher your positioning the better. The number of
attacks each flotilla may make each hour is determined by
its naval attack value.
If a flotilla succeeds in scoring a hit, then its target will
be determined. The likelihood that it will target a screening
class of ship is based on the enemy’s positioning so, for
example, if your opponent’s positioning is 30% then there’s
a 30% chance that you will target a screening vessel and
a 70% chance that you will target a core vessel. There are
a couple exceptions to this rule, though: carriers are very
much more likely to target a core vessel; submarines are
also very likely to target a core vessel and may decide to
withhold fire if they aren’t able to do so (until a submarine
fires, it remains hidden and will be very hard to spot); and
screening vessels will always target an enemy submarine
if they are aware of its existence. Screens that are part of
a very well-positioned fleet also have a chance, each hour,
of detecting a hidden submarine. Even if a hit is scored,
it will still be necessary to determine whether (and how
much) damage is done to the enemy vessel (based on
the same methods used in land combat). Once a ship has
targeted a vessel, it is very likely to continue firing at it until
it has been destroyed; although there is a possibility that
is will switch targets: particularly if a “preferred” target
presents itself.
As the battle progresses, the flotillas will gradually suffer
loss of organization or be sunk. When the organisation of a
flotilla drops low enough, the flotilla will break and attempt
to withdraw. Just as in land combat, a fleet that has more
than 50% of its flotillas in retreat will break off combat
automatically and attempt to sail out of range. Enemy
ships will continue to fire on them until
the maximum range of all enemy ships
has been exceeded, at which point the
combat will reach its conclusion. You may,
if you wish, manually order your fleet to
break away at any time by selecting it and
ordering it out of the sea zone.
Time of Day and
Weather Effects on
Naval Combat
Just as with land combat, night time
hours and poor weather conditions are
generally very bad for naval combat. Positioning will be
greatly affected and there is a significant reduction in the
chance of inflicting damage. Unlike land combat, however,
the defender and attacker suffer equal penalties, unless
one has a technological advantage over the other in this
area. Carriers will be highly ineffective in poor weather,
since their CAG’s are severely penalised in these conditions. In very adverse weather (storms and blizzards),
CAGs cannot fly at all.
Out-Of-Supply Effects on Naval
Combat
If a fleet is operating without supplies or fuel, then it would
be well advised to turn tail and run as soon as it becomes
aware of an enemy presence in a sea zone. If it stays and
fights, it is probable that it will suffer a particularly humbling defeat and will be very lucky if it manages to escape
in anything larger than a life boat.
Force Composition Effects
I have stressed the importance of having a good balance
of screening vessels to support your capital ships, but I
will do so again. You will receive a positioning penalty unless you have at least one screen for each capital ship.
Your capital ships will also be unable to maintain a safe
engagement distance from the enemy, and are thus far
more likely to be sunk.
End of Naval Combat
Once the fleets have disengaged from combat, the vanquished fleet must retreat from the sea zone. This will be
to a randomly selected adjacent zone that is usually (but
not always) in the general direction of its base. If there is
a friendly port or naval base adjacent to the sea zone then
it will retreat there instead. The victor of the combat may
elect to stay in the sea zone or continue whatever mission
it was engaged in when “interrupted” by the combat. Unlike land combat, sea zones are not assigned control so
no territory changes hands.
83
Enemy Occupation of a Port or
Base
display every naval mission that is available (some may
not be, due to fleet composition or insufficiently advanced
technology levels) and will usually require you to specify a
target zone, area or region from a list of valid potential targets. After selecting the target, the Naval Orders interface
will appear. If you use the “ctrl and right-click” method to
issue an order, then only context-sensitive missions will
be displayed and the Naval Orders interface will appear
as soon as you have chosen the mission (since you have
already identified the target by clicking on it).
Naval Orders
Naval Orders Interface
If an enemy land force manages to gain control of a naval
base or port that contains a fleet, then that fleet will be
scuttled. Any fleets that are assigned to a naval base that is
captured will be un-based and will rapidly lose supply and
organisation until they have been given a new, valid base
assignment. Your personnel will sabotage the naval base
before fleeing, though, so it will take a little while before the
enemy will be able to make effective use of that facility.
This interface is used to set specific mission parameters
Overview
whenever you issue a naval order. We will see an identiWhen a fleet isn’t in port, it is fairly rare that you won’t want cal set of controls when we take a look at the possible
it to be doing something: anything: rather than just sitting Air Orders.
around in a sea zone. Submarine packs will probably be
The top portion of the interface has three toggle buttons
used to disrupt enemy convoys and transport movement, on the left (day/night/both) that are used to specify when a
surface fleets will want to continually patrol certain por- fleet should initiate combat after detecting an enemy. You
tions of the ocean…and for a player with a large number of should probably keep this set at “day” for most naval comfleets, this would quickly become a nightmare of repetitive bat missions (unless you have advanced night technolomouse-clicking. Heart of Iron II allows you to do this if you gies), since most vessels perform very poorly in the dark.
really want to, but it also includes a number of extremely To the right of these buttons, you will see a slider where
useful naval missions in the Naval Orders interface that you may set the condition parameters for the mission. This
allow you to automate such routine chores. There are also is used to establish a minimum level of strength that each
some specialised naval orders that usually require an ele- flotilla in the fleet must maintain in order for the mission
ment of either timing or special targeting: for instance a to continue. If any flotilla’s strength level falls below this
carrier may send its planes to attack a province’s naval value, then the fleet will return to its naval base for a period
port facilities or its air bases and you will need to identify of time: until all flotillas in the fleet have been repaired to a
which of these is your intended target. The Naval Orders suitable strength level: and then resume its mission.
interface allows you to do this as well.
The lower half of the interface allows you to adjust the
In most cases, you will issue “standing orders” to carry mission’s time parameters, possibly delaying the date that
out a mission for a specified period of time, under certain it should begin the mission and setting its duration by asconditions, and in a particular part of the world’s oceans signing an end date. The default values are usually for
or possibly against a target province’s assets or forces. the mission to begin immediately and to continue for one
Once you’ve issued the orders, you can largely leave those month, but these can be changed to whatever values you
fleets to their own devices: even if they run into an en- desire by clicking the appropriate “+” and “-” buttons. If
emy force: which goes a long way toward eliminating the you have recently set parameters for another fleet’s mismicromanagement and complexity that would otherwise sion, then the default settings will be identical for the next
plague a naval nation. An additional reduction to potential fleet’s mission. Once the mission is complete, the fleet
micromanagement is the assumption of additional support will return to its assigned naval base to await new orders.
vessels that will resupply and refuel fleets that are on an If you use HoI2’s default message settings, you will be
assigned patrol. Rather than forcing you to keep track of given a mission status report when it arrives back at its
the distance each fleet has travelled and then return it base, informing you that it is ready for new orders. This
to base, naval missions are restricted to targets that are message has a “select” button that allows you to quickly
within the mission range of the fleet and they will only need select the fleet and issue it a new mission.
to return to base for repairs or upgrades (or for a faster rate
of organisation recovery).
Rebase
All of the naval orders may be accessed by selecting the I’ve already described this order, so I’ll simply remind
fleet and then either holding down the ctrl key and right- you that moving a fleet to a new naval base or to a port
clicking on the target or by clicking in the naval orders box will not reassign it to be based there. You must use the
in the information panel. The second of those methods will rebase order.
84
Move
for their supplies. Submarines are particularly effective at
This order is one of the available alternatives when “target- this mission and should be feared by all merchant vessels.
ing” a province. This instructs the fleet to enter the port Caution though: A fleet that engages in this order will not
or naval base of that province, but since this is not its attempt to detect an enemy’s naval forces.
assigned naval base it will not take on any fuel or supplies.
The move order is most often used to send transports Anti-Submarine Warfare (ASW)
to a port to pick up a land division for a subsequent sea Since enemy submarines pose a terrible threat to your suptransport or amphibious assault mission.
plies, you may wish to issue a fleet an order to patrol a sea
area and specifically look for submarines. This mission is
Attack
ideally suited to light cruisers and destroyers, which are
Although this isn’t a mission that you can select from the
particularly good at locating and engaging submarines,
menu, this is the mission type that will be displayed when
though this reduces the likelihood that they will spot and
you use a simple right-click to move a fleet to a new sea
engage an enemy surface fleet.
zone. The fleet will move to that sea zone via the most
direct path and will engage any enemy vessels that it enShore Bombardment
counters there. Because it is steaming at full speed to its
Shore bombardment is an order that can only be given to a
destination it is quite unlikely that it will spot an enemy
fleet that contains at least one capital ship (heavy cruiser
fleet during its voyage, but it will engage any that it manor larger), and is only used to support invasions. The fleet
ages to detect.
will be instructed to train its main batteries on the specified
Naval Interdiction
province during an amphibious assault, which will result in
This is a naval order that instructs your fleet to patrol the the enemy receiving a penalty to both attack and defence
sea zones within a particular area. It will randomly move effectiveness during the battle. This can help to considerthrough those zones and will initiate an attack against any ably offset your landing force’s invasion penalties.
enemy surface fleets it encounters. The chances of it spotCarrier Port Strike
ting a fleet are slightly less than the chances of it doing so
This order may only be given to a fleet that has at least
when stationary in a single sea zone, however this allows
one carrier with a CAG attachment. The carrier’s airplanes
you use a single fleet to cover a somewhat larger area of
will be ordered to attack an enemy port or naval base and
water (but you are less likely to spot any submarines).
attempt to sink any ships that are docked there (but they
Naval Combat Patrol
usually lack the armaments to damage the base itself).
This order is nearly identical to the naval interdiction order; Enemy fighters and AA defences in the vicinity are likely
however, a naval combat patrol is designed to cover a much to take exception to this action; and this mission cannot
larger section of the ocean. It will move randomly through be flown at all if the carrier is located in a sea zone that is
the sea zones in a specified region, but because it is cover- experiencing very adverse weather conditions.
ing a much larger region it is somewhat more likely that
Carrier Airbase Strike
an enemy fleet: and particularly enemy submarines: could
This is also an order that may only be given to a fleet that
escape its detection or slip by it unobserved.
has a CAG attached to a carrier. This order is the same
Convoy Raiding
as the Air Mission “Runway Cratering” (explained in the
This order instructs your fleet to patrol a sea area with the Air Combat section below) and is an attack against a
primary purpose of disrupting enemy commercial ship- province’s air base in an attempt to reduce its operational
ping. Any enemy convoys that trace their path through strength. Again, keep an eye on the weather, and on any
a sea zone that is currently patrolled by a navy with this enemy AA and fighters in the vicinity.
mission must attempt to slip past the patrol. There is a
Sea Transport
reasonable chance that at least some of them will fail to
A sea transport mission is used to transport land forces
do so and will be sunk: although if they are accompanied
to a friendly port once they have been loaded on board
by escorts then their chances increase significantly. These
the vessels. They will unload automatically upon reaching
limited actions are not displayed as battles in the game, but
their destination.
are reflected by a reduction in the convoy efficiency and
trade efficiency values that are displayed in the Production Amphibious Assault
Folder. A country that relies on foreign shipments and trade This mission is used to instruct transport vessels to take
to obtain the necessary resources is in great danger from the land forces they are carrying to a sea zone just off
this action: as are any troops that depend on those convoys an enemy province, in preparation for an invasion. When
85
the transports arrive in position, the land
troops will then automatically begin their
invasion of that province. To invade a
province from the sea, the province must
have a suitable area for the troops to land:
which is indicated by the presence of a
beach icon on the province’s shoreline. It
is not possible to invade a province that
does not have a beach. If you prefer, you
may load troops on the transport and
then manually position the vessels in the
adjacent sea zone. Then click the unload
button on the transport and then select
the province you wish your land forces
to invade.
Amphibious assaults are conducted in
the same manner that normal land battles are handled, however there are significant penalties for the invading forces
(although considerably less for marines)
and it is a province’s coastal fortifications
rather than its land fortifications that will
assist the defending troops in repelling
the attack. Be aware that launching a
successful large scale naval invasion
is extremely difficult since each division participating in
the invasion will increase the total amount of the invasion penalty. If the beach is well defended, then you will
probably need to conduct a very strong aerial and naval
bombardment campaign in support.
enemy land force’s effectiveness could
easily swing the battle in your favour.
Naval invasion is a risky affair, although
one that may reap great rewards if the
location and timing are well chosen. Remember that land force encirclement will
cause great losses to enemy organisation
so it may be worth considering a naval
“flanking” manoeuvre to get in behind an
enemy defensive line rather than trying
to assault it directly. If you must make a
direct assault: usually because the target
is an island with no alternate means of
approach: it is better to be patient if possible. Try blockading the target for a while
with a fleet devoted to destroying convoys.
The enemy supply depot will probably dissolve fairly quickly and his organisation
with then begin to drop. Then, after a little preliminary aerial bombardment, your
forces can move in with support from your
capital ships’ shore bombardment.
Just as land divisions may block a
handful of narrow straits, naval vessels
are able to prevent land forces from
crossing them as well. Don’t miss this great opportunity
to hold an enemy at bay (particularly in the Pacific island
chains) until you are able to assemble the necessary forces
to begin making direct attacks against those pockets of
resistance or launch a full scale invasion of your own.
Advanced Naval Strategies
The Air Forces
It is arguable that Hearts of Iron II’s greatest combat emOverview
phasis is on land battles; however you should not discount
Air Combat in Hearts of Iron II is a blend of the land combat
the importance of your navies. Land troops are nearly
and naval combat systems. Air forces are assigned misuseless without supply, and in many cases this supply
sions to patrol the skies for enemy aircraft, or to conduct
must be traced across water and is in jeopardy of enemy
extended bombing campaigns against enemy ground forcanti-convoy activities. Those same actions will also cut of
es, installations and infrastructure. Air transports: normally
sources of natural resources and greatly reduce trade efused by your paratroopers: can also be used for tempoficiency, resulting in a shortage of the materials needed to
rary air supply of encircled forces if absolutely necessary.
keep your industrial base operating at maximum capacity.
These missions are assigned through an order interface
Tactically, therefore, it is prudent to patrol your convoy
that is virtually identical to the one we just looked at for
routes and dispatch any enemy vessels you may find there;
naval orders. Combat between aircraft, though, is handled
and also to employ this technique to weaken your enemy
much more like land combat, but with only a limited number
before attacking.
of combat rounds being possible due to limitations in fuel.
There will be instances where your land combats take
Never underestimate the devastation that will occur if you
place in coastal provinces with beaches. Don’t undereslose control of the skies.
timate the potential impact of launching an amphibious
Air forces, like navies, must be assigned a base from
assault as part of that combat, and supporting it with naval
which to operate and may only land in provinces that have
bombardment: particularly if you can arrange for a large
such a base. Like naval bases, air bases have limited availnumber of capital ships to shell the enemy position. The exable space to handle a flow of aircraft, so exceeding this
tra shore bombardment and envelopment penalties to the
86
limitation will greatly reduce the flow of supplies and fuel,
and will significantly increase the length of time required
to complete repairs and technological upgrades.
Air Force Types
with the German V1 and V2 and would eventually (in the
post war years) lead to ICBMs. All of these are included
in HoI2’s technology tree (since some war technology is
deemed possible, although difficult to attain) and are handled through the Air Combat interface.
Air forces are made up of individual air wings, each of
which represents a number of similar-type airplanes that Air Wing Details
have an area of expertise. The Air Combat equivalent of a The sprites for squadrons are only displayed on the main
division is called an Air Wing (or wing). Groupings of wings map when they are in flight, so they can be a little harder to
are usually called squadrons or sometimes air groups or air locate and select until you are used to handling them. You
forces. The precise wording will vary somewhat from nation can easily spot an air base with a squadron in it because it
to nation, but their function is identical. For the purposes of will be blue in colour instead of grey. You will also see the
this section I will use the term “squadron” when referring squadron listed in the information panel when you select
to any combat group of air wings.
a province that contains one. The Air Forces Hot Button
Air wing types can be categorised by their size, range displays a complete list of all squadrons and their current
and general function. Strategic bombers are the largest base assignments and is probably the fastest and most
of these and are relatively slow-moving aircraft that can convenient method of rapid selection.
carry very large bomb loads over fairly great distances.
You can access the Air Wing Details information panel
Their missions are usually flown against large fixed em- by selecting any squadron and then clicking on one of the
placements such as infrastructure, factories, fortifications wings. As with land and naval divisions, the data displayed
and other such targets that require the impact of larger in the information panel will reflect any technological uppayloads and have no ability to avoid being hit. Tactical grades that this unit has received, so it may vary slightly
bombers are somewhat smaller and more manoeuvrable, between otherwise identical units. I will not provide a despecialising in precise targeting which is much more effec- tailed description of any data listed here that is equivalent
tive against moving targets (land forces). Close Air Support to a land or naval division’s statistics.
craft are inexpensive, very short range dive bombers which Air Wing Name: Assigned automatically, you may change
can inflict very high casualty levels on ground forces, but this to anything you like.
are unable to defend themselves particularly well against Air Wing Type: Below a representative picture of this
either ground defences or other aircraft. Naval Torpedo class of airplane you will see a description of its type and
Attack Planes are land-based aircraft that are specially specific model.
outfitted with munitions suited to attacks against naval Commander: The commanding officer of the squadron this
vessels and convoys.
wing has been assigned to. You can click anywhere on this
The smallest, fastest and most manoeuvrable aircraft bar to return to the squadron details.
available fall under three different general types: fight- Squadron Strength and Organisation: A graphic display of
ers, interceptors and escorts. Escorts are the slowest of the percentage strength (orange bar) and the percentage
the three types, but they also have the greatest range, so organization (green bar) of the entire squadron. An expandthey are suited to the task of escorting bombers. More ing tooltip gives precise details of these values.
than anything their function is to tie up enemy fighters Squadron Name, Size and Order Box: The name and the
and distract ground defences, allowing the bombers they number of wings in the squadron. If the squadron is curescort to succeed with their missions. Interceptors are the rently executing orders, then a summary will be listed in the
bomber pilot’s worst nightmare. This airplane has excellent order box. You may assign a new order by clicking on the
weaponry and speed for bringing down the larger aircraft, box and selecting a new mission from the scrollable list.
but is limited by its range and manoeuvrability. The fighter Location Details: The current location of this air wing.
is something of a multi-role aircraft. It has slightly greater Strength: The wing’s current combat strength.
range and slightly better attack capabilities than an in- Organisation: The wing’s current organisation.
terceptor but is much more likely to be shot down itself. Morale: The wing’s current morale.
It can also participate in limited attacks against ground Strategic Attack: This is the attack value against strategic
and naval targets, but is unable to stand much in the way targets such as infrastructure, factories, fortifications and
of return fire.
other provincial assets.
There is one last class of “wings” that are ordered from Soft Attack: The attack value used when conducting tactithe Air Wing menu of the production folder. These are cal attacks against soft land targets.
the flying bombs and flying rockets that historically began Hard Attack: The attack value used when conducting tacti-
87
cal attacks against hard land targets.
Naval Attack: The attack value when this wing attacks
a naval target.
Air Attack: This is the attack value used when the target
is another aircraft.
Surface Defence: This is the defence value used when
being fired upon by AA, land forces or naval forces.
Air Defence: This defence value is used when the wing is
being attacked by another aircraft.
Maximum Speed: The wing’s maximum speed.
Supply Consumption: The daily supplies required.
Fuel Consumption: This wing’s daily oil consumption rate
when in flight. It will use no oil when on the ground.
Range: The wing’s maximum range is the maximum distance it can travel from its base. When combining wings
into squadrons, the wing with the shortest range will determine the squadron’s range.
Sea Detection Capability: The wing’s ability to detect
naval vessels.
Air Detection Capability: The wing’s ability to detect other
aircraft in the vicinity.
Experience: This wing’s current experience level.
Effective Supply Efficiency: The wing’s current ESE
value.
Attach/Detach Nuke: This button will only appear once
you have achieved a technology level that allows you to
deploy a nuclear bomb on a rocket or strategic bomber.
Clicking it will ask you to confirm that you wish to remove
a bomb from your nation’s nuclear arsenal. If you confirm
this, the next mission flown by that unit will include the
option to deliver the bomb against the target. You may
later detach it and return it to your arsenal, if you wish.
The button will be greyed out unless the wing is able to
carry a nuclear bomb.
Disband Button: Click this button to disband the wing and
recoup some of its manpower.
able to command 1 wing, a Lt. General may command up
to 3 wings, an Air General may command up to 9 wings,
and an Air Marshal may command as many as 12 wings.
Since air combat, like naval combat, occurs in a single air
zone, the stacking, skill and trait effects are handled in
exactly the same way as they are used in naval combat.
Defending officers’ leadership ratings do not stack to allow
larger numbers of wings since, for these purposes, there
is no defender.
Leader Traits
Air officers: may also possess a special trait that will improve the combat abilities of the squadrons they command,
although these are forfeited if the leader is overstacked.
Tank Buster: This officer excels at commanding squadrons
that primarily attack tactical land targets such as tanks,
mechanised infantry and motorised infantry.
Superior Tactician: This officer is a combat ace, inspiring his squadrons to exceptional performance in air-to-air
combat.
Spotter: An officer with this trait can spot a needle in
a haystack. He is particularly good at aerial reconnaissance, reporting enemy force strengths with remarkable
accuracy.
Carpet Bomber: Ideally suited to command squadrons of
strategic bombers, this officer has a proven record of effective attacks against large provincial structures such as
factories and infrastructure.
Night Flyer: An officer with this ability will negate many
of the normal penalties for flying night missions against
targets of all sorts.
Fleet Destroyer: The tricky timing of pulling out of a steep
attack and releasing a torpedo takes a special sort of skill…
and this officer certainly has it. Naval vessels beware!
Air Bases
The rules that governing air movement and basing are very
similar to those of the naval bases. Each squadron must
be assigned to an air base and may only land in a province
The Squadron Details information panel is nearly identical
that contains one (you may use either your own air bases
to the one used for naval commands, including the squador those of an ally). If you station more wings at a base
ron’s current base assignment and operational range. The
than the size of the base allows, then you will suffer from
set of primary statistics listed for each wing are (in order
reduced rates of strength and organisation recovery, and it
from left to right) the values for air attack, naval attack,
will take longer to upgrade your aircraft to the latest techsoft attack, hard attack, strategic attack, air defence, and
nology. Airfields may be damaged by enemy aerial attacks,
surface defence.
with runways becoming too cratered to accommodate the
Leadership
normal allotment of aircraft (although this can be repaired
Officers perform a similar function for squadrons as they do over time by allocating IC to reinforcement).
for both ground and naval forces. Each leader in your officer
You can review the size and operational status of a base
pool will have the ability to control between one and twelve by selecting a province that contains a base and then
wings at a time: depending on his rank: without incurring hovering your mouse over the airbase symbol. A tooltip
a penalty for overstacking. Air officer ranks are similar to will inform you of the maximum base size and its current
their land force counterparts, with a Maj. General being effective size (which will be lower than the total base size
Squadron Details
88