1
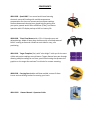
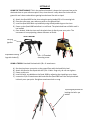
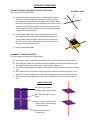
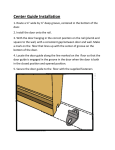
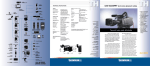
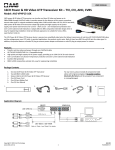
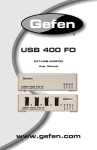
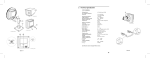
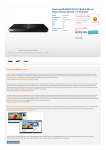
QUAD 1000 OWNERS MANUAL – OPERATION GUIDE Built in Redmond Oregon USA COMPONENTS 4001-0000 Quad 1000 5 arc second zenith laser featuring electronic servo self-leveling with variable temperature compensation for the most accurate and consistent readings. Features downward shooting laser plumb-bob for getting over your point, upward zenith laser to 900 feet (274m), one button operation with LCD display and up to 140 hrs. battery life. 4200-0000 Trivet Floor Mount with a 5/8 x 11 thread mount and adjustable legs. Made of heavy duty aluminum with a finished textured black E-coating surface and a handle on each side for easy, safe positioning. 4001-0010 Target Template (2ea.) with “ultra-bright” bulls-eye for the most visible and precise readings at any distance. Targets feature laser pass through allowing multiple readings at one time, special hard coating that protects the graphics on the target face and two ¼ inch holes for custom mounting. 4000-0200 Carrying Case double wall blow molded, custom fit foam inserts and two locking latches for securing your items. 4001-XXXX Owners Manual - Operators Guide OVERVIEW The Quad 1000 projects a precise laser beam straight up (Zenith) to 900 feet/274m for the purpose of providing plumb control for your project. It also features a short range downward shooting laser beam that is used like a plumb-bob or optical tribrach to easily get directly over your point. The Quad 1000 is a self- leveling instrument with electronic temperature compensation. It measures or senses ambient temperature changes while in operation and continually recalibrates itself to maintain the highest degree of accuracy possible. This insures consistent, accurate readings for plumb control on your project throughout the course of the job. Wrap around carrying handle Zenith plumb laser with up to 900 feet (274m) of range Bulls -eye bubble LCD display with status indicators On/Off power button (Control panel) Centering notches (3ea.) One on each side and one in front of housing Battery door access knob Plumb down laser for getting over your reference point 5/8 x 11 thread mounting hole (Underside) WHAT HAPPENS WHEN YOU POWER-UP? The Quad 1000 is activated and controlled by a single button. When you push the power button, the unit begins to self- level. Leveling status and battery power are displayed on the LCD screen. The downward shooting smaller beam (plumb-bob) is activated and will be blinking. Once the Quad has self- leveled to within its operating spec, the plum-bob laser comes on steady and the long range upward (Zenith) shooting laser beam is activated. Self-leveling time is normally under ten seconds. After five minutes has elapsed, the downward shooting plumb-bob laser automatically shuts off to save battery power. If at a later time you want to check to see if you are over your point, just push the power button to OFF, then push again to ON. This will activate the plum-bob laser for five more minutes. SETTING UP USING THE TRIVET MOUNT: This is the preferred method. It keeps the instrument low to the deck and closer to your reference point. Also, since the unit is only about five inches off the ground it won’t be so vulnerable to getting knocked over like with a tripod. A) B) C) D) Attach the Quad 1000 to the trivet using the spring loaded 5/8 x 11 mounting bolt. Place the trivet over your reference point on the ground floor. Level the Quad 1000 bulls-eye bubble by using the adjustable legs on the trivet. Power up the Quad 1000 and allow it to self-level. The plumb-bob laser will blink until it has leveled. E) Once leveled, slide the trivet until the plumb laser is directly over your point. The instrument is now projecting a beam reference at Zenith. TRIVET MOUNT Carrying handles (2) Adjustable leveling legs with knobs (2) 5/8 x 11 Threaded mounting screw USING A TRIPOD: Standard flat head with 5/8 x 11 attachment A) B) C) D) E) Set the tripod over your point on the ground floor with the head fairly level. Attach the Quad to the tripod with the 5/8 x 11 bolt. Snug only, do not over tighten. Power up the unit. Level the bulls- eye bubble on the Quad 1000 by adjusting the tripod legs up or down. Loosen the 5/8 x 11 attachment bolt and slide the Quad 1000 until the laser plumb-bob is directly over your point. Re-tighten attachment bolt to snug. Tripod leg adjustment for leveling the bulls- eye bubble SETTING UP (CONTINUED) PLACING THE QUAD 1000 DIRECTLY ON THE DECK / SLAB (Flat / level surface ground floor) A) Using a pencil and a square, or the notched target provided, draw a line through and across the center of your reference point extending about 6 inches on either side of center. Next, draw a line through the center at 90 degrees from the first line at about the same 6 inch length from the reference point. You have created an X with the center intersection point being the center of the reference point. REFERENCE POINT 90° B) Set the Quad 1000 on the deck and adjust the unit so that two pencil lines are in line with the two centering notches on the sides of the Quad base, and one line is centered on the notch on the front of the Quad. The instrument is now directly over the reference point. C) Power up the Quad 1000. ALIGNMENT / TEMPLATE TARGETS (The two targets provided are multi-purpose) A) They can be used as a centering template for floor/deck marking as described above. B) The targets are made of a translucent material allowing the laser spot to be read from the opposite side that the laser spot is impacting the target face. C) The centering rings (bulls eye target) make it easy to read the target and center the laser spot D) The targets have a ¼ inch hole through the target center that allows the center of the laser spot to pass through so that more than one target can be used at the same time. E) There are two mounting holes in each target to allow for custom mounting at the job site. TARGET TEMPLATES A) Centering template notches (4) (As shown above) B) Centering rings for laser spot. C) ¼ inch hole to allow center of laser spot to pass through to the next target D) Holes for custom mounting (2) JOBSITE CALIBRATION CHECK 1. Using the trivet mount, tripod or deck / slab mount as shown in “Setting Up” get the Quad 1000 precisely over your reference point on the ground floor. 2. Place the target / template precisely centered on the laser spot at the highest point possible above the Quad 1000. (At least 100 feet if possible) Secure the target so it will not move. 3. Rotate the Quad 1000 180° and very precisely set it over the reference point. 4. Go back to the target and measure any change of the laser spot relative to the bulls-eye target. Given the dynamics and movement of structures due to temperature, wind, loads etc., the target relation to the Quad 1000 laser may be moving and not providing a constant. This should definitely be taken into consideration so as a result, depending on conditions, you could be getting readings of 1/16 or 1/8 at the target per 100 vertical feet. If you are not comfortable or confident with the field calibration check, have it checked by your Dealer Service Department. LASER SAFETY The maximum power output of this laser is less than 5mw. A laser safety kit is supplied with the Quad 1000 laser. The kit contains operator qualification cards and a sign that should be posted near the laser whenever it is in use. Observe the following rules: Never look directly into a laser beam or point the beam into the eyes of others. Set the laser at a height that prevents the beam from shining directly into people’s eyes. DO NOT remove any warning signs from the laser. Only properly trained people are to use this product. If service is required, which results in the removal of the outer protective cover, only factory-trained personnel must perform this. CERTIFICATION The IEC and The United States Government Center of Devices for Radiology Health (CDRH) has classified this laser as a Class 3R/3A laser product. This laser complies with IEC/EN 608251:2001, CDRH 21 CFR 1040.10 and 1040.11. LABELS The labels required for this product are: Identification – Serial IEC Compliance: Non-Interlocked Protective Housing: Danger Logo Type: Aperture: QUAD 1000 SPECIFICATIONS Self-Leveling: Electronic servo with variable temperature compensation Self-Leveling Range: ± 2° Plumb Beam UP Accuracy: 5 arc seconds Laser Type / Class: 635nm / CDRH class 3A / IEC 825-1 class 3R Laser Power: 4.5mw up / 1.0mw down Power Source: 4ea. D-cell Alkaline batteries / 140 hrs. Battery life (Depending on conditions) Plumb Beam UP Range: 900ft. (274m) (Depending on conditions) Plumb Beam Spot Size: At Source 3/8” (9.525mm) (Nominal) 300 ft. 3/8” (9.525mm) 600 ft. 9/16” (14.287mm) 900 ft.7/8” (22.225mm) Operating Temperature: 0° to 120F (-18° to 50c) Storage Temperature: -4° to 158°F (-20° to 70°c) Dust and Water Sealed: To IP56 standards Weight: 7.25 lbs. (3.28k) Dimensions: 6 ½ inch / 16.51cm = H 6 ½ inch / 16.51cm = W 9 ¼ inch / 23.5cm = L Plumb Beam Down Accuracy / Range: 1 arc min. @ 15ft. (4.57m) (For getting over a point) Warranty: 24 months parts and labor for defected workmanship and material Warranty This product is guaranteed against defects in materials and workmanship for both parts and labor, under normal working conditions for two years from the date of purchase, except as noted herein. LaserLine Mfg., Inc. liability under this warranty is limited to repairing or replacing any product returned to an authorized service center for that purpose. Any evidence of attempts to repair this unit by other than factory authorized personnel automatically voids the warranty. LaserLine Mfg., Inc. does not take liability for any damages caused by non-accuracy of this product. Before using the product always check for accuracy per the enclosed instructions in this manual Warning! Under no circumstances, attempt to open or disassemble Laser Housing. Doing so may cause exposure to potentially hazardous levels of laser radiation. Factory Service Center LaserLine MFG., INC. 1810 S.E. First Street, Suite H, Redmond, OR 97756 Factory Service: New Product Warranty service policy for new products stated above. Service Warranty: 2 years on replacement Parts, 90 days on Labor. For all Warranty: Call Order Processing for RMA # at 541-548-0882. The Unit will be repaired and returned by prepaid freight. Non-Warranty Send to: LaserLine MFG., INC. at above address