1
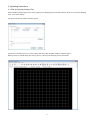
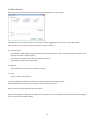
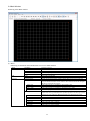
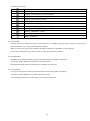
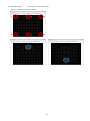
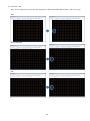
Projector Warping Tool Ver.1.20 User’s Manual Hitachi Maxell, Ltd. 1 Contens 1. Introduction....................................................................................................................................................... 3 1.1 Features ....................................................................................................................................................... 3 1.2 System Configuration ................................................................................................................................. 3 2. Installation ........................................................................................................................................................ 4 2.1 System Requirements ................................................................................................................................. 4 2.2 Projector Warping Tool Installation ........................................................................................................... 5 3. Operating Instructions ..................................................................................................................................... 8 3.1 Start-up Projector Warping Tool ................................................................................................................ 8 3.2 Quit Projector Warping Tool ....................................................................................................................... 9 3.3 Select Projector .......................................................................................................................................... 10 3.4 Main Window............................................................................................................................................. 11 3.5 Editing WarpMap ...................................................................................................................................... 14 3.5.1 Screen Type ............................................................................................................................................ 14 3.5.2 View Mode............................................................................................................................................... 14 3.5.3 Edit Mode................................................................................................................................................. 14 3.5.4 Operating the Editing Area ................................................................................................................... 15 3.6 Initialize the WarpMap ............................................................................................................................. 23 3.7 Open the WarpMap ................................................................................................................................... 23 3.8 Save WarpMap .......................................................................................................................................... 23 3.9 Display Preview......................................................................................................................................... 23 3.10 Send WarpMap ........................................................................................................................................ 24 3.11 Load WarpMap ........................................................................................................................................ 25 3.12 Select Warping Mode .............................................................................................................................. 25 3.13 Display Help ............................................................................................................................................ 25 3.14 Display version ........................................................................................................................................ 25 4. Restrictions ....................................................................................................................................................... 26 ・ Microsoft and Windows is the registered trademark of Microsoft Corporation in the US and other countries. ・ Pentium is the registered trademark of Intel Corporation in the US and other countries. ・ All other trademarks are the property of their respected owners. Warning ・ This software is free via download. The manufacturer has no responsibility for any errors that may occur while using this software. ・ This software, or any product used with this software may not be used for any act which obstructs the Maintenance of the International Peace and Safety. ・ This software, or any product used with this software may not be used for any act which obstructs the Maintenance of the International Peace and Safety. If this software is to be exported, please confirm the regulation of foreign exchange law, foreign trade law, US export administration regulations and the laws and regulations of the interested state and take the necessary procedures. 2 1. Introduction 1.1 Features The Projector Warping Tool is the application to configure the geometric distortion of the projector’s images when the images are projected onto screens which have a particular kind of surface such as a cylinder, a spherical shape, etc. Users can project images on these type of screens by transferring the WarpMap, which is created within this tool, from the PC to a projector which supports the warping function through a network connection. 1.2 System Configuration The following diagram shows the system configuration for using the projector Warping Tool. LAN LAN HUB Projector which supports warping function 3 2. Installation 2.1 System Requirements The following are the requirements of hardware and software to use the Projector Warping Tool. (1) Operating System Windows XP Home Edition Windows XP Professional Windows Vista Home Basic Windows Vista Home Premium Windows Vista Business Windows Vista Enterprise Windows Vista Ultimate Windows 7 Home Basic Windows 7 Home Premium Windows 7 Professional Windows 7 Enterprise Windows 7 Ultimate Windows 8 Windows 8 Pro Windows 8 Enterprise Windows 8.1 Windows 8.1 Pro Windows 8.1 Enterprise (2) Display XGA 1024 x 768 or higher、65,536-colors or higher (3) CPU Pentium 4 (2.8 GHz or higher) (4) Memory 1GB or higher (5) Hard Disc Minimum 150MB free space for installation (6) Wired or Wireless LAN 4 2.2 Projector Warping Tool Installation The following describes the installation process for the Projector Warping Tool to the PC with Windows7 installed. (1) Turn on the PC and log on as Administrator. (2) Shut down all the other application. (3) Double click the “ProjectorWarpingTool_v1.00_Setup.exe”. (4) After a moment, the Choose Setup Language dialog will appear. Select the language you will use in the list and click [OK]. (5) User have to install the “.NET Framework 4.” if the PC has not installed the “.NET Framework 4.0 or later”. Click [install] to install the “.NET Framework 4.0”. (This process won’t be needed if “.NET Framework 4.0 or later” is already installed to your PC.) (6) The Welcome dialog will appear. Click [Next]. 5 (7) License agreement dialog appears. If you accept it, select “I accept the terms of the license agreement” and press [Next]. (8) The Choose Destination Location dialog appears. Click [Next]. If you want to install to other the destination, click [Browse] and select the destination. (9) The Select Program Folder diagram appears. Confirm if the name “Projector Tools” is OK to be registered in the [Start] menu’s [Program], and click [Next]. If you want to change the folder name, please input the name you like and click [Next]. (10) The installation process will be started. 6 (11) “InstallShield Wizard Complete” dialog will be shown when the installation is completed. Click [Finish] to finish the installation. After the installation is completed properly, the folder registered in the step (9) will appear in [Start] menu [All programs]. “Projector Warping Tool” will appear if the installation was successful. The shortcut for “Projector Warping Tool” will also be made on the desktop. 7 3. Operating Instructions 3.1 Start-up Projector Warping Tool Select Windows [Start] [Projector Tools] [Projector Warping Tool]. Or double click the shortcut of “Projector Warping Tool” icon on the desktop. The [Select Projector] window will then appear. Specify the available projector or select [None] and click [OK], the Main window will then appear. When [Cancel] is clicked during this start-up process, the Projector Warping Tool is terminated. 8 3.2 Quit Projector Warping Tool Select [File] – [Exit] or click [x] button to quit the Projector Warping Tool. Confirmation dialogue will then appear, then select [Yes] to finish. 9 3.3 Select Projector Following is the [Select Projector] window which appears during the start-up procedure. Selecting [Projector] - [Select Projector] in the menu or click the [ ] button at the tool bar to show this window. There are three ways to select the projector which you want to connect to. (1) Select from List The projectors, which support warping function and exist on the network, will be searched and shown on the list when the [Projector Select] window appears. Select the projector from the list which you want to connect to. Click [Find] to search the projector again. (2) Manual Set the IP address of the projector manually to connect. (3) None It won’t connect to the projector. Click the [OK] button and then the connection is checked between the selected projector. Main window will be shown when successfully connected with the projector. Error message will appear when the connection failed. When [Cancel] button is clicked, the procedure for selecting the projector is canceled and terminates the Projector Warping Tool or to go back to the Main window. 10 3.4 Main Window Following is the Main window. (1) Menu Following are the Menu items and Function overview in Main window. Menu File Edit Projector Sub Menu New Open… Save As… Exit Undo Redo Select Projector Resolution 1024 x 768 1280 x 800 1920 x 1200 1920 x 1080 Lens Type 1: USL-901 2: SL-902 3: SD-903X 4: SD-903W 5: ML-904 6: LL-905 7: UL-906 Function overview Initialize the edit file Open the existing WarpMap file Save the WarpMap file Quit Projector Warping Tool Cancel the last operation Re execute the canceled operation Display the [Select Projector] window and set the projector to be connected. Select the projector’s resolution. Acquire the resolution data from the specified projector and the resolution will be selected. The resolution cannot be changed if the data is acquired from projector. Select when projector’s resolution is XGA (1024 x 768) Select when projector’s resolution is WXGA (1280 x 800) Select when projector’s resolution is WUXGA (1920 x 1200) Select when projector’s resolution is HD (1920 x 1080) Select the projector’s lens type. Acquire the lens type data from the specified projector and the type will be selected. The type cannot be changed if the data is acquired from projector. Select when USL-901 is installed. Select when SL-902 is installed. Select when SD-903X is installed. Select when SD-903W is installed. Select when ML-904 is installed. Select when LL-905 is installed. Select when UL-906 is installed. 11 Continuation of the list Projector Option Load WarpMap Warp1 Warp2 Warp3 Send WarpMap Warp1 Warp2 Warp3 Preview On Off Warping Mode Off 1 2 3 Screen Type Flat Horizontal Cylinder Vertical Cylinder Sphere Torus Horizontal Corner Wall Vertical Corner Wall View mode Data will be displayed in selected window size Data will be displayed in the actual window size Edit Mode Point Grid Contents About Help Load the WarpMap from the projector Retrieve the WarpMap saved in Warp1 Retrieve the WarpMap saved in Warp2 Retrieve the WarpMap saved in Warp3 Transfer the WarpMap to the projector. Transfer the WarpMap which is shown in the edit area to Warp1 Transfer the WarpMap which is shown in the edit area to Warp2 Transfer the WarpMap which is shown in the edit area to Warp3 Set On/Off to display the preview of WrapMap Turn On the WarpMap preview mode of the projector Turn Off the WarpMap preview mode of the projector Set projector’s Warping mode Turn Off the projector’s Warping mode Set projector’s Warping to 1 Set projector’s Warping to 2 Set projector’s Warping to 3 Select Screen type which image will be projected Select when flat surface screen is used Select when horizontal cylinder surface screen is used Select when vertical cylinder surface screen is used Select when Sphere surface screen is used Select when torus surface screen is used Select when horizontal corner wall surface screen is used Select when vertical corner wall surface screen is used Select View mode of the edit area. Display the Edit area in the current window size. Display Edit area be fixed in the projector’s resolution. Select the Edit mode for WarpMap Select when editing the outer frame. The controllable point is different for selected screen type. Select when editing the grid. Display help for Projector Warping Tool Display version information of Projector Warping Tool (2) Tool Bar Following are the Tool Bar icon’s and it’s corresponding menu. Icon Corresponding Menu [File] - [New] [File] - [Open] [File] - [Save As] [Edit] - [Undo] [Edit] - [Redo] [Projector] - [Select Projector] [Projector] - [Load WarpMap] - [Warp1] [Projector] - [Load WarpMap] - [Warp2] [Projector] - [Load WarpMap] - [Warp3] [Projector] - [Send WarpMap] - [Warp1] [Projector] - [Send WarpMap] - [Warp2] [Projector] - [Send WarpMap] - [Warp3] [Projector] - [Preview]-[On] [Projector] - [Preview]-[Off] 12 Continuation of the list [Option] - [Screen Type] - [Flat] [Option] - [Screen Type] - [Horizontal Cylinder] [Option] - [Screen Type] - [Vertical Cylinder] [Option] - [Screen Type] - [Sphere] [Option] - [Screen Type] - [Torus] [Option] - [Screen Type] - [Horizontal Corner Wall] [Option] - [Screen Type] - [Vertical Corner Wall] [Option] - [View Mode] - [Data will be displayed in selected window size] [Option] - [View Mode] - [Data will be displayed in the actual window size] [Option] - [Edit Mode] - [Point] [Option] - [Edit Mode] - [Grid] [Help] - [Contents] (3) Projector Box Selected projector is displayed in the box in the form of an “IP address (projector name)” when you selected your projector from the “List” in the [Select Projector] window. When you select your projector by setting the IP address manually, the IP address is only displayed. “Unselected” is displayed if you selected “None” in the [Select Projector] window. (4) Resolution Box Resolution of the projector which you selected in [Select Projector] window is displayed. “1024x768” will be displayed if you didn’t select the projector. Resolution displayed in the box will change if you change it in the menu. (5) Lens type Box Lens type of the projector which you selected in [Select Projector] window is displayed. “SD-903X” will be displayed if you didn’t select the projector. Lens type displayed in the box will change if you change it in the menu. 13 3.5 Editing WarpMap 3.5.1 Screen Type Select the shape of the screen which image will be projected from the [Option] - [Screen type] in the menu the Main window, or click / / / / / / button at the tool bar. There are 5 types of images you can choose from : - Flat --- Horizontal Cylinder --- Vertical Cylinder --- Sphere --- Torus --- Horizontal Corner Wall --- Vertical Corner Wall --3.5.2 View Mode Select view mode from the [Option] - [View mode], or click / button at the tool bar. There are 2 modes you can choose. (1) Data will be displayed in selected window size Edit area is modified to be displayed in the current window size so that the full WarpMap can be shown at all times. (2) Data will be displayed in the actual window size Edit area’s resolution is fixed to the projector’s resolution. If it doesn’t fit inside the window, scroll bar will be displayed. 3.5.3 Edit Mode Select Edit mode from the [Option] - [Edit Mode], or click / button at the tool bar. There are 2 modes you can choose. (1) Point This mode is to edit the outer frame of the WarpMap. The controllable point is different for selected screen type. (2) Grid This mode is to edit the grid in the WarpMap individually. 14 3.5.4 Operating the Editing Area User can edit the WarpMap by Grab, Drag and Drop with the editing point ( ■ ) in the edit area. When mouse cursor is moved near the editing point ( ■ ) the figure changes from to and you are able to drag with the left button of the mouse and drop at the necessary point. You cannot edit the shape anymore if the figure turns to . If the WarpMap is changed to the shape which a projector cannot support, the color of the line will turn to orange as shown below. WarpMap cannot be transferred to the projector if orange lines are displayed. (Preview is still displayed and available) Please edit the WarpMap within the range to prevent the line from turning orange. 15 Editing point differs based on which Edit Mode and Screen type is selected. Following describes how the editing point will be displayed based on the selected Edit Mode and Screen type. (1) Edit mode: Point, Screen type: Flat There are 4 Edit points as shown below. 1 2 3 4 (2) Edit mode: Point, Screen type: Horizontal Cylinder There are 6 Edit points as shown below. 1 2 5 6 3 4 When editing point 5 or 6, the blue guide line appears as shown below. Drag the point along the guide line by using mouse. 16 (3) Edit mode: Point, Screen type: Vertical Cylinder There are 6 Edit points as shown below 1 5 2 3 6 4 When editing point 5 or 6, the blue guide line appears as shown below. Drag the point along the guide line by using mouse. 17 (4) Edit mode: Point, Screen type: Sphere There are 7 Edit points as shown below. 1 6 2 5 3 7 4 When editing point 5 - 7, the blue guide line appears as shown below. Drag the point along the guide line by using mouse. Point 5 can be edited after the point 1 - 4 is moved. 18 (5) Edit mode: Point, Screen type: Torus There are 8 Edit points as shown below. 1 5 7 3 2 8 6 4 When editing point 5 - 8, the blue guide line appears as shown below. Drag the point along the guide line by using mouse. 19 (6) Edit mode: Point, Screen type: Horizontal Corner Wall There are 6 Edit points as shown below. 1 2 5 6 3 4 20 (7) Edit mode: Point, Screen type: Vertical Corner Wall There are 6 Edit points as shown below. 1 5 2 3 6 4 21 (8) Edit mode: Grid, There are 221 edit points for XGA and 187 edit points for WXGA/WUXGA/HD regardless of the screen type. XGA WXGA/WUXGA HD 22 3.6 Initialize the WarpMap User can Initialize the WarpMap displayed in edit area by selecting [File] - [New] from the menu or clicking the button at the tool bar in the main window. Confirmation message will appear if there is a WarpMap which the user is editing. 3.7 Open the WarpMap User can open the existing WarpMap file by selecting [File] - [Open] from the menu or clicking the button at the tool bar in the main window. Please select the WarpMap file (extension: warp2) for Projector Warping Tool. User cannot open the WarpMap file when the resolution or the lens type of the selected projector and WarpMap file doesn’t match. In this case, please change the projector to “Unselected” in the [Select Projector] window and open the WarpMap again. Selected WarpMap is displayed on the main window after it is loaded correctly. Confirmation message will appear if there is a WarpMap which user is editing. 3.8 Save WarpMap User can save the edited WarpMap by selecting [File] - [Save As] from the menu or click the button at the tool bar in the main window. Please select the WarpMap file (extension: warp2) for Projector Warping Tool. Please put the file name and select the destination to save in the Save As window of the Windows Standard type. WarpMap file is saved with the extension of .warp2. 3.9 Display Preview User can check how the WarpMap under editing is displayed by using the Preview function. Please select [Projector] - [Preview] - [On] from the menu or click the button at the tool bar in the main window. Please select the WarpMap file (extension: warp2) for Projector Warping Tool. The projected image will show the same image as edit area in the main window when preview function is set to On. When the user moves the cursor in the edit area, the cursor in the projected image will move in the same way. When the user drags and drops the edit point, the WarpMap which is displayed in the projected image will be updated when the edit point is dropped. Please select [Projector] - [Preview] - [Off] in the menu or click the displaying the preview. 23 button at the tool bar in the main window to quit 3.10 Send WarpMap User can send the WarpMap file, which the user created, to the projector by selecting [Projector] - [Send WarpMap] [Warp1] / [Warp2] / [Warp3] from the menu or clicking the / / button at the tool bar in the main window. Please click [Yes] in the confirmation message window to transfer the WarpMap displayed in the edit area to the specified storage location. The display confirmation message will appear when sending the WarpMap is completed. Select [Yes] to display the sent WarpMap. Sent WarpMap will be applied to the projection image 24 3.11 Load WarpMap User can load the WarpMap file from Warping mode 1 - 3, which is saved in the projector, and display the file on the edit area of main window. The WarpMap, which the user can load, is limited to the one that is sent by using this tool. User can load the WarpMap file by selecting [Projector] - [Load WarpMap] - [Warp1] / [Warp2] / [Warp3] from the menu or clicking the / / button at the tool bar in the main window. Please click [Yes] in the confirmation message window to load the WarpMap which is saved in the projector’s specified storage location and to display it within the edit area of main window. 3.12 Select Warping Mode User can switch the Projector’s Warping Mode by selecting [Projector] - [Warpig Mode] - [OFF] / [1] / [2] / [3] from the menu in the main window. 3.13 Display Help User can display Help for this tool by selecting [Help] - [Contents] from the menu or clicking the button at the tool bar in the main window. 3.14 Display version User can display the version of this tool by selecting [Help] - [About] from the menu in the main window. 25 4. Restrictions Restrictions for this tool are shown below. - Please use this tool when projector is turned ON. - This tool may not function well when there is firewall software, other than Windows Firewall, installed to the PC. Please register this tool as exceptional or disable the firewall software by referring the manual. - The connection may fail if the user goes through the connection procedure of the LiveViewer application during the usage of this tool. 26