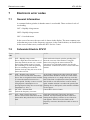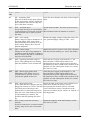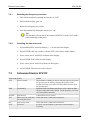
1
GB
MANUAL
HTC 950 RX
Translation of manual in original language
Contact Information
HTC Sweden AB
Box 69
SE-614 22 Söderköping - Sweden
Tel: +46 (0) 121-294 00
Fax: +46 (0) 121-152 12
You can find addresses for our retailers and service partners on our website:
www.htc-floorsystems.com
Always specify the model and serial number when asking questions about your product.
Trademarks
HTC is a trademark owned by HTC Sweden AB. Other names and products mentioned
in this manual may be registered trademarks owned by the relevant companies.
© 2007 HTC Sweden AB. All rights reserved.
EC Declaration of conformity
Manufacturer:
HTC Sweden AB
Box 69
SE-614 22 Söderköping
Sweden
+46 (0)121-29400
Type of equipment:
Grinding machine
Make:
HTC
Model:
HTC 950 RX
Year of manufacture:
See machine name plate
Serial number:
See machine name plate
As the manufacturer, we hereby declare under our sole responsibility that the above
product with serial numbers from 2004 onward conforms to the applicable regulations
in directives MD 2006/42/EC, EMC 2004/108/EC and LVD 2006/95/EC. The following
standards have been used as a basis: ISO 5349-1:2001, ISO 5349-2:2001, ISO
20643:2005, ISO 3741.
This product was CE-marked in 2004. The technical documentation is available from
the manufacturer.
Original of the EC declaration of conformity (Swedish). Other languages are
translations of the original of the EC declaration of conformity.
Söderköping, 01-01-2010
Peter Lundgren
Development Manager,
HTC Sweden AB
Kåre Kilgren
Product Manager,
HTC Sweden AB
HTC 950 RX
1
2
3
Table of contents
Introduction
1
1.1 General ............................................................................
1.2 Responsibility ..................................................................
1.3 Manual .............................................................................
1.3.1 Safety instructions – Explanation of symbols .....
1.4 Transportation .................................................................
1.5 On delivery ......................................................................
1.6 Unpacking the machine ...................................................
1.7 Machine name plate ........................................................
1.8 Handling and storage ......................................................
1.9 Vibration and noise ..........................................................
1.9.1 Hand and arm vibrations ....................................
1.9.2 Sound pressure level ..........................................
1
1
1
1
2
2
3
3
4
4
4
5
Safety
6
2.1 General Information .........................................................
2.2 Warnings .........................................................................
2.3 Notes ...............................................................................
6
6
7
Machine description
9
3.1 General machine description ........................................... 9
3.2 Description of controls – Control panel ........................... 11
3.3 Description of controls – Radio control unit ..................... 13
i
Table of contents
4
Usage
15
4.1
4.2
4.3
4.4
4.5
4.6
15
16
17
18
20
23
24
25
25
26
27
27
27
27
28
28
29
29
30
30
31
31
4.7
4.8
4.9
4.10
4.11
5
ii
HTC 950 RX
General Information .........................................................
Handle settings ................................................................
Wheel locking ..................................................................
Handling weights .............................................................
Access to grinding tools ..................................................
Fitting and replacing grinding tools ..................................
4.6.1 Fitting grinding tools ...........................................
4.6.2 Changing grinding tools ......................................
Preparations for dry grinding ...........................................
Preparations for wet grinding ..........................................
Manoeuvring via the control panel ..................................
4.9.1 Standby ..............................................................
4.9.2 Emergency stop switch ......................................
4.9.3 Start the machine - Manual driving .....................
4.9.4 Overload .............................................................
Manoeuvring via the radio control panel .........................
4.10.1 Standby ..............................................................
4.10.2 Start the Machine - Radio Control ......................
4.10.3 Stop the machine - Radio control .......................
4.10.4 Changing the radio frequency ............................
4.10.5 Interrupted radio communication ........................
Making operation easier ..................................................
Maintenance and repairs
33
5.1
5.2
5.3
5.4
5.5
5.6
5.7
5.8
5.9
33
33
33
33
34
34
35
35
35
General Information .........................................................
Cleaning ..........................................................................
Charging the machine's battery .......................................
Charging/replacing the radio control unit's batteries .......
Daily ................................................................................
Every week ......................................................................
Every month (or 100 hours) .............................................
Repairs ............................................................................
Spare parts ......................................................................
HTC 950 RX
6
Table of contents
Faultfinding
36
6.1 General Information .........................................................
6.1.1 The machine will not start ...................................
6.1.2 The machine vibrates or wears the tool
unevenly .............................................................
6.1.3 The machine is grinding at an angle ..................
6.1.4 The machine stops - manual operation ..............
6.1.5 The machine stops - radio control ......................
6.1.6 The fuses trip frequently .....................................
6.1.7 The machine cannot cope ..................................
36
36
Electronic error codes
38
7.1 General Information .........................................................
7.2 Schneider Electric ATV31 ................................................
7.2.1 Resetting the frequency converter .....................
7.2.2 Checking the last error code ..............................
7.3 Schneider Electric ATV312 ..............................................
7.3.1 Resetting the frequency converter .....................
7.3.2 Checking the last error code ..............................
38
38
40
40
40
41
41
8
Technical data
42
9
Environment
44
7
10 Warranty and CE marking
36
36
36
36
37
37
45
10.1 Warranty .......................................................................... 45
10.2 CE marking ...................................................................... 45
iii
Table of contents
iv
HTC 950 RX
HTC 950 RX
1
Introduction
1.1
General
Introduction
HTC 950 RX(R = Radio control, X = Four grinding discs) is a grinder that can be used
to grind, strip, clean and polish concrete, natural stone and terrazzo floors. The
machine's area of application depends on the choice of tool. You can easily mount and
replace the tool, thanks to the EZchange patented tool system.
The radio control means the operator is not affected by any vibrations from the
machine. Moreover, the grinding work is more effective since, for instance, emptying
the dust separator and handling the cables can be done at the same time as the machine
is grinding.
Read the manual carefully, so you are totally familiar with the machine before you start
to use it. Contact your local retailer for further information. For contact information, see
Contact Information at the start of the manual.
1.2
Responsibility
Even though every effort has been made to make this manual as complete and accurate
as possible, we bear no responsibility for incorrect or missing information. HTC
reserves the right to change descriptions in this manual without giving prior notice.
This manual is protected by the Copyright Act and no part of it may be copied or used
in any other way without the written approval of HTC.
1.3
Manual
In addition to the general functions, this manual deals with the areas of application and
the maintenance of the grinder.
1.3.1
Safety instructions – Explanation of symbols
A number of symbols are used in the manual to highlight the most important sections,
see below. In order to avoid both personal injury and material damage as far as possible,
it is extremely important to read and understand the text next to these symbols
particularly carefully. There are other symbols indicating practical tips. These are to
help you use the machine in the easiest and most effective way.
The following symbols are used in the document to indicate where special attention is
needed.
1.0
1
Introduction
HTC 950 RX
Warning!
This symbol means Warning! and indicates that incorrect use can result in
material damage to the machine or accessories. If you see this symbol next to a
section of text, you must be particularly careful when reading through the text
and not carry out any stages of which you are unsure. This is to protect you and
other users and to avoid damaging the machine or other equipment.
Note!
This symbol means Note! and indicates that material damage can occur if the
machine or its accessories are used incorrectly. If you see this symbol next to a
section of text, you must be particularly careful when reading through the text
and not carry out any stages of which you are unsure. This is to avoid damage
to the machine or other equipment.
Tip!
This symbol means Tip! and indicates that you can get tips and advice on ways
to make operating your machine or associated equipment easier, and to avoid
wear. When you see this symbol you should read the accompanying text to
facilitate your work and increase the service life of the machine.
1.4
Transportation
Note!
The machine cannot be moved manually if the drive wheels are locked and the
radio control activated.
Warning!
Never deactivate the radio control function when you have stopped the machine
on a sloping surface during loading, since the machine can start to roll.
The machine is best transported securely fastened to a pallet.The machine can also be
moved short distances using the inbuilt battery drive. The battery capacity is sufficient
to transport the machine for ca. 30 minutes.
The machine can also be transported by lifting equipment, for example truck of crane,
using the lifting eyes provided. In which case, make sure that the weights are locked in
the forward position and that the handle is in its back position, see Figure 4-5, page 19 and Figure 4-2, page 17.
1.5
On delivery
The following items are included in the delivery. Contact you retailer if anything is
missing.
2
1.0
HTC 950 RX
1.6
Introduction
•
Grinding machine
•
Manual
•
Locking key for control cabinet
•
Start key
•
Hammer EZ system
•
Splash guard
•
The radio control unit
Unpacking the machine
Warning!
Read through the safety instructions and the manual carefully before use.
•
•
1.7
Check carefully to see if the packaging or machine has been damaged during
delivery. If there is any sign of damage, contact your retailer and report it. Report
packaging damage to the transport company as well.
Check that the delivery matches the order. If there are any discrepancies, contact
your retailer.
Machine name plate
The machine name plate provides the following information. The model and serial
number must be specified when ordering spare parts for the machine.
Figure 1-1. Machine name plate
1.0
3
Introduction
1.8
HTC 950 RX
1.
Model
2.
Model number
3.
Serial number
4.
Year of manufacture
5.
Power (kW)
6.
Voltage (V)
7.
Current (A)
8.
Frequency (Hz)
9.
Rotational speed (r.p.m.)
10.
Weight (kg)
11.
Address field
Handling and storage
The machine should be stored in a dry, warm location when not in use. Otherwise it may
become damaged by condensation and coldness.
1.9
Vibration and noise
Warning!
Always use ear muffs when using the machine.
1.9.1
Hand and arm vibrations
Hand and arm weighted vibration level [m/s²] for HTC 950 RX have been measured
with equipment approved according to ISO 5349-1:2001. The measurement uncertainty
for the measurement apparatus has been measured as +/- 2%.
The machine has been tested in accordance with ISO 5349-2:2001 and ISO 20643:2005
in order to identify the operations that contribute to the most frequent vibration
exposures. At vibration levels > 2.5 m/s², the exposure time should be limited in
accordance with the table below. For vibration levels > 5 m/s², immediate measures
should be taken by the employer to ensure that the exposure time does not exceed the
time specified in the table below.
Identified work conditions Measured values [m/s²] Daily permitted exposure
(number of hours)
4
Grinding/polishing
3,58
15,6
Floor preparation (T-rex)
5,44
6,76
1.0
HTC 950 RX
1.9.2
Introduction
Sound pressure level
This machine has been tested for noise in accordance with ISO 3741. For information
on sound pressure levels, see the table in chapter Technical data, page 42.
1.0
5
Safety
HTC 950 RX
2
Safety
2.1
General Information
This chapter contains all the warnings and notes that should be considered for HTC 950
RX .
2.2
Warnings
Warning!
The machine may only be used or repaired by personnel who have received the
requisite theoretical and practical training and who have read the user manual.
Warning!
Never use the machine in an environment with a risk of explosion or fire.
Familiarise yourself with the fire-protection instructions for the working area
and follow them.
Warning!
Secure the area around the working area. No unauthorised persons should be
allowed within a 15-metre radius of the machine. If a loose object were to catch
under the grinding head, this could be flung out and cause personal injury.
Warning!
Use protective equipment such as safety shoes, safety goggles, protective
gloves, breathing mask and ear muffs.
Warning!
The machine must only be started with the grinding head down. The rotating
disc must be touching the floor and the correct tool must be fitted.
Warning!
Read through the safety instructions and the manual carefully before use.
Warning!
Always use ear muffs when using the machine.
Warning!
During grinding, the tools become very hot. Tip the machine back and allow it
to stand for a short while. Use protective gloves when removing the tools.
Warning!
Disconnect the electrical supply, when changing tools or repairing the machine.
6
1.0
HTC 950 RX
Safety
Warning!
The machine must only be used and moved on level surfaces. There is a risk of
crushing if the machine starts to roll.
Warning!
Connect the machine to an earth fault breaker.
Warning!
Do not clean the machine using a high-pressure washer. Otherwise moisture
may penetrate electrical elements and damage the machine’s drive system.
Warning!
The operator must never leave the machine unattended.
Warning!
The machine may only be used when the splash guard is fitted.
2.3
Notes
Note!
The machine may only be used to grind and polish natural stone, terrazzo,
concrete, or other materials stated in this manual or that are approved by HTC.
Note!
Only original tools and spare parts from HTC may be used for the machine.
Otherwise neither the CE marking nor the warranty will be valid.
Note!
For the CE marking to be valid, the instructions in this manual must be
followed.
Note!
The machine must only be lifted using the lifting eye intended for the purpose
in accordance with the relevant instructions.
Note!
The machine should be stored in a dry, warm (plus degrees) location when not
in use.
Note!
If the machine is stored in a cold (minus degrees) location, it must be placed in
a warm (plus degrees) location for at least two hours before use.
1.0
7
Safety
HTC 950 RX
Note!
The appropriated dust extractor must be used when dry grinding. Contact HTC
for model recommendation.
Note!
The dust extractor's suction hose must be connected to the appropriate socket
on the machine. Adjust the dust extractor to match the grinder's capacity.
Note!
Do not use the emergency stop switch to stop the machine, except in
emergencies.
Note!
As long as the emergency stop switch is pressed in, the machine cannot be
started. Reset by turning the switch 45° clockwise so that it pops out again. The
machine can then be restarted.
Note!
After removing glue and wet grinding, always lift up the grinding heads so that
they do not stick to the floor and damage machine components and the floor
when restarting.
Note!
When wet grinding, the water tank must be filled with water. Only use cold
water with no chemical additives.
8
1.0
HTC 950 RX
3
Machine description
3.1
General machine description
Machine description
HTC 950 RXIs designed for grinding in large spaces. It is used to grind, coarse grind,
prepare and polish concrete, natural stone and terrazzo floors or other materials
specified in this manual or material recommended by HTC. The machine is a perfect
choice for removing coverings and grinding of concrete floors according to the HTC
Superfloor method, which is an environmentally-friendly method for grinding and
polishing concrete floors.
Thanks to the fact the machine can be operated with the help of radio control, the work
is significantly simplified and the grinding time lengthened. Furthermore, the work is
more effective, since the discharging of the dust separator can be performed while the
machine is radio controlled.The machine is also light and easy to transport, load and
unload because of the inbuilt battery operation.
The machine is constructed from a number of main components, see Figure 3-1, page 10 and Figure 3-2, page 11. Since it is equipped with four grinding discs, the
machine is balanced and easy to use, which results in more efficient stripping and better
grinding results. It also has an integrated weight system for adjusting the grinding
pressure, which makes the machine perfect for those with high demands for flexibility.
The handle can be set in a number of different tilt positions. Choose a position that suits
you best, when you want to operate the machinery manually.
The grinding cover has a connection for an external suction hose used for dry grinding.
The machine can easily be equipped with a large number of tools, depending on the
material to be ground. For the different tools, see HTC’s Product Catalogue under the
Grinding Guide tab.
HTC 950 RX can be equipped with a Mist Cooler system for effective cooling of the
grinding tools. This system enables a very fine water mist to be diffused through a
nozzle onto the floor surface, which cools the tools, making the grinding more effective.
1.0
9
Machine description
HTC 950 RX
Figure 3-1. The front of the machine
10
1.
Handle
2.
Handle lock
3.
Lifting eye
4.
Cover
5.
Motor
6.
Weights
7.
Grinding cover
8.
Splash guard
9.
Weight lock
10.
Water connection
1.0
HTC 950 RX
Machine description
Figure 3-2. The machine's rear
3.2
1.
Control panel
2.
Electrical connection
3.
Extraction connection
4.
Weight lock
5.
Control cabinet
6.
Drive motor box
7.
Driving lock
Description of controls – Control panel
The picture below shows the machine's control panel:
1.0
11
Machine description
HTC 950 RX
Figure 3-3. Control panel
1.
Power - Standby indicator: Indicates that the machine's functions have been
activated. Shines with a green glow when the start key (9) is turned to the right
(On).
2.
Overload - Overload indicator: Lights up to indicate that the machine is using
too much power. If this is ignored, the power supply to the motor will be
interrupted and an error code generated.
3.
Com Error - Communication error indicator: Lights when there is a
communication error between the grinding machine and the radio control unit.
4.
Radio Enabled - Radio control indicator: Lights when the knob "Radio
On/Off" is turned to the right (On).
5.
Radio On/Off - Turn the knob to the right, when the grinding machine is to be
manoeuvred via radio control.
6.
Speed - Rotation speed: Regulates the rotational speed of the machine’s
grinding discs. This is only possible when the grinding discs rotation is started
via the "Start/Stop" knob.
7.
Start/Stop -Start/stop the grinding discs' rotation. Turn the knob to "Start" to
start the rotation, turn the knob to "Stop" to switch off the rotation.
8.
EM-Stop-Emergency stop switch: Press the switch in an emergency to cut the
power to the machine.
9.
On/Off - Start key to start/stop the machine's functions: Turn the key to the
right (On) to activate the machine's functions and prepare for starting. Turn the
knob to the left (Off) to switch off the machine's functions.
When the machine is not to be used, the knob "Start/Stop" must always be turned to the
Stop position and the knob "Radio On/Off" (5) is always turned to the Off position. The
knob (5) being in the Off position is indicated by the "Radio Enabled" (4) indicator
going out.
12
1.0
HTC 950 RX
Machine description
Note!
Press the emergency stop switch (EM-Stop), if the machine accidentally starts
to move to avoid personal injury and/or damage to the machine.
3.3
Description of controls – Radio control unit
The picture below shows the machine's radio control unit:
Figure 3-4. The radio control unit
1.0
1.
STEERING - Control for steering the machine to the right (R) and left (L).
2.
FREQ - Frequency button: Push the button to change the frequency of the
radio control.
3.
GRINDING SPEED (0 - 100%) - GRINDING SPEED (0 - 100%) - Regulates the rotational speed of the machine’s grinding discs.
4.
ON/STOP - Start/stop the grinding discs' rotation. Move the control to ON to
start the rotation, move the control to STOP to switch off the rotation.
5.
Battery compartment - Holds the batteries that power the radio control unit.
6.
EM-STOP - Breaks the radio contact between the radio control unit and the
machine's receiver, which results in the machine stopping immediately. The
radio control unit should be switched off when it is not in use. Can also be used
to start/stop the radio control unit. Used in combination with the button "Start
of radio communication".
7.
SPEED (min - max) - Turn to adjust the machine's speed in the direction of
movement.
8.
FWD/RWD - Control for moving the machine forward (FWD) or backwards
(RWD).
13
Machine description
•
14
HTC 950 RX
9.
OFFSET (L - R) - Turn the control to the left (L) or the right (R) to adjust for
any tendency to veer.
10.
Start of radio communication - Button to start the radio communication
between the radio control unit and the machine's receiver. It is used together
with the EM-STOP button.
11.
Display/Channel Info - Two points blink alternately with a red light, when the
radio control unit is activated. The displays also shows information on the
radio channel and any error messages. The letter "L" appears and blinks
rapidly, when the batteries need to be recharged/replaced. The radio control
unit functions for about 30 min after the "L" appears for the first time.
Take the radio control unit to a safe place when the "L" appears in the display
and switch off the unit. Install two charged AA batteries 1.2 V NiMH, or
alternatively two normal, non-rechargeable 1.5 V AA. For instruction on
charging/replacement, see under Charging/replacing the radio control unit's
batteries, page 33.
1.0
HTC 950 RX
Usage
4
Usage
4.1
General Information
The following section describes how to change tools and how to operate the grinding
machine. This section does not deal with the technical aspects of grinding, such as
selection of grinding tools, etc. For choice of tools, see HTC’s Product Catalogue under
the Grinding Guide tab.
Warning!
The machine may only be used or repaired by personnel who have received the
requisite theoretical and practical training and who have read the user manual.
Warning!
Never use the machine in an environment with a risk of explosion or fire.
Familiarise yourself with the fire-protection instructions for the working area
and follow them.
Warning!
Secure the area around the machine. No unauthorised persons should be within
a 15-metre radius of the machine. If loose objects get under the grinding head,
these may be flung out and cause personal injury.
Warning!
Use protective equipment such as safety shoes, safety goggles, protective
gloves, breathing mask and ear muffs.
Warning!
The machine must only be started with the grinding head down. The rotating
disc must be touching the floor and the right tool must be fitted.
Warning!
The machine must only be used and moved on level surfaces. There is a risk of
being clamped if the machine should start to roll.
Warning!
The operator must never leave the machine unattended.
Tip!
Check the minimum recommended cable area before using an extension cord.
You will find the recommended cable area under Technical data, page 42.
1.0
15
Usage
4.2
HTC 950 RX
Handle settings
The appropriate working height is set with the help of the adjustable handle. The handle
is locked with the handle lock on the handle cover, see Figure 4-1, page 16. Figure 4-1. Locking the handle
1. Loosen the handle by turning the handle lock to the left or the right.
2. Move the handle to the desired position, the handle locks automatically in the
desired position.
16
1.0
HTC 950 RX
Usage
3. Make sure that the handle lock returns to the original position to guarantee that
the handle is locked properly.
Figure 4-2. The handle's position
1. Working position - always used when operating manually. It can also be used
when driving via the radio control unit.
2. Rear position - used for tipping the machine to make tool replacement easier. It
can also be used to advantage when driving the machine via the radio control
unit.
3. The forward position - used, for instance, for transportation, as the machine takes
up significantly less space.
Lock the handle in the desired position, using the handle lock, see Figure 4-1, page 16. 4.3
Wheel locking
The machine is equipped with a locking mechanism on each wheel, see the driving lock
in Figure 3-2, page 11. The driving lock is used to release and decouple the
machine's wheels from their drive motors, which are located in the drive motor box, see Figure 3-2, page 11. In the locked position, the drive motors are connected to the
wheels, this means that the machine can only be moved by using the drive motors via
the operating panel or the radio control unit
1.0
17
Usage
HTC 950 RX
•
Decouple the wheels by pulling the locking pin straight out, see Figure 4-3,
page 18.
Figure 4-3. Decouple the wheels
•
Turn the locking pin 90 and release it for the secured position, see Figure 4-4,
page 18.
Figure 4-4. Turn 90 degrees
In order to couple the wheels to the drive motors, the same steps as above are carried
out.
Tip!
During faultfinding, the wheels can be decoupled from the motors and test
driven without the machine moving.
4.4
Handling weights
The machine is equipped with two weights to make it easy to move the machine's centre
of gravity. Each weight is provided with two locking pins with which the weights can be
lowered and locked in three positions; forward, up (normal position) and backwards.
•
18
Pull each pin out and lock in the extracted position by turning in the direction of
the arrow, see Figure 4-5, page 19.
1.0
HTC 950 RX
Usage
Tip!
We recommend that the weights are folded up during grinding, since if the
grinding pressure is too high and the tool is wrong, it can cause damage to the
machine and the floor.
Warning!
There is a risk of crush injuries when the weights are folded back, since these
are not locked in this position.
To obtain a greater grinding pressure, and thereby increased grinding effect, the weights
are lowered forwards, see Figure 4-5, page 19.
Figure 4-5. Weights lowered forwards
During normal grinding as well as during transport of the machine, the weights should
be placed in the up position, see Figure 4-6, page 19.
Figure 4-6. Weights in the up position
1.0
19
Usage
HTC 950 RX
During the exchange of tools and when tools with a high removal rate (T-Rex™) are
used, the weights should be folded back, see Figure 4-7, page 20.
Figure 4-7. Weights folded back
4.5
Access to grinding tools
Warning!
The tool becomes very hot during use. Tip the machine back and allow it to
stand for a short while. Use protective gloves when removing the tools.
Warning!
Disconnect the electrical supply, when changing tools or repairing the machine.
20
1.0
HTC 950 RX
Usage
1. Set the handle to the rear position - see Figure 4-2, page 17
2. Fold the weights back and place a foot against the frame, see Figure 4-8, page 21.
Figure 4-8. Foot on weight
1.0
21
Usage
HTC 950 RX
3. Tip the machine backwards carefully, until the weights reach the floor, see Figure 4-9, page 22.
Figure 4-9. Weights on the floor
4. Tip the machine further back, until the weight lock reaches the floor, see Figure 4-10, page 22.
Figure 4-10. Weight lock on the floor
22
1.0
HTC 950 RX
Usage
5. Lift the machine up as far as you can, lock the weight in its up position. Then
lower the machine completely to the floor, see Figure 4-11, page 23.
Figure 4-11. The machine rests on the floor
4.6
Fitting and replacing grinding tools
Warning!
Disconnect the electrical supply, when changing tools or repairing the machine.
Warning!
The tool becomes very hot during use. Tip the machine back and allow it to
stand for a short while. Use protective gloves when removing the tools.
As the machine is equipped with the patented EZchange tool system, fitting and
replacing grinding tools is quick and easy. The tool system consists of wings on which
diamond grinding tools are fitted without the need for screws.
1.0
23
Usage
4.6.1
HTC 950 RX
Fitting grinding tools
1. Slide the grinding tool diagonally, from above, down into the appropriate guide
slot on the tool holder, see Figure 4-12, page 24. Then push the tool fully
into the guide slot.
Figure 4-12. Fitting grinding tools
2. Lock the grinding tool into the tool holder by giving it a few light taps with a
rubber hammer - see Figure 4-13, page 24.
Figure 4-13. Locking grinding tools
24
1.0
HTC 950 RX
4.6.2
Usage
Changing grinding tools
1. Remove the grinding tool by giving it a few light taps with a rubber hammer so
the locking mechanism releases, see Figure 4-14, page 25. Then draw the
tool up out of the guide slot.
Figure 4-14. Removing grinding tools
2. Slide the grinding tool diagonally, from above, down into the appropriate guide
slot on the tool holder, see Figure 4-12, page 24. Then push the tool fully
into the guide slot.
3. Lock the grinding tool into the tool holder by giving it a few light taps with a
rubber hammer - see Figure 4-13, page 24.
4.7
Preparations for dry grinding
Warning!
Check that the splash guard is fitted.
1.0
25
Usage
HTC 950 RX
1. Connect a dust extractor to the machine. For dust extractor models, see under the
Suction System tab in the HTC Product Catalogue.
Note!
The dust extractor's suction hose must be connected to the appropriate
socket on the machine. Adjust the dust extractor to match the grinder's
capacity.
2. Inspect the floor carefully and remove any objects sticking up, such as
reinforcement rods or bolts, and any debris that could get caught in the machine.
3. Attach the appropriate tool to the machine, see under Fitting grinding tools,
page 24
4. Set the handle to the working position, see Figure 4-2, page 17. 4.8
Preparations for wet grinding
Warning!
Check that the splash guard is fitted.
1. Always use liquid suction when wet grinding.
Tip!
Never use a dust extractor, as blockages may develop in the dust
extractor's suction hose and filter.
2. Inspect the floor carefully and remove any objects sticking up, such as
reinforcement rods or bolts, and any debris that could get caught in the machine.
3. Attach the appropriate tool to the machine.
4. Set the handle to the working position, see Figure 4-2, page 17. Warning!
Only use cold water with no chemical additives.
5. Connect the water hose to the water connection.
6. Turn the tap on the machine on to start the water supply.
7. Turn in the opposite direction to turn the water off.
26
1.0
HTC 950 RX
4.9
Usage
Manoeuvring via the control panel
Tip!
Drive the machine manually in difficult to navigate spaces.
During manual driving, the operator pushes the machine forwards across the floor
surface and manoeuvres it via the control panel, see Figure 3-3, page 12.
4.9.1
Standby
To activate the machine's functions, turn the start key to the right. When the key is in
this position, the Power green indicator light on the control panel is lit, indicating that
the machine is in standby mode.
4.9.2
Emergency stop switch
The emergency stop switch, (EM-Stop) must only be used in an emergency.
When the switch is pressed, all electrically-powered equipment on the machine are
turned off.
Note!
Do not use the emergency stop switch to stop the machine other than in
emergencies, as it decreases the lifespan of the machine's electrical
components.
Note!
As long as the emergency stop switch (EM-Stop) is pressed, the machine
cannot be started. Reset by turning the switch 45° so that it pops out again. The
machine can then be restarted.
4.9.3
Start the machine - Manual driving
For a description of the control panel, see Figure 3-3, page 12.
1. Make sure the emergency stop switch has not been activated.
2. Check that the wheel lock is decoupled from the wheel before operating, see Figure 4-3, page 18.
3. Insert the cable.
4. Start the dust separator if dry grinding is to be done.
1.0
27
Usage
HTC 950 RX
5. Turn the start key to the right "On".
6. Start the grinding discs rotation by turning the knob to "Start".
7. Set the speed for the grinding discs using the Speed knob.
8. The machine has now started.
4.9.4
Overload
If the machine is using too much power, the Overload indicator on the control panel
goes off. The machine switches off automatically after a while if this is ignored. Reduce
the speed of the grinding discs to see if the Overload indicator goes out. If this does not
help, follow the procedure for troubleshooting.
Tip!
If the machine is heavy to operate, it can be due to the placing of the weights.
Fold the weights up or back, to unload the grinding head, see Figure 4-6, page 19 and Figure 4-7, page 20.
4.10
Manoeuvring via the radio control panel
During radio control, the machine is manoeuvred via the radio control unit, see Figure 3-4, page 13.
Warning!
Never leave the machine unattended when operating via the radio control unit.
When operating via the radio control unit, the machine is driven forwards with the help
of the motors in the drive motor box. From a work environment perspective, operation
via the radio control unit is recommended.
The radio control unit and the machine are individually paired, which means that only
the intended unit can control a machine. The identification code can be seen on the
machine sign and on the radio control unit.
28
1.0
HTC 950 RX
Usage
1. Loosen the battery cover on the radio control unit by screwing loose the screws
on the cover.
2. Place two charged AA batteries 1.2 V NiMH, or alternatively two normal,
non-rechargeable 1.5 V AA batteries in the battery space.
Note!
Rechargeable batteries must be fully charged before they are used for the
same time.
Warning!
Never attempt to charge standard, non-rechargeable 1.5 AA batteries.
3. Close the cover and fasten it in place with the screws.
•
4.10.1
Check that the wheel lock is secured between the wheel and the drive motor, see Figure 4-4, page 18.
Standby
To activate the machine's functions, turn the start key to the right "On". When the key is
in this position, the Power green indicator light on the control panel is lit, indicating that
the machine is in standby mode.
4.10.2
Start the Machine - Radio Control
Note!
To save energy, the radio control unit automatically switches off if a button is
not activated within a given time. in which case, the blinking points in the
display are extinguished.
1. Turn the knob "Radio On/Off" on the control panel to the right, to prepare the
machine for manoeuvring via the radio control unit, the indicator "Radio
Enables" on the control panel lights up.
2. Press the button "EM-STOP" and then press the button to start the radio
communication on the radio control unit to activate the radio control. The
buttons can be activated in any order, but after you have pressed the first button
the second must be pressed within 5 seconds. When the radio control is
activated, the two points start blinking alternately with a red light on the control
unit's display.
1.0
29
Usage
HTC 950 RX
3. Zero the radio control unit by doing the following:
- Turn the knob for speed (SPEED) to "min".
- Set the control for driving forwards/backwards (FWD/RWD) in the middle
position.
- Turn the knob for the rotational speed (GRINDING SPEED) to 0%.
- Move the control for starting and stopping the grinding discs' rotation
(ON/STOP) to STOP.
4. Press the button to start radio communication. The communication error
indication (ComError) on the machine's control panel should then go out.
5. Start the grinding discs rotation by moving in the control "ON/STOP" to ON.
Adjust the rotational speed with the knob "GRINDING SPEED".
6. Start the machine's drive motors by moving the control "FWD/RWD" to FWD.
Adjust the speed with the knob "SPEED".
•
4.10.3
Check the wheel's locking, if the machine does not move, see instructions under Wheel locking, page 17.
Stop the machine - Radio control
1. Turn the knob for speed (SPEED) to "min".
2. Set the control for driving forwards/backwards (FWD/RWD) in the middle
position so the machine stops.
3. Turn the knob for the rotational speed (GRINDING SPEED) to 0%.
4. Move the control for starting and stopping the grinding discs' rotation
(ON/STOP) to STOP.
5. Press in the button "EM-STOP", to switch off the radio control unit.
4.10.4
Changing the radio frequency
If several machines are used in the same workplace, there can be interference with the
radio communication, which means that it is necessary to change the frequency on a
machine. It can also be necessary to change the radio frequency, if other equipment that
is used in the workplace causes interference with the radio communication.
Change the frequency, by doing the following:
30
1.0
HTC 950 RX
Usage
1. Stop the machine, for how this is done see under Stop the machine - Radio
control, page 30.
2. Press and hold in the button to start radio communication.
3. Press on the frequency button "FREQ". The machine's radio receiver
automatically searches for the new frequency, the number of the selected
frequency channel is shown briefly on the radio control unit's display. Press on
the frequency button "FREQ" to see the selected frequency channel while
operating.
Note!
If the error code "Jt" is shown on the display, immediately contact the
HTC Service Centre for instructions.
4. Release the button to start radio communication.
5. Start the machine, for how this is done see under Start the Machine - Radio
Control, page 29.
4.10.5
Interrupted radio communication
If the distance between the machine and the radio control unit becomes too great, the
radio communication will be broken and the machine stops. In order to restart operation
via the radio control unit, follow the instructions under Start the Machine - Radio
Control, page 29.
4.11
Making operation easier
In order to keep the suction hose for the dust extractor and the power cable out of the
working area and/or path of the machine, the hose and cable can be arranged as shown
in the picture below.
1.0
31
Usage
HTC 950 RX
Figure 4-15. Making operation easier
Tip!
By arranging the hose and cable as shown in the picture, you avoid disruptive
stoppages caused by having to re-position the cable and hose.
32
1.0
HTC 950 RX
Maintenance and repairs
5
Maintenance and repairs
5.1
General Information
We recommend regular inspections of all seals.
Warning!
Disconnect the electrical supply, when changing tools or repairing the machine.
Warning!
Use protective equipment such as safety shoes, safety goggles, protective
gloves, breathing mask and ear muffs.
Warning!
During electro-welding work on the machine, the radio receiver must always be
disconnected to avoid damage to the receiver's electrical system.
5.2
Cleaning
Warning!
Do not clean the machine using a high-pressure washer. Otherwise moisture
may penetrate electrical elements and damage the machine’s drive system.
5.3
•
Vacuum the electrical cabinet, if required.
•
Always clean the machine after use with a damp sponge or cloth.
Charging the machine's battery
Warning!
Do not expose the battery to naked flames since this could cause an explosion.
The battery that drives the motors for the machine's drive wheel is charged continuously
as long as the machine is connect to the mains.
5.4
Charging/replacing the radio control unit's batteries
Warning!
Do not expose the batteries to naked flames since this could cause an explosion.
1.0
33
Maintenance and repairs
HTC 950 RX
•
Recharge/replace the batteries when L" appears in the display and blinks quick,
see Figure 3-4, page 13.
Procedure:
1. Stop the machine, see under Stop the machine - Radio control, page 30.
2. Loosen the battery cover by screwing the screws out on the cover
3. Remove the old/flat batteries.
4. Replace with the new/charged batteries.
5. Close the cover and fasten it in place with the screws.
6. Start the machine, see under Start the Machine - Radio Control, page 29.
5.5
Daily
•
Wash the machine, if it is used for wet grinding or with the Mist Cooler system.
•
Check for wear to the grinding tool – abnormal or uneven wear may indicate a
damaged grinding holder.
Check the tool holder and grinding holder to ensure that no damage or cracks
have arisen. Replace the parts if there is any damage.
Remove any residues of building material from the radio control unit.
•
•
5.6
Every week
•
Wash the machine.
•
Check the grinding holders. Remove the tools and run the machine in mid air at
the slowest speed. If the grinding holders oscillate or wobble significantly, they
are damaged.
Check that the upper belt is whole, by turning the large disc in one direction or
the other. If there is resistance the belt is whole, if the disc rotates freely the belt
is broken.
•
Tip!
Recondition all the grinding holders at the same time.
34
1.0
HTC 950 RX
5.7
5.8
Maintenance and repairs
Every month (or 100 hours)
•
Tighten anything that may have vibrated loose.
•
Remove the grinding cover and check that it is undamaged.
•
Check the upper belt and replace if necessary.
•
•
Check the seals on the shafts on which the upper belt runs and replace if
necessary.
Scrape and vacuum-clean the parts shielded by the grinding cover.
•
Test run and listen for any dissonance from the bearings.
•
Clean or, if necessary, replace the filter to the electrical cabinet.
•
Check the functioning of the radio control unit's ME-STOP button.
•
Check the parts that wear on the radio control unit, e.g. the dust cover.
Repairs
Any repairs that may be required must be carried out by a HTC Service Centre, which
has trained service personnel and uses HTC original parts and accessories. Contact your
retailer if your machine requires servicing. For contact information, see Contact
Information at the start of the manual.
5.9
Spare parts
To ensure rapid delivery of spare parts, always specify the model, the machine's serial
number and the spare part number when ordering. Information on the model and serial
number can be found on the machine's name plate.
Information on spare part numbers can be found in the machine's spare parts list which
is available to read or print out from the accompanying digital media or HTC's website:
www.htc-floorsystems.com
Only original tools and original spare parts from HTC may be used. Otherwise neither
the CE marking nor the warranty will be valid.
1.0
35
Faultfinding
HTC 950 RX
6
Faultfinding
6.1
General Information
This chapter describes some of the faults that may occur and how to deal with these
faults. If the fault cannot be dealt with, or if there are other faults, contact your nearest
retailer. See Contact Information at the front of the manual.
6.1.1
The machine will not start
•
•
•
•
6.1.2
•
•
•
Check the condition of the grinding holders. If the grinder holders need
reconditioning, contact HTC for information about spare parts.
Recondition the grinding holder. See under The machine vibrates or wears the
tool unevenly, page 36.
Check that the upper belt is undamaged. Try to turn the large disc in one
direction or the other, there should be resistance. If it turns freely, the belt is
broken and must be replaced.
The machine stops - manual operation
•
6.1.5
Check that there is movement between the chassis and grinding head. If
necessary, loosen one of the two pins in order to increase the play between the
chassis and the grinding head.
Check the belts, replace if necessary.
The machine is grinding at an angle
•
6.1.4
Check the error code on the frequency converter's display. For corrective
measures, see Electronic error codes, page 38.
The machine vibrates or wears the tool unevenly
•
6.1.3
Check if the emergency stop switch on the control panel is pressed. Reset the
switch by turning it 45°.
Check if the power connection is correct. Check that there is full voltage
available on the supply's phase/phases.
Check the fuses and contactors in the electrical cabinet.
Check the error code in the display on the frequency converter, see Electronic
error codes, page 38.
The machine stops - radio control
Other equipment can interfere with the radio traffic between the machine and the radio
control unit, which means that the communication error indicator (ComError) can start
36
1.0
HTC 950 RX
Faultfinding
to blink on and off. When the contact between the machine and the radio control has
been broken for too long the machine stops for safety reasons.
6.1.6
•
Check if the communication error indicator (ComError) blinks.
•
Restart the machine and switch off any interfering equipment.
•
Check the error code in the display on the frequency converter, see Electronic
error codes, page 38.
The fuses trip frequently
•
•
6.1.7
The load is too high on the distribution box to which the machine is connected.
Use a different socket or reduce the speed of the machine.
Check the tools. Ensure that the correct tools are used, that they are in working
order and that they are correctly fitted.
The machine cannot cope
•
•
•
•
Heavy load. Press the handle down slightly so that the grinding head eases
slightly away from the surface being ground.
Sticky coating on the surface being ground. Run half of the machine on the
surface to be cleaned and half on the clean surface. This removes any residue
from the tools.
Check the tools. Ensure that the correct tools are used, that they are in working
order and that they are correctly fitted.
Voltage drop. Check that the cable area meets HTC’s recommendations.
Tip!
Check the minimum recommended cable area before using an extension cord.
You will find the recommended cable area under Technical data, page 42.
1.0
37
Electronic error codes
HTC 950 RX
7
Electronic error codes
7.1
General Information
A common fault on grinders is that the motor is overloaded. There are three levels of
overloading.
OCF = Rapidly rising current
OHF = Rapidly rising current
OLF = Overload motor
In the event of an error, the error code is shown in the display. The most common error
codes that may occur on the frequency converter, in the control cabinet, are listed below.
In the event of other errors, contact the HTC Service Centre.
7.2
Schneider Electric ATV31
Error
code
Cause
Action
OCF
OCF = Rapidly rising current
Due to a high short-term load that is 2.5
times the nominal current over a certain
period. This usually occurs if you run
into something or if either the grinding
discs or something else inside the
machine locks up. May also occur if the
motor short circuits.
Check mechanical inertia, spin the grinding discs.
Reset the converter if the machine is sluggish.
Remove the plug for the motor and start the
converter to see if the fault remains. See also the
point below. Contact HTC Service Centre if the fault
remains.
OHF
OHF = Rapidly rising current
A less severe version of the same fault
above. Due to a high short-term load that
is 2 times the nominal current over a
certain period. Usually occurs as a result
of high power consumption over a
prolonged period. May also occur at high
temperatures (+ 50° C).
As the fault is related to the above fault, the action
indicated there should be carried out. If the surface
being worked on is very tough, this may cause this
fault. If the fault is temperature-related, the machine
must be left to cool down before it can be started
again. Another solution is to reduce the speed of the
grinding discs to half speed, as the machine will then
use less power.
InF /
EEF
InF / EEF = Internal fault
Fault in the frequency converter.
Contact HTC Service Centre.
SCF
SCF = Short circuit in the motor
Due to a short circuit in the motor or the
motor cable. May also be due to an earth
fault.
Check the wiring and, if necessary, the motor
isolation. Test by loosening the motor cable and
starting the frequency converter to see if the error
code appears. If this occurs, the fault is in the
frequency converter, otherwise the cable or motor is
broken.
38
1.0
HTC 950 RX
Electronic error codes
Error
code
Cause
tnF
tnF = Autotuning fault
Check the motor. Replace the motor with an original
May arise if the motor has been replaced motor.
by the wrong motor, which is outside the
norm values for the converter. May also
arise if the motor is broken.
OLF
OLF = Overload motor
Switch off the machine. The motor protection must
Occurs when the motor is overloaded for cool.
a prolonged period. The motor protection Wait 8 minutes before the machine is restarted.
in the converter trips in order to protect
the motor.
OSF
OSF = Over-voltage
Measure the supply voltage. Change the socket. The
Mains voltage too high or disturbance in max. permitted supply voltage is 240V + 10%.
the mains supply. May occur if large
motors/machines are switched on or off
in the vicinity. May be due to non-CE
marked equipment.
USF
USF = Under-voltage
Replace the socket or remove some of the consumers
Voltage too low due to large number of from the network (welding, etc. causes such faults).
consumers using the network. Temporary
drop in voltage. Long and/or weak cables
may also cause this fault.
ObF
ObF = Operating load when stopped
Arises if the grinding discs are running
when the machine is to be switched off.
Check the power supply to the machine, i.e. the
fuses and cable. If the machine still does not
function after the power supply has been checked,
the fault may be due to a fault on the contactor in the
machine or in the control panel. In this case, contact
HTC Service Centre.
PHF
PHF = Mains supply phase break
PHF flashes in the display for a few
seconds before it goes out. Occurs if
someone has pulled out the cord.
Check the power supply to the machine, i.e. the
fuses and cable. If the machine still does not
function after the power supply has been checked,
the fault may be due to a fault on the contactor in the
machine or in the control panel. In this case, contact
HTC Service Centre.
OPF
OPF = Motor phase break
Occurs when the motor plug has not been
plugged in correctly or is loose. The fault
may also be due to the plugs or the
terminal boxes in the motor being loose.
May also occur if the machine goes into
overspeed during, for instance, test
operation with the grinding disc in the
air.
Inspect the cable to the motor or the terminal boxes
in the motor. Reduce the speed if you are
test-operating the machine in the air. The fault
occurs if the motor current is around 8% of the
converter’s nominal current, which is 11 Amp on 2.2
kW single phase.
SLF
SLF = Faulty connection of remote
Restart the computer. If the fault remains, contact
terminal.
HTC Service Centre.
Occurs if connection to a remote terminal
is faulty. May also be due to an internal
fault.
1.0
Action
39
Electronic error codes
7.2.1
HTC 950 RX
Resetting the frequency converter
1. Turn off the machine by turning the start key to "Off".
2. Wait until the display goes out.
3. Reset the emergency stop switch.
4. Start the machine by turning the start key to "On".
Tip!
The machine will not start if the control ON/STOP is in the "ON" mode
when switching on the power.
7.2.2
Checking the last error code
1. Press and hold ESC until four dashes (----) are shown in the display.
2. Press ENTER when rdy (ready) is shown. SET is then shown in the display.
3. Press “arrow down” until SUP is shown in the display.
4. Press ENTER. FrH is shown in the display.
5. Press “arrow down” until LFt is shown in the display.
6. Press ENTER. The last error code is shown.
7.3
Schneider Electric ATV312
Error code Cause
Action
OCF
Excess current
The machine is running too fast or with too great a load. Lower
the speed, lower the load by changing the position of the
weights and check your tools. Check mechanical inertia, spin
the grinding discs.
OHF
Overheating
Open the electrical cabinet and allow to cool. Check the filter
and the cooling fans in the cabinet. Let the frequency converter
cool down before restarting.
IFx/EEF
Internal error
Contact HTC Service Centre
SCF
Short circuit or earth fault
involving the motor
Check the motor's cables and connections.
tnF
Auto-tuning fault
Check the motor's cables and connections.
OLF
Overload
See OCF. Let the frequency converter cool down before
restarting.
40
1.0
HTC 950 RX
Electronic error codes
Error code Cause
Action
OSF
Excess voltage
Mains voltage too high or disturbance in the mains supply.
Check the supply voltage, change socket.
USF
Under-voltage
The connection cable is too long, poor connection or too many
consumers connected to the mains. Change socket, use shorter
cables and lower the speed.
PHF
Mains supply phase break
Incorrect power supply to the frequency converter. Check the
fuses in the mains supply and the connection cable.
OPF
Motor phase break
Check the motor's cables and connections.
7.3.1
Resetting the frequency converter
1. Turn off the machine by turning the start key to "Off"
2. Wait until the display goes out.
3. Reset the emergency stop switch.
4. Start the machine by turning the start key to "On".
Tip!
The machine will not start if the control ON/STOP is in the "ON" mode when
switching on the power.
7.3.2
Checking the last error code
1. Press Enter. rEF is shown in the display.
2. Turn the knob counter-clockwise, until SUP is shown in the display.
3. Press Enter. FrH is shown in the display.
4. Turn the knob counter-clockwise, until LFt is shown in the display.
5. Press Enter. The last error code is shown in the display.
For the buttons and knobs described here, see Figure 7-1, page 41
Figure 7-1. Enter button and knob - Schneider
1.0
41
Technical data
8
HTC 950 RX
Technical data
The table below shows the machine’s technical data.
HTC 950
RX EU
HTC 950 RX HTC 950
EU Mist
RX US
HTC 950
RX US Mist
Motor
15 kW
15 kW
15 kW
15 kW
Current
32 A
32 A
32 A
32 A
Tension
3 x 380-415 3 x 380-415
V
V
3 x 440-480 3 x 440-480
V
V
LEDs
24 V
24 V
24 V
24 V
Control current
24 V
24 V
24 V
24 V
Total machine weight
617 kg
622 kg
617 kg
622 kg
Chassis weight
313 kg
318 kg
313 kg
318 kg
Weight, grinding head
304 kg
304 kg
304 kg
304 kg
Weights
2 x 50 kg
2 x 50 kg
2 x 50 kg
2 x 50 kg
Grinding diameter
920 mm
920 mm
920 mm
920 mm
Grinding pressure, weights lowered forwards
362 kg
362 kg
362 kg
362 kg
Grinding pressure, weights in the up position
251 kg
251 kg
251 kg
251 kg
Grinding pressure, weights folded backwards
195 kg
195 kg
195 kg
195 kg
RPM
458 - 1374
r.p.m
458 - 1374
r.p.m
458 - 1374
r.p.m
458 - 1374
r.p.m
Water tank
10 litres
10 litres
10 litres
10 litres
Grinding discs
4 x 270 mm 4 x 270 mm
4 x 270 mm 4 x 270 mm
Recommended minimum cable area
6 mm²
6 mm²
6 mm²
6 mm²
92 dBA
92 dBA
92 dBA
Sound pressure level, average value over time 92 dBA
according to ISO 3741, measurement
uncertainty according to class 1 measuring
instruments for sound level meters.
42
1.0
HTC 950 RX
Technical data
Figure 8-1. Width of the machine in millimetres
Figure 8-2. Height and length of the machine in millimetres
1.0
43
Environment
9
HTC 950 RX
Environment
HTC's products are constructed mainly of recyclable metal and plastic. The main
materials used are listed below.
Chassis
Frame
Electro-galvanised steel
Handle
Plastic covered steel
Wheels
Polyurethane-filled rubber wheels
Cover
ABS plastic
Motor
Aluminium
Grinding head
Lower cover
Aluminium
Cover
ABS plastic
External plate and steel components
Electro-galvanised steel
Other components
Steel
Electrical system
Control cabinet
Stainless steel
Cables
Copper conductors with PVC covering
Plastic components can be recycled by sorting as hard plastics. Electronics can be
deposited as electronic waste. The machine or machine components can also be returned
to HTC Sweden AB. For recycling and scrapping of components, see the applicable
national regulations for each country.
44
1.0
HTC 950 RX
10
Warranty and CE marking
10.1
Warranty
Warranty and CE marking
This warranty only covers manufacturing defects. HTC bears no responsibility for
damage that arises or occurs during transportation, unpacking or use. In no instance and
under no circumstances shall the manufacturer be held responsible for damage and
defects caused by incorrect use, corrosion or use outside the prescribed specifications.
The manufacturer is not responsible for indirect damage or costs under any
circumstances. For complete information on the manufacturer's warranty period, see
HTC's current warranty terms.
Local distributors may have special warranty terms specified in their terms of sale,
delivery and warranty. If there is any uncertainty regarding warranty terms, please
contact your retailer.
10.2
CE marking
CE marking of a product guarantees its free movement within the EU area in
accordance with EU regulations. CE marking also guarantees that the product fulfils
various directives (the EMC Directive and other possible requirements in so-called
directives for new procedures in accordance with these regulations). This machine
carries the CE mark in accordance with the Low Voltage Directive (LVD), the
Machinery Directive and the EMC Directive. The EMC Directive states that electrical
equipment must not disturb its surroundings with electromagnetic radiation and that it
must also be immune to electromagnetic interference in the surroundings.
This machine is classified for use in environments such as heavy industry, light industry
and homes. See the Manufacturer’s Declaration of Conformity, which shows that the
machine is harmonised with the EMC Directive.
1.0
45