1
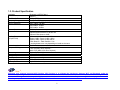
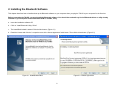
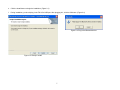
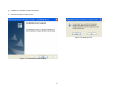
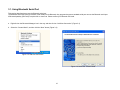
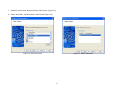
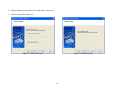
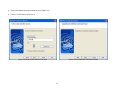
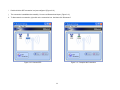
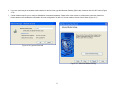
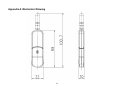
Bluetooth USB Adapter
TALUS
User Guide
Version 1.0.0
2009-07-07
1
User Guide for the TALUS
Document Version 1.0.0
Firmware version 1.0.X
Printed in Korea
Copyright
Copyright 2009, Systembase, Inc. All rights reserved.
Systembase Co.,LTD. reserves the right to make changes and improvements to its product without providing notice.
Trademark
TALUS is a trademark of Systembase Co.,LTD..
Windows® is a registered trademark of Microsoft Corporation.
Ethernet® is a registered trademark of XEROX Corporation.
Notice to Users
When a system failure may cause serious consequences, protecting life and property against such consequences with a backup system or safety device
is essential. The user agrees that protection against consequences resulting from system failure is the user's responsibility.
This device is not approved for life-support or medical systems.
Changes or modifications to this device not explicitly approved by Systembase will void the user's authority to operate this device.
Precautions and Safety
Do not drop or subject the device to impact. Damage to your products may result from improper use.
Keep away from harsh environments including humid, dusty, and smoky areas. Damage to your products may result from improper use.
Do not use excessive force on the buttons or attempt to disassemble the device. Damage to your products may result from improper use.
Do not place heavy objects on the product. Damage to your products may result from improper use.
2
Contents
1. Introduction
4
1.1. Overview.....................................................................................................................................4
1.2. Package Check List....................................................................................................................4
1.3. Product Specification.................................................................................................................. 5
2. Installing the Bluetooth Software
3. Using the Bluetooth Adapter
6
9
3.1. Using Bluetooth Serial Port ...................................................................................................... 10
3.2. Using Dial-up Network (DUN) .................................................................................................. 15
Appendix A. Mechanical Drawing
Appendix B. Warranty
19
20
B.1. GENERAL WARRANTY POLICY ............................................................................................ 20
B.2. LIMITATION OF LIABILITY ...................................................................................................... 20
B.3. HARDWARE PRODUCT WARRANTY DETAILS .................................................................... 20
B.4. SOFTWARE PRODUCT WARRANTY DETAILS..................................................................... 21
B.5. THIRD-PARTY SOFTWARE PRODUCT WARRANTY DETAILS............................................ 21
Appendix C. Contact Information
22
1. Introduction
1.1. Overview
Thank you for purchasing TALUS. TALUS is a Bluetooth-USB adapter with replaceable external antenna. TALUS supports Bluetooth 2.0+EDR class 1
with working distance up to 300 meters. In addition, working distance can be further extended using optional dipole or patch antennas. TALUS supports
USB 2.0 for the computer interface and can be used with Windows using Bluetooth stack driver included in the CD or MAC OS X using MAC OS X
Bluetooth stack driver.
1.2. Package Check List
z
z
z
z
TALUS
Stub Antenna
Quick Start Guide
CD-ROM including Windows Bluetooth driver, User Guide and Spec sheet
4
1.3. Product Specification
Standards
Max Transfer Rate
Frequency Range
Transmit Output Power
Receive Sensitivity
Antenna Connector
Antenna Gain
Working Distance
(In Open Field)
Bluetooth stack software
Computer OS Support
Size
Operating Temperature
Storage Temperature
Humidity
Regulatory Approvals
Warranty
Bluetooth 2.0+EDR Class 1
USB 2.0
3 Mbps (EDR)
2.402 ~ 2.480GHz
+19dBm (+6dBm EDR) E.I.R.P
Basic 1Mbps: -88 dBm
EDR 2Mbps: -87dBm
EDR 3Mbps: -82dBm
RP-SMA
Default Stub Antenna: 1 dBi
Optional Dipole Antennas: 3 dBi & 5 dBi
Optional Patch Antenna: 9 dBi
Stub antenna – Stub antenna: 300 m
Dipole (3 dBi) – Dipole (3 dBi) : 400 m
Dipole (5 dBi) – Dipole (5 dBi): 600 m
Patch antenna – Patch antenna: 1 km
* working distance can vary depending on install environment
Toshiba
Windows 2000/XP/Vista (32/64bit)
Linux (3rd party driver required)
MAC OS X (MAC OS X driver required)
72(L) x 22(W) x 10(H) mm
-20 ~ +70℃
-40 ~ +85℃
90% Non-condensing
FCC, CE, KCC
1 year limited warranty
*
Note :
Bluetooth v2.0 supports improved AFH function. AFH function is to mitigate the interference between WiFi and Bluetooth radios by
automatically avoiding the active WiFi channel from Bluetooth link. However, AFH does not provide a complete solution making WiFi and
Bluetooth work together in harmony. It is highly recommended for users to test their wireless system enough before deployment since the
overall system performance is affected by various environmental factors such as distance between them.
5
2. Installing the Bluetooth Software
This chapter describes how to install and set up the Bluetooth software on your computer when you plug the TALUS to your computer for the first time.
Before connecting the TALUS, you must install the Bluetooth software. You should also uninstall any kind of Bluetooth driver or utility already
installed on your computer such as Widcomm BTW or Toshiba, if any.
a. Insert the installation software CD.
b. Click on “Install Bluetooth Utility / Driver”
c.
The InstallSheld wizard is started. Click the Next button. (Figure 2.1)
d. Read the License and click the “I accept the terms in the license agreement” radio button. Then click the Next button. (Figure 2.2)
Figure 2.1: InstallShield wizard
Figure 2.2: License Agreement
6
e. Click the Install button to begin the installation. (Figure 2.3)
f.
During installation, you should plug in the TALUS to USB port. After plugging in it, click the OK button. (Figure 2.4)
Figure 2.4: Plug in the Bluetooth device
Figure 2.3: Ready to install
7
g. Installation is completed. Click the Finish button.
h. Click the Yes button to restart your PC.
Figure 2.6: restart your PC
Figure 2.5: InstallShield wizard complete
8
3. Using the Bluetooth Adapter
This chapter describes how you can use TALUS to make use of SPP and DUN services. For more information on other Bluetooth services, please refer
to the online Help provided by the Bluetooth Manager software. To open the Bluetooth Manager Help, please right-click on the Bluetooth Manager icon
on the tray, and then click on “Help” (Figure 3.1).
Figure 3.1: Getting Help File
9
3.1. Using Bluetooth Serial Port
This section describes how to use the Bluetooth serial port.
The Bluetooth Serial Port (SPP) provides a virtual serial port via Bluetooth. Any program that uses a standard serial port can use the Bluetooth serial port.
A Bluetooth passkey (PIN code) is required for to connect to. Please confirm your Bluetooth PIN code.
a. Right-click on the Bluetooth Manager icon in the tray, and then click on “Add New Connection” (Figure 3-2)
b. Select the “Custom Mode”, and then click the “Next” button (Figure 3-3)
Figure 3.2: Add New Connection
Figure 3.3: Select the “Custom Mode”
10
c.
Select the device name, and then click the “Next” button. (Figure 3.4)
d. Select "Serial Port”, and then click the “Next” button (Figure 3.5)
Figure 3.4: Select the Device
Figure 3.5: Select “Serial Port”
11
e. Select a COM port to use, and click the “Next” button. (Figure 3.6)
f.
Click the “Next” button (Figure 3.7)
Figure 3.6: Select a COM port
Figure 3.7: COM port setting
12
g. Enter a connection Name and change an icon. (Figure 3.8)
h. Click the “Finish” button. (Figure 3.9)
Figure 3.8: Enter a name and select an icon.
Figure 3.9: Complete the Connection Wizard
13
i.
Double-click the SPP connection icon just configured. (Figure 3.10)
j.
The connection is established successfully. You can use Bluetooth serial port. (Figure 3.11)
k.
To disconnect the connection, right-click on the connection icon. And then click “Disconnect”
Figure 3.10: Connect SPP
Figure 3.11: Complete the Connection
14
3.2. Using Dial-up Network (DUN)
This section describes how to connect to the Internet using a mobile telephone.
You must have already signed up with a provider and obtained a connection ID and password. Please ensure you have confirmed the ID, password and
telephone number of your provider's access point before you begin the set-up process.
A Bluetooth passkey (PIN code) is required for to connect to. Please make a note of your Bluetooth passkey.
a. Right-click on the Bluetooth Manager icon in the tray, and then click on “Add New Connection” (Figure 3.12)
b. Select the “Custom Mode”, and then click the “Next” button (Figure 3.13)
Figure 3.12: Add New Connection
Figure 3.13: Select the “Custom Mode”
15
c.
Select the device name of the mobile telephone, and then click the “Next” button. (Figure 3.14)
d. Select "Dial-up Networking”, and then click the “Next” button (Figure 3.15)
Figure 3.14: Select the Mobile Telephone
Figure 3.15: Select the “Dial-up Networking”
16
e. If you are connecting to the wireless modem station for the first time, type the Bluetooth Passkey (PIN Code). And then click the “OK” button (Figure
3.16)
f.
Certain modems require you to configure initialization commands separately. Please refer to the modem or mobile phone instruction manual for
further details on the initialization commands. Once the configuration is done or if it’s not needed, click the “Next” button (Figure 3.17).
Figure 3.16: Type the PIN Code
Figure 3.17: Advanced Modem Setting
17
g. Type your own telephone number, ID and password according to the arrangement with your provider. And then click the “Finish” button. The settings
will be registered, and the connection icon will appear in the “Bluetooth Settings” window. (Figure 3.18)
h. Start your network application, then the “Dial-up Connection” window will appear. Click the “Connect” button. Once you have connected to the
Internet, a message and a connection icon will appear in the task tray (Figure 3.19)
i.
To disconnect the connection, right-click on the connection icon. And then click “Disconnect”.
Figure 3.19: Dial-up Connection
Figure 3.18: Create Dial-up Connection
18
Appendix A. Mechanical Drawing
19
Appendix B. Warranty
B.1. GENERAL WARRANTY POLICY
Systembase Co.,LTD. (hereinafter referred to as Systembase) warrants that the Product shall conform to and perform in accordance with published
technical specifications and the accompanying written materials, and shall be free of defects in materials and workmanship, for the period of time herein
indicated, such warranty period commencing upon receipt of the Product.
This warranty is limited to the repair and/or replacement, at Systembase’s discretion, of defective or non-conforming Product, and Systembase shall not
be responsible for the failure of the Product to perform specified functions, or any other non- conformance caused by or attributable to: (a) any
misapplication or misuse of the Product; (b) failure of Customer to adhere to any of Systembase’s specifications or instructions; (c) neglect of, abuse of,
or accident to, the Product; or (d) any associated or complementary equipment or software not furnished by Systembase.
Limited warranty service may be obtained by delivering the Product to Systembase or to the international distributor it was purchased through and
providing proof of purchase or receipt date. Customer agrees to insure the Product or assume the risk of loss or damage in transit, to prepay shipping
charges to Systembase, and to use the original shipping container or equivalent.
B.2. LIMITATION OF LIABILITY
EXCEPT AS EXPRESSLY PROVIDED HEREIN, SYSTEMBASE MAKES NO WARRANTY OF ANY KIND, EXPRESSED OR IMPLIED, WITH RESPECT
TO ANY EQUIPMENT, PARTS OR SERVICES PROVIDED PURSUANT TO THIS AGREEMENT, INCLUDING BUT NOT LIMITED TO THE IMPLIED
WARRANTIES OF MERCHANTABILITY AND FITNESS FOR A PARTICULAR PURPOSE. NEITHER SYSTEMBASE NOR ITS DEALER SHALL BE
LIABLE FOR ANY OTHER DAMAGES, INCLUDING BUT NOT LIMITED TO DIRECT, INDIRECT, INCIDENTAL, SPECIAL OR CONSEQUENTIAL
DAMAGES, WHETHER IN AN ACTION IN CONTRACT OR TORT (INCLUDING NEGLIGENCE AND STRICT LIABILITY), SUCH AS, BUT NOT LIMITED
TO, LOSS OF ANTICIPATED PROFITS OR BENEFITS RESULTING FROM, OR ARISING OUT OF, OR IN CONNECTION WITH THE USE OF
FURNISHING OF EQUIPMENT, PARTS OR SERVICES HEREUNDER OR THE PERFORMANCE, USE OR INABILITY TO USE THE SAME, EVEN IF
SYSTEMBASE OR ITS DEALER HAS BEEN ADVISED OF THE POSSIBILITY OF SUCH DAMAGES. IN NO EVENT WILL SYSTEMBASE OR ITS
DEALERS TOTAL LIABILITY EXCEED THE PRICE PAID FOR THE PRODUCT.
B.3. HARDWARE PRODUCT WARRANTY DETAILS
WARRANTY PERIOD: Systembase warranties embedded hardware Product for a period of one (1) year, and external hardware Product for a period of
three (3) or five (5) years according to the Product type.
WARRANTY PROCEDURE: Upon return of the hardware Product Systembase will, at its option, repair or replace Product at no additional charge, freight
prepaid, except as set forth below. Repair parts and replacement Product will be furnished on an exchange basis and will be either reconditioned or new.
All replaced Product and parts become the property of Systembase. If Systembase determines that the Product is not under warranty, it will, at the
Customers option, repair the Product using current Systembase standard rates for parts and labor, and return the Product at no charge in or out of
warranty.
WARRANTY EXCLUSIONS: Damages caused by
- Accidents, falls, objects striking the Systembase product,
20
- Operating the Product in environments that exceed Systembase's temperature and humidity specifications,
- Power fluctuations, high voltage discharges,
- Improper grounding, incorrect cabling,
- Misuse, negligence by the customer or any other third party,
- Failure to install or operate the product (s) in accordance to their Systembase User Manual,
- Failure caused by improper or inadequate maintenance by the customer or any other third party,
- Floods, lightning, earthquakes,
- Water spills,
- Replacement of parts due to normal wear and tear,
- Hardware has been altered in any way,
- Product that has been exposed to repair attempts by a third party without Systembase’s written consent,
- Hardware hosting modified Systembase Software, or non-Systembase Software, unless modifications have been approved by
Systembase.
- Battery component capacity degradation due to usage, aging, and with some chemistry, lack of maintenance.
B.4. SOFTWARE PRODUCT WARRANTY DETAILS
WARRANTY PERIOD: Systembase warranties software Product for a period of one (1) year.
WARRANTY COVERAGE: Systembase warranty will be limited to providing a software bug fix or a software patch, at a reasonable time after the user
notifies Systembase of software non-conformance.
B.5. THIRD-PARTY SOFTWARE PRODUCT WARRANTY DETAILS
The warranty policy of the third-party software is conformed to the policy of the corresponding vendor
21
Appendix C. Contact Information
If you have any questions regarding the product, please contact your local dealer/distributor or contact us directly as contact information below:
Contact Technical Support
Email
Phone
[email protected]
82-2-855-0501 (EXT.113)
Contact Sales
Email
Phone
[email protected]
82-2-855-0501 (EXT.113)
22