1
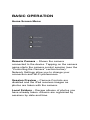
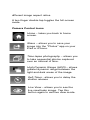
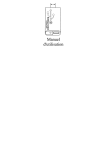
CameraMator User Manual version 1.3 INTRODUCTION Item Check List CameraMator device USB Cable Charging Cable Quick Start Guide Quick Start 1. Press the power button on the CameraMator device 2. Connect device to camera's USB port using the USB cable included 3. Set camera to JPEG or RAW+JPEG mode 4. Download the CameraMator app (available in App Store) 5. Go to "Settings" on your mobile device (iPhone or iPad) 6. Select "CameraMator" from the list of WiFi networks 7. Open your CameraMator app to begin using your device GETTING STARTED Recharging the battery 1. Plug the smaller end of the Charging Cable into the right side of the CameraMator device. 2. Attach the USB end of the Charging Cable into the USB port of your laptop or any USB charger. The device should now begin charging (indicated by the amber LED on the top righthand side). Power Switch Turn on the device using the power switch on the right side of the device. The CameraMator logo will appear on the LCD screen, and after a few seconds the device will be ready to use. Connecting the device 1. Plug the larger end of the USB cable into the port on the left side of the device. 2. Attach the smaller end of the USB cable to the USB port of your camera. 3. Turn the camera on and the device will identify the camera. 4. Make sure your camera is in JPEG or RAW+JPEG mode Standalone Wi-Fi Setup 1. Go to the Settings app on your iPad or iPhone. 2. Under Wi-Fi, select the "CameraMator" Wi-Fi network. After selecting the Wi-Fi, the activity indicator may continue to spin. However, you can confirm the connection by tapping on the blue arrow and making sure that the IP address and subnet mask is assigned. 3. Open the CameraMator app. Under the “Remote Camera” option on the home screen, you should see the name of your camera and the “Network Settings” option. The blue blinking LED light on the top left corner of the device indicates network activity. Using existing Wi-Fi Network 1. Under the “Remote Camera” option on the home screen, select “Network Settings.” 2. Select "On" under Join Known Networks. 3. Select your Wi-Fi network from the list of available networks. 4. Enter the password for your network when prompted and select “Done.” 5. The CameraMator device will reboot and join your Wi-Fi network. The LCD screen on top will display its IP address. BASIC OPERATION Home Screen Menu Remote Camera – Shows the camera connected to the device. Tapping on the camera name starts the camera control session (see the “Controlling the Camera” section below). Network Settings allow you to change your connection and Wi-Fi preferences. Session Preview – Camera Controls are disabled and the iPad receives images as photos are taken with the camera. Local Folders – Review albums of photos you have already taken. Albums are organized by sessions by date and time. CAMERA CONTROL Photos are taken by tapping the camera icon located on the ride side menu of the Camera Control Screen. After capturing the image the image will appear on the main screen as well as the filmstrip at the bottom of the screen. Photos can be displayed on the main screen by tapping on the thumbnail in the filmstrip. Information about the image (such as settings, file name, and the image histogram) will also be displayed on the bottom right hand corner. Photos are stored on your mobile device under a local folder in the CameraMator app. Image Viewing Gestures Use the pinch gesture to change the zoom on the image A single finger tap will switch between the different image aspect ratios. A two-finger double-tap toggles the full-screen mode. Camera Control Icons Home – takes you back to home screen. Share – allows you to save your image into the “Photos” app on your iPad or iPhone. Time-lapse photography – allows you to take sequential photos captured over an interval of time. High Dynamic Range (HDR) – allows greater dynamic range between the light and dark areas of the image. Self-Timer - allows you to delay the shutter release Live View – allows you to see the live viewfinder image. Tap this button again to exit live view mode. Camera Settings ISO Speeds Aperture Shutter Speed White Balance Extended Features The time-lapse option allows you to adjust your time duration and shutter release intervals: The HDR option allows you to take images over a wide range of exposure values: The self-timer option allows you to adjust the number of frames, time intervals, and delay before shutter release: SESSION PREVIEW In this mode, the ability to control the camera from the iPad is disabled. The CameraMator app automatically receives photos for viewing as they are taken. Previous photos can be viewed by tapping on them in the filmstrip. Although capturing functions are disabled in this mode, the “Share” option (to save to Photos app) is still available. LOCAL FOLDERS In this mode, you can browse through albums from previous sessions. Tap on the album thumbnail to browse the images in that album. Press and hold an album folder to delete albums: iPhone Application The iPhone application allows you to capture images. Remote Control allows you to change camera settings and take pictures. Images can be reviewed individually by selecting file name. SUPPORTED CAMERAS Canon 1Ds Mark III Canon 1D X Canon 5D Mark II Canon 5D Mark III Canon 7D Canon 40D Canon 50D Canon 60D Canon T2i Canon T3 Canon T3i Canon T4i Nikon D2X Nikon D3 Nikon D3S Nikon D4 Nikon D80 Nikon D90 Nikon D200 Nikon D300 Nikon D300S Nikon D600 Nikon D700 Nikon D800/D800E Nikon D3000 Nikon D3100 Nikon D5000 Nikon D5100 Nikon D7000 For the latest list of supported cameras, please visit the website at www.cameramator.com. DEVICE SPECS Screen Mono 132 x 32 px LCD Ports 1 x High Speed 480 Mbps USB Wireless 20 Mbps, WiFi 802.11 b/g/N Access Point, AdHoc, and Infrastructure Mode Memory 4GB Built-In Buffer for continuous shooting Software CameraMator App for iPhone, iPad, and Mac Battery 3300mAh Rechargeable Li-Poly Battery. Up to 8 hours battery life Power 10W (5V, 2A) via standard USB port. 5~7 hours to full charge Size 3.31" x 2.83" x 1.46" (84 x 72 x 37 mm) Weight 3.14 oz. (89 g)