1
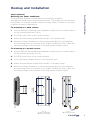
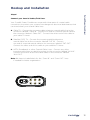
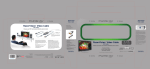
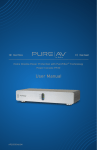
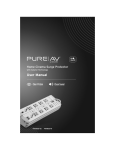
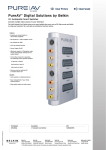
Home Theater
Power Conditioner PF30L, PF31L, and PF40L
User Manual
AP11000-10
AP11200-12
AP11201-12
Safety Precautions
PureAV Power Conditioner
Warning – Grounding and Polarization
This product must be plugged directly into a grounded AC power outlet (3prong). Do not use a 3-to-2-prong adapter to defeat the grounding pin. Do not
plug or “daisy-chain” this product into other electrical products such as surge
protectors, power strips, or UPSes. Do not plug this product into an extension
cord. Failure to plug this product directly into a grounded outlet may result in
personal injury or damage to your equipment.
Call a licensed electrician if you are unsure that your AC outlets are
properly grounded.
Warning – Rooftop Antennas and Satellite Dishes
If you use rooftop antennas, satellite dishes, or any other rooftop hardware that
connects to your PureAV Power Conditioner, make sure the wires are properly
grounded. This will protect against voltage surges from lightning strikes or
static charges.
Warning – Lightning Storm Protection
Although your PureAV Power Conditioner is built to withstand large power
surges, we cannot guarantee that it will protect all of your equipment in the
event of a large lightning storm. In the event of a lightning storm, it is best to
unplug your Power Conditioner from the wall. Once you have done this, there is
no need to unplug any of the equipment that is connected to the
Power Conditioner.
Warning – Water and other Liquids
Do not use this product with aquariums or other water-related products. Use
indoors and in dry locations only. Do not operate the Power Conditioner if any
liquid is spilled on or in the unit. Failure to follow these guidelines could result
in serious bodily injury or death.
Warning – Cleaning
Always unplug the Power Conditioner before cleaning. It is only necessary to
clean the Power Conditioner with a clean, dry cloth or duster. Do not use any
cleaning solutions, sprays, or water.
Warning – No User-Serviceable Parts Inside
If, for any reason, your Power Conditioner is malfunctioning, do not attempt to
repair or dismantle the unit in any way. Unplug the unit and consult this User
Manual for warranty and service contact information.
5
Hookup and Installation
The wall-mount bracket is designed to be mounted to drywall or
wood/plywood (cabinet or other wood furniture). The bracket can be mounted
horizontally or vertically and will hold the PureAV Power Conditioner securely
in either of these configurations.
For mounting to a wood surface:
1.
Use the wall-mount bracket as a template to mark the four screw locations
on the mounting surface (Fig. B).
2. Drill 3/32" pilot holes in the screw locations.
PureAV Power Conditioner
Step 1 (optional)
Mounting your Power Conditioner
3. Attach the wall-mount bracket with the #6 x 1/2" wood screws.
4. Mount the Power Conditioner to the mounting bracket (Fig. A) by aligning
the mounting holes on the back of the Power Conditioner (Fig. C) with the
mounting screws on the surface of the wall-mount bracket (Fig. B).
For mounting to a drywall surface:
1.
Use the wall-mount bracket as a template to mark the four screw locations
on the mounting surface (Fig. B).
2. Drill 3/16" pilot holes in the screw locations.
3. Insert the plastic drywall anchors into the pilot holes.
4. Attach the wall-mount bracket with the #6 x 1" drywall screws.
Fig. A
Fig. B
(Screw Locations,
Mounting Screws)
Mounting
Holes
Mounting
Screws
Screw
Locations
5. Mount the Power Conditioner to the mounting bracket (Fig. A) by aligning
the mounting holes on the back of the Power Conditioner (Fig. C) with the
mounting screws on the surface of the wall-mount bracket (Fig. B).
Fig. C
(Mounting Holes)
6
Hookup and Installation
PureAV Power Conditioner
Step 2
Connect Audio Components to the Audio Filter (switched)
Certain components do not need to be, or should not be, powered on at all
times. For this reason, the audio filter outlets are “switched” and can be
controlled with the button situated on top of the Power Conditioner unit
labeled “Switched”. When you depress and hold this button for approximately
two seconds, the “Switched On” light will illuminate and power will flow to the
switched outlets. To turn off the switched outlets, simply push and hold the
“Switched” button again until the “Switched On” light is extinguished. Power will
stop flowing to the switched outlets.
A. Attach PureAV power cord labels to each component’s power cord before
you plug the cord into the corresponding outlet on the
Power Conditioner.
B. Receiver (Preamp) – Connect your receiver or preamp power cord to the
outlet labeled “Receiver”.
C. Tape – Connect your tape player power cord to the outlet
labeled “Tape”.
D. CD – Connect your CD player power cord to the outlet labeled “CD”. (PF30L,
PF31L only)
E. Auxiliary 01 – This outlet can be used to connect any other audio equipment
you may have. (PF30L, PF31L only)
F.
Amp – Connect your main amplifier power cord to the outlet labeled “High
Current AMP”. This outlet is specifically designed to deliver high current
to power-hungry amplifiers. (The PF40L has two high-current outlets for a
secondary amp.)
Step 3
Connect Video Components to the Video Filter (always on)
Certain components should be powered at all times. For this reason, the video
filter outlets are “always on” or un-switched, and constantly receive power as
long as the Power Conditioner is plugged into an AC power source (wall outlet).
A. Attach PureAV power cord labels to each component’s power cord before
you plug the cord into the corresponding outlet on the
Power Conditioner.
B. Cable/Satellite – Connect your cable or satellite receiver power cord to the
outlet labeled “Cable/SAT”. (PF30L, PF31L only)
C. VCR – Connect your VCR power cord to the outlet labeled “VCR”.
D. DVD – Connect your DVD power cord to the outlet labeled “DVD”. (PF30L,
PF31L only)
E. TV – Connect your TV or monitor power cord to the outlet
labeled “TV/Monitor”.
F.
7
Digital Video Recorder – Connect your digital video recorder power cord to
the outlet labeled “DVR”. (PF31L only)
G. Auxiliary 02 – This outlet can be used to connect any other video equipment
you may have. (PF30L, PF31L only)
Hookup and Installation
Step 4 (PF40L only)
The PureAV Power Conditioner model PF40L contains a digital filter that is
optimized to clean and condition the power to all of your digital components.
Like the video filter, these outlets are “always on” or un-switched.
A. Attach PureAV power cord labels to each component’s power cord before
you plug the cord into the corresponding outlet on the
Power Conditioner.
B. Cable/Satellite – Connect your cable or satellite receiver power cord to the
outlet labeled “Cable/SAT”.
PureAV Power Conditioner
Connect Digital Components to the Digital Filter (always on)
C. Digital Video Recorder – Connect your digital video recorder power cord to
the outlet labeled “DVR”.
D. DVD – Connect your DVD power cord to the outlet labeled “DVD”.
E. CD – Connect your CD player power cord to the outlet
labeled “CD”.
F.
Auxiliary 01 – This outlet can be used to connect any other digital
equipment you may have.
G. Auxiliary 02 – This outlet can be used to connect any other digital
equipment you may have.
8
Hookup and Installation
PureAV Power Conditioner
Step 5
Connect your Pay-Per-View/Phone Line
Your PureAV Power Conditioner comes equipped with
Pay-Per-View/phone-line protection with a built-in splitter. These are standard
RJ11 phone jacks and are labeled “Phone”.
A. Connect one end of your telephone cable to the wall outlet to which you
normally connect your phone line. Connect the other end of your telephone
cable to the Power Conditioner phone jack labeled “IN”.
B. Connect one end of the PureAV phone cable (included) to the Power
Conditioner phone jack labeled “OUT”. Connect the other end of this cable
to the Pay-Per-View phone jack on your DSS receiver.
C. To connect a telephone – Connect one end of another phone cable to the
other Power Conditioner phone jack labeled “OUT”. Connect the other end
of this cable to the telephone you want to use.
Note: We have included labels for the “Phone IN” and “Phone OUT” lines
if needed for better organization.
9
Hookup and Installation
Connect your Coaxial Cables/DSS Lines
Your PureAV Power Conditioner comes with three pairs of coaxial-cable
connections to protect your system from dangerous electrical disturbances that
can travel down your coaxial-cable lines.
A. Cable TV – Connect the incoming cable television coaxial-cable line to the
connector labeled “Cable IN”. Connect one end of a second coaxial cable to
the connector labeled “Cable OUT”. Connect the other end of this cable to
your cable TV tuner.
PureAV Power Conditioner
Step 6
B. Satellite (DSS) TV – Connect the incoming satellite television
coaxial-cable line to the connector labeled “SAT IN”. Connect
one end of a second coaxial cable to the connector labeled “SAT OUT”.
Connect the other end of this cable to your satellite TV tuner.
C. HDTV, Broadband, or other Coaxial-Cable Lines – Connect any other
incoming cable lines you want to protect to the connector labeled “AUX IN”.
Connect one end of a second coaxial cable to the connector labeled
“AUX OUT”.
Note: We have included labels for the “Coax IN” and “Coax OUT” lines
if needed for better organization.
10