1
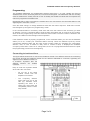
Feedback module with 8 occupancy detectors RS8-DC User’s manual Monitoring up to eight different track sections Integrated Voltage Control (prevents data errors in case of power failure in the layout). Fault monitoring with LED (keep you informed of what happens to the command station by blink codes) Separated by opto-couplers (signals that are present in the module are separated by optocouplers to avoid undesirable effects on the signals that are sent and received by the command station). Compatible with RS feedback bus (can work together with our RS2PC and RS8 modules, and can work with other feedback modules from other brands). This product is not a toy. It is inadvisable to use by children under 14 years. The kit contains small parts that could be swallowed by a child. Misuse of material can cause personal injury or injury due to cutting edges or punctures components with components. Please read the instructions carefully and follow them with all attention. Introduction: The RS8 module, as its acronym suggests is a feedback module with RS bus, 8-way detection with occupancy detectors included. Is performed in kit form or already mounted. If you are not familiar with the assembly of electronic kits would be appropriate to inform first. This module, assembled and in kit requires no adjustment. This module is designed for digital command stations which have the RS feedback system. If your system does not have such system, RS2PC is available for connecting to the computer. Operation: The feedback module RS8-DC combines the functions of detecting track occupancy with feedback function in the same module. For this reason the different currents flowing in the same are isolated from each other to prevent interaction of signals together by optocouplers. Total power can support is given by the power diodes used and that is 2.5 Amps, with peaks up to 3 Amps per input. The minimum current detected by any of the sections is a resistive wagon axle, tail lights, or a resting locomotive decoder. Keep in mind that the digital current to the tracks for the different sections comes from a booster or digital amplifier, and cannot mix track sections from an amplifier with track sections of another amplifier in the same feedback module which may cause a negative effect on them, even to damage the booster or feedback module. One function of the feedback module is to give good information to the command station, for that reason we have designed the internal circuitry to not report to the command station any false detection even when no current in the digital track it doesn’t report anything. Page 1 of 4 Feedback module with 8 occupancy detectors Connecting the RS8-DC to your digital system and / or layout: First of all: Turn off power or turn off your digital control system, any wiring in the digital system has to be done with the power turned off to avoid introducing parasites in it and / or to avoid irreparable damage due to unwanted voltage drops or crossings of wires that could cause a short. Power Connection: Connect the AC power cord to terminals marked with the symbol ~. It is indistinct order connection of the cables. This power must come from the AC power transformer. Ensure that the load connected to the transformer does not exceed its rated power. It is also possible to connect the power terminals to the output of power amplifiers or boosters of any command station. Feedback connection: Connect the RS module output cables to the RS input of the command station or the output of another feedback module in parallel. Remember that it is important to correctly connect the cable R to the R in the command station and cable S equally to S. Digital power connection: Connect the power cords to the output digital power booster or digital amplifier, (in the case of Lenz J and K). Connecting different track sections: Each output numbered (1 through 8) is ready to connect to the different track sections. For this reason it is important to know that current passes through them to the track, and that they apply to the letter K, ie, that the isolation has to be done on the track side where the letter K is connected to the digital current. After all this you can connect or turn on the digital system to verify the operation of the feedback module. Module functions (led-button operation): By the red LED's in one end, next to the button, you can see different states of feedback module. Once the module powered three things can happen: st - 1 : function properly, the LED stays off, when there is a change in inputs LED lights for a short time. - 2 : track without voltage, so the LED will blink with rapid intervals - 3 : no operation of the feedback bus, so the LED will blink slowly at regular intervals nd rd To find out which address has the feedback module, if pressed for a short amount of time the button, the LED signals with morse type digits the module address separated by a space. If the digit is zero, the LED lights for double space of time, if any other number blinks between spaces many times as the number meant. For example: If the address is 073, show a zero as the first digit, ie the LED will light up once for twice as long, then comes a space, then blinks seven times consecutively, then comes a space and then blink again three times. Finally if you have to program the module with a new address different from the default (065), press the button longer until the LED lights, then the module is in "programming" mode, and don’t goes off until you send an address, or press again the button that will return to normal operation. Page 2 of 4 Feedback module with 8 occupancy detectors Programming: The available addresses for programming devices range from 1 to 128. Usually the first 64 addresses are for the accessory devices, ie turnouts and signals. The addresses that are normally used for feedback are usually from 65 to 128. So initially the feedback module that accompanies this manual is programmed to address 65. Remember that in order to program the module has to be connected to the command station to get digital signal in terminals J and K. Once the cable change, to change addresses starts with the button sequence. Held down until the red LED lights up and goes into "programming" mode. In the command station in accessory mode enter and move the number of the accessory you want as address. Then the command station sends change information that is received by the module, which ends the "programming" mode and saves this new number. Once the number is entered in the module, the LED turns off and begins normal operation. If the feedback module is properly programmed, in the command station you can see the feedback status (To do so, consult your command station manual). Check the different inputs by current consumption between GND and the input section number (either by activating the consumption detector, reed, or even a resistor of 10K). Once a contact is done, is displayed the feedback occupancy information. If there is no change there, then it is not programmed well and has to repeat the programming process from the beginning. Connecting to track sections: The figure below shows how to connect the feedback module. The different sections are monitoring the current through the feedback module for the detector dedicated to consumer, bypassing the digital current to different sections. It is therefore important that the different sections are suitably insulated. Keep in mind two important details when make the connection: - Do not mix in the same module current from two amplifiers or boosters. - The occupancy detector works with only one of the rails (K), therefore when operating the same in a return loop must check the compatibility with the return loop module. Page 3 of 4 Feedback module with 8 occupancy detectors Troubleshooting: If you received the mounting kit check before initial operation all components, that there is no error and that the semiconductor is placed in the correct position. Accurately follow the assembly instructions. After mounting the module make a first check (same for the kit mounted), that may be the start-up and programming the module connected only to the control unit and amplifier. This removes interference from the module to other devices or from the same to the module. The reason is simple; usually the default address could be the same of other devices that are already in operation on the layout, and that would create a lack of control and in the command station would show false indications in different sections. The simplest test is to ask the module address pressing button slightly. Check that the module is the only one who is assigned a unique address and is not shared with any additional device. Once in conjunction with other detectors, RS8-DC module to be compatible with all who are in the market should not give any problems. In case of any problems finding what signal the LED. While the LED shows any type of problem does not send information to the control unit. Should you find that you are giving false occupations by other devices on the bus RS and newly built module, check for another module with the same number (usually 65), unplug the power (do not just reset), let it sit for a moment and then back on, the problem will be gone (it happens when the module is programmed in the set of the layout, ie with other devices RS). To verify operation put a resistor of 10K between terminal J of the module and either the module inputs. To see if it works is two ways, the first is the same module as LED lights for a moment when asked by the command station, the other is to go directly to the command station check if the resistor has created feedback, and therefore shows on the throttle in the feedback screen. Development and production PpP More information is available at: http://www.ppp-digital.es/ Subject to technical development changes or errors. Page 4 of 4

![T9000E [obsolete]](http://vs1.manualzilla.com/store/data/005920932_1-890f13b4deb2f1c3de1d3a852a7c64ca-150x150.png)