1
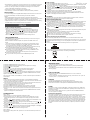
Meijer.com
Meijer.com
IMPORTANT SAFETY INSTRUCTIONS
CAUTION
The lighting flash with arrowhead symbol, within an equilateral
triangle, is intended to alert user to the presence of uninsulated
“dangerous voltage” within the product’s enclosure, that may
be of sufficient magnitude to constitute a risk of electric.
CAUTION: TO REDUCE THE RISK OF ELECTRIC SHOCK, DO NOT
REMOVE COVER (OR BACK). NO USER-SERVICEABLE
PARTS INSIDE. REFER SERVICING TO QUALIFIED
SERVICE PERSONNEL.
The exclamation point within an equilateral triangle is intended
to alert the user to the presence of important operating
and maintenance (servicing) instruction in the literature
accompanying the appliance.
RISK OF ELECTRIC SHOCK
DO NOT OPEN
WARNING
USE UNDER SUPERVISION OF AN ADULT DUE TO LONG CORD
This unit has a long AC cord or other long cord that can easily be tripped on or pulled on, causing injury, Please make sure
it is arranged so it will not drape over a tabletop,etc. Where it can be pulled on by children or tripped over accidentally.
FCC NOTICE:
This equipment has been tested and found to comply
with the limits for a Class B digital device, pursuant to
part 15 of the FCC Rules. These limits are designed to
provide residential protection against harmful
interference in a residential installation. This equipment
generates,uses and can radiate radio frequency energy
and,if not Installed and used in accordance with the
instructions,may cause harmful interference to radio
communications.
However,there is no guarantee that interference will not
occur in a particular installation. If this equipment does
cause harmfull interference to radio or television
reception. which can be determined by turning the
equipment off and on,the user is encouraged to try to
correct the interference by one or more of the following
measures:
All the safety and operating instructions should be read before the product
is operated.
This product should be operated only from the type
of power source indicated on the marking label. If you
are not sure the power supply, consult your appliance
dealer or local power company. For products intended
to operate from battery, or other sources refer to the
operating instructions in this manual.
23. Wall or ceiling mounting
This product should be mounted to a wall or ceiling only as
recommended by the manufacturer.
The safety and operating instructions should be retained for future reference.
All warnings on the product and in the operating instructions should be adhered to.
All operating and use instructions should be followed.
washbowl, kitchen sink or laundry tub; in a wet basement; or near a swimming pool.
receiver.
c
different from that to which the receiver is connected.
Unplug this product from the wall outlet before cleaning. Do not use liquid cleaners
or aerosol cleaners. Use a dry cloth for cleaning.
technician for help.
Slots and openings in the cabinet and in the back or bottom are provided for
ventilation, to ensure reliable operation of the product and to protect it from
overheating. These openings must not be blocked or covered. The openings
should never be blocked by placing the product on a bed, sofa, rug or other
similar surface. this product should never be placed near or over a radiator or
heat source. This product should not be placed in a built-in installation such as
a bookcase or rack unless proper ventilation is provided or the manufacturer's
instructions have been adhered to.
FCC NOTICE:
To assure continued compliance, follow the attached
installation instructions and use only shielded cables
when connecting to other devices. Modifications not
authorized by the manufacturer may void user’s authority
to operate this device.
can result in a risk of fire or electric shock.
Note:
Refer all servicing to qualified service personnel. Servicing
is required when the unit has been damaged in any way such
as the following: the power-supply cord or plug-in has been
damaged, liquid has been spilled into the unit, the unit has
been exposed to rain or moisture, the unit has been
dropped or the unit does not operate normally.
Display and Indicators
3 5 4 9 10
6 7 1211
8
AL 1 Indicator: Light when Alarm 1 is on.
AL 2 Indicator: Light when Alarm 2 is on.
PM Indicator: Light when the current time is PM.
Note: To save the batteries power in battery operating mode.
The display will turn off automatically when idle over than 5 minutes.
1 13
2
14
The unit is design to use the supplied AC/DC adaptor or 6 x AA size batteries (batteries
not included).
Batteries:
To install or replace batteries:
4. MEM/SET (Memory/Set) Button
5. POWER/FUNC (Power/Function) Button
6.
Button
7. CH MODE (Channel mode) Button
8. SNOOZE/SLEEP/DIMMER Button
9.
Button
10. VOL +/AL 1 (Volume up/Alarm 1) Button
11. VOL -/AL 2 (Volume down/Alarm 2) Button
12.
Button
13. AUX IN Jack
14.Battery Door
1. Open the battery door on the rear of unit.
2. Install 6 (six) AA size batteries into the battery compartment as the polarity markings
inside.
3. Replace the battery door.
NOTES:
1.Alkaline batteries are recommended for longer operation time.
2.In battery operation mode,for saving the battery power the connected iPod/iPhone
will not be charging.
BATTERY PRECAUTIONS:
Follow these precautions when using a battery in this device:
1.Use only the size and type of battery specified.
2.Be sure to follow the correct polarity when installing the battery as indicated in the battery
compartment. A reversed battery may cause damage to the device.
3.Do not mix different types of batteries together (e.g. Alkaline and Carbon-zinc) or old
batteries with fresh ones.
4.If the batteries in the device are consumed or the device is not to be used for a long period
of time, remove the batteries to prevent damage or injury from possible battery leakage.
5.Do not try to recharge the battery not intended to be recharged; it can overheat and
rupture. (Follow battery manufacturer’s instructions.)
6.Do not dispose of battery in fire. Battery may explodes or leak.
7.Clean the battery contacts and also those of the device prior to battery installation.
AC/DC Adaptor:
1. Insert the DC Plug from the supplied AC/DC Adaptor to the DC IN Jack on the rear of unit.
2. Insert the AC/DC Adaptor into wall outlet having AC 100-240V~, 50/60Hz
NOTES:
~ When AC/DC Adaptor was connected, the battery power will cut off automatically.
~ This AC/DC Adaptor is intended to be correctly orientated in a vertical or floor mount position.
~ When connected the iPod/iPhone to the docking, it will be charging automatically.
~ If Apparatus will not be used in a long period of time. To avoid damage the the unit. Unplug
the AC/DC Adaptor from the wall outlet and take out all batteries.
OPERATION
To set or reset the actual time:
1.Make sure the unit is in power off (standby) mode before setting.
2.Press and hold the MEM/SET Button on the front of unit until the digit of hour on
the display is blinking. Press the
or
Button to set the hour. (Make sure the
PM Indicator on the display is lit if the time is PM and not light if the time is AM).
3.Press the MEM/SET Button again; the digit of minute on the display will blink.
Press the
or
Button to set the Minute.
4.When finished, press the MEM/SET Button to save the settings and exit.
TIME SYNCHRONIZATION
The CMB3228 features a “CH MODE” button that allows you to set the time using the
internal clock of the iPod/iPhone.
With the iPod/iPhone docked and power OFF, press the “CH MODE” button once.
NOTE:
When you first dock your iPod/iPhone, the unit will run an authentication process,
so it may not respond immediately to the “CH MODE” button when pressed. Wait
for a few seconds and try pressing the “CH MODE” button again.
An iPod/iPhone can only sync time up to the nearest minute; it’s possible to have up
to 59 seconds difference between the unit and synced iPod/iPhone.
The iPod internal clock is automatically updated when sync’d with iTunes. We
recommend you sync the iPod with iTunes prior to docking to CMB3228 to make
sure you have the current time available.
The iPhone receives constant updates from the phone service provider, so the
iPhone time will always be current.
The sync function can only be done when the CMB3228 power is Off.
3.Press the POWER/FUNC Button to turn on the unit.
4.Press the POWER/FUNC Button repeatedly until “IPod” appears on the display.
5.Press the >ll Button to start playback.
6.During playback:
A.Press VOL+/AL 1 or VOL–/AL 2 Button to adjust volume level as desired.
B.Press the
Button to pause. Press again to resume normal playback.
C.Press the
or
Button to skipping tracks.
D.Press and hold the
or
Button to fast searching the desiredd section of current tracks.
7.To power off (Standby mode) the unit, press and hold the POWER/FUNC Button until OFF
appear on the display, then release the button.
Note: If you have an earlier non-dockable iPod , connect it to the AUX IN jack as the AUX IN
section follows.
AUX IN
To listen to the music from the external audio device or non-dockable iPods as follows:
1.Connect the external audio device or iPods/iPhone by an audio connection cable with 3.5mm
stereo plug on both ends (Cable not included).
2.Insert one end to the AUX Jack on the rear of unit. Insert the other end to the Phones Jack;
Line Out Jack or AUX Out Jack on the external audio device or iPods.
3.Press the POWER/FUNC Button to turn on the unit.
4.Press the POWER/FUNC Button repeatedly until “AU” appears on the display.
5.Playback the music in the connected external audio device or iPods as usual.
6.Press VOL+ or VOL– Button on the unit (and the connected unit) to adjust volume level as
desired.
7.To power off (Standby mode) the unit, press and hold the POWER/FUNC Button until OFF
appear on the display then, release the button.
ALARM SETTING
Alarm 1 setting:
1.Make sure the unit is in power off (standby) mode before setting.
2.Press and hold the VOL +/AL 1 Button for one second to enter setting mode. The AL 1
Indicator will light and Alarm 1 time will appear on the display (The digit of hour will be
blinking).
3.Press the
or
Buttons repeatedly to set the hour. (Make sure the PM Indicator on the
display is light if the alarm 1 time is PM and not light if it is AM).
4.Press the VOL +/AL 1 Button again, the digit of minute will be blinking. Press the
or
Buttons repeatedly to set the minute.
5.Press the
or
Buttons repeatedly to set the wake up mode to buzz (b), Radio (F) or
iPod/iPhone (I).
6.Press the VOL +/AL 1 Button to enter, the volume level (two digits) will appear on the display.
Press the
or
Buttons to set the volume level as desired.
7.Press the VOL +/AL 1 Button to save the settings and exit.
Alarm 2 setting:
Same as Alarm 1 settings above. But, press the VOL -/AL 2 Button instead of press the VOL
+/AL 1 Button.
Meijer.com
Radio reception
1.Press the POWER/FUNC Button to turn on the unit.
2.Press the POWER/FUNC Button repeatedly until Radio frequency appears on the display. Wait a
few seconds, you will hear sounds from speakers.
3.Press and hold the
or
Button until the displayed frequency starts running then release
the button. (When a radio station was been found, the frequency on display will stop running and
start to playback the searched station.) Press and release the
or
repeatedly to fine tune
if needed.
4.Repeat procedure 2 until the desiredd radio station was found.
5.Adjust the volume to the desiredd level by pressing VOL+/AL 1 or VOL–/AL 2 Button.
6.To power off (Standby mode) the unit, press and hold the POWER/FUNC Button until OFF
appear on the display then release the button.
ANTENNAS:
The Antenna wire on the rear cabinet is for radio reception. If reception is weak, unwind and
extend the wire or relocate the wire to improve the radio reception.
RADIO STATION PRESETTING
1.Receive the desiredd radio station as the previous procedure.
2.Press the MEM/SET Button, "P XX" (XX is the last stored number of radio station) will appear on
the display and "XX" will be blinking. Press the
or
Button repeatedly to select the
desiredd location (CH 1 – CH 20) you want store to. Press the MEM/SET Button again to store.
3.Repeat the same procedure until all the desiredd radio stations were stored into the memory.
4.After settings, press the CH MODE Button to enter to Channel mode. "P XX" will appear on the
display. Press the
or
Buttons repeatedly to select the desiredd stored radio station.
Notes:
If AC/DC Adaptor has been unplugged from the wall outlet or the power supply failed, the preset
radio stations will be deleted.
The stored radio station only can be deleted by storing another new radio station.
Total 20 radio stations can be stored in the memory list.
In Radio mode, only the frequency of current radio station will appear on the display.
To view current time. Press Standby Button to power off the unit.
Docking and Charging The iPod/iPhone:
This unit is designed with the same connector found in most iPod and iPhone docks. When
connecting the supported iPod/iPhone to the docking station on the top of the unit. The connecting
iPod/iPhone will be start recharging. You can also playback the music files in the iPod/iPhone as
follows:
1.Remove the cover of the iPod/iPhone Docking as shown on the figure below:
2.Insert the iPod/iPhone to the docking as shown below (If the power source of the unit is AC/DC
Adaptor. When iPod/iPhone is inserted, it will recharge automatically) :
IMPORTANT NOTE:
Alarm will not operate when the unit is in power on mode.
If radio (F) was select, select the desired radio station as previous procedure before
activating alarm.
If iPod/iPhone mode was selected, make sure the iPod/iPhone was inserted in the
docking properly.
SHUT OFF ALARM:
When alarm goes off, press POWER/FUNC Button to turn it off , the alarm will
reset for next day.
To turn off the alarm completely (not reset for next day). Press the VOL +/AL 1 (VOL -/AL
2 Button), the AL 1 (AL 2) Indicator will turn off.
SNOOZE
The alarm can be temporarily turned off manually by pressing the
SNOOZE/SLEEP/DIMMER Button; the alarm will turn back on automatically nine (9)
minutes later. This feature can be repeated until POWER/FUNC Button was pressed.
SLEEP
In the power on mode, press the SLEEP Button to activate the sleep function, SLEEP time
will appear on the display. Press the SLEEP Button repeatedly to set the sleep timer to 10 –
90 minutes as desired.
To turn off the unit before sleep timer time up, press and hold the POWER/FUNC Button
until “OFF” appear on the display.
Protect Your Furniture:
This model is equipped with non-skid rubber ‘feet’ to prevent the product from moving when
you operate the controls. These ‘feet’ are made from non-migrating rubber material
specially formulated to avoid leaving any marks or stains on your furniture. However certain
types of oil based furniture polishes, wood preservatives, or cleaning sprays may cause the
rubber ‘feet’ to soften, and leave marks or a rubber residue on the furniture. To prevent any
damage to your furniture we strongly recommend that you purchase small self-adhesive felt
pads, available at hardware stores and home improvement centers everywhere, and apply
these pads to the bottom of the rubber ‘feet’ before you place the product on fine wooden
furniture.
Meijer.com
AC/DC Adaptor is not plugged
into a wall outled or the
connector is not plugged into
the DC IN jack on the back of
the unit
Plug the AC/DC adaptor into wall outled and
plug the connector into the DC IN jack on the
unit.
Try others files.
LIMITED WARRANTY
General Specifications:
Power Source of Main Unit:
AC/DC Adaptor:
Input:
Output:
Audio Power:
Impendence of Speakers:
FM Radio Frequency Range:
DC 5V, 2.5A, Center positive
or 6 x AA size batteries (Not included).
AC 100-240V~, 50/60Hz, 0. 5A
DC 5V, 2.5A, Center positive
2x2W
4 Ohm; 3W x 2
88 – 108 MHz
Craig warrants this product to be free from manufacturing defects in material and
workmanship under normal use for a period of 90 days from date of purchase. If service
is required, please return the product to the store where it was purchased for exchange;
or, pack the unit in the original packing material with all accessories if applicable, a copy
of your sales receipt and a Cashier’s check or Money Order for $12.00 (to cover shipping
and handling costs) payable to Craig Electronics Inc. For consumers in Canada, please
make sure that the cashier check or money order is redeemable through a U.S. bank.
Ship your product freight pre-paid. Your unit will be repaired, replaced or if the unit can
not be repaired or replaced, a refund will be forwarded to you within four weeks of receipt
of your unit. Please ship your unit to:
Craig Electronics Inc.
1160 NW 163 Drive
Miami, Fl 33169
SPECIFICATIONS ARE SUBJECT TO CHANGE WITHOUT NOTICE
Accessory:
1 x User’s Manual
1 x AC/DC Adaptor
This warranty is void if the product has been: a) Used in a commercial application or
rental. b) Damaged through misuse, negligence, or abuse. c) Modified or repaired by
anyone other than an authorized Craig service center. d) Damaged because it is
improperly connected to any other equipment.
Note: This warranty does not cover: a) Ordinary adjustments as outlined in the Owner’s
Manual which can be performed by the customer. b) Damage to equipment not properly
connected to the product. c) Any cost incurred in shipping the product for repair. d)
Damage to the product not used in the USA.
This warranty is not transferable and only applies to the original purchase. Any implied
warranties, including the warranty of merchantability, are limited in duration to the period
of this expressed warranty and no warranty whether expressed or implied shall apply to
the product thereafter.
Under no circumstance shall Craig be liable for any loss or consequential damage arising
out of the use of this product. This warranty gives specific legal rights. However, you may
have other rights which may vary from state to state. Some states do not allow limitations
on implied warranties or exclusion of consequential damage. Therefore, these
restrictions may not apply to you.
To Obtain Service on your Product
email:[email protected]
Printed in China
CMB3228-IB-E0AE1-B0KU