1
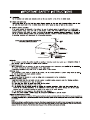
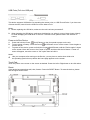
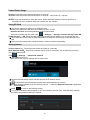
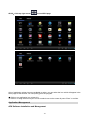
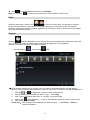
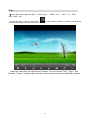
Model: CLP281x Please setup your gmail account into this Netbook at initial setup. If you are going to use a password or a pattern unlock you must have a valid gmail account setup in the event you forget either. Forgot lock pattern on android? Here's a way to reset it. Enter wrong pattern 5 times and wait for 30 seconds. Select “Forgot pattern” and enter your gmail account username and password. Make sure you use the same account that was used to activate the tablet and double check the password by logging in to that Google account in a browser on laptop or PC If you don't have access to the original Gmail account, you will need to do a hard reset and loose your settings and apps on the Netbook. The data on the memory card will not be wiped though. -1- -2- -3- -4- This manual contains important safety pr ecautions and information for correct usage. Please be sure to read this manual carefully before use to avoid any damages to the device. Please do not place the product in hot, wet or dusty environment. Please do not place the product in hot environment. Especially in summer, do not place it in a car with all windows closed. Avoid dropping or clashing the product and do not shake the TFT screen violently, or it may cause a damage or abnormal display to the screen. Please select a suitable volume and avoid loud sound while using earphones. Please turn down the volume or stop using if you get a roaring in your ears. For following situations, please charge the product. A.The device shows on the Buttom right corner. B.System automatically shut down, and it turns off soon after restart. C.Operation key shows no reaction. Notes: Chargers of other models cannot be used for this device because it may cause damage to the device which we are not responsible for. Please contact with our customer service department if you need a replacement charger. 1. Please do not disconnect the device while formatting, downloading and uploading; otherwise it may cause application errors. 2. We are not responsible for any memory erase loss caused by damage or product maintenance, or other personal reasons. 3. Please do not disassemble the product personally, and avoid cleaning the product with ethyl alcohol, thinner and Benzene. 4. Do not use this product in the areas which prohibit use of electronic devices, for example, in an airplane. 5. Please do not use this product while driving or walking in the street, or it might cause a car accident. NOTES: ~ This device does not support waterproof function. ~ All images on this manual are only for reference! Specification and appearance of the products are subject to change without prior notice! -5- FIRST USE: Battery Recharge The device has a built-in 2 pcs x DC Recharge as follows: 3.7V, 1500 mAh rechargeable Lithium-ion Polymer battery. Insert the small plug from the supplied AC/DC Adaptor into the DC IN jack on the device. Plug the AC/DC Adaptor into the wall outlet having AC 100-240V~, 50/60 Hz. This power unit is intended to be in a vertical or floor mount position. Notes: Your battery will last longer if you follow these simple guidelines for caring for and storing it. A. Use the supplied AC/DC Adaptor for charging only. Other model chargers may damage the device. B. For charging the first time, charge the device approximately 10 hours. For normal charging, the device needs approximately a 4 hour charge. C. Recharge and store the device within the temperature range of 5°C~35°C (40°F~95°F). D. Do not overcharge (longer than 24 hours). Excessive charging or running the unit until battery goes empty will damage battery. Battery life will be extended if you keep the battery fully charge. E. Battery life naturally shortens slowly over time. F. The rechargeable battery incorporated into this product is not user replaceable. SD card This device supports an SD Memory Card (Card not included). To increase memory size, insert an SD card into the card slot on the side of unit. Some of applications (such as “Picsel Smart Office”) can be operated by an external SD Card. Insert an SD card (Card not included) into the card slot on the left side of unit as the figure below: Notes: A. Insert the card (Up to 32GB, not included) into the card slot on left side of unit with metal chip face up. B. To take out the card, press the card until a “Click” is heard then pull out the card. C. Before replacing the storage card, make sure the unit has been powered off. D. When inserting the storage card, make sure the direction you select is correct. Never insert violently to avoid damaging the card or the unit. If the storage card doesn’t work, please check if the direction is correct. E. When the card is used for the first time, or it has been used in another device, please format it first through the Computer. You also need to download the desired music, photos and/or movie onto the card before installing into the unit Important: Formatting the SD Card will delete all the data on the card. Download the data to your computer before formatting the card. -6- USB Ports (Full size USB port) This device supports USB device for extending the memory size, or USB Thumb Drive. If you have one of these devices, insert it into the USB Port on the sides of unit. Notes: A. Before replacing the USB drive, make sure the unit has been powered off. B. When inserting the USB driver, make sure the direction you select is correct. Never insert violently to avoid damaging the USB driver or the unit. If it doesn’t work, please check if the direction is correct. Power on/off the Device A. B. C. Press and hold the Power On/Off button on the front panel to power on the unit To save power of battery. Press the Power. On/Off button to turn off the screen. Press it again to turn the unit on. To power off the device, press and hold the Power On/Off button until the "Device option" shows on the screen. Move the cursor to the Power off option and then click the left button. “Power off” menu will appear, move the cursor to “OK” option then left click it. Notes: Like your computer, after turning on the Device, you may have to wait a short while to let the operating system boot up before the home page appears on the screen. Touch Pad: Touch the pad to move cursor on the screen as desired. Press the Left or Right button to do click action. Reset: If the device becomes abnormal, halts, freezes. Press the RESET Button. To reset the device, please see the figure shown below: -7- Microphone jack: For sound recording, connect an external microphone (Not included) to the microphone jack on the left side of cabinet. Earphone jack: For private listening, connect an Earphone/Headphone to the Earphone/Headphone jack on the left side of cabinet. The speaker will cut off automatically. (Earphone/Headphone not included). Ethernet Jack: For internet connection, connect Ethernet cable to the RJ45 data port on the rear of cabinet with your own ADSL modem or router. ( Ethernet cable, ADSL modem and router are not included.) Location of Controls 1. 2. 3. 4. 5. 6. LCD Panel Speakers Power On/ Off button Keyboard Touch Pad LED indicators ( from Left to Right): a. System loaded/ Power On b. Battery Charging c. Scroll Lock d. Caps Lock e. Num Lock 7. USB Port 8. SD Card Slot 9. Earphone Jack -8- 10. Mic (Microphone) Jack 11. RJ 45 LAN port 12. DC In Jack F (Function) Button’s assignment: F1F2F3F4F5F6F7F8F9F10F11F12- Browser Music Video Gallery Calculator APK installer E-mail Clock Calendar Explorer Talk Settings Notes: 1. For F11 (F12), press the Fn and F1 (F2) buttons at the same time. -9- Power Button Usage Turn On: Press the power button and hold for 3 seconds. Turn Off: Press the power button and hold for 3 seconds, →tap Power off→ tap OK. RESET: Press the Reset key to reset the device. Reset will make the device reboot, the effect is equivalent to force shutdown after boot, please use with caution. Using SD Card ☆ The device supports a maximum of 32GB SD card. Insert your card into the SD slot until it clicks into place. It’s OK Remove SD Card: Close all applications or documents which have been opened from the card. Click → Settings → Storage, Unmount storage under SD CARD directory → OK. Press the card lightly; it is partially ejected allowing you to pull the card out. ☆ Don’t insert and remove the SD card repeatedly in a short time, as this may cause damage to the card. ☆ We recommend using major brands of memory cards to avoid incompatibility. Getting Started Turn the device on : Press the power button and hold for 3 seconds. Wi-Fi Network Setup:Since many features require a Wi-Fi connection, we recommend you set up your Wi-Fi network now. Click , → Settings, → Wireless & network. ☆ Select Wi-Fi to turn on. • Wi-Fi set up: Set up and manage WiFi access points. ☆The device automatically scans and lists all local Wi-Fi Network found. ☆ indicates secure networks that require login name/password to connect. ☆Click the desired network which you want to connect, → enter the Network Password if applicable, → Click Connect. ☆ Click to return to the Desktop screen. ☆ If your Wi-Fi network is set as hidden, it won’t be found by the auto scan. Click Add Wi-Fi network and follow the prompts to add your network. 1 -10 DESKTOP Status Bar • The Status Bar lies at the bottom of the screen. -- At the left side there are which stand for Escape, Homepage, Current Plays and Voice – and Voice + -- At the right side there are which stand for WiFi Signal, WiFi Status, Battery Status, Clock, etc. Screen Operation Size of this screen is 7”. Below are some advise of how to operate the operation zone: • By clicking the icon, you can get back to the homepage wherever interface you are in. • By clicking the icon, you can get back to the EX-interface during operation. • By clicking the icon, a window popups which shows the latest apps you are playing. • In the main menu interface, you can open and operate any app by clicking on the icons different applications such as Files, Music, Video, Gallery, as well as during web browsing or PDF viewing, you can drag the menu , by pressing the navigation keys ( Up, down, left, right arrows), to scrolling up and down the page as well as to enable the page to move different directions respectively. -11- APPS: Click top right corner to see APPS page A list of application widget icons are available to select, you can select the icon which will appear in the home page as the shortcut. You will quickly get to the program. ☆ Click on any application icon to launch it. ☆ Click on or using the arrow keys to move to select icons on the screen & press “Enter” to confirm. Application Management APK Software Installation and Management 1 -12 APK Installer (Application Installer) This device supports third party applications on the basis of android platform. Most of the applications can be downloaded from the websites via the internet, and copied into the internal flash or SD card of this device. z Click On the Apps page icon, and search for the appear on the screen: Apkinstaller and the following screen will Downloading Android Applications , , ☆ Pre-loaded App stores such as Amazon APP store, Getjar and SlideMe are providing many interesting and free applications for downloads. Individual app store may ask for credit card information and personal details. Please be caution that some application may require to pay. z Downloading Android Applications direct from a Website You can download Android applications directly from websites, and then quickly and easily install them on your device. z z Click the Web application icon to launch the internet browser. Enter the desired website URL, and Click the download link for the application you want to install on your device. z After the download is complete, click on the download file (in the Apps management screen), → Click Open → Install. Uninstalling Android Applications You can also quickly and easily uninstall the Android applications that you have installed. 1 -13 1. 2. 3. Click → Settings → Device→ Apps. Click the application you want to uninstall, → Uninstall. Click OK to confirm the Uninstall. Clock Click the Clock application icon. You can see the time and date. Alarm: ☆ You can use your device as an alarm clock by setting multiple alarms. displayed at the bottom of screens indicates that one or more This clock icon alarms have been set and are active. Add Alarm Click the z z z z Clock application icon. Click → Add alarm. Set up your alarm as desired. Click“Turn alarm on” with“√”. Click Done. Delete Alarm z z z Click the Clock application icon, → Click on the alarm you want to delete. Click Delete alarm. Video Conferencing A 3rd party application such as Skype can be downloaded from app stores such as Getjar and Amazon APP store. BROWSER Users can connect to the Internet through a browser. Click the browser icon on the Desktop , and then you can open the Web browser. 1 -14 CALENDAR Calendar application icon. Click the For the first time using the Calendar, you need to add an Gmail account. Enter Gmail address and password. Click Next and follow the prompts to complete the account configuration. Then you can use the Calendar.( Note: we generally recommend that Gmail account, test server for: m.google. com) Add Event 1. On the Calendar screen, click on the date to which you want to add an event. 2. Click on the event time, → click in each entry field to enter the desired event information. 3. Click Done. CAMERA Click the Camera application icon. Take Pictures z z z z In Camera → Click to take the picture. The picture will be saved. Click the picture thumbnail enter Gallery to scan the picture. Press Back to the Camera. z Click to exit the Camera and back to the Desktop. Take Videos Click Click to begin and tap again to stop. The video will be saved. Click the video thumbnail to play the video. Press Back to the Camera. Click switch to video, and you can take videos. switch back to camera. 1 -15 Click to exit the Camera and back to the Desktop. Note: You can click to choose to save the files in the Local disk or the SD card. Email to enter the ‘Email’ client. It’s required to configure Inside the apps menu, Click the icon the account information for the first time. Pre-register and set up your email account is necessary. Please be advised that Gmail ACCOUNT registration is necessary in order to access services provided by Google and Android System. Explorer Click the Explorer application icon to view the files on all storage devices (Internal memory, SD card, USB device), and to quickly & easily install Android application on your Netbook. Use the icons across the top of the screen as follows: • Internal memory) Your SD card USB ☆ The instructions below are for copying from a SD card or USB storage device into the internal memory. You can use the same method to copy from the device to a SD card or USB storage device. 1. 2. 3. Click the or to display the contents of your storage device. Click and hold in the folder/file you want to copy, → Click Copy. Click “Home” to Explorer main menu or “LevelUp” to previous folder 4. Click on the Internal Memory, → Click on the folder into which you want to copy the file. 5. Click “Editor”, → Click Paste Delete files:Click and hold on the folder/file you want to delete, → Click Delete → Delete to confirm the deletion. 1 -16 MUSIC − Using the pre-loaded Music Player to play audio files: ☆ Audio file formats supported: MP1 , MP2 , MP3, OGG , APE , FLAC, AC3 , AAC , AMR , DTS , RA , M4A. When no music files in the audio player playlist, the system will automatically load the music files from the card to the audio player playlist after turning on the audio player .The playlist as shown in the below figure: You can pass the audio files by the way of synchronous USB jump drive, or access to audio files by inserting the SD card which it is already full of audio files. You can also download the audio file through the network. 1 -17 Video ☆ Video file formats supported: MKV ( H.264 coding ), MPEG ( AVI ), MOV , FLV , MPG , VOB , MPE , DAT. In the main menu or desktop, tap the icon video files and image files. As shown below: to enter “Video” interface, on where it will list all the Select the video files into video player interface. You can choose "Play", "Stop," "fast forward", "rewind", "progress bar" and other control keys to control the playback progress. 1 -18 SETTINGS Wireless & networks Device Personal Wi-Fi Ethernet Turn on Wi-Fi. Ethernet connection setting / setting up IP address Date usage Display date usage info More Sound Display Setting VPN / portable hotspot and mobile networks Adjust Notification volumes & enable system sounds Adjust Brightness, choose wallpapers, setting up sleep time and front size Display internal and external storage memory status Battery Information Apps Management ADD account for Sync and ON/OFF Sync for individual account Enable location tracking Enable Screen lock, Encryption, setting up passwords and enable Unknown sources that to allow downloading apps from sources other then Google Play To choose Different System Display Languages and Configure Keyboard setting Enable backup data and Factory Data Reset Set up and select time zone, time & date format and to enable automatic date & time To enable talk back, adjust system font size, speak passwords, touch & hold delay and Install web scripts System updates & display device information Storage Battery Apps Accounts & Sync Location services Security Language & input System Backup & reset Date & time Accessibility About Tablet 1 -19 Frequently Asked Questions Android Q: What Android OS version is on my Device? A: 4.0 Basic Device Functionary Q: Do I have to charge the battery before use? A: You should charge the battery for at least 4 hours, but you can use the device while it’s charging. Use the include power adapter to charge; this device charge via USB cable. Email Q: Can I use any of my personal email addresses to send/receive email? A: The device supports POP3 and SMTP accounts. Some free email accounts are not supported on mobile devices. Check with your email provider to see if you account is supported. Media Cards Q: Which media cards are compatible with my Device? A: standard SD cards. Music Q: How do I add music files to my device? A: Copy the music files from your computer onto a SD card or USB storage device, and then use the Explorer application to copy the files into the device. Photos Q: How do I add photo files to my device? A: Copy the photo files from your computer onto a SD card or USB storage device, and then use the Explorer application to copy the files into the device. Video Q: Can I play YouTube videos on my device? A: Yes. You can tap the YouTube application icon to quick access videos. Q: How do I add video files to my device? A: Copy the video files from your computer onto a SD card or USB storage device, and then use the Explorer application to copy the files into the device. 6. Wi-Fi Q: Do I need a Wi-Fi adapter to connect to the Internet? A: No. The Wi-Fi adapter is built-in to the device. 2 -20 The main Applications on Home Page Apps Screen: Internet browser: z Click to connect the internet Email,Gmail: z Click into e-mail settings, after entering the email address and password, simply follow the on screen instructions for set up. This application supports IMAP mail (such as Hotmail, Gmail and Yahoo Mail, POP3 mail and Exchange). Press Menu button on screen to choose and remove email account. Music : z Click to enter the music playback mode. The list of Artists, Albums, Songs, Playlists etc... will appear on the screen . Click the desired music file to start playing. 2 -21 Gallery: z Click into photo player to play photos. E-Book: z z z Click into the book shelf to select/manage and/or read ebooks. To turn to next page, move the cursor to right hand side on the screen then click and hold Left button, then move to left hand side. To turn to previous page, move the cursor to left hand side on the screen then click and hold Left button, then move to right hand side. Amazon App Store: z z z z Click to browse the Amazon APP Store Main page. On the right side of the screen, click on Device without mobile number, then Amazon APP store downloading page will appear. Click on download now and app store will be downloaded automatically once is done, click on install and Amazon APPs store icon will then be displayed on your app page. SlideMe: z Click to enter (and you may sign in) to choose and buy applications. This is a third party Android market and exclusively managed by SlideME LLC. If you have encountered any problem, you may write to SlideME for help or visit the web site at www.slideme.org for details. 2 -22 Video: z z Click to turn on the video player. Click the desired file name to start playing. Social networking: This Device has pre-loaded with the most popular social applications for usage. Click the individual icon to login with pre-registered login name and passwords, otherwise, you may register online by following on screen instructions. Smart z z Office : Read or edit the common document files. Allow Online edition and saving of Google DOC Note: SD card might required to run this application at all time and documents can only be saved in the SD card. Troubleshooting: z Cannot power on the Device ¾ Check battery. ¾ Connect the supplied AC/DC Adaptor and recharge. (During recharging, the device can work normally). z Screen is flashing after power on is performed ¾ Short of power, please charge the battery. z Earphones do not transmit sound ¾ Earphone volume is poor. ¾ Try another music file. z PC connection ¾ This device cannot be connected with PC via USB port. z Cannot go online ¾ Check if your Wi-Fi or Ethernet setting is correct , proper password may be needed. ¾ Check if your router is working properly. 2 -23 ¾ Check your signal bar on the Device. It may not be connected due to weak signal. z How to buy/download the applications from the internet ¾ Make sure your device is already hooked up to Wi-Fi/3G networks. ¾ Press SlideME or Amazon app store icon on the home page. ¾ Search, Buy, Download and Install the desired applications by following the on screen instruction. Warning: Personal details and Credit Card information may be required, please stay Alert ! z Unable to Read Ebook ¾ Application Amazon Kindle already installed in the device. Make sure you are using the “Amazon Kindle” APP to read the ebooks bought from Amazon. ¾ Some online bookshops require their own application to buy, download, read and manage ebook purchases. Applications can be downloaded from the web or by going into the SlideMe or Amazon APP store and searching for a suitable one. ¾ Barnes and Nobles uses its own reader application, called “Nook”. Most other book stores will use third party applications such as Aldiko, which can be download from the SlideMe or Amazon APP store. z How to copy and read PDF-DRM and EPUB-DRM books from PC? This netbook does not support PDF and EPUB-DRM ebooks to be transferred from PC. z Short Battery life: ¾ Some of apps/programs are running internally; turn off all unnecessary apps/programs to save battery power. ¾ Turn off either 3G or Wi-Fi if unnecessary. ¾ Reduce the screen brightness level. z Media files can't be found: ¾ If new files were added onto the device; click the "Explorer" icon on the APPS menu to search. ¾ Use correct Apps to open corresponding media files. Click Video Player to play video files. Click Gallery to view photos. Click Music Player to play music. z Can't find the desired button within the screen ¾ Use the arrow keys to scroll Up and Down (Right to Left) to display the buttons behind the main screen. z Can't turn to next page in ebook reading ¾ Use the touch pad to double click on the mouse pad or mouse touch to go from right to left to turn to next page. z How to enter the Settings menu while applications/programs are running ¾ After turning on the application/program, click the Menu button to enter settings menu. Set each setting as instructed by the on screen instructions (functions depend on the software of the applications). z Cannot hook up with Wi-Fi or the Wi-Fi signal is weak ¾ Make sure Wi-Fi is available in your location and you are authorized (with correct password) to hook up to it. ¾ The device may be too far from the signal source. Move your device closer to the signal source. How to remove personal data/email accounts from the device: ¾ In the settings menu, select and enter “Backup & reset” setting. ¾ Click “Factory data reset” button to enter. ¾ Click “Reset tablet” button. z 2 -24 ¾ Click “Erase everything” button to start reset. Wait until the device finishes resetting by itself. The device will turn off automatically. (It may need a few minutes). IMPORTANT: After Factory Data reset, all users’ data (users installed applications, passwords, email accounts, g-mail accounts, media files etc...) will be deleted. Backup this data before resetting. z Is a USB Mouse compatible with the device? ¾ Yes, you can connect a USB Mouse through the USB port. z The cabinet/device is getting warm: ¾ This is normal. After some time of operation/recharging, the cabinet/device will become warm. 2 -25 PRODUCT SPECIFICATIONS Hardware Configuration: CPU Processing Speed Memory/ROM Memory/RAM DDR III Memory Card Slot Color Display Resolution of Display Battery Type USB Built in Speaker I/O ports Wireless Interface Battery life Input of the supplied AC/DC Adaptor Output of the supplied AC/DC Adaptor 1.3GHz 4GB (Internal 2.2GB flash memory has be assigned for Android operating system and pre-loaded Apps, existing 1.8 GB flash space is available for further operation needs.) 1 GB SD card(up to 32GB), not included 7 inch TFT Color LCD Non-glare 800 x 480 Pixels Built-in 2 pcs x DC 3.7V, 1500 mAh rechargeable Lithium-ion Polymer Battery; recharging via DC in jack 3 x USB 2.0 port 2 x 8 ohm, 1 W 3 x USB ports, SD Card Slot, Phones Jack, Mic Jack, LAN port, DC Jack WiFi 802.11b/g/n After full charge, up to 4 hours for Video playback or 3 hours for eBook reading or 5 hours for Music playback (Assuming Wi-Fi and others program/application are turned OFF; brightness and volume set to middle) AC 100-240V~, 50/60Hz, 0.5A DC 9V, 1.5A Software Configuration: Operating System Browser Video file supported Music file supported Photo file supported Email Android 4.0.3 Web Browser MKV(H.264 HP), AVI, RM/RMVB, FLV,MPEG-1,MPEG-2 MP3, APE, FLAC, AAC, AC3, JPEG, BMP, GIF, PNG, TIFF Support Web mail & Pop mail SPECIFICATIONS ARE SUBJECT TO CHANGE WITHOUT NOTICE Accessories: 1 x Instruction booklet 1 x AC/DC Adaptor 2 -26 Craig warrants this product to be free from manufacturing defects in material and workmanship under normal use for a period of 90 days from date of purchase. If service is required, please return the product to the store where it was purchased for exchange; or, pack the unit in the original packing material with all accessories if applicable, a copy of your sales receipt and a Cashier’s check or Money Order for $20.00 (to cover shipping and handling costs) payable to Craig Electronics Inc. For consumers in Canada, please make sure that the cashier check or money order is redeemable through a U.S. bank. Ship your product freight pre-paid. Your unit will be repaired, replaced or if the unit can not be repaired or replaced, a refund will be forwarded to you within four weeks of receipt of your unit. Please ship your unit to: Craig Electronics Inc. 1160 NW 163 Drive Miami, Fl 33169 This warranty is void if the product has been: a) Used in a commercial application or rental. b) Damaged through misuse, negligence, or abuse. c) Modified or repaired by anyone other than an authorized Craig service center. d) Damaged because it is improperly connected to any other equipment. Note: This warranty does not cover: a) Ordinary adjustments as outlined in the Owner’s Manual which can be performed by the customer. b) Damage to equipment not properly connected to the product. c) Any cost incurred in shipping the product for repair. d) Damage to the product not used in the USA. This warranty is not transferable and only applies to the original purchase. Any implied warranties, including the warranty of merchantability, are limited in duration to the period of this expressed warranty and no warranty whether expressed or implied shall apply to the product thereafter. Under no circumstance shall Craig be liable for any loss or consequential damage arising out of the use of this product. This warranty gives specific legal rights. However, you may have other rights which may vary from state to state. Some states do not allow limitations on implied warranties or exclusion of consequential damage. Therefore, these restrictions may not apply to you. To Obtain Service on your Product email:[email protected] or Please call 1-866-321-7191 Printed in China CLP281x-IB-E0CR1-B0US 2 -27