1
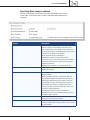
Comparing
Documents
Compare two versions of the same document
irrespective of location: local drive, network drive,
MS Outlook, MS Word or a Document Management
System.
With compareDocs you can compare PDF to PDF,
PDF to Word and any combination of supported
document types.
COMPAREDOCS QUICK STEP GUIDE
COMPARING CREATING
DOCUMENTS
PDFs
Learning Outcomes
By the end of this module, you will be able to:
Identify the different components of the compareDocs interface
Compare documents using a variety of methods, including drag and
drop, right-click integration with Windows Explorer and a Document
Management System
Save, email and print the Comparison Report directly from MS Word
Compare documents within other applications and systems, for
example MS Word or a Document Management System
Select the appropriate Comparison Report type based on source
document and output
Use the Selection Window to select which document(s) to compare
Modify default compareDocs settings for Compare, Rendering Sets,
Output, Optical Character Recognition and Language
Prerequisites
Before commencing this module, you should be comfortable with:
Navigating in Windows Explorer to locate a file
Accepting/rejecting changes using the MS Word Track Changes
toolbar
Navigating a PDF document using the Bookmarks and Comments
palettes
Duration
The estimated time for completion of this module is 60 minutes.
COMPAREDOCS QUICK STEP GUIDE
1
CREATING PDFs
What is compareDocs?
compareDocs is a document comparison application. It compares two
versions of the same document for differences.
compareDocs can be used to navigate to documents in different
locations, which are loaded into the application and then compared.
Or, you can compare documents directly from within other
applications or systems. For example, you can compare MS Word
documents directly within the MS Word application or within a
Document Management System (DMS). compareDocs integrates with
HP Autonomy, NetDocuments, MS SharePoint, OpenText eDOCS DM,
ProLaw and Worldox. Please refer to your User Guide for more specific
details on integration.
In addition to comparing like documents with compareDocs; MS
Word to MS Word or PDF to PDF, you can compare Word to PDF as
well as any two supported file types. Please refer to [cross-reference]
for a list of supported document types. The OCR module enables you
to compare image-based documents as well as output Comparison
Reports as MS Word documents.
Comparison made easy
Simply load the Original and Modified documents into the
compareDocs application and click the [Compare] button.
compareDocs compares the two documents based on your settings
and outputs a new marked up document called a Comparison Report,
showing all the changes between the two documents.
The Comparison Report can be output as a MS Word or as a PDF
document. This depends primarily on the source documents but it
can also be a choice you make. Comparing two MS Word documents,
for example, can produce a Comparison Report that is an actual MS
Word document with track changes enabled.
This means that you can accept/reject the changes directly in the
Comparison Report using MS Word track changes functionality.
2
COMPAREDOCS QUICK STEP GUIDE
COMPARING CREATING
DOCUMENTS
PDFs
compareDocs 4: what’s new?
compareDocs 4.0 was released on 18 December, 2013 and provides
users with the following new capabilities:
New interface - The compareDocs 4 interface has been redesigned
based on the MS Office 2010/13 look and feel to make it an intuitive
and easy product to use.
Speed improvements - Launch speeds for compareDocs have
improved significantly, and so have comparison speeds.
PDF Companion - The complimentary PDF Companion allows users
to create PDF documents from any application. This is ideal for users
who only have an occasional need to create PDFs.
Track Changes output - Users can choose to output the comparison
as a Track Changes document, allowing them to accept/reject
changes in this third iteration of the document. This approach results
in a more efficient document review process.
List numbers, tables and other items are fully marked up and can be
accepted/rejected in Track Changes format.
PDF comparisons - Produce a redline comparison report for 2
compared PDFs in a single click. This makes it easier to see and
understand the changes in the documents.
OCR Language Chooser - Reduce OCR’ing errors when working with
foreign languages. Specify the languages in your document using the
new OCR Language Chooser. Supports 180 languages including Asian
languages.
COMPAREDOCS QUICK STEP GUIDE
3
Opening the compareDocs application
The compareDocs application can be opened by clicking on the
compareDocs icon on the desktop. It can also be accessed from
within other applications or systems. For example, you can launch
the compareDocs application by right-clicking on a document(s) and
selecting the appropriate compareDocs option in Windows Explorer
or in your Document Management System.
You can compare documents in MS Word and pdfDocs with other
documents irrespective of location.
Open the compareDocs application
How to!
1.
Click on the compareDocs icon.
The compareDocs application displays.
Let’s take a closer look at the compareDocs interface.
4
COMPAREDOCS QUICK STEP GUIDE
COMPARING CREATING
DOCUMENTS
PDFs
The compareDocs interface
The compareDocs application consists of a number of different
components.
Essentially, you load the Original and Modified documents into the
application, select the appropriate Document Output, Report Type,
Rendering Set options and then click the [Compare] button to run the
comparison.
compareDocs generates a Comparison Report in MS Word or PDF
detailing the changes between the two documents.
Element
Description
The Cogwheel
File - the File option gives you options for loading the Original and Modified
documents into the compareDocs application. You can also run a new comparison
from the File menu, opening a new compareDocs application window.
Edit - the Settings option under the Edit menu lets you change or modify settings
for comparing documents, Comparison Report output, Rendering Sets, OCR and
languages.
Help - if you require help, you can display the compareDocs User Guide from the Help
menu. You can also access information about where the application is stored on your
machine, license details as well as the compareDocs version number.
Open buttons - You can navigate to the Original and the Modified documents directly
from the compareDocs application. Click on the appropriate [Open] button to navigate
to the document.
Information icon - The Original and Modified Information icons provide information
on the compared documents such as document name, path, date created, last modified, author and file size. Hover over either icon and this information is provided for
both documents. Click on the Original or Modified Information icon to get information
for that specific document.
Switch button - Click the Switch button to swap the Original and Modified document
around.
Document output - Once the comparison is complete, compareDocs outputs a Comparison Report, ie a new marked up document showing all the changes between the
two documents.
Report type - The Report type refers to the Comparison Report, which will either be a
MS Word or a PDF document.
Tip
The [Compare] button
displays the last used
comparison option. So,
if you selected the Save
As option, the [Compare]
button will display [Save
As] until it is changed. This
saves you having to select
from the drop-down list
every time.
Rendering Set - The Rendering Set option determines how the changes are marked up
in the Comparison Report. For example, insertions are indicated in blue underline; deletions are marked up in red strikethrough; moves “from” will be marked up in double
green strikethrough and move “to” will be displayed in double green underlined text.
Compare button - Click the [Compare] button to compare the Original and Modified
documents based on your output settings, Rendering Sets etc. The compareDocs
drop-down provides you with a number of workflow options.
COMPAREDOCS QUICK STEP GUIDE
5
Comparing Word to Word
You load the Original and Modified documents into the compareDocs
application. You can navigate to the documents on your local system,
network drive or Document Management System directly from
compareDocs.
Compare Word to Word
How to!
1.
Click on the Original [Open] button.
The Open dialog box displays.
2.
Navigate to the Original document location, select it and click
the [Open] button.
The Original document is loaded into the compareDocs interface.
3.
Click on the Modified [Open] button.
4.
Navigate to the Modified document location and click the
[Open] button.
Both documents are now loaded into compareDocs.
6
COMPAREDOCS QUICK STEP GUIDE
5.
COMPARING CREATING
DOCUMENTS
PDFs
As you are comparing two Word documents, the Document
Output option is set automatically to Word. You could change
this to PDF.
6.
Select Consolidated report marked up with Track Changes as
the Report Type.
Note
7.
Leave the default Rendering Set selected.
8.
Click the [Compare] button and select the View As New
Document option.
If you are using a
Document Management
System, it will appear as an
option on the [Compare]
button drop-down list.
The Comparison Report displays in MS Word with track changes
enabled. You can now continue to work on the document by
accepting or rejecting the changes in the new document. If you
had the Detailed Summary Report selected, it will also display at
the same time.
Tip
The next time you run a
comparison, you will note
the [Compare] button has
changed to the [View]
button. This is based on the
previously selected option,
which was View As New
9.
Close the Comparison Report and return to the compareDocs
application.
document.
COMPAREDOCS QUICK STEP GUIDE
7
Comparing PDF to PDF
Comparing two PDF documents is very similar to comparing two MS
Word documents.
Instead of navigating to the Original and Modified PDF documents
using the [Open] button, you can use the drag and drop method
to replace any documents that may be currently loaded in the
application. Or, you can also select the document in the Document
fields and press the [Delete] key.
Compare PDF to PDF
How to!
1.
Locate the Original PDF document on your system.
2.
Drag and drop it onto the Original document field.
This will replace any document in the Original document field.
3.
Drag and drop the Modified document onto the Modified
document field.
4.
Select PDF as the Document Output type.
5.
Click on the Report Type drop-down to see what report
options are available to you.
Note
The Summary Report
is mandatory for PDF
comparisons. It is
appended to the start of
the document.
8
COMPAREDOCS QUICK STEP GUIDE
6.
COMPARING CREATING
DOCUMENTS
PDFs
Click on the [Compare] drop-down and select the View As New
Document option.
The marked up document displays in your PDF viewer.
7.
Close the PDF document and return to the compareDocs
application.
COMPAREDOCS QUICK STEP GUIDE
9
Comparison options and workflow
compareDocs provides you with a number of time-saving document
comparison workflows.
For example, you can compare the Original and Modified documents
and email, print or save the Comparison Report to a local drive or into
your DMS as part of the same process.
Document Management System integration
If you have a DMS, it will appear as an option on the [Compare]
button drop-down. This will compare the two documents, allowing
you to then save and profile the Comparison Report directly into your
DMS.
compareDocs will automatically detect that you have a DMS on your
system and provide the appropriate DMS options.
Compare and email workflow
The Email option compares the Original and Modified documents.
When the comparison is complete, the Email Documents dialog
displays. You can include the Original, Modified and Comparison
Report (or any combination) as attachments.
Make sure your email application is currently open before starting this
exercise.
10
COMPAREDOCS QUICK STEP GUIDE
COMPARING CREATING
DOCUMENTS
PDFs
Compare and email
How to!
1.
Load an Original and Modified Word document into the
appropriate drag and drop zone.
2.
The Document Output option is set automatically to Word for
MS Word documents. Leave this setting as it is.
3.
Select Consolidated report marked up with track changes as
the Report Type.
4.
Leave the default Rendering Set selected.
5.
Select the Email option from the [Compare] button dropdown.
Note
The email subject field
assumes the modified file
name. You can change
this.
The Email Documents dialog box displays.
6.
Check the Comparison Result, Original and Modified
document checkboxes.
Tip
7.
You can rename the
email subject heading
as well as each of the
documents in the Email
Documents dialog. Also,
you can choose which
documents to send as
email attachments.
Click the [OK] button.
Your attachments are loaded into a new email message.
8.
Complete the necessary email information and click the [Send]
button.
COMPAREDOCS QUICK STEP GUIDE
11
Comparing and saving the Comparison Report
When the comparison is complete, you can choose to save the
Comparison Report to a specific location. You can define a default
save to location and whether the Comparison Report opens upon
saving. This is covered in the Settings section.
Compare and save the Comparison Report
How to!
1.
Drag and drop the Original document onto the Original
document field.
2.
Drag and drop the Modified document onto the Modified
document field.
3.
Leave all the Output and Report Types settings as they are.
4.
Click on the [Compare] drop-down and select the Save As
option.
The Save As dialog box displays.
5.
Navigate to the folder on your local or network drive and click
the [Save] button.
The Comparison Report displays.
Tip
6.
If you prefer the
Comparison Report not
display after being saved,
you can modify this setting
in compareDocs general
settings.
12
Close the Comparison Report and return to the compareDocs
application.
COMPAREDOCS QUICK STEP GUIDE
COMPARING CREATING
DOCUMENTS
PDFs
Comparing and printing the Comparison Report
The Print option will run the comparison and then display the Print
dialog box for you to print the Comparison Report. You can choose to
print only those pages with changes rather than printing all the pages
in the Comparison Report.
Compare and print the Comparison Report
How to!
1.
Drag and drop the Original document onto the Original
document field.
2.
Drag and drop the Modified document onto the Modified
document field.
3.
Leave all the settings as they are.
4.
Click on the [Compare] drop-down and select the Print option.
A window displays asking you if you want to print all pages or only
those with changes.
5.
Click the [Yes] button to print all pages.
6.
Select your printer from the Printer name drop-down and click
the [OK] button.
COMPAREDOCS QUICK STEP GUIDE
13
Steps...
1.
Launch the compareDocs application
•
Double-click the compareDocs icon on your desktop. Or open as you would normally
if you do not have an icon on your desktop.
The compareDocs application displays.
Note: the [Compare] button is grayed out. This will be enabled once you load the
Skill
Builder
Original and Modified documents into compareDocs.
2.
Compare Word documents - Comparison Report output with track changes
•
Click on the Original [Open] button and navigate to the C:\Exercise folder on your
system.
Aim:
•
Select the Original.doc file and click [Open].
•
Click on the Modified [Open] button.
•
Select the Modified.doc file in you C:\Exercise folder and click [Open].
•
Make sure the Document Output option is set to Word.
documents, which
•
The Report Type should be Consolidated report marked up with track changes.
will be emailed to a
•
The Rendering Set should be set to Standard [Server].
•
Click the [Compare] button and select the View As New Document option.
To run two comparisons,
specifying different
document outputs
and report types for
each comparison. You
will then compare two
colleague along with the
Comparison Report...
The Comparison Report opens in a new MS Word document.
Note: You can start to accept or reject the changes in the Comparison Report. The
Reviewing Pane also displays, listing all the changes in the document.
•
Close the MS Word document and return to the compareDocs
application.
3.
Compare Word documents - Comparison Report output as a redline in PDF
•
Make sure the two MS Word documents are still loaded in the compareDocs
application.
•
Select PDF as the Document Output option.
•
Select Consolidated report marked up with formatting as the Report Type.
•
Leave the Rendering Set option as Server [Standard].
•
Click the [View] button.
Note: the [Compare] button displays the previously selected option, which was View As
a New Document. This will stay like this until you make a different selection.
The PDF document displays as a standard redline document showing the changes between the two
documents.
•
14
Close the PDF document and return to the compareDocs application.
COMPAREDOCS QUICK STEP GUIDE
4.
COMPARING DOCUMENTS
CREATING PDFs
Compare and email two documents
•
Make sure the two Word documents are still loaded in the compareDocs application.
•
Leave all Output settings and actions the same as before.
•
Click on the [View] button drop-down and select the Email option.
The Email Documents dialog displays.
•
Type “Comparison Report and documents as requested” in the Subject field.
•
Check all documents in the Select Attachments area.
•
Click the [OK] button
A new email message displays. Note the Comparison Report is a PDF, while the Original and Modified are
MS Word documents.
•
Complete the To information and click the [Send] button.
•
Close the email application and return to compareDocs.
COMPAREDOCS QUICK STEP GUIDE
15
Working with Comparison Reports
The Comparison Report is produced after the Original and Modified
documents are compared and analyzed, showing the differences
between the two documents using standard markup or redline
formatting.
compareDocs provides you with a number of Comparison Report
types depending on the source document type and the Comparison
Report output type.
Source
Output
Report type
Both Word
Word
Consolidated report marked up with track changes
Both Word
Word
Consolidated report marked up with formatting
Both Word
PDF
Consolidated report marked up with annotations
Both Word
PDF
Side-by-side report marked up with annotations
Both Word
PDF
Consolidated report marked up with track changes
Both Word
PDF
Consolidated report marked up with formatting
Supported document type Word
Consolidated report marked up with formatting
Supported document type Word
Consolidated report marked up with track changes
Supported document types
Type
Description
.DOC
.DOCX
.DOCM
Microsoft® Word document
Microsoft® Word 2007 XML document*
Microsoft® Word 2007 XML macro-enabled document
.DOT
.DOTX
Microsoft® Word document template
Microsoft® Word 2007 document template*
.MSG
Microsoft® Outlook email message
.PDF
Portable Document Format
.PPT
.PPTX
.PPTM
Microsoft® PowerPoint presentation
Microsoft® PowerPoint 2007 presentation*
Microsoft® PowerPoint 2007 macro-enabled presentation
.RTF
Rich Text Format document
.TXT
Text file document
.XLS
.XLSX
.XLSM
.XLSB
Microsoft® Excel workbook
Microsoft® Excel 2007 XML workbook*
Microsoft® Excel 2007 XML macro-enabled workbook*
Microsoft® Excel 2007 binary workbook
* Microsoft® Office Compatibility Pack for Word, Excel and PowerPoint
2007 File Formats required if Microsoft® Office 2007 is not installed.
16
COMPAREDOCS QUICK STEP GUIDE
COMPARING CREATING
DOCUMENTS
PDFs
Markup with Track Changes
compareDocs enables you to utilize MS Word’s Track Changes
functionality to continue working on the Comparison Report. This
will allow you to accept/reject changes in this third iteration of the
document.
Document Output must be set to Word for this to work. This means
that you can compare two Word documents or even a Word and a PDF
document and still take advantage of Track Changes functionality.
This is made possible with DocsCorp’s OCR technology, which
converts the PDF to a Word document before comparing and
outputting as a Track Changes document.
Word documents and supported document types can be marked up
with Track Changes, however if they are output to PDF, you will not be
able to edit or modify the documents.
Word Comparison Reports are marked up using Rendering Sets based
on MS Word’s Track Changes feature.
Markup with Formatting or Redline
If you want to produce an industry-standard “redline” report you have
a number of options. When both documents are MS Word documents,
you can output them as either MS Word or PDF documents. The
Consolidated report marked up with formatting option produces a
standard redline document in both cases.
This means that in both instances you will not be able to use MS
Word’s Track Changes functionality. This is also the case for Word or
supported document types, which can be marked up with formatting
and output to PDF or Word.
Redline documents are usually marked up using the following
conventions:
Markups
Displays
Insertions
Insertions display in the Comparison Report as Blue Underlined text
Deletions
Deletions display as Red Strikethrough
Moves
Moves “from” display as Double Green Strikethrough
Moves “to” display as Double Green Underlineß
Markup with Annotations
When comparing two PDFs, a PDF with a MS Word document or
any combination of supported document types, you can choose
between a Consolidated and a Side-by-Side report marked up with
annotations. Both Comparison Reports are marked up using PDF
annotations.
COMPAREDOCS QUICK STEP GUIDE
17
Producing a Comparison Report with Track Changes
When comparing two MS Word documents, you have the option of
outputting the Comparison Report with Track Changes as a MS Word
or as a PDF document. Your workflow processes and requirements will
determine the Comparison Report output.
Produce a Comparison Report with Track Changes
How to!
1.
Drag and drop the documents onto the compareDocs
interface.
2.
Ensure the Word radio button is selected as the Document
Output.
3.
The Consolidated report marked up with Track Changes
should be selected
4.
Ensure the Standard (Server) Rendering Set is selected.
5.
Select the View As New Document option from the [Compare]
button drop-down.
The Comparison Report document displays. You can continue
to work on the document by accepting or rejecting the changes.
When you are finished, you can save, print or email the document.
6.
Right-click on any change in the document, and you will see a
number of Track Changes options.
Tip
You can also click on the
Review tab on the MS Word
ribbon.
7.
18
Close the Comparison Report.
COMPAREDOCS QUICK STEP GUIDE
COMPARING CREATING
DOCUMENTS
PDFs
Producing a Comparison Report with formatting
When comparing two MS Word documents, you have the option of
outputting the Comparison Report with formatting as a MS Word or
as a PDF document. Your workflow processes and requirements will
determine the Comparison Report output.
Produce a Comparison Report with formatting
How to!
1.
Drag and drop the Original Word document onto the Original
document field.
2.
Drag and drop the Modified Word document onto the
Modified document field.
3.
Ensure the PDF radio button is selected as the Document
Output.
If you prefer to output as a Word document, select the Word radio
button instead.
4.
Select the Consolidated report marked up with formatting
option from the drop-down.
5.
Ensure the Standard (Server) Rendering Set is selected.
6.
Select the View As New Document option.
The Comparison Report document displays as a PDF document.
7.
Close the Comparison Report.
COMPAREDOCS QUICK STEP GUIDE
19
Producing a Comparison Report with annotations
You can produce a Comparison Report with annotations from a
number of different source documents. For example, Word to Word,
PDF to PDF, PDF to Word or any combination of supported document
types. The document output in these cases can only be PDF.
Produce a Comparison Report with annotations
How to!
1.
Drag and drop the Original PDF document onto the Original
document field.
2.
Drag and drop the Modified PDF document onto the Modified
document field.
3.
Ensure the PDF radio button is selected as the Document
Output.
4.
Select the Consolidated report marked up with annotations
option from the drop-down.
5.
Ensure the Standard (Server) Rendering Set is selected.
6.
Select the View As New Document option from the [Compare]
drop-down.
The Comparison Report document displays as a PDF.
7.
Close the Comparison Report and return to the compareDocs
application.
20
COMPAREDOCS QUICK STEP GUIDE
COMPARING CREATING
DOCUMENTS
PDFs
Producing a Side-by-Side Comparison
The Side-by-Side Comparison Report with annotations can be
produced by comparing a number of different source documents. For
example, Word to Word, PDF to PDF, PDF to Word or any combination
of supported document types. The document output can only be PDF
in these instances.
Produce a Side-by-Side Comparison Report with annotations
How to!
1.
Drag and drop an Original PDF document onto the Original
document field.
2.
Drag and drop a Modified PDF document onto the Modified
document field.
3.
Ensure the PDF radio button is selected as the Document
Output.
4.
Select the Side-by-side report marked up with annotations
option from the drop-down.
5.
Ensure the Standard (Server) Rendering Set is selected.
6.
Select the View As New Document option.
The Comparison Report document displays. The new document is
always displayed on the left.
COMPAREDOCS QUICK STEP GUIDE
21
Working with the Selection Window
The Selection Window in compareDocs allows you to select which
documents to compare when more than two documents have been
sent to compareDocs through Windows explorer.
You can compare any document in the Selection Window, or
compare any listed document with any other document loaded in
compareDocs. You can even run a new comparison.
Use the Selection Window to compare documents
How to!
1.
Navigate to the file location on your system using Windows
Explorer.
2.
Select any three supported document types.
3.
Right-click on the documents and select Send to >
compareDocs
The Selection Window displays.
Note
To compare two
documents in the Selection
Window to each other
and not to any document
in compareDocs, select
the two documents and
check the New Comparison
option. Click the [Next]
button, which will spawn a
new compareDocs window
with both documents
loaded
4.
Select the two documents for comparison and click the [Next]
button.
The documents are loaded into compareDocs ready to be
compared.
22
COMPAREDOCS QUICK STEP GUIDE
COMPARING CREATING
DOCUMENTS
PDFs
compareDocs application and system integration
compareDocs as we have seen can be used as a standalone
application, ie you can navigate to the Original and Modified
documents directly from the compareDocs application and run the
comparison.
compareDocs integrates with most of the applications you use on a
daily basis. This integration will enable you to streamline workflow as
you will be able to compare documents within these applications and
systems without first having to launch compareDocs.
compareDocs integrates in the following ways:
Integration
Application
Toolbar
MS Word
MS Outlook
Internet Explorer
pdfDocs
Worldox
Drag and drop
MS Outlook
Windows Explorer
Document Management Systems
HP Worksite
MS SharePoint
NetDocuments
OpenText eDOCS DM
ProLaw 11 and 12
Worldox
Right-click
Windows Explorer
Document Management Systems
HP Worksite
MS SharePoint
NetDocuments
OpenText eDOCS DM
ProLaw 11 and 12
Worldox
COMPAREDOCS QUICK STEP GUIDE
23
Compare in MS Word
When compareDocs is installed on your machine it adds a
compareDocs toolbar or Ribbon to MS Word. You can perform a
variety of tasks by simply clicking on the appropriate button on the
toolbar.
If you are using MS Word 97-2003, compareDocs will appear in the
MS Word toolbar. If you use MS Word 2007 or above, click on the
DocsCorp Ribbon.
Button
Description
Launch compareDocs – Click this button on the toolbar to load the
current MS Word document into the compareDocs application.
Email Comparison – click this button to email the Original,
Modified and Comparison Report documents. You can select which
documents you wish to include as email attachments.
Save into DMS – Click this button to save the Comparison Report
back into your Document Management System. Note: one of
the documents (Original/Modified or both) needs to have been
sourced from the DMS originally.
Print Comparison Report to PDF – click this button to print the
Comparison Report to PDF.
Print Changes Only – click this button to print only those pages in
the Comparison Report with changes.
The compareDocs drop-down lists the following options:
Button
Description
Compare – Select this option to load the current MS Word
document into the compareDocs application for comparison.
Prepare for Accept Changes – Ensures that a Track Changes
comparison report can be completely reverted to the modified
document if Accept All Revisions is accepted in Word.
Restore Track Changes Default - Restores the Track Changes
configuration in Word before compareDocs was run.
Save Track Changes Settings - Marks the current Track Change
configuration as the original configuration. Use this setting if
you want compareDocs to restore Word Track Changes to be the
current configuration.
24
COMPAREDOCS QUICK STEP GUIDE
COMPARING CREATING
DOCUMENTS
PDFs
Comparing within MS Word
You can compare an open MS Word document by clicking on the
[Launch compareDocs] button on the DocsCorp Ribbon (MS Word
2007 or higher) in MS Word. This will load the current document into
compareDocs to be compared with another document.
Compare within MS Word
How to!
1.
Make sure you have a document opened in MS Word.
2.
Click on the [Launch compareDocs] button on the MS Word
toolbar or DocsCorp ribbon.
The MS Word document is loaded into the compareDocs
application.
3.
If required, load another document into the compareDocs
application.
4.
Make the necessary Output, Report Type and Rendering Set
selections.
5.
Click the [Compare] button and select View As New Document
to run the comparison.
The Comparison Report displays in MS Word as a new document.
COMPAREDOCS QUICK STEP GUIDE
25
Working with Comparison Reports in MS Word
compareDocs integrates with most applications and systems. As you
know, it integrates with MS Word, MS Outlook, pdfDocs and leading
Document Management Systems.
This gives you a number of efficient workflows when the Comparison
Report output is a MS Word document. Let’s look at some of the
workflows you have available to you when the Comparison Report
opens as a new MS Word document.
Print the Comparison Report
How to!
Compare two Word documents, and the Comparison Report will
display.
1.
Click the DocsCorp Ribbon in MS Word.
2.
Click the [Print Comparison Report] button on the MS Word
toolbar.
The Print dialog box displays.
Note
If you want to print the
document to PDF, you
should select DocsCorp
PDF Printer to generate a
PDF
Tip
compareDocs gives you
the ability to create PDF
documents using the
DocsCorp PDF Printer. This
can be accessed from any
application.
26
3.
Select your printer from the Printer Name drop-down.
4.
Click the [OK] button.
COMPAREDOCS QUICK STEP GUIDE
COMPARING CREATING
DOCUMENTS
PDFs
Printing the Changes Only Report
The Changes Only Report contains only those pages from the
Comparison Report that have differences. This report is printed to the
DocsCorp PDF Printer. Therefore, this report is always in PDF.
For example, if a comparison resulted in changes to pages 1-3 of 5,
then the Changes Only Report will contain 3 pages in total, ie pages 1,
2 and 3.
Print the Changes Only Report
How to!
1.
Make sure you have a Comparison Report open in MS Word.
2.
Click the DocsCorp Ribbon.
3.
Click the [Print Changes] button on the MS Word toolbar.
The Print dialog box displays. The DocsCorp PDF Printer is selected
automatically as the printer.
4.
Select your printer from the Printer Name drop-down.
5.
Click the [OK] button.
COMPAREDOCS QUICK STEP GUIDE
27
Emailing the Comparison Report
The Comparison Report can be emailed directly from within MS Word.
Clicking on the [Email Comparison] button on the MS Word toolbar
displays the Email Documents window.
From the Email Documents window you can make a number of
choices. You can select which document to email; the Comparison
Report, the Original document, the Modified document or any
combination.
You can also edit the names of the documents before emailing them.
Email the Comparison Report
How to!
1.
Make sure you have a Comparison Report open in MS Word.
2.
Click the DocsCorp Ribbon.
3.
Click the [Email Comparison] button on the MS Word toolbar.
The Email Documents window displays.
4.
Select which documents from the list you want to email as
attachments by checking the appropriate checkboxes.
5.
28
Click the [OK] button.
COMPAREDOCS QUICK STEP GUIDE
COMPARING CREATING
DOCUMENTS
PDFs
6.
Complete the To field in MS Outlook.
7.
Click the [Send] button.
Note
The file name for the
Modified document is used
as the Subject line for the
email. Click into the Subject
field and type in a more
appropriate subject title.
COMPAREDOCS QUICK STEP GUIDE
29
Steps...
1.
Prepare the workspace
•
Open MS Word on your system.
•
Open the Original1.doc file in your C:\Exercise folder.
The Original document displays.
Skill
Builder
2.
Compare an open MS Word document with another document
•
Click on the Launch compareDocs button on the MS Word toolbar or DocsCorp
ribbon.
Note: if using MS Word 2007, click on the Add-In ribbon to display the toolbar.
compareDocs launches with the document loaded into the Original Document field.
Aim:
To compare an open
•
MS Word document
Click on the Modified [Open] button and navigate to your C:\Exercise folder and
select the Modified1 document.
with another MS Word
•
document stored
on your local drive.
Click the [Open] button.
The document is loaded into the Modified Document field.
After reviewing the
Note: the Document Output is automatically set to Word.
Comparison Report
you will email it to a
colleague and then save
the Comparison Report
•
Set the Report Type as Consolidated report marked up with formatting.
•
Click the [Compare] button and select the View As New Document option.
The Comparison Report displays in MS Word.
to your local drive...
3.
Email the Comparison Report from MS Word
•
You have reviewed the Comparison Report and now want to email it to your
colleague.
•
Click the Email Comparison button on the MS Word toolbar.
Note: if using MS Word 2007, click on the Add-In ribbon to display the toolbar.
The Email Documents dialog box displays.
•
Type in a more appropriate subject in the Subject field.
•
Check the Comparison Report only in the Select Attachments area.
•
Click the [OK] button.
A new email message displays.
•
Enter your colleague’s email address in the To field and click the [Send] button.
The email is sent.
30
COMPAREDOCS QUICK STEP GUIDE
4.
COMPARING DOCUMENTS
CREATING PDFs
Save the Comparison Report from MS Word to DMS (optional)
If you have a DMS, you can save and profile the Comparison Report directly into the client
matter or folder.
•
Run the comparison from the compareDocs application.
The Comparison Report displays.
•
Click on the [Save Into DMS] button on the MS Word toolbar.
•
Follow the onscreen instructions to save and profile the Comparison Report in your DMS.
•
Once you have completed the save, return to the compareDocs application.
COMPAREDOCS QUICK STEP GUIDE
31
Drag and drop MS Outlook attachments
Adding documents to compareDocs from MS Outlook is a simple
drag and drop procedure. Supported document attachments can
be dragged from MS Outlook and dropped on to the appropriate
Original or Modified document field as well.
If you drag and drop more than two documents onto the
compareDocs application, the documents will be loaded into the
Selection Window. You can then determine which two documents
should be compared.
Compare MS Outlook attachments
How to!
1.
Drag the email attachment from the MS Outlook email
message and drop it onto the appropriate document field in
compareDocs.
2.
Repeat if necessary.
3.
Make the necessary Output, Report Type and Rendering Set
choices based on the document source types.
4.
Click the [Compare] button and select the View As New
Document for example.
32
COMPAREDOCS QUICK STEP GUIDE
COMPARING CREATING
DOCUMENTS
PDFs
Comparing documents in Windows Explorer
You can quickly compare documents on your system or network
by right-clicking on the document(s) and loading them into the
compareDocs application.
Right-clicking on more than two documents will load them into the
Selection Window.
Compare documents in Windows Explorer
How to!
1.
Select the Original document in Windows Explorer.
2.
Select the Modified document next.
3.
Right-click on the documents and select the Send to >
compareDocs option.
A new version of compareDocs is launched with both loaded in the
document fields.
4.
Make the appropriate Output, Report Type and Rendering Set
selections.
5.
Make the appropriate selection from the [Compare] button
drop-down options.
COMPAREDOCS QUICK STEP GUIDE
33
Comparing documents from a DMS
compareDocs integrates with leading Document Management
Systems such as HP Worksite, MS SharePoint, NetDocuments,
OpenText eDOCS DM, ProLaw and Worldox.
While there are some slight differences in processes and functionality,
integration is essentially the same for all the Document Management
Systems. Let’s look at some of the common integration points.
Integration
Description
[Open] buttons
Click on the [Open] button drop-down for
either the Original or Modified document
and select the DMS option. This will open
your DMS Open window. You can then
navigate to the document.
In General Settings, you can have the
[Open] button default to your DMS.
Document information icon When integrated with a DMS, clicking on
the Document Information icon will open
the Document Profile window from the
DMS.
Save into DMS
You can save and profile the Comparison
Report directly into your DMS. Click the
[Compare] button and select the Save
into DMS option. This will display the DMS
window.
There is also a [Save into DMS] button on
the MS Word toolbar. Click this to save the
Comparison Report directly into the DMS.
Right-click
compareDocs integration with a DMS
means that you can right-click on a
document(s) in the DMS and run the
comparison.
When the documents being compared
are sourced from DMS, then the naming
convention applied is [DocID] [DocVersion]
Document name.ext
e.g. [#4877954][v4] Modified document.doc
Comparing anything to anything
compareDocs has its own, self-contained PDF printer, named
DocsCorp PDF Printer. This will enable you to compare PDF-toWord documents. You will be able to compare any two supported
documents giving you in effect the ability to compare anything to
anything.
You can also use the DocsCorp PDF Printer to create a PDF document
from any application.
34
COMPAREDOCS QUICK STEP GUIDE
COMPARING CREATING
DOCUMENTS
PDFs
Compare Word to PDF
It is not unusual to send out a MS Word document for review only to
receive a PDF document back. compareDocs will compare a MS Word
to a PDF document, outputting the Comparison Report as a PDF, or as
a Word document using DocsCorp OCR technology.
1.
Load an Original Word and a Modified PDF document into the
appropriate document field.
How to!
2.
Choose between a Consolidated or a Side-by-Side report
marked up with annotations.
3.
Choose the Rendering Set.
4.
Click on the [Compare] button and choose from the list of
options available to you.
Note
compareDocs is able
to compare two Excel
spreadsheets by first
converting them to PDF
using the DocsCorp PDF
Printer. Once they have
been converted, they
can be compared. If you
need to compare all the
worksheets in a workbook,
you need to enable this
setting in the PDF Compare
settings.
The Comparison Report displays as a PDF. You can now review the
document for changes.
Try the same thing again, this time output the Comparison
Report to Word, or try marking the document up with either Track
Changes or Formatting. This will require compareDocs to OCR the
document as part of the process.
COMPAREDOCS QUICK STEP GUIDE
35
Steps...
1.
Compare two MS Excel spreadsheets
•
Load the Original and Modified Excel files into the compareDocs application.
The files are located in your C:\Exercise folder.
Skill
Builder
•
Make sure the Output is PDF.
•
Select the Side by Side report marked up with annotations as the Report type.
•
Leave all other settings the same.
•
Click the [Compare] button and select the View As New Document option.
The Comparison Report displays.
•
Aim:
Click on the Bookmarks pane in PDF viewer application to navigate through the
changes in the document.
To compare two MS
Excel workbooks for
•
Close the PDF document and return to the compareDocs application.
differences. Modify the
PDF comparison settings 2.
to ensure that all
worksheets are included
Change the PDF comparison setting to include all worksheets in a MS Excel
•
Select Cogwheel > Settings on the compareDocs interface.
The Settings dialog box displays.
in the comparison...
3.
•
Make sure you are on the General Compare options screen.
•
Check the Include all Worksheets option.
•
Click the [OK] button.
Run the MS Excel comparison again
•
Make sure the Original and Modified documents are still loaded in the compareDocs
application.
•
Leave other settings the same.
•
Click the [View] button.
The Comparison Report displays. This time all the worksheets in the Excel file are compared.
•
Click on the Bookmark pane in PDF viewer application to navigate through the
changes in the document.
•
36
Close the PDF document and return to the compareDocs application.
COMPAREDOCS QUICK STEP GUIDE
COMPARING DOCUMENTS
CREATING PDFs
COMPAREDOCS QUICK STEP GUIDE
37
Change Settings
You can change the compareDocs default settings at any time. To
display the Settings dialog box, select Cogwheel > Settings.
You can change settings for both PDF and Word comparisons from
this dialog box.
Integration
Description
Compare
Compare default settings can be modified for both Word and PDF
comparisons as well as specifying the default Open location for
the Original and Modified documents. You can specify the Save to
location for the Comparison Report.
Rendering Set - Word
Create, rename, delete and save new Rendering Sets for Word
comparisons.
Rendering Set - PDF
Create, rename, delete and save new Rendering Sets for PDF
comparisons.
Output
Set compareDocs to display Change Reports for both Word and PDF
Comparison Reports for example.
OCR
Specify OCR location and settings to support different comparison
and output workflows.
Language
Change compareDocs settings to support specific languages.
38
COMPAREDOCS QUICK STEP GUIDE
COMPARING CREATING
DOCUMENTS
PDFs
Compare general settings
The Compare Settings dialog box consists of three sections: General
Settings, Word Compare Settings and PDF Compare Settings.
In the General Settings section, you can specify settings to determine
the default Open from and Save to locations for documents.
Options
Description
Summary Report Header
This option lets you determine what displays as the
header for the Summary Report.
Save As Location
This option lets you specify the default save to
location for the Comparison Report. Click on the
[Browse] button to navigate to the desired location.
After Save
When the Original and Modified documents are
compared, a Comparison Report is generated
showing the differences between the two documents.
You can determine if the Comparison Report is
opened automatically or not after it has been saved.
Open from Location
This option lets you select the Open From Location
for the [Open] button. The options are None, My
Computer and DMS.
Close Application after comparing
Select this option to close the application once the
comparison is complete.
COMPAREDOCS QUICK STEP GUIDE
39
Specify general compare settings
How to!
1.
Click on the Cogwheel and select the Settings option.
The compareDocs Settings dialog box displays.
2.
Click the Save As Location [Browse] button and navigate to the
desired location.
3.
Click on the After Save drop-down and select from the
available options.
4.
Click on the Open From Location drop-down and select your
default open from setting.
5.
40
Click the [OK] button to save the changes.
COMPAREDOCS QUICK STEP GUIDE
COMPARING CREATING
DOCUMENTS
PDFs
Specifying Word compare settings
You can also specify how detailed you want the comparison to be, ie
at the word or character level as well as which MS Word elements to
compare.
Options
Description
Character Level
Character level comparison
You can compare at the word or character level
with compareDocs. For example, if you choose the
character level option, the following change may be
indicated in the Comparison Report:
Original text: That cat has brown fur.
Modified text: Thatis cat has brownlack fur.
If character level is not selected, then the modified
text will be marked up at a word level and may be
indicated as follows:
Modified text: ThatThis cat has brownblack fur.
Elements to compare
Select which MS Word elements such as Header/
Footers to compare.
Show Moves
The Moves feature must be enabled as it is not a
default setting.
When selected and used in conjunction with the
“Consolidated report marked up with formatting”
Report Type, Word Comparison Reports will mark
up text that has been moved from one location in
the document to another, as opposed to moves
being marked up as deletions from the source and
insertions at the destination.
Marking up of moves natively in MS Word is
dependent on the version of Word being used and
the Report Type selected.
Flatten Field Codes
When selected compareDocs will flatten all field
codes prior to comparing content.
Enable Improved Track Changes Output
When selected compareDocs will produce Track
Changes output with changes from the classic Track
Change output.
COMPAREDOCS QUICK STEP GUIDE
41
Specify Word compare settings
How to!
1.
Click the Cogwheel and select the Settings option.
The compareDocs Settings dialog box displays.
2.
Check the Character Level checkbox.
3.
Check the Word elements you want compared.
4.
Check the Show Moves checkbox.
5.
Click the [OK] button.
The compareDocs interface displays.
42
COMPAREDOCS QUICK STEP GUIDE
COMPARING CREATING
DOCUMENTS
PDFs
Specifying PDF compare settings
In the PDF Compare Setting dialog box you can determine the level to
which the PDFs are marked up, whether all worksheets in a MS Excel
workbook should be compared and if you want to display moves in a
PDF document.
Options
Description
Fine Tuning
The Fine Tuning setting determines how the change
is marked up in PDF Comparison Reports; word,
sentence or paragraph level.
A Fine Tuning setting of High displays changes at a
word level. For example:
Original text: That cat has brown fur. It is angry;
Modified text: That cat has black fur. It is angry.
A Fine Tuning setting of Medium displays changes at
a sentence level. For example:
Original text: That cat has brown fur. It is angry;
Modified text: That cat has black fur. It is angry.
A Fine Tuning setting of Low displays changes at a
paragraph level. For example:
Original text: That cat has brown fur. It is angry;
Modified text: That cat has black fur. It is angry.
Include all Worksheets
Select this option to compare all worksheets in a MS
Excel workbook.
Moves
Select the Show Moves options if you want moves to
be marked up in the Comparison Report.
COMPAREDOCS QUICK STEP GUIDE
43
Specify PDF compare settings
How to!
1.
Click the Cogwheel and select the Settings option.
The compareDocs Settings dialog box displays.
2.
Select the High Fine Tuning option.
3.
If you are comparing Excel workbooks, check the Include all
Worksheets checkbox to ensure that all worksheets in the
workbooks are compared.
4.
Show Moves is checked by default. Leave it checked.
5.
Click the [OK] button.
The compareDocs interface displays.
44
COMPAREDOCS QUICK STEP GUIDE
COMPARING CREATING
DOCUMENTS
PDFs
Rendering Sets
The Rendering Set determines how the Comparison Report is marked
up. compareDocs comes with a number of standard Rendering Sets
that you can use for MS Word and PDF comparison.
You can create your own Rendering Sets based on any of the existing
Rendering Sets that come with compareDocs. Note that you cannot
delete, overwrite or modify any of these standard Rendering Sets.
Creating new Word Rendering Sets
compareDocs comes with a number of pre-set Rendering Sets. These
are available from the Rendering Set drop-down on the Rendering
Settings - Word dialog box. These Rendering Sets have the word
(Server) displayed after the Rendering Set name.
Server-side Rendering Sets cannot be removed, renamed or modified,
but can be used as a template for new Rendering Sets, created and
stored locally on your computer.
Options
Description
Rendering Set
Select a compareDocs Rendering Set from the dropdown. These sets cannot be deleted or overwritten.
New
Click the [New] button to create a new Rendering Set.
Save As
You can perform a Save As on a Rendering Set and
give it a new name.
Rename
You can only rename a Rendering Set you created.
Delete
This option lets you delete a Rendering Set you
created.
compareDocs allows you to create Rendering Sets to mark up
documents with Track Changes or Formatting output.
COMPAREDOCS QUICK STEP GUIDE
45
Create a new Word Rendering Set
How to!
1.
Click the Cogwheel and select the Settings option.
The compareDocs Settings dialog box displays.
2.
Click the Rendering Set - Word option.
3.
From the Rendering Set drop-down, select the New option.
4.
Make the required changes for Track Changes or Formatting.
5.
Click the [OK] button.
6.
Type the name for the new Rendering Set in the Name field.
7.
Click the [OK] button.
The compareDocs interface displays.
Edit a Word Rendering Set
How to!
You cannot edit any pre-set Word Rendering Set in compareDocs. You
can only edit Rendering Sets you create.
1.
Click the Cogwheel and select the Settings option.
The compareDocs Settings dialog box displays.
2.
Click the Rendering Set - Word option.
3.
From the Rendering Set drop-down, select the Rendering Set
you want to edit.
4.
Make the necessary changes in the Track Changes display box.
5.
Click the [OK] button.
The compareDocs interface displays.
Delete a Word Rendering Set
How to!
1.
Click the Cogwheel and select the Settings option.
The compareDocs Settings dialog box displays.
2.
Click the Rendering Set - Word option.
3.
From the Rendering Set drop-down, select the Rendering Set
you want to delete.
4.
Click the [Delete] button under the Rendering Set drop-down.
5.
Click the [OK] button.
The compareDocs interface displays.
46
COMPAREDOCS QUICK STEP GUIDE
COMPARING CREATING
DOCUMENTS
PDFs
Creating new PDF Rendering Sets
compareDocs comes with a number of pre-set PDF Rendering
Sets. These are available from the Rendering Set drop-down on the
Rendering Settings (PDF) dialog box. These Rendering Sets have
the word (Server) display after the Rendering Set name. Click on the
Rendering Set drop-down to display all the pre-set PDF Rendering
Sets that come standard with compareDocs.
Server-side Rendering Sets cannot be removed, renamed or modified,
but can be used as a template for new Rendering Sets, created
and stored locally on your computer. Consult your User Manual to
learn more about the specific settings and options for creating or
modifying PDF Rendering sets.
COMPAREDOCS QUICK STEP GUIDE
47
View PDF Rendering Set settings
How to!
1.
Click the Cogwheel and select the Settings options.
The compareDocs Settings dialog box displays.
2.
Click the Rendering Set - PDF option.
The PDF Rendering Sets screen displays.
3.
Click the [OK] button.
Create a new PDF Rendering Set
How to!
1.
Click the Cogwheel and select the Settings options.
The compareDocs Settings dialog box displays.
2.
Click the Rendering Set - PDF option.
The PDF Rendering Sets screen displays.
Tip
You can also select New
from the Rendering Set
drop-down.
3.
Click the [New] button.
4.
Define Consolidated and Side-by-Side Report Settings.
5.
Click the [OK] button.
6.
Type the name for the new Rendering Set and click the [OK]
button.
Your new Rendering Set now displays in the Rendering Set dropdown as an option.
Rename a PDF Rendering Set
How to!
You can only rename a Rendering Set that you created. You cannot
rename any of the pre-set Rendering Sets in compareDocs.
1.
Click the Cogwheel and select the Settings options.
The compareDocs Settings dialog box displays.
2.
Click the Rendering Set - PDF option.
The PDF Rendering Sets screen displays.
3.
Select the Rendering Set from the drop-down options.
4.
Click the Rename option.
5.
Type the new name for the Rendering Set in the Name field
and click the [OK] button.
6.
Click the [OK] button to exit the screen.
The compareDocs interface displays.
48
COMPAREDOCS QUICK STEP GUIDE
COMPARING CREATING
DOCUMENTS
PDFs
Delete a PDF Rendering Set
How to!
1.
Click the Cogwheel and select the Settings options.
The compareDocs Settings dialog box displays.
2.
Click the Rendering Set - PDF option.
The PDF Rendering Sets screen displays.
3.
Select the Rendering Set from the drop-down options.
4.
Click the [Delete] button.
The Rendering Set is deleted from the drop-down as an option.
5.
Click the [OK] button to exit the screen.
The compareDocs interface displays.
COMPAREDOCS QUICK STEP GUIDE
49
Steps...
1.
Display the Settings dialog box
•
Make sure the compareDocs application is open.
•
Select Cogwheel > Settings.
The compareDocs Settings dialog box displays. Note the options available to you.
Skill
Builder
2.
Set General Compare options
•
You are going to make two changes related to the default Open location and the
default Save As location.
•
Click on the Save As Location [Browse] button.
•
Navigate to your C:\Exercises folder.
compareDocs settings
•
Click the [OK] button.
for PDF and Word
•
Click on the Open From Location drop-down and select the My Computer option.
•
Click the [OK] button.
Aim:
To configure
comparisons for your
firm…
3.
4.
Set PDF compare settings
•
Check the following options:
•
Fine tuning – high
•
Excel – include all worksheets
•
Comparison – show moves
Set PDF output settings
•
Click the [Output] button.
Note the options available to you. Also note that the Change Summary Report
is mandatory for PDF Comparison Reports and that it is always appended to the
beginning of the report.
•
Check the Change Detail Report option.
•
Click the Include Change Detail Report drop-down and select the Display as a
Separate Report option.
•
5.
Click the [OK] button.
Run a new PDF comparison based on new PDF settings
•
Using the [Open] buttons, load the Original and Modified PDF documents into the
appropriate Document fields in the compareDocs application.
•
Make your Report Type and Rendering Set options.
•
Click the [Compare] button and select the View As New Document option.
Two new PDF documents display. One the Comparison Report with the Change Summary Report
appended and the other the Change Detail Report.
50
COMPAREDOCS QUICK STEP GUIDE
COMPARING DOCUMENTS
CREATING PDFs
Steps...
1.
Display the Settings dialog box
•
Make sure the compareDocs application is open.
•
Select Cogwheel > Settings.
The Settings dialog box displays. Note the options available to you.
2.
3.
Set Word Compare Settings
•
Check the Character Level option.
•
Check the MS Word elements (Headers/footers, tables etc) you want compared.
•
Check the Show Moves option.
•
Click the [OK] button.
Set Word output settings
•
Click the Output button.
The Word Output settings dialog box displays. Note the options available to you.
4.
•
Check the following:
•
Include Change Summary Report – append to the beginning of the comparioson report
•
Include the Change Detail Report as a separate document
•
Select the Automatic – same as Modified option from the Save files in this format
•
Click the [OK] button.
Run a new Word comparison based on new Word settings
•
Load the Original and Modified Word documents into the appropriate Document
fields in the compareDocs application.
•
Make your Report Type and Rendering Set options.
Note the Change Summary and Detailed Reports are selected.
•
Click the [Compare] button and select the View As New Document option.
Two new Word documents display. One the Comparison Report with the Change Summary Report appended and the other the Change Detail Report.
•
Close all open documents and return to the compareDocs application.
COMPAREDOCS QUICK STEP GUIDE
51
Output
The Comparison Report can be output as a PDF or as a MS Word
document. You can also specify if you require Change Summary or
Detail reports appended to the Comparison Report or generated as
separate documents.
If the Comparison Report is MS Word and the document type is
Consolidated marked up with track changes, you can also have the
Track Changes toolbar and Preview Pane display. You can also specify
the format of the report, for example in MS Word 97-2003 or MS Word
2007.
Options
Description
Compare Data in Sequence
Using the Compare Data in Sequence option allows
PDF files to be processed in a top down, left-to-right
order, as viewed in Adobe Reader.
PDF Annotations
Choose to print the annotations and to hide the
annotation details when you hover over them in the
Comparison Report.
Show Unicode Differences
Select this option to display the Unicode difference
within the comments and annotation of the PDF
change.
Change Reports
Choose whether to display the Change Detail Report.
Note that the Change Summary report is mandatory
and will always display at the start of the PDF
Comparison Report.
The Change Detail Report can be displayed at the
start or end of the Comparison Report. If you want
you can have it produced as a separate document.
52
COMPAREDOCS QUICK STEP GUIDE
COMPARING CREATING
DOCUMENTS
PDFs
Options
Description
Show Track Changes toolbar and Show
Reviewing Pane
You can have the Track Changes toolbar and the
Reviewing Pane display when the Comparison Report
is produced.
This is when both source documents are MS Word
documents, the output is MS Word and the Report
Type is Consolidated Report marked up with track
changes.
Author
When comparing MS Word documents using the
“Consolidated report marked up with track changes”,
each Tracked Change can include a user-specified
Author record.
Save files in this format
This option determines the document file format
for Word Comparison Reports when saved from
compareDocs.
This can be either in Word 97-2003 format or in Word
2007. You can specify to have the Comparison Report
saved in the same format as the Modified document.
Document View
Specify whether the Word Comparison Report
displays in Normal or Print View when Word is the
specified Document Output.
Change Reports
You can choose to include a Change Summary or
a Change Detail report as part of your Comparison
Report.
The reports can display at the start or end of the
document or they can be generated as separate
documents.
Update Automatic Links at Open
When selected, compareDocs automatically updates
any links to other documents before running the
comparison.
COMPAREDOCS QUICK STEP GUIDE
53
Define output settings
How to!
1.
Click the Cogwheel and select the Settings options.
The compareDocs Settings dialog box displays.
2.
Click the Output option.
3.
Make the required changes to Word and/or PDF output
settings.
4.
Click the [OK] button.
The compareDocs interface displays.
54
COMPAREDOCS QUICK STEP GUIDE
COMPARING CREATING
DOCUMENTS
PDFs
OCR
When you scan a paper page, it produces just an image file, a photo
of the page. The computer cannot understand the letters on the page,
so you cannot search for words, edit it or compare it with anything.
If you have the DocsCorp OCR module installed, it will provide you
with a number of useful workflows.
1.
Compare paper documents
2.
Compare image files (TIFF, JPEG, image PDF)
3.
Compare PDFs and output the Comparison Report to a MS
Word document
4.
Compare any two supported document types and output the
Comparison Report to a MS Word document
OCR converts the image document from being a non-searchable
document into one that is searchable. Once it document has been
OCR’ed, it can then be compared. DocsCorp OCR works in the
background so that you do not have to do anything.
Options
Description
OCR Service Provider
Specifies the location of the DocsCorp OCR Server on
you system.
Compare PDF as Word documents
Select this option to compare PDF documents
as Word documents. This means that you can
compare image PDFs as well as PDFs and output the
Comparison Report as a MS Word document.
Compare PDF as OCR PDF documents
Check this option to compare a PDF to a Word
document. Note the Enable PDF documents to be
compared in MS Word format must also be checked.
Preserve image resolution and
compression
This ensures that documents being sent to OCR
Server are returned using the same resolution and
compression rates.
Display OCR Languages
When selected, the user will be presented with a list
of languages being applied to the OCR process.
COMPAREDOCS QUICK STEP GUIDE
55
Configure OCR settings in compareDocs
How to!
1.
Select the Cogwheel, and select the Settings option.
The compareDocs Settings dialog box displays.
2.
Check the following options:
Enable PDF documents to be compared in MS Word format
Auto convert Word to PDF and back to MS Word
3.
Click the [OK] button.
Compare two image documents
How to!
1.
Load the Original_image and Modified_image documents
located in the C:\Exercise folder into the compareDocs
application.
2.
Select PDF as the Document Output.
3.
Select Side-by-Side report marked up with annotations as the
Report Type.
4.
Select the Standard (Server) Rendering Set.
5.
Click the [Compare] button and select the View As New
Document option.
The Comparison Report displays in your PDF viewer.
Compare a PDF to a MS Word document with MS Word output
How to!
1.
Load the Original MS Word and Modified PDF documents
located in the C:\Exercise folder into the compareDocs
application.
2.
Select Word as the Document Output.
3.
Select Consolidated report marked up with track changes as
the Report Type.
4.
Select the Standard (Server) Rendering Set.
5.
Click the [Compare] button and select the View As New
Document option.
The OCR options dialog box displays.
6.
Check the Perform OCR checkbox for the modified PDF
document, and click the [OK] button.
56
COMPAREDOCS QUICK STEP GUIDE
COMPARING CREATING
DOCUMENTS
PDFs
Managing Multiple Languages for OCR
The Language option allows you to specify the default language used
in the document for the most accurate results. Multiple languages
can be compared in documents. The DocsCorp OCR module supports
over 180 languages.
In Settings, click on the Languages option and select your default
language from the drop-down. When the documents are OCR’ed
during the comparison process, you can specify other languages in
the document in addition to the default language.
Displaying OCR Languages
How to!
1.
Click the Cogwheel and select the Settings option.
2.
Select the OCR option.
3.
Check the Display OCR Languages checkbox.
4.
Click the [OK] button.
COMPAREDOCS QUICK STEP GUIDE
57
Printing to PDF
compareDocs provides users with the ability to print to PDF from any
application. Simply select the DocsCorp PDF Printer as your printer.
Print to PDF
1.
Open a MS Word document.
2.
Select Print in the Backstage view.
3.
Select DocsCorp PDF Printer from the Printer Name dropdown list.
4.
Click the [OK] button.
The document is converted to PDF and displays in your PDF viewer.
58
COMPAREDOCS QUICK STEP GUIDE
1.
COMPARING CREATING
DOCUMENTS
PDFs
What are the main areas of the compareDocs interface?
...............................................................................................................................
..............................................................................................................................
..............................................................................................................................
2.
What is the default Output setting when comparing two MS
Word documents? Can this be changed?
Review
Questions
...............................................................................................................................
...............................................................................................................................
...............................................................................................................................
As a review of the topics
covered in this module,
3.
What are some of the Comparison Report types available to you
please answer the following
in compareDocs?
questions:
...............................................................................................................................
...............................................................................................................................
...............................................................................................................................
4.
Explain what the Selection Window is in compareDocs and how
it is used.
...............................................................................................................................
................................................................................................................................
...............................................................................................................................
5.
compareDocs can be used as a standalone application. T or F?
................................................................................................................................
................................................................................................................................
................................................................................................................................
6.
What are the compareDocs settings that can be changed or
modified?
...............................................................................................................................
...............................................................................................................................
...............................................................................................................................
COMPAREDOCS QUICK STEP GUIDE
59
You now know
The compareDocs interface consists of five different areas in
addition to the Menu toolbar.
The Compare Documents area has two fields—one for the Original
document and the other for the modified.
Review
Checklist
The Document Output area is where you determine whether the
Comparison Report is in MS Word or PDF.
The Report Type is the Comparison Report, which displays the
changes between the Original and Modified documents. The
markup in the Comparison Report is based on Document Output
and Rendering Set choices.
The Rendering Set determines how the Comparison Report is
marked up based on the document sources.
The [Compare] button runs the comparison when it is clicked.
The default Output option when comparing two MS Word
documents is Word. That means that the Comparison Report will be
output as a Word document. You can select to have the Comparison
Report be output as a PDF document.
There are 4 Comparison Report types available in compareDocs.
Consolidated report marked up with track changes
Consolidated report marked up with formatting
Consolidated report marked up with annotations
Side by Side report marked up with annotations
When you select more than two documents to compare in
compareDocs, the Selection Window displays. This enables you
to select which documents are loaded into the compareDocs
application for comparison.
compareDocs integrates with MS Word, MS Outlook, Window
Explorer, the pdfDocs Solutions Suite and leading Document
Management Systems. This means that you can run comparison
directly from these applications or systems. compareDocs
integration enables you to streamline processes and workflow.
In Settings you can change and modify compareDocs options for
General Settings, Word compare settings, PDF compare settings,
Rendering Sets (Word, PDF), Output (Word, PDF), OCR and Language
settings.
60
COMPAREDOCS QUICK STEP GUIDE