1
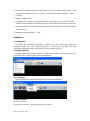
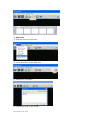
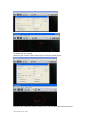
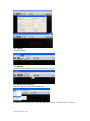
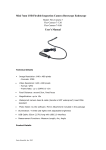
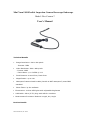
Mini 7mm USB Flexible Inspection Camera Borescope Endoscope Model: Flex-Camera-7 User’s Manual Technical Details Image Resolution: 640 x 480 pixels - Formats: JPEG Video Resolution: 640 x 480 pixels - Format: WMV - Frame Rate: up to 30FPS @ VGA Focal Distance: around 5cm, fixed focus Magnification: up to 10x Waterproof camera head & cable (handle is NOT waterproof) meet IP66 standard Photo Taken: by the software Illumination: 4 white LED lights with adjustable brightness USB Cable: 82cm (2.7ft) long with USB 2.0 interface Measurement Functions: Measure Length, Arc, Angle Product Details Oasis Scientific, Inc. 2012 Dimension: Flexible cable with handle: 62cm (2.0ft); Flexible cable: 52cm (1.7ft); Flexible cable diameter: 6mm (0.24in); Camera head outer diameter: 7mm (0.28in) Weight: 166g (5.6oz) Compatibility: Windows 7/Vista/XP, MAC 10.5 or above, Linux (note: For Mac, please use Photo Booth or Facetime to open it. No software for Mac at this time). Package Includes: Mini USB Inspection Camera, CD Software (with User's Manual and software) Manufacturer’s Warranty: 1 year Software: 1. Installation To install the Supereyes software, simply copy and paste the ‘supereyes software’ folder into your desired directory. To open the software, find the ‘supereyes software’ folder and double click the ‘supereyes.exe’ 2. Starting Device Plug the endoscope into the USB port. Double click on the icon of ‘supereyes.exe’. Click ‘preview’ to view objects under examination. 3. Languages Three languages are available: English, Chinese and Japanese. 4. Basic Setting 1) Device source Click ‘Device Source’, choose the device you need. Oasis Scientific, Inc. 2012 2) Device Setting You can change the Device Setting based on your need. 3) Video Format Setting Set Video format for video resolution 5. Picture Capture Oasis Scientific, Inc. 2012 1) Setting Picture Path 2) Shoot 3) Preview the stored picture After the photo has been taken and saved, you can open it through A. Open the Image Folder B. Double click the picture in the ‘type Picture” 6. Video Recording 1) Setting the video path 2) Setting Frame Rate Oasis Scientific, Inc. 2012 3) Video Recording 4)Stop 5) Play Video A. click player to play (only for DZC file) B. open video files by Video Folder C. double click video on the ‘Type video’ Oasis Scientific, Inc. 2012 7.Add Text 1) Click the device of ‘Add Text’ 2) Click the button of the ‘Add Text’ 3) Add text in the frame 4) Display the text in the screen Oasis Scientific, Inc. 2012 8. Measurement 1) Setting the Measuring Standard Put a precision ruler under the lens of endoscope, pull a line about one millimeter, and write down the number 2) Measure the length 3) Measure the arc length Oasis Scientific, Inc. 2012 4)Measure the angle 9. Option Set Up 1) select video record format WMV (general format) or DZC (professional high compression ratio format) 2) Select photo size 3) Select color of the ruler 4) Select the measure setting Oasis Scientific, Inc. 2012 The drawing can be saved by selecting the ‘Save Measure Line’. The data of measurement can be saved by selecting the ‘Save Measure data’. Oasis Scientific, Inc. 2012 5) Select the Arc setting Selecting the ‘Center show’ allows you to see the central point. Selecting the “Diameter show” allows you to see the diameter data of the arc. Oasis Scientific, Inc. 2012 10. Output Print the photos 11. Marker Click the button ‘Marker’ to play or cancel the marker. 12. Measure the Picture Open the picture that will be measured Complete the measurement. Click the right key mouse to select ‘save’ or ‘cancel’. Oasis Scientific, Inc. 2012