1
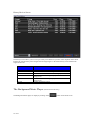
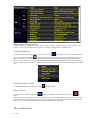
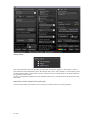
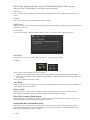
User Manual For use with Karaoki Build 0.5.3578 or greater Manual Version 0.5 1 of 18 Oct 28th 2009 Index USER MANUAL ................................................................................................................................................ 1 Index ............................................................................................................................................................ 2 INTRODUCTION ................................................................................................................................................. 3 Plug-in mode............................................................................................................................................... 3 Stand–alone mode....................................................................................................................................... 3 REQUIREMENTS ................................................................................................................................................ 3 INSTALLATION .................................................................................................................................................. 3 BEFORE STARTING KARAOKI............................................................................................................................ 3 In Plug-in Mode. ............................................................................................................................................... 3 THE MODE SELECTION SCREEN. ...................................................................................................................... 3 THE MAIN SCREEN............................................................................................................................................ 4 Selecting the player in DEX or Red Mobile that you wish to use for Karaoke. (“Plug–in” Mode only)......... 4 Changing the Text Size..................................................................................................................................... 5 Deck Controls ................................................................................................................................................... 5 Karaoke Song Cases ......................................................................................................................................... 5 Case Song List .................................................................................................................................................. 6 Scan Folder. ...................................................................................................................................................... 7 Scan .............................................................................................................................................................. 7 Change Path.................................................................................................................................................. 7 Only Add If Song Is Not In Case ................................................................................................................. 7 Use Filename Only....................................................................................................................................... 7 Only Extract Tags From Unzipped Files...................................................................................................... 7 Scan Using ‘Karaoke Naming Conventions’ ............................................................................................... 7 Edit Track Popup.......................................................................................................................................... 8 Trim Tracks .................................................................................................................................................. 8 Searching for a song. .................................................................................................................................... 8 Singer Rotation ................................................................................................................................................. 9 Graphics Buttons ............................................................................................................................................ 10 Output Screen. ................................................................................................................................................ 10 History Screen ................................................................................................................................................ 11 History Review Screen ................................................................................................................................... 12 THE BACKGROUND MUSIC PLAYER (STAND-ALONE MODE ONLY) ................................................................ 12 Adding Music to the BGM Player. ................................................................................................................. 13 Using the BGM Player.................................................................................................................................... 13 Silence Detector.............................................................................................................................................. 13 THE CONFIG SCREEN ...................................................................................................................................... 13 Startup Mode .................................................................................................................................................. 14 Selection a sound device. ........................................................................................................................... 15 Speaker Assignment ................................................................................................................................... 15 Refresh VU Meter at 10fps option ............................................................................................................. 15 Player Progress Bar Option ............................................................................................................................ 15 Max Singers On Screen .................................................................................................................................. 15 Hide DJ App. (Plugin mode only, requires DEX/Red Mobile build # 7094 or greater) ................................ 16 Tool Tips......................................................................................................................................................... 16 Console ........................................................................................................................................................... 16 High Priority ................................................................................................................................................... 16 News Ticker.................................................................................................................................................... 16 Pitch Bend....................................................................................................................................................... 16 Loading ........................................................................................................................................................... 16 Auto Delete ................................................................................................................................................ 16 Pause on load.............................................................................................................................................. 16 Show CDG Graphics When Paused. .......................................................................................................... 16 Background Music Automation options .................................................................................................... 16 Screen 2 Background Image ........................................................................................................................... 17 Tempo/Key Set up .......................................................................................................................................... 17 Menu Color ..................................................................................................................................................... 17 Using ‘Remote Request Stations .................................................................................................................... 17 Sending a message to all terminals ............................................................................................................ 18 Sending a message to a selected terminal .................................................................................................. 18 2 of 18 Introduction Karaoki is a Karaoke player that is designed as stand-alone player or to integrate with PCDJ DEX and Red Mobile as a plug in. Plug-in mode. Karaoki lets DEX/RED Mobile handle the audio by interfacing to it via the Lightdecks port. Karaoki loads the karaoke graphics then tells DEX/RED M what audio file to load, in return DEX/RED M tells Karaoki the audio status, e.g. Playing, Pause, Song position (so the graphics can be kept in sync with the audio), and a lot of other information. Karaoki can also automatically fade down and back up to a pre-set level any background audio playing on players 1 and 2 on DEX Stand–alone mode. In Stand –alone mode Karaoki has its own automated background music player (BGM Player), once music is added to the BGM player simply click on the play button and the player will automatically work its way through the tracks in the player. There is an autofade option so Karaoki can also automatically fade the BGM down and back up to a pre-set level when the karaoke deck starts and stops, there is also a silence detector so the automated fades happen as the karaoke sound starts and stops. In both modes Karaoki also has the ability to interface to a remote request terminal (software available separately as a free download). When a singer makes a request using a request terminal the request is automatically placed in the singer rotation list, to load and play the song the Karaoki simply clicks on the ‘Load Next Singer’ button. Requirements PC/Laptop with dual head video card with 64MB of dedicated video ram (Not Shared), Pentium 4 class (dual core recommended) or equivalent, 1gig Ram Windows XP (sp2 or higher) or Vista (32 or 64 bit version) or Windows 7 (32 or 64 bit version) (computer performance rating 3 or higher recommended), shared graphics memory is NOT Recommended. PCDJ DEX or Red Mobile. (Plug-in Mode) Sound Card (Stand-alone Mode) Installation Click on “Karaoki setup.exe”, follow the instructions on the screen. Before starting Karaoki In Plug-in Mode. In this manual it is assumes that you have a working knowledge of DEX or Red Mobile, if this is not the case please familiarise yourself with one of these products before you continue. You may wish to turn off the ‘Auto Cue’ option on the ‘General’ page of the software’s ‘Options’ menu as Karaoke tracks tend to have silence at the beginning of the song, this will be lost if the ‘Auto Cue’ option is left turned on. The Mode Selection Screen. Once the software registration has been checked Karaoki will check to see if you have a compatible DJ Applications installed, If this the case you will be asked if you wish to run Karaoki as a “stand-alone” application or as a “Plug-in”. If you do not have a compatible DJ Applications installed Karaoki will start in “Stand-alone“ mode 3 of 18 If the “Don’t Ask Me Again” option is set, Karaoki will always start in the selected mode and this message will not be shown again. These settings can be reset on the config screen. If you choose “Plug-In” Karaoki will start your DJ application (DEX / RED Mobile) for you. If you have more than one compatible DJ application installed on your PC Karaoki will ask you to select the one you wish to use, it will than start the DJ application in the correct mode for you. The main Screen. Above is a picture of Karaoki’s main screen (in Plug-In mode), Its controls will now be explained in more detail. Selecting the player in DEX or Red Mobile that you wish to use for Karaoke. (“Plug–in” Mode only) The player that is to be used for Karaoke is selected by clicking on one of the following buttons. When using Karaoki with DEX we recommend you use player 3 or 4 on DEX for your karaoke deck, this will leave players 1 and 2 for audio (DJ) work. When used with Red Mobile will only buttons 1 and 2 will be shown as Red Mobile has only 2 decks, Use deck 2 for Karaoki. 4 of 18 Changing the Text Size. Use the ‘T Size’ button to change the size of the text, pressing the button will rotate the text size through one of 4 sizes, pressing the ‘B’ button toggles the font from normal to bold. Deck Controls The deck Controls are as any other Player. The Load button allows you to browse (Right mouse click) and load (Left mouse click, to Load current selected track) MP3, MP3+G, WAV, WAV+G and ZIP files. You can also drag and drop files into the player area. The Bend buttons can be set to Fixed (7%) or constant bend, select the required mode on the ‘Config’ screen. Click on the ‘P. Range’ number to select the pitch range, reset the pitch to zero by clicking on the ‘Pitch fine’ number or right clicking in the pitch fader. The tempo control allows the tempo to ‘Locked to the value shown on the control, Use the +/- buttons to set the value, use the ‘Lock’ button to Enable/Disable the Key/tempo control. The Graphics, Offset and Rotation will be covered in the Rotation section. Karaoke Song Cases All Karaoke song cases are shown in the ‘Cases’ list, this is the list to the left of the main screen, to edit the case right click on the case, a menu will appear. The selected case is shown in Blue on a Black background. 5 of 18 Menu options are as follows: Menu Item Function New Case Creates a new case Clear Case Clears selected Case’s contents Delete Case Removes selected case from computer’s hard drive Print Case Prints out the selected case’s contents Save Case As Saves the selected case using a new name, Leaves the selected case intact. Scan Case using This allows the user to re-scan the selected case using one of a number of the standard Naming Convention Karaoke file naming conventions. Case Song List The ‘Case Song List’ shows the songs in the selected case, it is the centre list on the screen. Drag a selected song into the Karaoke deck to load it into the player or drag it into the singer rotation to add it to the list; the selected song is highlighted in Blue on a Black background. If the link to the song’s MP3+G, WAV+G or ZIP files is broken the text for the broken link will turn red, To add or edit the songs in the list right click on the list or selected song, a active menu will appear, select the Function you wish to use from the menus list. Main Menu Item Add Tracks Sub Menu Item Scan Folder Import M3U Scan Single Track Add Track Manually Edit Track 6 of 18 Edit Track Function Scans a folder for MP3 or ZIP files, where possible extracts ID3v1 and v2 data from files and places the data in the ‘Song List’, if the ID3 data cannot be obtained the song’s File name is used instead. Imports M3U Play lists into the Song list, adding ID3v1 and v2 data where possible, if the data cannot be extracted the song’s file name is used instead. Scans a single MP3 or ZIP file, where possible extracts ID3v1 and v2 data from files and places the data in the ‘Song List’, if the ID3 data cannot be obtained the song’s File name is used instead. Manually add Artist, Song, Genre and file data to the song list. Edit the selected song’s Artist, Track and Genre data. See Picture below. Trim Tracks Remove Track Scans case and trims unwanted text from the title and artists fields. Removes the selected song from the song list Genre File Show or Hide the Genre column Show or Hide the File column Show /Hide Columns Scan Folder. When selected you will be prompted to select a start path to scan, then the following screen will appear. Scan The ‘Scan’ button starts the scan of the selected folder and all its sub folders. Change Path Allows the user to change the path of the folders to be scanned. Only Add If Song Is Not In Case When selected only songs that are not already in the case will be added. Use Filename Only When selected the data will not be taken from the ID3 tags, instead the file name will be placed into the Title column of the case, The case should be scanned using a ‘Karaoke Naming Convention’, the user will be prompted to do this automatically after each scan. Only Extract Tags From Unzipped Files When set the scanner will not unzip zipped files to extract tag information but will extract tags from unzipped files. This option speeds up scanning when there is a mix of zipped and unzipped Karaoke libraries being scanned. Scan Using ‘Karaoke Naming Conventions’ Cases can be scanned using ‘Karaoke Naming Conventions’, simply select the name format from the drop down list, and click ‘Go’, the tracks will be scanned 7 of 18 The ‘Only If Starts With’ filter allows you to only scan tracks that start with a specific set of characters. For example most Sunfly karaoke DiscID’s start with SF, so putting SF in the filter will only rename the tracks using the selected format if the first two letters to the discID are SF. Up to five filter can be used at a time, use a semicolon to separate the filters e.g. SF;ZM;Z8 Note:- Naming conventions are only applied to songs that have the ‘Artist’ column empty. Edit Track Popup. The ‘Edit Track’ popup allows you to edit Artist, Title and Genre date for the selected song. If you are editing a single Artist or Genre you can lock the data by clicking on the ‘Padlock’ next to the field you wish to lock, you can then step through the song list using the ‘Next’ and ‘Previous’ buttons. If the ‘Artist’ field is blank an additional dropdown list is shown so a ‘Karaoki Naming Convention’ filter can be applied if required. Note; the Name format box is only shown if the Artist box is empty. Trim Tracks The trimmer Scans case and trims unwanted text from the title and artists fields, simply type the text you wish to remove into the “Text To Remove” box and click on trim, the trimmer will work its way through the case removing the unwanted text. The trim button will only be visible once text has been added to the “Text To Remove” box. Searching for a song. To search for a song type the text that you wish to search for in the ‘Search Box’, then press the enter Key. The search will search Artist, Title and Genre data; the results will be shown in the Search results list. This is the bottom right list on the screen (shown below). 8 of 18 The ‘In Case’ column shows the ‘Song Case’ that the song was found in. To add a song to the ‘Rotation List’ drag the selected song into the ‘Rotation List’ you will be prompted to add the singers’ name, the song will then be added to the rotation list and the screen undated. To load a selected track into the player drag it onto the player. Stand-alone mode only: If the background music player (BGM Player) is being displayed the search will search the background music and NOT the karaoke cases, drag the result onto the BGM play button to load the track into the BGM Player. Singer Rotation As singers are added to the ‘Rotation List’ up to the top 5 singers (number set on config screen) can be shown on the local ‘Monitor Screen’ and ‘Singers Monitor’ (Screen 2). Singers can be moved up and down the list by dragging them to the required position, right clicking on the list will display an active popup menu. If you are using Remote Terminals, singer’s requests will automatically be added to the rotation list. Active Menu Item Function Edit Singer Delete Singer Refresh Display Clear List Key + Edits singers name Removes singer from rotation list Refreshes the singer display and KJ Monitor Removes all singers from rotation Increases the song key by the amount set on the config screen. Decreases the song key by the amount set on the config screen. Loads saved history into the rotation list. Key Load History 9 of 18 Graphics Buttons The ‘Screen 2’ button toggles on and off the Singers screen, If a second monitor is not connected the screens output is show in a new window. The ‘Offset’ control allows the graphics to be advanced and retarded in relation to the audio, having the graphics slightly advanced (0.2 to 0.3 seconds) can help some singers. The ‘Load Next Singer’ loads the singer at the top of the rotation list and starts the player. If the ‘Auto Delete’ option on the config screen is set the singer on the top of the ‘Rotation List’ will deleted after the song has played for 20 seconds. Stand-alone mode only. If the ‘Auto Fade’ option on the config screen is set the background music will faded out when the karaoke song starts. Once the song has finished the background music will be faded up to the level set by the ‘Fade To Volume’ control on the Config screen. The point when the fades happen will depend on if the silence detector is set on the background music player, if set the fades will take place when the silence transitions take place. . Plug-in mode only. If the ‘Auto Fade’ option on the config screen is set Dex/ Red Mobile players 1 and 2 are faded out. Once the song has finished players 1 and 2 on DEX/Red Mobile will be faded up to the level set by the ‘Fade To Volume’ control on the Config screen. We recommend that in DEX/Red Mobile a folder is set to an ‘Auto Play’ folder and ‘Auto Play is engaged to give you your background music. Output Screen. 10 of 18 Above is the Singers screen (Screen 2), if a second monitor is connected the singers screen will detect the monitor and auto resize to fill the monitor, the screen is optomised for resulutions of 800x600 (standard 4 by 3) and 1440x900 (widescreen16 by 9) although the screen should rescail to any size screen. The screen shows the next 5 singers when a MP3+G song is not playing, when playing it will show the song graphics. The information on the screen is also shown on the KJ’s output monitor screen. The text along the botom of the screen is a ‘News Ticker’, this can be used for displaying information to your audience. To enable the ticker check the ‘Enable Ticker’ box on the ‘Config’ screen.To edit the text type your message in the ‘Ticker’ message box on the ‘Config’ screen. History Screen The history screen is displayed by clicking on the button. When a karaoke track loaded with the “Load Next Singer” button has been playing for 20 seconds it is added to the history, the history is saved whenever a singer/song is added to the history list, by default this is saved as “Default”. At the end of a karaoke session you may save the history under another name so it can be loaded back into the singer rotation at a later date using the “Load History” menu option on the rotation list menu. Button Function Open Save Clear Del To Rotation Load Key - Loads existing saved history so it can be edited Saves the history to the hard drive Clears the history Deletes the selected item from the history Adds the selected item to the singer rotation list Loads the selected item into the Karaoke player Decreases the selected song’s key by the amount set on the config screen. Increases the selected song’s key by the amount set on the config screen. Displays the history review screen Key + Review 11 of 18 History Review Screen The history review allows you to review previously saved histories by means of the dropdown menu while keeping the current history intact. Single selected songs/singers or the whole history can be added to the singer rotation list. Button Function Append All To Rotation Load Key - Adds all the items in the list to the singer rotation list Adds the selected item to the singer rotation list Loads the selected item into the Karaoke player Decreases the selected song’s key by the amount set on the config screen. Increases the selected song’s key by the amount set on the config screen. Displays the history screen Key + Review The Background Music Player (Stand-Alone mode only) The Background music player is display by clicking on the 12 of 18 button on the main screen. Adding Music to the BGM Player. Songs are added to the BGM player list by right clicking on the list and selecting “Add Tracks” and then “Scan Folder” or one of the other sub menu items. This is the same as adding tracks to a karaoke case. Using the BGM Player To start the BGM palyer simply select a track and click on the (Play/Pause) button, the BGM Player will play each track in turn untill the (Stop) button is clicked. When a track has played, a blue tick is placed in the box to the left of the Artists name in the list, the track will not be automaticaly played again until all other tracks have been played, once all tracks have been played the BGM will start playing the tracks for a second time, this time a red tick is placed in the box to the left of the Artists name showing the track has been played more than once. Shuffle BGM Player Tracks. To shuffle the BGM player tracks click on the (Shuffle) Button. Silence Detector To use the silence detector click on the button, to disable the silence detector click on the button. When selected, the silence detector will detect the silence at the end of the BGM track playing and start next track automaticaly. Also if the autofade option is set on the config screen as well as the silence detector will detect the silence at start and end of the Karaoki music and fade the BGM player acordingly. The Config Screen 13 of 18 Startup Mode This control determines the start-up behaviour of Karaoki, if either the ‘Plugin’ or ‘Stand Alone’ option is selected Karaoki will automatically start in the selected mode, if the ‘Ask At Startup’ is selected the user will be asked what mode they wish Karaoki to start in. The blue dot next to either Plugin or Stand alone indicates the operational current mode. NOTE: if a compatible DJ application is not installed on the same PC as Karaoki, Karaoki will start in stand alone mode. Stand Alone Audio (Stand-alone mode only) The stand alone audio section allows you to select and set-up the audio device used by Karaoki. 14 of 18 Selection a sound device. The sound device (Card) for either the karaoke or BGM player is selected by selecting the device you wish to use from the ‘Sound Device’ dropdown list, different audio devices (Cards) may be used by the Karaoki and Background music players. Speaker Assignment You may select the speaker outputs you use on the selected sound device (Card), simply select the speaker output(s) from the ‘Speaker Assignment’ dropdown list. The list options change if you have ‘Mono Mode’ selected so the sound can be directed to individual speaker channel outputs. Stereo Mode Mono Mode Refresh VU Meter at 10fps option By default the VU meters are refreshed 25 times per second, to improve performance on lower specification PC’s this can be reduced to 10 times per second by setting this option. Player Progress Bar Option This option switches the player progress bar between bar and dot mode. Max Singers On Screen This control sets the maximum number of ‘next up’ singers shown on the singer screen and monitor window, setting the control to 0 disables the ‘Next singer’ message. 15 of 18 Hide DJ App. (Plugin mode only, requires DEX/Red Mobile build # 7094 or greater) Setting this option, DEX/Red Mobile will be hidden when using Karaoki. Tool Tips The ‘Tool Tips’ button switches On or Off the tool tip balloons that are shown whenever the mouse is over a control. Console The ‘Console’ button displays the debug information console. High Priority Setting this option will start Karaoki as a high priorty application, using this setting may help the performanance of karaoki on some PCs. News Ticker To use the news ticker, check the enable Ticker box, type your message in the Ticker Message box. Pitch Bend The pitch bend can be set to either continuous bend (0 – 10%) or fixed 7% bend. Loading The two buttons in the loading section are as follows; 1. Disable warning message when trying to load a track while the karaoke player is playing (Left button) 2. Hide case and search lists while loading data (Right Button), setting this option decreases case loading and search times. The red cross indicates the option is active Auto Delete When set, after 20 seconds of singing the current singer will be deleted from the singer rotation and added to or details updated in the singer history. Pause on load When this option is set the ‘Load Next Singer’ button on the main screen when pressed will load the next Singer/Song and the player will pause. When the option is not set, the player will play. Show CDG Graphics When Paused. When this option is set the Karaoke graphics will be shown when the karaoke player is paused, when not set the karaoke graphics will be hidden when the player is paused. Background Music Automation option When ‘Auto Fade’ is selected the background music will automatically fade out when the karaoke player is started, the background music will be faded back up to the ‘Fade To Volume’ level when the karaoke song ends or the karaoke player is pause or stopped. 16 of 18 Screen 2 Background Image The ‘Change’ button allows the user to change the backgroung immage displayed on the singers screen. The ‘Default’ button resets the background image. Tempo/Key Set up These option buttons set the Key/Tempo ‘change per click’ of the Key/Tempo +/- buttons. Menu Color This control sets the ‘Right click’ menu text color. Using ‘Remote Request Stations To use request stations enable the stations using the ‘Enable Remote Request Stations’ option on the ‘Config’ screen. Set the port on the stations to the same value as the port on the ‘Config’screen, the default value is 6000 but can be changed if this is already in use. Set the IP on the ‘Request Station’ to the same value as the one shown on the ‘Config’ screen, this is a fixed value and cannot be changed by the program. Select the Case that you wish to display on the Request Stations from the ‘Use Case’ dropdown box, All cases will be shown on the dropdown box. Restart Karaoki. All avaliable terminals should connect to Karaoki and be shown on the ‘Terminals’ list. 17 of 18 If the selected ‘Use Case’ case is not present on the terminals or has a been edited since it was uploaded the terminals will upload a new or updated copy of the case. Sending a message to all terminals Type your message in the message box, Click on the ‘Message All’ button, you message will be sent. Sending a message to a selected terminal Type your message in the message box, Click on the terminal in the ‘Terminal’ list you wish to send the message to, click on the ‘Message Selected’ button. 18 of 18