1
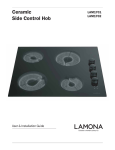
5 Zone Ceramic
Touch Control Hob
User & Installation Guide
LAM1625
LAMONA Appliances
Dear Customer,
Congratulations on your choice of hob which has been designed to give you excellent service.
The user manual will help you use your product quickly and safely.
Please read this user manual before installing and using the hob.
Always follow the safety instructions.
Keep this user manual within easy reach for future reference.
Please read any other documents supplied with the product.
Remember that this user manual may also applicable for other models and there maybe some minor
differences between the illustrations and your product.
Explanation of symbols
Throughout this user manual the following symbols are used:
Important information or useful tips about usage.
Warning for possible hazards to health and property.
Warning possibility of electric shock.
European Directives
As a producer and a supplier of cooking appliances we are committed to the protection of the environment
and are in the compliance with the WEEE directive. All our electric products are labelled accordingly with
the crossed out wheeled bin symbol. This indicates, for disposal purposes at end of life, that these products
must be taken to a recognised collection points, such as local authority sites/local recycling centres
This appliance Complies with European Community Directives (CE) for household and similar electrical
appliances and Gas appliances where applicable.
This appliance conforms to European Directive 2009/125/EC regarding Eco design requirements for
energy-related products
This product’s packaging material is recyclable. Help recycle it and protect the
environment by dropping it off in the municipal receptacles provided for this purpose.
Your product also contains a great amount of recyclable material. It is marked with this
label to indicate the used appliances that should not be mixed with other waste. This
way, the appliance recycling organised by your manufacturer will be done under the
best possible conditions, in compliance with European Directive 2012/19/EC on Waste
Electrical and Electronic Equipment. Contact your town hall or your retailer for the used
appliance collection points closest to your home. We thank you doing your part to protect
the environment.
02_
User manual LAM1625
Index
01 - Before Using the hob
04
02 - Safety
General
Fire safety advice
Fire Safety
,IDSDQFDWFKHVÀUH Deep fat frying
If you have an Electrical Fire
04
05
06
06
06
06
03 - Using your hob
Touch controls
Controls layout
Initial setup
Functions
Timed cooking
Safety shut off
08
08
08
08
09
10
10
04 - Cleaning and Maintenance
Ceramic hob glass
11
11
05 - Trouble Shooting
12
06 - Installation
General Information
Positioning
Connect to the electricity supply
Technical Data
13
13
13
16
17
07 - Your guarantee
18
Index _ 03
LAMONA Appliances
01 - Before using the hob
0DNHVXUHWKDW\RXKDYHUHPRYHGDOOSDFNDJLQJZUDSSLQJVVWLFNHUVDQGÀOPVIURPWKHKREVXUIDFH
,WLVUHFRPPHQGHGWKDW\RXFOHDQDQGZDVKWKHKREVXUIDFHEHIRUHXVLQJIRUWKHÀUVWWLPH
Apply a thin coat of ceramic hob cleaner to the hob to help maintain and protect it.
02 - Safety
WARNING! - The
appliance and its
accessible parts become
hot during use. Care should
be taken to avoid touching
heating elements. Children
less than 8 years of age
shall be kept away unless
continously supervised.This
appliance can be used by
children aged from 8 years
and above and persons
with reduced physical
sensory or mental
capabilities or lack of
experience and knowledge
if they have been given
supervision or instruction
concerning the use of the
appliance in a safe way and
04_ Before Using the hob
understand the hazards
involved. Children shall not
play with the appliance.
Cleaning and user
maintenance shall not be
made by children without
supervision.
WARNING! Unattended cooking on a
hob with fat or oil can be
dangerous and may result
in ¿re
NEVER try to extinguish a
¿re with water but switch
off the appliance and then
coYer the Àame with a lid
or damp cloth
WARNING! - Metallic
obMects such as kniYes
forks spoons and lids
User manual LAM1625
should not be placed on
WARNING! the hob surface since they Do not spray aerosols
can get hot
in the vicinity of this
appliance while it is in
operation
WARNING! -Danger
WARNING! - Do not
of ¿re do not store items
store or use Àammable
on the cooking surface
liquids or items in the
WARNING! -Never
vicinity of this appliance
leave any cook zone on
WARNING! without a pan covering it.
Do not modify this
7KLVFDXVHVDÀUHKD]DUG
appliance
WARNING! -If the
General
surface is cracked broken
Always ensure that pan bases are dry, stable
or shattered switch off
DQGÁDWEHIRUHXVLQJWKHPRQWKHKRE
the appliance to avoid the Always match the size of pan to the cook
zone – do not use large pans on small zones
possibility of electric shock
or vice versa.
and call for a service
Always position pans over the centre of the
cook zone, and turn the handles to a safe posiengineer¶s visit
tion so they cannot be knocked or grabbed.
WARNING! Servicing should be
carried out only by
authorised personnel
Always lift pans onto and off the hob, rather
than sliding them across the surface, to avoid
marks and scratches.
This appliance should only be used for normal
domestic cooking of food.
Never use the hob for any other purpose than
cooking food.
Plastic cooking utensils can melt if they come
into contact with a warm hob. Never leave
them close to, or on top of the hob.
Safety _ 05
LAMONA Appliances
Never use the hob surface as a chopping
board or food preparation area, as this may
lead to it becoming damaged.
Never leave aluminium foil on the hob top,
LWUHÁHFWVKHDWEDFNLQWRWKHHOHPHQWZKLFK
leads to damage.
Never heat up a sealed tin of food on the hob,
as it may explode.
Never leave pans overhanging the edge of the
hob. The surface of the hob is smooth. If pans
are knocked they may move on the hob top.
Fire safety advice
0RVWNLWFKHQÀUHVRFFXUZKHQSHRSOHDUHGLVWUDFWHG
or leave things unattended, so remember:
If you’re called away from the hob - by the phone or
someone at the door, either take pans off the heat,
or switch off your hob.
Don’t let yourself be distracted while cooking.
,I\RXGRKDYHDÀUHLQWKHNLWFKHQGRQ·WWDNHDQ\
risks - get everyone out of your home and call the
Fire Service
,IDSDQFDWFKHVÀUH
Do not move it as it’s likely to be extremely hot.
Turn off the heat if it’s safe to do so, but never
lean over a pan to reach the controls.
8VHÀUHEODQNHWRUDGDPSWHDWRZHOWRFRYHU
the pan.
,I\RXKDYHSXWWKHÀUHRXWOHDYHWKHSDQWR
cool completely.
This hob is not intended to be
opertated by means of a external timer
or seperate remote control system.
Deep-fat frying presents more
dangers in your kitchen
1HYHUÀOODSDQRURWKHUGHHSIDWIU\HUPRUH
than one-third full of oil.
'RQRWXVHDÀUHH[WLQJXLVKHURQDSDQRI
burning oil - the force of the extinguisher can
VSUHDGWKHÀUHDQGFUHDWHDÀUHEDOO
,I\RXKDYHDQHOHFWULFDOÀUHLQWKH
NLWFKHQ
Pull the plug out, or switch off the power at the
IXVHER[WKLVPD\EHHQRXJKWRVWRSWKHÀUH
immediately
6PRWKHUWKHÀUHZLWKDÀUHEODQNHWRUXVHD
dry powder or carbon dioxide extinguisher
Remember: never use water on an electrical or
FRRNLQJRLOÀUH
Avoiding damage to the appliance
The ceramic glass of the hob can be damaged by
objects falling onto it. Be especially careful with
heavy jars of food being stored in cupboards above
the hob, we recommend storing them away from the
hob area.
The edge of the glass can be damaged by being
knocked by cookware. Cookware made of cast
iron, cast aluminium or with damaged bottoms
can scratch the ceramic glass if pushed across the
surface.
Objects that melt and things that boil over can burn
onto the ceramic glass and should be removed as
soon as possible. To avoid damage to cookware and
the ceramic glass, do not allow sauce pans or frying
pans to boil dry.
Do not use the cooking zones with empty cookware
or without cookware in place.
06_ Safety
User manual LAM1625
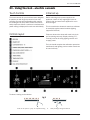
03 - Using the hob - electric ceramic
Touch Controls
Initial set up
The touch controls for your hob have been designed
WRSURYLGH\RXZLWKÀQJHUWLSFRQWURORI\RXUKRE
providing accurate and repeatable power settings
for cooking and an easy clean surface that can be
easily wiped over. When a cook zone is activated the
power setting is displayed for each zone individually,
Before switching on the power supply to the
appliance, switch off any bright lights (such as
cooker hood) and ensure the appliance is not in
direct sunlight.
Controls layout
This is to enable the electronic controls to calibrate
its sensitivity against natural ambient lighting
(approx 30 seconds).
Failure to observe the above will result in the hob
not functioning correctly, (Display showing “FL”).
To rectify remove all strong lighting sources and
re-apply power.
The hob should complete the calibration procedure
satisfactorily and lighting such as cooker hoods can
be used normally.
To select a setting on the selector
ÀJ
7RXFKDWRQHSRLQWWR´MXPSµWRDVSHFLÀFVHWWLQJRUVOLGH\RXUÀQJHUDORQJWKHVHOHFWRU
_ 07
LAMONA Appliances
Functions
To adjust the power setting see use the slider
DVLQÀJ
Repeat as necessary for the other zones.
Lock
A Red Led indicates when the key lock is
active, to deactivate/activate, touch the Key
Lock key for 1 second.
The key lock is deactivated when the Red LED
switches off.
If any of the cook zones are ON, the key lock
function locks all the keys except the ON/OFF
key.
If the cook zones are OFF, the key lock function
locks all the keys, including the ON/OFF key.
Switching a zone off
Touch the required cook zone key until the
]RQHGLVSOD\ÁDVKHVQRZUHWXUQWKHSRZHU
OHYHOWRE\XVLQJWKHVOLGHUDVLQÀJ
'XDO=RQH,IÀWWHG
Note: The dual zone is where the inner ring of the
heating element can be controlled separately.
2
1
The Key Lock is automatically activated every
time the electricity supply is switched off and back
on to the hob.
To avoid unintentional switching on of the
appliance, e.g. by small children and pets, we
recommend activation of the key lock feature.
1
COOK ZONE KEY (INNER ONLY)
2
CENTRAL DUAL ZONE KEY (INNER & OUTER)
Note; Generic illustration shown above your
appliance may visually differ.
Switching on the hob
Touch and hold the on/off symbol for 1
sec. The hob will beep and all energy level
indicators will display “0”.
To operate the dual cook zone
If no other symbol is selected within 10 secs
the hob will turn off.
Select the appropriate cook zone and set the
power level as per the single zone
Operating a zone
Ensure the Key lock is deactivated.
Touch the On/Off Key for 1 second a beep
sounds and the cook zone displays become
illuminated.
:KLOVWWKHKHDWHUGLVSOD\LVVWLOOÁDVKLQJSUHVV
the central dual zone key, a red LED will illuminate next to the cook zone to indicate it has
been activated.
The power level of the cook zone will stop
ÁDVKLQJDQGWKHSRZHUOHYHOLVVHW
Touch the required cook zone key.
Whilst selected, adjust the cook zone power
OHYHODVUHTXLUHGE\IROOZLQJWKHVWHSVLQÀJ
Then either touch the cook zone key again to
FRQÀUPWKHVHWWLQJRUDIWHUVHFRQGVWKH
hob will auto set the hob power and will beep
DQGVWRSÁDVKLQJ
08_
To de-select the dual cook zone
Touch the cook zone Key, the power level
GLVSOD\ZLOOVWDUWÁDVKLQJ
:KLOVWWKHSRZHUOHYHOGLVSOD\LVÁDVKLQJSUHVV
the centre dual zone key or return the power
level to “0” and the red led will disappear and
the inner and out elements will be disconnected. i.e. centre element controlled only.
Note: Only the inner ring can be be operated on its
own, the outer ring can only be operated with the
inner ring, match your pan accordingly.
Using the hob
User manual LAM1625
Notes on use
The power settings on the hob do not indicate
any set temperature and cannot be used to
judge one element against another.
During cooking, the elements will cycle on and
off. This is normal.
6WRSJR3DXVHIXQFWLRQ
The Pause function allows temporary pausing
of the cooking process, if the Pause key is
touched for more than 120 milliseconds.
To adjust the set time:
Touch the symbol for the desired zone followed
by the timer symbol.
8VLQJWKH´ǗµRU´9µV\PEROVUHGXFHRU
increase the time required (in minutes).
To deactivate timed Cooking:
Touch the symbol for the desired zone followed by
the timer symbol.
Pause LED blinks, a pause sound is heard and
the hob is stopped,
$GMXVWWKH´9µV\PEROGRZQWR´µ$WWKHHQGRIWKH
cooking time
the heaters actual power settings are stored
and all the active heaters power are set to 0,
the heaters auto switch off time is stopped,
At the end of the cooking time the buzzer will
DFWLYDWHDQGWKH]RQH·V/('ZLOOÁDVK7RXFKWKH
zone key to deactivate.
all the timers running count downs are
stopped,
all keys are locked except the Pause key, and
the on / off key,
Residual heat indicator
If the glass surface is hot an “H” will be displayed in
WKHFRRN]RQHGLVSOD\XQWLOWKHJODVVKDVVXIÀFLHQWO\
cooled.
the timer displays nothing, and all the heater
led’s display 0
Timed cooking
Refered
zone
LED’s
Timer
Timer adjust indicator
All 5 cooking zones can be operated under the
timer independently and at the same time for
up to 99 minutes. When the set time expires the
timer will beep and the cook zone will switch off
automatically.
To set the timed cooking to a zone:
Set the desired zone power level as described
previously.
:KLOVWWKHFRRN]RQHSRZHUOHYHOLVÁDVKLQJ
WRXFKWKH´ǗµRU´9µNH\VDQGWKHWLPHU
will illuminate “00” also two Red LEDs will
LOOXPLQDWHWKHÀUVWRQHZLOOEHÁDVKLQJRQWKH
timer to indicate the activated timed cook
zone and the second one “00.” Indicates that
the time can be adjusted.
8VLQJWKH´ǗµRU´9µV\PEROVVHWWKHWLPH
required in minutes.
To check remaining time:
Touch the symbol for the desired zone followed
by the timer symbol.
Using the hob
´+µDQG´µZLOOÁDVKDOWHUQDWLYHO\LIWKHFRRN
zone is hot and another cook zone is in use.
lock:
When the system is in child lock the controls
are deactivated. To lock and unlock the hob
touch and hold the key symbol.
Safety shut off
If the power level of a zone is not changed
for a long period of time the cook zone will
automatically switch off. The maximum time a
cook zone can stay on depends on the power
level.
Power Level
Max. time on (hrs)
1
10
2
5
3
5
4
4
5
3
6
2
7
2
8
2
9
1
_ 09
LAMONA Appliances
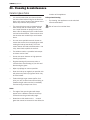
04 - Cleaning & maintenance
Ceramic glass hobs
It is recommended that you clean and wash
WKHKREVXUIDFHEHIRUHXVLQJIRUWKHÀUVWWLPH
Apply a thin coat of ceramic hob cleaner to the
hob to help maintain and protect it.
The ceramic hob top can be cleaned using a
clean, damp cloth or kitchen paper. Do not
use a used dishcloth or sponge as they can
OHDYHDÀOPRIGHWHUJHQWRQWKHVXUIDFHZKLFK
can lead to discoloration. Please ensure that
the elements are cooled fully to avoid steam
burns.
You can use a specialist ceramic cleaner to
restore the surface, but use sparingly to avoid
coating the hob top too thickly. Too much
cream cleaner will lead to discolouration. Use
a dry, clean cloth to polish the surface.
For stubborn marks, a specialist hob scraper
or cleaner can be used.
Do not use steam cleaners or high-pressure
cleaning equipment.
Regular cleaning will prevent any salts or
minerals from accumulating on your hob and
discolouring the glass.
Wipe any spillage as soon as possible.
Clean the hob top as regularly as possible, this
will prevent any build up of grease which may
EHDÀUHKD]DUG
Foods with high sugar content (toffee, fruit
juice, jam, etc.) that boil over while cooking, or
spattered sugar stains must be immediately
removed using a scraper even if hot.
function of the appliance.
Safety when Cleaning
For cleaning, the appliance must be switched
off and cooled down.
Risk of burns from residual heat.
Notes:
The edge of the ceramic glass will always
appear to be a different colour than the top
surface due to the ground safety edge.
Scratches or dark stains on the
ceramic
glass that cannot be removed do not affect the
10_
Cleaning and maintenance
User manual LAM1625
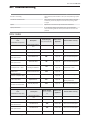
05 - Troubleshooting
If you encounter a problem, it is often something minor, please read some of the suggested tips below.
The hob is not working
Check the fuse/circuit breakers to see if you are experiencing a power
failure
The hob has turned itself off
Check that the main on/off switch has not been touched or covered
accidentally, remove any objects on the hob and try turning it back
on again.
Repairs
Repairs are to be carried out by trained service technicians.
Display F and letters
If “F” and letters appear on the display, your unit has detected a
fault, the following table lists actions you should take to correct the
problems
Error codes
Appliance errors
Event that generates the
error
Description
Heater Display
Effect in the
(fore 0.5 sec./ back 0.5 sec)
appliance
‘F0’
App. off
-------
Normal status recovery
(Visualization Priority Order)
Microcontroller fault
Microcontroller Internal
Error
On/Off key emitter fault
Security Key Error
‘FA’
App. off
When the fault disappears
On/Off key receiver fault
Security Key Error
‘FC’
App. off
When the fault disappears
Touch NTSC Error
‘FE’
App. off
When the fault disappears
Touch NTc Error
‘Ft’
App. off
When the fault disappears
Touch NTc Error,
‘Fc
App. off
User interface temperature
sensor short-circuit
User interface temperature
sensor open-circuit
User interface
When user interface
overtemperature > 96ºC
switching off all heaters.
EEPROM fault
Eeprom Checksum Error
‘FH’
App. off
-------
Security Key Error
‘FJ’
App. off
When the fault disappears
Keyboard Error
‘FL’
App. off
Security Key Error
‘FU’
App. off
Microcontroller A/D
converter multiplexer fault
Ambient Light fault
Microcontroller A/D
converter conversion fault
temperature < 89ºC
When satisfactory ambient
lighting is detected
When the fault disappears
Radiant Heater errors
Event that generates the
error
Heater Display
Description
sec)
(Visualization Priority Order)
Microcontroller fault
(fore 0.5 sec./ back 0.5
Microcontroller Internal
Effect in the
appliance
Normal status recovery
‘F0’
App. off
-------
Communication Error
‘F5’
Heaters Off
When the fault disappears
HC NTSC Error
‘F3’
Heaters Off
When the fault disappears
HC NTSC Error
‘F4’
Heaters Off
When the fault disappears
HC Relays Failure
‘Fr’
Heaters Off
When the fault disappears
Error
Communication fault
Heater control temperature
sensor short-circuit
Heater control temperature
sensor open-circuit
Heater control relay fault
Trouble shooting
_ 11
LAMONA Appliances
06 - Installation
General information
Positioning
,QVWDOODWLRQVKRXOGRQO\EHFDUULHGRXWE\DTXDOLÀHG
installer or engineer.
Choosing your installation
We recommend that you install this appliance in a
work top which is a minimum 38mm deep.
Please keep to the following points most carefully;
Although every care has been taken to ensure
this appliance has no burrs, or sharp edges, we
recommend that you wear protective gloves when
installing and moving this appliance. This will
prevent injury.
The minimum distances to other appliances and
units are to be observed.
Wall surfaces above the work surface and
in the immediate vicinity of the cooking
hob must be heat resistant.
Laminated surfaces and the adhesive used for
À[LQJWKHPPXVWEHKHDWUHVLVWDQWLQRUGHUWRDYRLG
any damage.
The space for air circulation, located
underneath and at the back of the hob
improves its reliability by ensuring that it
ZLOOFRROGRZQHIÀFLHQWO\
Installations should be carried out in line
with the National Regulations applicable
with this product type.
Note: Avoid installing the appliance next to doors
and under windows. This will avoid the potential
for hot cookware being knocked off the hob when
doors and windows are opened (Risk of burns).
7KHKREFDQEHÀWWHGLQWRDZRUNWRSOHVVWKDQ
38mm deep, but the 25mm gap between hob base
and appliance must be maintained.
Installation above a unit with a drawer or door
The base of the appliance must be protected
from damage e.g. drawers may only be
LQVWDOOHGSURYLGLQJDSDUWLWLRQSDQHOLVÀWWHG
to the required dimensions underneath the
appliance.
INSTALLATION ABOVE A UNIT WITH
A DRAWER OR DOOR
Worktop
Hob
25mm
Partician
Partition
Installation above an oven
Refer to the manufacturer’s instructions for
clearances above the oven. We recommend a
minimum 25mm gap between the bottom of
the hob and appliance
Worktop
Built-in appliances may only be used after they have
been built-into suitable built-in units and surfaces
that meet the required standards.
Hob
25mm
oven or partition
12_
Installation
User manual LAM1625
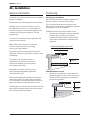
Clearances and dimensions – requirements
No shelf or overhang of combustible material
should be closer than 650mm above the hob.
When installing an extractor hood above the
hob, refer to its manufacturer’s instructions
Clearances and dimensions – requirements
There must be a minimum clearance of 50mm
between the rear edge of the hob and the rear
wall. This clearance must be maintained up to
650mm above the worktop (unless otherwise
stated in your extractor manual)
There must be a minimum clearance of 50mm
between the edges of the hob and any side
walls; this clearance must be maintained up to
420mm above the worktop.
* 650mm min
Minimum distance
between carcasses must
be equal to width of hob
420mm min
50mm min
737.5mm (77cm Hobs)
50mm min
30mm min /
50mm max
(
487.5mm
(77cm Hobs)
50mm Min
height to extractor
* Minimum
as recommend in extractor
instruction manual
Installation
_ 13
LAMONA Appliances
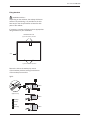
Fitting into worktop
Cut a hole in the work surface to the required size.
(737.50mm x 487.5mm) as illustrated above.
A clearance of at least 50mm should be maintained
between the cutout and any rear or side wall.
The worktop must be of heat-resistant material or
covered with heat-resistant material.
Protecting the cut-out
The types of chipboard used for work
surfaces swell relatively quickly in contact with
humidity.
Insert the hob into the recess, ensuring that the
foam seal is sitting correctly.
Locate and attach the securing clamps to the
front and rear underside of the hob, using the
screws provided. Tighten the screws so that the
KRELVSXOOHGGRZQÀUPO\DJDLQVWWKHZRUNWRSWKXV
ensuring a good seal.
<RXPD\ZDQWWRÀOODQ\JDSEHWZHHQWKHKREWRS
glass and the work top surface with silicone sealant.
'2127ÀWVLOLFRQHVHDODQWXQGHUWKHJODVVKRE
instead of foam seal.
Apply a suitable sealant to the cut edge to protect it
from moisture ingress.
Self Adhesive Seal
Apply the self adhesive seal to the underside edges
of the hob glass. For best results, the seal should
be adhered along each side in turn, as close to
the edge as possible, and trimmed at each corner,
taking care to ensure a neat join.
CONVENTIONAL INSTALLATION
1
Hob
Worktop
This hob can be installed conventionally
(glass above the work top) or recessed into the work
WRSIRUDÁXVKÀW
Conventional Installation
,QVWDOOWKHVSLUHFOLSVVKRZQLQÀJ$
Place the hob in the aperture, checking the hob
glass is covering the work top along all four sides.
Set the front edge of the appliance parallel with the
front of the work top.
1. Self adhesive seal
1
RECESSED METHOD
2
1
Worktop
Hob
Locate and attach the securing clamps as required,
Tighten the screws so that the hob is pulled down
ÀUPO\DJDLQVWWKHZRUNWRSWKXVHQVXULQJDJRRG
seal.
Recessed method
Recess the work top to the appropriate depth
$SSUR[PPDQGVKDSHWRÀWWKHKREDGGPPWR
overall glass size.
1. Self adhesive seal
2. Silicone sealant
,QVWDOOWKHVSLUHFOLSVVKRZQLQÀJ$
14_
Installation
User manual LAM1625
Fixing brackets
Installation advice :
Depending on the cabinets, the worktop thickness
and the hob positioning, it is possible for the hob
base and/or the clamp brackets to interfere with
parts of the cabinet.
If necessary cut away cabinetry and use appropriate
À[LQJEUDFNHWVIRU\RXULQVWDOODWLRQ
Underside of hob
Typical Installation positions
Seal
Typical Installation positions
Secure the hob to the worktop by means
of the brackets provided, taking the thickness
of the worktop into account.
ÀJ$
1
4
30mm
2
70 & 90cm
Appliances only
3
40mm
1 Worktop
2 Bracket
3 Screw
4 Spire clip
50mm
_ 15
LAMONA Appliances
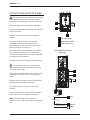
Connect to the electricity Supply
This appliance must be earthed. Only connect
to the electrical mains terminal with the power
switched off. The electrical mains terminal is live.
2
Follow the terminal block connection schematic.
Loose and inappropriate connections can make the
terminal overheat.
1
3
(QVXUHWKHFDEOHFODPSLVÀWWHGFRUUHFWO\DQG
securely.
1 Door release tab
2 Cable clamp ratchet
A device must be provided in the electrical
installation which allows the appliance to be
disconnected from the mains at all poles with a
contact opening of at least 3mm.
We recommend that the appliance is connected
by a competent person who is a member of a
“Competent Person Scheme” who will comply with
the required local regulations.
3
Cable clamp screw
Terminal Block Connection
Schematic
Connection should be made with a suitable cable.
Ensure that you route all mains electrical
cables well away from any adjacent heat source,
such as an oven or grill.
4
Firstly open the terminal block cover using a small
ÁDWEODGHGVFUHZGULYHULQWKHGRRUUHOHDVHWDEV
shown.
5
Strip the wires & connect to the terminal block as
shown in the terminal block schematic.
Fit the cable clamp & secure with the screw
provided.
Close the terminal box, ensuring that the cover is
closed and all screws are tight and in place.
BROWN / L1
Note; The cable clamp has a ratchet type
mechanism on the right hand side of the retaining
arm.
Live
5
Neutral
230V.....240V
BLUE / N
GREEN/YELLOW / PE
16_ Installation
4
Earth
User manual LAM1625
Technical data
Technical Data
Electrical Supply
a9+]
7RWDO3RZHU5DWLQJ#9
~ 50Hz (kW)
7.53kW
Hob Details
Cook Zone
Normal Power
Rating kW@230V
LH Front
1.65
LH Rear
1.1
Center dual
0.69 / 2.0
RH Rear
1.1
RH Front
1.65
Hob Dimensions (W X D X H) mm
770 x 520
Cut Out Required (W x D) mm
737.5 x 487.5
Cable Type
HORR-F5 4.0mm ², 3 core or equivalent
Installation _ 17
LAMONA Appliances
07 - Your guarantee
Product Guarantee Details (UK only)
<RXUDSSOLDQFHKDVWKHEHQHÀWRIDFRPSUHKHQVLYHPDQXIDFWXUHU·VJXDUDQWHHZKLFKFRYHUVWKHFRVWRI
EUHDNGRZQUHSDLUV'HWDLOVRIZKLFKDUHVKRZQRQ\RXU3URRIRI3XUFKDVH'RFXPHQW
Any claim during the period of the guarantee (MUST BE ACCOMPANIED BY THE PROOF OF PURCHASE)
The product must be correctly installed and operated in accordance with the manufacturer’s
instructions and used for normal domestic purposes.
This guarantee does not cover accidental damage, misuse or alternations which are likely to affect the
product.
The guarantee is invalid if the product is tampered with, or repaired by any unauthorised person.
7KHJXDUDQWHHLQQRZD\DIIHFWV\RXUVWDWXWRU\RUOHJDOULJKWV
What to do if you need to report a problemPlease ensure you have ready:
7KHSURGXFW·VPRGHOVHULDOQXPEHUV
Howdens Proof of Purchase document
Your full contact details
Call the Service Line on 0845 00 60 006
18_ Your guarantee
User manual LAM1625
Product InformaƟon
Commission RegulaƟon (EU) No 66/2014
Model
Type of hob
No of cooking zones
HeaƟng technology
ႇ
ECelectric cooking
ECelectric hob
LAM1625
Ceramic
5
Ceramic
FL - 180mm
RL - 150mm
FR - 180mm
RR - 150mm
Centre - 210mm
FL - 200 Wh/kg
RL - 184.5 Wh/kg
FR - 200 Wh/kg
RR - 194.2 Wh/kg
Centre - 185.4 Wh/kg
192.4 Wh/kg
_ 19
083316802
v3 17-11-15
If supplied, please stick your self adhesive product rating plate
here, or make a note of the product serial number below in the
box below for future reference.
Serial Number : ...........................................................................................
Z