1
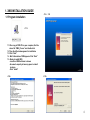
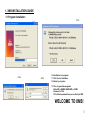
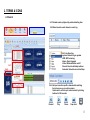
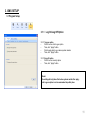
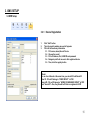
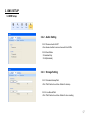
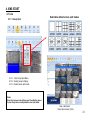
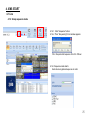
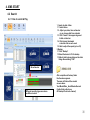
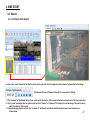
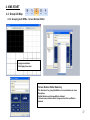
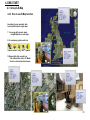
XMS USER MANUAL (Version 1.0.0) -Central Monitoring System- About XMS 1. What is XMS? XMS is central monitoring system supporting Max. 256ch and unlimited number of DVRs connection with compatibility with DVR & IP products. 2.Main Features -Floating & Docking for Multi Screen: Max.256ch each for Live & Playback -Group Spot -Calendar Search/ Event Search: Search by date, time/ Search by Event Log -E-map Function (Map Link): Monitor cameras using map -Status Check (Health, Camera, HDD): Detect the status of devices connected to XMS -Quick Search/ Hot spot: Instant search when event occur -PTZ Camera control -Digital Zoom -Device view: Each device pop up in group 3. Recommended PC specification (Minimum) * CPU - Intel Pentium 4 3.0GHz, * RAM- DDR 1G * HDD - 160GB, * VGA- ATI RADEON 256M * LAN - 10/100Mbps Fast Ethernet * OS: Windows XP 2 Contents 1. XMS INSTALLATION GUIDE------------------------------------- 4 1.1 Program Installation ----------------------------------------------- 4 2. TERMS & ICONS----------------------------------------------------- 6 2.1 Terminology ---------------------------------------------------------- 6 2.2 Menu ------------------------------------------------------------------ 7 2.3 Live --------------------------------------------------------------------- 8 2.4 Search ----------------------------------------------------------------- 9 2.5 E-map ---------------------------------------------------------------- 10 3. XMS SETUP ---------------------------------------------------------- 11 3.1 Program Setup ------------------------------------------------------ 11 3.1.1 Log on/Log off Option------------------------------------- 11 3.1.2 Display Setup ---------------------------------------------- 12 3.1.3 Group Setting ---------------------------------------------- 13 3.1.4 Event Option ------------------------------------------------ 14 3.1.5 User Registration ------------------------------------------ 15 3.1.6 Profile Registration --------------------------------------- 15 3.2 DVR Setup ----------------------------------------------------------- 16 3.2.1 Device Registration --------------------------------------- 16 3.2.2 Audio Setting ----------------------------------------------- 17 3.2.3 Storage Setting -------------------------------------------- 17 3.2.4 Remote Setup ---------------------------------------------- 18 3.3 Backup Schedule --------------------------------------------------- 21 4. XMS Start---------------------------------------------------------------22 4.1 Live -------------------------------------------------------------------22 4.1.1 Monitor Live & Select screen mode------------- 22 4.1.2 Device Pop-Up -------------------------------------- 23 4.1.3 Group Spot ------------------------------------------- 24 4.1.4 Setup sequence mode ----------------------------- 25 4.1.5 Change the location of channels------------------26 4.1.6 On screen control ------------------------------------27 4.1.7 Main screen arrangement -------------------------28 with Floating and Docking function 4.1.8 Example of Usage --------------------------------- 29 4.2 Search -------------------------------------------------------------- 30 4.2.1 How to search & Play ----------------------------- 30 4.2.2 Hot Spot/ Quick Search----------------------------32 4.2.3 Event Search functions-----------------------------33 4.3 Group & E-map ----------------------------------------------------34 4.3.1 Grouping multi DVRs ------------------------------- 34 4.3.2 Grouping multi DVR (Division Editor)------------36 4.3.3 Registering map for E-map ------------------------ 38 4.3.4 E-map Setup ------------------------------------------ 39 4.3.5 How to use E-Map function------------------------ 40 4.4 Status ---------------------------------------------------------------41 5.PTZ CONTROL------------------------------------------------------- 42 5.1 PTZ Camera control ----------------------------------------------42 5.2 Digital Zoom with Mouse-----------------------------------------43 APPENDIX (USB Joystick integration) -----------------------------44 3 1. XMS INSTALLATION GUIDE 1.1 Program installation <1.2 ~ 1.3> <1.1> 1.1 After copy of XMS CD on your computer, find the above file “XMS_Pro.exe” and double click 1.2 Then the left window appears for installation 1.3 Click “Next” 1.4 Brief information of XMS appears. Click “Next” 1.5 -Ready to install XMS -Location of XMS software is shown -How much capacity of memory space to install is shown -Click “Install” <1.4> <1.5> 4 1. XMS INSTALLATION GUIDE 1.1 Program installation <1.7> <1.6> <1.8> <1.9> 1.6 Installation is in progress 1.7 Click Yes for installation 1.8 Restart your system 1.9 Then, Logon window appears Default ID is AMDIN, MANAGER or USER Password is 1234 Fill in ID and password then you are finally in XMS WELCOME TO XMS! 5 2. TERMS & ICONS 2.1 Terminology 1. Device - Equipment that you can connect to XMS software (Ex: DVR) 2. Model - Name of each equipment category (Ex: DVR 2016, DVR 5016) 3. User - ID that can access to XMS registered 4. Profile - User group with different access authority 5. Append - To add some item on list 6. Event - System, HDD, alarm, video, record, schedule 7. Drag & drop - Keep the mouse clicked then move it to some point 8. E-map - To monitor devices using registered maps 9 . Playback - Play the recorded data. 10. Floating - To make multiple windows hang freely on monitor 11. Docking - To make multiples functions divided on one screen 12. License - To give official permission to use XMS software 13. Group - a set of devices to connect to XMS 14. Live - The current moment that cameras are monitoring 15. Search - Look for recorded data 16. Hotspot -Intensive monitoring for specific channel 17. Group Spot -User Customizable Group Spot Window 18. Quick Search - Instant Search in a easy way. 19. Event log - each log file of system, HDD, alarm, video, record, schedule events 20. Log - A log is an official written account of what happens each time period 21. Pop-up - Certain window comes out when there is special occasion. 22. Event Search - Search by each event : system, HDD, Motion as so on 23. Relay - To send video or audio signal 24. Alarm - To show unexpected occasion. 25. Channel - Camera 26. Screen mode - Various types according to the number of cameras and the screen arrangement. 27. Sequence - To come things one after another (change screen mode one after another) 28. Tool bar - Bar shown all the functions on. 29. Digital Zoom 6 - Zoom function with mouse on XMS. 2. TERMS & ICONS 2.2 Menu 2.2.1 Live- Live display of device or group 2.2.2 Search- Search of each device - Calendar, event search 2.2.3 E-map- Monitor multi devices on a map 2.2.4 Status- Check the status of each device - Connection, HDD, each channel 2.2.5 Group- connection multi devices to group 2.2.6 Setup-Device, Model, User & profile setup/ local setup 2.2.7 Check functions Shown in initial screen Of XMS 2.2.8 XMS version Information & copyright 2.2.9 Full Screen of Live display 7 2. TERMS & ICONS 2.3 Live 2.3.1 Screen mode- the number of channels & arrangement of screens on XMS 2.3.2 Sequence- sequence device by device 2.3.3 Stop- disconnect device on Live 2.3.4 Local recording: On live, able to record AVI file 2.3.5 Change into NTSC Resolution: Display Screen as NTSC Resolution (720x480) ① ② ③ ④ ⑤ ⑥ ⑦ Display Mode 1) Single Screen 2) Quad Screen 3) 8 Ch. Screen 4) 10 Ch. Screen 5) 13 Ch. Screen 6) 16 Ch. Screen 7) Original Screen Mode 2.3. 6 Change into PAL Resolution: Display Screen as PAL Resolution (704x576) 8 2. TERMS & ICONS 2.4 Search 2.4.1 Normal search- playback by selected starting time 2.4.2 Event search- search based on event log. 2.4.2 2.4.3 Live Event log -system: Network log on system -HDD: HDD scanning -Alarm: Alarm triggered -Video: Motion detection on/off -Record: Record start/stop/continue -Schedule: Schedule record start/stop 2.4.1 2.4.4 2.4.3 2.4.4 Hot spot- monitor specific channel while watching live to keep an eye on certain camera Quick search- on Hot spot, instant search by clicking buttons for 300 seconds Rewind Play Pause Snap shot Stop 9 2. TERMS & ICONS 2.5 E-map 2.5.1 Registry of map - In group, register map file (format JPG or BMP) 2.5.2 Connect devices to map -drag & drop (cameras, relay, alarm, speaker, MIC) 2.5.3 Icons for using E-map camera Sensor Relay MIC Speaker 2.5.4 Map link – Register multiple maps to mark exact location of camera. By linking maps, you can move to sub map 10 3. XMS SETUP 3.1 Program Setup 3.1.1 Log On/Log Off Option 3.1.1.1 Log on option • Click to turn on Auto Log on option. • Then, click “Apply” button. • Click to apply Auto Log on when system reboots. • Then, click “Apply” button. 3.1.1.2 Log off option • Click to turn on security option. • Then, click “Apply” button. <Note> The setting will only take effect when system restart after apply. Auto Log on option is not recommended in public place. 11 3. XMS SETUP 3.1 Program Setup 3.1.2 Display Option Device Title Camera Title 3.1.2.1 OSD features Date & -Device Title On/Off Time -Camera Title On/Off -Time On/Off -OSD Color -Live Recording Status On/Off -IP Camera Recording Status On/Off OSD Color Set 3.1.2.2 Auto Logon Display • Click to set which display to show when start • Then click “Apply” button - Backup Status : Displays Backup status window when start 3.1.2.3 Device Sequencing -Sequencing Time Setup : Interval 5~100 seconds <Note> Auto logon display function only works when Auto Log on option is turned on. 12 3. XMS SETUP 3.1 Program Setup 3.1.3 Group Setting 3.1.3.1 Group add/modify -Register new group or modify group -Register device/ map to a group 3.1.3.2 Screen & Map -Screen – Screen division for each group -Map – register maps for each group 13 3. XMS SETUP 3.1 Program Setup 3.1.4 Event Option 3.1.4.1 On screen notification On/Off -Motion, Alarm 3.1.4.2 Main Event Log On/Off -Motion, Alarm, Video Loss, System, HDD Event 3.1.4.3 Alarm Spot On/Off • Live Image –Shows Live image • Still Image – Shows Still image when event occurred. 3.1.4.4 Use of Event messenger On/Off -Motion, Alarm, System 14 3. XMS SETUP 3.1 Program Setup 3.1.5 User Registration 1. 2. 3. Click “Add” button Then, the registry window as left appears Fill in all the necessary information 3-1. Fill in name of USER, password and description 3-2. Select new user’s profile (User Group) 3-3. Functions and Access Device appear according to profile 3-4. Then, click the registry button <Note> You can register user’s name and information to access to XMS in USER registry 3.1.6 Profile Registration 3-1 3-2 1. 2. 3. Click “Add” button Then, the profile registry window appears as left You can amend the access authority of each profile or append new profile 3-1. For each profile, able to give different access authority 3-2. able to add users that belong to a profile 3-3. able to add accessible devices for a profile 3-3 <Note> Profile can be defined as “User Group” Profile is higher category of User in registry 15 3. XMS SETUP 3.2 DVR Setup 3.2.1 Device Registration 1. 2. 3. Click “Add” button Then, the registry window as seen left appears Fill in all the necessary information 3-1. Fill in name, description of Device 3-2. Choose the model 3-3. Fill in IP address, Port, USER ID and password 3-4. Designate profile for access to this registered device. 3-5. Then, click the registry button <Note> To use Live & Search at the same time, you should fill in different ID. User ID : Fill out ID belong to “USER GROUP” in DVR Search ID : Fill out ID belong to “ADMIN OR MANAGER GROUP” in DVR and “Search ID”. Also, they should be ID that are registered in DVR 16 3. XMS SETUP 3.2 DVR Setup 3.2.2 Audio Setting 3.2.2.1 Receive Audio On/Off -Can choose whether to receive live audio from DVRs 3.2.2.2 Send Mode -To Selected Only -To All (Broadcast) 3.2.3 Storage Setting 3.2.3.1 Schedule Backup Path -Click “Path” button to set drive & folder for backup 3.2.3.2 Live Record Path -Click “Path” button to set drive & folder for live recording 17 3. XMS SETUP 3.2.4 Remote setup Remote setup 1. Mouse right click on device name 2. Select “Remote setup” 3. Fill in device password (password you log on device) I. Recording setup 1. Recording operation 1) Schedule: Weekly or Daily 2) In case of weekly, setup each day from Sun to Sat 3) Pre event recording time” 0~5 Sec - When the record will start before event occur 4) Post event recording time: 0~180 (Second) - How long will be recorded after event occur Alarm recording Continuous/Motion setup 18 3. XMS SETUP 3.2.4 Remote setup II. Camera setup • Status/Title Setup - Setup for Each Camera (Connection Status or Camera Name). • Color Setup - Setup Color for Each Screen. • Covert/PTZ Setup - Setup Each Camera Covert Function & PTZ Protocol. - Click the “Properties” button. - Setup about PTZ camera. • Motion Area - Click the “Camera” Button. - Choose the area. 19 3. XMS SETUP 3.2.4 Remote setup III. Event/Sensor setup • Alarm Input - Setup for Each Channel Alarm Connection & Type. • Alarm Out - Setup each channel when alarm, videoloss, motion are happened. - HDD Event: Alarm On/Off when HDD has the problem. - Operation: Setup Relay Connect with Alarm Sensor - Mode: Setup Reacted Relay as Latched/Transparent Mode - Type: Setup Relay Type N/Open or N/Close - Duration: Setup Reacted Relay Time (5sec~5min or Until key-in) • Buzzer out - Setup each channel when alarm, videoloss, motion are happened. - Buzzer: On/Off - Duration: Buzzer time(5sec~5min or Until key-in) - HDD Event: Buzzer On/Off when HDD event happen - Keypad : Setup Key Input Sound - Remocon: Setup remocon Input Sound • HDD Event - Drive ID: HDD Connected location - Smart Alarm: On/Off - Temperature: HDD Temperature - Polling Time: HDD Checking Time • E-mail Notification - If happen the alarm, videoloss, motion and HDD event, setup the notification at the E-mail. - HDD Event: E-mail notification On/Off when HDD event is happened. - Notification: On/Off 20 3. XMS SETUP 3.3 Backup Schedule * Backup Schedule 1. Select frequency of schedule backup 2. Select time to begin backup 3. Select device for auto backup 4. Select begin day, time, channels 5. Adjust duration of backup 6. Click Add then it will be on the list * Backup Manual 1. Adjust begin & End time for backup 2. Select device 3. Select channels 4. Designate path for backup data 5. Click Start 21 4. XMS START 4.1 Live 4.1.1 Monitor Live & Select screen mode 4.1.1.1. Registered devices or group appear as seen in red circle after registry work. 4.1.1.2. Click device to see Live 4.1.1.3. If you registered a group, we are able to see the Live display of group 4.1.1.4. All the functions in Menu can be used on tool bar as seen Above. 4.1.1.5 Up to 256 channels can be displayed in Live. 4.1.1.6 Among various screen modes, able to choose even the same number of channel with different arrangement of screen <NOTE> -Unlimited number of devices can be registered. -Up to 256 channels can be displayed in Live. -Digital Zoom can be used simple by clicking mouse. (Please see Page 15 for the details) 22 4. XMS START 4.1 Live 4.1.2 Device pop-up <16 channel viewer appears- DVR 2016> 4.1.2.1. When monitoring a group, mouse right click a channel on screen then click “View” 4.1.2.2. It will show whole channels from specific DVR 4.1.2.3. If you pick a channel from DVR 2004, appear 4 channels or from DVR2016, appears 16 channel as left. <4 channel viewer appears- DVR 2004> 23 4. XMS START 4.1 Live 4.1.3 Group Spot Selectable default screen split modes 4.1.3.1. Click Group Spot Menu 4.1.3.2. Select group to display 4.1.3.3. Select screen split mode <Note> Group Spot screen mode follows user GroupSetting menu. You can freely add or modify default screen split mode. User customized Group Spot screen (16ch.) 24 4. XMS START 4.1 Live 4.1.4 Setup sequence mode 4.1.4.1 Click “Sequence” button 4.1.4.2 Then “Sequencing Time” window appears Fill in time period of sequence from 5 to 100 sec 4.1.4.3 Sequence mode starts Each device registered sequence in order 25 4. XMS START 4.1 Live 4.1.5 Change the location of channels 1. Click “A” channel on Live 2. Then drag & drop to “B” channel 3. The locations of “A” channel and “B” channel are exchanged B A A Drag &drop B 4. Click the left icon then screen arrangement move to default screen mode after changing location of channels by drag & drop 26 4. XMS START 4.1 Live 4.1.6 On Screen Control (Picture 1-1. Live) In Live, able to use PTZ simply using mouse. 4.1.6.1 . Select a channel then yellow frame appears 4.1.6.2 . Click mouse scroll then the frame color changes - 1. Blue frame: Digital Zoom in & out - Roll the mouse scroll for zoom in & out - 2. Green frame: PTZ camera control - click on some point on camera and drag in direction for PTZ camera. 4.1.6.3. See the right pictures picture1-1 (yellow) 1-2(Blue), 1-3(Green) (Picture 1-2. Digital Zoom) Use PTZ easily with mouse (Picture 1-3. PTZ camera control) 27 4. XMS START 4.1 Live 4.1.7 Main screen arrangement with Floating and Docking function Picture (1-1) Picture (2-1) 4.1.7.1 On tool bar, mouse right click on function and 4.1.7.3 After Floating or Docking, when click mouse right button, select “floating” then as picture 1-2, Additional menu will appear. If you click “Tabbed Document”, The tab will float and become freely adjustable. the window will go back to normal 4.1.7.2 If you click “docking” and set the position, as picture 1-3 4.1.7.4 If you click “Hide”, the window will be hidden as picture 2-2 the window will be docked to the position user wants Picture (1-2) Picture (1-3) Picture (2-2) 28 4. XMS START 4.1 Live 4.1.8 Example of Usage - For multiple monitors Search Live E-Map -Using multiple monitors as above, you can float each function windows on multiple monitors and observe more events faster and more easily. 29 4. XMS START 4.2 Search 4.2.1 How to search & Play 1. Search by date & time 1.1 Select device 1.2 Adjust year, date, time on time bar or you choose date from calendar 1.3 Click “Search” then appear log event & data on time bar 1.4 Click forward, backward or double click on each event 1.5 Able to adjust the speed (up to x 32) 2. Backup 1.1 Click “Backup” 1.2 Select the device & CH for backup 1.3 Able to hide backup status and do other things like watching “LIVE” Move time bar Different recording types are shown as different colors. After completion of backup, folder like the above appears. The name of folder will be created as seen above Year/ Month/Date_ Hour/Minutes/Second (Inside folder, able to see AVI backup file of each channel) 30 4. XMS START 4.2 Search 4.2.1 How to search & Play– User programmable tips *Selection of screen division in search *Quick search (No need to adjust time) Rewind 120 seconds before the current time Play 120 seconds after the current time *User programmable search screen arrangement -Hide Log Event, Control -Hide Log time -Hide Log Event, Control, Log time 31 4. XMS START 4.2 Search 4.2.2 Hot Spot/ Quick Search In Live screen, select channel for Hot Spot or quick search and click then live image of selected channel appears like the left image ① ② ③ ④ ⑤ 1)Backward, 2)Forward, 3)Pause 4) Snap Shot- to save picture, 5)Stop 1. Click “forward” or “backward” in live. Then, quick search start before 120 seconds at the time and continue for 300 seconds in total 2. Click “pause” and adjust time for quick search and click “forward” or “backward” for display of recorded image. Then quick search start at the time for 300 seconds 3. During the display of quick search, click “forward” or “backward” multi times and the display forward , back forward up to 4 times faster. 32 4. XMS START 4.2 Search 4.2.3 Event Search functions Information for Each event Popup window For each event 1. Event information appears below Live screen as seen above (Name, channel, Date/Time, Description, Device, IP) 2. Double click event to see image. 3 After the double click, Event viewer appears as seen left adjust the year, month, date & time 4 Click Rewind, Forward or stop to search recorded image by each event. (Note) Events definition 1. System: Network Log on system 2. HDD: HDD scanning 3. Alarm: Alarm triggered 4. Video: Motion detection on/off 5. Record: Record start/stop 6. Schedule: Schedule record start/ stop 33 4. XMS START 4.3 Group & E-Map 4.3.1 Grouping multi DVRs – setup screen mode 1. Click group icon in main screen -Mouse right click in red box and click “Append” to add new group. 2. Fill in name and description of new group then click “registry” 3. Click new group then Screen and Map appear as above Mouse right click on “Screen” to register “screen type” then click “Append” 4. Fill in Name and description and select screen type You can register unlimited number of screen type for each group in the same way 34 4. XMS START 4.3 Group & E-Map 4.3.1 Grouping multi DVRs – setup screen mode 1. After registering screen type in group, make a screen arrangement of the screen type 2. Click registered screen type as the below red box. 3. Then the selected screen mode appears 1. Select cameras from devices. 2. Click a camera. Then drag & drop in a channel of screen mode. 3. You are able to register cameras from multiple devices in a screen mode Drag & Drop 35 4. XMS START 4.3 Group & E-Map 4.3.2 Grouping multi DVRs – Screen Division Editor *Division Editor Group Adding screen Click “Editor” *Division pops up Input column & Row for your own Screen Division Then Click OK *Merge Drag & Drop as above, then mouse right click Click “merge” to make select cells to one cell *Divide Merged cell can be re-divided 36 4. XMS START 4.3 Group & E-Map 4.3.2 Grouping multi DVRs – Screen Division Editor •Apply new division Click Apply then close •Screen Division Editor Summary This function is for giving flexibilities of screen divisions to users. Exceptions -Default division can’t be modified or deleted. -Current screen division that is being used can’t be modified or deleted. 37 4. XMS START 4.3 Group & E-Map 4.3.3 Registering map for E-map Click & Drag Camera, sensor, Relay, speaker 1. In a group, mouse right click “ map” then fill in name, description of the map and find a map using Path on your PC. 2. With same process, you can register unlimited maps After registering map, 3. Select a map to place camera, sensor, relay speaker and MIC icons on a map. 4. Go to device and find camera, sensor, relay speaker and MIC then click them and drag them on the point on the preview of map 5. Then, the following icons appear <Note>JPG or BMP file format can be registered on maps Camera, sensor, relay, MIC, speaker 6. Click “Registry” to complete this process 38 4. XMS START 4.3 Group & E-Map 4.3.4 E-Map Setup Map 1-1 Map 1-2 If you register multiple maps, you can link each map. 1 In group, click one of maps then the map(1-1) appears. 2 Click sub map which will be linked to the map and drag it on the map(1-1) 3 Then, link icon appears as map(1-2). If you click the link icon, you can move to sub map(1-2) 4 In the same way, you can make map link as below (map2-1, 2-2, 2-3) Map 2-1. World Map Map 2-2. UK Map *Click link icon to move to sub map Map 2-3. Birmingham Map 39 4. XMS START 4.3 Group & E-Map 4.3.4 How to use E-Map function According to your necessity, able to set up sub maps for upper map 1. You can go to those sub maps using E-Map link on each map. 2. On each map, register each icon Camera, sensor, relay, MIC, speaker 3. Mouse right click on each icon *info: channel No. device, IP, Model *view: live view of selected camera . 40 4. XMS START 4.4 Status (Health check for connected devices) 1. Go to Status 2. Click “Start” button. 3. Then, XMS detects devices that are connected & HDD usage of each connected device 4. To stop health check, click “Stop” button. * Health check might have XMS perform slowly. Therefore, it is recommended to click “Stop” after health check of devices. 41 5. PTZ CAMERA CONTROL 5.1 Remote PTZ control 1. Mouse right click on certain channel of Live screen. 2. Click “PTZ” 3. Appears the below window (Note) 1. Click the scroll of mouse once then blue frame appear for Digital Zoom 2. Click the scroll of mouse twice then green frame appear for PTZ camera control -Green colored frame for PTZ camera control -Click the scroll on mouse one more then appears green -Click some point on screen and drag in direction to move focus of camera. -Then, the focus of camera moves 42 5. DIGITAL ZOOM 5.2 Digital zoom control with mouse 1 click the scroll on a camera as below. 2 Then the color of frame of channel changes for digital zoom. 3 You can use this function on Live, Search, Hot spot/Quick search, E-map -Normal Mode in Live -Yellow frame -Blue colored frame means Zoom function -Click the scroll on mouse then appear blue -Click the scroll then the blue Color appears For Zoom function - Roll the scroll on mouse for Zoom in & out 43 <APPENDIX> Pan/Tilt/Zoom control with USB joystick integrated with XMS software Currently, users can enhance their usability of PTZ control with USB Joystick. -Compatible model no is currently as below, HFX Series I, Model 1400 Option 5 from CH PRODUCTS Inc http://www.chproducts.com/oem/finger_ip_desktop.html Click this to go to single mode of selected channel In live, there are 12 buttons including 2 On the stick. Each number of 1~10 on the housing is number of channel. If you press button #2, XMS selects ch2. Then click the left button on the stick to See selected channel in single division Mode To select ch number bigger than 10, press The first digit number then press the second Or third digit a bit longer Press no 2 to select ch 2. Press the left button on the stick to see single mode 44 <APPENDIX> Pan/Tilt/Zoom control with USB joystick integrated with XMS software Currently, users can enhance their usability of PTZ control with USB Joystick. -Compatible model no is currently as below, HFX Series I, Model 1400 Option 5 from CH PRODUCTS Inc http://www.chproducts.com/oem/finger_ip_desktop.html Using the stick part, you can control pan/tilt/zoom functions Pan/Tilt direction 2 buttons on stick Stick part Zoom in Housing 10 buttons on housing 45