1
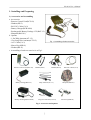
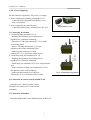
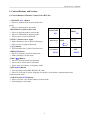
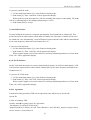
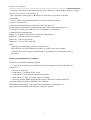
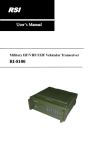
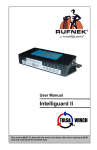
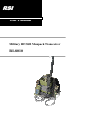
RSI
User’s Manual
Military HF/SSB Manpack Transceiver
RI-8010
RI-8010 User’s Manual
Contents
1. Installing and Preparing ………………………………………………………………..… 2
1) Accessories and Assembling …………………………………………………………… 2
2) DC Power Supplying …………………………………………………………………… 3
3) Connecting of Antenna ……………..………………………………………………...… 3
4) Connecting Remote Control Unit(RCU-02) ………………………………………….… 3
5) Connecting Handset(HS-2) …………….………………….……………………….....… 3
2. Control Buttons and Sockets ………………………………………………………...…… 4
1) Control Buttons of Remote Control Unit (RCU-02)…………………………………..….4
2) Information of Sockets ……………………………………………….…..………………5
3. Operation of Transceiver ………………………………………………………..…………5
1) Power On/Off …………………………………………………………………………… 5
2) Setting of Status Values ……………………………………………………………...…. 5
4. Communication ………………………………………………………………..………..... 8
1) Public Voice Communication(Clear Mode) ……………………………………………. 8
2) Private Voice Communication(Encrypt Mode)…………….………………………....….8
3) Message Communication ……………………………………….……….…………..….. 8
4) Frequency Hopping ………………………………………………..………………..….. 9
5) Network Communication ………………………………………….….……………..…. 9
6) AutoScan Function……………………………………………………….…………..…. 9
7) AutoCall Function ……………………………………………………….…………..…. 10
8) ALE Call Function……………………………………………………….…………..…. 10
9) Key Agreement ……………………………………………………….….…………..…. 10
10) Data Communication …………………………………………………..….……..……...11
5. How to Use Editor Button ……………………………………….……………………..…12
1) Edition of Alphabets and Characters ……………………………………..…………..…12
2) Numbers Inputting ……………………………………………….……………….……..13
6. Specifications ……………………………………………………….………………….…14
1
RI-8010 User’s Manual
1. Installing and Preparing
1) Accessories and Assembling
a. Accessories
- Remote Control Unit(RCU-02)
- Handset(HS-2)
- RS-232C Cable(CA-2)
- Battery Charger(BCR-9000)
- Rechargeable Battery Package 12V(BAT-12)
- Manpack(BAG-01)
b. Options
- 1.5m Whip Antenna(AT-1.5)
- 15m Long Wire Antenna(AT-L15)
- ACC Cable(CA-3)
- Morse Key(MK-01)
- Headset(HS-21)
c. Assembling of main accessories is as Fig.1.
Remote Control Unit(RCU-02)
Battery Package(BAT-12)
Battery Recharger(BCR-9000)
Handset(HS-2)
Headset(HS-21)
Whip Antenna(AT-1.5)
Long Wire Antenna(AT-L15)
Fig.2. Accessories and Options
2
RS-232C Cable(CA-2)
Manpack(BAG-01)
Morse Key(MK-02)
RI-8010 User’s Manual
2) DC Power Supplying
RI-8010 must be supplied by DC power 12 voltage.
a. Power supplying by battery package(BAT-12)
- Connects power plug and closes battery cover.
- Sets cover latches.
b. Power supplying by external power
- Connects to power plug, external power DC 12V.
3) Connecting of antenna.
a. Connecting whip antenna(AT-1.5).
- Stand up the mainbody on working area or
bag(BAG-01) within the mainbody. .
- Stretch out 1.5M whip antenna(AT-1.5) to make
on working status.
- Insert 1.5M whip antenna(AT-1.5) to the
antenna socket of the mainbody(Fig.4).
- Make sure that connecter of whip
antenna(AT-1.5) is fixed into socket exactly.
b. Connecting long wire antenna(AT-L15).
- Stand up the mainbody on working area or
bag(BAG-01) within the mainbody. .
- Install long wire antenna(AT-L15) on an appropriate
area.
- Insert connector of long wire antenna(AT-L15) to
the antenna socket of the mainbody.
- Make sure that connecter of long wire
antenna(AT-L15) is fixed into socket exactly.
4) Connection of remote control unit(RCU-02)
- Insert the ACC cable of remote control
unit(RCU-02) into the ACC socket of the
mainbody.
5) Connection of Handset
- Insert the handset(HS-2) into handset socket of RCU-02.
3
Fig.3. Battery cover
RI-8010 User’s Manual
2. Control Buttons and Sockets
1) Control Buttons of Remote Control Unit (RCU-02)
- [CHANNEL/ESC ] Button
ㅇ Moves to channel mode in main mode(clear
mode).
ㅇ Moves to main mode in any mode.
- [HOP/MAIN/<] Button (move left)
CHANNEL
FREQ
ㅇ Moves to hopping mode in main mode.
/\
ESC
BS
ㅇ Moves to main mode in hopping mode.
ㅇ Moves cursor to left in edit mode.
- [TUNE/>] Button (move right)
HOP/MAIN
TUNE
MSG
ㅇ Makes antenna to tune in selected frequency.
<
>
ㅇ Moves cursor to right in edit mode.
- [/\]([\/]) Button
ㅇ Increases(Decreases) value of selected item.
VOICE/DATA
SET
- [FREQ/BS] Button
\/
SEND
MODE
ㅇ Moves to frequency mode in main mode.
ㅇ Makes backspace in edit mode.
- [MSG/
] Button
ㅇ Moves to message mode in main mode.
ㅇ Moves cursor to next line in edit mode.
ㅇ Saves value of frequency in frequency mode.
- [SET/MODE] Button
ㅇ Sets operating mode(USB,LSB,FM, CW, AM).
ㅇ Moves to set mode for power, hopping, net number, local number, random number and
communication mode.
- [VOICE/DATA/SEND] Button
ㅇ Move to private voice mode(1200bps) in main mode.
ㅇ Send message in edit mode.
4
RI-8010 User’s Manual
2) Information of Sockets
Table 1. Handset Connector Information.
Connector
PIN #
NAME
DESCRIPTION
1
GND
Connects to ground.
2
Transmit
While pushing [PTT], transmit voice.
3
Receive
Receive voice.
4
-
-
5
-
-
6
PTT
PTT sign
7
-
-
- Connector for RS-232C
corresponding pins
① - ②
② - ③
③
-
:
⑤
3. Operation of Transceiver
1) Power on/off
- Push and release [ON/OFF] button to turn on transceiver.
ㅇ Then display memorized frequency, channel and operating mode to
screen(Fig.6).
ㅇ Character “Rx” appears in upper-right of screen.
ㅇ Now transceiver is in clear mode as first status.
- To turn off, Push and hold [ON/OFF] button while one second.
Fig. 6. Display
2) Setting of Various Values
- Setting of channel
This product have 100 channels.
Channel setting is as follows:
Fig. 7. Channel Setting
5
RI-8010 User’s Manual
ㅇ Push [CHANNEL] button when clear mode.
Then cursor blinks at position of channel
number on screen(Fig.7).
ㅇ Push [/\] button or [\/] button to up/down channel number.
ㅇ Push [ESC] button to set channel.
- frequency fine tuning and setting(Fig.8)
ㅇ frequency fine tuning
· Push [FREQ] button in main mode. Then cursor blinks at position of 10Hz unit.
· Push [/\] button or [\/] button to up/down frequency.
· Push [ESC] button to return to main mode.
ㅇ frequency setting
· First push [FREQ] button twice in main mode.
· Use number keys to set frequency you want.
· Push [
] button to keep the selected frequency.
· Push [ESC] button to return to main mode.
- Setting of operating mode
ㅇ Push [SET/MODE] button in main mode. Then cursor blinks at position of operating mode.
There are USB,LSB,FM, CW and AM modes.
ㅇ Push [/\] button or [\/] button to select mode you want.
ㅇ Push [ESC] button to return to main mode.
- Volume control
Push [/\] button or [\/] button to control volume of received signal.
- Setting of communication mode (M-MODE)
ㅇ In main mode, push [SET] button twice and push [<]([>]) button until “M-MODE” appears.
ㅇ Push [/\] button or [\/] button to select “MANUAL” or “AUTO” mode.
If “AUTO” mode is set, RI-8010’s transmitting channel can be changed between CH01~CH09
automatically.
ㅇ Push [ESC] button to return to main mode.
- Setting of power(POW)
ㅇ In main mode, push [SET] button twice and push [<]([>]) button until “POWER” appears. Then
power setting menu is displayed.
ㅇ Push [/\] button or [\/] button to change power by step 1W.
ㅇ Push [ESC] button to return to main mode.
- Setting of hopping mode(HOP)
ㅇ In main mode, push [SET] button twice and push [<]([>]) button until “HOP” appears. Then
hopping setting menu is displayed.
ㅇ Push [/\] button or [\/] button to select “RANDOM”, “ADAPTIVE” or “INTELLIG” mode.
ㅇ Push [ESC] button to return to main mode.
- Setting of network number(NET)
ㅇ In main mode, push [SET] button twice and push [<]([>]) button until “NET” appears.
ㅇ Push [/\] button or [\/] button to select net number.
ㅇ Push [ESC] button to return to main mode.
6
RI-8010 User’s Manual
CH 01
Rx
LSB
0 5,0 0 0. 0 0
FREQ
CH01
Rx
LSB
0 5,0 0 0. 0 0
CH 01
Rx
LSB
0 4, 9 9 9. 9 0
“∨”
-10Hz
”
blink
FREQ
0 6, 2 0 0. 0 0
SET
0 5,0 0 0. 0 0
0 5,0 0 0.1 0
0 0, 0 0 0. 0 0
+10Hz
......
ESC
ESC
CH01
Rx
LSB
0 6, 2 0 0. 0 0
CH 01 Rx
LSB
0 4,9 9 0.0 0
Fig.8 Setting of frequency
- Setting of address(ADR)
ㅇ In main mode, push [SET] button twice and push [<]([>]) button until “ADR” appears.
ㅇ Push [/\] button or [\/] button to select address number.
ㅇ Push [ESC] button to return to clear mode.
- Setting of Random
ㅇ In main mode, push [SET] button twice and push [<]([>]) button until “RANDOM” appears.
ㅇ Push number button to select random number. If want to stop random number change, please
push [ESC] button. Then original random number will be return.
ㅇ After input random number, push [
] button to keep the random number.
ㅇ Push [ESC] button to return to clear mode.
- Frequency tuning
You can use frequency tuning function to maximize transmitting power.
When you are in clear mode, Push [TUNE] button, then the transmitter is tuned automatically to the
frequency.
7
RI-8010 User’s Manual
4. Communication
There are Public Voice(Clear Mode), Private Voice(Encrypt Mode), Send Message, Frequency
Hopping, Network and Data communication.
Note: Before communication, you must confirm that your address(ADR) have been set and key
agreement have been taken with opposite, excepting Public Voice mode. Refer to Setting
address(ADR) in 3.2) Setting of Various Values and 4.6) Key Agreement.
1) Public Voice Communication(Clear Mode)
When status setting is finished, you can make public voice communication.
Push PTT button of Handset(HS-2) to transmit. Then “Tx” appears on screen. Release PTT
button to return to receive. Then “Rx” appears on screen.
If you want to change working frequency, use fine tune or frequency setting function to
change it.
2) Private Voice Communication(Encrypt Mode)
ㅇ Push button [VOICE/DATA] in clear mode to have private voice communication of 1200bps.
ㅇ Double click button [VOICE/DATA] in clear mode to have private voice communication of
600bps.
Then “Speech” is displayed on screen.
You can take private voice communication.
If you want to escape to clear mode, push [ESC] button once more.
3) Message Communication
You can take message sending in private mode.
ㅇ Push [
] button to edit messages. Then cursor appears on upper-left of screen.
You can edit message using editor.
ㅇ Editing finished, push [SEND] button to send message.
Then “IDnumber” and “Message Tx”appears on upper side of screen. number is current ID(1~8 or
N).
If no response from other side, “Resp no” appears on screen and transmitting and
receiving repeat until there would be response.
In receiving response, “Message Rx” appears on screen.
If message receiving is ok, the message appears on screen of each other.
To return to message receiving mode, push [ESC] button.
To escape to clear mode in message receiving mode, push [ESC] button.
ㅇ Editing finished, double-click [SEND] button to send message in spread spectrum mode.
Then “Spread Tx” appears on upper side of screen.
Note: For receiving of spread spectrum mode, User must push button [*] to display FUNC menu,
and push button [8](PSK Rx) to enter to spread receiving mode.
8
RI-8010 User’s Manual
In receiving response, “Spread Rx” appears on screen.
If message receiving is ok, the message appears on screen of each other.
4) Frequency Hopping
There are random(RANDOM), adaptive(ADAPTIVE) and intelligent(INTELLIG) modes.
You can select a mode wanted of them. Refer to Setting of the hopping mode(HOP) in 3.2) Setting of
Various Values.
ㅇ When you are in clear mode, push [HOP] button to move frequency hopping mode.
Then “HopReady Tx” appears on screen.
Send side and receive side repeat transmit and receive until synchronization is ok.
Received, “HopReady Rx” appears on screen.
ㅇ If synchronization between receive side and transmit side is ok, “HOP” appears upper of
screen and move clear mode.
ㅇ To make private voice communication or send message, repeat section 2) or 3).
ㅇ Push [ESC] button to escape to clear mode in private voice communication.
If you push [ESC] button in message edit mode, You will be in message receive mode.
Then you can push [ESC] button to escape to clear mode.
ㅇ In clear mode Push [HOP] button to stop hopping.
5) Network Communication
Network Communication is a way communicating between only members in a group.
A group is a set of members who have same net number and same random number.
You must know net number and random number of the group to become a member of the
group. Saying, Network Communication(Group Communication) is a mode
communicating between members who has the same net number(NET) and random
number(RANDOM) each other.
To process net communication:
ㅇ Sets random number(RANDOM). Refer to 3.2) Setting of Various Values.
ㅇ Sets net number(NET).
ㅇ Sets current ID to “N”.
ㅇ Process a communication.
6) AutoScan Function
In AutoScan Mode the transceiver scans automatically from Channel 00 to Channel 99. This means
that when the caller and the called differ in Channel, the called side’s Channel will be set to the caller
side’s one automatically. AutoScan Function requires that the caller and the called should be the
same frequency and mode from Channel 00 to 99.
9
RI-8010 User’s Manual
To process AutoScan mode:
ㅇ In Clear mode Push button [*] to enter Function Setting mode.
ㅇ Push button [4]. Then “AutoScan” will be appeared in display.
When signal received, the transceiver will stop scanning and response to the calling. The mode
will be set automatically to the calling mode(message or voice).
ㅇ Push button [ESC] to escape.
7) AutoCall Function
In AutoCall Mode the transceiver transmits automatically from Channel 00 to Channel 99. This
means that when the caller and the called differ in Channel, the caller side’s Channel will be set to
the called side’s one automatically. AutoCall Function requires that the caller and the called should
be the same frequency and mode from Channel 00 to 99.
To process AutoCall mode:
ㅇ In Clear mode Push button [*] to enter Function Setting mode.
ㅇ Push button [5]. Then “AutoCall” will be appeared in display.
When response signal received, the transceiver will stop transmitting and move to Clear mode.
Then “Ok” will be appeared in display.
8) ALE Call Function
In ALE Call mode the transceiver selects automatically frequency in ALE List and transmits. ALE
Call Function requires that the caller and the called maybe not the same frequency and mode from
Channel 00 to 99.
To process ALE Call mode:
ㅇ In Clear mode Push button [*] to enter Function Setting mode.
ㅇ Push button [6]. Then “ALE Call” will be appeared in display.
When response signal received, the transceiver will stop transmitting and move to Clear mode.
Then “Ok” will be appeared in display.
9) Key Agreement
Transmission Encryption Key(TEK) can be agreed any time and the key is stored with
current ID.
a) How to exchange TEK
Assume A and B are going to have key agreement.
- Push button [*] to display FUNC menu.
- B push button [1] to wait for A’s call. Then “IDnumber” and “Pub Key” appears on upper side of
screen. number is current ID(1~8).
10
RI-8010 User’s Manual
- A starts key agreement by pressing button [2]. Then “IDnumber” and “Pub Key” appears on upper
side of screen. number is current ID(1~8).
- OK is appeared on the display of B and also A. Then the key agreement is finished
successfully.
- The new TEK is stored with current ID. You may see what current ID is.
b) How to set current ID
Transmission Encryption Keys of 8 can be stored with IDs of 8.
In clear mode to press button [*] and then button [3] will be show current ID to you.
To change current ID, press button [/\] or [\/] till ID that you want is seen.
c) Buttons for Key Management
Button [*] – displays FUNC menu to operate Key Management.
Button [1] – waits for call for key agreement.
Button [2] – starts key agreement.
Button [3] – views or sets current ID.
Note:
* During key exchanging, you must not touch any key.
If Key Agreement is not finished successfully, you must re-take the procedure.
* Because ID N is for network communication, you should not set current ID to N in key
agreement.
10) Data Communication by Computer
It follows to communicate data by computer:
ㅇ Connects between the device and RS-232C port of computer by the provided RS-232C
cable(CA-2).
ㅇ Powers on the device.
ㅇ Push button [*] to display FUNC menu.
ㅇ Push button [\/] to select data communication mode.
ㅇ Push button [9]. Then “PC comm” appears in display.
ㅇ Starts up program SHIELD installed in computer and makes communication you
want by the program.(Refer to SHIELD You ‘s Manual.)
While data communicating, “Rx” appears in display during receiving and “Tx”
appears during transmitting. If no response, “Resp No” appears.
11
RI-8010 User’s Manual
5. How to Use Editor Button
In the state of message edit, You can edit with English/Symbols and Number.
1) English and Symbol entry mode
- Push [BS] button to switch to the English/Symbol entry mode from clear mode.
Then dot appears at the right bottom in the display.
Fig.9. Entry Mode switch
- Push corresponding button continuously until the letter you wanted appears.
To entry the letters in the same button, wait 0.5 sec until cursor moves the next position
after the first letter appears and repeat previous operation for second, third, fourth letters.
For example, to entry “AB”, wait 0.5 sec after “A” appears with pushing “ ABC” button and cursor
moves next position, then push [ABC] button to entry “ B”.
(*) All English letters are fixed within 0.5 sec after appeared or with pushing other
buttons before less than 0.5 sec.
- Push [ * ] button to switch between large letter and small one.
- Push [ # ] button to make the space.
- 15 symbols are arranged in the [1] button, push continuously this until appears the symbol you wanted.
Symbol is fixed within 0.5 sec. Symbols arranged in “1” button are shown below. ! " # $ % & ' ( ) * + , -. /
- Symbols are also arranged in the English letter button with English letters.
12
RI-8010 User’s Manual
When edit symbols, push corresponding button continuously until symbol you wanted appears.
Selected symbol is fixed within 0.5sec.
2) Number entry mode
- Push [MODE] button momentarily to switch to the number entry mode from English/Symbols
mode. Then dot appears at the right center in the display.
- Push corresponding number button to entry the number you wanted.
- To process the space function, push [#] button .
13
RI-8010 User’s Manual
6. Specifications
Transmitter
General
Frequency range
1.6~60MHz
Preset channel numbers
100
Operating modes
Power output
SSB, CW, FM 0.1 ~ 10W
AM
USB, LSB, CW, AM, FM
0.1 ~ 4W
Modulation
Simplex/Half-duplex
Frequency Hopping(ECCM)
SSB
balanced
ALE, Encrypted voice
AM
low level
Channel scanning
FM
variable reactance
Carrier suppression more than 40 dB
Data/Message
Frequency stability
±0.5ppm
Unwanted sideband more than 50 dB
Channel spacing
100Hz
Audio response
200 ~4000Hz
Antenna tuning
automatic(internal)
Microphone
150Ω(1000Hz)
Silent tuning
45
Tuning time
1~2.5s
Supply voltage
DC 9~14V
Data and Digital Voice Encryption
Real-time encryption AES (Rijndael OFB)
Supply current
Key length
256 bit
Key agreement
Elliptic Curve 320 bit
3.0A(at 13.8V)
TEK storage
8
Antenna connector
50 Ω
Voice bit rate
2400/1200/600 bps
Handset connector
FQ14-7Z
Modem
Coded PSK(serial tone),
Receive standyby
0.3A(at 9.6V)
max.audio
Transmit max
0.45A(at 9.6V)
MSK
Size and weight
No battery
Data mode
208 x 84 x 310mm,3.5Kg
simplex: FEC2,
Half-duplex: FEC2-ARQ
With battery 208 x 84 x 310mm,5.1Kg
Data rate
75 ~ 2400bps
Receiver
Frequency Hopping
Sensitivity
Hop rate
10, 20 hop/s
SSB/CW
0.16 uV (at 10dB S/N)
Hop range
0.3~3MHz
AM
2 uV (10dB S/N)
Sync. time
Max. 15s
FM
0.25uV (12dB SINAD)
Sync channels
8
Selectivity
more than 2.1KHz/-6dB
More than 4.5KHz/-60dB
Image rejection
more than 70dB
Phone
600 Ω(1000Hz)
Environmental
Operating temperature
-40oC ~ +60oC
Storage temperature
-40oC ~ +80oC
Environmental rating
immersion, shock,
temperature
Specifications are subject to change without prior notice
14