1
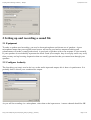
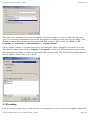
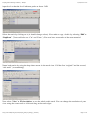
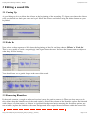
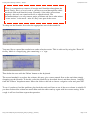
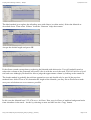
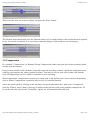
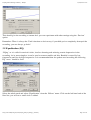
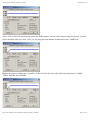
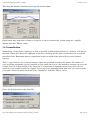
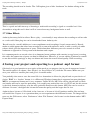
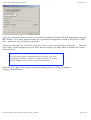
Simple guide to editing in Audacity - Steeple
24/08/2009 14:29
Simple guide to editing in Audacity
Simple guide to editing in Audacity
From Steeple
Contents
1 Outline
2 Setting up and recording a sound file
2.1 Equipment
2.2 Configure Audacity
2.3 Recording
3 Editing a sound file
3.1 Cueing Up
3.2 Fade In
3.3 Removing Blemishes
3.4 Compression
3.5 Equalisation (EQ)
3.6 Normalisation
3.7 Other Effects
4 Saving your project and exporting to a podcast .mp3 format
1 Outline
This session will introduce you to Audacity (a free cross-platform audio-editing application).You will learn
how to set up Audacity and how to record, manipulate and save a sound file suitable for use in a course,
project, podcast or on a website.
The Audacity website is http://audacity.sourceforge.net/. The software is Open Source meaning that it is
free and can be modified by anybody with the appropriate skills; you can make a donation to the authors
though – this will help the project prosper!
Browse the Website, have a look at the tabs at the top – they include comprehensive help and user guides.
There are different downloads for different operating systems and plug-ins, etc. There is also an Audacity
wiki and user community area.
To install Audacity on your own machine you should download the latest ‘proper’ version (ie, not a Beta
version): the Windows version is downloadable from the front page of the site; other versions are available
via the ‘Download’ tab.
http://www.steeple.org.uk/wiki/Simple_guide_to_editing_in_Audacity
Page 1 of 14
Simple guide to editing in Audacity - Steeple
24/08/2009 14:29
It is also recommended that you download (or read) the Quick Reference Guides and / or User Manual,
these are available under the ‘Help’ tab.
Note: Audacity is not necessarily the best choice for musicians and video post production. There are other
software packages listed which are more suitable. An example of one of the drawbacks is that the ‘Effects’:
Echo, Compression, etc are printed onto the source file; in other words you change the source file rather
than routing the source file through an effects processor as happens with other systems. Another point to
note is that Audacity does not have a mixer meaning that it is not particularly good for playing two sources
at once. It also lacks a sequencer for syncing with MIDI instruments. What Audacity is good at is simple
sound recording - there is probably no need to buy a package to do this as it runs on Windows, Linux and
MacOS.
You can use the project menu, import audio command to import MP3 files and WAV files into Audacity.
If you are expecting to want to save sound files in MP3 format then you also need to download and save
the ‘LAME’ MP3 encoder. This library is also free but must be downloaded separately from the main
software (probably) due to licensing restrictions. Type ‘LAME MP3 encoder’ into the Google search box at
the top of the page, this will give you a page of explanation.
Read the instructions and then visit the LAME website: http://lame.buanzo.com.ar/ - versions exist for
Windows, MacOS and Linux. Download the appropriate ZIP file and expand and save ‘somewhere
sensible’. (This may mean ‘My Documents’ or possibly ‘Program Files’ or equivalent.)
Once you have saved the LAME encoder, you need to tell Audacity where the library can be found. To do
this use ‘Edit’ > ‘Preferences’ > ‘File Formats’. Then click on the ‘Find Library’ button and navigate to the
‘sensible’ place where you saved LAME.
http://www.steeple.org.uk/wiki/Simple_guide_to_editing_in_Audacity
Page 2 of 14
Simple guide to editing in Audacity - Steeple
24/08/2009 14:29
2 Setting up and recording a sound file
2.1 Equipment
To make a spoken word recording, you need a decent microphone and decent set of speakers. A poor
microphone means that your original sound source will not be good and no amount of editing and
enhancement will make it sound professional. A good pair of speakers with a flat response is also essential.
If your speakers do not faithfully represent the actual sound (for example, they do not play treble very well)
then you may end up boosting frequencies that are actually present but that you cannot hear through your
speakers.
2.2 Configure Audacity
The first thing you (may) need to do is to set the audio input and output; this is done via preferences. It is
probably best to choose your soundcard for output.
As you will be recording via a microphone, select that as the input source. A mono channel should be OK.
http://www.steeple.org.uk/wiki/Simple_guide_to_editing_in_Audacity
Page 3 of 14
Simple guide to editing in Audacity - Steeple
24/08/2009 14:29
The signal level (volume) of low cost microphones with no pre-amp is an issue so make sure the sound
card is set correctly to maximum boost and the microphone is selected as input source for recording. You
should also check that you have not muted playback from your PC. This is done via ‘Start’ > ‘All
Programs’ > ‘Accessories’ > ‘Entertainment’ > ‘Volume Control’.
Check ‘Master Volume’ is not muted or at zero; also check that ‘Wave’ playback is not muted or at zero.
The check the input source click on ‘Options’ > ‘Properties’; all PCs are different but you need to check
that microphone recording is enabled for the input socket you are using. The following has enable input via
the red ‘phono’ socket on the rear of the PC.
2.3 Recording
Now it is time to record a track. Click the big red record button and speak into the microphone. Adjust the
input level so that the level indicator peaks at about -3dB.
http://www.steeple.org.uk/wiki/Simple_guide_to_editing_in_Audacity
Page 4 of 14
Simple guide to editing in Audacity - Steeple
24/08/2009 14:29
input level so that the level indicator peaks at about -3dB.
Select the track by clicking on it (it should change colour). Now make a copy, do this by selecting ‘Edit’ >
‘Duplicate’. (You could also use ‘Cut’ and ‘Paste’.) You now have two tracks of the same material.
Name both tracks by using the drop down arrow in the track view. Call the first “original” and the second,
“edit track” (or something).
Next select ‘View’ > ‘Fit in window‘ to see the whole audio track. You can change the resolution of your
view using the zoom tools or click and drag at the track edges.
http://www.steeple.org.uk/wiki/Simple_guide_to_editing_in_Audacity
Page 5 of 14
Simple guide to editing in Audacity - Steeple
24/08/2009 14:29
3 Editing a sound file
3.1 Cueing Up
A good thing to do is to delete the silence at the beginning of the recording. To figure out where the silence
ends you should use both your ears and eyes! Select the silence and delete using the delete button on your
keyboard.
3.2 Fade In
Next select a short segment of file from the beginning of the file and then choose 'Effects' > 'Fade In'.
This is very useful to avoid a surprisingly loud signal from the start. It allows the listener time to adjust to
what they will be hearing.
You should now see a gentle slope at the start of the track.
3.3 Removing Blemishes
If the track contains a cough or other such noises it may be good to remove it. There are four ways to do
this; either chop the blemish out of the track entirely, reduce the volume of the blemish, replace the blemish
with silence (or white noise) or if there is significant background noise meaning the first three options are
not suitable, replace the blemish with some background noise copied from elsewhere within the sound file.
http://www.steeple.org.uk/wiki/Simple_guide_to_editing_in_Audacity
Page 6 of 14
Simple guide to editing in Audacity - Steeple
24/08/2009 14:29
There is a temptation to remove all coughs and blemishes throughout the
track. Firstly, this is a lot of work as you have to trawl through the whole
track and find each blemish in turn. Secondly, if the edits are not done
properly, the track can sound artificial or unprofessional. The
recommendation is to only remove major problems and leave other minor
"venue noises" in the track - after all, they were part of the event.
To chop out the blemish, first select the appropriate area of the sound file.
You may like to expand the resolution to make selection easier. This is achieved by using the ‘Zoom In’
facility which is a magnifying glass containing a ‘+’ sign.
Then delete the area with the 'Delete' button on the keyboard.
The second method is to reduce the volume; this may give a more natural flow to the track than simply
chopping out the blemish. To do this, select the blemish (as described above) and then choose ‘Amplify’
from the ‘Effects’ dropdown menu. Move the slider to the left to choose a negative value and press OK.
To see if you have fixed the problem, play back the track and listen to see if the new volume is suitable. If
you have reduced the volume too much then undo the effect and try again with less severe setting. If the
cough is still too loud then repeat the operation.
http://www.steeple.org.uk/wiki/Simple_guide_to_editing_in_Audacity
Page 7 of 14
Simple guide to editing in Audacity - Steeple
24/08/2009 14:29
The third method is to replace the offending area with silence (or white noise). Select the blemish as
described above. Then select ‘Silence’ from the ‘Generate’ drop down menu.
Accept the default length and press OK.
If the silence sounds wrong then try replacing the blemish with white noise. You will probably need to
reduce the volume of the generated noise until it fits in with the rest of the track. This will involve a bit of
trial and error although you should be able to judge the approximate volume by looking at the sound file.
The fourth method is probably the trickiest approach to use and should only be used if the previous
methods have failed. First of all, determine the length of the blemish; you may like to Zoom In to make
sure your calculations are as accurate as possible.
In this case the blemish lasts 5.35-4.70 secs = 0.65secs. Now copy 0.65secs of ambient background noise
from elsewhere in the track – do this by selecting an area and then use the ‘Copy’ button.
http://www.steeple.org.uk/wiki/Simple_guide_to_editing_in_Audacity
Page 8 of 14
Simple guide to editing in Audacity - Steeple
24/08/2009 14:29
Then select the area you want to replace and press the ‘Paste’ button.
The finished track should now have the blemish removed. You should listen to the section that was replaced
to see if it sounds acceptable. You can always undo the changes if the results are not satisfactory.
3.4 Compression
In a nutshell, 'Compression' (or Dynamic Range Compression) makes the quiet bits of the recording louder
and the loud bits quieter.
It may not be suitable in all situations, especially when the recording contains significant background noise
with big gaps between the louder (spoken) sections. You need to rely on your ears to make sure that the
level of compression you have added is suitable for your recording.
Where appropriate, compression is used to give more body to the spoken voice and to musical instruments
such as drums. Compression is probably used on 99% of recorded material.
Select the whole track by clicking in the left-hand side track information box, then select ‘Compressor’
from the ‘Effects’ menu. Start by moving all sliders to the left hand side giving minimal compression. To
be on the safe side, unselect the ‘Normalize’ option; we will normalize the track later.
http://www.steeple.org.uk/wiki/Simple_guide_to_editing_in_Audacity
Page 9 of 14
Simple guide to editing in Audacity - Steeple
24/08/2009 14:29
This should give the recording a warmer feel; you can experiment with other settings using the ‘Preview’
option.
Remember: There is always the 'Undo' function so don't worry if you think you've completely destroyed the
recording, you can always go back!
3.5 Equalisation (EQ)
‘EQing’ as it is called in musical circles, involves boosting and reducing certain frequencies in the
recording. At its most simplest, it can be used to remove rumble and hiss. Rumble is caused by low
frequencies and hiss by high frequencies. It is recommended that for spoken word recording the following
EQ ‘curve’ should be used.
Select the whole track and select ‘Equalization’ from the ‘Effects’ menu. Click on the left-hand end of the
blue line, you will see a small circle is added.
http://www.steeple.org.uk/wiki/Simple_guide_to_editing_in_Audacity
Page 10 of 14
Simple guide to editing in Audacity - Steeple
24/08/2009 14:29
Next, click on the blue line directly above the 50Hz marker, do not worry about being too precise, you can
move the blobs sideways later. Now you can drag the first marker downwards to the -24dB level.
Repeat the process adding more ‘handles’ to the line. Do this above the following frequencies: 300Hz,
700Hz, 3000Hz and 10000Hz.
http://www.steeple.org.uk/wiki/Simple_guide_to_editing_in_Audacity
Page 11 of 14
Simple guide to editing in Audacity - Steeple
24/08/2009 14:29
Then drag the handles around the top to get the desired shape.
Equalisation may reduce the volume so it may be an idea to increase the volume using the ‘Amplify’
options from the ‘Effects’ menu.
3.6 Normalisation
Normalising a track means "making it as loud as possible without adding distortion". Audacity will analyse
the peak volume then boost the amplitude of the wave ensuring that the peak volume does not exceed the
prescribed limit. Remember that we compressed before so much of the spike will have been reduced
anyway.
This is a good trick to use if your recording is quiet and you think it needs to be louder. For instance, if
your recording equipment is not as powerful as you would like it to be, the normalize function can raise the
volume levels to a more audible level. However, it is important to remember not to raise the levels too
much or it will sounds distorted or 'clipped' so use your own judgement about how loud you want to make
your track. Select the whole track and select ‘Normalize’ from the ‘Effects’ menu.
Leave the default options and click OK.
http://www.steeple.org.uk/wiki/Simple_guide_to_editing_in_Audacity
Page 12 of 14
Simple guide to editing in Audacity - Steeple
24/08/2009 14:29
The recording should now be louder. The -3dB option gives a little ‘headroom’ for further editing of the
track.
This is a quick and efficient way of boosting a weak audio recording’s signal to a useable level. One
downside to using this tool is that it will of course boost any background noise as well.
3.7 Other Effects
Audacity has many built-in effects. Have a play – occasionally it may enhance the recording to add an echo
or a wah-wah! Other plug-ins can be downloaded from Audacity site.
'Reverb' may be a useful addition as it can compliment vocal recordings if used conservatively. Reverb
makes a sound appear that it has been recorded in a room with reflective walls; it adds a variety of subtle
echoes which give the impression of space. Think about how different your voice sounds in a tiled
bathroom as opposed to a living room with furniture and carpets.
It is common practice to record voices in a dampened room (perhaps with curtains (or egg boxes) covering
the walls; the impression of space can then be added later. However, if you are editing a podcast be careful
to use these effects sparingly as they can distort and lessen the overall sound quality of the recording.
4 Saving your project and exporting to a podcast .mp3 format
Obviously it is good practise to save copies of the track as you progress just in case of unexpected events!
The easiest option is to choose ‘Save Project’ (or ‘Save Project As’) from the File menu. Make sure you
save your work in a sensible place and give it a sensible name.
You probably also want to save the sound file in a format that is able to be played back on your device of
choice. WAV is a ‘lossless’ format; it is a Microsoft Windows format but is supported on most platforms.
MP3 is a compressed format and is very common. Unlike WAVs; MP3 files can be played back on iPods
and similar and can be used for podcasting. It is roughly one tenth of the size of a WAV and for this reason
is the ideal format for delivery over the web; podcasts should use this format. MP3 files can be saved at
different ‘bit rates’, the higher the bit rate the better the quality and the larger the file size.
Audacity has a bit rate of 128 which is fine, however, a bit rate of 64 will produce smaller files and may
still sound fine. If space is at a premium then you can experiment with different bit rates. To change the bit
rates use the 'Edit' menu, select ‘Preferences’ then ‘File Formats’, the bit rate is at the bottom under ‘MP3
Export Setup’.
http://www.steeple.org.uk/wiki/Simple_guide_to_editing_in_Audacity
Page 13 of 14
Simple guide to editing in Audacity - Steeple
24/08/2009 14:29
Ogg Vorbis certainly has the best name and is another compressed format with better reproduction than the
MP3 format, it is an Open Source standard but is generally not supported as much as WAV files or MP3
files – maybe one day it will gain in popularity.
If you have more than one sound file, select the one you want to save and choose ‘Export as ….’ Form the
‘File’ menu. I would suggest saving as a WAV and also saving as an MP3 which is probably the version
that you will use.
The rest of this page is intentionally left blank for your own
contributions! Please contribute to these tutorials by visiting
Steeple at http://www.steeple.org.uk/wiki/contribute
Retrieved from "http://www.steeple.org.uk/wiki/Simple_guide_to_editing_in_Audacity"
Category: SteepleBooklet
http://www.steeple.org.uk/wiki/Simple_guide_to_editing_in_Audacity
Page 14 of 14