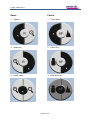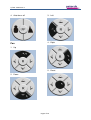
1
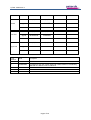
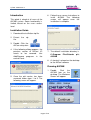
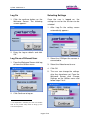
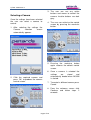
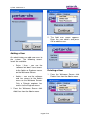
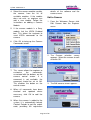
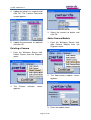
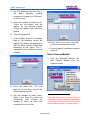
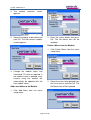
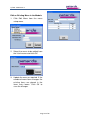
AllCAM V2.0.1.0
Users Manual
Author: David Muse
Version: 2.0.1.0
Publication: 05/08/09
Petards plc
390 Princesway
Team Valley Trading Estate
Gateshead
Tyne & Wear
NE11 0TU
JL/UM - 5958 Issue 2
Raised
Checked
Approved
Issue:
01
02
Date:
16/09/09
24/09/09
Signed:
D.MUSE
D.MUSE
Name:
D.MUSE
D.MUSE
Date:
16/09/09
25/09/09
Signed:
M.AINSCOW
M.MENON
Name:
M.AINSCOW
M.MENON
Date:
16/09/09
28/09/09
Signed:
S.RICHARDSON
S.RICHARDSON
Name:
S.RICHARDSON
S.RICHARDSON
Issue
Number
Date
Description
1
2
16/09/2009
24/09/2009
Initial Issue
Description of UP and VISCA commands added. Minimise functionality
added to the software and User Manual
Page 2 of 16
JL/UM - 5958 Issue 2
Introduction
This guide is aimed at all users of the
AllCAM system. Some functionality is
limited, based on the users access
level.
6. Follow the on screen instructions to
install AllCAM. The following
screen will appear once the
installation is complete.
Installation Guide
1. Download the instillation zip file.
2. Extract
file.
the
zip
3. Double Click the
AllCam setup icon
4. If the following dialog appears, the
previous version of AllCam V2
needs to be removed. Use
Add/Remove programs in the
control Panel.
7. The default installation directory is
C:\Program Files\Petards plc\
AllCAM
8. A shortcut is placed on the desktop
to the AllCam software
Running AllCAM
5. Once the old version has been
removed, follow steps 1 to 3. The
following screen will appear.
1. Double
Click
the
AllCAM Icon on the
desktop. The Welcome
Screen will appear.
Page 2 of 16
JL/UM - 5958 Issue 2
Log On
Selecting Settings
1. Click the continue button on the
Welcome Screen. The following
screen appears.
Once the user is logged on, the
settings to use for the session can be
selected.
1. After Log On the setting screen
automatically appears.
2. Enter the log on details and click
OK.1
Log On as a Different User
1. From the Welcome Screen click log
off from the Utilities menu.
2. Select the COM port the camera is
connected to.
3. Select the Video format to use.
4. Click OK
5. The user can change the settings
after they have been set. From the
Welcome Screen click Change
Settings on the Utilities menu and
follow steps 2 to 4.
2. Click Continue to log on.
1
If no keyboard is available, the user can double
click on any of the entry boxes to bring up the
onscreen keyboard.
Page 2 of 16
JL/UM - 5958 Issue 2
Selecting a Camera
Once the settings have been selected
the user can select a camera to
control.
1. After selecting the settings the
Camera
selection
screen
automatically appears.
3. The user can use any active
buttons and menus to control the
camera. Inactive buttons are dark
grey.
4. The user can minimise the control
screen by pressing the maximise
button.
5. Pressing the maximise button
again restores the default control
screen.
2. Click the required camera and
press OK, to produce the camera
control screen.
6. Once a camera is selected the
settings
are
stored
and
automatically loaded when AllCAM
is started.
7. To control a different camera press
Cancel.
8. From the welcome screen click
Continue and follow steps 2
onwards.
Page 3 of 16
JL/UM - 5958 Issue 2
Zoom
Focus
1. Zoom in
1. Focus Near
2. Zoom out
2. Focus Far
3. Reset zoom
3. Auto focus on
Page 4 of 16
JL/UM - 5958 Issue 2
4. Auto focus off
3. Left
Pan
4. Right
1. Up
5. Reset
2. Down
Page 5 of 16
JL/UM - 5958 Issue 2
Presets2
3. Clear Preset
P.o.P = Power on Preset
U.P.1 = User Preset 1
U.P.2 = User Preset 2
1. Set preset
On Screen Display
The OSD overlays the camera settings
on the camera image.
1. On
2. Recall Preset
2. Off
IR Cut Filter
1. On
2. Off
2
If any of the preset buttons are pressed, there is a
5 second delay before any other buttons can be
used. During this time all buttons are disabled.
Page 6 of 16
JL/UM - 5958 Issue 2
Camera Selection
1. ANPR camera
2. Overview camera
Sending UP Commands
This allows Petards Universal Protocol
commands to be sent direct to the
camera.
1. Select UP Terminal
Engineer menu.
from
the
Sending VISCA Commands
This allows Sony specific VISCA
commands to be sent direct to the
camera.
1. Select VISCA Terminal from the
Engineer menu.
2. The UP Terminal appears. Enter
the UP command and click OK. A
list of all commands sent in the
current session is displayed.
2. The VISCA Terminal appears.
Enter the VISCA command and
click OK. A list of all commands
sent in the current session is
displayed.
Page 7 of 16
JL/UM - 5958 Issue 2
2. The Add user screen appears.
Enter the user details and press
OK to add the user.
Adding a User
An administrator can add new users to
the system. The following access
levels are available:
•
•
Sales / User – can use the
software but don’t have access
to the Admin or Engineer menus
on the Welcome Screen.
Admin – can use the software
and has access to the Admin
menu on the Welcome Screen.
Only a Petards engineer has
access to the Engineer menu.
Deleting a User
1. From the Welcome Screen click
Delete User from the Admin menu.
1. From the Welcome Screen click
Add User from the Admin menu.
Page 8 of 16
JL/UM - 5958 Issue 2
2. Select the user to delete and press
OK.3
Adding a Camera
Resetting a Password
1. From the Welcome Screen click
Reset Password from the Admin
menu.
2. Select the user and enter the new
password, click OK.
3
Warning! Make sure there is always at least one
Administrator on the system.
1. From the Welcome Screen click
Add Camera from the Engineer
menu.
2. The Add camera screen appears.
3. Enter the camera name. The name
of the camera should include the
video format to be used by the
camera
Page 9 of 16
JL/UM - 5958 Issue 2
4. Select the camera module used by
the camera, from the list of
available modules. If the module
does not exist, an engineer can
add a new module. Follow the
instructions on adding a Camera
Module.
details of the software and the
camera name.
Edit a Camera
1. From the Welcome Screen click
Edit Camera from the Engineer
menu.
5. If the camera module is a Sony
module, tick the VISCA Enabled
box. This allows the engineer to
send VISCA commands to the
camera.
6. Click OK to bring up the Camera
Commands screen.
2. The Camera selection screen
appears. Select the camera to edit
and click OK.
7. This screen allows the engineer to
customise
the
commands,
associated with the buttons, on the
camera control screen. If a
command is not available, the
command should be set to NA.
This disables the button on the
control screen.
3. The Edit camera screen appears.
8. When all commands have been
checked and updated where
necessary, click OK to add the
camera.
9. When the camera is added to the
system, it is automatically locked.
Contact Petards to get the unlock
code, providing the registration
Page 10 of 16
JL/UM - 5958 Issue 2
4. Update the details as required and
click OK. The Camera Command
screen appears.
3. Select the camera to delete and
click OK.
Add a Camera Module
5. Update the commands as required
and click OK.
1. From the Welcome Screen click
Add Camera Module from the
Engineer menu.
Deleting a Camera
1. From the Welcome Screen click
Delete Camera from the Engineer
menu.
2. The Add camera module screen
appears.
2. The Camera
appears.
selection
screen
3. Enter the module name.
Page 11 of 16
JL/UM - 5958 Issue 2
4. Set the command time out, this is
the
delay
between
sending
commands through the COM port,
in milliseconds.
5. Enter the number of menus to use.
These are the menus that will
appear on the camera control
screen, for settings such as Shutter
Speed.
6. Click OK to continue.
7. If the number of menus is greater
than 0, the following screen will
appear. This allows the engineer to
add the items and the associated
command to the menu. This is
repeated for the number of menus
entered.
10. Enter each of the menu item titles
and the associated command.4
11. Once all details have been entered
click OK.
Edit a Camera Module
1. From the Welcome Screen click
Edit Camera Module from the
Engineer menu.
8. Enter the menu title. This title
appears on the menu bar of the
camera control screen.
9. Set the number of menu items.
Note: if you enter the items and
commands, then change the
number of items, all items and
commands are set to NA.
4
Warning! Make sure the menu item titles are
unique. When an item is pressed on the camera
control screen, the command associated with the
first occurrence of the title is sent to the camera
Page 12 of 16
JL/UM - 5958 Issue 2
2. The module
appears.
selection
screen
3. Select the module to be edited and
click OK. The Edit camera module
screen appears.
2. Enter the menu details and press
OK. The No Menus box will be
updated.
Delete a Menu from the Module
1. Click Delete Menu from the menu
setup menu.
4. Change the module name and
Command T/O value as required. If
the module name is updated, each
camera using the module will
automatically be updated with the
new module name.
Add a new Menu to the Module
2. Select the menu to be deleted from
the list of menus and click OK. The
No Menus box will be updated.
1. Click Add Menu from the menu
setup menu.
Page 13 of 16
JL/UM - 5958 Issue 2
Edit an Existing Menu in the Module
1. Click Edit Menu from the menu
setup menu.
2. Select the menu to be edited from
the list of menus and click OK.
3. Update the menu as required. If the
number of menu items changes the
existing items are placed in the
items entry boxes. Click OK to
save the changes.
Page 14 of 16