1
Human-Machine
Interface
User manual
Document
Version
HMI version
Articles
Asyril_HMI_User_Manual_E_v1.0
v1.0
Date
rc1.0v2.0.2
Asycube Mezzo
Asycube Forte
Asycube Fortissimo
Asycube Largo_A5
14.11.2014
Human-Machine Interface - Asyril SA
Operating Manual
Table of Contents
© Copyright Asyril S.A.
Document version : v1.0
Table of Contents
Introduction ................................................................................................................................2
General information .............................................................................................................2
Roles and access levels .....................................................................................................3
Installation............................................................................................................................5
Prerequisite....................................................................................................................5
Installing the HMI software on a specific computer ......................................................5
Pre-installing ............................................................................................................5
Installing...................................................................................................................6
Starting HMI ........................................................................................................................7
General ......................................................................................................................................8
Main window........................................................................................................................8
Operator action panel : States ....................................................................................11
Operator action panel : Alarms ...................................................................................13
Operator action panel : Options ..................................................................................16
Operator action panel : Login .....................................................................................17
Operator action panel : Shortcuts ...............................................................................18
Operator action panel : Statistics ................................................................................20
Operator action panel : Recipes .................................................................................22
Configuration .....................................................................................................................24
HMI configuration ........................................................................................................26
Product configuration ..................................................................................................29
Asycube configuration with Ethernet ....................................................................30
Asycube configuration with RS .............................................................................33
Asyview configuration............................................................................................36
Robot configuration ...............................................................................................38
Process configuration ............................................................................................40
User management .............................................................................................................42
User management : home ..........................................................................................42
User management : manage users ............................................................................44
User management : edit panel..............................................................................46
Asycube ...................................................................................................................................48
Home .................................................................................................................................49
Easy tune ..........................................................................................................................52
Platform .............................................................................................................................56
Outputs ..............................................................................................................................61
Reservoir ...........................................................................................................................65
Backlight ............................................................................................................................69
Process ..............................................................................................................................71
Scripting .............................................................................................................................75
Console..............................................................................................................................79
Configuration .....................................................................................................................81
Troubleshooting .......................................................................................................................87
Technical support ....................................................................................................................88
For a better service... ........................................................................................................88
Contact ..............................................................................................................................88
Revision table ..........................................................................................................................89
HMI user manual
HMI version : rc1.0v2.0.2
1/90
Human-Machine Interface - Asyril SA
Operating Manual
Introduction
© Copyright Asyril S.A.
Document version : v1.0
Introduction
This documentation describes the pages of this interface and possibilities supplied by. How to configure your products
is not described in it.
Another specific documentation explains how to work with your product and the HMI provide only a solution to do it.
General information
This document is the property of Asyril S.A.; it may not be reproduced, modified or communicated, in whole or in
part, without our prior written authorisation. Asyril S.A. reserves the right to modify any information contained in this
document for reasons related to product improvements without prior notice. Before using the product, please read
this entire document in order to ensure that the product is used correctly. However, if you encounter difficulties when
using the product, do not hesitate to contact our customer service department.
In this manual, the safety information that must be respected is split into three types: "Danger", "Important" and "Note".
These messages are identified as follows:
DANGER!
Failure to respect this instruction may result in serious physical injury.
DANGER!
This instruction identifies an electrical hazard. Failure to respect this instruction may result
in electrocution or serious physical injury due to an electric shock.
IMPORTANT!
Failure to respect this instruction may result in serious damage to equipment.
NOTE:
The reader's attention is drawn to this point in order to ensure that the product is used correctly.
However, failure to respect this instruction does not pose a danger.
Reference …
For more information on a specific topic, the reader is invited to refer to another manual or another
page of the current manual.
2/90
HMI version : rc1.0v2.0.2
HMI user manual
Human-Machine Interface - Asyril SA
Operating Manual
© Copyright Asyril S.A.
Document version : v1.0
Roles and access levels
Roles and access levels
The HMI has many different access level to be able to limitate access to important, sensible or dangerous
parameters to operators.
In this documentation, minimum level required to access to an element is identified by icons on the right of the
explanation of the element. If there is no icon signify that operator has access to this element.
Icons list:
Icon
Level access minimum
Advanced operator
Technician
Advanced technician
Integrator
HMI user manual
HMI version : rc1.0v2.0.2
3/90
Human-Machine Interface - Asyril SA
Operating Manual
© Copyright Asyril S.A.
Document version : v1.0
Roles and access levels
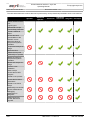
The table below defines the actions that can be performed by each professional permitted to work on the machine:
Operator
Advanced
operator
Technician
Advanced
technician
Integrator Developer
Switch on/switch off the
unit
Login/Logout
Select/load a recipe
Launch/Stop production
Create a statistical
report
Access the basic
functionalities of the
"header" screen
Read the values of
the process dynamic
variables
Acquire and analyse an
image
Move the robot
Vibrate the Asycube
Add/modify an operator
Modify the values of
the process dynamic
variables
Obtain and analyse an
image
Perform a new
calibration
Save a recipe
Access the full ARL
program
Create a new process
Access the full Vision
parameters
Create a new Vision
recipe
Add/modify a technician
Access maintenance/
debugging
Add/modify an
integrator
Advanced access
to HMI, Robot and
Asyview
4/90
HMI version : rc1.0v2.0.2
HMI user manual
Human-Machine Interface - Asyril SA
Operating Manual
© Copyright Asyril S.A.
Document version : v1.0
Installation
Installation
NOTE:
If a computer is included in your product, the "HMI" software is already installed.
This chapter explains how to install the HMI on your own computer if needed.
Prerequisite
To install and execute the HMI you need those elements:
• Computer with windows 7 (or 8) 64bits (a 32 bits version of HMI can be delivered on request)
• .Net 4.0 minimum installed.
• User access defined by your IT service to be able to install and execute software.
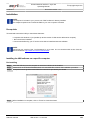
NOTE:
Check that your version of the ".net framework" is up to date. You can download this version from the
Microsoft website: http://www.microsoft.com/download/
Installing the HMI software on a specific computer
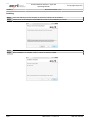
Pre-installing
Step 1
Step 2
Step 3
Insert the USB key into the computer on which the HMI should be installed.
Double-click on the SurfaceToolkitRuntime.msi executable file to launch the installation procedure.
Accept the license agreement and follow the instructions provided by the wizard
Step 4
When installation is complete, click on "Finish" to close the wizard.
HMI user manual
HMI version : rc1.0v2.0.2
5/90
Human-Machine Interface - Asyril SA
Operating Manual
© Copyright Asyril S.A.
Document version : v1.0
Installing
Installing
Step 1
Step 2
Insert the USB key into the computer on which the HMI should be installed.
Double-click on the setup.exe executable file to launch the installation procedure.
Step 3
Step 4
Follow the instructions provided by the wizard.
When installation is complete, click on "close" to close the wizard
6/90
HMI version : rc1.0v2.0.2
HMI user manual
Human-Machine Interface - Asyril SA
Operating Manual
Starting HMI
© Copyright Asyril S.A.
Document version : v1.0
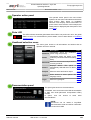
Starting HMI
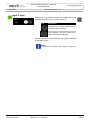
Step 1
Step 2
Click on the shortcut created on the desktop .
If needed, configure the HMI depending of your products on the configuration page.
HMI user manual
HMI version : rc1.0v2.0.2
7/90
Human-Machine Interface - Asyril SA
Operating Manual
© Copyright Asyril S.A.
Document version : v1.0
General
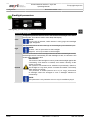
General
This chapter introduces you to the general aspect of the HMI. Page descriptions for products can be found in the
following chapters.
Main window
Start/Stop panel
This part of the window give access to the start/stop action and show the OMAC
state if the process is used. In other cases, this panel has only the Asyril icon.
8/90
HMI version : rc1.0v2.0.2
HMI user manual
Human-Machine Interface - Asyril SA
Operating Manual
Document version : v1.0
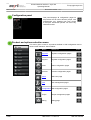
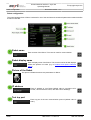
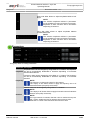
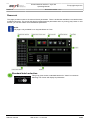
Main window
Operator action panel
State LED
© Copyright Asyril S.A.
The operator action panel is the zone where
operator can see some informations and execute
some actions. Each button on headband
selection menu display various informations or
give access to some actions. Is this example, the
states panel is displayed (see description of this
panel here).
This LED indicator shows the global state of the HMI. If one product is in error, the global
state is in error. For more details for product states, click on states button on headband
selection menu.
Headband selection menu
This menu gives access to all informations and actions that an
operator can see or execute.
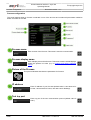
Name
Description
Informations about the production
Statistics
(when using the process).
Informations about the states of all
States
products (connection state and working
state).
Allows to execute some simple actions
Shortcuts
on every products.
Displays alarms. This panel is
Alarms
automatically selected when an alarm
occurs.
Recipes
Options
Login
Documentation panel
Link
more
details
more
details
more
details
more
details
more
details
Gives access to some options like more
language choice.
details
more
Allows to login/logout.
details
Allows to select and load a recipe.
This panel gives access to documentations.
In standard, user can access to the HMI documentation
in PDF and CHM (Microsoft Compressed HTML)
formats.
In option, user can access to some other
documentations.
NOTE:
Documents can be added in AsyrilData
\Documentation folder and will be visible after
a restart of the HMI.
HMI user manual
HMI version : rc1.0v2.0.2
9/90
Human-Machine Interface - Asyril SA
Operating Manual
© Copyright Asyril S.A.
Document version : v1.0
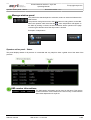
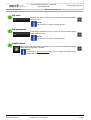
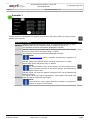
Main window
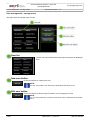
Configuration panel
This panel displays all configuration pages for
all products and for other element (recipe, user
management, etc). Operator has never access
to this part. Advanced operator can have very
restricted access.
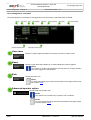
Product and options selection menu
This menu gives access to all products defined in HMI configuration and to
various other elements. See list below :
Icon
Name
Access to
asycube
AsyCube configuration pages
asyview
AsyView configuration pages
robot
Robot configuration pages
process
Process configuration pages
home
HMI home page
user
User management pages
Level
configuration HMI configuration pages
10/90
recipe
Recipe management pages
debug
Debug page
HMI version : rc1.0v2.0.2
HMI user manual
Human-Machine Interface - Asyril SA
Operating Manual
© Copyright Asyril S.A.
Document version : v1.0
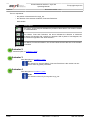
Operator action panel : States
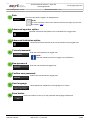
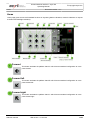
Manage window panel
This panel is the standard panel to minimize, restore or extend to fullscreen the
HMI window.
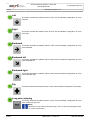
The question mark gives access to the help buttons in many places on the HMI.
When the question mark looks like this
, some help buttons will appear on
the HMI. By clicking on these, the documentation will be opened on the page
concerning the element where the help button is located.
Examples of help buttons :
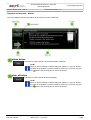
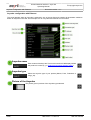
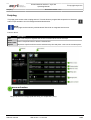
Operator action panel : States
This panel displays states of all products. It is essential and very helpful to have a global view of the state of the
products.
HMI version informations
The HMI version information can be found in this panel. This version
number should be communicated in the event of any contact with the
After-Sales department of Asyril SA.
HMI user manual
HMI version : rc1.0v2.0.2
11/90
Human-Machine Interface - Asyril SA
Operating Manual
© Copyright Asyril S.A.
Document version : v1.0
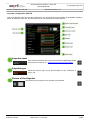
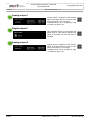
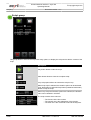
Operator action panel : States
State table
This table provides more information about the connection state of each module (robot, process, asycube and
asyview) and indicates whether an alarm has occurred. In addition, the "data" column indicates whether the data
related to each module has been loaded or not.
The table contains following informations :
Column title
module
connection
data
controller
process
alarm
complement
12/90
Description
Name of the involved product.
State of the connection (disconnected, connected, connecting).
State of the data (loaded, not loaded).
State of the controller (used only by the asyview (configuration, running, etc)).
State of the internal process of each product (idle, execute, stopping, etc).
Indicate if a product has an alarm (true/false).
Additional process state (used only by the process and the asyview).
HMI version : rc1.0v2.0.2
HMI user manual
Human-Machine Interface - Asyril SA
Operating Manual
© Copyright Asyril S.A.
Document version : v1.0
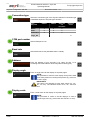
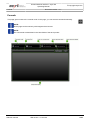
Operator action panel : Alarms
Operator action panel : Alarms
This panel displays warnings and alarms of all products and of the HMI itself.
delete button
This button is used to delete one preselected alarm message.
NOTE:
When an alarm message is deleted using the "delete" or "clear all" buttons,
the alarm is not deleted, only the message is cleared. It is necessary to press
the "
" button before being able to resume production.
clear all button
This button is used to delete all alarm messages.
NOTE:
When an alarm message is deleted using the "delete" or "clear all" buttons,
the alarm is not deleted, only the message is cleared. It is necessary to press
the "
HMI user manual
" button before being able to resume production.
HMI version : rc1.0v2.0.2
13/90
Human-Machine Interface - Asyril SA
Operating Manual
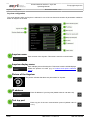
Operator action panel : Alarms
scrollbar
button
© Copyright Asyril S.A.
Document version : v1.0
The scrollbar allows to navigate in alarm messages. The scrollbar is visible only when all
messages cannot be displayed in the panel.
This button is available when an alarm occurs, and is greyed out under normal
conditions.
NOTE:
When an error occurs, the situation that generated the alarm must be resolved
and then the alarm cleared by clicking on the "
14/90
HMI version : rc1.0v2.0.2
" button
HMI user manual
Human-Machine Interface - Asyril SA
Operating Manual
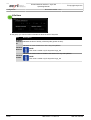
Operator action panel : Alarms
© Copyright Asyril S.A.
Document version : v1.0
Alarms list
This table provides useful information for diagnosing errors:
• The "Module" column gives the name of the module issuing the error (such as the Robot,
Asyview, HMI, etc.).
• The "Information" column contains a clear explanation of the error encountered and
possibly a solution to resolve it.
• The "Time" column provides information about the time and date on which the error
occurred.
NOTE:
By keeping the mouse on the time value, the date of the alarm is displayed.
HMI user manual
HMI version : rc1.0v2.0.2
15/90
Human-Machine Interface - Asyril SA
Operating Manual
© Copyright Asyril S.A.
Document version : v1.0
Operator action panel : Options
Operator action panel : Options
This panel gives access to global options, like language choice.
list of languages
A specific language may be chosen by pressing the associated name.
NOTE:
Some languages are available on request; for more information, please
contact Asyril customer services.
ok button
16/90
Press this button to validate the language selected.
HMI version : rc1.0v2.0.2
HMI user manual
Human-Machine Interface - Asyril SA
Operating Manual
© Copyright Asyril S.A.
Document version : v1.0
Operator action panel : Login
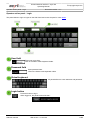
Operator action panel : Login
This panel allows to login or logout on the HMI. See level access chapter for more details.
User field
Enter user name here.
Click in the field to make keyboard visible.
Password field
Enter password here.
Click in the field to make keyboard visible.
Virtual keyboard
Keyboard allows to enter username and password.
Login button
Press this button to log in.
When logged in, the panel become like that :
HMI user manual
HMI version : rc1.0v2.0.2
17/90
Human-Machine Interface - Asyril SA
Operating Manual
© Copyright Asyril S.A.
Document version : v1.0
Operator action panel : Shortcuts
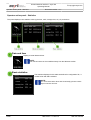
Operator action panel : Shortcuts
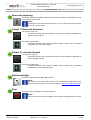
This panel gives access to simple, accessible for operator, functions for all products.
Process shortcuts
Shortcuts to functions of process give access to standard functions like Load/Unload
tool and specific programs defined in programmation page of process.
The two buttons "load tool" and "unload tool" enable a tool to be loaded or unloaded
from the robot's platform.
Any other program whose name begins with " _ " will be displayed in this list in the
form of a shortcut button.
IMPOTANT NOTE:
The programs executed from this list no longer respect the sequence of
OMAC states. The program will be directly executed without passing through
the "starting", "stopping" phases, etc.
AsyView shorcuts
Shortcuts to functions of AsyView give access to main functions of AsyView:
• Pressing the "acquire" button enables a photo of the platform to be taken
depending on the configuration performed.
• Pressing the "abort" button enables this image capture to be cancelled.
• Pressing the "reset" button allows to reset the Asyview.
• If necessary, the "stop" button may be pressed to stop the Asyview.
18/90
HMI version : rc1.0v2.0.2
HMI user manual
Human-Machine Interface - Asyril SA
Operating Manual
© Copyright Asyril S.A.
Document version : v1.0
Operator action panel : Shortcuts
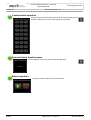
AsyCube shortcuts
Shortcuts to functions of AsyCube give access to standard functions
of AsyCube:
• Nine buttons which provide to execute the standard
batches for Platform (forward, right, backward-left, flip,
etc.)
• Two buttons (on the right) to execute standard advanced
vibrations (center long size and short size). These
buttons are only visible for AsyCube Largo_A5.
• Two buttons (bottom) to execute reservoir activation
(vibrations for Mezzo, Forte, Frortissimo and outputs
activations for Largo_A5). In both cases, batches A and
B are executed by these buttons.
• One button allows to switch the backlight on and off.
• One button allows to stop both vibrations and reservoir
activation.
Robot shortcuts
Shortcuts to functions of Robot give access to useful functions of Robot:
• The "off" button is used to activate the brakes and to switch off the
power to the motors.
• The "idle" button is used to activate the power to the robot and to
initialize it.
• The "slowspeed" box enables the robot to be set at slow speed.
• If it is necessary to release the brakes (for the calibration steps for
example), the "brakes release" box should be ticked (not possible in
Operator level).
General shortcuts
This general panel give access to general functions:
• Reload execute a data reload for all connected products.
• Cleaning display open a special page during 20 seconds to be able to clean
the touch screen.
HMI user manual
HMI version : rc1.0v2.0.2
19/90
Human-Machine Interface - Asyril SA
Operating Manual
© Copyright Asyril S.A.
Document version : v1.0
Operator action panel : Statistics
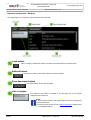
Operator action panel : Statistics
This panel displays some statistics value (cycle time, mtbf, average time, etc.) of productions.
Date and time
Display of actual date and time.
NOTE:
The date and time can be modified directly from the Windows toolbar
Basic statistics
The statistics displayed in this table are defined in configuration file ; it
creates a link with ARL variables.
NOTE:
For more information about this functionality, please contact
Asyril customer services.
20/90
HMI version : rc1.0v2.0.2
HMI user manual
Human-Machine Interface - Asyril SA
Operating Manual
© Copyright Asyril S.A.
Document version : v1.0
Operator action panel : Statistics
Advanced statistics
The statistics displayed in this table are defined by Asyril SA.
NOTE:
For more information about this functionality, please contact
Asyril customer services.
HMI user manual
HMI version : rc1.0v2.0.2
21/90
Human-Machine Interface - Asyril SA
Operating Manual
© Copyright Asyril S.A.
Document version : v1.0
Operator action panel : Recipes
Operator action panel : Recipes
This panel allows to choose the recipe needed for the production.
Load button
When a recipe is selected in the list of recipes, this button allows to load the recipe.
Refresh button
This button is used to refresh the content of the list of recipes.
Save descriptor button
This button allows to save the descriptor.
List of recipes
This dropdown list makes it possible to scroll through all of the recipes
configured and to load one.
NOTE:
A recipe must be loaded in the recipes folder in order to be displayed
in the dropdown list.
The recipes folder can be choose in HMI configuration. Default value
is ...\AsyrilData\Recipes\
22/90
HMI version : rc1.0v2.0.2
HMI user manual
Human-Machine Interface - Asyril SA
Operating Manual
Operator action panel : Recipes
Document version : v1.0
Descriptor table
HMI user manual
© Copyright Asyril S.A.
This descriptor is loaded
when a recipe is selected. It
may be modified then saved
by clicking on the "save
descriptor" button.
HMI version : rc1.0v2.0.2
23/90
Human-Machine Interface - Asyril SA
Operating Manual
© Copyright Asyril S.A.
Document version : v1.0
Configuration
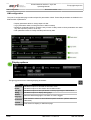
Configuration
This page allows to access to the HMI configuration editor.
Open button
Click on this button to load a HMI configuration file (*.arc). You need to restart the HMI
to activate the loaded configuration.
Save as button
Click on this button to save the HMI configuration file (*.arc).
AsyrilData path button
This panel gives access to the HMI data folder.
• The field displays the actual data folder.
• The select button allows to choose the target folder.
• The move button allows to choose the target folder
and move data from actual folder to this folder.
Informations panel
This panel displays some
informations when editing HMI
configuration.
Products expander
This expander allows to show/hide the products configuration part of HMI
configuration.
This section is used to configure the products (more details).
24/90
HMI version : rc1.0v2.0.2
HMI user manual
Human-Machine Interface - Asyril SA
Operating Manual
© Copyright Asyril S.A.
Document version : v1.0
Configuration
Hmi expander
This expander allows to show/hide the HMI configuration part of HMI configuration.
This section is used to modify some configuration of HMI (more details).
HMI user manual
HMI version : rc1.0v2.0.2
25/90
Human-Machine Interface - Asyril SA
Operating Manual
© Copyright Asyril S.A.
Document version : v1.0
HMI configuration
HMI configuration
This part of configuration page contains all specific parameters of HMI. These HMI parameters are divided in four
different kind of parameters:
• Display parameters allow to change aspect of HMI.
• Login parameters allow to manage access to HMI on startup.
• Behaviour parameters allow to control the way of work of HMI (certain of these parameters are useful
only with a specific product, not for all).
• Path parameters allow to modify standard path used by HMI.
Display options
This group gives access to following display parameters :
Option
fullscreen
border
can quit
debug
default
language
resolution
Description
Activate this option to start HMI in fullscreen mode.
Activate this option to have border around HMI window.
Activate this option to have quit button on the top right angle of HMI window.
Activate this option to display debug page.
Select the default language to use when no user is logged.
Enter resolution values to start HMI with specific resolution (default values are
1280x1024).
custom
Enter the text to display on HMI home page.
information
26/90
HMI version : rc1.0v2.0.2
HMI user manual
Human-Machine Interface - Asyril SA
Operating Manual
© Copyright Asyril S.A.
Document version : v1.0
HMI configuration
Login options
This group gives access to following login parameters :
Option
Description
Activate this option to hide the login button in headband menu selection
hide login
and the user button in Product and options selection menu.
Select the default role to use when no user is logged (more details about
role
roles here).
default
Enter the default login name and password (to be automatically logged
user and
on startup).
password
Enter the logout time for operator (system logout automatically the
logout
operator if no activity is detected during logout time value).
time for
The logout time for technician is 2x logout time for operator.
operator
The logout time for integrator is 4x logout time for operator.
Behaviour options
This group gives access to following behaviour parameters :
Option
Description
Activate this option to enable using OMAC states (only useful with
omac
process).
simulation Activate the simulation mode (work only with robot and process).
log
Activate this option to log HMI exceptions.
exception
synchro
Activate this option to synchronize date with robot.
date
tcp
Enter the tcptimeout for all tcp communications (if product doesn't answer
timeout
after this time, the product is considered disconnected).
ftp
Enter the ftp timeout of all ftp communications.
timeout
HMI user manual
HMI version : rc1.0v2.0.2
27/90
Human-Machine Interface - Asyril SA
Operating Manual
© Copyright Asyril S.A.
Document version : v1.0
HMI configuration
Paths options
This group gives access to following paths parameters :
Option
recipe
path
report
path
28/90
Description
Enter the target recipe path (if path is changed, recipe in actual folder will
not be copied in the new folder).
Enter the target report path (if path is changed, reports in actual folder will
not be copied in the new folder).
HMI version : rc1.0v2.0.2
HMI user manual
Human-Machine Interface - Asyril SA
Operating Manual
© Copyright Asyril S.A.
Document version : v1.0
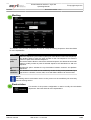
Product configuration
Product configuration
This part of configuration page allows to declare new product in HMI or to modify parameters of an already defined
product.
New product selection
Select a product type in this list to define a new product (of this type) in HMI
configuration.
Existing product selection
Select an existing product in this list to modify, delete or copy a product
definition.
Delete selected product
Delete the selected existing product from the HMI configuration.
Copy selected product
Copy the selected existing product from the HMI configuration and create a new one. A
numeric suffix is added to the name of the product for the new product.
HMI user manual
HMI version : rc1.0v2.0.2
29/90
Human-Machine Interface - Asyril SA
Operating Manual
Asycube configuration with Ethernet
© Copyright Asyril S.A.
Document version : v1.0
Asycube configuration with Ethernet
This panel appears when an Asycube is selected in one of the two lists and contains all parameters needed to
define an Asycube in the HMI. This example is for an Asycube with Ethernet communication.
Asycube name
Asycube type
Enter a name of the Asycube. This name is used in all HMI displays where
this product is involve (e.g. in Products and options selection menu).
Select the Asycube type of your product (Mezzo, Forte, Fortissimo or
Largo_A5).
Picture of the Asycube
This picture gives a preview of the Asycube type selected.
30/90
HMI version : rc1.0v2.0.2
HMI user manual
Human-Machine Interface - Asyril SA
Operating Manual
Document version : v1.0
Asycube configuration with Ethernet
Connection type
Select the connection type of the Asycube selected. Connection type
possibilities depend of Asycube type as follow :
Type
Asycube
Mezzo
Forte
Fortissimo
Largo_A5
IP address
Subnet mask
TCP port
Address
Display angle
Display scale
© Copyright Asyril S.A.
RS485
RS232
x
x
x
x
x
x
Enter IP address
192.168.127.254).
Ethernet
via
converter
x
x
x
Ethernet
native
x
of
your
Asycube
(default
parameter
is
Enter subnet mask of your Asycube (default parameter is
255.255.255.0).
Enter tcp port of your Asycube (default parameter is 4001).
Enter the address of your Asycube (1 for Largo_A5 and 1 to 8
according with rotativ selector of the Asycube for other types).
Enter an angle value for the display of Asycube pages.
NOTE:
This parameter is useful to have display of Asycube in HMI
in the same position as real Asycube position (e.g. reservoir
on left or right).
IMPORTANT!
This value is not intended to have skew values (e.g. 30°,
45°, 78°, etc.). The standard values are 0°, 90°, 180° and
270°.
Enter a scale value for the display of Asycube pages.
NOTE:
This parameter is useful to rescale displays in case of
special angle used (e.g. descrease ratio with 90° or 270°).
HMI user manual
HMI version : rc1.0v2.0.2
31/90
Human-Machine Interface - Asyril SA
Operating Manual
Asycube configuration with Ethernet
© Copyright Asyril S.A.
Document version : v1.0
Apply button
Click on this button to save the configuration of your Asycube. You need then to restart
HMI to apply configuration changes.
NOTE:
A message in Information panel inform you to restart the HMI to apply
configuration changes.
32/90
HMI version : rc1.0v2.0.2
HMI user manual
Human-Machine Interface - Asyril SA
Operating Manual
© Copyright Asyril S.A.
Document version : v1.0
Asycube configuration with RS
Asycube configuration with RS
This panel appears when an Asycube is selected in one of the two lists and contains all parameters needed to
define an Asycube in the HMI. This example is for an Asycube with RS communication.
Asycube name
Asycube type
Enter a name of the Asycube. This name is used in all HMI displays where
this product is involve (e.g. in Products and options selection menu).
Select the Asycube type of your product (Mezzo, Forte, Fortissimo or
Largo_A5).
Picture of the Asycube
This picture gives a preview of the Asycube type selected.
HMI user manual
HMI version : rc1.0v2.0.2
33/90
Human-Machine Interface - Asyril SA
Operating Manual
Document version : v1.0
Asycube configuration with RS
Connection type
Select the connection type of the Asycube selected. Connection type
possibilities depend of Asycube type as follow :
Type
Asycube
Mezzo
Forte
Fortissimo
Largo_A5
COM port number
Baud rate
Address
Display angle
Display scale
© Copyright Asyril S.A.
RS485
RS232
x
x
x
x
x
x
Ethernet
via
converter
x
x
x
Ethernet
native
x
Select COM port to use.
Select baud rate to use (standard value is 19200).
Enter the address of your Asycube (1 for Largo_A5 and 1 to 8
according with rotativ selector of the Asycube for other types).
Enter an angle value for the display of Asycube pages.
NOTE:
This parameter is useful to have display of Asycube in HMI
in the same position as real Asycube position (e.g. reservoir
on left or right).
IMPORTANT!
This value is not intended to have skew values (e.g. 30°,
45°, 78°, etc.). The standard values are 0°, 90°, 180° and
270°.
Enter a scale value for the display of Asycube pages.
NOTE:
This parameter is useful to rescale displays in case of
special angle used (e.g. descrease ratio with 90° or 270°).
34/90
HMI version : rc1.0v2.0.2
HMI user manual
Human-Machine Interface - Asyril SA
Operating Manual
Asycube configuration with RS
© Copyright Asyril S.A.
Document version : v1.0
Apply button
Click on this button to save the configuration of your Asycube. You need then to restart
HMI to apply configuration changes.
NOTE:
A message in Information panel inform you to restart the HMI to apply
configuration changes.
HMI user manual
HMI version : rc1.0v2.0.2
35/90
Human-Machine Interface - Asyril SA
Operating Manual
© Copyright Asyril S.A.
Document version : v1.0
Asyview configuration
Asyview configuration
This panel appears when an Asyview is selected in one of the two lists and contains all parameters needed to
define an Asyview in the HMI.
Asyview name
Enter a name of the Asyview. This name is used for communication.
Asyview display name
Enter a display name of the Asyview. This name is used in all HMI displays
where this product is involve (e.g. in Products and options selection
menu).
Picture of the Asyview
This picture indicates that there are parameters for Asyview.
IP address
Text tcp port
36/90
Enter IP address of your Asycube (default value is 192.168.0.70).
Enter tcp port of the text communication protocol (default value is
7171).
HMI version : rc1.0v2.0.2
HMI user manual
Human-Machine Interface - Asyril SA
Operating Manual
© Copyright Asyril S.A.
Document version : v1.0
Asyview configuration
Binary tcp receive port
Enter tcp port of the binary protocol receive port (default value is
7575).
Binary tcp send port
Enter tcp port of the binary protocol send port (default value is 7474).
Ftp user
Enter the ftp user to use to connect to the Asyview ftp access.
NOTE:
Ftp connection is used to transmit recipes.
Ftp password
Enter the ftp password to use to connect to the Asyview ftp access.
NOTE:
Ftp connection is used to transmit recipes.
Apply button
Click on this button to save the configuration of your Asyview. You need then to restart
HMI to apply configuration changes.
NOTE:
A message in Information panel inform you to restart the HMI to apply
configuration changes.
HMI user manual
HMI version : rc1.0v2.0.2
37/90
Human-Machine Interface - Asyril SA
Operating Manual
© Copyright Asyril S.A.
Document version : v1.0
Robot configuration
Robot configuration
This panel appears when a Robot is selected in one of the two lists and contains all parameters needed to define
a Robot in the HMI.
Robot name
Enter a name of the Robot. This name is used for communication.
Robot display name
Enter a display name of the Robot. This name is used in all HMI displays
where this product is involve (e.g. in Products and options selection
menu).
Picture of the Robot
This picture indicates that there are parameters for Robot.
IP address
Text tcp port
38/90
Enter IP address of your Robot (default value is 192.168.0.10 for
Pocket, 192.168.0.20 for Power, 192.168.0.30 for Desktop).
Enter tcp port of the text communication protocol (default value is
8181).
HMI version : rc1.0v2.0.2
HMI user manual
Human-Machine Interface - Asyril SA
Operating Manual
© Copyright Asyril S.A.
Document version : v1.0
Robot configuration
Ftp user
Enter the ftp user to use to connect to the Robot ftp access (default
value is "hmi").
NOTE:
Ftp connection is used to transmit alarms, frames, points
and tools.
Ftp password
Enter the ftp password to use to connect to the Robot ftp access
(default value is "hmi").
NOTE:
Ftp connection is used to transmit alarms, frames, points
and tools.
Apply button
Click on this button to save the configuration of your Robot. You need then to restart
HMI to apply configuration changes.
NOTE:
A message in Information panel inform you to restart the HMI to apply
configuration changes.
HMI user manual
HMI version : rc1.0v2.0.2
39/90
Human-Machine Interface - Asyril SA
Operating Manual
© Copyright Asyril S.A.
Document version : v1.0
Process configuration
Process configuration
This panel appears when a Process is selected in one of the two lists and contains all parameters needed to
define a Process in the HMI.
Process name
Enter a name of the Process. This name is used for communication.
Process display name
Enter a display name of the Process. This name is used in all HMI displays
where this product is involve (e.g. in Products and options selection
menu).
Picture of the Process
This picture indicates that there are parameters for Process.
IP address
Text tcp port
40/90
Enter IP address of your Process (default value is 192.168.0.10 for
Pocket, 192.168.0.20 for Power, 192.168.0.30 for Desktop).
Enter tcp port of the text communication protocol (default value is
8181).
HMI version : rc1.0v2.0.2
HMI user manual
Human-Machine Interface - Asyril SA
Operating Manual
Process configuration
Ftp user
© Copyright Asyril S.A.
Document version : v1.0
Enter the ftp user to use to connect to the Process ftp access (default
value is "hmi").
NOTE:
Ftp connection is used to transmit recipes.
Ftp password
Enter the ftp password to use to connect to the Process ftp access
(default value is "hmi").
NOTE:
Ftp connection is used to transmit recipes.
Apply button
Click on this button to save the configuration of your Process. You need then to restart
HMI to apply configuration changes.
NOTE:
A message in Information panel inform you to restart the HMI to apply
configuration changes.
HMI user manual
HMI version : rc1.0v2.0.2
41/90
Human-Machine Interface - Asyril SA
Operating Manual
© Copyright Asyril S.A.
Document version : v1.0
User management
User management
The user management part of HMI allows to create, edit, delete user. Define various type of users with various roles
allows to give different access to operators, technician, maintenance technician, programmer, etc.
Default users and passwords are listed below:
User name
operator
Password
operator
Role
Operator
advoperator
technician
advtechnician
integrator
only Asyril S.A.
advoperator
technician
advtechnician
integrator
Advanced operator
Technician
Advanced technician
Integrator
Developer
User management : home
The home page of the user management allows to display and edit the logged user data.
User name
Real name
42/90
The login information actually in use is displayed here.
The name associated with the login informations enables the person logged in to be
identified easily.
HMI version : rc1.0v2.0.2
HMI user manual
Human-Machine Interface - Asyril SA
Operating Manual
Document version : v1.0
User management : home
Role
© Copyright Asyril S.A.
The role of the person logged in is displayed here.
NOTE:
For more information about roles and associated access rights, please read
the chapter "roles".
Advanced operator option
Checked if the advanced operator role is activated for the logged user.
Advanced technician option
Checked if the advanced trechnician role is activated for the logged user.
Current password
Enter the actual password of logged user.
NOTE:
This field enables password of logged user modification.
New password
Enter the new password of logged user.
Confirm new password
Confirm the new password of logged user.
User language
This dropdown list enables the user language to be chosen.
Save button
Click on this button to save your new password and language modification.
HMI user manual
HMI version : rc1.0v2.0.2
43/90
Human-Machine Interface - Asyril SA
Operating Manual
User management : manage users
© Copyright Asyril S.A.
Document version : v1.0
User management : manage users
This page allows to manage users on HMI.
User list
The list of all users declared and their login informations are displayed
here.
New user button
Click on this button to create a new user.
NOTE:
You can only create a user who has a hierarchical role below yours.
Edit user button
Click on this button to edit the login information, role or language of a user.
NOTE:
You can only modify the content of users who have a hierarchical role below
yours.
44/90
HMI version : rc1.0v2.0.2
HMI user manual
Human-Machine Interface - Asyril SA
Operating Manual
© Copyright Asyril S.A.
Document version : v1.0
User management : manage users
Remove user button
Click on this button to permanently remove a user selected in the list.
NOTE:
You can only remove a user who has a hierarchical role below yours.
HMI user manual
HMI version : rc1.0v2.0.2
45/90
Human-Machine Interface - Asyril SA
Operating Manual
© Copyright Asyril S.A.
Document version : v1.0
User management : edit panel
User management : edit panel
This panel appears on the bottom of the page when new user button or edit user button is clicked.
User name
Name
Choose or edit the login information for the user you wish to create or edit.
Choose a user name that enables you to easily identify the person logged in.
NOTE:
This "name" is not the login information used by the user, it simply enables
the person logged in to be identified.
Role
Choose the user's role.
NOTE:
For more information about roles and associated access rights, please read
the chapter "roles".
Advanced operator option
Choose advanced operator role.
NOTE:
This special role is enable only if operator role is selected.
NOTE:
For more information about roles and associated access rights, please
read the chapter "roles".
46/90
HMI version : rc1.0v2.0.2
HMI user manual
Human-Machine Interface - Asyril SA
Operating Manual
© Copyright Asyril S.A.
Document version : v1.0
User management : edit panel
Advanced technician option
Choose advanced technician role.
NOTE:
This special role is enable only if technician role is selected.
NOTE:
For more information about roles and associated access rights,
please read the chapter "roles".
Password
Enter the desired password.
Confirm password
Confirm the desired password.
User language
Select the user favorite language.
Save button
Click on the "Save" button to apply your modifications.
Close window button
Close the window without saving.
HMI user manual
HMI version : rc1.0v2.0.2
47/90
Human-Machine Interface - Asyril SA
Operating Manual
© Copyright Asyril S.A.
Document version : v1.0
Asycube
Asycube
This chapter describes pages related to Asycube.
Pages list
Home .................................................................................................................49
Easy tune ..........................................................................................................52
Platform .............................................................................................................56
Outputs ..............................................................................................................61
Reservoir ...........................................................................................................65
Backlight ............................................................................................................69
Process .............................................................................................................71
Scripting ............................................................................................................75
Console .............................................................................................................79
Configuration .....................................................................................................81
Controls disable
Some pages, tabs, buttons, textboxes, etc can be disable depending of the following parameters :
• AsyCube connection state (disable when not connected).
• Function is not possible for the moment (another function is processing)
• The level access is not correct to access to the parameter.
Controls not visible
Some pages, tabs, buttons, textboxes, etc can be not visible depending of the following parameters :
• The AsyCube type does not have this element.
• Option is not valid for your product (for example process tab is valid only with dll or vision system).
• The level access is not correct to access to the parameter.
48/90
HMI version : rc1.0v2.0.2
HMI user manual
Human-Machine Interface - Asyril SA
Operating Manual
© Copyright Asyril S.A.
Document version : v1.0
Home
Home
Home page gives access to all standard functions of Asycube (platform vibrations, reservoir vibrations or outputs
activation and backlight activation).
Forward
This button activates the platform batch A which has as standard configuration to move
parts forward.
Forward left
This button activates the platform batch B which has as standard configuration to move
parts forward left.
Forward right
This button activates the platform batch C which has as standard configuration to move
parts forward right.
HMI user manual
HMI version : rc1.0v2.0.2
49/90
Human-Machine Interface - Asyril SA
Operating Manual
© Copyright Asyril S.A.
Document version : v1.0
Home
Left
Right
This button activate the platform batch D which has as standard configuration to move
parts left.
This button activate the platform batch E which has as standard configuration to move
parts right.
Backward
This button activates the platform batch F which has as standard configuration to move
parts backward.
Backward left
This button activates the platform batch G which has as standard configuration to move
parts backward left.
Backward right
This button activates the platform batch H which has as standard configuration to move
parts backward right.
Flip
This button activates the platform batch I which has as standard configuration to flip parts.
Long axis centering
This button activates the platform batch J which has as standard configuration to move
parts centered in long axis.
NOTE:
This button is only visible for Asycube Largo_A5. For other Asycube types, batch
J is a user custom batch.
50/90
HMI version : rc1.0v2.0.2
HMI user manual
Human-Machine Interface - Asyril SA
Operating Manual
© Copyright Asyril S.A.
Document version : v1.0
Home
Short axis centering
This button activates the platform batch K which has as standard configuration to move
parts centered in short axis.
NOTE:
This button is only visible for Asycube Largo_A5. For other Asycube types, batch
K is a user custom batch.
Output 1 / Reservoir backward
For Asycube Largo_A5 :
This button activates the outputs batch A which has as standard configuration to
switch on digital output 1.
For other Asycube types :
This button activates the reservoir vibration batch A which has as standard
configuration to move parts forward.
Output 2 / reservoir forward
For Asycube Largo_A5 :
This button activates the outputs batch B which has as standard configuration to
switch on digital output 2.
For other Asycube types :
This button activates the reservoir vibration batch B which has as standard
configuration to move parts backward.
Switch backlight
This button switches the backlight ON and OFF.
NOTE:
This button is not visible when Asycube has no backlight (configuration in the
firmware of the Asycube which can be modified in Asycube configuration page).
Stop
This button stop all vibrations or output activations.
NOTE:
This button doesn't stop the backlight, use the switch backlight button to do that.
HMI user manual
HMI version : rc1.0v2.0.2
51/90
Human-Machine Interface - Asyril SA
Operating Manual
© Copyright Asyril S.A.
Document version : v1.0
Easy tune
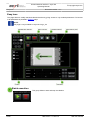
Easy tune
This page allows to modify standard vibration batches by giving access to only needed parameters. Full access
to all parameters is possible in Platform page.
NOTE:
This page is only available for Asycube Largo_A5.
Batch execution
52/90
This group allows to start and stop the vibration.
HMI version : rc1.0v2.0.2
HMI user manual
Human-Machine Interface - Asyril SA
Operating Manual
© Copyright Asyril S.A.
Document version : v1.0
Easy tune
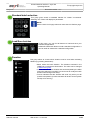
Standard batch selection
This group gives access to standard batches for "classic" movements.
Selecting one of them will display its parameters.
NOTE:
Select a batch in this page select the same batch in Platform page.
Load/Save batches
Duration
In this group, you can find all buttons to load and save your
batches configurations.
Default file load button allows to load a standard configuration. It
can be useful to restart with a standard configuration.
This group allows to choose which duration must be used when activating
vibration (by pressing start button) :
• Batch select the batch duration. The vibration executed in the
HOME tab correspond to this duration. The value can be changed
in Parameters group.
• Custom select a custom duration that can be adjusted by the slider
next to the selector (it's usefull if you don't want to modify the batch
duration when doing some tests).
• Forever indicates that the vibration will ends only when you will
press the stop button (or when actuators will be too hot and system
will stop it for security).
HMI user manual
HMI version : rc1.0v2.0.2
53/90
Human-Machine Interface - Asyril SA
Operating Manual
© Copyright Asyril S.A.
Document version : v1.0
Easy tune
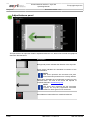
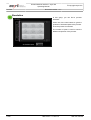
Adjust balance panel
This panel allows to adjust the vibration amplitude balances. In it, there is few controls and graphical
elements describe below:
Control
Description
Background picture indicates the direction of the Asycube.
Green arrow indicates the theoratical movement of the
selected batch.
NOTE:
This arrow represent the movement that parts
must have when parameters are correctly defined.
Black arrow indicates the programmed movement of the
selected batch. The size of the arrow will depend of
amplitude defined in Parameters group.
NOTE:
This arrow don't represent the real movement
of parts, but only the programmed movement
needed to obtain green arrow movement.
Clear balances button allows to reset both balances.
54/90
HMI version : rc1.0v2.0.2
HMI user manual
Human-Machine Interface - Asyril SA
Operating Manual
© Copyright Asyril S.A.
Document version : v1.0
Easy tune
Short side slider allows to adjust amplitude balance LeftRight.
NOTE:
The vibration amplitude defined in parameters
group will always be set to minimum one actuator.
Amplitude of other actuators will be decreased
depending of balances.
Long side slider allows to adjust amplitude balance
Forward-Backward.
NOTE:
The vibration amplitude defined in parameters
group will always be set to minimum one actuator.
Amplitude of other actuators will be decreased
depending of balances.
Parameters
This group allows to modify parameters :
Parameter Description
Amplitude value can be changed by using slider or +/- buttons. The amplitude
amplitude set will be automatically distributed to actuators depending of movement
selected and balances.
Frequency value can be changed by using slider or +/- buttons. The frequency
set will be automatically distributed to actuators depending of movement
selected.
frequency
NOTE:
The frequency is always the same for all actuators.
The "deploy to all" button allows to apply the frequency set to all
standard batches (except flip movement).
Duration value can be changed by using slider or +/- buttons.
duration
HMI user manual
NOTE:
The "deploy to all" button allows to apply the duration set to all standard
batches (except flip movement).
NOTE:
If a longer duration is needed, slide the value to maximum and press
the + button. Additionnal time is added to the maximum value.
Slide then in a lower value decrease the maximum value.
HMI version : rc1.0v2.0.2
55/90
Human-Machine Interface - Asyril SA
Operating Manual
© Copyright Asyril S.A.
Document version : v1.0
Platform
Platform
This page provides access to the platform batch parameters. There is 26 batches available, but 9 batches (for
AsyCube Mezzo, Forte, Fortissimo) or 11 batches (for AsyCube Largo_A5) have predefined functions. The goal
of this page is to adjust batches parameters and to try it using "play" button. In this window, you can also load
or save the batches parameters.
Standard batch selection
This group gives access to standard batches for "classic"
movements. Selecting one of them will display its parameters.
56/90
HMI version : rc1.0v2.0.2
HMI user manual
Human-Machine Interface - Asyril SA
Operating Manual
© Copyright Asyril S.A.
Document version : v1.0
Platform
Custom batch selection
This group gives access to batches which can be customized for
special vibrations. Selecting one of them will display its parameters.
frequencies lock option
Select this option will locked frequencies of all actuators. It is usefull
to modify all frequencies in the same time for a batch because usually
frequencies are the same for all actuators for a specific component.
Selected batch function name
This box displays the function name of the selected batch.
Batch execution
HMI user manual
This group allows to start and stop the vibration.
HMI version : rc1.0v2.0.2
57/90
Human-Machine Interface - Asyril SA
Operating Manual
© Copyright Asyril S.A.
Document version : v1.0
Platform
Load/Save batches
In this group, you can find all buttons to load and
save your batches configurations.
Default file load and save allow to load or
save a standard configuration (load to restart
with a standard configuration and save to be
able to override the manufacturer standard
configuration).
Copy/Paste
This group allows to copy a batch and paste it on another. The procedure is the
following :
1.
2.
3.
4.
Select the batch to copy on Standard or Custom batch selection group
Click on copy button
Select the batch that you want to replace
Click on past button.
IMPORTANT!
All values of the batch will be copied (amplitude, frequency, phase,
waveform for all actuators and duration).
Duration
This group allows to choose which duration must be used when activating vibration (by pressing
start button) and to modify these values :
• Batch select the batch duration and the value can be adjusted in the field or modified
by +/- buttons. The vibration executed in the HOME tab correspond to this duration.
• Custom select a custom duration that can be adjusted in the field or modified by
+/- buttons (it's usefull if you don't want to modify the batch duration when doing
some tests).
• Forever indicates that the vibration will ends only when you will press the stop button
(or when actuators will be to hot and system will stop it for security).
58/90
HMI version : rc1.0v2.0.2
HMI user manual
Human-Machine Interface - Asyril SA
Operating Manual
© Copyright Asyril S.A.
Document version : v1.0
Platform
Actuator 1
This group allows to parametrize one actuator (the first one in this case). There is one group for each
actuator of the Asycube.
Parameter Description
Level
Vibration amplitude of the actuator signal. The range value is from 0% to 100%.
amplitude Amplitude value can be changed by using +/- buttons by step of 1%.
The amplitude set will be automatically distributed to actuator.
Vibration frequency of the actuator signal. The range value is from 0Hz to 250Hz.
Frequency value can be changed by using +/- buttons.
The frequency set will be automatically distributed to actuator.
frequency
NOTE:
If Lock Frequencies option is selected, the frequency is applied to all
actuators.
phase
Vibration phase of the actuator signal. The range value is from 0° to 359°.
Phase value can be changed by using +/- buttons.
NOTE:
For Asycube Mezzo, Forte and Fortissimo, the third actuator has no
phase parameter, because it's the vertical actuator and disphase this
signal make no sens.
Vibration signal can have four different waveforms which can be selected with
these four buttons.
The signals can be (by order of appearance) : None signal, sinus signal, saw
waveform tooth up signal and saw tooth down signal.
NOTE:
Usual waveform is sinus signal. Waveform is setted to none when no
vibration is needed on this actuator.
HMI user manual
HMI version : rc1.0v2.0.2
59/90
Human-Machine Interface - Asyril SA
Operating Manual
© Copyright Asyril S.A.
Document version : v1.0
Platform
The icon represents:
• the position of the actuator for Largo_A5.
• the direction of the actuator for Mezzo, Forte and Fortissimo.
More details :
Icon
Description
For Largo_A5, the red point indicates the position of the actuator. The actuator vibrates
in vertical direction.
For Mezzo, Forte and Fortissimo, the arrow indicates the direction of horizontal
actuators movements with a phase of 0 degrees. With a phase of 180 degrees, the
movement is opposite to the arrow direction.
For Mezzo, Forte and Fortissimo, the circles indicate that the direction of the actuator
is vertical.
Actuator 2
See description of Actuator 1 group
Actuator 3
See description of Actuator 1 group
NOTE:
This actuator for Asycube Mezzo, Forte and Fortissimo is the vertical one and
doesn't need any phase parameter.
Actuator 4
See description of Actuator 1 group
NOTE:
This actuator exists only for Asycube Largo_A5.
60/90
HMI version : rc1.0v2.0.2
HMI user manual
Human-Machine Interface - Asyril SA
Operating Manual
© Copyright Asyril S.A.
Document version : v1.0
Outputs
Outputs
This page provides access to the outputs batch parameters. There is 26 batches available, but 2 batches have
predefined functions. The goal of this page is to adjust batches parameters and to try it using "play" button. In this
window, you can also load or save the batches parameters.
NOTE:
This page is only available for an Asycube Largo_A5.
Standard batch selection
This group gives access to standard batches for "classic" outputs
activation. Selecting one of them will display its parameters.
HMI user manual
HMI version : rc1.0v2.0.2
61/90
Human-Machine Interface - Asyril SA
Operating Manual
© Copyright Asyril S.A.
Document version : v1.0
Outputs
Custom batch selection
This group gives access to batches which can be customized for special
outputs activation. Selecting one of them will display its parameters.
Selected batch function name
This box displays the function name of the selected batch.
Batch execution
62/90
This group allows to start and stop the outputs depending of batch
parameters.
HMI version : rc1.0v2.0.2
HMI user manual
Human-Machine Interface - Asyril SA
Operating Manual
© Copyright Asyril S.A.
Document version : v1.0
Outputs
Load/Save batches
In this group, you can find all buttons to load and
save your batches configurations.
Default file load and save allow to load or save
a standard configuration (load to restart with a
standard configuration and save to be able to
override the manufacturer standard configuration).
Copy/Paste
This group allows to copy a batch and paste it on another. The procedure is the
following :
1.
2.
3.
4.
Select the batch to copy on Standard or Custom batch selection group
Click on copy button
Select the batch that you want to replace
Click on past button.
IMPORTANT!
All values of the batch will be copied (digital output 1, analog output 1, digital
output 2, analog output 2 and duration).
Duration
This group allows to choose which duration must be used when activating outputs (by pressing
start button) and to modify these values :
• Batch select the batch duration and the value can be adjusted in the field or modified
by +/- buttons.
• Custom select a custom duration that can be adjusted in the field or modified by
+/- buttons (it's usefull if you don't want to modify the batch duration when doing
some tests).
• Forever indicates that the outputs activation will ends only when you will press the
stop button.
Digital output 1
HMI user manual
This parameter allows to parametrize the
digital output 1. If this option is selected, the
output 1 will switch on when the batch is
activated.
HMI version : rc1.0v2.0.2
63/90
Human-Machine Interface - Asyril SA
Operating Manual
Document version : v1.0
Outputs
Analog output 1
Digital output 2
Analog output 2
64/90
© Copyright Asyril S.A.
Analog output 1 amplitude of the actuator
signal. The range value is from 0% to 100%
and correspond to 0 to 10V signal.
Amplitude value can be changed by using
+/- buttons by step of 1%.
This parameter allows to parametrize the
digital output 2. If this option is selected, the
output 2 will switch on when the batch is
activated.
Analog output 2 amplitude of the actuator
signal. The range value is from 0% to 100%
and correspond to 0 to 10V signal.
Amplitude value can be changed by using
+/- buttons by step of 1%.
HMI version : rc1.0v2.0.2
HMI user manual
Human-Machine Interface - Asyril SA
Operating Manual
© Copyright Asyril S.A.
Document version : v1.0
Reservoir
Reservoir
This page provides access to the reservoir batch parameters. There is 26 batches available, but 2 batches have
predefined functions. The goal of this page is to adjust batches parameters and to try it using "play" button. In this
window, you can also load or save the batches parameters.
NOTE:
This page is only available for an Asycube Mezzo or Forte.
Standard batch selection
This group gives access to standard batches for "classic" movements.
Selecting one of them will display its parameters.
HMI user manual
HMI version : rc1.0v2.0.2
65/90
Human-Machine Interface - Asyril SA
Operating Manual
© Copyright Asyril S.A.
Document version : v1.0
Reservoir
Custom batch selection
This group gives access to batches which can be customized for special
vibrations. Selecting one of them will display its parameters.
Selected batch function name
This box displays the function name of the selected batch.
Batch execution
66/90
This group allows to start and stop the vibration.
HMI version : rc1.0v2.0.2
HMI user manual
Human-Machine Interface - Asyril SA
Operating Manual
© Copyright Asyril S.A.
Document version : v1.0
Reservoir
Load/Save batches
In this group, you can find all buttons to load and
save your batches configurations.
Default file load and save allow to load or save
a standard configuration (load to restart with a
standard configuration and save to be able to
override the manufacturer standard configuration).
Copy/Paste
This group allows to copy a batch and paste it on another. The procedure is the
foloowing :
1.
2.
3.
4.
Select the batch to copy on Standard or Custom batch selection group
Click on copy button
Select the batch that you want to replace
Click on past button.
IMPORTANT!
All values of the batch will be copied (amplitude, frequency, waveform and
duration).
Duration
This group allows to choose which duration must be used when activating vibration (by pressing start
button) and to modify these values :
• Batch select the batch duration and the value can be adjusted in the field or modified by +/buttons.
• Custom select a custom duration that can be adjusted in the field or modified by +/- buttons
(it's usefull if you don't want to modify the batch duration when doing some tests).
• Forever indicates that the vibration will ends only when you will press the stop button (or
when actuator will be to hot and system will stop it for security).
HMI user manual
HMI version : rc1.0v2.0.2
67/90
Human-Machine Interface - Asyril SA
Operating Manual
© Copyright Asyril S.A.
Document version : v1.0
Reservoir
Actuator 1
This group allows to parametrize the reservoir actuator.
Parameter Description
Level
Vibration amplitude of the actuator signal. The range value is from 0% to
100%.
amplitude
Amplitude value can be changed by using +/- buttons by step of 1%.
The amplitude set will be automatically distributed to actuator.
Vibration frequency of the actuator signal. The range value is from 0Hz to
250Hz.
frequency
Frequency value can be changed by using +/- buttons.
The frequency setted will be automatically distributed to actuator.
Vibration signal can have four different waveforms which can be selected
with these four buttons.
The signals can be respecting order : None signal, sinus signal, saw tooth
waveform up signal and saw tooth down signal.
NOTE:
Usual waveforms are saw tooth up or down signals. Waveform is
set to none when no vibration is needed on this actuator.
68/90
HMI version : rc1.0v2.0.2
HMI user manual
Human-Machine Interface - Asyril SA
Operating Manual
© Copyright Asyril S.A.
Document version : v1.0
Backlight
Backlight
This page gives access to the backlight adjustment parameters (intensity and flash time). This page is visible only
if Asycube has a backlight defined in the configuration page.
Preview group
The preview group contains a display where you
can see the effect of the adjustment of backlight
parameters.
Light intensity group
HMI user manual
The light intensity group contains controls to
adjust intensity of backlight.
The value can be changed by using slider or
+/- buttons.
The range value is from 0% to 100% (on
Asycube Largo_A5, backlight switches on
from 20%).
The switch button allows to test the value
set.
HMI version : rc1.0v2.0.2
69/90
Human-Machine Interface - Asyril SA
Operating Manual
Backlight
Flash mode group
70/90
© Copyright Asyril S.A.
Document version : v1.0
The flash mode group contains controls to adjust
flash duration of backlight.
Flash duration value can be changed by using +/buttons.
The range value is from 0 to 10000ms.
HMI version : rc1.0v2.0.2
HMI user manual
Human-Machine Interface - Asyril SA
Operating Manual
© Copyright Asyril S.A.
Document version : v1.0
Process
Process
This page gives access to the process of the Asycube.
As described in the User Guide of the AsyCube, the process has 3 different parts (feeding, working and
recirculation). Each of these parts contains some sequences of vibrations. You can manage these 3 parts and
their sequences in this page and test them using the simulation part.
HMI user manual
HMI version : rc1.0v2.0.2
71/90
Human-Machine Interface - Asyril SA
Operating Manual
© Copyright Asyril S.A.
Document version : v1.0
Process
Manage process
In this group, you can manage your processes (load, save, default files and advanced mode).
Control
Description
Load button allows to load a *.fproc file.
Save button allows to save actual process to a *.fproc file.
Advanced mode allows to edit the feeding part of the process and
the recirculation part. See User Guide for more explanations.
Load default planar process button allow to load a standard process
for a planar plate.
Load default structured process button allow to load a standard
process for a structured plate.
Save default planar process button allow to save the actual process
as a standard process for a planar plate.
Save default structured process button allow to save the actual
process as a standard process for a structured plate.
Feeding
72/90
This section of the process configuration is used to modify the feeding sequences.
See User Guide for more explanations.
HMI version : rc1.0v2.0.2
HMI user manual
Human-Machine Interface - Asyril SA
Operating Manual
© Copyright Asyril S.A.
Document version : v1.0
Process
Working
This section of the process configuration is used to modify the working sequences. See User Guide
for more explanations.
Control
sequence
parts
synchronize
by
table of
vibrations
Description
Select the sequence by its number of parts (new value allows to add a new sequence).
The textbox allows to enter the parts number for the new sequence or to edit the
number of parts of the selected sequence.
The remove button allows to remove the selected sequence, this button becomes edit
button to modify number of parts of selected sequence and add button to add new
sequence.
Synchronize option activates the synchronization between reservoir and platform
sequences.
The vibrations in the table can be modified by double clicking on the parameter. By a
right click on a vibration, remove, add, move and delete vibration can be executed.
NOTE:
The feeding and the recirculation section on the process can be modified by the same way
than the working section.
Recirculation
HMI user manual
This section of the process configuration is used to modify the recirculation
sequences. See User Guide for more explanations.
HMI version : rc1.0v2.0.2
73/90
Human-Machine Interface - Asyril SA
Operating Manual
© Copyright Asyril S.A.
Document version : v1.0
Process
Simulation
In this group, you can find a process
simulator :
Press one of the nine buttons to give the
positions of simluated parts to the process.
Then the process is executed.
The number of parts is used to test the
different sequences of the process.
74/90
HMI version : rc1.0v2.0.2
HMI user manual
Human-Machine Interface - Asyril SA
Operating Manual
© Copyright Asyril S.A.
Document version : v1.0
Scripting
Scripting
This page gives access to the scripting test tool. This tool allows to program little sequencies of vibrations
and/or output activation and /or backlight activation/deactivation.
NOTE:
All this page can be used only with Advanced Technician or Integrator level access.
Common terms:
Term
add
insert
before/ after
replace
Description
Add a new script line signifies that the line is stacked at the end of the script.
Insert a script line before or after the selected line.
Replace a script line will remove the selected script line and place a new one in the same place.
save as bouton
This group allows to manage (load and save) your scripts files (*.asc).
HMI user manual
HMI version : rc1.0v2.0.2
75/90
Human-Machine Interface - Asyril SA
Operating Manual
© Copyright Asyril S.A.
Document version : v1.0
Scripting
Script group
This group allows to execute the script with many options, to display the script and to edit the content of the
script.
Control
Description
Play button allows to start the script.
Clear button allows to clear the complete script.
Loop script option allows to execute the script in loop.
When loop script is selected, the duration option can be activated.
If not, the duration is unlimited. Stop button (instead of start button)
allows to stop the script.
When loop script and duration options are selected, the duration
value can be entered in this field.
The script contains three columns:
• The first one is the line number.
• The second one is the explanation of the function.
• The third one is the command to send to the Asycube.
76/90
HMI version : rc1.0v2.0.2
HMI user manual
Human-Machine Interface - Asyril SA
Operating Manual
© Copyright Asyril S.A.
Document version : v1.0
Scripting
This button allows to delete the selected script line.
This button allows to move the selected line up.
This button allows to move the selected line down.
Platform motion
This group allows to add or insert a platform vibration motion, or replace the selected line with the platform
motion.
Outputs activation
This group allows to add or insert an output activation, or replace the selected line with the output activation.
NOTE:
This group is visible only with Asycube Largo_A5.
Reservoir motion
This group allows to add or insert a reservoir vibration motion, or replace the selected line with the reservoir
motion.
NOTE:
This group is visible only with Asycube Mezzo, Forte and Fortissimo.
Waiting option
This group allows to add or insert a waiting time, or replace the selected line with the waiting time.
HMI user manual
HMI version : rc1.0v2.0.2
77/90
Human-Machine Interface - Asyril SA
Operating Manual
Scripting
© Copyright Asyril S.A.
Document version : v1.0
Backlight option
This group allows to add or insert a backlight activation/deactivation, or replace the selected line with the
backlight activation/deactivation.
Custom command
This group allows to add a custom command, or edit the selected script line.
78/90
HMI version : rc1.0v2.0.2
HMI user manual
Human-Machine Interface - Asyril SA
Operating Manual
© Copyright Asyril S.A.
Document version : v1.0
Console
Console
This page gives access to the console mode. In this page, you can execute commands manually.
NOTE:
All this page can be used only with Integrator level access.
NOTE:
The commands are described in the User Guide of the each product.
HMI user manual
HMI version : rc1.0v2.0.2
79/90
Human-Machine Interface - Asyril SA
Operating Manual
© Copyright Asyril S.A.
Document version : v1.0
Console
Command mode
This group allows to select the command mode :
Mode
quick
mode
full
mode
Description
In this mode, user has to enter only the specific command (e.g. CA1000, RP300).
In this mode, user has to enter the complete command (e.g. {#01,CA1000},
{#01,RP300}).
Command line
Enter the command in this text box.
Executed commands can be bring back using arrow keys.
Action on command line
This group allows to select if command must be kept in the command line after execution. This option is usefull
to execute several times the same command.
Send to asycube button
This button allows to execute the command.
Clear responses display
This group allows to clear the responses display.
Responses display
80/90
This group displays the responses to the previous
commands.
HMI version : rc1.0v2.0.2
HMI user manual
Human-Machine Interface - Asyril SA
Operating Manual
Configuration
© Copyright Asyril S.A.
Document version : v1.0
Configuration
This page gives access to the configuration of the Asycube. All these parameters are saved in the Asycube
Firmware but in none of the configuration file on your computer.
Asycube type
Firmware version
HMI user manual
In this group, you can find the type of Asycube. The value is read in the
Asycube firmware.
In this group, you can find the firmware version.
HMI version : rc1.0v2.0.2
81/90
Human-Machine Interface - Asyril SA
Operating Manual
© Copyright Asyril S.A.
Document version : v1.0
Configuration
Life time
In this group, you can find some informations about life time of Asycube.
Info
Description
product
switched Indicates the time of activity of the Asycube (power on time).
on
Indicates the total vibration time of the Asycube platform.
vibration
duration
NOTE:
This value is visible only for Asycube Largo_A5.
Indicates the total number of vibration executed on the Asycube platform.
vibration
number
82/90
NOTE:
This value is visible only for Asycube Largo_A5.
HMI version : rc1.0v2.0.2
HMI user manual
Human-Machine Interface - Asyril SA
Operating Manual
© Copyright Asyril S.A.
Document version : v1.0
Configuration
Communication parameters
In this group, you can change IP address, subnet mask and tcpport of Asycube electronic.
Click on the button to apply the modifications.
NOTE:
This parameter is visible only for Asycube Largo_A5.
If Asycube is not in default parameters mode (switch 1 in OFF position) : the parameters are
applied in the firmware, the HMI will reconnect automatically and the configuration of HMI is
modified. The ethernet interface of the computer is not modified. Do it manually if needed (if
the new subnet is different than actual one).
If Asycube is in default parameters mode (switch 1 in ON position) : the parameters are applied
in the firmware but the HMI keep connected on default parameters and the configuration of
HMI is not modified. The ethernet interface configuration of the computer is not modified.
When you will restart the Asycube not in default parameters mode (switch 1 in OFF position),
you will have to configure the HMI and if needed to modify the ethernet interface configuration
of the computer.
See more explanations in Operating Manual of the Asycube.
Output 1 logic
In this group, you can select the logic of the digital output 1.
Icon
Description
Logic positive, the output change from 0V
to 24V when activated.
Logic negative, the output change from
24V to 0V when activated.
NOTE:
This parameter is visible only for Asycube Largo_A5.
HMI user manual
HMI version : rc1.0v2.0.2
83/90
Human-Machine Interface - Asyril SA
Operating Manual
Document version : v1.0
Configuration
Input 1 logic
© Copyright Asyril S.A.
In this group, you can select the logic of the digital input 1. This
parameter is visible only for Asycube Largo_A5.
Icon
Description
Logic positive, the input change from 0V
to 24V has to be detected.
Logic negative, the input change from
24V to 0V has to be detected.
When a signal on this input is detected, a message is displayed
on the alarm screen.
NOTE:
This parameter is visible only for Asycube Largo_A5.
Output 2 logic
In this group, you can select the logic of the digital output 2.
This parameter is visible only for Asycube Largo_A5.
Icon
Description
Logic positive, the output change from 0V
to 24V when activated.
Logic negative, the output change from
24V to 0V when activated.
NOTE:
This parameter is visible only for Asycube Largo_A5.
84/90
HMI version : rc1.0v2.0.2
HMI user manual
Human-Machine Interface - Asyril SA
Operating Manual
Document version : v1.0
Configuration
Input 2 logic
© Copyright Asyril S.A.
In this group, you can select the logic of the digital input 2. This
parameter is visible only for Asycube Largo_A5.
Icon
Description
Logic positive, the input change from 0V
to 24V has to be detected.
Logic negative, the input change from
24V to 0V has to be detected.
When a signal on this input is detected, a message is displayed
on the alarm screen.
NOTE:
This parameter is visible only for Asycube Largo_A5.
HMI user manual
HMI version : rc1.0v2.0.2
85/90
Human-Machine Interface - Asyril SA
Operating Manual
© Copyright Asyril S.A.
Document version : v1.0
Configuration
Backlight parameters
In this group, you can change parameters for backlight.
Parameter Description
Change this parameter allows to save in the firmware the backlight color used in
the Asycube. This value is used to auto adapt HMI display.
color
NOTE:
If none color is selected, switch buttons in many pages and backlight
page disappears.
This parameter allows to select the logic of the backlight synchronization input.
logic
timeout
NOTE:
Positive : 24V on input switch on the backlight.
Negative : 0V on input switch on the backlight.
This value is the timeout of the backlight. After this duration with backlight at 100%,
the backlight switch automatically off. With backlight at 50%, the timeout is the
double of the parameter value.
IMPORTANT!
The timeout of the backlight is used to protect the backlight against the
overheating. If the timeout is reached, don't restart it directly, let the
system cool down.
The system is not intended to be switched on permanently. Switch on
the backlight on only when picture is needed and switch it off directly
when picture is acquired.
This protection is disable (timeout set to 0) for Largo_A5 because
its backlight cannot be damaged in case of backlight switched on
permanently.
NOTE:
This parameter is only indicative and can only be modified by Asyril.
86/90
HMI version : rc1.0v2.0.2
HMI user manual
Human-Machine Interface - Asyril SA
Operating Manual
© Copyright Asyril S.A.
Document version : v1.0
Troubleshooting
Troubleshooting
Ref. Problem
1
HMI crashes on
starting
2
HMI starts but
no button are
displayed
HMI user manual
Solution
Try to start HMI with administrator access (right-click on shortcut, Properties/Compatibility,
select “Run this program as an administrator”).
The SurfaceToolKit is missing or improperly installed.
HMI version : rc1.0v2.0.2
87/90
Human-Machine Interface - Asyril SA
Operating Manual
© Copyright Asyril S.A.
Document version : v1.0
Technical support
Technical support
For a better service...
Before contacting us, please note down the following information concerning your product:
• Serial number and product key for your equipment
• Software version(s) used
• Error message, alarm, or visual signals displayed by the interface.
Contact
You can find extensive information on our website: www.asyril.ch
You can also contact our Customer Service department:
[email protected]
+41 26 653 7190
88/90
HMI version : rc1.0v2.0.2
HMI user manual
Human-Machine Interface - Asyril SA
Operating Manual
Document version : v1.0
Revision table
Revision table
Revision Date
Author Comment
1.0
14.11.2014 HsJ
Initial version
HMI user manual
© Copyright Asyril S.A.
HMI version : rc1.0v2.0.2
HMI version
rc1.0v2.0.2
89/90
Human-Machine Interface - Asyril SA
Operating Manual
Revision table
© Copyright Asyril S.A.
Document version : v1.0
This document is the property of Asyril S.A.; it may not be reproduced, modified or communicated,
in whole or in part, without our prior written authorisation. Asyril S.A. reserves the right to modify
any information contained in this document for reasons related to product improvements without
prior notice.
Asyril SA
Z.I. le Vivier
Ch-1690 Villaz-St-Pierre
Switzerland
Tel. +41 26 653 71 90
Fax +41 26 653 71 91
[email protected]
www.asyril.ch
90/90
HMI version : rc1.0v2.0.2
HMI user manual