1
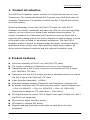
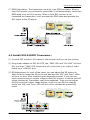
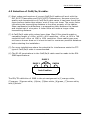
Cat-X DVI-D Expander DVI-E102T DVI-E102TR User Manual ◄ V1.0 ► www.green-box.com.tw www.data-av.com Cat-X DVI-D Expander Certifications FCC This equipment has been tested and found to comply with Part 15 of the FCC Rules. Operation is subject to the following two conditions: (1) This device may not cause harmful interference (2) This device must accept any interference received, including interference that may cause undesired operation. CE This equipment is in compliance with the requirements of the following regulations: EN 55022: CLASS B RoHS All contents of this package, including products, packing materials and documentation comply with RoHS. © 2008 by Green-Box Green-Box Technology Co. Ltd. reserves the right to make changes in the hardware, packaging, and any accompanying documentation without prior written notice. No part of this document may be reproduced or transmitted in any form or by any means, electronic, mechanical, photocopying, recording, or otherwise, without prior written permission of Green-Box Technology Co. Ltd. 2 / 10 Cat-X DVI-D Expander 1. Product introduction The Cat5 DVI-D Expander system consists of a Transmitter and one or more Transceivers. The system can extend DVI-D signals over Cat5/5e/6 cable. By cascading Transceivers it is possible to extend the DVI-D signals with almost unlimited capacity. By taking advantage of low-cost Cat5/5e/6 FTP cable, the Cat5 DVI-D Expander can simplify installation and save cost. With its unlimited cascading capacity you can extend your digital video displays almost anywhere. To simplify installation the Transmitter and Transceiver units are fitted with a magnetic pad enabling them to be quickly attached to metal surfaces. A screw fixing plate is also included for permanent installations. The Cat5 DVI-D Expander system is perfect for digital signage and public information display applications where crystal-clear, high-resolution digital video needs to be shown without distance limitations and with reduced installation costs. 2. Product Features Unlimited cascading of DVI-D over Cat5/5e/6 FTP cable The system consists of a Transmitter and one or more Transceiver Transmitter has a DVI-D local connection and extends the DVI-D signal over Cat5/5e/6 FTP cable Transceiver has one DVI-D output port and a cascading function to extend the DVI-D signal over Cat5/5e/6 FTP cable Video Amplifier Bandwidth: 1.65GHz Maximum distance between Transmitter and Transceiver is determined by display resolution and FTP cable type and quality. Typical distances are: < 80m. for 800x600, < 50m. for 1024x768, < 40m. for 1280x1024. (Distances are based on FTP cable skew < 15ns/100m). DVI Input/Output Connector: DVI-D digital video signal (Digital only. DVI-I and DVI-A not supported) EQ control to adjust the video quality LED status to indicate DVI activity Magnetic pad and attachable metal plate on each device for easy installation 3 / 10 Cat-X DVI-D Expander 3. Panel Descriptions Front Panel & Rear Panel DVI-E102T One Port Cat-X DVI-D Transmitter Video EQ Control DVI-E102TR One Port Cat-X DVI-D Transceiver Power Jack RJ-45 DVI Output EQ Indicator LED ON : Auto EQ LED Off : Manual Link Indicator of Local Monitor (MI) DVI Output for Local Monitor (MI) DVI Input (Use HDMI connector) RJ-45 DVI Input Link Indicator Power Indicator DVI-HDMI Cable for Player To DVI Player To HDMI Input of Transmitter 4 / 10 Cat-X DVI-D Expander 4. Installation and Operation 4.1 Install DVI-E102T Transmitter: (1) First Time Set-up: Turn off the DVI output device (PC or DVD Player) and monitors. (2) Device Connection: Connect local DVI monitor (M1) to the “DVI/M1 OUT” of the transmitter and take the DVI-HDMI cable, plug HDMI end to “INPUT” port of transmitter and the other end of the cable to PC/Player’s DVI-D video port. (3) Connect the power adaptor to the “5VDC” and plug into the power outlet. (4) System Turn On: Turn on your DVI output device and monitor to confirm the functionality of the display. The “M1 LINK” LED of the Transmitter should display orange to confirm the connection of a local DVI monitor. (5) Remote monitors: Make sure the remote monitor(s) to be connected to the DVI-E102TR Transceiver can display the broadcast video resolution. (6) EQ Adjustment: In most of the cases, you can adjust the EQ control to Auto mode by rotating the EQ control anticlockwise. The “EQ” and ”Auto” LEDs will display blue. If noise or an unstable image is seen on the local DVI monitor it indicates the DVI signal received by the Transmitter needs to be adjusted. Adjust the EQ control for best image display quality. The “EQ” and ”Auto” LEDs will turn off to indicate manual EQ mode. 5 / 10 Cat-X DVI-D Expander (7) EDID Simulation: The transmitter has built in an EDID simulator. When a local DVI monitor is connected to transmitter it will automatically record the EDID data from the DVI monitor. When a local DVI monitor is not connected the transmitter, it will simulate the EDID data and activate the DVI signal at the PC/player. 4.2 Install DVI-E102TR Transceiver: (1) Connect DVI monitor’s DVI cable to the receiver and turn on the monitor. (2) Plug power adaptor to DVI-E102TR, the “PWR” LED and “M1 LINK” will turn ON, the other “LINK” LED should turn off, since there is no input of video signal from “LINK IN” port. (3) EQ Adjustment: In most of the cases, you can adjust the EQ control to Auto mode by rotate the EQ to the left side and the “EQ” and ”Auto” LEDs will turn on blue. After connecting the expander system, if you can see some dynamic dots or unclear image on the DVI monitor, it reflects the DVI signal received by Transmitter need to be adjusted. Then you can adjust the EQ control for better image display, it will turn the EQ into manual mode, the “EQ” and ”Auto” LED will turn off to indicate the manual EQ mode. 6 / 10 Cat-X DVI-D Expander 4.3 Selection of Cat5/5e/6 cable: (1) Most makes and versions of current Cat5/5e/6 cables will work with the DVI-E102T Transmitter and DVI-E102TR Transceivers. However since the quality and characteristics of Cat5/5e/6 cable varies it has been found that some perform better than others, even if they cost lower. The major factor influencing the transmitting distance is the skew property of the cables. Skew represents the difference in propagation delay between the fastest and slowest set of wire pairs. A lower skew will mean a longer video transmitting distance. (2) A Cat5/5e/6 cable with a skew lower than 15ns/100m should enable a cascading length of <80m. at 800 x 600 resolution, <50m. at 1024 x 768 resolution and <40m. at 1280 x 1024 resolution. Some cable types may not have a known skew so it is best to test for maximum practical distances before starting the installation. (3) For some installations where the potential for interference exists the FTP type of Cat5/5e/6 cable is recommended. (4) The RJ-45 terminations to the Cat5/5e/6 cable must be made to the EIA 568B specifications. PAIR 3 PAIR 2 PAIR1 PAIR4 Jack Position The EIA/TIA definition of 568B in the pin assignment is (1)orange white, (2)orange, (3)green white, (4)blue, (5)blue white, (6)green, (7)brown white, and (8)brown. 7 / 10 Cat-X DVI-D Expander (5) Connecting the Cat5/5e/6 cable: Plug one end of the cable to the Transmitter's “LINK IN/OUT” port and the other end to the Transceiver's RJ-45 “LINK IN/OUT” port. The monitor connected to the Transceiver should now display and the “LINK” LED should turn green to indicate the DVI signal activation. Adjust the “EQ” control for best quality DVI display. 4.4 Extending Audio Signals: The DVI-E102T Transmitter and DVI-E102TR Transceiver are not able to extend audio signals. Use a pair of Databay DVS-AR Audio Extenders with 4-wire phone cable and RJ-11 connectors to extend the audio. 4.5 Install More Transceivers and Displays: (1) Using additional DVI-E102TR Transceivers and Cat5/5e/6 cable it is possible to extend the system almost indefinitely to remote DVI-D displays. For a large group of cascaded Transceivers, please ensure common grounding is maintained to minimize ground-loops and interference. (2) A DVI-D splitter or distribution amplifier may be used at each DVI-D output to drive additional local DVI-D displays. 8 / 10 Cat-X DVI-D Expander 5. Specifications Model Name Model No. Input One Port Cat-X DVI-D Expander Transmitter DVI-E102T One Port Cat-X DVI-D Expander Transceiver DVI-E102TR Use one DVI-HDMI cable to connect player RJ-45 x 1 Output DVI Female x 1 RJ-45 x 1 Max Distance and Resolution <80m. at 800x600 resolution, <50m. at 1024x768 resolution and <40m. at 1280x1024 resolution. (Above distances are based on cable skew <15ns/100m) Video Control EQ x 1 Signal Type DVI-D Power Consumption DC 5V, 2A Housing Metal Dimension (LxWxH) Compact Size, 62x113x29 mm 6. Order Information Order Details Part Number Remark One Port DVI-D Transmitter DVI-E102T DVI-HDMI Cable x 1 One Port DVI-D Transceiver DVI-E102TR Power Adaptor DC5V, 2A x 1 Power Adaptor DC5V, 2A x 1 9 / 10 Cat-X DVI-D Expander 7. Remarks I. Please read this operation manual carefully before installing the system. II. Please use high quality DVI cable for optimum results. III. To prevent potential power damage do not use 2-wire extension cords. Ensure DC outlets at PCs and displays are on the same phase and have correct and common grounding. IV. Limited Warranty: (1) In no events shall the vendor’s liability for direct or indirect, special, incidental or consequential damages, loss of profit, loss of business, or financial loss which hay be caused by the use of the product exceeds the price paid for the product. (2) The vendor makes no warranty or representation, expressed or implied with respect to the contents or use of this documentation, and especially disclaims its quality, performance, merchantability, or fitness for any particular purpose. (3) The vendor also reserves the right to revise or update the product or documentation without obligation to notify any user of such revisions or updates. For further information please contact your vendor. 8. Notice 1. All other company or product names mentioned herein are trademarks or registered trademarks of their respective companies. 2. Specifications are subject to change without notice. 3. Please read user manual carefully before operating the device 4. Please use the power adaptor accompanied with this product. Warranty does not cover for damages caused by pairing other power adaptor 5. Please check all connecting devices are properly grounded to avoid electric failure 6. This product has limited warranty for one year from defects in material and workmanship. Items that are physically damaged, misused, tempered with or altered are void of warranty. For further details please contact your distributor. In case warranty sticker is damaged or missing, warranty is void. For further details please contact your distributor. P/N: CDDMEPDCM100A0 10 / 10