1
University of Aberdeen
Computing Science Department
2008
MS Information Systems Group Project
The A-Team
Pizzeria Web Application
Supervisor:
Dr. Bruce Scharlau
Group members:
Afolabi Akinrimisi
Edward Dobson
Ishaku Jilemsam
Adetoun Osuntuyi
Craig Stewart
Kristina Tamosauskaite
Godfrey Maclayton
1
Acknowledgments
The MS Information Systems group wants to thank to our supervisor, Dr. Bruce Scharlau, for
his help in the duration of this project.
2
Executive summary
Our Information Systems group, The A-Team, was set the task of building a pizza ordering
system. This system had to have a web interface for customers and a web interface for staff,
both built using Java. Both of these had to be tied to a MySQL or MS Access database, also
created by the group.
The system had to include:
-
a customer-side interface to allow customers to order pizzas by choosing a base,
toppings, and any extras such as a soft drink or other side dishes as they desire
-
a staff-side interface to allow staff to see orders placed, and let them add, edit, or
delete bases, toppings and extras.
The following report will explain how the system was built, describing any problems we
encountered along the way and how we solved these problems in the six weeks we had to
create the system.
Each phase of the creation of the system will be outlined, covering the planning stage, the
analysis stage, the design stage, the implementation stage and the post-implementation stage.
3
Table of Contents
Acknowledgments ............................................................................................... 1
Executive Summary ............................................................................................. 2
Table of Contents ................................................................................................. 3
1. Introduction ............................................................................................... 5
1.1 Project summary ................................................................................. 5
1.2 Team summary ................................................................................... 5
2. Project Management .................................................................................. 6
2.1 Scope and Scope Creep....................................................................... 6
2.2 Project Lifecycle ................................................................................. 7
2.3 Creating Project Schedules ............................................................... 10
2.3.1 Gantt Charts .......................................................................... 10
2.3.2 Project Documentation .......................................................... 11
2.4 Project Review ................................................................................. 13
3. System analysis ....................................................................................... 14
3.1 Contextual Enquiry ........................................................................... 14
4. Requirements Analysis ............................................................................ 19
4.1 Functional and Non-functional Requirements ................................... 19
4.2 Feasibility Analysis .......................................................................... 21
4.3 Risk Analysis.................................................................................... 21
5. System Design ......................................................................................... 23
5.1 Overview .......................................................................................... 23
5.2 Prototyping ....................................................................................... 24
5.3 Information Architecture .................................................................. 34
5.4 MVC model...................................................................................... 35
5.5 Design Issues .................................................................................... 37
6. Coding ..................................................................................................... 38
7. Project Implementation ............................................................................ 44
8. Testing .................................................................................................... 47
8.1 Cognitive walkthrough....................................................................... 47
8.2 Heuristic Evaluation........................................................................... 47
9. Learning and Skills Development ............................................................ 48
10. Conclusions ............................................................................................ 50
10.1 Requirements fulfilment ................................................................. 50
10.2 Limitations to the Project ................................................................ 52
10.3 Future Development ....................................................................... 52
Bibliography ...................................................................................................... 54
Appendices
Appendix 1 – User manual ................................................................................. 56
- Front-end................................................................................................ 58
- Back-End ............................................................................................... 63
Appendix 2 – Agenda and Minutes .................................................................... 69
- Example agenda ..................................................................................... 69
- Example minutes .................................................................................... 70
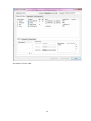
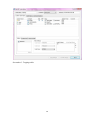
Appendix 3 – Database Screenshots ................................................................... 72
4
1. Introduction
1.1 Project summary
The overall goal of this project was to develop a system that would provide a simple, userfriendly interface for both online customers who wish to buy home-delivered pizza and staff
of the pizza delivery service. It was decided that the best framework for this system was Java,
utilising Eclipse and Tomcat as well as MySQL to house the database.
1.2 Team summary
There was much multi-tasking on this project which led to overlap of team members between
tasks. Each team member was allocated a specific task which s/he was responsible for. Other
members had to join them in order to achieve the required results and to gain experience in all
the fields of the project. As a result each member had an opportunity to gain organizational
skills as well as group work skills. As a general overview these tasks were allocated to the
following team members:
-
Afolabi Akinrimisi: Prototyping task leader, risks analysis, coding
-
Edward Dobson: Team leader, coding task leader
-
Ishaku Jilemsam: System design task leader, prototyping, project management, coding
-
Adetoun Osuntuyi: System analysis task leader, testing, prototyping, coding
-
Craig Stewart: Documentation task leader, database design, coding
-
Kristina Tamosauskaite: Database design task leader, requirements analysis, coding
-
Godfrey Maclayton : Database design
5
2. Project Management
It is becoming increasingly important for IT professionals to master project management
skills. Judging the number of failed IT projects which put tremendous strains on business is
becoming an imperative. Needless to say that many IT projects fail because of poor project
management. A successfully managed project will increase efficiency and productivity, which
means increased profits, return on investment and increased customer service satisfaction.
This project gave members of the team a chance to practice as well as apply skills and
processes to activities in order to meet deadlines and achieve desired results. The task had a
start and end date, and it was required to produce a specific deliverable or end product. Each
task had to be accomplished during the course of the project with the resources available.
2.1 Scope and Scope Creep
The project began by setting realistic objectives and establishing the scope of the tasks to be
completed as well as the ultimate goal of the project along with the tasks required to achieve.
This means all the work required to research, install software, study new material and build
the two interfaces (customer and staff) of a web application. The scope was kept in check to
avoid gradual increases that can undermine the success of the project. Changes usually occur
in small increments and therefore might seem negligible. However these small increases add
up leading to a scope creep which will eventually undermine or compromise the success of
the project.
6
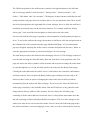
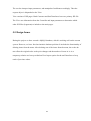
2. 2 Project Lifecycle
The life cycle constitutes the five project management phases.
Planning phase
During the planning phase, it was decided that we would use Agile Web Development
method because it focuses on the development of the web application which is necessary to
achieve desired results in a short period of time. Furthermore, the need to build the system
and all the tasks required to achieve the goals were identified. The people who would perform
the various tasks and the resources required were also allocated. The tasks dependent on each
other were identified and the time required to complete them was drawn. The entire team met
and agreed on the project plan tasks that were assigned. The team leader was responsible for
satisfying the disparate priorities of the team members to meet project goals and constraints.
Analysis phase
This set the foundation for the project. The project scope, project goals and tasks required
were defined by the supervising tutor. The team then proceeded to conduct a requirements
analysis, determining project objectives, assumptions and constraints and finally developing a
plan on how to proceed. The requirements analysis helped to identify the goals of the project
as well as the problems or requirements that the project must resolve. These were then
translated into requirements. The team realised that the success of the project depended so
much on how closely the objectives were met. The project deliverables were listed, deadlines
for final and intermediate tasks were drawn, quality criteria for the deliverables and the need
for all stakeholders to understand and agree to the project objective. A major constraint which
was recognised quite early in the project was the team’s inexperience in developing enterprise
projects and creating java beans. The three major constraints (time, resources and scope) were
pointed out clearly right at the beginning of the project.
To overcome the constraints, a statement of work was produced in which all the resources
were required to install and learn new software, complete practical projects individually to
7
enhance their understanding of enterprise development. The tasks included installation of
Tomcat to developing servlets and JSPs and connecting to a database that uses MS Access or
MySQL.
Design phase
Full project execution started somewhat around the third week of the project and the progress
was monitored by the supervising tutor. This phase focused on how the system will work. The
designers’ main preoccupation was to review the requirements specification for completeness
and to assure technical consistency and quality of the product. In the course of the project,
different options were considered and the best option which complied with the standard and
requirement of the end product as selected. Decisions about hardware and software impacted
on the final outcome to make the product technically, economically and operationally viable.
Corrective actions were taken as necessary and as suggested. Tasks were delegated and
reassigned and conflicts resolved. During this phase, disruptions were detected and corrective
measures taken, as well as troubleshooting problems, updating team members about project
status and driving the project forward.
Implementation phase
The team met regularly to monitor the objectives as to whether they are being met and to
work towards delivering the system. The team focused on evaluating the flexibility and the
reusability of software components as well as predicting system performance. The system was
developed in small iterations which resulted in prototypes. After each iteration the actual data
was compared with what was agreed during the planning stage and measures were taken to
correct anomalies. Thus adjustments were made as necessary. Status reports were sent to
members of the team to keep everyone apprised. So if a code that would solve a particular
problem was written by a member of the team, this would be mailed to everyone.
Since project team members were forwarding plans and status reports to others within the
team, it is expected that each team member would have a different reaction to project plan
8
modifications leading to conflict of interest. Conclusions were always reached by agreement
and there was no occasion on which the team leader had to veto a proposed change. Thus,
based on recommendations the project plan was occasionally adjusted without losing sight of
the project’s ultimate goal.
Post implementation phase
During the final days of the team’s work together, the project was evaluated to determine the
aspects of the project that worked well and the changes that should be implemented in the
future. The team focused on deployment, operation and maintenance of the system. The
project was considered as success because it was completed within the time frame specified
and the finished product met quality standards.
Hopefully the team would receive a formal acceptance of the project deliverable from the
supervising tutor and further recommendations after the project presentation and
demonstration of the functionality of the system.
Figure 1: Project life cycle
Source: CS5944 Systems Analysis notes (Lecture 2, Systems Development)
9
2. 3 Creating Project Schedules
Although experience is the best way to become a project manager, there is software available
to help with the details of project management. We have used Microsoft Project Manager
software which enabled us to schedule project start date, project calendar, necessary tasks and
their durations and project resources. Whatever changes were made, the software would
recalculate the finish dates and adjust the calendar.
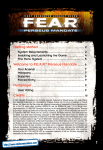
2.3.1 Gantt Charts
The team used project management software which contains Gantt charts to graphically
display project tasks and durations. Each task is represented by a bar with dates in increment
of days and weeks displayed at the top. The task duration is represented by the length of the
horizontal bar and the left end of the taskbar marks the start date, the right end marks the
completion date. Some tasks were performed concurrently, some overlapped and some ran
sequentially.
10
Figure 2: Gantt chart of the project schedule
2.3.2 Project Documentation
The team was able to identify the tasks that are most important and the tasks that can be
delayed without affecting the completion of other tasks or the overall project. Being aware of
critical tasks such as the installation of Tomcat, the team made adjustments to ensure that the
project is completed on time. Tasks were documented to provide a paper trail and minutes of
meetings kept records of the teams’ activities about who did what and the dates they started
and completed them. This made the tracking of progress easier, problems were solved as they
occurred and necessary adjustments were made. Documentation also promoted team member
accountability and it enabled the stakeholders to monitor various stages of the project.
11
As mentioned earlier, every member of the team had to submit a log which documented
achievements and problems that needed the coordinator’s attention. Issues that arose during
the course of the project that required authoritative decisions in order for the team to complete
tasks and keep the project on track were addressed. The log also served as a backup
documentation and members could use it to write their individual reports. The team met
regularly to discuss progress and to respond to project issues and unanticipated developments.
Variations were identified and addressed proactively responding to potential deviations to
avoid crisis. The team meetings also presented the opportunity to present new ideas to
improve workflow, solve problems, inform team members of project status and make
decisions.
Figure 3: Using software to monitor project progress
12
2. 4 Project Review
Scheduled meetings provided an excellent way to manage project scope creep. Regular
meetings to review and discuss progress helped to manage changes and eliminate those that
are not crucial to the success of the project. The review also provided the opportunity for
testing the product deliverable, evaluate its performance and document lessons learned. The
lessons learnt and the results of test and evaluation will be discussed in the following
chapters.
13
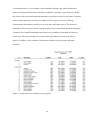
3. System Analysis
In designing this system, a study was carried out on similar systems that already exist in the
current market in order to determine their features, navigation and functionalities. This was
necessary because most of the likely users of our system would have used other similar
systems. To get a true representation of the systems in use, the group agreed to use Contextual
inquiry for this purpose.
What is more, the group also thought it was important to know other functionalities that the
users would like to be added to a pizza ordering system. To do this we have brainstormed the
features of the system that would probably appeal to the user.
Thus, this analysis was a key for determining functionalities required, which would help to, if
possible, create a system that was more efficient and user friendly than similar systems.
3. 1 Contextual Enquiry
In carrying out the contextual inquiry, the group wanted to:
-
Determine major features of other pizza systems.
-
Detect both strengths and weaknesses in existing similar systems.
-
Determine what users are likely used to. This is essential for ease of use.
-
Give a rough idea of how the system is going to be designed and what labelling
schemes should be used for navigation.
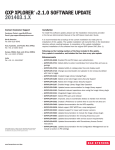
For this reason the two popular systems (Pizza Hut and Domino’s Pizza) were chosen to be
studied.
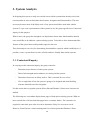
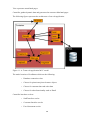
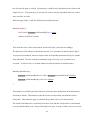
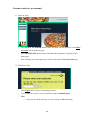
The following two screenshots display home pages of both pizza ordering systems. What we
have noticed first of all was that both pages have a common feature. The customers are
required to enter their post codes in order to determine if they live in an area served.
However, Pizza Hut has a clearer naming and view of this option than Domino’s Pizza.
14
Figure 4. Pizza Hut home page.
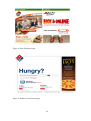
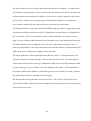
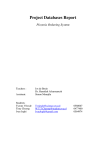
Figure 5. Domino’s Pizza home page.
15
What is more, both systems have the log in option in the home page, and register option is
displayed only in Domino’s Pizza home page.
This has suggested to us that we should also include post code verification as well as log in
options to our system to be.
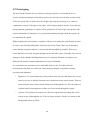
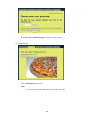
Figure 6. Shopping basket page of a customer interface at pizza hut.
The screenshot above is the shopping cart of a customer who has created a pizza but has not
ordered it yet.
16
After we have studied this page we have pinpointed few features which are the following.
This particular page is not very user friendly because of a lack of some features. The user
might change his/her mind and in order to change the base or size of the pizza but there is no
option given for this. This means that the customer has to remove the present pizza and start
building the new one from scratch again. Some of the customers might find this irritating.
However, this interface does have some good features which we have opted for as well. There
is an option to add another pizza besides already created ones and a customer can order drinks
or sides without having to go to a different page.
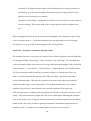
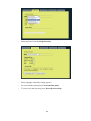
The screenshot of Domino’s Pizza shopping basket page provided below is the shopping
basket of a customer who wants to change a thing or two with the pizza s/he is about to order.
After having analyzed it we have distinguished the following features.
This interface is slightly better than that of Pizza Hut but it still has some problems.
For example, the letters “S” and “D” might not be understood by some customers. Even
though there is a key on the side which states what these letters mean, it is not very visible
and some customers may not see it.
Furthermore, some of the text on clickable buttons weren’t clear enough. For example, the
button “Back to pizzas” naming is ambiguous which might be misinterpreted by the customer
and lead to errors.
17
Figure 7. Shopping basket page of a customer interface at Domino’s Pizza.
Overall, the inquiry gave an idea of some important features on pizza ordering systems which
were used in the design of our pizza ordering system. It also exposed some of the flaws of
already existing systems which helped us to avoid the same mistakes.
18
4. Requirements Analysis
Because of short timeline we have chosen to use agile web development method over the
others. It focuses on developing a web application quickly in iterations rather than step by
step progress. As a result this kind of method produces less documentation as other methods
would do.
Thus, having analysed the basic requirements provided by the client we have written the
following requirements specification. However, due to time constraints of the project and the
development method chosen we have not used UML diagrams to describe the system to be.
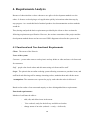
4.1 Functional and Non-functional Requirements
Client: The owner of the Pizzeria
Users of the system:
Customer – person who wants to order pizza/s and any drinks or sides and uses web front-end
for customers.
Staff – people who check orders and edit menu using web front-end for staff.
Scope: The pizzeria has an online ordering system allowing customers to purchase items, and
staff back-end allowing staff to manage incoming orders, maintain them and edit the menu.
Assumptions: The customers are expected to pay by cash when the order is delivered.
Based on the results of our contextual enquiry we have distinguished these requirements:
Functional requirements:
Member of staff must be able to:
-
add, edit, and delete items in the menu.
-
View ordered, ready for the delivery and delivered orders.
-
change status of an order (ordered -> ready -> delivered).
19
-
View items ordered in a particular order.
-
see the customer’s address for the delivery.
Customer must be able to:
- Register, login and logout of the system.
- Check the area served by entering the post code.
- Choose any base, toppings and extras (drinks and sides) and add them to an
order.
- Delete the items chosen.
Non-functional requirements:
Execution qualities (security and usability):
-
The registration system provided for the users of the customer web front-end
should include the functionality of Forgotten Password which would be sent
to the user’s valid email account.
-
Registration, log in and log out facilities should be implemented using secure
medium.
-
The system should be memorable and easy to use.
-
The orders must contain all the relevant information (order ID, order status,
date, total price, address, items in the order and their prices)
-
The error messages should be clear and should guide to the following step.
Evolution qualities (maintainability, extensibility and quality of service):
-
The system should work on the most popular browsers such as IE, Firefox,
Opera and operating systems such as Microsoft Windows, Linux and Mac OS.
-
The system should be flexible and easy to maintain (considering further
expansion of the web application and growing number of customers).
-
The system should respond within a period of 2 seconds.
20
-
The updates should be done in real-time and visible for the users of the system
immediately after update.
4.2 Feasibility Analysis
In order to determine the viability of our project we have considered the following feasibility
analyses:
Technical feasibility
We have analysed how familiar we are with the technology and how we can use it in the most
efficient and effective way. We have determined how much time it will take to get used to
new technologies and how many people would be needed to fully achieve the desired results.
What we have found out is that, even though we were new to the technologies used it was
achievable to complete the project in time without any delays. We have determined the time
necessary to learn all the functionality of technologies used and carefully planned all the
aspects of the project.
Economic feasibility
We have identified the costs and benefits of the project and came to the decision that it is
economically viable to start this project. The software chosen for the development was free
and considering the maintenance of the web application, the client would need to pay only for
web hosting, database server and annual maintenance fees.
4.3 Risk Analysis
We considered the following risks that may arise in the project in order to try to pre-empt
their occurrence and offer appropriate solutions:
Team Risks
-
Absence of team members for various reasons
21
-
Inexperienced project team
-
Time constraint in terms of the duration given to complete the project
-
Lack of knowledge on project topic
-
Scope Creep
Client/User
-
Frequent change of staff / customer requirements
-
Attempting to please the different types of users
Application
-
New problem domain / technology
-
Complexity in the project problem
Expected Consequences
-
Difficulties due to new domain / technology
-
Late delivery of the system
-
Misunderstanding amongst team members
Careful planning of the project helped us to avoid the possible consequences in case of any of
the above mentioned risks.
22
5. System Design
5.1 Overview
“Design is a process of envisioning a solution to a problem under
constraints, and the representations of the product that are produced
during the design process”.1
Design is a critical intermediate step between a statement of requirements and the
construction of a solution. It produces a description of the solution and allows the behaviour
of proposed solutions to be evaluated and compared.
The goal of the design phase was to provide a credible blueprint for implementation which
satisfies both functional and non-functional requirements, as well as to ensure clear
communication to programmers and other stakeholders.
The team focussed on the three main aspects of design: Prototyping, Information Architecture
and Design Patterns.
A Prototype is a working model of look and functionality of envisaged product, it’s a model
suitable for the evaluation of design performance and product potential.
Information Architecture refers to organising content and designing navigation systems to
help users find the information they need.
The team then decided to use the Model View Controller Design Pattern. This decision
defines how the entire system is to be laid out in subdirectories and which parts deal with data
transfers, coding and the staff and customer interfaces.
1
J. Preece et al, "Interaction Design", Wiley 2002. Chapter 11.
http://www.csd.abdn.ac.uk/~jmasthof/teaching/CS5541/lectures/
23
5.2 Prototyping
The need for the creation of a user interface prototype cannot be overestimated. It’s an
iterative analytical technique which allows users to be actively involved in the creation of the
UI for the system. This is achieved by the design team using the prototype as a vehicle to
communicate various UI designs to the public. Also being an analysis artefact, it provides the
design team the opportunity to explore various problems at an early stage in the project with
various stakeholders. Furthermore it is a potential foundation through which the system can
be continually developed.
While designing the user interface, a number of factors were taken into consideration in order
to create a user friendly and dynamic system for the client. Firstly, there was an attempt to
ensure that the navigation scheme is as clear and understandable as possible. This was to
ensure that users can easily navigate through our site and order pizzas. Secondly, there was an
attempt to ensure that the labelling scheme used is consistent. Platform conventions were
followed and words in content and buttons were used consistently.
It’s essential for the customer to feel comfortable with our site. To achieve this, the
development team made use of the four visual design principles of repetition, contrast,
proximity and alignment.
-
Repetition: It’s essential that users always know where they are and where they can go
when on our site, to aid this elements were repeated across the whole system. This was
achieved by the same colour scheme being used all through the site. We also made use
of global and local navigation to aid the user’s movement through the system.
-
Contrast: The principle of contrast was effectively applied when deciding the colour
scheme to use all through the site. The text-colour is black, which is in contrast to the
background-colour of yellow.
24
-
Proximity: The global navigation links on the left hand side are in close proximity to
one another, so are the local navigation links at the top of each page which are also
placed in close proximity to one another.
-
Alignment: The principle of alignment was effectively used in order to create cohesion
on each webpage. The content at the centre of the page have all been aligned to the
left.
When designing the prototype the development team thought it was important to have a logo,
so we created the name A – Team Pizza situated at the top right hand corner of each page.
Our logo also serves as a link to the homepage of the web application.
Front End – Prospective customers ordering a pizza
The customer interface of our pizza site consists of the Global Navigation to the left hand side
of each page labelled: “Home Page”, “Place An Order” and “Staff Page”. We also made use
of local navigation which are present on every page other than the homepage, and are labelled
“Enter Postcode”, “Create Pizzas”, “Choose Extras”, “Address Details” and “Finalize Order”.
The first action that would be made by a customer would be to click the link “Place An
Order” on the left hand side navigation or the “Place An Order” hyperlink on the centre
screen of the homepage. This takes the customer to the next screen where they would be
required to either login or enter the postcode. If a returning customer the user would be
required to log-in, but if a new customer they would be required to Enter postcode.
If the customer enters a valid postcode (beginning with AB) they may then proceed to “create
pizzas”. If the postcode doesn’t begin with AB, a note would appear indicating the customer
is not in our delivery area. If login is clicked the customer would be transferred to the address
details section. Here they would be required to enter their email address and password if a
returning visitor, or complete an extended number of forms if a new customer.
25
For returning visitors, if a valid email address and password is entered, they may proceed to
“create pizzas”. If a valid email address but an incorrect password is entered, a “Forgotten
Password” option would appear. In other to get a password reminder, the link “Get Password
Reminder” needs to be clicked. When the “send password reminder” link is clicked, the user’s
password would be generated from the systems memory and the customer may then proceed
to “create pizzas”. If the email address or both the email and password are wrong, the
customer would be redirected to the “please register your details” section. Letters making up
an email address are case insensitive.
For new customers, if all the forms are completed they may then proceed to “create pizzas” by
pressing the “Register” button. Once a valid email address is entered into its field a password
reminder would be offered. If any field is left empty, an error message indicating that the
particular field cannot be left empty would appear. At the “create pizzas” section the customer
would need to click the “add a pizza” button, at this section at least one pizza order needs to
be placed. This takes the customer to the next page where they are required to add a base and
topping/s. A base must be selected from the drop-down box, without which the customer
would be unable to proceed to the next step.
Toppings can be selected by ticking the squares, without a topping being ticked the customer
would be unable to proceed to the next step. Multiple pizzas can be created by clicking the
button “Create another pizza” and can be viewed towards the right hand side of the “create
pizzas” page. If the customer has more than one pizza in the order they can edit or delete the
pizza by clicking the respective links “Edit Pizza”, or “Delete Pizza”. Once the pizza is
created to the customer’s satisfaction he may click the “proceed to next step” button. This
takes the customer to the next page where he could choose extras. Extras can be added by
clicking the “Increase Quantity” button and removed by clicking the “Decrease Quantity”
button. The price of the extras and total price of the order are listed just below the Extras
table.
26
The customer may then proceed to the next step where they are required to login or register if
not already done so. Once successfully logged in or registered the customer may then proceed
to checkout, at this point the delivery address of the customer would appear on the page. The
customer then proceeds to the Finalize Order section where they could add pizza, edit pizza or
delete pizza as well as edit or delete extras. This can all be done by the customer pressing the
appropriate buttons
Once the customer is satisfied with the order he may then click the “confirm order” button at
the bottom right hand corner of the “Finalize order” page. This then takes the customer to a
page showing a confirmation of the customer’s order.
As the design phase was an iterative process, improvements to the user interface were
continual leading to various additions and subtractions to the system.
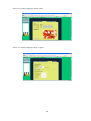
This is a sample prototype of the expected flow of events for the customer interface of our
pizza site taking the user from start to finish with the system. The prototype consists of 6
screens.
Screen 1: Welcome Home Page, Customer clicks on Place an Order
27
Screen 2: Customer required to enter postcode
Screen 3: Customer required to create pizza
28
Screen 4: Customer required to choose extras
Screen 5: Customer required to login / register
29
Screen 6: Customer finalize the order
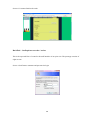
Back End – Staff updates an order / orders
This is the expected flow of events for the staff interface of our pizza site. The prototype consists of
eight screens.
Screen 1: Staff enters username and password to login
30
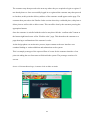
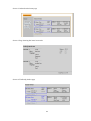
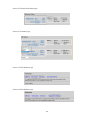
Screen 2: Ordered orders home page
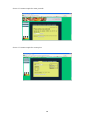
Screen 3: Page showing the items in an order
Screen 4: The Ready Orders page
31
Screen 5: The Delivered Orders page
Screen 6: All Orders page
Screen 7: The Edit Menu page
Screen 8: The Edit Menu page
32
The Global navigation for the staff interface consists of navigation buttons to the left hand
side of each page labelled “Ordered orders”, “Ready orders”, “Delivered orders”, “All
Orders”, “Edit Menu” and “Get Accounts”. Clicking any of these buttons would take the staff
to that particular web page where he would be able to view any particular order. There would
also be local navigation at the right hand side of each webpage, this is to allow the staff move
around the system and carry out the necessary functions. For example within the “Ready
orders page”, there would be local navigation to items such as the order table.
Access to the staff interface page is granted to relevant members of staff granted privileges to
do so. To access the staff interface page, the member of staff has to click the navigation tab on
the left hand side of the customer interface page labelled Staff Page. A User authorisation
pop-up will appear requiring the staff to enter a username and password (Screen 1), failure to
enter the appropriate username or password would give an error message.
The staff then proceeds to the Ordered orders homepage (Screen 2). This webpage consists of
an order table showing the OrderID, Status, Date and Total Price of any particular order. The
page also shows the delivery address of the customer and an option to change the order status
to ready through the use of a tab, this then transfers the order onto the Ready Orders page.
Clicking the order table takes the staff to screen 3 which shows the customers email address
and items ordered. Screen 4 shows the Ready Orders page consisting of items ready to be
delivered, there is also an option of changing the status of the order to delivered which
automatically lists the order in the delivered page. The next screen 5 shows the Delivered
Orders page, listed here is the OrderID, Status, Date and Total Price of any particular order
along with the delivery address of the customer. Screen 6 shows the All Orders page
consisting of all the orders that have been made, there is a drop-down menu under the order
link tab consisting of Ordered, Ready and Delivered options. This is to allow changes to the
status of an order in case an error has been made. Screen 7 shows the Edit menu page where
the staff can edit bases, extras and toppings, create a base, as well as add and delete items by
33
pressing the corresponding button “Create Topping”, “Create Base”, or “Create Extra”. To
edit menu the staff is required to select one of the 3 options (Edit Bases, Edit Extras, Edit
Toppings). The staff may also clear the database by clicking this link “Clear Database”
(Screen 8). To avoid corrupting the existing orders the staff is required to Backup and clear
the orders in the database before deleting products. This is done by the staff clicking the link
labelled “Get Accounts” located at the left hand side of the page, and pressing ok in the
following pop-up. To return to the customer interface the staff has to click the customer
interface tab at the top left hand corner of the webpage.
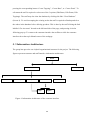
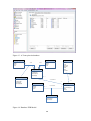
5. 3 Information Architecture
The group has agreed to use a hybrid organisational structure for the project. The following
figures represent customer and staff interface information architecture.
Home
Place an order
Choose extra
Create pizza
Enter postcode
Staff page
Address details
Login
Finalize order
Register
Figure 9. Information Architecture of the customer interface
34
Figure 10: Information Architecture for the staff interface
Schemes
The pizza ordering system is designed using inexact organisational scheme.
Navigation
In choosing labelling schemes for the navigation, careful analysis was carried out on
similar systems so that labels will be familiar to users. Effort was also made to make
labels easy to understand.
An active navigation is highlighted with a different colour from an inactive one. This will
prevent customers from being lost or not having an idea of where they are on the site.
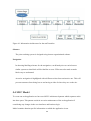
5.4 MVC Model
To create our web application we have used MVC architectural pattern which separates tasks
into three parts. This pattern results in an easier maintenance of the web application if
considering any changes in the user interfaces and business logic.
Model contains domain-specific information on which the application is run.
35
View represents actual html pages
Controller gathers dynamic data and generates the content within html pages.
The following figure represents the architecture of our web application.
Figure 11. A- Team web application MVC model
The model consists of JavaBeans which are the following:
– Database connection class
– Classes for pizza/extra/pizza element objects
– Classes for customer data and order data
– Classes for other functionality such as Email
Controller has three servlets:
– Staff Interface servlet
– Customer Interface servlet
– Excel document servlet
36
The servlets interpret input parameters, and manipulate JavaBeans accordingly. Then the
request object is dispatched to the View.
View consists of JSP pages. Both Customer and Staff interfaces have one primary JSP file.
The View uses information from the Controller and input parameters to determine which
other JSP files (fragments) to include to the main pages.
5.5 Design Issues
During the project we have created a MySQL database, which is working well on the current
system. However, we have faced an intrinsic database problem. It includes the functionality of
deleting items from the menu. After deleting one of the items from the menu, the orders do
not reflect the original order as the price changes and the number of items in it. As a
temporary solution we have provided an Excel report option for the staff interface to keep
track of previous orders.
37
6. Coding
The major part of this project was the coding.
The team faced rather a steep learning curve, as initially we had not heard of servlets or JSP.
After familiarising ourselves with these concepts by reading the book “Head First Servlets
and JSPs” we then set about installing the appropriate software on our computers. It took
rather a long time to successfully install and integrate the MySQL, Apache Tomcat and
Eclipse programs. When this had been achieved, we built a very basic servlet and jsp web
application, which demonstrated that we were able to produce a program that
Ran within the Tomcat container
Had a web interface
Could read and write to the MySQL database.
Further reading of the “head first” book gradually introduced us to new concepts, such as the
MVC model, and entity language. We quickly realised that the true potential of the EL
system could be unleashed if we re-factored our project to implement JavaBeans.
Separating our entities into beans seemed like a lot of hassle at the time, but as the project
progressed and became more complicated, we realised we had saved ourselves a lot of effort
in the long run. We created the bean classes initially to reflect the tables in our database but
we also created a bean to handle the database connectivity.
The architecture of our bean classes was such that each bean (except at the lowest level)
contained other beans. The “Order” class is the top-level bean, and this contains a
“Customer”, some “Pizzas” and “Extras”. The “Pizza” class contains a “Base” and many
38
“Toppings. The Base, Topping and Extra classes are all extensions of the abstract “Element”
superclass. We arranged things in this way, as these classes had many common methods and
attributes
Using the bean system meant that our jsp files could be free of scriptlets. This is considered
beneficial (according to the “Head First” book), as it enables web developers who are nonjava programmers to manipulate the jsp files without having to deal with the java element of
the coding.
The beans also allow direct access to the bean attributes with the syntax ${bean.attribute}.
We found this particularly helpful. However, it soon became clear that where the attribute of
a bean was a collection of objects, another method was necessary in order to access the
individual elements.
At this point, we started using the Java Standard Tag Library. The two tags that we used the
most were the <c:forEach> tag – allowing iteration over a collection, and the <c:choose> and
<c:if> tags. Using these tags we were able to provide a dynamic and interactive customer
interface, where the presented content is tailored to the situation at any given time.
To receive input from the user, we decided that on most occasions, we only need two pieces
of information, namely the action to be performed, and the data that applies to that action. An
example of this is deleting a pizza from an order. In this case, the action would be “delete
pizza”, and the data would be the ID number of the pizza to be deleted. To implement this,
we created JavaScript functions for each action. Some of these functions would take an
argument that would become the data.
In the body of our jsp file, we have placed a form element with hidden attributes. This form is
not visible to the user, but its elements are updated by the JavaScript functions, and then the
form is submitted. This is the method by which the servlet gets most of its information from
the user. There are a couple of cases where this action/data model does not apply, for instance
when the user inputs his address details. In this situation a different form is used, with many
39
different parameters. However this form also submits a hidden “action” field, so the servlet
knows which function to call and therefore how to
process the information it is receiving.
The customer interface servlet looks for the “action” request parameter, and if it finds it,
converts it to an enum element. Assuming this is successful, this enum is used to decide what
action the servlet should take. The servlet then contacts the appropriate JavaBeans for the
action in question, and performs the appropriate activities.
After performing the action-specific tasks, the request and response objects are passed to the
main jsp file. This jsp uses the “focus” parameter to determine which section of the website
to display.
The servlet creates a session if one does not already exist. This session is used to contain
information about the order being made and persists over many request/response cycles. We
implemented url encoding, so in the event of a user disabling cookies, the site will still
function correctly. The session is also used to store the logged-in status of a user.
A minor niggle with the site turned out to be quite a tricky problem to solve. Namely that
when the user clicks a link on the site, for example one of the supplementary navigational tags
at the top of the yellow box area, the page reloads and consequently, the page would scroll
right to the top (as this is the default position). This was an undesirable characteristic of the
site, and we had to find a way to explicitly control the y-scrolling position.
Our solution is a three-part solution. The first stage was to include another line in our
invisible form:
<input type="hidden" id="pos" name="pos" value="0${param.pos}"></input>
This line creates a parameter “pos”, and its value is set to be the existing “pos” parameter.
The zero precedes the reference to this parameter, as in the event that no parameter is set (e.g.
40
the first time the page is visited) ${param.pos} would be null, and therefore the value would
simply be zero. If ${param.pos} is not null, the value is merely prepended with zero, which
does not affect its value.
When the page loads, it calls the following JavaScript function:
function setPos(){
var Yscroll=document.getElementById('pos').value;
window.scrollTo(0,Yscroll);
}
This reads the value of the form element, and scrolls in the y direction accordingly.
The third part of the solution is the bit that sets the “pos” parameter in the first (last?) place.
As previously mentioned, most user input results in action/data parameters being set, and the
form submitted. We now needed a penultimate stage, where the “pos” parameter was
recorded. To achieve this, we created another JavaScript function as detailed below:
function submitForm(){
document.getElementById('pos').value=document.documentElement.scrollTop;
document.getElementById('updatecart').submit();
}
This function is called by the other functions, when they have updated the form information,
and want to submit. This function reads the current scroll position, and edits the form to
reflect this. Then when the page is reloaded, the position can be set to this position.
The result could almost be overlooked, but it does work and the scroll position is maintained
over the submit/reload cycle. Some efforts had to be done in order to find a way to access the
41
scroll variable that was compliant with both Firefox and Internet Explorer, but we eventually
found a suitable candidate, which was
document.documentElement.scrollTop;
Another problem that we had which took longer than anticipated to solve was the local
navigation (at the top of the yellow area of the page). The first problem was that not all of the
text of these little tabs was the same length. Therefore we wanted the tabs to be generated at
the appropriate size automatically. Initially we tried to resize an image of the tab background
for each tab. This was not an ideal solution, as it stretched the borders in an undesirable way,
and it was also impossible to implement the resizing of a background image in a table cell.
Therefore we would have had to use a normal foreground image (<img src=”the tab
background”>) and then manipulate the z-axis.
We did however come up with a more elegant solution. We divided the tab image into three
sections; the left and right edge sections, and a small sliver of the central section. In this way
we were able to have three <td> elements for every tab, with the central element repeating its
background. In this way we were able to have variable size tabs.
Our gif images were then adjusted to have transparent backgrounds, as we realised this was
cosmetically necessary.
To implement these navigational elements in a clear and simple way, we created a custom tag
file, called “tab.tag”. This allowed us to use the following syntax in our jsp files
<myTags:tab tabText="Enter Postcode"/>
42
The tag file sets the text of the tab to that supplied by the tabText attribute. It compares this
text with the request parameter “focus”, and uses this information to decide if it has the focus
at that particular time and therefore whether to use the active (yellow) images or the inactive
(grey) images. In this way the jsp developer is isolated from having to worry about the
active/inactive status of the tab, and merely has to insert the line shown above.
The customer interface servlet uses SSL and HTTPS for the part of the web page where login
information and address details are entered. Normally this security feature is configured via
the web.xml file. However as the same servlet is used for both the secure and non-secure
parts, we have configured the redirection to and from the secure parts manually in the servlet.
The staff interface servlet is designed in the same way as the customer interface, but it is
much less complicated. It uses the same beans as the customer interface, and has methods for
staff actions such as adding new toppings, extras and bases.
The major difference is that it implements basic HTML security. It prompts the user for a
username and password when the page is first accessed by the browser. One other special
feature of the staff interface servlet/jsp combination is that it has a JavaScript function which
refreshes the page every 30 seconds ( if you are looking at the orders). This means that if a
new order is added to the database, it will show up on the screen within 30 seconds, without
the staff-member having to manually refresh the page.
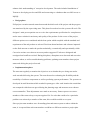
The third servlet in the application is the Excel servlet. This creates a report of all of the
orders in the database, and also provides a summary of how many items of each topping, base
and extra have been sold.
43
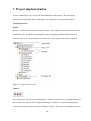
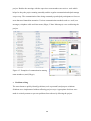
7. Project implementation
Various technologies were used in the implementation of this project. The subsequent
sections will explain how these technologies were deployed to develop the interfaces.
Technologies used:
Eclipse
We have used the latest Ganymede Eclipse version. This software was chosen because of its
capabilities to be extended by installing necessary development toolkits and because it is
relatively easy to use. It provided to us a better view of our project and easier navigation.
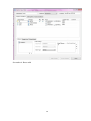
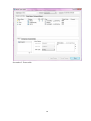
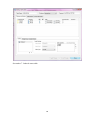
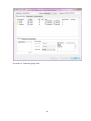
Figure 12. Eclipse Project view
Tomcat
As a requirement, the project was developed on Apache Tomcat server, an implementation of
the Java Servlets and Java Server Pages technologies. Tomcat is an open and participatory
environment released under the Apache Software License. The project team had the choice to
44
download the 5.5 or 6.0 version. This would be the container or platform for developing and
deploying the web application and web service. The team got Apache Tomcat to serve
requests using the https protocol.
Java
Java programming language made it easier for the team to work from different locations since
it could run on any hardware/operating-system platform: Microsoft Windows, Linux or
Solaris. This environment enabled portable server-side applications, such as Web services,
servlets, and Enterprise JavaBeans. Java Servlets provided the Web development team with a
simple, consistent mechanism for extending the functionality of the Web server and for
accessing the business system. Servlets are server-side Java EE components that generate
responses (typically HTML pages) to requests (typically HTTP requests) from clients. Java
Server Pages (JSPs) on the other hand are server-side Java EE components that generate
responses, typically HTML pages, to HTTP requests from clients. JSPs embed Java code in
an HTML page by using the special delimiters <% and %>. A JSP is compiled to a Java
servlet.
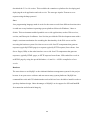
Database
The team chose to use MySQL as the relational database management system for the project
because it an open source software and can run on many system platforms. MySQL has
command line tools and GUI administration tools which we have decided to install in order to
speed up database design. Other advantages of MySQL are its support for SSL and InnoDB
for transaction and referential integrity.
45
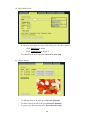
Figure 13. A-Team pizzeria database
bases
toppings
ID{PK}
name
price
1 ..*
< has
has >
1
1
1
customer
ID{PK}
Email
password
HouseNo
Street
Town
Postcode
ID {PK}
name
price
pizzas
PizzaID {PK}
OrderID {FK}
BaseID{FK}
1
makes >
1 .. *
orderedtopings
< consists of
OrderID {PK}
PizzaID {PK}
ToppingID{PK}
1
extras
ID {PK}
name
price
1 .. *
orders
< consists of
1 .. *
orderedextras
OrderID {PK}
ExtraID {PK}
Figure 14. Database EER Model
46
1
orderID {PK}
customerID {FK}
date
status
8. Testing
Several tests were carried out to evaluate the system for both the customer and staff interface.
8.1 Cognitive walkthrough
This method was used to evaluate the system from a user’s point of view by stepping through
tasks and detecting where users might have problems.
Customer interface
The system was evaluated to be efficient, straight forward and easy to use. Evaluators also
liked the fact that the pages weren’t cluttered which can sometimes confuse users.
Staff interface
Overall, the system was evaluated to be efficient, labels used on navigations were clear and
easily understood, the system was fast and the pages were not too cluttered.
The major problem detected is that there is no option to search for a particular order using its
unique order number. It was suggested that a search box should be included in the interface.
This was noted by the team and will be included in future developments as it is not a major
requirement of our client.
8.2 Heuristic Evaluation
This is another method used to evaluate the usability of the system.
It was evaluated that users will not be confused with the label names used for navigation,
error messages were easily understood and found the system to be consistent with its layout.
Overall the system was evaluated as good, easy to use and efficient.
47
9. Learning and Skills Development
Every member of the team would be taking away with them some software project
management skills. Working on the project has given members of the team the chance to
develop strong planning, organisational, communication and problem solving skills.
Planning
Team members learnt to identify tasks that constituted the project, understand ways in which
tasks are dependent upon one another and know ways that project dependencies will affect the
project as a whole. Another important aspect of planning the team members have learnt was
how to interact with project stakeholders and this includes the project manager, project team
members, sponsors and of course the customers. Stakeholders usually have an interest in a
project and the power to exert influence in a positive or negative manner over the project.
Organisation
The project was an opportunity to work with disparate people. One of the key achievements
of the project was the chance to bring people together to work towards a single purpose and
goal. Boundaries were broken and individual skills level was developed in order to
accomplish the goal. It was evident that team members took ownership of the project judging
by the commitment to the completion of the task. The project plan was pursued methodically
and all the resources were encouraged to begin and complete tasks at the proper time and also
manage a variety of tasks simultaneously. Members learnt to prioritise their tasks to stay
within the project scope. To achieve this, the organisational structure for reporting the project
was clearly defined as well as the roles and responsibilities of each team member.
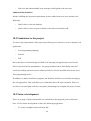
Communication
Project team members have learnt to evaluate and communicate project data effectively. Team
members were required to hand in weekly report of team and individual activities to the
supervising tutor. Regular meetings with the supervisor kept informed of the progress of the
48
project. Besides the meetings with the supervisor team members met twice a week which
helped to keep the project running smoothly and the regular communication helped manage
scope creep. The communication lines being constantly open helped participants to focus on
areas that need immediate attention. Various communication methods such as e-mail, text
messages, telephone calls and chat rooms (Skype, Yahoo Messenger) were used during the
project.
Figure 15. Examples of communication among
team members (email, Skype)
Problem solving
The team learnt to quickly identify problems (real or potential) and propose solutions.
Solutions were implemented without affecting project scope. Appropriate decisions were
made in a timely manner to prevent problems from adversely affecting the project.
49
10. Conclusions
MS Information Systems group had a task to create a pizza ordering web application which
has customer front-end and staff back-end. The team started the project by creating a project
plan and distributing the work load among the team members by allocating specific tasks to
each member. Because of careful planning the team dealt with the time constraint
successfully.
The Agile development methodology was chosen because of the project scope and short
timeline. The project was done in small iterations and incriminations. Initially we
brainstormed the requirements and created an early requirements specification which helped
to track the tasks necessary. This early stage resulted in a prototype which was created in
order to assess if the requirements were met and to notice problems, if any, in an early stage.
Although during the project some additional requirements were added, we have managed to
avoid scope creep and left few requirements to consider for future development. The web
application was tested using Cognitive walkthrough, Heuristic evaluation, and HTML
validation. Both interfaces were accepted by the users positively and the web application itself
conforms to the html standards as it is a valid html. The system is secure and usable.
Overall project was successful and the team managed to deliver the anticipated outcome.
10.1 Requirements Fulfilment
Most of the initial requirements were achieved as well as the ones which were added in the
progress of the development.
Functional requirements
Staff: The requirements for the staff interface have been achieved.
A member of staff is able to:
50
-
Add and delete items in the menu. However, edit requirement was not met fully. It is
possible to do this considering the following flow of events. A person has to delete the
particular item that need to be updated and then add a new one.
-
View all orders and orders grouped by their status.
-
Change status of an order (Ordered ->Ready->Delivered).
-
Correct order status in case of any mistakes.
-
View items in a particular order and the address for delivery.
Customer: The requirements for the customer interface have been fully achieved.
A customer is able to:
-
Log in, log out and register. The registration form is validated and if any errors occur
the customer is notified about it.
-
Check if s/he lives in the area served by entering the post code.
-
Create a pizza by choosing any base and topping and add any extras to an order.
-
Delete and edit pizzas and extras in the order.
Non-Functional Requirements
All the usability, operational and security requirements were met. The web application has
intuitive interfaces which are memorable and easy to use. Only relevant information is listed.
The system:
-
Responds in a period of 2 seconds (however it might differ if using slow internet
connection or an old machine).
-
works on the most popular Internet browsers(IE, Firefox, Opera) and Operating
systems(Mac OS, Linux, Microsoft Windows: XP, Vista)
-
Is using SSL for customer interface and BASIC security for staff interface.
-
Has Forgotten Password functionality which was added due to the growing client
requirements.
-
Provides real-time database updates.
51
-
Has clear and understandable error messages which guide to the next step.
Additional functionalities
Besides fulfilling the requested requirements we have added some new ones which are the
following:
-
Staff is able to clear the database
-
Staff is able to create a report of all the orders ordered and items sold.
10.2 Limitations to the project
To achieve the requirements of the project the following were chosen to create a dynamic web
application:
-
Java programming language
-
Servlets
-
JSP
Due to the lack of the knowledge and skills in developing web applications as well as the
lack of experienced Java programmers, the group members had to individually learn and
search for teaching materials such as online tutorials for Servlets and JSPs and various level
Java programming books.
In addition, we had to install new programs and facilities which were used while developing
the web application. This could have been a limitation due to the time constraint. However,
we stick to our work plan (with few exceptions) and managed to complete the project in time.
10.3 Future development
There are a range of improvements that we could make to the program, given a little more
time. For the future development we have the following suggestions:
-
To create a straight forward edit item link.
52
-
The reports for keeping orders documented could be generated in few formats.
-
Option for printing the report.
-
Option for sending the report to the email.
-
Email confirmation for the customer of an order placed and items ordered.
-
Link for the post codes in the area.
-
Automatic street and town suggestions after entering post code and house number
during registration.
-
Search option of a particular order in customer interface by an order ID.
-
Database improvements.
-
To include a feature to disable a particular item, rather than simply have the option to
remove it from the database. This would be beneficial for two reasons as we could
temporarily remove items and reinstate them (for example when the stock has run
out).
-
To include automatic stock checking and quantity updating, which would be a useful
feature.
All in all, the system is flexible to certain extent considering the growth of the number of the
customers and further development of the web application.
53
Bibliography
1. A. Dennis, B.H. Wixom, D. Tegarden, Systems analysis and Design with UML
Version 2.0, second edition, Wiley, 2005
2. Brett McLaughlin, Building Java Enterprise Applications (Volume 1), O’Reilly, 2002
3. Bryan Basham, Kathy Sierra, Bert Bates, Head First Servlets and JSP, O’Reilly, 2004
4. Comninos D., The Practice of Project Management, Kogan Page Ltd 2006
5. Geoff Reis, Project Management Demystified Third edition Spon Press 2007
6. Gosling J., Joy B., Steele G., & Bracha G., The Java language specification, third
edition. Addison-Wesley, 2005.
7. Hugh E. Williams, D. Lane, Web Database applications with PHP and MySQL,
second edition, O’Reilly, 2004
8. Sid Kemp, Project Management Demystified McGraw Hill 2004
Online sources:
Wikipedia (2008)
Agile web development - http://en.wikipedia.org/wiki/Agile_web_development
[Accessed 26/07/08]
Agile Software development - http://en.wikipedia.org/wiki/Agile_software_development
[Accessed 26/07/08]
Systems design - http://en.wikipedia.org/wiki/Systems_design
[Accessed 28/08/08]
Requirements - http://en.wikipedia.org/wiki/Requirements
[Accessed 30/08/08]
Functional Requirements - http://en.wikipedia.org/wiki/Functional_requirements
[Accessed 31/08/08]
Non-functional Requirements - http://en.wikipedia.org/wiki/Non-functional_requirements
54
[Accessed31/08/08]
Google (2008)
Bredemyer consulting pdf document http://www.bredemeyer.com/pdf_files/NonFunctReq.PDF
[Accessed 02/09/09]
55
Appendix 1 – User manual
Table of Contents
Home page ............................................................................................... 57
1. Navigation ................................................................................. 57
2. A-Team logo .............................................................................. 57
Staff interface user manual..................................................................... 58
1. Entering the staff interface ......................................................... 58
2. Layout of a web page ................................................................. 58
3. Navigating staff interface ........................................................... 58
4. Ordered Orders .......................................................................... 59
5. Ready Orders ............................................................................. 59
6. Delivered Orders ....................................................................... 60
7. Items in an order ........................................................................ 60
8. All Orders .................................................................................. 60
9. Edit Menu.................................................................................. 61
10. Clear Database ......................................................................... 62
11. Generate Report ....................................................................... 62
12. Change Status .......................................................................... 62
Customer interface user manual ............................................................ 63
1. Place an order............................................................................ 63
2. Enter Post Code......................................................................... 63
3. Create Pizzas ............................................................................. 64
4. Edit/Delete Pizza ....................................................................... 66
5. Choose Extras ........................................................................... 66
6. Registration/Login..................................................................... 67
7. Finalize Order ........................................................................... 68
56
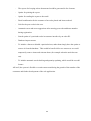
Home page
1. Navigation
The main navigation is on the left hand side. It has 3 buttons:
-
HOME PAGE – press to return to the home page.
-
PLACE AN ORDER – press to make an order.
-
STAFF PAGE – press to go to staff interface
2. The A-Team logo
-
Press logo to go to the home page of the web application.
57
Staff interface user manual
1. Entering the staff interface
-
Press STAFF PAGE button in the home page left hand side navigation.
Note: User authorisation pop-up will appear
o Enter username and password into the provided fields
o Press OK button to enter staff interface
o Press Cancel to quit logging in
2. Layout of a web page
-
Navigation is on the left hand side
-
Orders and their addresses are listed on the right hand side
3. Navigating staff interface
Left hand side navigation:
58
-
To go to customer interface press Customer Interface
-
To view ordered orders press Ordered Orders
-
To view ready orders press Ready Orders
-
To view delivered orders press Delivered Orders
-
To view all orders press All Orders
-
To edit menu press Edit Menu
-
To get accounts press Get Accounts
4. Ordered Orders
-
To view items ordered in a particular order click an order table
-
To change status of an ordered order to Ready press Change to Ready
5. Ready Orders
-
To view items ordered in a particular order click an order table
-
To change status of a ready order to Delivered press Change to Delivered
59
-
The delivery address is listed next to the order on the right hand side
6. Delivered Orders
-
To view items ordered in a particular order click an order table
-
The delivery address is listed next to the order on the right hand side
7. Items in an order
-
Click an order table to see ordered items (see above 4, 5, or 6)
-
In the items page you will see:
Customer email in the top of the page
Pizzas ordered(base and toppings)
Drinks and sides
8. All Orders
60
-
To view items ordered in a particular order click an order table
-
To change status of an order select one of the 3 provided options in the drop-down
box
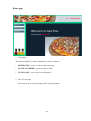
9. Edit menu
-
To edit menu select one of the 3 options (Edit Bases, Edit Extras, Edit
Toppings)
-
To add a new item
enter the name and price in pence
61
press a corresponding button Create Topping, Create Base, or Create
Extra
-
To delete an item press delete item
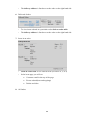
10. Clear Database
-
Press Clear Database link
-
Press OK to confirm your choice
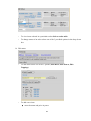
11. Generate Report
-
Press Get Accounts in the left hand side navigation
-
In the following pop-up press OK
-
View orders
12. Change Status
-
Change status to Ready see Ordered Orders (4p)
-
Change status to Delivered see Ready Orders (5p)
-
To correct order status see All Orders (5p)
62
Customer interface user manual
1. Place an order
-
Press PLACE AN ORDER button on the left hand side navigation or click Place
an Order link in the home page.
-
Press HOME PAGE button on the left hand side navigation to go back to the
home page.
-
After clicking one of the option you will be redirected to Enter Postcode page.
2. Enter Post Code
-
Click Login link if you are a returning customer.
-
Enter postcode if you are a new customer and press Submit Query.
-
Note:
o If you are not in the delivery area you will get a Note about this.
63
-
Press Proceed to Pizza Design in order to create a pizza
3. Create Pizzas
-
Press Add a pizza to proceed
-
Note:
o You need to order at least one pizza to place an order
64
-
Select any base from the drop-down box
-
Select toppings wanted by ticking squares
-
To create another pizza press Create another pizza
-
To proceed to the next step press Proceed to next Step
65
4. Edit/ Delete Pizza
-
-
If you have more than one pizza in the order you can edit or delete it
-
Click Edit Pizza to edit it
-
Click Delete Pizza to delete it
To proceed to the next step press Proceed to next Step
5. Choose Extras
-
To add any extra to an order press Increase Quantity
-
To delete extra from the order press Decrease Quantity
-
To proceed to the next step press Proceed to next Step
66
6. Registration / Login
-
If you are a returning customer but not logged in yet:
o Enter your email address
o Enter your password
o Press Log in
-
Note:
o If you have entered a wrong email address a Note will be displayed to enter
a valid email address
o If you have entered a wrong password a Forgotten Password option will
appear
o In order to get password remainder press Get Password Reminder
-
If you are a new customer:
o Fill in all the required fields
o Press Register
-
Note:
o If you forgot to fill in any of the fileds a Note will be displayed to fill in a
particular field/s.
67
7. Finalize Order
-
To add another pizza press Add another Pizza
-
To edit pizza press Edit Pizza
-
To delete pizza press Delete Pizza
-
To edit extras press Edit Extras
-
To delete all extras press Delete all Extras
-
To Confirm your order press Confirm Order(last chance to pull out)
You have placed an order, please pay by cash.
68
Appendix 2 – Example agenda and minutes
There follows an example each of the agendas and minutes we took during meetings.
Agenda
CS5946 Meeting
Thursday August 7: 1pm
Meston G01
Present
Afolabi Akinrimisi (AA), Edward Dobson (ED), Ishaku Jilemsam (IJ), Godfrey Maclayton (GM),
Adetoun Osuntuyi (AO), Craig Stewart (CS), Kristina Tamosauskaite (KT)
Apologies
N/A
Agenda for meeting on Thursday 7/8/2008
1. Discuss progress with installation of Eclipse and Tomcat
2. Discuss progress with CS5540 practical exercises
3. Discuss UI interface
4. Forthcoming tasks to be completed before Monday
5. Prepare for Friday meeting
6. AOB
7. Date of Next Meeting
Monday 11 August, 1pm, Meston G01
69
Minutes
CS5946 Meeting
Thursday August 7: 1pm
Meston G01
Present
Afolabi Akinrimisi (AA), Edward Dobson (ED), Ishaku Jilemsam (IJ), Adetoun Osuntuyi (AO), Craig
Stewart (CS), Kristina Tamosauskaite (KT)
Absent
Godfrey Maclayton (GM)
Apologies
N/A
Minutes of meeting on Thursday 7/8/2008
1. Discuss progress with installation of Eclipse and Tomcat – Deadline today
All installed and working except IJ. Unsure about GM.
2. Discuss progress with CS5540 practical exercises
Everyone currently progressing with Practical Week 3. All agree to stick to schedule: Practical Week 3
to be completed by Saturday, Week 4 by Sunday, Week 5 by Monday.
3. Discuss UI interface
Drop-down menu for toppings will not work. ED will look at how difficult it will be to program
checklist.
Back button needed. IJ will add to UI.
Shopping cart required so customer can see at all times what they are ordering. IJ will adjust.
Registration details moved from start of sequence to end, with just a postcode entry at the start. IJ
will adjust.
All adjustments to be done before next meeting.
70
4. Discuss database
Sides and Drinks need to be combined in database under the collective term Extras. KT will make
changes.
5. Forthcoming tasks to be completed before Monday
Everyone complete CS5540 Practicals as per schedule deadlines. All should be complete by next
meeting – if anyone has any problems, bring up at Friday meeting or contact other group members
over the weekend or contact Bruce.
6. Prepare for Friday meeting
Remember to complete weekly Personal Log to hand in.
7. AOB
ED’s name means ‘wealthy guy’.
8. Date of Next Meeting
Monday 11 August, 1pm, Meston G01
71
Appendix 3 – Database screenshots
Screenshot1. Customer table
72
Screenshot2. Orders table
73
Screenshot 3. Toppings table
74
Screenshot 4. Bases table
75
Screenshot 5. Extras table
76
Screenshot 6. Pizzas table
77
Screenshot 7. Ordered extras table
78
Screenshot 8. Ordered toppings table
79