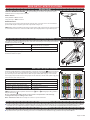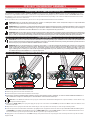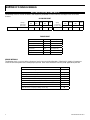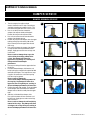
1
2014 FSR OWNER’S MANUAL TABLE OF CONTENTS INTRODUCTION. . . . . . . . . . . . . . . . . . . . . . . . . . . . . . . . . . . . . . . . . . . . . . . . . . . . . . . . . . . . . . . . . . . . . . . . . 2 About off road, stunt, downhill and freeriding . . . . . . . . . . . . . . . . . . . . . . . . . . . . . . . . . . . . . . . . . . . . . . . . . 2 Service and modifications . . . . . . . . . . . . . . . . . . . . . . . . . . . . . . . . . . . . . . . . . . . . . . . . . . . . . . . . . . . . . . . . . . 2 BIKE SETUP SPECIFICATIONS . . . . . . . . . . . . . . . . . . . . . . . . . . . . . . . . . . . . . . . . . . . . . . . . . . . . . . . . . . . . . 3 Seatpost height . . . . . . . . . . . . . . . . . . . . . . . . . . . . . . . . . . . . . . . . . . . . . . . . . . . . . . . . . . . . . . . . . . . . . . . . . . . 3 Frame linkage assembly . . . . . . . . . . . . . . . . . . . . . . . . . . . . . . . . . . . . . . . . . . . . . . . . . . . . . . . . . . . . . . . . . . . 3 Down tube cable guide installation . . . . . . . . . . . . . . . . . . . . . . . . . . . . . . . . . . . . . . . . . . . . . . . . . . . . . . . . . . 3 142+ rear axle . . . . . . . . . . . . . . . . . . . . . . . . . . . . . . . . . . . . . . . . . . . . . . . . . . . . . . . . . . . . . . . . . . . . . . . . . . . . . 3 Accessories . . . . . . . . . . . . . . . . . . . . . . . . . . . . . . . . . . . . . . . . . . . . . . . . . . . . . . . . . . . . . . . . . . . . . . . . . . . . . . 3 Front derailleur type and position . . . . . . . . . . . . . . . . . . . . . . . . . . . . . . . . . . . . . . . . . . . . . . . . . . . . . . . . . . . 4 SWAT BIKE EQUIPMENT . . . . . . . . . . . . . . . . . . . . . . . . . . . . . . . . . . . . . . . . . . . . . . . . . . . . . . . . . . . . . . . . . . 4 TCCT (Top Cap Chain Tool). . . . . . . . . . . . . . . . . . . . . . . . . . . . . . . . . . . . . . . . . . . . . . . . . . . . . . . . . . . . . . . . . 5 EMT TOOL . . . . . . . . . . . . . . . . . . . . . . . . . . . . . . . . . . . . . . . . . . . . . . . . . . . . . . . . . . . . . . . . . . . . . . . . . . . . . . . 6 SWAT BOX . . . . . . . . . . . . . . . . . . . . . . . . . . . . . . . . . . . . . . . . . . . . . . . . . . . . . . . . . . . . . . . . . . . . . . . . . . . . . . . 7 INTERNAL CABLE ROUTING . . . . . . . . . . . . . . . . . . . . . . . . . . . . . . . . . . . . . . . . . . . . . . . . . . . . . . . . . . . . . . . 8 PF30 BOTTOM BRACKET ASSEMBLY . . . . . . . . . . . . . . . . . . . . . . . . . . . . . . . . . . . . . . . . . . . . . . . . . . . . . . . 12 Installing PF30 and PF30DH Bottom Bracket Cups . . . . . . . . . . . . . . . . . . . . . . . . . . . . . . . . . . . . . . . . . . 12 Frame Preparation . . . . . . . . . . . . . . . . . . . . . . . . . . . . . . . . . . . . . . . . . . . . . . . . . . . . . . . . . . . . . . . . . . . . . . . . 12 Installing the Bottom Bracket (73 x 46mm BB shell, press-in cups) . . . . . . . . . . . . . . . . . . . . . . . . . . . . 12 Installing the Adapter Cups . . . . . . . . . . . . . . . . . . . . . . . . . . . . . . . . . . . . . . . . . . . . . . . . . . . . . . . . . . . . . . . . . 13 Mountain Crank Compatibility . . . . . . . . . . . . . . . . . . . . . . . . . . . . . . . . . . . . . . . . . . . . . . . . . . . . . . . . . . . . . . 13 FORK LENGTH SPECIFICATIONS . . . . . . . . . . . . . . . . . . . . . . . . . . . . . . . . . . . . . . . . . . . . . . . . . . . . . . . . . . . 14 TORQUE SPECS . . . . . . . . . . . . . . . . . . . . . . . . . . . . . . . . . . . . . . . . . . . . . . . . . . . . . . . . . . . . . . . . . . . . . . . . 14 FRAME SPECIFICATIONS . . . . . . . . . . . . . . . . . . . . . . . . . . . . . . . . . . . . . . . . . . . . . . . . . . . . . . . . . . . . . . . . . 15 ENDURO 29 CHAINRING SETUP . . . . . . . . . . . . . . . . . . . . . . . . . . . . . . . . . . . . . . . . . . . . . . . . . . . . . . . . . . . 15 AUTOSAG AIR SHOCK SETUP . . . . . . . . . . . . . . . . . . . . . . . . . . . . . . . . . . . . . . . . . . . . . . . . . . . . . . . . . . . . . 16 Step 1: Setting Autosag . . . . . . . . . . . . . . . . . . . . . . . . . . . . . . . . . . . . . . . . . . . . . . . . . . . . . . . . . . . . . . . . . . . . 16 Step 2: Adjusting rebound . . . . . . . . . . . . . . . . . . . . . . . . . . . . . . . . . . . . . . . . . . . . . . . . . . . . . . . . . . . . . . . . . 16 Step 3: Adjusting compression . . . . . . . . . . . . . . . . . . . . . . . . . . . . . . . . . . . . . . . . . . . . . . . . . . . . . . . . . . . . . 16 SETUP DATA . . . . . . . . . . . . . . . . . . . . . . . . . . . . . . . . . . . . . . . . . . . . . . . . . . . . . . . . . . . . . . . . . . . . . . . . . . . 16 AIR CHARTS . . . . . . . . . . . . . . . . . . . . . . . . . . . . . . . . . . . . . . . . . . . . . . . . . . . . . . . . . . . . . . . . . . . . . . . . . . . 17 X-FUSION 02RL AIR SHOCK SETUP . . . . . . . . . . . . . . . . . . . . . . . . . . . . . . . . . . . . . . . . . . . . . . . . . . . . . . . . 17 Step 1: Adjusting sag . . . . . . . . . . . . . . . . . . . . . . . . . . . . . . . . . . . . . . . . . . . . . . . . . . . . . . . . . . . . . . . . . . . . . . 17 Step 2: Adjusting rebound . . . . . . . . . . . . . . . . . . . . . . . . . . . . . . . . . . . . . . . . . . . . . . . . . . . . . . . . . . . . . . . . . 17 Step 3: Adjusting compression . . . . . . . . . . . . . . . . . . . . . . . . . . . . . . . . . . . . . . . . . . . . . . . . . . . . . . . . . . . . . 17 CANE CREEK DB AIR SHOCK SETUP . . . . . . . . . . . . . . . . . . . . . . . . . . . . . . . . . . . . . . . . . . . . . . . . . . . . . . . . 17 COIL SHOCK SETUP . . . . . . . . . . . . . . . . . . . . . . . . . . . . . . . . . . . . . . . . . . . . . . . . . . . . . . . . . . . . . . . . . . . . . 18 Step 1: Adjusting sag . . . . . . . . . . . . . . . . . . . . . . . . . . . . . . . . . . . . . . . . . . . . . . . . . . . . . . . . . . . . . . . . . . . . . . 18 Step 2: Setting rebound . . . . . . . . . . . . . . . . . . . . . . . . . . . . . . . . . . . . . . . . . . . . . . . . . . . . . . . . . . . . . . . . . . . 18 Step 3: Setting compression . . . . . . . . . . . . . . . . . . . . . . . . . . . . . . . . . . . . . . . . . . . . . . . . . . . . . . . . . . . . . . . 18 Setting Cane Creek Double Barrel coil rebound and compression . . . . . . . . . . . . . . . . . . . . . . . . . . . . . . 18 SHOCK SETTINGS. . . . . . . . . . . . . . . . . . . . . . . . . . . . . . . . . . . . . . . . . . . . . . . . . . . . . . . . . . . . . . . . . . . . . . . 19 CARBON FRAME INSTRUCTIONS. . . . . . . . . . . . . . . . . . . . . . . . . . . . . . . . . . . . . . . . . . . . . . . . . . . . . . . . . . . 20 Seatpost . . . . . . . . . . . . . . . . . . . . . . . . . . . . . . . . . . . . . . . . . . . . . . . . . . . . . . . . . . . . . . . . . . . . . . . . . . . . . . . . . 20 Bottom bracket . . . . . . . . . . . . . . . . . . . . . . . . . . . . . . . . . . . . . . . . . . . . . . . . . . . . . . . . . . . . . . . . . . . . . . . . . . . 20 Headset installation / removal . . . . . . . . . . . . . . . . . . . . . . . . . . . . . . . . . . . . . . . . . . . . . . . . . . . . . . . . . . . . . . 20 SPECIALIZED BICYCLE COMPONENTS 15130 Concord Circle, Morgan Hill, CA 95037 (408) 779-6229 0000017543_OM R2, 06/13 Please note all instructions are subject to change for improvement without notice. Please visit www.specialized.com for periodic tech updates. Feedback: [email protected] Page 1 of 20 INTRODUCTION Congratulations on your purchase and welcome to the finest line of suspension bikes available! About Off Road, Stunt, Downhill and Freeriding This manual is designed to be used in conjunction with the Bicycle Owner’s Manual and owner’s manuals supplied by the manufacturer of the front and rear suspension components. If you did not receive any of these manuals, download them from the Internet, contact your Authorized Specialized Dealer, or contact us by telephone. There may be more current manuals and technical information available. For the most current information, regularly check the Specialized web site or consult your Authorized Specialized Dealer. These manuals were written for an important reason: your safety while riding. This manual contains many “Warnings” and “Cautions” concerning the consequences of failure to maintain or inspect your bicycle or of failure to follow safe cycling practices. The combination of the safety alert symbol and the word Warning indicates a potentially hazardous situation which, if not avoided, could result in serious injury or death. The combination of the safety alert symbol and the word Caution indicates a potentially hazardous situation which, if not avoided, may result in minor or moderate injury, or damage to your bicycle or a component. Because the consequences of not following a Warning usually include “you may lose control and fall,” which could result in serious personal injury or death, we may not repeat this in conjunction with each Warning. Because it is impossible to anticipate every situation or condition which may occur, a practice or situation may be unsafe but not anticipated by this manual. So, don’t forget to use your common sense. WARNING! Make sure you have, review, and understand the warnings, instructions, and content of the manuals for your bicycle. About off road, stunt, downhill and freeriding Downhill racing, severe off road riding, jumping, and stunt riding is extremely dangerous. Some downhill racers and freeriders reach speeds similar to motorcycles, thus face similar risks and hazards. When engaging in these activities, you, your bicycle and safety equipment must be in perfect condition. We recommend that at all times you wear appropriate safety gear, such as an approved full face helmet, full finger gloves, and body armor. Not every bicycle is built for every activity. Check with your Authorized Specialized Dealer to make sure you have the right equipment. No bicycle is indestructible. Downhill racing, severe off road riding, jumping, and stunt riding increases the stress on every part of your bicycle. Frames or parts under high stress may fail, causing you to lose control or fall. Because of the risk involved, Specialized recommends that you conduct a thorough inspection before each ride. If you miss a jump, ditch your bike in mid crash, dump or launch your bike without you on it, inspect yourself for injury, then carefully inspect your bicycle for damage. Here is what you should look for when you inspect your bicycle for this type of riding: bent or broken components, such as the handlebar, handlebar stem, seatpost, pedals; dents, cracks, scratches, deformation, or discoloration. Because damage may be internal and hidden, if any of these signs are present, stop riding until your bicycle has been thoroughly inspected by your Authorized Specialized Dealer. WARNING! Although many catalogs, advertisements and articles about bicycling depict riders racing, jumping, riding hard off road, and/ or stunt riding, this activity is extremely dangerous, increases the rider’s risk of injury or death, and potentially increases the severity of any injury. The action depicted is being performed by experts with many years of training and experience. Even with that training and experience, cyclists who engage in such activity often get seriously injured. It is also foreseeable that during some jumps or stunts, and even some races, that the rider will exceed the design capacity of the frame or components, which may result in something on the bicycle bending or breaking. If a frame or component bends or breaks, such may lead to loss of control, serious personal injury or death. As activities such as racing, jumping, severe off road riding, and stunt riding are extremely dangerous, SAFETY should always be the first consideration. Don’t ride in the race, ride hard off road, try the jump, or do the stunt, UNLESS YOU CAN DO SO SAFELY. Here are some additional recommendations: Take lessons from a competent instructor first. Do jumps or stunts only in areas designated for this type of riding. Start with easy jumps and easy stunts first, and slowly develop skills before trying more dangerous jumps or stunts. Wear appropriate safety gear, such as a full face helmet, body armor, full finger gloves, etc. Make sure by checking with your Authorized Specialized Dealer that your bike is suitable for the kind of activity you intend to engage in. Constantly inspect your bicycle for signs of stress: cracks in the paint; dents; crushing or bending of the frame; bent components. Do not ride your bicycle if it shows such signs of stress. Do not seek to bend or break the frame or components. Remember, SAFETY FIRST!!! Understand and recognize that the stresses imposed on your bike by riding at speed, jumping or stunt riding may break or damage parts of the bicycle, which may result in loss of control, serious injury or death. Specialized does not warrant the bicycle frame or components for such activities, and expressly disclaims all warranties, including the warranty of fitness for particular purpose and merchantability. Stunt riding, severe off road riding, jumping, or riding downhill at speed is extremely dangerous, and the rider voluntarily assumes the risk that the bicycle frame and/or its components will bend or break, and voluntarily assumes the risk of injury or death. Service and modifications Technological advances have made bicycles and bicycle components more complex, and the pace of innovation is increasing. It is impossible for this manual or the accompanying manuals to provide all of the information required to properly repair and/or maintain your bicycle. In order to help minimize the chances of an injury, it is critical for you to have work performed by an Authorized Specialized Dealer. WARNING! Service on Specialized bicycles requires special knowledge and tools. Specialized recommends that all service and repairs be performed by an Authorized Specialized Dealer. Your bicycle has been engineered and tested with specific components and parts. Because of the great variety in these items, it is impossible for Specialized to test and approve of all possible combinations. Modifying the frame, fork, or any of the components may make your bike unsafe. For example, changing the front suspension on your bicycle may alter the steering characteristics and/or add stresses to the frame which have not been tested for. If you must replace any component, have this done by your Authorized Specialized Dealer. WARNING! Never modify your frame or bicycle in any way. Do not sand, drill, fill, or remove parts. Do not install incompatible forks or suspension parts. An improperly modified frame, fork, or component, can cause you to lose control and fall. CAUTION: Any modification of your frame, fork, or components means that your bike no longer meets our specifications and therefore voids your warranty. Page 2 of 20 BIKE SETUP SPECIFICATIONS Seatpost height SEATPOST MINIMUM INSERTION 1 : To prevent damage to the frame, it’s important to have a minimum amount of seatpost in the seat tube. 1 Carbon frames: Small / Medium - 70mm insertion Large / X-Large - 100mm insertion Aluminum frames: If you cannot see the seatpost tube through the seat tube hole, your seatpost is too far extended. If a greater saddle height is required, replace the seatpost with a longer one. NOTE: When running a saddle in a low position, it’s important to fully compress the rear end of the bicycle to ensure that the tire doesn’t contact the saddle. This is especially important on longer travel bicycles. Frame linkage assembly Specialized recommends following a specific order when assembling the rear triangle pivot locations of FSR suspension bike models 2 . 2 E A. Main pivot D. Lower shock eye or yoke pivot B. Main link pivot E. Upper shock eye C. Horst link or link @ seatstay pivot Assembling the upper or lower pivots of the seatstay as a last step makes it easier to align the parts and hold the washers in place. C D B A C Down tube cable guide installation Certain Specialized FSRs are equipped with bolt-on down tube cable guides 3 under the down tube (3- or 4-cable bats). For proper housing placement and function, the hydraulic rear brake housing goes in the larger (non-drive-side) inner slot, while the gear cables (4mm only) go on the outside. 3 A C B A A B A Telescoping seatposts with internal routing require the 4-cable bats, with the cable (4mm only) going in the narrower (drive-side) inner slot. A. Blue: Gear (narrow outer slots) F. Triple or Quad bat alloy holder B. Red: Brake (larger inner slot) G. Drive-side C. Green: Seatpost (narrower inner slot) H. Non-drive-side D. Triple or Quad bat rubber base (standard) I. Seatpost housing entry port E. Triple or Quad bat rubber base (extended) J. Down tube NOTE: Stumpjumper Carbon / Enduro models use 2 x Alloy models use 3 x D . D and 1 x E F G F H G H D D E E . Stumpjumper Alloy /Camber Do not overtighten the guide bolts! Too much pressure can squeeze the cable housings, creating friction and poor shifting for the cables. Demo and Status models: The housings are routed on top of the down tube. I J J QUAD BAT TRIPLE BAT 142+ rear axle Certain Specialized bike models are equipped with a 142+ rear axle system, which requires the use of a proprietary Specialized 142+ wheel, or a 142mm compatible wheel. For additional information regarding compatibility, please refer to the Roval Hub Compatibility Guide at www.specialized.com. Accessories Specialized offers replacement chainstay protectors for most FSR models, available through your Authorized Specialized Dealer. Page 3 of 20 Front derailleur type and position MODEL ADAPTER (fig.4) EPIC (except WC) CAMBER SAFIRE SHIMANO DERAILLEUR *See fig.5 SRAM DERAILLEUR High Direct Mount 2nd Gen 38-40t: E2, 42/44t: E S3 1st Gen 38-40t: E2, 40/42/44t: E S1 2nd Gen 38-40t: E2, 42/44t: E S3 ENDURO 26 -- 38-40t: E2, 42/44t: E S3 ENDURO 29 -- -- A3 2nd Gen 38-40t: E2, 42/44t: E S3 STUMPJUMPER RUMOR 4 1st gen adapter 2nd gen adapter 5 Shimano derailleurs are equipped with high-low height adjuster chips. Place the chips in the position that optimizes the spacing relative to the chainring size. Enduro 29 models are compatible only with the SRAM A3 MDM front derailleur (model # 00-7618-017-000 - FD MDM 2x10 38/36 BLK DP). Epic (non-WC models) are equipped with a fixed frame mount (fig.5), which accepts either a Shimano or SRAM high mount derailleur. Carbon Epic models require the additional slotted bracket that goes between the frame and the frong derailleur (fig.5). SWAT BIKE EQUIPMENT Certain Specialized bikes are compatible with SWAT (Storage, Water, Air, Tools) components. The matrix below explains the compatibility between SWAT components and Specialized bikes. SWAT consists of the following parts: TCCT (Top Cap Chain Tool) SWAT Box EMT Tool SWAT components can be assembled in stages: STAGE 1 STAGE 2 STAGE 3 Any one SWAT component by itself Any combination of two SWAT components (Mini Kit = TCCT + SWAT Tool) All SWAT components together MAX STAGE COMPATIBILITY FULL SWAT EQUIPPED W/FRAME CRADLE SW Epic FSR Carbon 2014 BIKE MODEL Stage 3 √ Epic FSR Marathon Carbon Stage 3 √ Epic FSR Expert Carbon Stage 3 √ MINI KIT EQUIPPED SW Camber FSR Carbon Stage 2 √ Camber FSR Expert Carbon Stage 2 √ Camber FSR Expert Carbon Evo Stage 2 √ SW SJ FSR 29 Stage 2 √ SW SJ FSR 26 Evo Stage 2 √ SW SJ FSR 29 Evo Stage 2 √ SJ FSR Expert Carbon 29 Stage 2 √ SJ FSR Expert Carbon Evo 26 Stage 2 √ SJ FSR Expert Carbon Evo 29 Stage 2 √ Specialized frames equipped with carbon steerer tubes: Small and medium frames have short steerer tubes that require a tapered expander plug. SMALL / MEDIUM FRAMES: Tapered expander plug Page 4 of 20 LARGE / X-LARGE FRAMES: Straight expander plug TCCT (Top Cap Chain Tool) TCCT INTO ALLOY STEERER TUBE: 1 2 3 4 A PARK TNS-4 B A : TCCT B : Star Nut Tool Extender 32mm 28.6mm 1 1/8” 53214-1160 Install the star nut, then thread the TCCT into the star nut. Tighten the bolt down to adjust headset tension just like a regular top cap. TCCT INTO CARBON STEERER TUBE: 1 CHAIN TOOL USAGE: 2 1 4 2 3 28.6mm 1 1/8” Install the expander plug, then thread the TCCT into the plug. Tighten the bolt down to adjust headset tension just like a regular top cap. NOTE: The TCCT can be installed on additional bike models. Carbon steerer tubes require the TCCT-specific expander plug. NOTE: The TCCT requires the use of a quick-connect link to re-attach the chain. Page 5 of 20 EMT TOOL The EMT Tool can be mounted two ways: Directly to a Specialized Zee-Cage 2, with the Cage-Mount Tool cradle 1 CAGE-MOUNT TOOL CRADLE 2 Install the metal bracket into the Cage-Mount Tool cradle (the round hole goes into the cradle, the oblong hole aligns with the Zee-Cage’s lower frame mounting hole). Align the hole at the base of the Zee-Cage 2 over the hole in the Cage-Mount Tool cradle. Insert the T-Nut into the Frame Tool cradle from below. Thread the T-Bolt into the T-Nut. Torque the T-Bolt to 15 in-lbf (1.7 Nm). Install the EMT tool into the cradle. NOTE: The EMT Tool with Cage-Mount Tool cradle and Zee-Xage 2 can be installed on many bike models. Some frames are not compatible due to interference between the frame and the Cage-Mount Tool cradle. Verify that the fit is unobstructed before installation. Directly into the Frame Tool cradle above the upper shock eye (2014 Epic Carbon frames only) 1 FRAME TOOL CRADLE 2 A Insert the tool into the cradle from an angle. As the tool slides into position, press the tool upward, making sure the tool’s external pivot bolts are above the small retainer bumps (fig.2-A). Ensure that the tool clicks into place at the back, to hold it in snugly. Press up on the tool as it slides into the cradle until the tool clicks into place. To remove the tool, apply upward pressure with a finger or two and pull the tool toward the head tube. Page 6 of 20 SWAT BOX The SWAT Box is compatible only with frames equipped with a 3rd water bottle boss on the downtube (2014 Epic). 1 Insert the T-Nut into the SWAT Box from the inside. Place the Zee-Cage 2 over the SWAT Box and align the hole at the base of the Zee-Cage 2 with the hole in the SWAT box. Torque the T-Bolt to 15 in-lbf (1.7 Nm). 2 Bolt the assembly to the down tube (2 x Specialized low-profile M5 x 16mm water bottle bolts, 1 x recessed M5 x 18mm bolt). Torque the bolts to 25 in-lbf (2.8 Nm). R TI E R VE LE S C O 2 O LD C A R S EP TR I A R DG AT E EL Y 3 TURBO SL TUBE Place a Specialized Turbo SL tube (29 x 1.75 - 2.40, with 40mm valve stem) into the box. Partially thread the Specialized CO2 head onto a 25g CO2 cartridge (cartridge sold separately). Click the CO2 head/cartridge assembly into its designated slot. Click the Specialized Tire Lever into its designated slot. The SWAT Box can only accept the Specialized Tire Lever. Page 7 of 20 INTERNAL CABLE ROUTING The following Internal Cable Routing (ICR) instructions are for 2014 Epic Carbon and Camber Carbon models only. The ICR system has many different configurations, depending on the choices made regarding brakes, derailleurs and telescoping seatposts (Camber). Fig.1: Decide which component configuration will be installed on the bike. Rear brake (RED): Internal or external? Front / Rear derailleur (BLUE): Yes or no? (Epic WC models do not have the option for a front derailleur.) Command Post IR (GREEN): Yes or no? (Epic models are not compatible with Command Post IR.) 1 OPTIONS WITH INTERNAL BRAKE ROUTING 5/4 4/4 OPTIONS WITH EXTERNAL BRAKE ROUTING 4 4/4 4/4/5 5/4 4 4/4/5 4 4 4/4/5 5/4 4 4/4/5 4 4 4/5 5/4 0 4 4/5 Page 8 of 20 4/5 0 4/5 NOTE: For optimal performance, Specialized suggests that the rear brake and rear derailleur housings enter the hood scoop on the non-drive-side of the frame, while the front derailleur and Command Post IR enter the hood scoop on the drive-side of the frame. However, these are only recommendations. The setup should be done based on the particular needs of the chosen components and rider preferences. Fig.2: Choose the entry and exit port hood scoops that match the desired component selection (fig.1). Each frame has its own predetermined selection of hood scoops installed at the factory, with the additional hood scoop options supplied in the parts bag. ENTRY PORT HOOD SCOOPS 5/4mm: Rear brake (5mm), derailleur (4mm) 4/4mm: Derailleurs and/or Command Post IR 4mm: Derailleur or Command Post IR 0mm: Blank EXIT PORT HOOD SCOOPS 4/4/5mm: Derailleurs (4mm) and rear brake (5mm) 4/5mm: Rear derailleur (4mm) and rear brake (5mm) 2 ENTRY PORT HOOD SCOOPS 5/4 mm 4/4 mm 4 mm EXIT PORT HOOD SCOOPS 0 mm 4/4/5 mm 4/5 mm Measure out the cable housing lengths for the chosen components (derailleur, Command Post) by running the housings from the handlebar controls, along the underside of the down tube and to the receiving component. Cut each length of cable housing with an additional few inches to accommodate changes during the final installation. TECH TIP: To keep track of the intended component for each cable, mark each cable with a piece of tape for the correct component. NOTE: Mechanical cable actuated rear brakes can be installed in the same way as derailleur and Command Post cables. Hydraulic brakes are installed in the opposite direction. Refer to pages 6 and 7 for additional information. NOTE: If running a Command Post IR, it is recommended to refer to the Command Post IR Adjustable-Height Seatpost Instruction Guide, and complete the installation of the Command Post IR cable housing before installing any other cable housing. 3 4 ar ur Reaille r de de Fro rai nt Rea lleur bra r ke t Froilnleur dera Fig.3: To help simplify the installation of the cable housings, designate a derailleur cable housing for each component (derailleur, brake, Command Post) and mark each cable with tape. Run each derailleur cable through the proper entry port hole with the cable head entering first. Fig.4: Guide each cable out through the exit port hole. If necessary, use a hooked dental pick. Page 9 of 20 5 6 Rear r derailleu de Fro rai nt ll Re eur Bra ar ke ar ur Re aille r de Fig.5: Install each pre-cut housing over each derailleur cable, and into the entry port holes. Be sure to match the housing lengths to the correct cables. For hydraulic brakes, do not place any housing over the cable, as v this cable will be used to guide the hydraulic housing from the bottom. Fig.6: Push the derailleur cable housing(s) through the entry port hole(s) until they become visible at the exit port hole. 7 8 8 Run brake housing on inside of seatstay and chainstay Fig.7: Place the correct exit port hood scoop over the derailleur housing(s). Keep the cable intended for the rear brake out of the hood scoop. Fig.8: Hydraulic brakes: With the hydraulic housing disconnected from the brake lever, install the rear brake caliper on the seatstay brake mount, then run the housing through the exit port hood scoop brake hole. Tape the housing to the brake cable. Fasten the hood scoop to the frame. 9 10 FOAM: 52cm Fig.9: Pull the cable attached to the brake housing until the housing comes out the entry port hole. Fig.10: Install a section of 52cm long foam tubing (talc pre-applied at factoryv) over each section of housing, through the entry port hole. Page 10 of 20 11 12 Fig.11: Choose the hood scoops that match the cable choices. Install the correct hood scoop over the appropriate sections of housings. Place the hood scoops into the entry port holes and fasten the hood scoops to the frame (M4 x 13mm chamfered head bolts). NOTE: If the bolts are being installed after the hood scoops have been installed on the housings, carefully flex the housings to the side to provide enough space for the bolt to access the hood scoop bolt hole. Be sure not to damage the housings. Once the entry and exit port hood scoops have been fastened to the frame, adjust the housing lengths so that each housing reaches its mating shifter or Command Post (hydraulic brake housing is adjusted later) with enough housing length to allow the handlebar to rotate freely through its entire range of rotation. Fig.12: Place the rear derailleur housing section into the chainstay. Pull the housing out of the chainstay at the dropout using a hooked dental pick. 13 14 Front Derailleur Housing loop distance Camber: 35-45mm Epic: 30-40mm Rear Brake Rear Derailleur Tighten the exit port hood scoop cable pinch bolt, just tight enough to keep the housings from migrating in or out of the down tube. Fig.13: Adjust each length of exposed cable housing to create a loop, so that the gap between the bottom bracket shell and the housing loops is 30-40mm (Epic) or 35-45mm (Camber). Position the front derailleur housing against the cable stop, adjust the loop distance, then trim the housing to the appropriate length. Epic frames do not need a large loop since the housing does not connect to the chainstay. Position the rear derailleur housing loop to the correct distance from the bottom bracket shell. Do not adjust the housing length at the rear derailleur until after the exit port pinch bolt has been tightened. Position the rear brake housing loop to the correct distance from the bottom bracket shell. Final length adjustment can then be made at the brake lever so that the handlebar can rotate freely through its entire range of rotation. Remove the tape holding the cable to the housing, trim the housing length, attach the housing to the brake lever and bleed the brake if necessary. Tighten the exit port hood scoop cable pinch bolt, just tight enough to keep the housings from migrating in or out of the down tube. Fig.14: External rear brake routing: Camber and Epic models are equipped with two single-bolt guide (middle and upper position) and one dual-bolt cable guide (lower position). Place the guides over the brake housing and fasten the guides using recessed head bolts (M4 x 13 mm). NOTE: Epic frame bottom bracket housing loops: Do not zip-tie the front derailleur housing to the rear derailleur and/or brake housings! PART TORQUE in-lbf (Nm) HOOD SCOOP BOLT (Exit and Entry) 6 (0.7) EXIT PORT HOOD SCOOP CABLE PINCH BOLT 9.5 (1) Page 11 of 20 PF30 BOTTOM BRACKET ASSEMBLY This design allows for the installation of Specialized OSBB carbon cranks, or the installation of different adapters to fit a variety of crank offerings. Installing PF30 and PF30DH Bottom Bracket Cups The PF30 design (73x46mm PF30 or 83x46mm PF30DH bottom bracket shell, 42x30x7mm BB30 bearings, Specialized PF30 press-in cups), allow the use of Specialized carbon cranks, or, with the use of Specialized bearing adapters, the use of Shimano cranks or SRAM GXP MTN cranks. The adapters in some cases are followed by specific spacers and/or wave washers, depending on the crank. For additional information about crank compatibility, please refer to the chart below. For Specialized carbon crank installation, please refer to the Specialized Carbon Crankset Instruction Guide. WARNING! Failure to follow these instructions may result in a catastrophic failure of the crank, frame and/or its components while riding, which may result in serious personal injury or death. WARNING! Bicycle assembly is a complicated task which requires training and experience. Do not attempt installation of any component if you do not have experience and training as a bicycle mechanic. Failure to follow this warning may result in serious personal injury or death. Reference should also be made to Barnett’s or some other comprehensive bicycle manual. WARNING! Failure to follow the torque specifications in this instruction guide will void your warranty, but most importantly may result in damage to the crank, which may not be visible. If the crank is damaged, this can result in loss of structural integrity, which may result in serious personal injury or death. To ensure the best assembly possible and to prevent any damage to the crank components, follow all torque specifications. Frame Preparation CAUTION: Do not face or ream bottom bracket shell! This can possibly prevent proper installation of the crank. Your Specialized frame does not require any bottom bracket shell pre-installation preparation, as all surfaces have been precisely machined to specific tolerances at the factory for proper interface with the S-Works Carbon crankset. WARNING! Great care should be taken to not damage carbon fiber or composite material. Any damage may result in a loss of structural integrity, which may result in a catastrophic failure. This damage may or may not be visible in inspection. Before each ride, and after any crash, you should carefully inspect your crank for any fraying, gouging, scratches through the paint, chipping, bending, or any other signs of damage. Do not ride if your crank shows any of these signs. After any crash, and before you ride any further, take your bicycle to an Authorized Specialized Dealer for a complete inspection. Installing the Bottom Bracket (73 x 46mm BB shell, press-in cups) 2 1 Carbon sleeve only for use with Specialized carbon cranks PF30 MTN Press-in Cup (S111600013) Bearing Press (9895-3045 or S125300012) 73mm Carbon Bearing Spacer (S111600012) Cartridge Bearing 42 x 30 x 7mm (S091600016) 46mm PF30 SHELL WITH PRESS-IN CUPS Remove any grease from the bottom bracket shell. Finish cleaning the bottom bracket shell with an alcohol wipe. Prepare the cranks for installation. Any adapters, spacers, wave washers, spider, chainrings, etc. that are involved with the installation of the crank must be ready to be installed prior to the installation of the bottom bracket cups. NOTE: Due to the 20 minute work time of the epoxy, the cranks must be installed immediately after the cups are installed, to ensure that the cups, bearings and crank are aligned. Fully mix the 3M DP 420 2-part epoxy, then apply the epoxy to the outer surface of the OSBB cups and the first 10mm of the inner diameter of the bottom bracket shell. Wipe off the excess epoxy from the inside and outside flanges of the cups. Use an alcohol wipe to clean off any remaining residue. Press the cups into the bottom bracket shell until the cups lightly bottom out against the frame. Use either the Specialized Bottom Bracket Bearing Press (S125300012) or the Mindset Headset Bearing Press tool (9895-3045). When using the 9895-3045 tool, either use a Park Headset Press Tool or a bench-mounted vise to press the cups into the frame. Be sure to press the cups evenly into the frame. Apply grease to the outer diameter of the OSBB bearings, then press them into the cups using the same tool that pressed the cups into the frame. Page 12 of 20 Be sure to press the bearings in straight. Do not force the bearings into the cup. Wipe any last epoxy residue from the outside of the cup. Once the bearings bottom out in the cups, do not apply any more pressure. Excess force can damage the cups and cause the bearings to spin roughly. To remove the cups from the frame, pull the bearings out as shown in the Specialized Carbon Crank set Instruction Guide, then lightly tap the backside of the cups in a circular pattern with a large flat surface. Do not use a screwdriver, as it may damage the cups. Before installing new cups with new epoxy, remove any excess epoxy lips that may have formed at the inside and outside edges of the cups. TECH TIP: Any thin epoxy residue that remains on the contact area of the bottom bracket shell should not be removed. This thin film of epoxy residue can actually benefit the bond of fresh epoxy when installing new cups. Installing the Adapter Cups Install the left bearing reducer adapter into the non-drive-side bearing, and the right bearing reducer adapter into the drive-side bearing. The reducer adapters should install by hand with a friction fit. Shimano MTN require no spacers or wave washer. SRAM GXP MTN cranks require a wave washer and a selection of shims on the non-drive-side. Refer to the crank instruction guide for additional installation information. A. Reducer adapter (left / non-drive-side) B. Reducer adapter (right / drive-side) Reducer adapter cups C. OSBB (42x30x7mm) cartridge bearing D. PF30 46mm to 42mm MTN press-in cup E. 46mm diameter bottom bracket shell F. Shim(s) (SRAM GXP MTN cranks only) G. Wave washer (SRAM GXP MTN cranks only) B C D E D C A F G Non-drive-side crank arm A C D E D C B Drive-side crank arm F G (SRAM GXP MTN cranks only) Mountain Crank Compatibility BOTTOM PF30 shell (carbon or alloy) BRACKET Shell inner diameter: 46mm TYPE Shell width: 73mm CRANKSET Width bearing-to-bearing: 73mm (with Specialized MTN press-in cups) SPECIALIZED CARBON PF30 press-in cups / OSBB bearings SHIMANO HOLLOWTECH II PF30 press-in cups / OSBB bearings / Specialized/Shimano reducer adapters (Part # S120400003) SRAM/TRUVATIV BB30 SRAM PF30 cups for BB30 SRAM/TRUVATIV GXP PF30 press-in cups / OSBB bearings / Specialized/SRAM reducer adapters (Part # S120400004) BOTTOM PF30DH shell (carbon or alloy) BRACKET Shell inner diameter: 46mm TYPE CRANKSET Shell width: 83mm Width bearing-to-bearing: 83mm (with Specialized MTN press-in cups) SRAM PF30DH (XO, Descendant) SRAM PF30 cups for BB30 E13 (long spindle) E13 PF30 adapter/bearing/spacer kit Page 13 of 20 FORK LENGTH SPECIFICATIONS WARNING! Specialized frames are compatible ONLY with forks that have a specific maximum amount of travel (see table below). Use of different styled forks or forks with longer travel may result in catastrophic failure of the frame which may result in serious personal injury or death. FAMILY MODEL MAX FORK TRAVEL CROWN EPIC All 100mm (3.9”) Single CAMBER All 110mm (4.3”) Single CAMBER EVO All 120mm (4.7”) Single RUMOR All 110mm (4.3”) Single All 120mm (4.7”) Single 26” EVO 150mm (5.9”) Single SAFIRE STUMPJUMPER FSR 29 130mm (5.1”) Single 29 EVO 140mm (5.5”) Single 26” 160mm (6.5”) Single EVO 180mm (7.1”) Single 29” 160mm (6.5”) Single STATUS All 200mm (7.9”) Double DEMO All 200mm (7.9”) Double ENDURO TORQUE SPECS Torque specs are in-lbf (Nm) PIVOT (in-lbf / Nm) EPIC CAMBER RUMOR SAFIRE MAIN (BB) 180 (20) 150 (17) 150 (17) 215 (24.2) DROPOUT 115 (13) 110 (12.4) 110 (12.4) 95 (10.7) 80 (9) 95 (10.7) 95 (10.7) 110 (12.4) 160 (18) 95 (10.7) 95 (10.7) 110 (12.4) S-LINK @ FRAME S-LINK @ SEATSTAY S-LINK @ CLEVIS 80 (9) -- -- 95 (10.7) LOWER SHOCK EYE 130 (14.7) 130 (14.7) 130 (14.7) 130 (14.7) UPPER SHOCK EYE 130 (14.7) 130 (14.7) 130 (14.7) 130 (14.7) PIVOT (in-lbf / Nm) STUMPJUMPER FSR ENDURO STATUS DEMO MAIN (BB) 150 (17) 215 (24.2) 215 (24.2) 190 (21.5) DROPOUT 110 (12.4) 150 (17) 110 (12.4) 190 (21.5) S-LINK @ FRAME 110 (12.4) 190 (21.5) 215 (24.2) 190 (21.5) S-LINK @ SEATSTAY 110 (12.4) 190 (21.5) 110 (12.4) 190 (21.5) S-LINK @ CLEVIS 170 (19.2) 190 (21.5) -- 190 (21.5) LOWER SHOCK EYE 130 (14.7) 130 (14.7) 190 (21.5) 170 (19.2) UPPER SHOCK EYE 95 (10.7) 170 (19.2) 190 (21.5) 110 (12.4) REAR DERAILLEUR 70 (7.9) FRONT DERAILLEUR SEAT COLLAR (Bolt style) WATER BOTTLE 25 (2.8) DOWN TUBE CABLE BATS 30 (3.4) REAR AXLE 133 (15) DERAILLEUR HANGER 35 (4) DERAILLEUR HANGER (Demo) 115 (11.3) BRAIN MOUNT 55 (6.2) BRAIN HOUSING GUIDE Page 14 of 20 44 (5) 45 (5.1) 6 (0.7) FRAME SPECIFICATIONS DESCRIPTION EPIC CAMBER RUMOR 1 1/8” upper / 1.5” lower 1 1/8” upper / 1.5” lower 1 1/8” upper / 1.5” lower SEATPOST DIAMETER 27.2mm 30.9mm 30.9mm SEAT COLLAR (CARBON) 31.8mm -- -- HEADSET SEAT COLLAR (ALLOY) FRONT DERAILLEUR CLAMP REAR HUB SPACING BOTTOM BRACKET SHELL DERAILLEUR HANGER ISCG TABS DESCRIPTION HEADSET SEATPOST DIAMETER SEAT COLLAR (CARBON) SEAT COLLAR (ALLOY) FRONT DERAILLEUR CLAMP REAR HUB SPACING BOTTOM BRACKET SHELL DERAILLEUR HANGER ISCG TABS DESCRIPTION 31.8mm 34.9mm 34.9mm High direct mount (non-WC) E-Type Direct Mount (DMD) E-Type Direct Mount (DMD) 142mm x 12mm 142mm x 12mm 142mm x 12mm PF30 73 x 46mm PF30 73 x 46mm PF30 73 x 46mm 9892-4020 9892-4020 9892-4020 -- -- -- SAFIRE STUMPJUMPER FSR ENDURO 26” 1 1/8” upper / 1.5” lower 1 1/8” upper / 1.5” lower 1 1/8” upper / 1.5” lower 30.9mm 30.9mm 30.9mm -- 34.9mm 34.9mm 34.9mm 34.9mm 34.9mm E-Type Direct Mount (DMD) E-Type Direct Mount (DMD) E-Type Direct Mount (DMD) 135mm 142mm x 12mm 142mm x 12mm Threaded 73mm PF30 73 x 46mm PF30 73 x 46mm 9895-4020 9892-4020 9892-4020 -- ISCG 05 ISCG 05 ENDURO 29” STATUS DEMO 1 1/8” upper / 1.5” lower 1.5” upper / 1.5” lower 1.5” upper / 1.5” lower SEATPOST DIAMETER 30.9mm 30.9mm 30.9mm SEAT COLLAR (CARBON) 34.9mm -- 36.9mm 34.9mm 34.9mm 34.9mm SRAM MDM (with taco blade, below) -- -- HEADSET SEAT COLLAR (ALLOY) FRONT DERAILLEUR CLAMP REAR HUB SPACING BOTTOM BRACKET SHELL DERAILLEUR HANGER ISCG TABS 142mm x 12mm 135mm 150mm (Team - 135mm) PF30 73 x 46mm Threaded 73mm PF30DH 83 x 46mm 9892-4020 9895-4020 9891-4010 ISCG 05 Standard ISCG 05 ENDURO 29 CHAINRING SETUP 2 Chainring setup: Use taco blade (A) to mount front derailleur. 1 Chainring setup: Remove taco blade and replace with spacer (B) between bearing and chainstay. BEA RIN G TACO BLADE SPA CER AXL E WA SH ER CHAINSTAY Page 15 of 20 AUTOSAG AIR SHOCK SETUP Certain Epic, Camber, Rumor, Stumpjumper, Safire and Enduro models are equipped with AUTOSAG, a unique new feature designed to simplify and speed up the adjustment of air pressure. The AUTOSAG feature automatically determines the correct amount of sag, and eliminates the need to refer to an air chart to determine the correct pressure based on rider weight. However, the shock still requires compression and rebound adjustment based on type of terrain and rider weight. Please refer to the compression and rebound charts (page 19) following the setup steps. NOTE: Shock air pressure can also be set up manually to rider preference. Step 1: Setting Autosag 1. Position the shock compression lever or knob (blue) to the full open or off position air valve cap (black) and the AUTOSAG valve cap (red). . Remove the positive 2. Attach a high-pressure shock pump to the positive air valve All models except Epic and Safire: inflate to the rider’s weight in pounds (lb) plus 50psi. For kilograms, multiply by three (e.g. 75kg = 225psi). Epic and Safire: inflate to the rider’s weight in pounds (lb) plus 100psi. For kilograms, multiply by two + 100psi (e.g. 75kg = 250psi). NOTE: Do not exceed 350psi before activating the Autosag valve (this is a starting pressure only). After the Autosag is activated, Fox recommends a maximum working pressure of 300psi when riding. RockShox Button 3. Make sure the rider is wearing all gear that would normally be worn on a ride (shoes, helmet, hydration pack if used, etc.). Mount the bicycle, prop up against a wall, and sit in the saddle in a normal riding position. Do not set sag while riding. 4. Press the AUTOSAG valve (Fox: Air valve. RockShox: Grey button). Air will release as the suspension settles into its pre-adjusted sag point. Make sure all the air is out and release the valve. 5. Cycle the shock a few times , then dismount the bicycle. 6. Do not depress the AUTOSAG valve again, otherwise the proper sag setting will be lost, and will require this procedure to be repeated from step #2. 7. Put the positive air and AUTOSAG valve caps back on. NOTE: Rider weight in pounds (lb) plus the PSI (depending on model as described above) is the lowest amount of pressure that should be in the shock before activating AUTOSAG. If the air pressure is too low, the AUTOSAG button may let air out of the negative chamber, which would result in incorrect sag. NOTE: Sag is measured as the distance between the o-ring and the shock body’s seal, after the rider’s weight has been applied to the bike, with no bounce. When AUTOSAG is correctly set, sag should measure approximately (20-30% of stroke, depending on riding/terrain experience, i.e travel). If the rider is approaching 300lbs, AUTOSAG may not function, and sag may exceed the bike’s prescribed amount. Step 2: Adjusting rebound Refer to the chart to set the rebound damping (red knob). Rebound damping controls the rate at which the shock returns after it has been compressed. Clockwise for slower rebound (slow speed, bigger hits). Counter-clockwise for faster rebound (higher speeds, small bumps, more traction). Step 3: Adjusting compression Refer to the chart to set the compression damping (blue knob). SPECIALIZED / FOX BRAIN FADE: Controls the inertia valve damping. The blue knob adjusts damping (Race Tune or Trail Tune) from firm (clockwise) to soft (counter-clockwise) and does NOT completely lock out the shock. Backing off from full firm can help with tracking in loose terrain conditions while riding off camber sections or climbing. The soft setting can also help during lengthy downhill or rugged conditions where the rider may want the suspension active at all times. FOX CTD: Provides varying levels of compression damping, depending on whether the rider is climbing, trail riding or descending. C (Climb): The firmest low-speed compression setting is activated for maximum pedaling efficiency. T (Trail): Moderate low-speed compression setting is activated for an optimal blend of pedaling efficiency and bike control on variable terrain. Factory Series shocks offer three levels of Trail adjust. Performance and Evolution shocks are preset with low-speed compression damping. D (Descend): Low-speed compression setting optimized for the perfect balance of control and plushness for steep, aggressive descents. ROCKSHOX MONARCH RL: Firm - compression is firmed up, providing a pedal platform for climbing and/or smooth hardpack. Open - no pedal platform, unobstructed compression damping for trail riding and descending. SETUP DATA DATE RIDER WEIGHT FORK PSI FORK REBOUND DAMPING (# of clicks from full slow) FORK COMPRESSION DAMPING (# of clicks from full firm) SHOCK PSI SHOCK REBOUND DAMPING (# of clicks from full slow) SHOCK COMPRESSION DAMPING (# of clicks from full firm) Page 16 of 20 AIR CHARTS Certain Rumor and Camber, as well as Enduro 26 and 29 models are equipped with shocks which require that the pressure be adjusted with a shock pump. Please refer to the supplied air chart for the suggested air pressure for the rider’s weight. Rider weight includes all riding gear (clothing, shoes, helmet, gloves, hydration pack, etc). X-FUSION 02RL AIR SHOCK SETUP Step 1: Adjusting sag CAMBER/ RUMOR ENDURO 26 ENDURO 29 X-FUSION 02RL MODEL SAG EYE-TO-EYE / STROKE DB AIR 26 DB AIR 29 CAMBER 12mm (25%) 7.75” x 1.875” (197mm x 47.5mm) LBS (KG) PSI PSI PSI 7.75” x 1.875” (197mm x 47.5mm) 90 (41) 72 103 88 100 (45) 79 105 90 93 RUMOR 12mm (25%) RIDER WEIGHT NOTE: See the chart for starting air pressures to dial in the sag. The chart is only a starting point, actual sag needs to be checked and adjusted on the bike, while riding, and at regular intervals. Position the blue compression lever in the “Open” position to allow the shock to sag more easily. After setting the pressure, push the rubber ring up to the seal, sit on the bike gently, dismount, and measure sag. Step 2: Adjusting rebound Refer to the rebound/compression chart to set the rebound damping (red knob). Rebound damping controls the rate at which the shock returns after it has been compressed. 110 (50) 86 108 120 (54) 93 112 97 130 (60) 100 117 102 140 (64) 107.5 123 108 150 (68) 115 130 115 160 (73) 120 137 122 129 170 (77) 125 144 180 (82) 130 152 137 Clockwise for slower rebound (slow speed, bigger hits). 190 (86) 135 163 144 Counter-clockwise for faster rebound (higher speeds, small bumps, more traction). 200 (91) 140 173 155 210 (95) 145 184 164 220 (100) 150 195 175 230 (104) 155 205 186 198 Step 3: Adjusting compression The X-Fusion 02RL adjustment has two lever positions, locked out or open, based on the terrain conditions. CANE CREEK DB AIR SHOCK SETUP MODEL SAG EYE-TO-EYE / STROKE ENDURO 26/29” 17mm (30%) 8.5 x 2.25” (216mm x 57mm) 240 (109) 160 215 250 (113) 165 225 211 260 (118) 170 235 225 270 (123) 175 245 239 280 (127) 180 255 253 The recommended compression and rebound settings for the DB Air shock are based off a mean rider weight of 150-180 lbs (68-82 Kg). For any weight above or below this range, it is recommended to adjust the rebound damping settings. If the air pressure is lower than 125psi, rebound damping should be decreased (sped up). Above 150psi, rebound damping should be increased (slowed down). For additional shock setup information, please visit http://ww2.canecreek.com/products/suspension/db-air. NOTE: Air pressures, rebound and compression settings are suggested starting point recommendations only. They should be adjusted according to the rider’s needs for each type of terrain to achieve optimal performance. NOTE: Not all shock pumps are 100% accurate. To ensure that the sag is set correctly, Specialized recommends that the sag be manually measured after the shock is pressurized and the shock pump is removed. AAC0064 Page 17 of 20 COIL SHOCK SETUP Step 1: Adjusting sag Proper sag should be achieved with one turn of preload on the spring. More then two turns of preload will require a higher spring rate or not enough sag will require a softer spring rate. See spring rate chart for additional information or refer to the shock manual. SAG INFO: MODEL SAG (%) SAG (inches) Sag (mm) EYE-TO-EYE / STROKE (inches) EYE-TO-EYE / STROKE (mm) STATUS 30 - 35% 0.8 - 0.95” 21 - 24mm 8.75” x 2.75” 222.3mm x 69.9mm DEMO 8 30 - 35% 0.9 - 1.0” 23 - 27mm 9.5” x 3” 241.3mm x 76.2mm ENDURO EVO 30 - 35% 0.75 - 0.85” 19 - 22mm 8.75” x 2.5” 222.3mm x 63.5mm XS S M L SPRING RATE: MODEL STATUS DEMO 8 (Ohlins) DEMO 8 (DB Coil) DEMO 8 (Fox Van RC) 350 400 450 500 52 N/mm (297lb) 60 N/mm (343lb) 68 N/mm (388lb) 76 N/mm (434lb) -- 350 400 450 300 ENDURO EVO ENDURO EXPERT EVO 350 400 450 450 500 550 76 N/mm (434lb) 84 N/mm (479lb) 92 N/mm (525lb) OHLINS SHOCK RATES / TUNING INFO:Please refer to the Ohlins shock manual supplied with the shock, or go to www.specialized.com. Step 2: Setting rebound Adjust Rebound (red knob): Rebound damping controls the rate at which the shock returns after it has been compressed. Clockwise for slower rebound (slow speed, bigger hits). Counter-clockwise for faster rebound (higher speeds, small bumps, more traction). Step 3: Setting compression Vanilla RC / R: Adjust low-speed compression (small blue knob): Low-speed compression damping controls slower wheel movement, which helps in pedaling efficiency and bike attitude. Clockwise for a firmer platform and more efficient pedaling, greater resistance to small and medium bumps, more harshness. Counter-clockwise for a more active, supple reaction to terrain, less efficient pedaling, less harshness. Turn the compression adjuster knob to full firm and ride your bike for a while, then gradually reduce compression until it starts to feel too soft and active for the terrain. Gradually increase compression until the optimal setting is found for the terrain and riding style. Setting Cane Creek Double Barrel coil rebound and compression For additional shock setup information, please visit http://ww2.canecreek.com/products/suspension/double-barrel. NOTE: Air pressures, rebound and compression settings are suggested starting point recommendations only. They should be adjusted according to the rider’s needs for each type of terrain to achieve optimal performance. Page 18 of 20 SHOCK SETTINGS COMPRESSION EPIC SJ FSR 29 SJ FSR 26 / 29 / EVO SJ FSR 26 / 29 / EVO CAMBER CAMBER SAFIRE CAMBER CAMBER RUMOR SAFIRE SAFIRE RUMOR BRAIN SHOCK COMPRESSION (Counterclockwise clicks from full firm) RUMOR ENDURO 26 / 29 TERRAIN BRAIN (Race tune) BRAIN (Trail Tune) CTD FACTORY CTD PERFORMANCE / EVOLUTION MONARCH RL X-FUSION 02RL 0-2 0-2 C C FIRM LOCKOUT T FIRM LOCKOUT T OPEN OPEN D OPEN OPEN XC Race/Climbing/ Asphalt T 3-6 3 - OPEN (1 - Soft) (2 - Medium) (3 - Firm) Smooth hardpack T 3-6 3 - OPEN (1 - Soft) (2 - Medium) (3 - Firm) Trail riding 6 OPEN D Downhill/Technical REBOUND RIDER WEIGHT LBS (KG) 90 (41) 100 (45) 110 (50) 120 (54) 130 (60) 140 (64) 150 (68) 160 (73) 170 (77) 180 (82) 190 (86) 200 (91) 210 (95) 220 (100) 230 (104) 240 (109) 250 (113) 260 (118) 270 (123) 280 (127) BRAIN CTD FACTORY / PERFORMANCE / EVOLUTION REBOUND MONARCH RL X-FUSION 02RL 5-9 10-14 7-10 8-20 4-7 7-14 5-10 5-11 0-5 5-10 3-8 3-8 0-3 0-5 0-3 0-3 (Counterclockwise clicks from full slow) Page 19 of 20 CARBON FRAME INSTRUCTIONS Specialized carbon frames utilize advanced composite materials that require particular care during assembly, storage and riding. This installation and care guide contains instructions and warnings, plus torque specifications. Assembling a complete bicycle is a complicated task requiring training and experience, only a trained and experienced bicycle mechanic should install components to this frame. Reference should also be made to Barnett’s or some other comprehensive bicycle manual. WARNING! Failure to follow these instructions may result in a catastrophic failure of the frame and/or its components while riding, which may result in serious personal injury or death. WARNING! Bicycle assembly is an art which requires training and experience. Do not attempt installation of any component if you do not have experience and training as a bicycle mechanic. To ensure the best assembly possible and to prevent any damage to the components or frame, follow all torque specifications. Please refer to the specific owner’s manuals for each mating component’s correct torque specifications. If the mating component’s recommended torque exceeds the frame’s recommended torque, use the lower torque specification. Due to torque considerations, not all components will be compatible. WARNING! Failure to follow the torque specifications in this installation guide will void your warranty, but most importantly may result in damage to the frame which may not be visible. If the frame is damaged, this can result in loss of structural integrity. Bicycle components such as a handlebar, handlebar stem, seatpost, saddle, brakes, must be mutually compatible with each other, as well as the frame and the intended use. Any doubt regarding compatibility should be discussed with your local Authorized Specialized Dealer. WARNING! When placing the frame and/or bicycle in a repair stand, clamp the stand to the seatpost and not the frame. Clamping the frame can cause damage to the frame that may or may not be visible, which may impair the structural integrity of the frame. WARNING! Great care should be taken to not damage carbon fiber or composite materials, including the frame and any carbon fiber or composite components. Any damage may result in a loss of structural integrity, which may result in a catastrophic failure. This damage may or may not be visible in inspection. Before each ride, and after any crash, you should carefully inspect your bicycle for any dents, fraying, gouging, scratches through the paint, chipping bending, or any other signs of damage. Do not ride if your bicycle shows any of these signs. After any crash, and before you ride any further, take your bicycle to an Authorized Specialized Dealer for a complete inspection. Seatpost Refer to your seatpost owner’s manual prior to installation. Specialized FSR frames have a 30.9mm or 27.2mm seatpost diameter and require that the seatpost have a tolerance of 30.78mm to 30.95mm or 27.08mm to 27.25mm. Do not grease the inside surface of the carbon seat tube! Certain Specialized carbon frames use a quick-release seatpost binder. Since the components of this assembly are in direct contact with carbon fiber, pay special attention to ensure proper tightness for the seatpost when correctly tightened to specifications. TECH TIP: Specialized recommends the application of carbon assembly compound (or carbon paste) between the seat tube and seatpost to increase friction. See your Authorized Specialized Dealer if you have any questions. WARNING! Do not extend the seatpost above the minimum insertion line. Extension beyond the minimum insertion line can result in failure, causing serious injury or death. WARNING! Do not pull down on down tube derailleur cables to pre-stress the cables. This can cause damage to the cable guides. Your Specialized carbon frame does not require any bottom bracket or head tube pre-installation preparation. All surfaces are already prepared from the factory, with the exception of greasing the bottom bracket threads (threaded bottom bracket cups) and head set cups. For threaded bottom brackets, it is acceptable to chase the bottom bracket threads if necessary. Do not face bottom bracket cups. Bottom bracket Oversized Bottom Bracket: Please refer to the carbon crank instruction guide (IG0276 - Crankset - Carbon MTB Crankset) for assembly instructions and compatible tools. For crank compatibility specifications, please refer to the carbon crank compatibility guide (CG0308 - Bottom Bracket Oversized MTB Bottom Bracket). All documents are available at www.specialized.com. Headset installation / removal Specialized carbon frames use a 1 1/8” (41.8mm x 8mm x 45°) Campagnolo Standard compatible top and 1.5” (52mm x 7mm x 45°) bottom bearing, except Demo frames which use a 1.5” diameter headset, top and bottom. Ensure that replacement bearings are compatible with the Specialized headset specification. No tools are needed for installation or removal of both bearings. Grease bearing surfaces before installation. Page 20 of 20 SPECIALIZED BICYCLE COMPONENTS 15130 Concord Circle, Morgan Hill, CA 95037 (408) 779-6229 2014 SUSPENSION FORK OIL, AIR, AND COIL CHARTS GEN.0000000004392 Rev A © 2013 SRAM LLC RockShox Oil Volume Chart 30 Gold Fork Drive Side Model Damper Technology TK Volume (mL) Lower Leg Oil wt Volume (mL) Oil wt 5 5 15 Turnkey TK 27 TK 29 143 3-8 BoXXer Domain Lyrik Oil wt - Solo Air Volume (mL) Oil wt 10 15 3-8 Solo Air 5 RC 130 15 10 - Motion Control DH 30 Solo Air with Volume Adjust 10 230 5 R2C2 10 15 Coil with Drop Stop RC Motion Control IS 290 Coil Dual Crown RC Motion Control IS 325 Coil Dual Crown R Rebound 370 RC 15 Coil Rebound 5 10 15 - 15 40 40 Coil U-Turn Coil - 15 30 Motion Control Coil U-Turn Coil 200 Pike Volume (mL) Lower Leg 105 World Cup Reba Upper Tube Motion Control R Recon Gold Spring Technology 85 RCT Argyle Upper Tube Non-Drive Side R Rebound RC2L RC2DH Mission Control Mission Control DH 184 RC Motion Control IS 187 R Rebound 213 Charger Bleed Dual Position Air Solo Air 5 10 15 - 10 15 Solo Air Coil RCT3 3 5 0w30 Solo Air - 15 0w30 5 5 15 Solo Air Grease 5 15 6 15 RC RLT, RL 106 Motion Control RL3 TK TK29 RL R 111 Turnkey Rebound Motion Control Solo Air 133 5 6 3 15 15 Coil - 10 2 RockShox Oil Volume Chart Recon Silver Model TK Revelation Fork Drive Side WC XXWC XX RCT3 RLT RL Damper Technology SID Volume (mL) Oil wt Lower Leg Volume (mL) Turnkey Oil wt 150 5 6 15 Motion Control WC XXWC XX RCT3 RLT RL 134 Volume (mL) Oil wt 6 - 15 12 Dual Position Air Solo Air Grease 5 15 5 5 15 Solo Air Grease 5 15 3-8 15 10-16 15 12 15 98 Motion Control 106 111 120 U-Turn 130 5 5-8 - 15 U-Turn 140 125 U-Turn 150 Sektor Silver 125 5 6 15 XC 32 Motion Control Turnkey Solo Air 150 TK Turnkey 150 5 6 15 Solo Air - 6 Solo Air - 15 12 Coil 100 TK Turnkey 122 5 5 15 Solo Air Coil - 5 10 15 Coil - 10 15 123 TK 27 93 80/100 Turnkey 120 Oil wt 15 Turnkey TK 29 Volume (mL) 5 130 RL TK Lower Leg 5 TK XC 30 Upper Tube Coil RLT3 RL3 XC 28 Spring Technology Solo Air WC 1 1/8 XXWC 1 1/8 Sektor Gold Upper Tube Non-Drive Side - 109 3 RockShox Air Spring Pressures by Rider Weight <140 LBS 140-160 LBS 160-180 LBS 180-200 LBS 200-220 LBS (<63 KG) (63-72 KG) (72-81 KG) (81-90 KG) (90-99 KG) 90-110 psi 110-125 psi 125-140 psi 140-160 psi 175+ psi 265 psi 50-70 psi 70-85 psi 85-100 psi 100-120 psi 135+ psi 205 psi Argyle 120-135 psi 135-150 psi 150-165 psi 165-180 psi 180+ psi 220 psi BoXXer 30-45 psi 45-60 psi 60-75 psi 75-90 psi 90-105 psi 165 psi Lyrik 45-55 psi 55-65 psi 65-75 psi 75-85 psi 85-95 psi 148 psi Lyrik 45-65 psi 65-85 psi 85-105 psi 105-125 psi 125-145 psi 248 psi Pike 45-55 psi 55-65 psi 65-75 psi 75-85 psi 85-95 psi 148 psi Pike 29 55-65 psi 65-75 psi 75-85 psi 85-95 psi 95-105 psi 163 psi 45-65 psi 65-85 psi 85-105 psi 105-125 psi 125-145 psi 248 psi Reba 70-90 psi 90-105 psi 105-120 psi 120-135 psi 135+ psi 200 psi Recon Gold 90-110 psi 110-125 psi 125-140 psi 140-160 psi 175+ psi 265 psi 50-70 psi 70-85 psi 85-100 psi 100-120 psi 135+ psi 205 psi 90-110 psi 110-125 psi 125-140 psi 140-160 psi 175+ psi 265 psi 50-70 psi 70-85 psi 85-100 psi 100-120 psi 135+ psi 205 psi Revelation 65-85 psi 75-100 psi 85-115 psi 95-125 psi 125+ psi 220 psi Revelation <110 psi 110-125 psi 125-140 psi 140-155 psi 155-170 psi 255 psi Sektor Gold 40-60 psi 60-75 psi 75-90 psi 90-105 psi 105+ psi 225 psi Sektor Silver 50-70 psi 70-85 psi 85-100 psi 100-120 psi 120+ psi 200 psi SID 70-90 psi 90-105 psi 105-120 psi 120-135 psi 135+ psi 200 psi XC32 90-110 psi 110-125 psi 125-140 psi 140-160 psi 175+ psi 265 psi 50-70 psi 70-85 psi 85-100 psi 100-120 psi 135+ psi 205 psi 90-110 psi 110-125 psi 125-140 psi 140-160 psi 175+ psi 265 psi 50-70 psi 70-85 psi 85-100 psi 100-120 psi 135+ psi 205 psi FORK 30 Gold 80 mm 30 Gold 100-120 mm Dual Position Air 120-140 mm Pike Dual Position Air 80 mm Recon Gold 100-120 mm Recon Silver 80 mm Recon Silver 100-120 mm Dual Position Air 80 mm XC32 100-120 mm XC30 80 mm XC30 100-120 mm MAX PSI 4 RockShox Coil Springs by Rider Weight FORK Argyle <140 LBS 140-160 LBS 160-180 LBS 180-200 LBS 200-220 LBS (<63 KG) (63-72 KG) (72-81 KG) (81-90 KG) (90-99 KG) Red Medium Blue Firm Black X-Firm Not Available Pink XXX-Firm Silver X-Soft Yellow Firm Red Medium Blue Firm Black X-Firm Silver X-Soft Yellow Firm Red Medium Blue Firm Black X-Firm Green X-Soft Black Soft Yellow Medium Red Firm Blue X-Firm Silver X-Soft Yellow Firm Red Medium Blue Firm Black X-Firm BoXXer Domain Lyrik Recon Silver Recon Gold Sektor XC 28 80 / 100 mm XC 28 120 mm XC30 XC32 5 SUSPENSION FORK 2012 160 - 180 lbs 72 - 81 kg 140 - 160 lbs 63 - 72 kg < 140 lbs < 63 kg Coil Spring Chart by Rider Weight FORK MODEL COIL COLOR Argyle R, RC Red/ Medium BoXXer Race/RC, Team/R2C2 Silver/ X-Soft Domain Dual Crown RC and R, U-Turn RC and R Lyrik U-Turn RC2L/RC2DH, RC, R, 170mm Recon Silver R, RL, TK, TK 29 Recon Gold R, RL, TK, TK 29 Sektor R, RL, TK Totem RC2L/RC2DH, RC XC 28 80/100 TK Green/ X-Soft XC 28 120 TK Yellow/ Soft XC 30 RL, TK, TK 29 Silver/ X-Soft XC 32 RL, TK FORK MODEL COIL COLOR Argyle R, RC Blue/ Firm BoXXer Race/RC, Team/R2C2 Yellow/ Soft Domain Dual Crown RC and R, U-Turn RC and R Lyrik U-Turn RC2L/RC2DH, RC, R, 170mm Recon Silver R, RL, TK, TK 29 Recon Gold R, RL, TK, TK 29 Sektor R, RL, TK Totem RC2L/RC2DH, RC XC 28 80/100 TK Black/ Soft XC 28 120 TK Yellow/ Soft XC 30 RL, TK, TK 29 XC 32 RL, TK FORK MODEL COIL COLOR Argyle R, RC Black/ X-Firm BoXXer Race/RC, Team/R2C2 Red/ Medium Domain Dual Crown RC and R, U-Turn RC and R Lyrik U-Turn RC2L/RC2DH, RC, R, 170mm Recon Silver R, RL, TK, TK 29 Recon Gold R, RL, TK, TK 29 Sektor R, RL, TK Totem RC2L/RC2DH, RC XC 28 80/100 TK Yellow/ Medium XC 28 120 TK Red/ Medium XC 30 RL, TK, TK 29 XC 32 RL, TK GEN.0000000004149 Rev C 180 - 200 lbs 81 - 90 kg 200 - 220 lbs 90 - 99 kg 2 FORK MODEL COIL COLOR Argyle R, RC Not Available BoXXer Race/RC, Team/R2C2 Blue/ Firm Domain Dual Crown RC and R, U-Turn RC and R Lyrik U-Turn RC2L/RC2DH, RC, R, 170mm Recon Silver R, RL, TK, TK 29 Recon Gold R, RL, TK, TK 29 Sektor R, RL, TK Totem RC2L/RC2DH, RC XC 28 80/100 TK Red/ Firm XC 28 120 TK Blue/ Firm XC 30 RL, TK, TK 29 XC 32 RL, TK FORK MODEL COIL COLOR Argyle R, RC Pink/ XXX-Firm BoXXer Race/RC, Team/R2C2 Black/ X-Firm Domain Dual Crown RC and R, U-Turn RC and R Lyrik U-Turn RC2L/RC2DH, RC, R, 170mm Recon Silver R, RL, TK, TK 29 Recon Gold R, RL, TK, TK 29 Sektor R, RL, TK Totem RC2L/RC2DH, RC XC 28 80/100 TK Blue/ X-Firm XC 28 120 TK Black/ X-Firm XC 30 RL, TK, TK 29 XC 32 RL, TK 2011 Technical Manual SRAM LLC WARRANTY SRAM warrants its products to be free from defects in materials or workmanship for a period of two years after original purchase. This warranty only applies to the original owner and is not transferable. Claims under this warranty must be made through the retailer where the bicycle or the SRAM component was purchased. Original proof of purchase is required. This warranty statement gives the customer specific legal rights. The customer may also have other rights which vary from state to state (USA), from province to province (Canada), and from country to country elsewhere in the world. To the extent that this warranty statement is inconsistent with the local law, this warranty shall be deemed modified to be consistent with such law, under such local law, certain disclaimers and limitations of this warranty statement may apply to the customer. For example, some states in the United States of America, as well as some governments outside of the United States (including provinces in Canada) may: a. Preclude the disclaimers and limitations of this warranty statement from limiting the statutory rights of the consumer (e.g. United Kingdom). b. Otherwise restrict the ability of a manufacturer to enforce such disclaimers or limitations. To the extent allowed by local law, except for the obligations specifically set forth in this warranty statement, in no event shall SRAM or its third-party suppliers be liable for direct, indirect, special, incidental, or consequential damages. · This warranty does not apply to products that have been incorrectly installed and/or adjusted according to the respective SRAM technical installation manual. The SRAM installation manuals can be found online at www.sram.com, www.rockshox.com, www.avidbike.com, www. truvativ.com, or www.zipp.com. · This warranty does not apply when the product has been modified. · This warranty does not apply when the serial number or production code has been deliberately altered, defaced or removed. · This warranty does not apply to damage to the product caused by a crash, impact, abuse of the product, non-compliance with manufacturer’s specifications of usage or any other circumstances in which the product has been subjected to forces or loads beyond its design. · This warranty does not apply to normal wear and tear. Wear and tear parts are subject to damage as a result of normal use, failure to service according to SRAM recommendations and/or riding or installation in conditions or applications other than recommended. Wear and tear parts are identified as: Dust seals/Bushings/Air sealing o-rings/Glide rings/Rubber moving parts/Foam rings/Rear shock mounting hardware and main seals/Stripped threads and bolts (aluminum,titanium, magnesium or steel)/ Upper tubes (stanchions)/Brake sleeves/Brake pads/Chains/Sprockets/Cassettes/Shifter and brake cables (inner and outer)/Handlebar grips/Shifter grips/Jockey wheels/Disc brake rotors/Wheel braking surfaces/Bottom out pads/Bearings/Bearing Races/Pawls/Transmission gears/Spokes/Free hubs/ Aero bar pads/Corrosion/Tools · This warranty shall not cover damages caused by the use of parts of different manufacturers. · This warranty shall not cover damages caused by the use of parts that are not compatible, suitable and/ or authorized by SRAM for use with SRAM components. · This warranty shall not cover damages resulting from commercial (rental) use. ROCKSHOX SUSPENSION SERVICE We recommend that you have your RockShox suspension serviced by a qualified bicycle mechanic. Servicing RockShox suspension requires knowledge of suspension components as well as the special tools and fluids used for service. Used suspension fluid should be recycled or disposed of in accordance to local and federal regulations. NEVER pour suspension fluid down a sewage or drainage system or into the ground or a body of water. This publication includes trademarks and registered trademarks of SRAM Corporation designated by the symbols ™ and ®, respectively. Copyright © SRAM LLC 2011 For exploded diagram and part number information, please refer to the Spare Parts Catalog available on our web site at www.sram.com. For order information, please contact your local SRAM distributor or dealer. Information contained in this publication is subject to change at any time without prior notice. For the latest technical information, please visit our website at www.sram.com. Your product‘s appearance may differ from the pictures/diagrams contained in this catalog. Product names used in this document may be trademarks or registered trademarks of others. TABLE OF CONTENTS GETTING STARTED .......................................................................................................................................................................................................................................4 PARTS ................................................................................................................................................................................................................................................................................4 TOOLS ................................................................................................................................................................................................................................................................................4 RECORD YOUR SETTINGS.............................................................................................................................................................................................................................................5 OIL VOLUME CHART .......................................................................................................................................................................................................................................................6 TORQUE CHART ...............................................................................................................................................................................................................................................................6 SERVICE INTERVALS .....................................................................................................................................................................................................................................................6 ANATOMY .........................................................................................................................................................................................................................................................................7 FORK REMOVAL .............................................................................................................................................................................................................................................9 LOWER LEG REMOVAL ...............................................................................................................................................................................................................................10 SEAL SERVICE .............................................................................................................................................................................................................................................11 WIPER & OIL SEAL REMOVAL....................................................................................................................................................................................................................................11 WIPER & OIL SEAL INSTALLATION .........................................................................................................................................................................................................................11 COIL SPRING SERVICE ...............................................................................................................................................................................................................................12 COIL SPRING REMOVAL/SERVICE ...........................................................................................................................................................................................................................12 COIL SPRING INSTALLATION ....................................................................................................................................................................................................................................13 DAMPER SERVICE ......................................................................................................................................................................................................................................14 DAMPER REMOVAL/SERVICE ...................................................................................................................................................................................................................................14 DAMPER INSTALLATION............................................................................................................................................................................................................................................15 LOWER LEG INSTALLATION .....................................................................................................................................................................................................................17 FORK INSTALLATION..................................................................................................................................................................................................................................18 3 GEN.0000000003184 REV C BOXXER RC TECHNICAL MANUAL GE T T ING S TA R T E D This guide provides step-by-step instructions to assist in performing routine maintenance of your BoXXer front suspension fork. PARTS Servicing your fork will require new replacement parts such as dust seals, o-rings, oil, etc. Make sure you have all the parts available before you begin service. Refer to the RockShox Spare Parts Catalog for a complete list of all service kits and corresponding part numbers for the 2011 BoXXer RC. TOOLS The following chart is a list of the tools needed for service of your 2011 BoXXer RC. While this chart is intended to be comprehensive, it is still only a guide. The tools required for each step of service are detailed in the text of each service section. LOWER LEG REMOVAL OIL AND DUST SEAL SERVICE DAMPER SERVICE SPRING SERVICE LOWER LEG INSTALLATION FORK/WHEEL REMOVAL/ INSTALLATION SAFETY GLASSES X X X X X X APRON X X X X X X RUBBER GLOVES X X X X X X CLEAN RAGS (LINT FREE) X X X X X X OIL PAN X X X X X X CLEAN WORK AREA X X X X X X BICYCLE STAND X X X X X X TOOLS SAFETY/STARTING EQUIPMENT WRENCHES/PLIERS 2 mm HEX X 4 mm HEX 5 mm HEX X X X 6 mm HEX X 24 mm SOCKET X X TORQUE WRENCH X X LARGE SNAP RING PLIERS - INTERNAL X X X X X X MISC TOOLS PLASTIC MALLET X LONG DOWEL ROD (PLASTIC OR WOOD) X X SHARP PICK X X X DOWNHILL TIRE LEVER OR LARGE FLAT HEAD SCREWDRIVER X 35 mm OIL SEAL/DUST WIPER INSTALLER X RULER X X OIL/LIQUIDS 5wt ROCKSHOX SUSPENSION OIL X 15wt ROCKSHOX SUSPENSION OIL GREASE (SUSPENSION OIL SOLUBLE) X X X X GRADUATED CYLINDER/BEAKER X X X X X X X X ISOPROPYL ALCOHOL 4 X X X GEN.0000000003184 REV C BOXXER RC TECHNICAL MANUAL G ETT IN G STARTED (CON TINUED) RECORD YOUR SETTINGS Take a moment and record all of your BoXXer settings in the chart below. This will allow you to return your fork to its original settings after service. Be sure to record the service date as well, this will help you keep track of service intervals. To determine your compression and rebound settings perform the following: Rebound - Count the number of clicks while turning the rebound adjuster fully counter-clockwise. Compression - Count the number of clicks while turning the compression adjuster fully counter-clockwise. The number of preload spacers will be determined during Spring Service. UPPER CROWN HEIGHT NUMBER OF PRELOAD SPACERS COMPRESSION REBOUND MY SETTINGS SERVICE DATE 5 GEN.0000000003184 REV C BOXXER RC TECHNICAL MANUAL G ETT IN G STARTED (CON TINUED) The following chart lists all of the oil volumes and weights for your BoXXer as well as tool sizes and torque values for all of the fasteners. OIL VOLUME CHART Damper technology (drive side) BoXXer RC Motion Control IS Volume (mL) Height (mm) Oil wt Upper leg 290 Volume (mL) Oil wt Lower leg 105 5 10 Spring technology (non-drive side) 15 Volume (mL) Oil wt Upper leg Coil - Volume (mL) Oil wt Lower leg - 40 15 TORQUE CHART Part/fastener Tool size Torque Maxle DH (non drive-side) 6 mm 8 clicks Maxle DH (drive-side) 6 mm 5.7 N·m (50 in-lb) Crown bolts 4 mm 5 N·m (44 in-lb) Bottom bolts 5 mm 7.3 N·m (65 in-lb) Top caps 24 mm 7.3 N·m (65 in-lb) Compression adjuster bolt 2 mm 0.6-1.0 N·m (5-9 in-lb) SERVICE INTERVALS The following chart is a summary of the maintenance/service intervals for RockShox forks. Following this schedule is important to ensure the consistent performance and longevity of your fork. Some of the information listed may not be applicable to your fork. Maintenance 6 Interval (Hours) Clean dirt and debris from upper tubes Every ride Check air pressure (air forks only) Every ride Inspect upper tubes for scratches Every ride Lubricate dust seals and upper tubes Every ride Check front suspension fasteners for proper torque 25 Remove lowers, clean/inspect bushings and change oil bath (if applicable) 25 Clean and lubricate air spring assembly 50 Change oil in damping system 100 Clean and lubricate coil spring assembly (coil forks only) 100 GEN.0000000003184 REV C BOXXER RC TECHNICAL MANUAL ANATOM Y Steerer Tube Upper Crown Compression Adjuster Knob Spring Top Cap Frame Bumper Upper Tube Brake Hose Guides NON-DRIVE S IDE D RIVE SIDE Lower Crown Lower Leg Bottom Bolt Rebound Adjuster Knob Maxle Lite DH 7 GEN.0000000003184 REV C BOXXER RC TECHNICAL MANUAL SAFETY FIRST! At SRAM, we care about YOU. Please, always wear your safety glasses and protective gloves when servicing your RockShox suspension. Protect yourself! Wear your safety gear! 8 GEN.0000000003184 REV C BOXXER RC TECHNICAL MANUAL F O R K R E M O VA L INTRODU CTION Removing your fork from the bike is the first step required in order to perform service. BoXXer’s dual crown feature allows the fork to be easily disassembled and removed from the bike. This provides easy access to internal components and is more XX convenient than working around a complete bike. BO ER RACE TECHNICAL MANUAL G E T T I N G S TA RT ED ( C O N T I N U E D ) RECORD YOUR SETTINGS Take a moment and record all of your BoXXer settings in the chart below. This will allow you to return your fork to its original settings after service. Be sure to record the service date as well, this will help you keep track of service intervals. 2. 3. 4. 5. 6. 7. 8. 9. 9 If you haven’t done so already, measure and record (in the “Record Your Settings” section) the distance between the top of the lower crown and the top of the upper tube just underneath the top cap. This will make re-installing your fork easier. Use a 6 mm hex wrench to loosen the Maxle™ DH bolt on the non-drive side until detent clicks are no longer felt. Use a 6 mm hex wrench to unthread and completely remove the Maxle DH from the drive side. Pull downward on the wheel to remove it from the fork. Remove the brake caliper and disconnect the brake hose from the fork. Use a 4 mm hex wrench to loosen the four lower crown and two upper crown bolts that clamp the crowns to the upper tubes. Do not loosen the steerer tube clamping bolt located on the upper crown. Slide the upper tubes downward until they are clear of the upper crown enough to be able to remove the frame bumpers. Lightly re-tighten one of the lower crown bolts to temporarily hold the fork in place. Use your thumb and pry the thickest section of each frame bumper away from the upper tube. Spray isopropyl alcohol or water between each bumper and upper tube. Twist each bumper back and forth until it is loose on the upper tube. Slide both bumpers up and off of the upper tubes. Loosen the lower crown bolt and slide the fork down through the lower crown and completely remove it from the bike. Use isopropyl alcohol and a lint free rag to clean the upper tubes and the crown clamping surfaces. 1 2 To determine your compression and rebound settings perform the following: Rebound - Count the number of clicks while turning the rebound adjuster fully counter-clockwise Compression - Count the number of clicks while turning the compression adjuster . fully counter-clockwise . Note: The number of preload spacers will be determined during Spring Service. UPPER CROWN HEIGHT SERVICE DATE NUMBER OF PRELOAD SPACERS COMPRESSION REBOUND MY SETTINGS 1. The following chart lists all of the oil volumes and weights for each section of your BoXXer as well as tool sizes and torque values for all of the fittings. OIL VOLUME CHART Volume Damper technology (mL) Boxxer Race Volume Oil wt (mL) Upper leg (drive side) Motion Control IS Oil wt Lower leg 5 10 Spring technology (non-drive side) 15 Coil TORQUE CHART 3 Part/fitting 5 Tool size Torque Maxle DH (non drive-side) 6 mm 8 clicks Maxle DH (drive-side) 6 mm 5.7 N·m (JOMC Crown bolts 4 mm 7.3 N·m (65 in-lb) Bottom bolts 5 mm 7.3 N·m (65 in-lb) Top caps NN 7.3 N·m (65 in-lb) Compression adjuster bolt NN /·NJOMC Volume (mL) Oil wt Upper leg - Volume (mL) Oil wt Lower leg - 40 15 5 $PQZSJHIUª43".--$t 6 7 GEN.0000000003184 REV C BOXXER RC TECHNICAL MANUAL L O W E R L EG R E M O VA L 1. 2. 3. 4. 5. 6. 7. 10 Clamp one of the upper tubes, just below the top cap, in a bike stand and place an oil pan beneath the fork to catch any draining oil. Do not scratch the upper tube while clamping it into the bike stand. Clean any debris from the stand clamping surface. A clean rag wrapped around the upper tube may be used to protect the tube surface. Firmly pull the external rebound adjuster knob and remove it from the drive side shaft bolt. Use a 5 mm hex wrench to loosen both shaft bolts three to four turns. Use a plastic mallet to firmly strike each shaft bolt to free the shafts from their press-fit to the lower leg. Remove the shaft bolts completely and allow the oil to drain. If oil doesn’t drain from either side, the press-fit may not be completely released. Re-install the shaft bolt two to three turns and strike it again. Remove the lower leg from the fork by firmly pulling each upper tube out of the lower leg assembly. Do not hit the brake arch with any tool when removing the lower leg as this could damage the fork. If an upper tube does not slide out of the lower leg, the press-fit may not be completely released. Re-install the shaft bolt 2 to 3 turns and strike it again. Allow any remaining oil in the lower leg to drain into the oil pan. Spray isopropyl alcohol onto the upper tubes and clean with a lint free rag. Inspect the upper tubes for damage. Damage such as scratches, chips or wear marks on the surface of the upper tube can cause oil to leak during use and allow dirt and debris to contaminate the internals of the fork. Damaged upper tubes should be replaced. 2 3 4 5 GEN.0000000003184 REV C BOXXER RC TECHNICAL MANUAL SE A L S E R V I C E INTRODU CTION Suspension fork seals are considered "wear and tear" parts and require regular maintenance. The frequency of seal replacement will depend on the frequency of riding, riding terrain, rider body weight, and type of fork. The following chapter covers wiper and oil seal removal and installation. WIP ER & OIL SEA L REM OVA L 1. 2. 3. Position the tip of a downhill tire lever or large, flat head screwdriver underneath the lip of the lower black oil seal, above the upper bushing. Stabilize the lower leg upright on a bench top or on the floor. Hold the lower leg firmly and use downward force on the tool handle to leverage both seals out at the same time. Be sure to stabilize the lower leg in order to prevent it from slipping while installing the seal. Do not allow the lower legs to twist in opposite directions, compress toward each other, or be pulled apart. This will damage the lower leg. Spray isopropyl alcohol on and into the lower leg. Wipe the lower legs clean, then wrap a clean, lint free rag around a dowel and clean the inside of each lower leg. 1 2 3 WIPER & OI L SEA L INSTAL L ATION 1. 2. 3. 4. 11 Position the oil seal, with the grooved side visible, onto the stepped side of the 35 mm seal installation tool. Hold one of the lower legs firmly and use the seal installation tool to push the oil seal evenly and completely into that leg. Repeat for the other leg. Be sure to stabilize the lower leg in order to prevent it from slipping while installing the seal. Do not allow the lower legs to twist in opposite directions, compress toward each other, or be pulled apart. This will damage the lower leg. Position the dust wiper seal, with the grooved side visible, into the recessed side of the 35 mm seal installation tool. Hold one of the lower legs firmly and use the seal installation tool to push the dust wiper evenly and completely into that leg. Repeat for the opposite leg. 1 2 3 4 GEN.0000000003184 REV C BOXXER RC TECHNICAL MANUAL C O IL S P R ING S E R V I C E 1 RE MOVA L/SERVICE CO IL SPRING 1. 2. 3. 4. 5. 6. 12 Use a 24 mm socket wrench to unthread and remove the spring top cap. Use a pick to remove the top cap o-ring. Apply a few drops of suspension oil to a new o-ring and install. Remove the spring pre-load spacer(s) then pull the coil spring from the upper tube. Use large internal snap ring pliers to remove the spring shaft base plate snap ring. Pull the spring shaft and base plate from the upper tube. Spray isopropyl alcohol on the coil spring, spring isolators, spring shaft, base plate, and the outside of the upper tube and wipe dry with a clean rag. Inspect the spring shaft assembly for damage. Replace entire assembly if necessary. Check the position of the spring isolators. There should be three isolators evenly spaced along the coil spring with approximately 50 mm of exposed coil at each end. If any of the isolators needs to be re-positioned, you can “thread” it along the coil by twisting it by hand. Once the isolator is positioned in place, use a heat gun or hair dryer to shrink down and secure the spring isolators around the spring. Gradually heat the isolators until they emit vapors. Be careful not to get the heat gun too close or you may burn a hole in the isolator. Allow the area to cool before handling. Spray isopropyl alcohol into the upper tube. Wrap a clean, lint free rag around a long dowel and insert into the upper tube to clean inside the upper tube. 2 1 2 3 4 5 ISOLATORS 6 GEN.0000000003184 REV C BOXXER RC TECHNICAL MANUAL C O IL SPRING INSTAL L AT ION 7. 8. 9. Make sure the base plate is installed on the spring shaft so that the small top out spring is oriented toward the spring perch. Insert the spring perch, spring shaft, and base plate assembly completely into the bottom of the upper tube so that the retaining ring groove is visible. Use large internal snap ring pliers to secure the snap ring into the snap ring groove. Make sure the snap ring is securely fastened in the snap ring groove. You can check this by using the snap ring pliers to rotate the snap ring back and forth a couple of times, then firmly pulling down on the damper shaft. Snap rings have two unique sides. One side is flat edged, while the other is round edged. Installing snap rings with the flat edge facing the tool will allow for easier removal and installation. 10. Identify the smaller diameter end of the coil spring. Use a grease brush and apply a generous amount of grease to the entire length of the coil spring. Install the coil spring, with the smaller diameter end first, into the upper tube. 11. Use a ruler to measure the distance from the top of the coil spring to the top of the upper tube. This distance should be at least 14 mm but not more than 16 mm. If the measurement is greater than 16 mm, add preload spacers until the measurement falls between 14-16 mm (each preload spacer is 2 mm thick). If the distance measures greater than 16 mm and is not corrected, the coil spring will experience up/down play in the upper tube and the fork will make a ‘knocking’ noise. If the distance is less than 14 mm, the coil spring will bind in the upper tube which can lead to damage of the coil spring. 12. Clean the top cap, then apply grease to the top cap threads and o-ring. Insert the top cap into the upper tube/crown and hand thread it into the upper tube. Be careful not to damage the top cap o-ring upon installation. Use a 24 mm socket wrench to tighten to 7.3 N·∙m (65 in-lb). 13 7 SPRING PERCH SUPPORT WAVY TOP OUT BASE WASHER WASHER SPRING PLATE 8 9 10 11 12 GEN.0000000003184 REV C BOXXER RC TECHNICAL MANUAL DA M P E R S E R V IC E D A MPER REM OVA L/SERVICE 1. 2. 3. 4. 5. 6. 7. 8. 9. 14 Turn the compression adjuster knob counter-clockwise until it stops. Record your setting by counting the number of clicks. This will make tuning your fork after service easier. Use a 2 mm hex wrench to remove the compression adjuster knob retaining bolt. Remove the compression adjuster knob. Use a 24 mm socket wrench to unthread the compression damper top cap. Remove the compression damper from the upper tube by pulling it up and rocking side to side. Once removed, clean the upper tube threads with a rag. Use a pick to remove the compression damper o-rings located at the top and bottom of the damper. Apply grease to the new o-rings and install them. Do not scratch or damage the top cap or the surface of the piston during removal of the o-rings. Any damage will allow oil to bypass the o-rings during use, resulting in oil leakage and decreased damper performance. Pour any remaining oil from the upper tube into the oil pan. Push the rebound damper shaft into the seal head, leaving just enough shaft exposed to hold onto with your fingers. Use large internal snap ring pliers to remove the seal head snap ring from the snap ring groove. Do not scratch or damage the surface of the damper shaft during removal of the snap ring. Any damage will allow oil to bypass the inner o-ring during use, resulting in decreased damper performance and travel loss. Position the upper tube upright. Firmly pull down on the damper shaft and remove the rebound damper and seal head assembly from the upper tube. Slide the seal head off the damper shaft. Use a pick to remove the inner and outer seal head o-rings. Apply grease to the new o-rings and install them. Do not scratch or damage the seal head during removal of the o-rings. Any damage will allow oil to bypass the o-rings during use,resulting in decreased damper performance and travel loss. 2 3 4 5 7 8 9 GEN.0000000003184 REV C BOXXER RC TECHNICAL MANUAL D AMPER INS TA L LATION 10. Spray isopropyl alcohol on the rebound damper shaft and clean with a lint free rag. 11. Remove the glide ring from the rebound shaft assembly. Apply grease to the new glide ring and install it. 12. Apply grease to the seal head inner o-ring. Slide the rebound seal head onto the rebound damper shaft with the stepped side of the seal head oriented toward the piston. 13. Spray isopropyl alcohol into the upper tube. Wrap a clean, lint free rag around a dowel and clean the inside of the upper tube. 14. Apply a small amount of grease to the seal head outer o-ring. Insert the rebound damper piston into the bottom of the upper tube at an angle, with the side of the glide ring opposite the split entering the upper tube first. Continue to angle and rotate until the glide ring is in the upper tube. Push the seal head firmly into the bottom of the upper tube until the retaining ring groove is visible. 15. Push the rebound damper shaft into the seal head, leaving just enough shaft exposed to hold onto with your fingers. Use large internal snap ring pliers to secure the snap ring into the snap ring groove. Make sure the snap ring is securely fastened in the snap ring groove. You can check this by using the snap ring pliers to rotate the snap ring back and forth a couple of times, then firmly pulling down on the damper shaft. 11 12 13 14 PISTON DAMPER SHAFT SEAL HEAD 15 Snap rings have a sharper-edged side and a rounder-edged side. Installing snap rings with the sharper-edged side facing towards the tool will allow for easier installation and removal. 15 GEN.0000000003184 REV C BOXXER RC TECHNICAL MANUAL D A MP ER INSTA L LATION ( CON TINUED) 16. Make sure that the fork is upright in the bicycle stand. Pull the rebound damper shaft down to the fully extended position. Measure and slowly pour 290 mL of 5wt RockShox suspension oil into the upper tube. You can use oil height to measure oil fill. This method is recommended for use only when the lower leg is attached to the fork. Pour suspension oil into the upper tube. Compress the fork a few times to circulate the oil throughout the damping system. If the fork is still on the bike, you will need to unweight the front of the bike to allow the fork to fully extend. Measure from the top of the upper tube to the top of the oil level. The measurement should be 105 mm. Add or remove oil as necessary. 17. Apply grease to the compression damper top cap threads, top cap o-ring, and piston o-ring. Insert the compression damper into the top of the upper tube and push downward until the damper is fully seated in the upper tube. 18. Use a 24 mm socket wrench to thread the compression damper into the upper tube and tighten to 7.3 N·∙m (65 in-lb). 19. Re-install the compression adjuster knob and retaining bolt. Tighten the retaining bolt to 0.6-1 N·∙m (5-9 in-lb). Reset the compression adjuster knob to its original setting (documented in the table in the “Getting Started” section). 16 16 17 18 19 GEN.0000000003184 REV C BOXXER RC TECHNICAL MANUAL L O W E R L EG IN S TA L L AT IO N 1. Spray the upper tubes with isopropyl alcohol and wipe with a clean rag. 2. Clean and inspect the shaft bolts, nylon crush washers, and crush washer retainers. Replace any crush washers and crush washer retainers if damaged. You must clean dirty crush washers and replace damaged crush washers. Dirty or damaged crush washers can cause oil to leak from the fork. 3. Apply a liberal amount of grease to the inner surfaces of the dust wiper and oil seal. 4. Gently slide the lower leg assembly onto the upper tubes. Be sure each upper tube is inserted into its corresponding side of the lower. Slide the upper tubes into the lower leg until you feel the spring and damper shafts make contact with the inside of the legs, then pull the upper tubes back out a few centimeters to provide clearance for oil lubrication installation. Make sure both dust seals slide onto the tubes correctly without folding the seals’ lip. 5. Invert the fork to about 45 degrees, with the fork legs pointing upward. Measure and pour 10 mL of 15wt RockShox suspension oil into the drive side lower leg through the shaft bolt hole, then inject/pour 40 mL of 15wt suspension oil into the non-drive side lower leg through the shaft bolt hole. 6. Slowly slide each upper tube completely into the lower leg until the shaft threads are visible through the shaft bolt holes. Sliding the upper tubes and lower legs together too quickly will cause oil to spray out of the shaft bolt holes. 7. Check for oil in the shaft threads. If there is oil in this area, use the corner of a rag to clean and dry the threads. 8. Thread the rebound damper and coil spring shaft bolts into the threaded shaft ends, through the lower leg holes. Use a 5 mm hex to tighten bolts to 7.3 N·∙m (65 in-lb). 9. Insert the external rebound adjuster knob onto the rebound shaft bolt. To secure the rebound adjuster, press firmly to engage the retaining clip on the shaft bolt. 10. Spray isopropyl alcohol on the entire fork and wipe it with a clean rag. 17 3 4 5 6 7 8 9 GEN.0000000003184 REV C BOXXER RC TECHNICAL MANUAL F O R K IN S TA L L AT IO N INTRODU CTION Re-installing the fork onto your bike is the final step in servicing your BoXXer fork. Once you have installed the fork onto your bike, you will be ready to ride! 1. 2. 3. Slide each upper tube through the lower crown, leaving enough clearance to install the frame bumpers. Spray a liberal amount of isopropyl alcohol or water on the inner surface of the frame bumpers and re-install the bumpers onto the upper tubes. Gently push and twist the upper tubes through the upper crown. With a minimum extension of 2 mm, position both upper tubes to extend past the top of the upper crown by an equal amount. Measure the distance from the top of the upper tube to the top of lower crown. This distance must be 156 mm (+/ - 2 mm). Align the logo on the drive side upper tube with the logo on the lower leg. Refer to the BoXXer crown heights diagram for proper crown height dimensions. Improper crown height placement can cause a reduction in handling performance, travel, and/or cause fork damage. 2 3 BOXXER CROWN HEIGHTS TOP OF UPPER TUBE 156 MM (±2 MM) TOP OF LOWER CROWN 18 MINIMUM 2 MM TOP OF UPPER TUBE TO TOP OF UPPER CROWN GEN.0000000003184 REV C BOXXER RC TECHNICAL MANUAL FO R K IN STA L LATION ( CON TINUED) 4. 5. 6. 7. 8. 9. 19 Use a 4 mm hex wrench to torque the four lower crown bolts in an alternating fashion to 5 N·m (44 in-lb). Tighten the two upper crown bolts to 5 N·m (44 in-lb). Re-install the brake according to the brake manufacturer’s instructions. Fasten the brake hose to the brake hose guides on the fork’s lower leg. Position your wheel in the lower leg dropouts. The hub should seat firmly in the dropouts. Be sure to position the disc brake rotor in the caliper. Verify that neither the rotor, hub, nor rotor bolts interfere with the lower legs. If you are unfamiliar with adjusting your disc brakes, see your brake manufacturer’s instructions. Slide the externally threaded end of the Maxle DH through the drive side of the hub, until it engages the threads of the lower leg dropout. Use a 6 mm hex wrench to turn the drive side axle bolt and tighten the axle into the dropout. Torque to 5.7 N·m (50 in-lb). Use a 6 mm hex wrench to turn the non-drive side axle bolt clockwise until you hear or feel 8 clicks or you reach a torque value of 3.4 N·m (30 in-lb). Re-check that all damping adjusters are at their original positions (documented in the table in the “Getting Started” section), or refer to the BoXXer RC Tuning Guide to aid in tuning adjustments for the rider. 4 5 7 8 GEN.0000000003184 REV C www.sram.com WORLD HEADQUARTERS SRAM, LLC 1333 N. Kingsbury St., 4th Fl Chicago, Il 60642 USA Phone +1-312-664-8800 Fax +1-312-664-8826 EUROPEAN HEADQUARTERS SRAM Europe Paasbosweg 14-16 3862ZS Nijkerk The Netherlands Phone +31-33-450-6060 Fax +31-33-457-0200 ASIAN HEADQUARTERS SRAM Taiwan No. 1598-8 Chung Sahn Rd Shen Kang Hsiang, Taichung County 429 Taiwan R.O.C. Phone +886-4-2564-3678 FAX +886-4-2561-3686