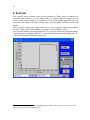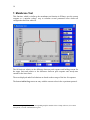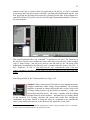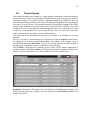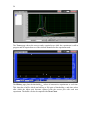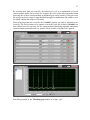
1
G-clamp version 2.0 User Manual Paul H.M. Kullmann and John P. Horn Department of Neurobiology and Center for the Neural Basis of Cognition University of Pittsburgh School of Medicine E 1440 Biomedical Science Tower Pittsburgh, PA 15261 http://www.neurobio.pitt.edu To download this document and the G-clamp program go to: (http://hornlab.neurobio.pitt.edu) Contact Information: Dr. Paul H.M. Kullmann Phone: 412-648-9291 [email protected] Dr. John P. Horn Voice: 412-648-9429 [email protected] Grant Support: This document and the G-clamp software that it describes were both developed at the University of Pittsburgh with support from National Institutes of Health grant RO1 NS21065. Copyright Information: These materials are freely available for non-commercial research and educational purposes. The authors reserve the copyright and request that others using this material acknowledge its origin. Those wishing to publish any of this material or to develop commercial applications must first contact the authors. G-clamp v1 2003, v1.2 October 1, 2004 G-clamp v2 February 1, 2007 Copyright © 2007 2 Table of Contents 1. PROGRAM START ............................................................................................................................... 4 2. RUNNING AN EXPERIMENT............................................................................................................. 5 2.1. EXPERIMENT LOGGING .................................................................................................................... 6 3. EXITING G-CLAMP V2 ....................................................................................................................... 6 4. AMPLIFIER MODULES....................................................................................................................... 7 4.1. 4.2. 5. AXOCLAMP 2B ................................................................................................................................ 7 MODEL 2400 .................................................................................................................................... 8 SYNAPTIC CONDUCTANCE EDITOR ............................................................................................. 9 5.1. CREATING A NEW SYNAPTIC CONDUCTANCE .................................................................................... 9 5.1.1. alpha-function........................................................................................................................... 10 5.1.2. double-exponential ................................................................................................................... 10 5.1.3. voltage-dependent..................................................................................................................... 10 5.2. EDITING AN EXISTING SYNAPTIC CONDUCTANCE ........................................................................... 11 5.3. DELETING AN EXISTING SYNAPTIC CONDUCTANCE......................................................................... 11 6. SEAL TEST........................................................................................................................................... 12 7. MEMBRANE TEST ............................................................................................................................. 14 7.1. CALCULATIONS .............................................................................................................................. 15 8. BRIDGE TEST ..................................................................................................................................... 17 9. EXPERIMENT MODULES ................................................................................................................ 19 9.1. 9.2. 9.3. 9.4. 10. VCLAMP ......................................................................................................................................... 19 THRESHOLD-GSYN ......................................................................................................................... 25 SYNAPTIC GAIN ............................................................................................................................. 28 STRIP CHART.................................................................................................................................. 31 EVENT FILES ................................................................................................................................. 32 10.1. CREATING EVENT FILES .................................................................................................................. 32 …with Neurosim ..................................................................................................................................... 32 11. 11.1. 11.2. 11.3. 11.4. 11.5. 12. OFFLINE UTILITIES..................................................................................................................... 34 G-CLAMP FILEUTILITIES MASTER.VI ............................................................................................. 34 G-CLAMP COUNT APS IN GAI-FILE.VI ........................................................................................... 35 G-CLAMP RETRIEVE GTH-FILE RESULTS.VI................................................................................... 37 G-CLAMP GET MEMBRANE TEST RESULTS.VI ................................................................................ 38 G-CLAMP CONVERT STP-TO-GAI.VI ................................................................................................ 40 DATA FILES.................................................................................................................................... 41 12.1. NAMES ........................................................................................................................................... 41 12.2. CONTENT ....................................................................................................................................... 41 12.2.1 Vclamp - *.IVB..................................................................................................................... 41 12.2.2 Gsyn Threshold - *.GTH...................................................................................................... 42 12.2.3 Synaptic Gain - *.GAI.......................................................................................................... 42 12.2.4 Strip Chart - *.STP .............................................................................................................. 42 APPENDIX A – G-CLAMP INSTALLATION ........................................................................................... 44 HARDWARE .................................................................................................................................................. 44 Connecting embedded controller and host computer.............................................................................. 44 3 Connecting recording amplifier and break-out box (BNC-2090) ........................................................... 44 AxoClamp 2B amplifier...................................................................................................................................... 44 Model 2400 amplifier.......................................................................................................................................... 44 SOFTWARE ................................................................................................................................................... 45 TROUBLE-SHOOTING .................................................................................................................................... 46 4 1. Program Start - Start the embedded controller Start LabVIEW 8 on the host computer and open the project G-clamp.lvproj Open G-clamp v2 – Host.vi under My Computer\Host - Once start-up of the embedded controller is complete, press the Run button to start G-clamp v2 – Host.vi. The VI will go through an initialization process that includes starting G-clamp components on the embedded controller and establishing a communication link between G-clamp software running on the host computer and on the embedded controller. The final initialization step is the loading of an amplifier module (see section Amplifier Modules). DO NOT interact with the front panel of G-clamp v2 – Host.vi until the amplifier module has been loaded. 5 - - Set your data directory either by typing a path into the DataDirectory control on the General page or by using the folder button to the right of the control to open a file dialog box: Navigate to the designated data directory and finalize your selection by pressing Current Folder in the dialog box. Open up to three experiment modules by selecting them from the list under the menu item ExpModules. Each experiment module will be loaded into a sub-panel, starting on the page Exp. Module 1 and continuing with pages Exp. Module 2 and Exp. Module 3. If you try to load more than three modules, a dialog will appear asking you to cancel loading the fourth module or to close one of the already open modules 1 . 2. Running an experiment - - 1 Set up your experiment with the corresponding experiment module (for details see the specific experiment module section under Experiment Modules). Make sure that any settings in the amplifier module section that have to be set by the user (see section Amplifier Modules for details) correspond to the real settings at your amplifier. Check the control Virtual Conductances on the General page for the status of the conductances: green – enabled, red – disabled and the strength of the conductance (in nS) 2 . (These conductances can be used with all experiment modules except the Strip Chart module.) Check the status of the control Save Data: green – enabled, red – disabled. (The Strip Chart module ignores this control and always saves data to file) Closing a module sometimes results in a LabVIEW error message. This error is non-fatal and can be ignored: Select ‘Continue’ in the error dialog to proceed with the G-clamp session. 2 The kinetics of these conductances are hard-wired into the software and can not be changed while running G-clamp v2. Instructions for modifying or adding a conductance are not yet available for G-clamp v2. However, consulting the “Programmer’s Guide” for G-clamp v1.2 (http://hornlab.neurobio.pitt.edu/downloads.htm) should give you an idea about how-to. 6 - - Start the experiment with the Start button on the front panel of the corresponding experiment module. If you want to abort the experiment after it was started, use the Abort Exp. button in the lower right section of the G-clamp v2 – Host.vi front panel. (This works only for experiments with the modules Vclamp and Threshold-gsyn. Synaptic Gain experiments can not be aborted and Strip Chart experiments are terminated with the Enough data button in this module’s front panel.) Check the RT Loop Info indicator: After each data transmission it indicates performance of the dynamic clamp feedback loop by showing mean cycle length and its standard deviation as well as maximum jitter. A mean value larger than the set value indicates consistent failure to perform at the requested rate while a correct mean value but maximum jitter larger than the ½ mean indicates an occasional failure which did not affect overall performance. (The Strip Chart module uses a data acquisition mode unrelated to the dynamic clamp feedback loop and therefore does not evaluate loop performance.) 2.1. Experiment Logging G-clamp v2 keeps a running record of most experimental settings together with time stamps when an experiment is started. User comments (e.g. about drug applications) can be added at any time. This record is maintained in computer memory until one of two conditions is met: - a change in the data directory or - exiting G-clamp These two conditions trigger writing the experiment record to a text file in the data directory used last (and the start of a new record if a change in data directory occurred). Part or all of the current record can also be marked and with copy/paste transferred to other applications. 3. Exiting G-clamp v2 The Exit button on the front panel of G-clamp v2 – Host.vi stops G-clamp v2 – Host.vi and the G-clamp software running on the embedded controller. It also saves the current experiment log as well as information about the amplifier module and the data directory to the configuration file for use as start-up parameters the next time G-clamp v2 is started. 7 4. Amplifier Modules Amplifier modules contain amplifier-specific controls required to communicate the recording mode (current clamp, voltage clamp) to the G-clamp software. The last module used is loaded at program start. To change the amplifier module, select another amplifier on the “General” page of the experiment section. Currently modules for two amplifiers are available: - AxoClamp 2B from Molecular Devices (formerly Axon Instruments) with the x 0.1 LU gain headstage - Model 2400 from A-M Systems, Inc with a headstage that has the 100 MΩ/10 GΩ feedback resistor combination If you have a different amplifier or one of these amplifiers with a different headstage, consult the manual with the set-up instructions. 4.1. AxoClamp 2B The AxoClamp 2B amplifier has two separate inputs for external current and voltage commands. For the G-clamp program to use the right command input, the user has to set the recording mode in the amplifier module section. Note that only BRIDGE (current clamp) and (cont.) SEVC (voltage clamp) are available. 8 4.2. Model 2400 The Model 2400 amplifier telegraphs several of its settings to the computer. Actively used by the G-clamp program are the MODE and GAIN settings, while the FILTER and Cmembrane settings are only of informative nature to the user. The remaining two controls, PROBE GAIN and EXTERNAL CLAMP SIGNAL, are NOT telegraphed and have to be set by the user for correct scaling of the amplifier output and the amplifier input command. The status of the telegraphed amplifier settings are updated automatically each time before an experiment is started and an update can also be initiated with the button Amplifier Settings - Update to the right. 9 5. Synaptic Conductance Editor The Synaptic Conductance Editor allows the user to define the kinetics of a synaptic conductance gsyn for use with the experiment modules Threshold-gsyn and Synaptic Gain. Once a synaptic conductance has been defined its kinetic parameters are preserved in a configuration file and therefore defined synaptic conductances are available from the beginning whenever G-clamp v2 is started. The Synaptic Conductance Editor also allows modification (editing) of an existing synaptic conductance and its removal (deleting) from the configuration file. The Editor is started from the G-clamp v2 – Host.vi menu: Edit > Synaptic Conductances. At start, it reads the configuration file and populates the list of existing synaptic conductances with their names. The Cancel button stops the Synaptic Conductance Editor and exits it without any changes to the configuration file. A new synaptic conductance or modifications to an existing synaptic conductance become available for use immediately after exiting the Synaptic Conductance Editor, i.e. no Gclamp restart is required. Next the user has to select an action: - Create new - Edit existing - Delete existing 5.1. Creating a new synaptic conductance First the user has to select one of three possible kinetic models for the new synaptic conductance: - alpha-function - double-exponential - voltage-dependent 10 Once a kinetic model has been selected, a model-specific field for setting the modelspecific parameters becomes visible. Any change of a parameter triggers an update of the conductance waveform graph which shows the template for the synaptic event that Gclamp will use whenever the Threshold-gsyn or Synaptic Gain modules execute. This template has a finite length which the user has to specify with the Duration parameter. 5.1.1. alpha-function gsyn(t) = k x t x exp(-t/tau) with k = e/tau and e the base of the natural logarithm. 5.1.2. double-exponential gsyn(t) = k x exp(-t/taurise) – exp(-t/taufall) with k a dimensionless factor that scales the peak to unitary (1 nS) conductance. 5.1.3. voltage-dependent This kinetic model mimics a NMDA-receptor conductance and its voltage-dependent block by extracellular Mg2+. gsyn(Vm,t) = [k x exp(-t/taurise) – exp(-t/taufall)] / [1 + eta x [Mg2+] x exp(-1 x gamma x Vm)] with k a dimensionless factor that scales the peak to unitary (1 nS) conductance. This model as well as the default values of its parameters (taurise = 0.67 ms; taufall = 80 ms; eta = 0.33 / mM; gamma = 0.06 / mV) are from Zador, Koch & Brown3 . The voltage-dependence of this conductance can be studied by changing the parameter “Vm” and by toggling the waveform display between conductance (g) and current (I). I is calculated assuming a reversal potential of 0 mV. 3 Zador A, Koch C & Brown TH (1990) Biophysical model of a Hebbian synapse. PNAS 87:6718-6722 11 5.2. Editing an existing synaptic conductance Selecting the conductance to be edited in the list of existing synaptic conductances brings up the parameter field for the conductance. For details on the different kinetic models see the preceding section, ‘Creating a new synaptic conductance’. 5.3. Deleting an existing synaptic conductance Select the conductance to be deleted in the list of existing synaptic conductances. 12 6. Seal Test This function, which is similar to the seal test function in PClamp, serves to monitor seal formation while patching a cell in voltage clamp. A unipolar, periodic voltage4 step is given and the current response is monitored: As the patch pipette approaches the cell membrane and forms a seal, the initially large current response becomes smaller and smaller. The trace shown reflects the average of the last 10 current responses and the values shown for seal resistance (Rseal) and holding current (Ih) are based on this average. Ih is the mean holding current during the last 25% of the pre-voltage-step period and Rseal is then calculated according to Ohm’s Law from the difference between Ih and the last 25% of the current response during the voltage-step. 4 If the recording amplifier (and the corresponding amplifier module of the G-clamp software) is in current clamp mode, a current command will be given. 13 14 7. Membrane Test This function, which is similar to the membrane test function in PClamp, uses the current response to a unipolar voltage 5 step to calculate several parameters after whole-cell configuration has been achieved. The fit limits are relative to the difference between peak response and holding current for the upper limit and relative to the difference between peak response and steady-state current for the lower limit. The trace displayed and all calculations are based on the average of the last 10 responses. The button Add to Log creates an entry with the current values in the experiment protocol. 5 If the recording amplifier (and the corresponding amplifier module of the G-clamp software) is in current clamp mode, a current command will be given. 15 7.1. Calculations Ipeak Iss Ihold ΔV = pulse amplitude Vhold - Holding current (Ih) is determined from the last 25% of the pre-voltage-step period. Steady-state current (Iss) is determined from the last 25% of the voltage-step period. - The transient portion of the current response is fit with a single exponential which gives the time constant (tau). The area (charge Q) under the current transient can be used to calculate access resistance (Ra) and membrane resistance (Rm). Q1 = CV Tau Q3 Iss Q2 ΔI = ΔV/(Ra+Rm) Ihold (at Vhold) The total charge (Qt) under the transient is the sum of the charge (Q1) in the transient above the steady state response plus the correction factor (Q2): Qt = Q1 + Q2 - Q1 is found by integrating the charge above Iss. - Q2 is calculated as ΔI x tau = (Iss – Ih) x tau. The small error charge (Q3) introduced with the calculation of Q2 is ignored. After Qt has been derived, Cm can be calculated: Cm = Qt / ΔVm (1) where ΔVm is the amplitude of the voltage step. In the steady-state, the relation between ΔVm and ΔV is: ΔVm = ΔV x Rm/Rt = ΔV x Rm/(Ra + Rm) (2) 16 where Rt, Rm and Ra are the total, membrane and access resistances, respectively. Substituting for ΔVm from (2) into (1) derives: Cm = Qt x Rt / ΔV x Rm (3) Substituting (3) for Cm in definition of the time constant = Ra x Cm: tau = Qt x Ra / ΔV yields: Ra = tau x ΔV / Qt (4) which provides access resistance directly as a function of measured variables. The total resistance is calculated from the steady-state response: Rt = ΔV / ΔI = Ra + Rm (5) from which one obtains: Rm = Rt – Ra (6) 17 8. Bridge Test This function serves to monitor and adjust the settings of the bridge circuitry while recording in current clamp from a cell. A unipolar, periodic current 6 step is given and the voltage response is monitored. Because the much smaller capacitance of the pipette charges much faster than the whole-cell capacitance, the voltage response has two phases: The initial, almost instantaneous change reflects charging of the pipette capacitance7 and its amplitude reflects the size of the access resistance. By setting the bridge so that the slower response of the whole-cell capacitance seems to rise exactly from the pre-current-pulse level the voltage drop across the access resistance is eliminated. The trace shown reflects the average of the last 10 voltage responses. 6 If the recording amplifier (and the corresponding amplifier module of the G-clamp software) is in voltage clamp mode, a voltage command will be given. 7 Detection of this change is facilitated by increasing the cut-off frequency of the low-pass filter operating on the amplifier’s voltage output and by turning up the capacitance neutralization of the amplifier to speed-up the charging process. 18 19 9. Experiment Modules 9.1. Vclamp The name of this module is somewhat misleading; seemingly implying that it is intended only for voltage clamp recordings. In fact, the purpose of this module is to generate several types of command waveforms for the amplifier irrespective of whether the amplifier is in voltage clamp or (dynamic) current clamp mode. Currently three types of command waveform are available: - square pulse - ramp - zap (a frequency-modulated sine wave) These commands can be combined sequentially and command amplitudes can be made to increment or decrement from one iteration to the next. (Almost) all experiment parameters are defined in a script-like protocol. Protocols are stored in an array, of which only one element (protocol) is visible at any time and this visible protocol is the one that will be executed upon pressing Start. To scroll through the array of protocols use the horizontal slider at the bottom of the Scripts window. When scrolling through the array of protocols 8 the waveform display shows exactly what command(s) will be given to the amplifier. Similarly, editing a protocol in the Scripts window triggers continuous updates of the waveform display. If your waveform does not look like what you expect you probably have a syntax error in your protocol. Note that no error-checking is implemented and therefore execution of a script containing syntax errors could crash G-clamp! Before explaining some example protocols the general rules of the protocol syntax shall be described: - All expressions have to be typed in lower case - In (most) commands consisting of an expression and a numerical value expression and numerical value have to be separated by exactly one space - Each command consists of a separate line - Comments can be added to a script by placing the % symbol at the beginning of each comment line - Required commands for a script are (in the following xy denotes a numerical value and [text in square brackets gives additional information]): o samplerate xy [sample rate in Hz] o pause xy [time in ms from end of one episode to start of next] o for xy [indicates start of a recording episode with the duration of the recording episode determined by the 8 Scrolling through the array of protocols while grabbing the slider with the cursor does not always trigger a waveform update. In this case move the cursor into the script field and click the left mouse button once. 20 - - sum of all ‘wait’ commands from here to the ‘end’ command; xy has to be at least 1] o end [indicates end of the recording episode] o wait xy [time in ms before a change in the amplifier command is given; at least one ‘wait’ command has to be within the ‘for xy’ – ‘end’ sequence to set the duration of the recording episode] A ‘wait’ command can not be followed by another ‘wait’ command. Commands that change the amplifier command are (in the following xy denotes the amplitude of the command in mV for a voltage clamp command and in pA for a current clamp command and [text in square brackets gives additional information]): o const xy [sets the amplifier command to a new value which remains in effect for the duration of the following ‘wait’ command] o ramp xy [initiates a linear change in the amplifier command starting at the previous amplifier command level; the speed of the change is determined by the following ‘wait’ command] o zap xy fstart xy fstop xy [initiates a frequency-modulated sine wave (of amplitude xy) command to the amplifier: the start frequency is set with the numerical value after ‘fstart’ (inHz) and the end frequency with the numerical value after ‘fstop’ (in Hz) 9 ; the speed of the frequency-modulation is determined by the following ‘wait’ command] All of these commands operate relative to the holding potential (voltage clamp) or DC current command (current clamp) dialed in on the recording amplifier. The ‘const’ and ‘ramp’ commands can be followed by either ‘decrement xy’ or ‘increment xy’ (with xy denoting the change in the amplifier command) which successively changes the effective value of the preceding ‘const’ or ‘ramp’ command from episode to episode. The change becomes effective with the second episode, i.e. in the first episode the effective amplifier command corresponds to the value of ‘const’ or ‘ramp’. To add a new script scroll to the end of the protocol array. The last element is grayed-out, indicating that it is not an active script. It is activated by starting to edit it. To make any changes to the scripts permanent you have to exit the module by using the Close Module button. Any changes made to scripts are lost if you exit G-clamp v2 with the Vclamp module still open. 9 Setting ‘fstart’ and ‘fstop’ to the same value xy yields an unmodulated sine wave of frequency xy. 21 This script generates a square pulse of 10 mV/pA with a delay of 50 ms by first giving the amplifier command ‘const 10’. This command level is maintained for 50 ms before another amplifier command (‘const -10’) returns the command level to zero. The recording episode ends after another 50 ms. This pattern is repeated 50 times (‘for 50’) with 150 ms breaks in between episodes (‘pause 150’). If the last amplifier command does not return the command level back to zero, that level will be maintained during the pause until the start of the next episode! This script gives a series of negative square pulses of increasing amplitude. The first pulse is -10 mV/pA (‘const -10’). With ‘increment -10’ this value becomes -20 mV/pA for the second episode (-10 + -10 = -20), -30 mV/pA for the third epsisode (-20 + -10 = -30) and so on. With the last, seventh episode (‘for 7’) the command level reaches -70 mV/pA. Note: ‘increment -10’ is equivalent to ‘decrement 10’ 22 This script demonstrates the combination of a pre-pulse and a variable test pulse. With ‘const 50’ the pre-pulse is initiated and maintained for 400 ms (‘wait 400’). By being relative to the preceding command level ‘const 20’ next changes the command level to 70 mV/pA (50 + 20 = 70) in the first episode. With ‘increment 20’ the change relative to the pre-pulse becomes 40 mV/pA in the second episode, 60 mV/pA in the third episode and so on. This script demonstrates the use of the ‘ramp’ command. The numerical value of the ‘ramp -80’ command sets its amplitude (-80 mV/pA) with the start value defined by the preceding amplifier command level: In this case set to 40 mV/pA with the preceding ‘const 40’. The speed of the ramp is -20 /s (-80 / 4000 ms) as set by the following ‘wait 4000’ command. At the end of the ramp the amplifier command level returns automatically to a value corresponding to the midpoint of the ramp. Note that although in this example the ramp 23 returns to 0 mV/pA as it starts at 40 mV/pA and ends at -40 mV/pA, a ‘const 0’ command is required in the script between the ‘wait 4000’ specifying the ramp duration and the ‘wait 800’ specifying the post-ramp time before the recording episode ends. If the midpoint of a ramp differs from 0 mV/pA the value for the following command then should be relative to the ramp midpoint. This script demonstrates the ‘zap’ command 10 . It generates a sine wave. The frequency of the sine wave increases at a constant rate from a start value to an end value. In this example (‘zap 15 fstart 0 fstop 5’) the sine wave starts at 0 Hz and ends at 5 Hz. The speed of the modulation is determined by the following ‘wait’ command, therefore in this case (5 Hz – 0 Hz) / 10000 ms = 0.5 Hz / s. Note that after the ‘zap’ command the value of the next ‘const’ command is absolute and not relative to the level achieved at the end of the sine wave! Data files generated by the Vclamp module are of type ‘.ivb’. Simulate? allows observation of the behavior of an implemented (nonsynaptic) conductance under voltage clamp conditions. The recording amplifier is operated in voltage clamp mode and a script is used to run a voltage clamp protocol (e.g. the protocol to measure IA steady state inactivation described above). The script – together with the holding potential dialed-in at the amplifier – determine the Vm reading. Based on the measured Vm G-clamp calculates the current that would flow through the conductance at any time. Instead of using this value as a command to the amplifier the value is only displayed to the user (as the Im trace) and, optionally, saved to file. 10 It seems like only sine waves symmetrical around 0 mV/pA work: Using a preceding ‘const xx’ command to let the sine wave oscillate around xx mV/pA does not work! 24 Leak Subtraction is only for voltage clamp recordings to correct for a cell’s passive membrane current, i.e. leak current. G-clamp uses P/N subtraction in which a series of scaled-down versions of the command waveform are generated, and the responses to the scaled-down versions are accumulated and subtracted from the command response. Scaleddown versions are used to prevent active currents from being activated. The number of these scaled-down commands is the “N” referred to in P/N. The command waveform (pulse P) is scaled down by a factor of 1/N, and this applied N times to the cell. Since leak current has a linear response, the accumulated responses of the subsweeps approximate the leak current component of the response to the actual command waveform. For added flexibility in preventing the occurrence of active currents, the polarity of the P/N waveform can be reversed by making N in Protocol (P/N) a negative value and by eliciting the scaled-down versions from a different holding potential as dialed in at the recording amplifier by shifting it with Vhold (mV). To speed-up the process of running the leak subtraction, the scaled-down versions of the command waveform are executed without the delay between episodes that is defined with the ’pause’ command in the script. Instead brief breaks before (Pre-Pulse) and after (PostPulse) each subsweep can be added with the Settling Times (ms) controls. With Leak Subtraction (and Save Data) enabled G-clamp generates two data files: One file contains the raw data and the other one contains the leak-subtracted data. Both files are of type ‘.ivb’ and have a name consisting of the usual recording time stamp (ddhhmmss 11 ) plus ‘_leak_and_test-pulses’ for file with the raw data and ‘_leak_subtracted’ for the file with the corrected data. 11 d – day, h – hour, m – minute; s – second 25 9.2. Threshold-gsyn This module determines the strength of a virtual synaptic conductance required to bring the neuron under observation to action potential threshold. It does this in an iterative process in which the strength of the virtual synapse is adjusted depending on whether the previous trial elicited an action potential or not. An initial starting value (g (nS)) reflecting an upper limit has to be set by the user. The procedure operates by setting the strength of the virtual synapse to the arithmetic mean of the upper and a lower limit which is initially zero. If this setting elicits an action potential the current setting becomes the new upper limit, if it fails to elicit an action potential the current setting becomes the new lower limit. Typically, within 10 iterations the procedure zeroes in on threshold-gsyn. The peak of an action potential has to exceed 0 mV in order to be identified as an action potential. The type of synapse is determined by the selection made from the Kinetic control and by the setting for its reversal potential (Erev (mV)). The timing of the synaptic event is specified with the control Event File. To select an event file click on the folder symbol to the right of the control and select an event file from the file dialog. The Variable? control has to be enabled (green) to allow for the iterative adjustment of synaptic strength. Disabling Variable? (red) keeps the strength of a synapse constant and is an easy way to test the behavior of a cell repeatedly to the same synaptic input. Duration (s) determines the length of one recording episode, Pause (s) the length of the break from then end of one episode to the start of the next and Iterations determines the number of episodes. 26 The Traces page shows the most recently acquired trace while the experiment is still in progress and all acquired traces of the selected channel after the experiment ends. The History page plots the threshold-gsyn values of consecutive experiments vs. real time. This chart has a buffer which can hold up to 200 pairs of threshold-gsyn and time values after which the oldest pair becomes replaced with the newest pair with each new experiment. The buffer can also be emptied with Clear Chart. 27 By selecting more than one event file, the behavior of a cell to a combination of several virtual synaptic inputs can be tested. For example, the effect of the after-hyperpolarization following one or more action potentials on threshold-gsyn can be tested by using one event file and giving these synapses supra-threshold strength in combination with another event file which contains the synapse to be tested. When using more than one event file, the Variable? property can only be assigned to one event file. The first occurrence of a synaptic event in the event file for which Variable? has been enabled sets the start time for the action-potential-identifying algorithm and allows action potentials generated earlier by synaptic events in other event files to be ignored. Data files generated by the Threshold-gsyn module are of type ‘.gth’. 28 9.3. Synaptic Gain This module uses event files to stimulate a neuron with patterns of virtual synaptic activity and it determines the number of action potentials generated by these synaptic events. The controls in the Parameters section have identical function as the corresponding controls in the Threshold-gsyn module. In this module synaptic strength(s) is fixed, therefore g (nS) specifies gsyn. Duration (s) determines the length of the recording episode. Because displaying the potentially huge amount of data acquired with a Synaptic Gain experiment can cause memory problems on the host computer the waveform graph on the Trace page shows no more than 1 million data points. Every trace (or zoomed-in section of a trace) larger than 1 million data points will be decimated until it is less than 1 million. 29 With gon delay (s) and goff (s) an initial and a final part of the recording episode can be excluded from virtual conductance (synaptic and/or non-synaptic) activity and/or the DCcurrent command (see below). 30 DC-current (pA) can be used to add a DC current command to the recording episode. Data files generated by the Synaptic Gain module are of type ‘.gai’. 31 9.4. Strip Chart The Strip Chart module is an acquisition-only module that records voltage and current traces for as long as the user wishes. It was originally developed to record long, uninterrupted sequences of spontaneous pacemaking activity of midbrain DA neurons. Because no computations are performed and no commands are given to the amplifier, recorded data can be sent every second from the embedded controller to the host computer and displayed to the user without interference with the ongoing data acquisition. The only parameter that can be set by the user is sample rate (Hz). After initiating a data acquisition with the Start button the Start and Close Module buttons become disabled and grayed out. Data are acquired, transferred to and displayed on the host computer in 1-second packets. This module always saves the acquired data into a file (with the file name extension ‘STP’) irrespective of the status of the Save Data button in the lower right section of the G-clamp user interface. The file is created when the first 1-second packet arrives and its name is built from the recording time of this first packet. New data are appended to this file as they arrive on the host computer. STP-files can be converted to a GAI-file with the offline utility Convert stp-to-gai.vi. The Freeze button stops updating of the waveform graph thus allowing closer inspection of the trace currently on display. This has no effect on the on-going transfer and saving of data. 32 10. Event files Event files are new in G-clamp v2 and replace the template files used in G-clamp v1. Event files are text files with the file extension EVT containing a single column of ascending numbers standing for the timing (in ms) of virtual synaptic events. The type of virtual synapse, i.e. its kinetic, is determined by the user with the Kinetic control of the experiment modules Threshold-gsyn and Synaptic Gain. Thus a single event file can be used for different types of virtual synapses. Note that the length of a recording episode is user-specified in both experiment modules, Threshold-gsyn and Synaptic Gain. Therefore virtual synaptic events listed in an event file to occur at times after the end of the recording episode are ignored. Note also that if an event file contains two identical time values (two synaptic events occurring at the same time) only one event will start at the specified time and the second one will start in the next iteration of the dynamic clamp loop. The delay between the two events therefore will depend on the user-specified sampling rate. 12 Consider the relation of user-specified sample rate and the temporal precision used when creating the event file. For example, in an event file with a precision of 50 μs two events listed to occur at 100.95 and 101.00 ms will start at these times if sampling rate is set to 20 kHz (or a multiple of 20 kHz). However, if the sampling rate is only 10 kHz (temporal precision of 100 μs) 100.95 will be rounded up to 101.0. The first of these two events will therefore start at 101.0 ms and the second event – as described in the preceding paragraph – will start at 101.1 ms. 10.1. Creating event files Any text editor can be used to create an event file. File requirements are: - The file has to be saved as an ASCII text file. - The file name extension has to be EVT. - The file contains only numbers (event times) arranged in a single column in ascending order. - Time unit is milliseconds (ms). - No empty lines (or formatting codes) after the last number. …with Neurosim To create an event file with Neurosim follow the instructions in the Neurosim manual for creating a template file of virtual synaptic plasticity. For each synapse (e.g. primary synapse, n secondary synapses) Neurosim creates a text file of type DAT which contains the event times for that synapse. To use these files as event files in G-clamp v2, the DAT files have to be re-formatted and re-named: 12 If real simultaneous start of the two events is required, place the time values in separate event files and execute both event files together. 33 1. Convert the line-arrangement of event times in the DAT file to a columnarrangement by opening the DAT file with Microsoft Excel. 2. Use the ‘Increase Decimal’ and/or ‘Decrease Decimal’ function on the column to set all event times to the same number of digits after the decimal point, i.e. submillisecond resolution. 3. Use ‘Save As…’ to save the spreadsheet as a tab-delimited text file to the G-clamp event file folder (G-clamp\Event Files). 4. Open the file with Notepad. Scroll down to the end of the file and delete any empty lines after the last event time. Save the file. 5. Change the file name extension to DAT (if you haven’t done so in step 3. already rename the file so that it has a meaningful name). If you want to combine the events from several DAT files into one EVT file open all DAT files with Microsoft Excel and use copy-paste to copy all time values (without 0’s) into a single column of one spreadsheet. Use the ‘Sort Ascending’ function on the column before proceeding with step 2. above. 34 11. Offline Utilities These are LabVIEW VIs written for offline analysis of G-clamp data files. Files with analysis results created by these VIs are written to the same directory which contained the G-clamp data files analyzed. 11.1. G-clamp FileUtilities Master.vi This VI serves as the gateway to the analysis VIs proper. It is used to select G-clamp data files and to feed these files into the selected file utility. A file dialog opens at VI start (or with Change Directory) to navigate to a directory containing G-clamp data files (Press Current Folder to exit the file dialog window). All files (and subfolders) are listed in alphanumerical order. File types can be used to limit the file list to display only files of the selected type. File Utilities is populated at VI start with the analysis VIs available and used to select an analysis VI. Analysis VIs typically are specific for one of the G-clamp data file types and the data files that can be processed by the selected analysis VI are shown in the file list on a gray background. 35 All files selected in the file list will be processed successively by the analysis VI selected when Do it! is pressed. Once the analysis VI finishes a new data directory/file/analysis VI selection can be made to process another set of data files. Done stops G-clamp FileUtilities Master.vi. 11.2. G-clamp Count APs in GAI-file.vi This VI uses a peak detection function to find action potentials in files created by the Synaptic Gain module (or by the Strip Chart module after the stp-files have been converted to gai-files). 36 Analyze toggles the VI from working either on the voltage trace (current clamp recording) or the current trace (e.g. loose patch voltage clamp recording). Accordingly, peaks/valleys toggles the function from detecting AP peaks or inward current peaks. Peaks have to be above threshold (mV) while valleys have to be below. Peak detection is based on an algorithm that fits a quadratic polynomial to sequential groups of data points. The number of data points used in the fit is specified by width (datapoints) 13 . Each peak/valley found is marked in the waveform graph by a red square. An initial part of the trace can be excluded from the peak search with Settling time (s). If Settling time (s) > 0 then this initial part of the trace is used to calculate mean Vm/Ih (mV/pA) otherwise mean Vm/Ih (mV/pA) yields NaN (Not a Number). Analysis of the whole trace occurs in consecutive segments. The length of these segments can be adjusted with segment length (s) while # of segments informs the user about the total number of segments for a specific segment length. Next proceeds to the next segment while Previous goes back to the segment before the current one. Any change in Analyze, peaks/valleys, threshold (mV), width (datapoints) or Settling time (s) triggers re-analysis of the current trace. A change in segment length (s) triggers re-analysis of the trace from its beginning. 13 width (datapoints) is coerced to a value greater than or equal to 3. The value should be no more than about 1/2 of the half-width of the peaks/valleys and can be much smaller (but > 2) for noise-free data. Large widths can reduce the apparent amplitude of peaks and shift the apparent location. For noisy data, this modification is unimportant since the noise obscures the actual peak. Ideally, width should be as small as possible but must be balanced against the possibility of false peak detection due to noise. 37 The output of this VI consists of indicators on the front panel (mean Vm/Ih (mV/pA), APs in current segment, Total # of APs) and two ASCII text files (GAI – Vm APs per segment.txt and GAI – Individual APs.txt). GAI – Individual APs.txt contains three columns of data: The 1st column contains the locations (time relative to start of recording minus Baseline Duration (sec)) of all peaks or valleys detected. The 2nd column contains the interspike intervals and the 3rd column contains the peak amplitudes. A new set of three columns is added for each gai-file processed. GAI – Vm APs per segment.txt contains one column of data for each gai-file processed. The 1st value corresponds to mean Vm/Ih (mV/pA), the 2nd value to Settling Time (s), the 3rd value to segment length (s), the 4th value to # of segments and the remaining values to the number of peaks/valleys found in each segment. 11.3. G-clamp Retrieve GTH-file Results.vi This VI retrieves the threshold-gsyn value from a gth-file together with some other useful information. The VI displays and works only on the voltage traces of a gth-file. Part of each trace can be defined as baseline with Baseline Start (sec) and Baseline Duration (sec). A mean value is derived from all data points in the baseline part of the voltage traces and from the mean values of all voltage traces in a gth-file a final mean value and standard deviation is calculated. The VI also determines a mean action potential peak value by averaging the peak values of all action potentials found. AP Search Start can be used to exclude conditioning action potentials prior to the test synapse. Action potentials are found using the same algorithm and parameters (threshold (mV), width (datapoints)) as described in 38 section 11.2. for G-clamp Count APs in GAI-file.vi. All parameters can be changed until Set is pressed which initiates processing of the current file. The output of this VI consists of an ASCII text file (GTH Results.txt) which contains one line of tab-delimited data for each gth-file processed. The columns in this file contain: 1st column: time of recording (hh:mm:ss; this time format is MS Excel compatible, allowing plotting of results vs. time) 2nd column: mean membrane potential during baseline period (mV) 3rd column: SD of membrane potential during baseline period (mV) 4th column: threshold-gsyn (nS) 5th column: mean action potential peak (mV) 11.4. G-clamp Get Membrane Test Results.vi This VI is an off-line version of the Membrane Test function available in G-clamp. The latter is more geared towards a speedy analysis by averaging only a limited number of current responses and by using a simple least square fit to determine the time constant of the averaged current response. G-clamp Get Membrane Test Results.vi on the other hand averages as many current responses as supplied with, i.e. as many as are contained in an ivb-data file and it uses the Levenberg-Marquardt algorithm to determine the least squares set of coefficients in an iterative process. For details on the calculations see section 7. Membrane Test and 7.1. Calculations. 39 To perform the exponential fit to the decay phase of the current transient the function has to be provided with a) information about the voltage pulse used and b) initial guess coefficients for the fit. The voltage pulse has to be defined with Baseline Duration, Pulse Duration and Pulse Amplitude. Initial Guess Coefficients Fit contains three numerical values. The first value corresponds to the initial amplitude of the signal, the second value corresponds to the inverse of the time constant of decay and the third value corresponds to the end value ultimately approached by the exponential. All user-settable parameters can be changed any time. Each change triggers a re-calculation of the outputs. With Done the VI proceeds to the next data file or stops after processing the last data file. This VI does not save processing results to file; therefore its output (Ra, Rm, Cm, τm and Ih) has to be written down by the user before proceeding to the next file. 40 11.5. G-clamp Convert stp-to-gai.vi Converts stp-files created by the Strip Chart module into gai-files. The original stp-files remain in the folder. 41 12. Data files 12.1. Names Data file names have the general form ddhhmmss.??? in which - dd is the day of month, - hh is the hour (24-hour clock), - mm is the minute, - ss is the second when the experiment finished, and - ??? indicates the experiment type (Vclamp: IVB; Gsyn Threshold: GTH; Synaptic Gain: GAI ) All numerical values in the name have a leading zero if in the single-digit range. 12.2. Content Each G-clamp experiment module has its own data file format. 12.2.1 Vclamp - *.IVB - a SGL giving the number of iterations done - 4 SGLs without meaning - a SGL giving the episode duration in ms - a SGL giving the sample rate in Hz - a SGL giving the pause time (in ms) between epsiodes - as often as episodes were performed: - a 1-D array of SGLs giving the voltage trace - a 1-D array of SGLs giving the current trace 42 12.2.2 Gsyn Threshold - *.GTH - a SGL giving the length of the following string - a string giving the name of the event file used for the experiment - a SGL giving the number of episodes - 2 SGLs giving the initial upper limit (in nS) for the search algorithm - a SGL giving the pause time (in ms) from end of one episode to start of next - a SGL giving the reversal potential Erev of the virtual synapse - a SGL giving the sample rate (Hz) - as often as episodes were performed: - a SGL giving the strength of the virtual synapse in nS - a 1-D array of SGLs giving the voltage trace - a 1-D array of SGLs giving the current trace 12.2.3 Synaptic Gain - *.GAI - a SGL giving the length of the following string - a string listing the template file(s) used for the experiment - a SGL giving 1/sample rate (sample rate is in Hz) - a SGL without any meaning - a SGL giving the number of action potentials elicited - a SGL giving the length of the traces as # of data points - a number of bytes (0s) to extend header length to a total of 512 bytes - voltage trace (SGLs) - current trace (SGLs) 12.2.4 Strip Chart - *.STP - a DBL of value 1 - a DBL giving the number of data channels (2) - as many DBLs as indicated by the previous DBL, each giving the sample rate 43 - as often as 1-sec episodes were recorded: - for each data channel a 1-D array of SGLs comprising a 1-sec episode Use “Convert stp-to-gai.vi” in “G-clamp.lvproj\My Computer\OfflineUtilities” to convert stp-files to gai-files. 44 Appendix A – G-clamp Installation Hardware Connecting embedded controller and host computer Connect both machines directly using a cross-over cable 14 . DO NOT go through a local area network (LAN)! We found that when going through a LAN transfer of larger amounts of data (>~100.000 bits) is not reliable, causing the host computer part of the G-clamp software to wait forever for a wrong amount of data from the controller and therefore to become unresponsive. Even if the reason for this bug could be figured out, we recommend the direct connection: Because there is no other network traffic, the direct connection is so fast that even tens of Megabytes of data (several minutes of experiment with the Synaptic Gain Module) can now be transferred to the host computer in almost no time for display and saving. Connecting recording amplifier and break-out box (BNC-2090) AxoClamp 2B amplifier - OUTPUT 10 Vm Æ analog-in 0 OUTPUT Im Æ analog-in 1 INPUT EXT. ME1 COMMAND Æ analog-out 0 INPUT EXT. VC COMMAND Æ analog-out 1 Model 2400 amplifier - 14 (variable) Output Æ analog-in 8 Fixed Output x 10 Vm Æ analog-in 9 Fixed Output Im Æ analog-in 10 Telegraph Output FREQ Æ analog-in 12 Telegraph Output MODE Æ analog-in 13 Telegraph Output GAIN Æ analog-in 14 Telegraph Output Cmembrane Æ analog-in 15 EXTERNAL (command input) Æ analog-out 0 Alternatively – according to NI – you can also use normal network cables with a hub between embedded controller and host computer. We did not test this alternative and can not exclude the possibility that this solution might have the same problems as experienced when going through a LAN. 45 Software - - - - 15 Extract the content of the file G-clamp.zip on your drive C:\. This will result in a folder C:\G-clamp with several subfolders. Start Measurement & Automation Explorer (MAX) and start the Configuration Import Wizard under File > Import… to import the file G-clamp v2.nce (from C:\G-clamp\Main VIs\Target) to your embedded controller. This file contains all the NI-DAQmx Scales, Global Virtual Channels and Tasks defined for the AxoClamp 2B and Model 2400 recording amplifiers. (Under Devices and Interfaces complete the sections NI-DAQmx Devices and PXI Systems according to your hardware) Start LabVIEW 8 and open the LabVIEW project G-clamp.lvproj from C:\Gclamp\. In the project right-click My Computer and select Properties… In the upcoming Options window go to VI Server:Machine Access and add the IP address of your embedded controller to allow access. In the project right-click Project: G-clamp.lvproj and select New > Targets and Devices… Search for and add your embedded controller to the project. Right-click your embedded controller and select Properties… Under VI Server: Configuration check the box TCP/IP to enable this protocol. 15 Å Test whether this is really necessary? Under My Computer > Build Specifications select Main Target VI; right-click and select Build. This creates a source distribution (in C:\ni-rt\startup on the host computer) of all files required to run the master program on the embedded computer (G-clamp v2 – Target.vi). Under My Computer > Build Specifications select Target Dynamic VIs; rightclick and select Build. This creates a source distribution (in C:\nirt\startup\Dynamic VIs on the host computer) of all files required to run the experiment modules from within the master program on the embedded computer. Copy the folder C:\ni-rt\ with all its sub-directories and files from the host computer into the root directory C:\ of the embedded controller. In the project under My Computer\Host\G-clamp v2 – Host.lvlib\ open the file Gclamp v2 Host.cfg. o In the section [LastUsed] replace the Target entry with the name of your embedded controller. o In the section [Available] replace the existing Targets entries with the name of your embedded controller. o Edit one of the existing target sections ([G-clamp1] or [G-clamp2]; delete the other one) so that the section has the name of your embedded controller and the IP entry has its IP address. It is not necessary to add the host computer to the VI Server machine access list. By default, machine access should be unrestricted with the wildcard symbol “*”. 46 Trouble-Shooting This section gives hints on how to deal with problems we encountered. Disclaimer: Because we do not completely understand the reason for these problems we do not claim that our solutions will always work or that they are the only possible and/or best solutions. - - - The embedded controller is seen by MAX but LabVIEW or Internet Explorer/MS Explorer (FTP clients) are unable to connect to the embedded controller. o Make sure that embedded controller and host computer are on the same subnet. If the problem persists try different subnet masks. E.g. on one of our set-ups subnet mask 255.255.255.0 for embedded controller and host worked fine while on another we had to change the mask to 255.255.0.0 to make it work. G-clamp starts fine, updating RT Target System Info or amplifier settings (if the Model 2400 amplifier module is in use) works, but when an experiment is started no commands are given to the amplifier and no data are recorded. o This seems to be a problem with the deployment of the network-shared variables from the host computer to the embedded controller when the host computer is running under an IP address different from the one that was used when the shared variables were created during G-clamp development. Possible work-arounds: In the project right-click the embedded controller and select Connect. This apparently deploys the missing stuff to the embedded controller. After the deployment you can safely disconnect. With host computer and embedded controller connected directly via a cross-over cable, change the IP address of the host computer to 136.142.127.88. If you disconnect from the embedded controller and connect to your LAN you have to change back to your network administrator-assigned IP address. Replace all network-shared variables with newly created ones (huge PITA): Carefully write down for each network-shared variable under My Computer\Host its properties (location in the project, name, data type…), delete them and create them new. Next re-link every instance of a network-shared variable in all VIs in the project to the newly created variables. Finally, create the source distributions Main Target VI and Target Dynamic VIs again and copy the created files again to the embedded controller (see above). After a LabVIEW/G-clamp crash on the host computer G-clamp is not able any more to connect to the embedded controller. o Sometimes crashes result in changes to the file c:\ni-rt.ini on the embedded controller, e.g. in deletion of the line server.tcp.enabled=True. It is therefore useful to have a working copy of ni-rt.ini available.