1
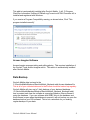
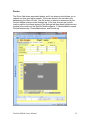
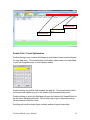
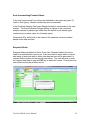
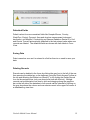
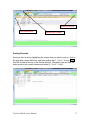
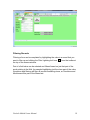
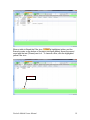
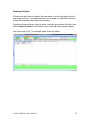
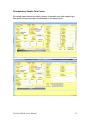
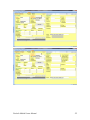
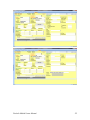
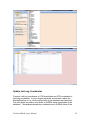
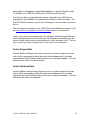
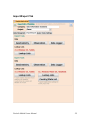
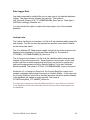
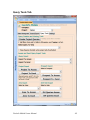
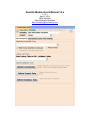
GeoInfo Mobile Users Manual v3.x V1.0.1 April 3, 2014 Mike Schaefer Geo-Information Solutions [email protected] Table of Contents What Is GeoInfo Mobile? ...................................................................................... 4 Hardware/Software Requirements ........................................................................ 5 Installation ............................................................................................................. 5 UTM Latitude Longitude Converter Software .................................................... 5 Access Imagine Software .................................................................................. 6 Data Backup ......................................................................................................... 6 Data Management Tab ......................................................................................... 7 Data Entry/View/Edit Forms .............................................................................. 8 Form and Datasheet Views.......................................................................... 11 Photos ......................................................................................................... 12 Read GPS.................................................................................................... 13 Navigation Bar ............................................................................................. 13 Double Click / Touch Optimization ............................................................... 14 Auto Incrementing/Created Values .............................................................. 15 Required Fields............................................................................................ 15 Defaulted Fields ........................................................................................... 16 Saving Data ................................................................................................. 16 Deleting Records ......................................................................................... 16 Sorting Records ........................................................................................... 17 Filtering Records.......................................................................................... 18 Freezing Columns........................................................................................ 20 Geochemistry Sample Card Forms.............................................................. 21 Observation Database Forms ...................................................................... 25 Log Forms.................................................................................................... 30 Lookup List Tools ............................................................................................ 32 Update Lat Long Coordinates.......................................................................... 33 Delete Project Data ......................................................................................... 34 Delete Database Data ..................................................................................... 34 Import/Export Tab ............................................................................................... 35 Import Tools .................................................................................................... 36 Geochemistry Importer ................................................................................ 36 Observation Importer ................................................................................... 37 Data Logger Importer ................................................................................... 38 Lookup List Importer .................................................................................... 42 Export Tools .................................................................................................... 43 Geochemistry Data ...................................................................................... 43 Observation Data ......................................................................................... 43 Data Logger Data ........................................................................................ 44 Lookup Lists................................................................................................. 44 Query Tools Tab ................................................................................................. 45 Create Project Queries .................................................................................... 46 Select Query to View ....................................................................................... 47 Query Export ................................................................................................... 47 GeoInfo Mobile Users Manual 2 Setting Tab ......................................................................................................... 48 Appendix A – ODBC Database Linking Setup .................................................... 49 Appendix B – ArcGIS OLE DB Connection Setup .............................................. 50 Appendix C – ArcGIS Make Query Table Tool ................................................... 51 Appendix D – MapInfo Database Linking ............................................................ 53 GeoInfo Mobile Users Manual 3 What Is GeoInfo Mobile? GeoInfo Mobile is a field data collection database software for the mining industry. Surface geochemistry samples, field observations and drill/trench/blast hole/underground log data are collected in GeoInfo Mobile. A complete information system offered by Geo-Information Solutions involves collecting field data using GeoInfo Mobile software ( www.GeoInfoMobile.com ) on handheld mobile computers (v2.x) or Windows tablets (v3.x), importing this data into the GeoInfo Tools database, and then importing assay results into the GeoInfo Tools database to complete the data collection. The GeoInfo Tools database is then used to manage and facilitate analysis of the data. GeoInfo Mobile can be used independently of GeoInfo Tools, if you already have a corporate database solution, however integrated with GeoInfo Tools a complete data management system is provided. GeoInfo Mobile Provides; Data Entry/View/Edit Forms – Data entry forms for geochemistry samples, field observations, and drill hole, blast hole, trench, and underground working logs. Lookup list validation tables – data stored in the database is validated against lookup list validation table values providing integrity to each piece of data stored in the database. An Active field setting for each value in a lookup list allows users to customize visible lookup lists by project. Lookup lists are imported into GeoInfo Mobile from corporate databases so integrity rules are enforced in the field at the rock-human interface. Coordinate re-projection – GPS is read and location data are automatically entered in the database. Coordinates are stored in Latitude/Longitude (native GPS) and automatically converted to UTM. Photos - Photos can be collected and edited. Import/Export – Data and Lookup list can be imported and exported in and out of GeoInfo Mobile, to and from the GeoInfo Tools corporate database or you own corporate database. Query Tools - queries present the data as needed for presentation and analysis, and direct linking (ODBC) to these queries is supported by most 3rd party GIS, mine modeling and statistical software packages. Queries can be exported to Excel or Access. Data is managed by project so each project can have independent settings. GeoInfo Mobile is the field data component of a company’s data system. It provides simple, quick, field validated data collection tools. GeoInfo Mobile Users Manual 4 Hardware/Software Requirements GeoInfo Mobile can run on Windows XP through Windows 8. GeoInfo Mobile is powered by Microsoft Access but does not require full Access to be installed on your computer. Free Access 2007 runtimes can be downloaded and installed from here http://www.microsoft.com/en-us/download/details.aspx?id=4438 . GeoInfo Mobile was designed as a light weight Access database application (GeoInfo Tools handles the heavy weight work) and can run on minimal hardware. Small Windows tablets with Intel Atom processors and 2 GB of memory work well, 32 GB of storage is sufficient however 64 GB is recommended if GIS field navigation software is going to be integrated with GeoInfo Mobile. Geo-Information Solutions packages and sells a few optimized complete hardware and software packages for field data collection, www.GeoInfoMobile.com. Contact [email protected] for more information. Installation Run the GeoInfoMobilev3.xbxInstaller.exe installer to install GeoInfo Mobile. Shortcuts to start GeoInfo Mobile are created in the Windows “All Programs” list (no folder so near the top) and on the Desktop. The user manual, GeoInfo Mobile Users Manual.pdf, is installed in the C:\GeoInfoMobile\User Manual directory. The User Manual can be opened by clicking the Help Icon ( ) on the main GeoInfo Mobile form. GeoInfo Mobile is Microsoft Access database application. The software is a split Access database: the program/application is C:\GeoInfoMobile\GeoInfoMobile.accdr and the backend data is stored in C:\GeoInfoMobile\Backend\GeoInfoMobile_Backend.mdb. After being run the first time GeoInfo Mobile creates a companion file, C:\GeoInfoMobile\Settings\GeoInfoMobile_Settings.accdr that stores user defined settings. This database file also stores licensing information so please do not detach this file from your local copy of GeoInfo Mobile. UTM Latitude Longitude Converter Software Coordinate conversion from the native GPS Latitude/Longitude WGS84 projections to UTM requires installation of the UTM Coordinate Converter add-in. GeoInfo Mobile Users Manual 5 This add-in is automatically installed after GeoInfo Mobile. A dll, C:\Program Files\Geo Information Solutions\UTMLatLongConverison\UTMLLConverter.dll, is installed and registered with Windows. If you receive a Program Compatibility warning, as shown below, Click “This program installed correctly”. Access Imagine Software Access Imagine manages taking and editing photos. This requires installation of the GeoInfo Tools Access Imagine add-in. This add-in is automatically installed after GeoInfo Mobile. Data Backup GeoInfo Mobile data is stored in the C:\GeoInfoMobile\Backend\GeoInfoMobile_Backend.mdb Access database file. This is all of your collected data and is the file that should be backed up regularly. GeoInfo Mobile will store up to 7 daily backups of your backend database (C:\GeoInfoMobile\Backend\Backup\GeoInfoMobile_Backend_BackupX.mdb); one is created each time the software is opened provided no other software is using the database. If you use software with ODBC links to the database and this software is open when the database is opened it will not backup; so open the database before your GIS software! This is not a substitute for you making regular backups of your data. GeoInfo Mobile Users Manual 6 Data Management Tab GeoInfo Mobile can be used in Landscape or Portrait screen orientations. GeoInfo Mobile Users Manual 7 Data Entry/View/Edit Forms All data entry and editing are completed using the Data Entry/View/Edit forms. Forms are provided many Geochemistry Sample Card (GSC) sample types, Observations (ODB) types, and Log types (LOG) for logging drill hole, blast hole, trench, and underground workings. The following forms are provided; Three form formats are provided: Standard Landscape, Mobile (small device landscape), and Portrait. Depending on the tablet screen orientation and size users can find the format that they like best. All formats have the same data fields, they are just arranged differently. In general the following is suggested; Standard Landscape: displays greater than 11 inches Mobile: 8-11 inch tablets where field size needs to be bigger to operate by touch. Portrait: 8-11 tablets. Field size is smaller than Mobile View and larger than Standard Landscape view. This format also optimizes GeoInfo Mobile content, minimizes Windows and Access software elements, and works well with the Windows Onscreen keyboard. GeoInfo Mobile Users Manual 8 Standard Landscape format has all fields on one page. The page needs to be scrolled down to see the complete photo and comment fields. Mobile Landscape format has several tabs for different types of data and the fields are larger and thus more touch friendly on small devices. GeoInfo Mobile Users Manual 9 Portrait Format has two tabs and the fields are sized between Standard and Mobile landscape formats. The field size is good for touch operation and Windows and Access elements are minimal. GeoInfo Mobile Users Manual 10 Form and Datasheet Views Forms open to a default view of either Form View or Datasheet (or Log) View and can be toggled between these views depending on what view is most suitable for the user. Form and Datasheet views can be toggled by double clicking on the grey/blue record selectors to the left of the record or form. Double Click record selector to show Form view at this record Double Click record selector to show Datasheet view GeoInfo Mobile Users Manual 11 Photos The Photo field shows associated photos and if one does not exist allows you to capture one from your tablet camera. Photos are linked to the records in the database by the Photo ID field. The file location of photos is determined by the GeoInfo Mobile settings on the Settings tab. If the user does not set a photo location path for the current project in the Settings tab then default directories are created in the location of the GeoInfo Mobile software, C:\GeoInfoMobile, named PhotosGeochemistry, PhotosObservatons, and PhotosLog. GeoInfo Mobile Users Manual 12 Click on the photo control (grey imago box) and the camera icon will fly in on the left. The first time you use your tablet right click on the camera icon to set the camera device to use. Once your device is defined then click on the camera icon to take a photo. (Warning: some camera settings are not functioning properly and resolution settings are not working so some cameras are only capturing low resolution images right now.) Alternately you can select the Folder icon and select a photo to link to this record. Once you have a linked photo to a record you have the following photo tools; Full Screen View: just click full screen to close Pan Screen View Edit Picture: opens picture to default Windows picture program you have setup. You can edit in Paint or Photoshop for example. Rotate Picture Refresh Picture (need to do after editing to see changes) Read GPS The Read GPS button will connect to the tablet GPS or a Bluetooth GPS based on the COM port settings in the GeoInfo Mobile Settings tab. If a GPS is found the native GPS Latitude/Longitude coordinates will be saved and the UTM coordinates will be calculated and saved. Survey Type will be set as either GPS or GPSDifferential based on the reading type and the HDOP and number of satellites will be saved. HDOP (Horizontal Dilution Of Potion) is a measure of GPS accuracy; 0-1 is excellent, 1-2 is good, 2-5 is poor and 5+ is unacceptable. Navigation Bar Access provides a navigation bar on the bottom left of each form, however, for touch screen tablets the navigation bar is too small to use by touch. GeoInfo Mobile has a larger navigation bar on all the forms that is touch friendly. The GeoInfo Mobile navigation bar has added functionality for creating new records and deleting records. GeoInfo Mobile Users Manual 13 Delete Record Create Record Bar Navigation Bar Double Click / Touch Optimization Double clicking in any numeric field brings up a calculator based numeric keypad for easy data entry. This is particularly useful when values need to be calculated or you are doing data entry on touch screen tablets. Double clicking in a pick list field expands the pick list. This is particularly useful on touch screen tablets as you do not need to click the small down arrow. Double clicking on a pick list field label will open the Lookup List Viewer/Editor for the list that is validating that field. This is quick way to get to the proper lookup list that controls a field on a form. Scrolling with touch is single finger vertically and two fingers horizontally. GeoInfo Mobile Users Manual 14 Auto Incrementing/Created Values In the Log forms interval From values are defaulted to the previously typed To value to save typing. Sample numbers are auto-incremented. In the Geochem Sample Card forms Sample Number is incremented to the next number. The GeoInfo Mobile Settings tab has an option to auto increment sample numbers by sample type rather than the default by all sample types combined (one number series for all sample types). Observation IDs, which have to be unique in the database, are auto-created based on the date and time. Required Fields Required fields are labeled in Red in Form view. Required fields in the forms need to be entered before moving on, if the user starts to enter data in a record and wants to leave that table to enter other data an error will be presented if a required field is missing for that record,(see below). The user will have to enter the required field data or type the ESC key to delete the record. Closing the form exits without saving the problem record. GeoInfo Mobile Users Manual 15 Defaulted Fields Default values for some consistent fields like Sampler/Person, Country, State/Prov, Project, Prospect, Area and structure measurement instrument declination, and MagSus, Conductivity and Gamma Radiation Device ID’s, Unit and Device Type are automatically defaulted to the last entered value when new records are created. The defaulted fields are shown with italic labels in Form View. Saving Data Data is saved as soon as it is entered in a field so there is no need to save your data. Deleting Records Records can be deleted in the forms by clicking the grey box to the left of the row then pressing the delete key on the keyboard, going the Quick Access Toolbar at the top and selecting the Delete icon (black X), or by clicking the Delete Record Icon on the navigation bar (only one record at a time with this tool). Multiple records can be selected at one time by click and dragging along the grey/blue bar on the left side of the datasheet or all records can be selected by clicking on the grey box where the column and row selectors meet in the upper left corner of a datasheet/log view form. GeoInfo Mobile Users Manual 16 Delete One Record Select All Records Quick Access Toolbar Sorting Records Sorting a form is set by highlighting the column that you want to sort on, click on the grey/blue column label box, and then clicking the A…Z or Z…A icon, , from the toolbar at the top of the Access window. Alternately you can click the down arrow by the column header and select A…Z or Z…A sort. GeoInfo Mobile Users Manual 17 Filtering Records Filtering a form can be completed by highlighting the value in a record that you want to filter on and clicking the Filter Lightning bolt icon, the top of the Access window. , from the toolbar at Part of a field value can be selected and filtered based on just that part of the word existing in the field, for example highlighting just the stone part of the value Sandstone and filtering will filter all records containing stone, so Sandstone and Mudstone will be part of the filtered set. GeoInfo Mobile Users Manual 18 When a table is filtered the Filter icon, , is highlighted yellow, and the Record counter on the bottom of the table (see figure below) shows the record count with the text (Filtered) next to it. To remove a filter, click the highlighted yellow Filter icon. Filter Icon GeoInfo Mobile Users Manual 19 Freezing Columns Columns can be frozen in a table if the user wants to scroll horizontally and still see certain columns. This might be useful, for example, for Alteration Primary in a table like Alteration which has many columns. Select the columns that you want to freeze (using the grey column title bar), then select Freeze Columns from the More menu at the top of the Access window. Log forms have From, To and Depth fields frozen by default. GeoInfo Mobile Users Manual 20 Geochemistry Sample Card Forms All sample types share some basic common information and each sample type has specific unique description fields based on the sample type. GeoInfo Mobile Users Manual 21 GeoInfo Mobile Users Manual 22 GeoInfo Mobile Users Manual 23 GeoInfo Mobile Users Manual 24 Observation Database Forms All observation types share some basic information and each observation type has specific unique description fields. Geology observation fields are the same as a rock geochemistry sample. GeoInfo Mobile Users Manual 25 GeoInfo Mobile Users Manual 26 General Observations are for collecting any observation type that does not have a specific data entry form. Any observation can be collected here! Type is the field name and the Parameter and Comment fields are the data. GeoInfo Mobile Users Manual 27 GeoInfo Mobile Users Manual 28 GeoInfo Mobile Users Manual 29 Log Forms Log forms are for logging Drill Holes, Blast Holes, Trenches or Underground Workings. A tab exists on the log for each type of data; Collar – Survey – Collar and survey information. Collar surveys (drill rig set up) should be entered as well as down hole surveys. Down drill holes should have negative dips, horizontal holes have a 0 dip and up holes (possible underground) positive dips. Hole Type – RVC, Core, and drill size information by interval. Lithology – Lithology, modifiers, color and texture. Lithology Minerals – Lithology minerals, percentage estimates, and style. Alteration – General alteration types or suites including primary and secondary. Individual mineral alterations like chloritization can be entered in the Alteration Minerals section. Alteration Minerals – Alteration minerals, percentage estimates, and style. Mineralization – General mineralization types or suites including primary and secondary. Individual mineralization minerals like chalcopyrite can be entered in the Mineralization Minerals section. Mineralization Minerals – Mineralization related minerals like chalcopyrite, pyrite etc…percentage estimates, and style. Structure – Structure type, rank (for paragenetic sequence), modifiers, strike and dip. Depth is the center of the structure and the width provides interval information for larger structures if needed. GeoInfo Mobile Users Manual 30 Physical Properties – Magnetic susceptibility, density, and scintillometer. Magnetic susceptibility data can be imported from a MPPEM25 instrument export. Geotech – Recovery length and RQD lengths are used to automatically calculate recovery and RQD. Samples – Analysis sample intervals are assigned sample numbers. QAQC samples can be logged. Composites – after composite settings are complete and assay results are received from the lab, composite intervals can be logged. GeoInfo Tools only. Photos – Photos are linked to the database. Parameters – the parameter log is used to log information that does not have an appropriate location in any of the other logs. The parameter field should be the name of field that will be used to store the information and the Value field is the value for this column/parameter. For example; since protolith does not exist in the lithology log, “Protolith” (the text) can be typed in parameter field and the name of the Protolith like Limestone should be typed into the Value field. Assay – Assay results for the sample intervals. GeoInfo Tools only. Density Formulas Density requires 2 to 3 fields be collected for a density calculation. The four methods in the database are as follows. Method Calculation_______________________ DryWet WeightDry / (WeightDry - WeightWet) WetVolume Volume / (WeightWet – Volume) DryVolume Volume / (WeightDry – Volume) Wax Measured Fields WeightDry (D) WeightWaxAir (A) (Core and Wax) WeightWaxWater (W) (Core and Wax in water) Calculation: D / (A-W((A-D)/0.93)) GeoInfo Mobile Users Manual 31 Lookup List Tools Select a lookup table to view. Lookup tables provide pick list values for data entry fields on the Data Entry forms. Lookup tables are validation tables with referential integrity in the database model which means they not only provide pick lists for easy data entry but they also restrict the data that can be entered into the database fields. A value is required in a lookup table before data values for that field can be entered into the database. The database model provides integrity such that if a data field value needs to be changed, a typo or value change, the user can change the value in the lookup list and it will automatically change all values in the database tables that are the same. A lookup list value can only be deleted if no data in the database uses that value. If the user tries to delete a value that is in use in a database table the database will not allow it and a warning message will be generated. Lookup lists are a very important setup and maintenance item for building a good database. Do not put the same characteristic in a list spelled two different ways, and keep your lists appropriate for that lists data type. Limit your lists to select, carefully thought out values, as your database is only as good as your lists. Lookup lists in GeoInfo Mobile are presented to the user alphabetically, so some lists are worth special naming so they order or group properly; for example alteration intensity, 1_Weak, 2_Moderate, 3_Strong, and lithology modifier, GrainedFine, GrainedMedium, GrainedCourse. Use words without spaces (some software struggles with spaces or special characters) in title case (proper case) for ease of reading. All capital words take too much space on small mobile device screens and are very difficult to read. The Active checkbox limits the items that are displayed in GeoInfo Mobile pick lists. The active setting in lookup lists are managed by project in the database. The idea is that the complete master database lookup lists do not need to be visible for all projects in the database, so users can edit the active setting to show only the appropriate values for their project. (For example: why would Kimberlite be a lithology for a Porphyry project?) The only value that is by default editable is the Active setting for a value. To make the lookup list fully editable so you can edit, add and/or delete records you need to click the Make Editable button and enter a password. Generally lookup lists are not managed in GeoInfo Mobile, but rather a corporate database like GeoInfo Tools. If you need to edit these lists contact your database manager for the password. GeoInfo Mobile Users Manual 32 Update Lat Long Coordinates Converts Lat/Long coordinates to UTM coordinates and UTM coordinates to Lat/Long coordinates. It only converts and writes coordinates if either the Easting/Northing or Lat_Dec/LongDec fields in the database are blank (null). This coordinate conversion only works for WGS84 datum coordinates in the database. The database knows the coordinates are in WGS84 datum if the GeoInfo Mobile Users Manual 33 datum fields, LatLongDatum and/or EastNorthDatum, use the following format; LL_WGS84 and UTMZ12N_WGS84 (any UTM zone in this format). Run this tool after new geochemical samples, observations or drill holes are imported into the database or coordinates are entered or edited manually. The Read GPS button already converts the coordinates so this tool does not need to be run. This tool requires installation of the UTMLLConverterInstaller.exe program. See the UTM Latitude Longitude Converter Software section for instructions. *Note: if you edit one coordinate pair in the database, either Easting/Northing or Latitude/Longitude and want the other pair calculated by the database you will have to delete those values from the database so they are blank (null). The tool only converts records with empty fields in the second coordinate pair. Delete Project Data GeoInfo Mobile is designed as a data entry tool not a data storage tool and as such it will be necessary to delete the data in the database after it has been exported from GeoInfo Mobile and imported into a corporate database. This tool deletes all the data for the active project. Delete Database Data GeoInfo Mobile is designed as a data entry tool not a data storage tool and as such it will be necessary to delete the data in the database after it has been exported from GeoInfo Mobile and imported into a corporate database. This tool deletes all the data in the database. GeoInfo Mobile Users Manual 34 Import/Export Tab GeoInfo Mobile Users Manual 35 Import Tools The GeoInfo Mobile Importers import field data collected using GeoInfo Mobile software (www.GeoInfoMobile.com) into the database. Geochemistry Importer The Geochemistry Importer imports data collected and exported from the GeoInfo Mobile Geochemical Sample Card. 1. Get GIM Data. Use the file browser to locate the GeoInfo Mobile export text file you want to import into the database. The file format is GeochemSC_DeviceID_YYYYMMDD.txt for v2.x (handheld Windows Mobile devices) and GSC_DeviceID_Project_YYYYMMDDHH.txt for v3.x (Windows Tablet devices). The GeoInfo Mobile data is loaded into the importer data window, this data is a temporary copy of the export file data and any edits made here will not change the original export file. The data in the importer window should be reviewed and can be edited if needed. 2. Upload to Database. This uploads the data to the database. If an error is returned it will describe the problem, usually missing values in a lookup table or duplicate sample numbers. Data will not load until it is error free. Fix errors in the importer data window and try again. GeoInfo Mobile Users Manual 36 Errors are generally not present if users are using updated lookup lists exported from the database and imported into GeoInfo Mobile. In general users can not type new values in GeoInfo Mobile, except in a few fields like Project and Sampler, so any new typed values will need to be either added to the database validation lookup tables (VT_* tables) or edited in the importer data window to match a value already in the database validation table lookup list. An error occurs if a sample already exists in the database. This occurs when GeoInfo Mobile data is loaded to the database and the data is not cleared out of the GeoInfo Mobile database, and then the user collects more data. The next time data is imported a duplicate error is generated. The duplicate samples are listed and will need to be deleted in the importer data window (highlight the grey/blue box left of the data, you can select multiple records at one time, and press the delete key on your keyboard or click the Access delete icon or right click). Sorting by sample number or date (right click on the field name and sort A..Z) can sometimes group all duplicates and make them easy to find and delete. After data is loaded successfully a message appears and the temporary data in the importer data window is deleted. If the importer is closed without completing the upload to the database the temporary data is deleted. Observation Importer The Observation Importer imports data collected and exported from the GeoInfo Mobile Observation Database. The importer functions like the Geochemistry Importer so review that section for details. The file format is Observations_DeviceID_YYYYMMDD.txt for v2.x (handheld Windows Mobile devices) and ODB_DeviceID_Project_YYYYMMDDHH.txt for v3.x (Windows Tablet devices). GeoInfo Mobile Users Manual 37 Data Logger Importer The Data Logger Importer imports data collected and exported from the GeoInfo Mobile Data Logger. The importer functions like the Geochemistry Importer so review that section for details; however this importer has some important differences worth noting. Log data from GeoInfo Mobile is not exported to a single file, but one file for each log type that contains data. The file format is Log_DeviceID_YYYYMMDD_LogType.txt for v2.x (handheld Windows Mobile devices) and Log_DeviceID_Project_YYYYMMDDHH.txt for v3.x (Windows Tablet devices). The importer has a tab for each log type. When running the Get GIM Data tool the user only need locate the collar file and all the other associated files will be recognized and loaded into the appropriate data tab. The Upload To Database tool has a bit more functionality than the Geochemistry and Observation importers, mainly in that is not only appends data but it will also allow users to update existing data. Data that already exists in the database in the Geochemistry and Observation importers has to be removed before uploading; in the Data Logger Importer existing data can be updated or ignored. This is required as logging can occur over long periods of time where some of the data might be needed in the database before the hole is complete. Also it is common to have more than one GeoInfo Mobile data collector logging a hole, maybe a geologist logging lithology, alteration, mineralization, minerals, and structure, and a technician logging samples, photos, magnetic susceptibility, density and geotech. GeoInfo Mobile Users Manual 38 The importer looks for duplicates in the file to be uploaded and will report errors if found; these duplicates need to be removed before the data can be loaded. The duplicate finder queries in the pick list in the upper right corner of the importer help find the intervals that are duplicated if you get this error message. The Upload To Database tool provides several messages as data is loaded, more messages if a hole has been loaded into the database previously. The first message will always appear, and it states how many holes are being appended (new holes) and how many are being updated. This message is designed to give the user a chance to catch a Hole ID error when more than one GeoInfo Mobile data collector is being used to log the same hole. If a geologist logs hole J-1004 and loads the data in the database this message should state “You are about to append one new hole to the database”, if the geologist then starts to load a technicians log data for the same hole and the message states the same “You are about to append one new hole to the database” the import should be canceled because the hole names might not match as this hole should be being updated. If loaded with a different name, even J1004 versus J-1004, the database will treat the data as two different holes. Common Hole ID mistakes involve using spaces and special characters in names, like J 1004, J1004, and J1004. If you do catch an error in a Hole ID and need to change it, you need only change it in the collar tab and all the descriptive data Hole ID values will be changes as well. GeoInfo Mobile Users Manual 39 The second message will appear only when data is being updated. It discusses possible issues with updating primary key values. Read this message and understand it, as it is important. An example: If you load a lithology interval for hole J-1004 at 23.5 to 45.9 as Andesite and then later change Andesite to BasalticAndesite in GeoInfo Mobile and then load the log data again the update will be fine, Andesite for this interval will be replaced by BasalticAndesite. However if you change the interval to 23.5 to 62.5 and load this data into the database, since From and To values are part of the primary key (the tables unique record identifier), this new record will not be treated as a duplicate for updating, but rather a new record that is appended to the database. This creates an overlap for lithology in the database. A query in the database has been designed to find these problems, in this case an overlap (qrySJDHaDatabaseTablesOverlapCheck), and can be used to locate problems that can be fixed, but it is always best to catch problems right away. GeoInfo Mobile Users Manual 40 A few operating procedures can alleviate this issue Only load your log data into the database once when it is complete. Log without editing From, To, Depth, Sample Numbers, Log Type, Mineral Type, or Structure Type if you plan to load the log data multiple times. After loading a log into the database multiple times as the hole is being logged, when the hole is complete you can delete the hole from the database and then load it one last time complete without gaps or overlaps. The idea being that the GeoInfo Mobile data collector contains the master log while logging a hole and then once the hole is complete and a final clean upload is completed to the database, the database is now the master. The GeoInfo Mobile log should then be deleted. The next message (a series of similar messages--one for each data type that might need updating) asks the user what to do with intervals that already exist. New data will always be appended but the user has the option to update or ignore existing data. Generally we would say Yes and update existing data because our view is the master log is in the field until the log is complete. GeoInfo Mobile Users Manual 41 Lookup List Importer This tool imports lookup lists that have been created, managed, and then exported from GeoInfo Tools, other corporate databases or other GeoInfo Mobile users. Lookup lists need to be setup and imported before collecting field data as the database is validated by these lookup lists. Validated means you cannot collect a field value unless it exists in the corresponding lookup list. Please read and understand the following warning! This general data flow concept for GeoInfo Mobile, which if followed, will alleviate any problems suggested above, is: 1. Create and manage lookup list in GeoInfo Tools or another corporate database. 2. Export the Lookup/Validation lists from GeoInfo Tools or another corporate database. GeoInfo Mobile Users Manual 42 3. Delete all the old data from any previous data collection with GeoInfo Mobile. 4. Import the new lookup/validation lists into GeoInfo Mobile. 5. Collect field data and export to GeoInfo Tools or another corporate database. Export Tools All export files are saved in the GeoInfo Mobile install directory C:\GeoInfoMobile. Geochemistry Data All data for all sample types are exported to a single text file. The format is GSC_DeviceID_Project or All_YYYYMMDDHHMM.txt. You are provided the option to export the active project only or the complete database. Observation Data All data for all observation types are exported to a single text file. The format is ODB_DeviceID_Project or All_YYYYMMDDHHMM.txt. You are provided the option to export the active project only or the complete database. GeoInfo Mobile Users Manual 43 Data Logger Data Log data is exported to multiple files one for each type of log data that has been logged. The export always includes the collar file. The format is Log_DeviceID_Project or All_YYYYMMDDHHMM_DataType.txt. Data type is like Collar, Lithology, Alteration, etc… You are provided the option to export the active project only or the complete database. Lookup Lists The Lookup List Export tool creates a .txt file of all the validation table lookup lists and settings. This file can then be imported into another users GeoInfo Mobile so the lookup lists match. The v3.x windows OS Tablet export creates a single file for all the projects in the database and includes the Country and State lookup list. The format is VTGIMWin_YYYYMMDDHHMM_All_Device.txt. The v2.x export tool creates a .txt file of all the validation table lookup lists and settings for the active project only. Several exports can be made, one for each project, and then as users change their work from one project to another they can load the appropriate pick lists in GeoInfo Mobile v 2.x on their Windows Mobile handheld. The format is VTGIM_YYYYMMDDHHMM_Project_Device.txt. Similar the v 2.x Lookup List Export tool, the Country/State/Prov export tools creates a validation table lookup lists export for GeoInfo Mobile. In this case only the Country/Stat/Prov lookup list is included and since the whole world is already in the database this update is rarely required. The format is VTGIMCountryState_YYYYMMDD_Device.txt. It is important to keep your GeoInfo Mobile pick lists in sync with your GeoInfo Tools database lists as this eliminates almost all errors when loading data into the database. GeoInfo Mobile Users Manual 44 Query Tools Tab GeoInfo Mobile Users Manual 45 Create Project Queries This tool creates a base set of queries for the active project. Run this tool after: A new project is added to the database. An update of GeoInfo Mobile is being used for the first time. GeoInfo Mobile by default contains a set of queries that present views of all the data in the database. These queries are labeled qryALL*. Project queries created by users are labeled qryXXX* where XXX is the 2-3 letter project code assigned in the VT_Project lookup table. Queries are further classified by information category; surface geochemistry sample data query names are qryXXXCHEM* , drill hole/trench/blast hole/underground working log data query names are qryXXXDH*, and field observation data query names are qryXXXOBSV*. The list of project queries is always changing as client requests are being added. Please review this list frequently for new query views of your data. Contact GeoInformation Solutions with new query requests; they can be added permanently for all projects. Some important queries help manage your data. Query qryXXCHEM_SampleTypeCounts shows sample type counts. Queries qryXXXDH_Logxxxxxx show errors or potential problems in log data. These queries do From, To, Depth, Gap, Overlap and Survey Depth checks on your log data. Use these queries to clean your data! GeoInfo Mobile Users Manual 46 Select Query to View This tool opens queries that have been created for a project. Queries are used to view the data in the database. Queries are exported to use in other programs or linked to via ODBC directly to other software. Clicking the View all queries check box below the pick list will list all queries for all projects and the qrALL* queries. Un-checking this box will list only the active project queries. Query Export Data can be exported from the database in either Access database or Excel spreadsheet format. Queries can be exported by project (all project queries), prospect, area, drill hole/trench, or query. An export to Excel creates one spreadsheet with a tab for each query that contains data. An export to Access creates a new database with a table for each query that contains data. All export files are saved in the GeoInfo Mobile install directory C:\GeoInfoMobile. *Note: Sometimes you receive errors related to specific queries (commonly Density and Geotech) where some values were not exported. This is due to division by zero errors using your data. This is a clue to find and fix these errors. GeoInfo Mobile Users Manual 47 Setting Tab Auto sample numbering by default groups all surface samples as one number series. You can check the setting box to use different sample number series for each sample type. Datasheet and Query/Table font size can be set. If left blank Medium is used. GPS settings generally do not need changing from the default values, except COM port which will need to be set based on your GPS. Picture path setting are by project, so for each project set the folder path for photos. You have the option to have GeoInfo Mobile create subdirectories based on sample type, observation type or Hole ID (GIM will create the sub directories as needed). If the user does not set a photo location path for the current project in the Settings tab then default directories are created in the location of the GeoInfo Mobile software, C:\GeoInfoMobile, named PhotosGeochemistry, PhotosObservatons, and PhotosLog. GeoInfo Mobile Users Manual 48 Appendix A – ODBC Database Linking Setup ODBC (Open Database Connectivity) is used to connect ArcGIS, MapInfo, CoreView, mine modeling software, statistical software and almost any other software directly to the GeoInfo Mobile database queries. ODBC provides a direct link to the database and it is preferred to use an ODBC connection rather than repeatedly exporting and importing data into other software for analysis and presentation. ODBC is a standard interface for accessing database management systems (DBMS). An application can use ODBC to query data from a database. ODBC uses an ODBC driver as a translation layer between the application and the database. The application uses ODBC functions through an ODBC driver manager with which it is linked, and the driver passes the query to the database. To setup a Windows ODBC driver to the GeoInfo Tools Database; Windows 32 bit Operating System; 1. Click the Windows Start menu, Control Panel, Administrative Tools, and Data Sources (ODBC). 2. Select the System DSN tab, and then click Add. 3. Locate the Microsoft Access Driver (*.mdb, *.accdb) in the driver list and click Finish. If this driver is not installed on your computer download and install the Access Database Engine components at http://www.microsoft.com/en-us/download/details.aspx?id=23734 . 4. Type GeoInfoMobile, the exact name of the GeoInfo Mobile file (without the extension), in the Data Source Name field. A description is not required. 5. Click Select to locate the GeoInfoMobile.accdr front end database on your computer. Change the List of File Type to All Files (*.*). 6. Click OK to close the setup form and OK again to close the ODBC Data Source Administrator form. Windows 64 bit Operating System; 1. In Windows File Explorer locate and open (double click) the C:\Windows\SysWOW64\odbcad32.exe file 2. Select the System DSN tab, and then click Add. 3. Locate the Microsoft Access Driver (*.mdb, *.accdb) in the driver list and click Finish. If this driver is not installed on your computer download and install the Access Database Engine components at http://www.microsoft.com/en-us/download/details.aspx?id=23734 . 4. Type GeoInfoMobile, the exact name of the GeoInfo Mobile file (without the extension), in the Data Source Name field. A description is not required. 5. Click Select to locate the GeoInfoMobile.accdr front end database on your computer. Change the List of File Type to All Files (*.*). 6. Click OK to close the setup form and OK again to close the ODBC Data Source Administrator form. GeoInfo Mobile Users Manual 49 Appendix B – ArcGIS OLE DB Connection Setup ArcGIS links directly to the GeoInfo Mobile database using an OLE DB connection to an ODBC driver. After setting up an ODBC driver as described in Appendix A you can then setup an ArcGIS OLE DB connection. 1. Open ArcCatalog 2. In the ArcCatalog browser section on the left locate the Database Connections folder and expand it. Double click Add OLE DB Connection option. 3. In the Provider tab select Microsoft OLE DB Provider for ODBC Drivers, and then click Next. 4. In the Connection tab select the GeoInfoMobile ODBC driver from the Use data source name dropdown list. 5. Click Test Connection button and upon receiving the Test connection succeeded message click OK. 6. Click OK in the Data Link Properties form to finish setting up the OLE DB connection. 7. Rename the .odc connection to GeoInfoMobile.odc GeoInfo Mobile Users Manual 50 Appendix C – ArcGIS Make Query Table Tool There is a limitation in ArcGIS when linking to database tables by just opening them directly from the database ODBC driver… selections do not work. The reason for the selection limitation in ArcGIS with linked database tables is the database tables do not have OID or Object-ID fields which are required for some advanced features of ArcGIS, like selections. If you link to the database using the Make Query Table tool, in ArcToolbox, you have the option to create an Object-ID field so you can have full functionality in ArcGIS with linked database tables. Below are instructions for opening GeoInfo Mobile database queries using the ArcGIS Make Query Table tool; Open ArcToolbox in ArcMap Double click the Make Query Table tool to open the dialog box. The tool is located in Data Management Tools\Layers and Table Views. In the Input Tables field click the Open File Icon. Navigate to Database Connections then select your database OLE DB connection. Then find the database query that you want to open. In the fields list Select All or just the fields your want. (See the bug note below for pre v9.3 AcrGIS.) An Expression is an option; this will give you a subset of the database data. Generally we leave this blank and use a Definition Query in ArcGIS instead. Type the same name as the database query in the Table Name field; this lets you know the data is from the database. When we see qry* in any layer name we know it is a linked table to a database. ArcGIS does not let you use the same exact name as the input database query name, so add an underscore to the name. If you use an expression to limit records then describe that filter after the underscore. For example: qryNPCHEMSoil_ for all the soil data or qryNPCHEMSoil_MSchaefer for soils collected by MSchaefer. The Key Fields Options field is where we define an Object-ID field for the database query. Select USE_KEY_FIELDS (or Virtual if you do not know the unique primary key for the data). In Key Fields check the SampleNum, ObservID, HoleID field or any field or combination of fields that define the primary key for a table (a unique value for each record). Click OK to run. This step is not required in all ArcGIS versions and the query might be automatically loaded; Once run go the Results tab of ArcToolbox, find your Make Table Query session and expand the list. Find the query you just loaded and right click and select Add To Display. Close ArcToolbox. GeoInfo Mobile Users Manual 51 Now the table is loaded in the Sources tab of ArcMap. Right click on the newly added table and click Display XY Data. Select the correct X and Y coordinate fields and projection and create the mapped points. Set your symbology and then save a layer file of your final mapped query so you do not have to recreate these steps every time you want to map this data. *BUG in ArcGIS v9.2 (fixed in 9.3 and beyond). If you select all the fields to display and run the tool, a bug causes each field to be duplicated. The work around is to select all the fields and then unselect just one field, doing this gets rid of the duplication bug issue in ArcGIS. GeoInfo Mobile Users Manual 52 Appendix D – MapInfo Database Linking Read the MapInfo User Manual to understand the MapInfo DBMS tool principles. A brief explanation follows; 1. MapInfo needs to manage mappable tables in a specific look up table format in the database, called the MapInfo Catalog. GeoInfo Mobile already has this table ready for MapInfo. 2. The first thing you do is connect to the database:, File-Open DBMS Connection. Connect to an ODBC driver (set up explained in Appendix A) 3. Make the MapInfo DBMS Toolbar visible. 4. The 4th icon on the DBMS Toolbar is Make DBMS Table Mappable. You do this only once for each query in the database that you want to map. This writes a record in the MapInfo Catalog in the GeoInfo Tools Database. Once the record is written in the MapInfo Catalog it will not show up in the list anymore, since it need be completed only once. When making a query/table mappable use the following settings: a. Index Type = XY Coordinates b. X Coordinate = Long_Dec or Easting c. Y Coordinate = Lat_Dec or Northing d. Uncheck Per Row Style e. Select a symbol and color f. Set the projection g. Some versions of MapInfo return an error at the end “Unable to download only the OBJECT from an DBMS table ……” then another error “The table you have chosen cannot be made mappable …..” but the table is still made mappable and you can ignore it. 5. You can now open the query that has been made mappable. File-Open and change Files of Type from MapInfo (*.tab) to the name of your ODBC database driver GeoInfoMobile. Select the query that you have made mappable and you should now see your data loaded in a map window as objects. If you open a query that has not been made mappable you will see the table open rather than map objects. Use the default Downloaded Data option as MapInfo is slow using Live Access. You can use Column and Row filters as desired but if you do a Column filter make sure to select the OBJECT at the bottom of the list or you will only get a table. 6. Since we link via Downloaded Data you need to use the Refresh DBMS Table tool to automatically re-query the database if new data is available. 7. The Unlink DBMS Table tool breaks the link from the Downloaded Data to the database and thus you are then left with the equivalent of a normal Tab file and no way to re-query the database for new data. We don’t do this often. GeoInfo Mobile Users Manual 53