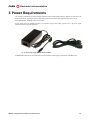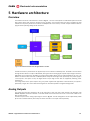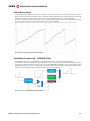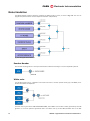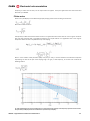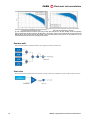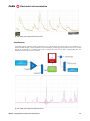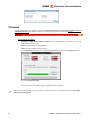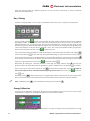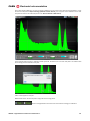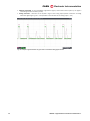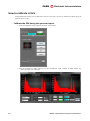
1
CAEN Tools for Discovery n Electronic Instrumentation Rev. 0 - User Manual UM3074 Digital Detector Emulator User Manual Emulation of Digital Pulses from Radiation Detectors Rev. 1 - 05 May 2014 Purpose of this Manual This User Manual contains the full description of the Digital Detector Emulator firmware and software GUI. The description is compliant with Digital Detector Emulator firmware release 1.36864, and software release 1.4.1.8. For future release compatibility please check the firmware and software revision history files. Change Document Record Date 20 January 2014 05 May 2014 Revision 00 01 Changes Initial release Added support to DT5800S. Updated AWG Chapter. Symbols, abbreviated terms and notation TDC ADC DAQ DPP MCA DDE QDC USB Time-to-Digital Converter Analog-to-Digital Converter Data Acquisition Digital Pulse Processing Multi-Channel Analyzer Digital Detector Emulator Charge-to-Digital Converter Universal Serial Bus Reference Documents [RD1] FPGA-Optimised Uniform Random Number Generators Using LUTs and Shift Registers, David B. Thomas and Wayne Luk] [RD2] UM2088 – DPHA User Manual CAEN S.p.A. Via Vetraia, 11 55049 Viareggio (LU) - ITALY Tel. +39.0584.388.398 Fax +39.0584.388.959 [email protected] www.caen.it © CAEN SpA – 2014 Disclaimer No part of this manual may be reproduced in any form or by any means, electronic, mechanical, recording, or otherwise, without the prior written permission of CAEN SpA. The information contained herein has been carefully checked and is believed to be accurate; however, no responsibility is assumed for inaccuracies. CAEN SpA reserves the right to modify its products specifications without giving any notice; for up to date information please visit www.caen.it. MADE IN ITALY : We stress the fact that all the boards are made in Italy because in this globalized world, where getting the lowest possible price for products sometimes translates into poor pay and working conditions for the people who make them, at least you know that who made your board was reasonably paid and worked in a safe environment. (this obviously applies only to the boards marked "MADE IN ITALY", we cannot attest to the manufacturing process of "third party" boards). CAEN Tools for Discovery n Electronic Instrumentation Index Purpose of this Manual ......................................................................................................................................... 2 Change Document Record ................................................................................................................................... 2 Symbols, abbreviated terms and notation .......................................................................................................... 2 Reference Documents........................................................................................................................................... 2 Index ........................................................................................................................................ 4 List of Figures......................................................................................................................... 6 List of Tables .......................................................................................................................... 6 1 Introduction ..................................................................................................................... 7 Main functionalities ................................................................................................................................................ 8 2 3 4 Technical Specifications ............................................................................................... 9 Power Requirements ................................................................................................... 10 Panel Description ......................................................................................................... 11 Front panel device (DT5800D) ........................................................................................................................... 11 Front panel device (DT5800S) ........................................................................................................................... 12 Back panel device (DT5800D and DT5800S).................................................................................................. 13 Front panel device (NDT6800D) ........................................................................................................................ 14 Back panel device (NDT6800D) ........................................................................................................................ 15 5 Hardware architecture ................................................................................................. 16 Overview................................................................................................................................................................ 16 Analog Outputs ..................................................................................................................................................... 16 Digital I/O ............................................................................................................................................................... 17 Correlation Block .................................................................................................................................................. 18 Delay generation .....................................................................................................................................................................18 6 Firmware architecture.................................................................................................. 20 Overview................................................................................................................................................................ 20 Random Number Generation ............................................................................................................................. 22 From custom distributions to a set of values.................................................................................................... 22 Energy Datapath .................................................................................................................................................. 23 Timebase Datapath ............................................................................................................................................. 24 Shape Datapath ................................................................................................................................................... 26 Custom Shape – Memory Based data-path ........................................................................................................................26 Digital RC .................................................................................................................................................................................29 Pulsed Reset (basic) ..............................................................................................................................................................30 Pulsed Reset (advanced) ─ COMING SOON.....................................................................................................................30 Noise Emulation ................................................................................................................................................... 31 Random Number .....................................................................................................................................................................31 White noise ..............................................................................................................................................................................31 Flicker noise .............................................................................................................................................................................32 Random walk ...........................................................................................................................................................................33 Shot noise ................................................................................................................................................................................33 Interference ..............................................................................................................................................................................34 Baseline drift emulation ....................................................................................................................................... 35 Multi-shape emulation ......................................................................................................................................... 36 7 Getting Started.............................................................................................................. 38 Scope of the chapter ........................................................................................................................................... 38 System Overview ................................................................................................................................................. 38 Hardware Setup ................................................................................................................................................... 38 Software and Drivers ........................................................................................................................................... 39 Firmware................................................................................................................................................................ 41 Practical Use ......................................................................................................................................................... 42 8 Software Interface ........................................................................................................ 48 Introduction ........................................................................................................................................................... 48 Installation ............................................................................................................................................................. 48 Requirements .....................................................................................................................................................................48 CAEN Electronic Instrumentation Notes on XP installation ...................................................................................................................................................49 Program Execution .............................................................................................................................................. 49 First Run ................................................................................................................................................................ 50 One Touch Interface ............................................................................................................................................ 53 Setting Area .......................................................................................................................................................... 55 Main Settings .....................................................................................................................................................................56 Channel 1 Mode / Channel 2 Mode ......................................................................................................................................56 Run / Debug .............................................................................................................................................................................57 Energy Calibration ..................................................................................................................................................................57 Spectrum Quantization ...........................................................................................................................................................59 Connector Router ....................................................................................................................................................................59 CH 1 / CH 2 ........................................................................................................................................................................62 General settings ......................................................................................................................................................................63 Energy Mode ...........................................................................................................................................................................64 Import an Energy Spectrum from File ..................................................................................................................................66 How to generate an Energy Spectrum with the internal tool.............................................................................................67 Generate an Energy Spectrum with Isotopes Database ...................................................................................................69 How to modify a spectrum .....................................................................................................................................................72 Energy Mode - Sequence ......................................................................................................................................................73 Signal Shape ...........................................................................................................................................................................74 Multi-Shape ..............................................................................................................................................................................80 Shape Interpolator ..................................................................................................................................................................82 Time Distribution .....................................................................................................................................................................82 Pile-up.......................................................................................................................................................................................84 Noise Emulation ......................................................................................................................................................................86 Interference ..............................................................................................................................................................................86 Baseline Drift ...........................................................................................................................................................................87 LSFR Settings .........................................................................................................................................................................89 Arbitrary Waveform Generator ........................................................................................................................... 90 Delay-Correlation ................................................................................................................................................. 92 Timing Settings ..................................................................................................................................................................92 Statistical Settings .............................................................................................................................................................93 Climatic Operating Condition ...........................................................................................................................................95 Display Area.......................................................................................................................................................... 96 Settings CH1/CH2 .............................................................................................................................................................96 Realtime CH1/CH2 ............................................................................................................................................................96 Delay-Correlation...............................................................................................................................................................97 Accepted File Formats ........................................................................................................................................ 98 Shape (.csv) .......................................................................................................................................................................98 Spectrum (.csv)..................................................................................................................................................................98 Time distribution (.csv)......................................................................................................................................................99 Interference (.csv) .............................................................................................................................................................99 Signal Generator (.csv) .....................................................................................................................................................99 Sequence in Energy Mode and in Time Distribution (.csv) .........................................................................................99 9 Calibration ................................................................................................................... 100 10 System Recovery and Update .................................................................................. 101 11 Application Examples ................................................................................................ 102 Setting up a remote experiment ....................................................................................................................... 102 Operate with pseudorandom generation ........................................................................................................ 106 How to get a new sequence modifying the seeds ............................................................................................................106 Step-by-step control of the pseudo-random generator ....................................................................................................107 How to repeat the same sequence .....................................................................................................................................107 How to generate a fixed number of events........................................................................................................................107 Multi-shape.......................................................................................................................................................... 108 Correlated event generation ............................................................................................................................. 110 Generating artificial spectra with isotopes database .................................................................................... 114 How to calibrate in KeV ..................................................................................................................................... 119 Calibrate the DDE during the spectrum import .................................................................................................................119 Calibrate the device using an imported spectrum ............................................................................................................121 12 Technical support ...................................................................................................... 124 5 UM3074 – Digital Detector Emulator User Manual List of Figures Fig. 3.1: AC/DC power supply provided with the DT5800 kit........................................................................................................10 Fig. 5.1: The hardware architecture of the Digital Detector emulator ..........................................................................................16 Fig. 5.2: Filter sequence on the Digital Detector analog output stage ........................................................................................17 Fig. 5.3: Signal output before (on the left) and after (on the right) the 20 MHz .........................................................................17 Fig. 5.4: Hardware and firmware generation of delay between the two output channels. ........................................................18 Fig. 5.5: Generation of correlated events with the internal third channel. In blue the channel 1 signal, in red the channel 2 signal. The event with the yellow bullet is generated by the third channel. ................................................................................19 Fig. 5.6: Generation of correlated events with the internal third channel. In blue the channel 1 signal, in red the channel 2 signal. The event with the yellow bullet is generated by the third channel. ................................................................................19 Fig. 6.1: Digital Detector Emulator firmware architecture. ............................................................................................................21 Fig. 6.2: Emulation of a spectrum. ....................................................................................................................................................23 Fig. 6.3: The three ways to emulate the energy. ............................................................................................................................23 Fig. 6.4: Conversion of a programmed energy spectrum into an amplitude sequence. Evaluating the histogram on the output vector user gets the same input spectrum. .........................................................................................................................24 Fig. 6.5: Generation of Poisson distributed events using the Bernoulli Trails method..............................................................24 Fig. 6.6: Generation of a custom temporal distribution..................................................................................................................25 Fig. 6.7: Schematic diagram showing the principle of paralyzable and non-paralyzable dead-time on the top of the figure. On the bottom the emulation scheme of the dead-time. ...............................................................................................................25 Fig. 6.8: Memory based shape generation......................................................................................................................................26 Fig. 6.9: Shape readout and amplitude modulation. ......................................................................................................................27 Fig. 6.10: Linear interpolation. It is possible to select a corner point that separates the “rise time” region from the “fall time” region. A different interpolation ratio can be set for the two regions (top). The user can set is the number of samples to be added between a real sample and the consecutive (bottom). ............................................................................................28 Fig. 6.11: Pile-up emulation...............................................................................................................................................................28 Fig. 6.12: Memory based data-path output signal. .........................................................................................................................28 Fig. 6.13: Digital RC structure. ..........................................................................................................................................................29 Fig. 6.14: Typical Digital RC analog output. ....................................................................................................................................29 Fig. 6.15: Typical output of the basic pulsed reset option. ............................................................................................................30 Fig. 6.16: Structure of the advanced pulsed reset option. ............................................................................................................30 Fig. 6.17: Noise generation architecture. ........................................................................................................................................31 Fig. 6.18: Implementation of 1/f noise shaping filter: we can observe that the envelope of the frequency responses of the first order low pass filters (-20 dB/dec) has the same trend of the 1/f ideal noise (-10 dB/dec). .............................................32 Fig. 6.19: Comparison between a continuous time low pass filter (LPF) with pole at 1 KHz (and 100 KHz) and the corresponding digital implementation obtained through an IIR digital filter. The frequency response in the digital domain has been obtained by applying the FFT function to the output of the filter with a white noise with spectral density equal to 1 as input (blue line). The red curve is extracted from the blue one by averaging on 100 samples. ......................................33 Fig. 6.20: Analog output signal with white and 1/f noise. ..............................................................................................................34 Fig. 6.21: Analog output signal with artificial interference. ............................................................................................................34 Fig. 6.22: Baseline drift emulation. ...................................................................................................................................................35 Fig. 6.23: Baseline drift emulation. In the table an example of values that the user can set and the corresponding preview. ................................................................................................................................................................................................35 Fig. 6.24: Typical output of the baseline drift emulation with pulses superimposed. ................................................................36 Fig. 6.25: Multi shape emulation algorithm. ....................................................................................................................................36 Fig. 6.26: Typical output of one emulated channel with two different shapes (50% mixture). .................................................37 Fig. 7.1: The hardware setup including the Digital Detector Emulator DT5800D and the DT5724 used for the practical application ............................................................................................................................................................................................38 Fig. 7.2: Firmware Upgrade window ................................................................................................................................................41 Fig. 8.1: Example of signal saturation. The green trace is on when the analog signal saturates. ..........................................61 Fig. 8.2: Example of events with constant rate (top) and Poisson (bottom) time distribution. .................................................83 Fig. 8.3: Events in pile-up on both output channels (red and blue). ............................................................................................84 Fig. 8.4: Emulation of events with paralyzable dead-time (top), and non-paralyzable dead-time (bottom). ..........................85 Fig. 8.5: Baseline drift emulation. In the table an example of values that the user can set and the corresponding preview. ...............................................................................................................................................................................................................88 Fig. 11.1: Spectrum for the background emulation to be programmed on channel 1 and channel 2 (left). Spectrum for the signal emulation (blue circle) to be programmed on channel 3 (right). .....................................................................................111 List of Tables Tab. 1.1: Table of the supported Digital Detector Emulator models ..............................................................................................8 Tab. 5.1: Analog output stage performances ..................................................................................................................................17 CAEN Electronic Instrumentation 1 Introduction The massive evolution of digital processors for radiation measurements has highlighted the extreme convenience to develop techniques for emulating the detection and acquisition systems. The process of debugging of systems as digital pulse processors, pulse discriminators, Time-to-Digital/Amplitude converters, etc, requires an ever-increasing effort of processing algorithms that are becoming more and more complex. The possibility to generate test vectors that are the as similar as possible to the actual data produced by the experiment, both in the software simulation and at the hardware level can extremely reduce the R&D projects time. All of this can be summarized in the need to generate an electrical signal with completely controlled characteristics that is compliant to the real output of a radiation detection setup. Although the use of a source and a detector is always the best way to generate a reliable data set, it involves considerable disadvantages, especially during preliminary feasibility studies. The use of the source inherently involves a risk for the health of the experimenters, and in addition requires labs equipped in accordance with the regulations in term of use of radioactive substances. Moreover, the emission spectrum depends on the nature of the source, e.g. the polarization of an X-ray tube or the process of decay. The statistical distribution of the events is Poissonian and usually the user can only control the rate, and has no control on the statists. The spectrum of noise, interferences and the pulse shape are issues on which the experimenter can hardly affect. Furthermore, the natural emission process is not repeatable and therefore it is not possible to evaluate the behavior of different implementations of the processing system on a set of equal data. It is common practice to use electronic instruments to generate analog signals with similar features to real experiment. There are instruments able to generate exponential signals with fixed amplitude and Poissonian temporal distribution, that can emulate effects such as pile up. However they cannot modulate the amplitudes of generated signals according to a generic spectrum of emission. To overcome this problem hardware tools, called arbitrary waveform generators, have been developed. These instruments can generate long sequences of events at high rate (up to 1 GSPS), which have been synthetized off-line using simulation tools (e.g. MatLab). At present the most efficient tools have 1 Gword memory which means about a signal one second long before a repetition or about 10 millions of counts. Obviously this is not enough for a good statistics of a complex spectrum. We therefore developed, in collaboration with Nuclear Instruments SrL and Politecnico of Milan, a multichannel digital instrument for emulating radiation detection systems. The processor is initialized with a reference pulse shape, with statistic distribution of amplitude and time. According to this information, the device generates a stream of events that can be also selectively summed together simulating the pile-up phenomenon. At each pulse can be superimposed noise arbitrarily generated and baseline deviation. The Digital Detector Emulator is therefore the only synthesizer of random pulses that is also an emulator of radiation detector signals with the possibility to configure the energy and time distribution. The stream of emulated signals becomes a statistical sequence of pulses, reflecting the programmed input features. When the emulation process is reset, the kernels of generators can be either re-initialized with new random data making the sequence always different, or they can be stored to reproduce the same sequence many times. The Digital Detector Emulator is able to emulate two different radiation sources at a time on the two output channels and to provide them either with fully independent parameters, or with some of them correlated. For example the events can be time correlated (steps of 12 ps), or a subset of events can share the same energy spectrum. It is also possible to set the channels in a master/slave configuration, where the first channel works as a trigger for the second one. 7 UM3074 – Digital Detector Emulator User Manual Rev. 1 CAEN Electronic Instrumentation Main functionalities The main features of the Digital Detector System are: Emulator/Pulser/Function Generator operation mode Energy spectrum emulation Time spectrum emulation Pile-up emulation Noise and periodic interference emulation Continuous and pulsed reset emulation Baseline drift Debug mode: predictable sequence generation with step-by-step pulse generation Windows software for full system management USB 2.0 connection DLL for automation of emulation process Replay on analog channels of recorded or synthetized signals Generation of shifted copy of a signal with 12 ps step (i.e. correlated event emulation) Load / download in CSV format of parameters/shapes/spectra The description of this User Manual is compliant with the following products: Board Models DT5800D DT5800S NDT6800D NDT5800S Description DT5800D - Dual Channel Desktop Digital Detector Emulator with channel correlation DT5800S - Single Channel Desktop Digital Detector Emulator NDT6800D - Dual Channel NIM/Desktop Digital Detector Emulator with channel correlation NDT6800S - Single Channel NIM/Desktop Digital Detector Emulator Product Code WDT5800DXAAA WDT5800SXAAA WNDT6800DXAAA WNDT6800SXAAA Tab. 1.1: Table of the supported Digital Detector Emulator models UM3074 – Digital Detector Emulator User Manual Rev. 1 8 CAEN Electronic Instrumentation 2 Technical Specifications • Single line (65535 selectable levels) • Spectrum emulation (16384 bins with 14 bit resolution) Energy emulation features • ± 4 V output range, high impedence; ± 2 V, 50 Ω termination • 16 bit D/A converter • Constant rate emulation • Poisson distribution • Programmable statistical generation of events (256 bins, 8 bit resolution) • Up to 11 MCPS, both in constant and statistical emulation Time emulation features • Integrator circuit emulation without pile-up limitation • Up to 16 pile-up events in the memory based algorithm • Programmable dead-time and emulation of parallelizable and non-parallelizable machines • 20 ns to 10 ms exponential decay time • 4096 points to store waveforms • Arbitrarily programmable shapes Signal shape • Shape length from 64 ns to 26 μs (w/o interpolation) / 26 ms (interp.) • Separated rising and falling edge interpolation • Up to two separate shapes mixed on the same channel with independent statistic • White noise emulation (BW 62.5 MHz) • 1/f noise emulation • Random Walk (baseline drift) Noise emulation • Interference generation (e.g. possibility to record spikes from switching power supplies and inject in the output signal) • Interference generation with fixed amplitude and frequency or randomly modulated in amplitude and injection time Baseline Correlated events emulation Digital I/O RNG (random number generation) • Baseline drift programmable with arbitrary shape • Three operation modes: 1) Channel 1 (CH1) is the time shifted copy of Channel 2 (CH2) (12 ps step); 2) CH2 has its own statistics generator (i.e. different spectrum, different noise, etc.) but is triggered by CH1 (delayed by 12 ps step); 3) A third emulator channel (with separate statistic properties) generates correlated pulses for both CH1 and CH2. In this way, only some events of the two channels are correlated • 12 ps step programmable delay (from 0ps to 32us), 18 FWHM, 60 ppm linearity • Temperature stabilization of the delay line • 2-input and 2-output programmable • Trigger out, analog saturation warning, machine overload sensing • Trigger in, random number generator control (reset / play / pause), gating, baseline reset • 8 independent LFSRs with 64 bits generate the base for the statistical emulation • Possibility to randomize the seeds of each RNG independently • Possibility to initialize the RNG with fixed seeds to get repeatable sequences to test different processing architectures • Generation of finite length streams of pulses to debug step-by-step the DUT Programmable sequence • 500 kpoints of memory/CH to store a sequence of pairs (energy, time of occurrence) to generate long predictable and defined sequences of pulses Arbitrary waveform generator • 1 Mpoints/CH to store any arbitrary waveform • Function generation: sin, square, ramp, saw, pulse, sinc up to 10 MHz Software and interface • Windows-based user interface managing more than one emulator • USB 2.0 and Ethernet interfaces 9 UM3074 – Digital Detector Emulator User Manual Rev. 1 CAEN Electronic Instrumentation 3 Power Requirements The module is powered by the external AC/DC stabilized power supply provided with the digitizer and included in the delivered kit. Please, use only the power supply shipped with this instrument and certified for the country of use. Input: 100-240 VAC , 50-60 Hz; Output: 12.0 V, 5.0 A . All I/O digital gates are LVCMOS compliant. The dynamic range of the analog outputs is 2.2 V @ 50 output impedance and 4.4 V @ high impedance. Fig. 3.1: AC/DC power supply provided with the DT5800 kit The NIM/Desktop module can work with both the external AC/DC power supply, and the power from NIM crates. UM3074 – Digital Detector Emulator User Manual Rev. 1 10 CAEN Electronic Instrumentation 4 Panel Description Front panel device (DT5800D) The DT5800D front panel is as in the following picture. Numbered labels are explained in the table. 1 8 2 3 Number 1 2 3 4 5 6 7 8 4 5 6 7 Description Blue LED – Analog output CH1 power on status OFF: channel output disabled ON: channel output enabled Analog output CH1 Digital input CH1 Digital output CH1 Digital output CH2 Digital input CH2 Analog output CH2 Blue LED – Analog output CH2 power on status OFF: channel output disabled ON: channel output enabled CAUTION. All I/O gates are LVCMOS compliant. The dynamic range of the analog outputs is 2.2 V @ 50 output impedance and 4.4 V @ high impedance. 11 UM3074 – Digital Detector Emulator User Manual Rev. 1 CAEN Electronic Instrumentation Front panel device (DT5800S) The DT5800S front panel is as in the following picture. Numbered labels are explained in the table. 1 5 2 3 Number 1 2 3 4 5 4 Description Blue LED – Analog output CH1 power on status OFF: channel output disabled ON: channel output enabled Analog output CH1 Digital output CH1 Digital input CH1 Blue LED – Analog output CH1 status OFF: normal operation ON: machine overloaded CAUTION. All I/O gates are LVCMOS compliant. The dynamic range of the analog outputs is 2.2 V @ 50 output impedance and 4.4 V @ high impedance. UM3074 – Digital Detector Emulator User Manual Rev. 1 12 CAEN Electronic Instrumentation Back panel device (DT5800D and DT5800S) The DT5800D and DT5800S back panel is as in the following picture. Numbered labels are explained in the table. 1 2 3 Number 1 2 3 4 13 4 Description Serial number ON/OFF switcher Power Supply Connector (+12 V central terminal positive) USB Interface Connector UM3074 – Digital Detector Emulator User Manual Rev. 1 CAEN Electronic Instrumentation Front panel device (NDT6800D) The NDT5900 front panel is as in the following picture. Numbered labels are explained in the table. 8 7 6 5 Number 4 1 3 2 1 1 2 3 4 5 6 7 8 9 10 Description Blue LED – Analog output CH1 power on status OFF: channel output disabled ON: channel output enabled Analog output CH1 Digital input CH1 Digital output CH1 Digital output CH2 Digital input CH2 Analog output CH2 Blue LED – Analog output CH2 power on status OFF: channel output disabled ON: channel output enabled USB Interface Connector Serial Number 9 10 CAUTION. All I/O gates are LVCMOS compliant. The dynamic range of the analog outputs is 2.2 V @ 50 output impedance and 4.4 V @ high impedance. UM3074 – Digital Detector Emulator User Manual Rev. 1 14 CAEN Electronic Instrumentation Back panel device (NDT6800D) The DT5800D front panel is as in the following picture. Numbered labels are explained in the table. 1 2 3 Number 1 2 3 15 Description Power Supply Connector (+12 V central terminal positive) ON/OFF switcher NIM Power Supply UM3074 – Digital Detector Emulator User Manual Rev. 1 CAEN Electronic Instrumentation 5 Hardware architecture Overview The hardware structure of the emulator is shown in Fig. 5.1. The core of the system is a FPGA device Spartan 6 LX-150 that contains all the logic resources necessary for the emulation. The instrument does not have a hardware user GUI interface and requires a permanent connection via USB/Ethernet to the host PC, on which complex software allows to program all the operating settings of the instrument. Fig. 5.1: The hardware architecture of the Digital Detector emulator The USB connection is performed at the physical layer via the interface FT2232H by FTDI. The FPGA is interconnected through two bus LVDS to a couple of 16-bit DACs, which generate the analog signals. Specific output stages convert the differential current signal from the DACs into single-ended voltage signals that are made available for the user. The FPGA is connected to two memories of 4 Mword (32-bit words) for the storage of the pulse shape. The power supply is a crucial point in the system. In fact, the digital circuits require high currents that are supplied by switching power architectures. The analog section of the system requires very pure power supplies with ripple below 1 mV. Moreover, the system is powered by a single +12 V source while the analog section needs both positive and negative voltage levels. Analog Outputs The analog stage has been designed to be at the same time at low noise and at high dynamic. We therefore used AD8045 amplifiers that allow to achieve a noise level of 820 uV rms with rise time of 5 ns or noise level of 200 uV rms with rise time of 30 ns. The filter sequence in the analog output stage is shown in Fig. 5.2. The two analog filters can be independently added by the user in the GUI interface, where they are called “anti-alias” and “output” filter respectively. UM3074 – Digital Detector Emulator User Manual Rev. 1 16 CAEN Electronic Instrumentation Fig. 5.2: Filter sequence on the Digital Detector analog output stage Feature Dynamic Linearity Rise Time Value ±2V 10 ppm No Filter 5.5 ns 90 MHz 10 ns 90 + 20 MHz 30 ns Tab. 5.1: Analog output stage performances The first filter has a single-pole at 90 MHz, and acts as an anti-aliasing filter directly connected to the DAC output. By slowing down the signal before the amplification stage, it makes the operational amplifiers not to be affected by slewrate limitation during the rise-time. If this filter is enabled, the rise time increases to 10 ns, depending on the amplitude within a range of ± 100 ps around the nominal value over the entire emulator output dynamics. If disabled, the range becomes about 1.5 ns. The second filter is a 7th-order Bessel filter with a 20-MHz bandwidth acting as a reconstruction filter. It avoids the output signal to have the typical step shape due to the 125 MSPS DAC, as in Fig. 5.3. Fig. 5.3: Signal output before (on the left) and after (on the right) the 20 MHz The analog output is designed to generate a signal amplitude of ± 2 Vpp, with 50 Ω termination. It is possible to terminate it with high impedance, having a final amplitude of ± 4 Vpp. In this case it is possible to have multiple signal reflections, if the signal edge is sharp. It is strongly recommended to enable both filters when using high impedances. Digital I/O The digital I/O functionalities can be set from the software GUI (refer to Chapter 8 for the complete list of functionalities). The digital outputs provide LVCMOS 0-3.3 V signals, as the inputs can receive signals with amplitude 0-3.3V. Inputs and outputs are protected with anti-ESD diodes. 17 UM3074 – Digital Detector Emulator User Manual Rev. 1 CAEN Electronic Instrumentation Correlation Block In the two channel version of the Digital Detector Emulator it is possible to correlate the two analog outputs in three different ways. Delay generation The two channels can be used in a master-slave configuration. The master channel has its own time base generator, as the slave channel generates a signal with a programmable time delay with respect to the master one. This resolution on the programmable delay is 12 ps. This is a quite peculiar feature, and even if higher temporal resolution pulser devices are available, none of them are able to generate at the same time analog signals with fully programmable shape, energy and temporal distributions. The high resolution of the settable delay makes the instrument particularly useful for designing and debugging measurements involving times of flight, as in high-energy physics experiments, or temporal correlation, as in PET applications, where the correlation defines a window of acceptance of the photons. In this latter application, the required resolution is of the order of 100 ps, about 10 times worse than what achieved by the Digital Detector Emulator. Three operating modes are available: In the first mode the slave channel generates the same event of the master channel, translated in time. In the second mode the two channels are totally independent and only temporally correlated. This means that different energy spectra, noise contributions, interference, shapes, can be assigned to the two channels and the master channel only acts as a trigger for the slave one with a programmable temporal shift. The hardware and firmware architecture that realizes the emulation of the temporal correlation is shown in Fig. 5.4. A low jitter clock generator produces a signal that is divided over three different lines by a clock distributor. One of these is used as clock of the FPGA device. The two channels are synchronized with this clock signal. The other two outputs of the distributor are sent as inputs of two integrated delay lines, between which it is possible to insert a time lag by means of a control SPI bus. The lines delayed are then used respectively as the clock lines of the two DACs that are connected to the outputs of the two digital channels of the FPGA device. In this way the two channels, while being originated synchronous, are shifted by the programmed time interval. Fig. 5.4: Hardware and firmware generation of delay between the two output channels. In the third operating mode the emulator can be programmed to generate energy and time correlated signals. Besides the two physical channels there is a third channel inside the emulator that can be used to inject correlated pulses. The third channel has a complete independent statistics, both in amplitude and time, and injects the same event in the two outputs (see Fig. 5.5). UM3074 – Digital Detector Emulator User Manual Rev. 1 18 CAEN Electronic Instrumentation Fig. 5.5: Generation of correlated events with the internal third channel. In blue the channel 1 signal, in red the channel 2 signal. The event with the yellow bullet is generated by the third channel. The thermal stability of the delays is guaranteed by variations kept below 0.03°C at 25°C through a Peltier cell and a high-speed control loop. It has been experimentally verified that from 15°C to 65°C, when the difference between the front of the clock of the DAC and that of the FPGA device is less than 2 ns, the DACs used in the device enter in a metastability condition. The delay lines may generate a total delay (advance on a DAC and delay on the other) of 16 ns while the clock period is 8 ns. Since 4 ns are inhibited due to metastability there are 12 ns available for the fine adjustment of the delay. Being greater than 8 ns, this delay gives the possibility of emulating any phase rotation. Since the delay inserted on each channel is 8 ns, it is evident that it is impossible to use a single delay line, since the time of adjustment is 6 ns. The system can prevent malfunction mainly because it has a priori knowledge of the delay to be emulated and on the basis of this a-priori knowledge it is possible to choose the best combination delay/advance on the two DACs to minimize the risk of metastability. Fig. 5.6: Generation of correlated events with the internal third channel. In blue the channel 1 signal, in red the channel 2 signal. The event with the yellow bullet is generated by the third channel. The delay line is used to shift the phase of the two channels with a resolution of 11.6 ps on a scale ranging from 0 to 32 ps. 19 UM3074 – Digital Detector Emulator User Manual Rev. 1 CAEN Electronic Instrumentation 6 Firmware architecture Overview The hardware of the Digital Detector Emulator slightly differs from a classic arbitrary function generator. The great innovation is the ensemble of algorithms that allow the synthesis of digital signals in real-time with specific controlled characteristics. The number of operations that enables the real-time emulation of signal the closest as possible to reality is really huge. The emulator is able to generate each sample of the stream at the rate of 125 Msamples/s, taking into account the emission spectrum, the statistic of emission and therefore also the pile-up between the events, the shape of the signal, the contributions of noise and interferences, the fluctuations and drift of the baseline, the shaping of the conditioning electronics. The hardware is from 100 to 10,000 times faster than the equivalent software that we have developed in Matlab to characterize the system. To be able to accelerate as much as possible the calculation, the spatial distribution of the processing resources into the FPGA device has been deeply exploited. Fig. 6.1 shows the structure of the firmware. An algorithm for getting the first order statistical characteristics of a random process from a histogram of events has been devised and implemented. The algorithm returns the statistical distribution of amplitudes and occurrence times of the events. The generator of occurrence times acts as the trigger for the output of the signal shape, whose amplitude is scaled according to the sorted amplitude value. The user can load into the system memory the shape of the signal to be emulated. The stored shape (called reference pulse) is normalized to the unit maximum value. The algorithm then extracts a value of starting time and amplitude, and generates the reference shape rescaling its amplitude. There are three independent data-paths for the pulse generation. The first case is called “custom shape data-path”. The device provides 16 generator machines that can trigger independently with the extracted starting time. The shapes generated can be summed together to emulate the pile up. Any kind of shapes can be emulated with this data-path, even custom shapes that can be loaded through a file. The only limitation is the number of piled-up events that cannot exceed 16. The second case is the “exponential data-path” that emulates a real analog pulser with no limits on the generation of piled-up events. It can only emulate exponential shapes. The third case is the “pulsed reset data-path” that can emulate pulsed reset detectors. In addition, the instrument implements the emulation of the baseline drift, noise, and analog output interferences. The drift of the baseline value is not statistical but is introduced by the user as a deterministic shape, in order to allow the emulation of deterministic variations, like periodic interferences or couplings. At the rate of 125 MHz, the system is able to emulate a drift profile up to 7 s long. White and 1/f sources of stationary noise and generic disturbances can be emulated as well. The range of frequencies of the 1/f noise extends from few Hz to more than 100 kHz. The power spectral density of the 1/f noise is obtained by properly shaping the power spectral density of a white noise generated by a LSFR. The shaping transfer function is obtained as the superposition of ten first-order low-pass filters with poles positioned at equal distance on a logarithmic scale in the range of frequencies where the 1/f shaping is desired. The device can also emulate the random drift of the baseline. UM3074 – Digital Detector Emulator User Manual Rev. 1 20 CAEN Electronic Instrumentation Fig. 6.1: Digital Detector Emulator firmware architecture. 21 UM3074 – Digital Detector Emulator User Manual Rev. 1 CAEN Electronic Instrumentation Random Number Generation The emulation process is based on the generation of pseudo-random sequences that statistically reproduce the input programmed features. For example the user can set the desired energy spectrum; then the device will convert the spectrum into a sequence of numbers representing the pulse amplitudes. A very good source of pseudo-random numbers is required in order to have very long sequences, with no pattern and artefact. This will ensure that the emulator output is as close as possible to a real output. Moreover a pseudo-random generator allows to reproduce many times the same sequence, or to generate any times a statistically independent sequence. This is quite straightforward since the user has only to store the initial “seed” that enables the number generator. The seed is a 64 bit number, used as a starting point for the pseudo-random generator. The use of a simple Linear-Feedback Shift Register (LFSR) allows to generate pseudo-random sequences with statistical properties that limits the good result of the emulation. For this reason the LFSR are used to program a 32 bit LookUp Table-Shift Register (LUT-SR) generator that generates numbers with very small auto-correlation. The LUT-SR has a very 1024 long period, up to 2 clock cycles. Refer to [RD1] for further details about this method. The structure of the number generation is shown in the figure above. From custom distributions to a set of values In emulating a radioactive source, a primary task is to generate the energy values following a user-defined energy spectrum and the Poisson distribution of the pulse occurrence times. Those distributions have to be converted into a stream of values, whose probability distribution follows the input spectra. Being a statistical variable x described by a density probability distribution f(x), it can be modelled by the cascade of a generator of uniformly distributed random numbers and the transform function F(x). In this way, the quality of the generated statistic values depends only on the uniform number generator, which can be used for every emulated source, characterized only by F(x). Therefore from a white spectrum it is possible to get any kind of spectrum. In order to explain how the algorithm works, let us consider that the energy spectrum is a histogram composed by 16 energy bins, from E0 up to E15, with a maximum dynamic range (DR) equal to 16. The bin width is the spectrum resolution, while the DR is the maximum height of each histogram column. Of course, the higher is the number of bins and the DR, the better is the represented spectrum. However, increasing the accuracy of the spectrum is simply a matter of the number of bits that can be used and this is not a problem with modern digital devices. Each column of the histogram can be thought as composed by a number of small squares; if a generic bin x is twice higher than a bin y means that there is twice the probability for an event to have energy E x rather than energy Ey. In fact, the height of the column of the bin x represents the density probability that the event has energy between E x-1 and Ex+1. The product of the column value by the bin width returns the probability. The ratio of the probabilities that an event has energy in a certain interval rather than in another one is simply the ratio between the corresponding areas below the density probability curve. With reference to Fig. 6.2, each square of each column is sequentially numbered. Consider the simplified case in which 5 the total number of squares under the curve is a power of 2, e.g. 2 =32. Using 5 bit in the random number generator, all the 32 numbers can be obtained with the same probability, i.e. the random numbers map completely the area under the spectrum curve. Every time a random number is generated, the algorithm searches the number in the spectrum area and, when finds it, delivers the bin number n thus indicating the corresponding energy value En. If we consider again a generic x bin two times higher than a y bin, it is easy to see that, since the random numbers with equal probability map all the squares, there is twice the probability that the random number picks up a square in x rather than in y column, which means that generated pulses with Ex energy are twice those with Ey energy. In practice, an array is loaded with the cumulative energy spectrum Hc(Ex) that is computed from energy spectrum H(E) UM3074 – Digital Detector Emulator User Manual Rev. 1 22 CAEN Electronic Instrumentation In this way, only one memory cell per bin is required. Using the cumulative spectrum, it is still possible to identify the bin that contains the generated random number by means of an extension of the described algorithm. For instance (see Fig. 6.2), if the random number is 18, it is easy to see that it belongs to the memory cell number 10: in fact, the cell number 10 contains a number that is higher than 18 (20), while the previous cell contains a number that is lower (16); this means that bin number 10 contains the squares that go from 16 to 19, exactly the range in which 18 belongs. So the output energy value correspondent to the random number 18 is 10. Fig. 6.2: Emulation of a spectrum. Energy Datapath The energy of a pulse represents the area under the pulse, and for a constant shape it is proportional to the pulse amplitude itself. The emulator has three ways to modulate the energy, as shown in the following figure. Fig. 6.3: The three ways to emulate the energy. The “fixed energy” mode generates pulses with the same amplitude; “spectrum” generates pseudo-random sequences of values that follow the programmed input energy spectrum; “sequence” allows to load a file with a sequence of predefined energy values that the emulator will reproduce repetitively. The sequence is copied into the internal memory of the device; therefore the maximum allowed length is 500K values. The “spectrum” data-path uses the algorithm explained in the previous section. Fig. 6.4 shows an example of generation of a set of amplitudes starting from an energy spectrum. 23 UM3074 – Digital Detector Emulator User Manual Rev. 1 CAEN Electronic Instrumentation Fig. 6.4: Conversion of a programmed energy spectrum into an amplitude sequence. Evaluating the histogram on the output vector user gets the same input spectrum. Timebase Datapath It is possible to generate the time of occurrence of a pulse in four ways, as shown in the following figure: “fixed rate”, “Poisson” distribution, thought a “custom” distribution, or a “sequence” of maximum 500K events. The Poisson distribution is obtained through the Bernoulli Trials method. Repeated independent trials in which there can be only two outcomes are called Bernoulli trials. Bernoulli trials lead to the binomial distribution. If the number of trials is large, then the probability of k success in n trials can be approximated by the Poisson distribution. The generation process of Poissonian events is shown in Fig. 6.5. For each clock cycle the device generates a pseudorandom number. If this number is greater than α = rate/fclk, then the event is generated. Fig. 6.5: Generation of Poisson distributed events using the Bernoulli Trails method. The “custom” generation with programmable statistics use an algorithm similar to the algorithm that converts the energy spectrum into amplitude values. It generates a sequence of values that fluctuates around the mean rate according to the programmed statistics. The programmable resolution is 256 values. A scale factor (“interpolator”) can be used to extend it. UM3074 – Digital Detector Emulator User Manual Rev. 1 24 CAEN Electronic Instrumentation Fig. 6.6: Generation of a custom temporal distribution. For any selected data-path the emulator is able to generate two kind of dead-time, able to emulate detectors, or detection systems characterized by paralyzable or non-paralyzable dead-time. In a non-paralyzable detector, an event occurring during the dead time is simply lost, so that with an increasing event rate the detector will reach a saturation rate equal to the inverse of the dead time. In a paralyzable detector, an event occurring during the dead time will not just be missed, but will restart the dead time, so that with increasing rate the detector will reach a saturation point where it will be not able to record any event at all. Fig. 6.7: Schematic diagram showing the principle of paralyzable and non-paralyzable dead-time on the top of the figure. On the bottom the emulation scheme of the dead-time. The emulator can work also with an external trigger fed into the digital input connector. The external trigger is sampled with a precision of 8 ns, and it then enables the event generation. 25 UM3074 – Digital Detector Emulator User Manual Rev. 1 CAEN Electronic Instrumentation Shape Datapath The emulator allows for three types of shape generation: “custom shape”, the “digital RC”, and the “pulsed reset”. Custom Shape – Memory Based data-path The custom shape data-path allows to emulate any kind of shape the user can program. The control software fed a 4096 memory buffer with the points describing the shape. An interpolator is used to get shapes longer than 32 µs. Since the emulation is based on 16 memory machines, the maximum number of piled-up events is 16. If more than 16 piledup events are requested, the exceeding events are discarded, and the final statistic might not be Poissonian. The shape generator is able to: 1. read a memory that contains the shape of the pulse; 2. interpolate the output of the memory to achieve long pulse shapes using few kBytes of memory. Note: The “memory based” shape emulation is referred in the software GUI as “Fast” shape. Fig. 6.8: Memory based shape generation. A time-quantized vector that contains the shape of the pulse is stored in memory and read from the first to the last element any time a start pulse is fired from the time base generator. Reading the memory with a fixed time step dt and feeding the DAC with memory output the emulator generates the desired waveform. The multiplier modulates the amplitude of the signal read from the memory to the value calculated according to the reference spectrum. UM3074 – Digital Detector Emulator User Manual Rev. 1 26 CAEN Electronic Instrumentation Fig. 6.9: Shape readout and amplitude modulation. In case of exponential shape, its generation flow is as follows: 1. An ideal exponential shape is generated according to the definition 2. 3. The shape passes through a first-order IIR low-pass filter with bandwidth equal to . The system calculates the sample in correspondence to which the filtered shape at full-scale gets off below the LSB of the DAC. On this basis, the system calculates the factor of subsampling: 500 points are reserved to the rising edge, the remaining 3596 are for the tail. The subsampled shape is programmed and the factors for the linear interpolation of rising and falling edges are calculated. 4. 5. The value of time step dt between two samples depends on the interpolation function. The interpolation allows the reduction of used memory. In order to explain how the interpolation operates, let’s take as example the output shape of a big gas-filled detector. The exponential queue associated to each pulse is typically long some milliseconds. At the rate of 125 Msamples/s, a signal 10 ms long requires 1.75 Mwords of memory to be stored that is too much for on-chip memory resources. An interpolator 1:1000 reduces the request of memory to 1.75 kwords. There are several kinds of interpolator functions that can be used to oversample the shape vector, e.g. polynomial, exponential, spline, and linear interpolation functions. Spline functions guarantee the minimum error, but require very high computational effort. Since for each piled-up event it is required one shape generator, and there are up to 16 piled-up events to be emulated, 16 shape generators are required (meaning 16 memories, 16 control logic units and 16 interpolator stages). Consequently, the complexity of the interpolator should be as smaller as possible and a linear interpolator has been implemented. Moreover detector signals can have sharp rise time and very long decay time. For this reason it is convenient to set two different interpolation ratios, one for the “rise time” region, and one for the “fall time” region. The algorithm is able to select a “corner” point, where the region on the left is the rise time region and the region on the right is the fall time region. The user can set is the number of samples to be added between a real sample and the consecutive (see the bottom of Fig. 6.9). The interpolator can work both with exponential shapes, and with any custom shape, even those taken from real setups. 27 UM3074 – Digital Detector Emulator User Manual Rev. 1 CAEN Electronic Instrumentation Fig. 6.10: Linear interpolation. It is possible to select a corner point that separates the “rise time” region from the “fall time” region. A different interpolation ratio can be set for the two regions (top). The user can set is the number of samples to be added between a real sample and the consecutive (bottom). Since the time of arrival of pulses is random, it is inevitable that a pulse may arrive at a time when the previous one is not fully expired. In this case, the incoming pulse “piles up” on the tail of the previous one and appears to have a height different from its true value. Pulse pile-up depends on the counting rate. The pile-up emulation is obtained using a tree of adders that mix the output of different shape generators. Each generator is started independently according to the START signal controlled by the time base generator. Sometimes it is useful to be able to limit the pile-up effect and simulate a detector where no pulses could be piled-up. If the user disables the pile-up emulation a new pulse is fired only when the previous one is finished. Fig. 6.11: Pile-up emulation. Fig. 6.12: Memory based data-path output signal. UM3074 – Digital Detector Emulator User Manual Rev. 1 28 CAEN Electronic Instrumentation Digital RC In the “custom” shape option the algorithm reads 16 memories where the samples of the shape are written. Therefore this is a quite versatile option to emulate any kind of signals. The drawback is that in case of either high rate signals, or for very long shapes, the number of memories is not sufficient to guarantee the correct emulation. For this reason we implemented the “Digital RC” option. This is based on two first order IIR (Infinite Impulse Response) filters that emulate the behaviour of a classical analog pulser. It allows the emulation of exponential only shapes, with no limitation on the signal rate, and on the length of the exponential tails. The only limitation comes from the saturation of the analog stage; otherwise this method would give infinite piled-up events. The complexity of the IIR filters method allows the DAC to operate at 62.5 MSPS of frequency, half of its operating frequency. A linear interpolator is used to create the DAC missing samples. Note: Do not use this method for pulses with decay time less than 400 ns. In Fig. 6.13 it is shown the implementation of the Digital RC option. Delta-like pulses are fed into the first IIR filter. The decay time of the first filter set the pulse decay time. The second IIR filter then emulates the rise rime; it has a pole at the rise_time/0.35 frequency. Fig. 6.14 shows the typical analog output for the Digital RC option. Note: Being the emulation of a real RC-RC, the output signal amplitude might depend on the rise and fall time values too. Fig. 6.13: Digital RC structure. Fig. 6.14: Typical Digital RC analog output. 29 UM3074 – Digital Detector Emulator User Manual Rev. 1 CAEN Electronic Instrumentation Pulsed Reset (basic) The Digital Detector Emulator allows the basic emulation of a pulsed reset detector. The signal output has the typical staircase shape of a pulsed reset detector, whose amplitude and time distribution are consistent with the input energy and time distributions. In the basic option the user cannot set the shape of the signal, or the reset discharge. This block is an integrator that sums the pulses up to a fixed threshold. Then it resets to the programmed minimum value. The typical output of the pulsed reset basic function is shown in Fig. 6.15. Fig. 6.15: Typical output of the basic pulsed reset option. Pulsed Reset (advanced) ─ COMING SOON The full pulsed reset option is implemented in a dedicated firmware that can be uploaded into the device. The integrator used in the basic function is connected to a series of secondary circuits that allows to emulate a finite rise time, and a specific behaviour during the reset. As shown in Fig. 6.16 the integrator output is processed by a first order IIR filter with a pole in rise_time *0.35 that emulates the detector rise time. During the reset the integrator block is disconnected and a 16384 memory is used to emulate any custom reset behaviour. Fig. 6.16: Structure of the advanced pulsed reset option. UM3074 – Digital Detector Emulator User Manual Rev. 1 30 CAEN Electronic Instrumentation Noise Emulation The Digital Detector Emulator allows the emulation of different types of noise, as shown in Fig. 6.17. The user can program the spectral features and the amplitude modulation independently. Fig. 6.17: Noise generation architecture. Random Number Pure random number generator. The output of the LFSR is modulated according to a constant amplitude spectrum. White noise The emulated white noise is a wideband noise white noise with a constant spectral density (up to 62.5MHz) and a Gaussian distribution of amplitudes. The white noise is generated as RND1-RND2+RND3-RND4, where RNDn is the random number generated by the LFSR generator n. The noise spectrum approximate well a real white noise up to 62.5 MHz (limitation due to the DAC 31 UM3074 – Digital Detector Emulator User Manual Rev. 1 CAEN Electronic Instrumentation frequency) if neither the anti-alias, nor the output filter are applied. If they are applied then the white noise band decreases up to 20 MHz. Flicker noise Flicker noise (-10 dB/dec) can be obtained by properly shaping a white noise according to the formula: where the transfer function is A simple way to obtain the desired transfer function is to approximate the function with the sum of a given number of first order low pass filters with n singularities positioned at an equal distance on a logarithmic scale in the range of frequencies where we want to implement the 1/f noise shaping. where n is the number of low pass filters (LPFs) used, and fmin and fmax are the minimum and maximum frequencies representing the limit of the pink noise shaping range. The gain, at low frequency, of the LPFs has to follow the following relation: Fig. 6.18: Implementation of 1/f noise shaping filter: we can observe that the envelope of the frequency responses of the first order low pass filters (-20 dB/dec) has the same trend of the 1/f ideal noise (-10 dB/dec). UM3074 – Digital Detector Emulator User Manual Rev. 1 32 CAEN Electronic Instrumentation Fig. 6.19: Comparison between a continuous time low pass filter (LPF) with pole at 1 KHz (and 100 KHz) and the corresponding digital implementation obtained through an IIR digital filter. The frequency response in the digital domain has been obtained by applying the FFT function to the output of the filter with a white noise with spectral density equal to 1 as input (blue line). The red curve is extracted from the blue one by averaging on 100 samples. Random walk Very low speed baseline drift approximate as the integral of a Gaussian white noise. Shot noise Shot noise is defined as sporadic and short bursts of noise, in which the amplitude is similar among the bursts of noise. 33 UM3074 – Digital Detector Emulator User Manual Rev. 1 CAEN Electronic Instrumentation Fig. 6.20: Analog output signal with white and 1/f noise. Interference The Digital Detector Emulator allows the generation of a programmable noise shape that can be memorized in a memory of 4096 samples. A typical application is the emulation of a switching power supply that the user can sample through an oscilloscope. It is possible both to add a constant rate noise, and to add a programmable jitter. The amplitude as well can be constant or random. Fig. 6.21: Analog output signal with artificial interference. UM3074 – Digital Detector Emulator User Manual Rev. 1 34 CAEN Electronic Instrumentation Baseline drift emulation The reference (“baseline”) of the electrical signal representing the detected event can be not stable because it depends on both the impinging radiation rate (D.C. coupled systems or systems with poor pole-zero compensation), and on the thermal drift of detector and read-out electronics. The baseline drift is a source of inaccuracy and broadening of the spectral measurements, and usually its amplitude is estimated and subtracted from the signal by means of a custom analog circuit (baseline restorer) or by proper processing techniques. The Digital Detector Emulator is able to emulate the drift of the baseline in time following a programmable non-linear profile. Fig. 6.22 shows the block diagram of the baseline emulator stage. A small memory that contains the key-points of the baseline function is read and the output interpolated by a linear interpolator. The reset architecture emulates the quenching circuit that restores the baseline value. The reset takes place any time the memory is completely read or by an external trigger signal. The external reset input allows the debug of the quenching circuit of the user analog front-end in a detection system. For each key-point the user can program the interpolation factor, choosing among “slow” and “fast”. A long line can be therefore defined by setting only the two limit points. A slow interpolation is performed to emulate slowly variable signals up to drifts of several seconds. A fast interpolation is performed to emulate fast variable signals corresponding to the presence of circuits of reset or quenching. The precision of both interpolation procedures can be regulated by means of the slow and fast interpolation sliders. Fig. 6.22: Baseline drift emulation. Fig. 6.23: Baseline drift emulation. In the table an example of values that the user can set and the corresponding preview. 35 UM3074 – Digital Detector Emulator User Manual Rev. 1 CAEN Electronic Instrumentation Fig. 6.24: Typical output of the baseline drift emulation with pulses superimposed. Multi-shape emulation To debug pulse shape discrimination systems, the emulator is able to generate two different programmable shapes on the same output channel. The user can program the energy and time statistical distributions, as well as the number of pile-up events. The “custom” shape (memory based) option should be enabled. The user can program the relative percentage of the first and second shape to be generated. The 16 memories are divided into two blocks of 8 memories, where the two different shapes can be programmed. For any start signal each block decide which shape as to be generated, according to the programmed percentage. Fig. 6.25: Multi shape emulation algorithm. UM3074 – Digital Detector Emulator User Manual Rev. 1 36 CAEN Electronic Instrumentation Fig. 6.26: Typical output of one emulated channel with two different shapes (50% mixture). 37 UM3074 – Digital Detector Emulator User Manual Rev. 1 CAEN Electronic Instrumentation 7 Getting Started Scope of the chapter This chapter is intended to provide a quick guide of the Digital Emulator Software, in order to manage the first practical use of the Digital Detector Emulator. System Overview The Digital Detector Emulator system proposed in the chapter consists of the following products: DT5800D, 2-channel with standard firmware revision 1.36864. Digital Detector Emulator software GUI release 1.4.1.8, running on the host station. The description is compliant with the form factors DT5800S, DT5800D, and NDT5900. The correlation among channels is not implemented in the one channel form factor DT5800S. Hardware Setup The getting start demo proposed in this Chapter makes use of the DT5800D connected via USB to a computer equipped with Microsoft Windows 7 Professional 64-bit OS. The Digital Detector Emulator driver and software are properly installed in the work station (see the next section). The analog output of DT5800D is sent to the CAEN Desktop Digitizer DT5724 with DPP-PHA firmware. The DT5724 readout is monitored through the DPP-PHA Control Software, running on the host station. Refer to [RD2] for more information about the DPP-PHA Control Software installation and practical usage. Alternatively it is possible to use one of the CAEN Digitizers with DPP firmware installed, as the 751 or 720 families, or an oscilloscope. DT5724 + DPP-PHA Firmware DT5800D + Digital Detector Emulator Firmware PC + DPP-PHA Control Software + Digital Detector Emulator Software Fig. 7.1: The hardware setup including the Digital Detector Emulator DT5800D and the DT5724 used for the practical application UM3074 – Digital Detector Emulator User Manual Rev. 1 38 CAEN Electronic Instrumentation Software and Drivers The Digital Detector Emulator Software is compliant with Windows XP, Vista, 7, and 8 OS, both 32 and 64 bit. SOFTWARE o Digital Detector Emulator Software for Windows OS. Download the standalone Digital Detector Emulator Software 1.4.1.8 full installation package on CAEN website in the ‘Download’ area of the Digital Detector Emulator page (login is required before the download). Unpack the installation package, login as administrator, launch the setup file. If Microsoft .NET is not already installed, the setup will ask you to install it. The operation may take some minutes. Complete the Installation wizard. 39 UM3074 – Digital Detector Emulator User Manual Rev. 1 CAEN Electronic Instrumentation Select the destination folder The setup will create a Desktop icon. Launch the program when the setup is completed. See Section Installation for requirements and special cases. DRIVERS o USB 2.0 Windows driver. How to install the driver (Windows) Power ON the Digital Detector Emulator. The device starting may last about 30 seconds. The front panel LEDs are first ON. When they go OFF the device is ready for use. Connect the emulator to a USB port (please, avoid to use a USB Hub). Wait for Windows to install the drivers through Windows Update. Check the correct installation UM3074 – Digital Detector Emulator User Manual Rev. 1 40 CAEN Electronic Instrumentation Firmware The Digital Detector Emulator Software works with the Digital Detector Emulator Firmware. The firmware is already installed into the device. If an update is available, a warning message appears in the main software GUI. How to upgrade the firmware Download the Digital Detector Emulator Firmware (.BIN) on CAEN website in the ‘Download’ area of the Digital Detector Emulator page. Open the Digital Detector Emulator Software. Under “Hardware”, select “Firmware Upgrade”. You can download the firmware from web, browse and select the .BIN file, and finally program the FPGA. Fig. 7.2: Firmware Upgrade window When the firmware is successfully upgraded, restart the emulator software. 41 Note: The FPGA programming can take some minutes. The green bar shows the upgrade status. Please, wait until the end of the firmware upgrade. UM3074 – Digital Detector Emulator User Manual Rev. 1 CAEN Electronic Instrumentation Practical Use The following step-by-step procedure shows how to use the Detector Emulator Software and how to get a simple output signal. 1. Check that the whole hardware in your setup is properly connected and powered on. 2. Download the examples.zip file from the ‘Download’ section of the Digital Detector Emulator from CAEN web site. 3. Run the software. Run the Detector Emulator Software GUI, according one of the following options: 4. o The Desktop icon o The Quick Launch icon o The .exe file in the main folder from the installation path on your host Connect to the emulator Select the Digital Detector Emulator checkbox and press ‘CONNECT ALL’ Wait for the complete loading of the software GUI Note: If the DT5800 drivers are not correctly installed, only the LAN option will appear in the ‘Available hardware’ box. In that case please try to reboot both the PC and the Emulator. 5. Enable the Detector Emulator calibration The calibration file can be automatically taken from a web repository and loaded into the software GUI. Press ‘Get it from web’ to let the software get the specific file for your device. Use the ‘Default’ option only if you want to try the device and you do not have an internet connection available. The correct calibration file should be loaded as soon as possible. UM3074 – Digital Detector Emulator User Manual Rev. 1 42 CAEN Electronic Instrumentation You can also download the file from CAEN website and use the ‘Load’ option. Note: To delete a calibration file and restore a new one, go to “File”-> “Restore”->”Delete calibration file to restore it”. 6. OneTouch interface The Detector Emulator comes with two main software GUIs, the general GUI that provides all the advanced functionalities of the Digital Detector Emulator, and the OneTouch interface, a simpler GUI that allows the user to setup a signal in a very straightforward way. The OneTouch Interface generates exponential shape analog output, with as many piled-up events as half of the DAC frequency. The user can set the analog output signal rate, the amplitude, the rise and fall time of the exponential shape, and the white noise contribution. 43 UM3074 – Digital Detector Emulator User Manual Rev. 1 CAEN Electronic Instrumentation Action 1: set the RATE to “Poisson”, and change the rate value to 2 kHz. Note: You can change the rate value by either moving the knob pointer or by writing the value in the underlying box. Note: The “Exponential” box is green when the signal shape is set to AUTO. Otherwise it becomes red. In that case, just click on the box itself to restore the shape to AUTO. Note: After typing the value of a parameter in a box menu, press “Enter” to activate the setting. Action 2: set the AMPLITUDE to “Fixed Value”, and change the amplitude value to 0.8 V. Note: You can change the amplitude value by either moving the knob pointer or by writing the value in the underlying box, or by writing the desired value in Volts in the green box. Note: After typing the value of a parameter in a box menu, press “Enter” to activate the setting. Action 3: set the SHAPE parameters. “Rise Time” = 0.10 us, and “Fall Time” = 50.00 us. Note: You can change the shape values by either moving the knob pointer or by writing the value in the underlying box. Note: If you set the Rise Time = 0.00 you are asking for the best the device can provide, i.e. about 6-8 ns (due to the DAC sampling). Action 4: copy settings from channel 1 to channel 2. Path 1: Under CH2 tab, select “Copy CH1” Action 5: enable channel 1 and channel 2 OUTPUT. The two front panel LEDs will be ON. UM3074 – Digital Detector Emulator User Manual Rev. 1 44 CAEN 7. Electronic Instrumentation Check the analog output on the DT5724 with DPP-PHA firmware installed For the particular example of this chapter we are making use of a DT5724 with proper DPP-PHA firmware installed. The Detector Emulator settings chosen in the previous step are consistent with a signal coming from a pre-amplifier device, compliant with the DPP-PHA firmware itself. The DPP-PHA Control Software must be properly installed in the host PC. Please refer to the DPHA User Manual for any details about the DPP-PHA settings. Note: The same test can be performed with any other CAEN digitizer with proper DPP or Standard firmware. Be aware that the standard firmware allows to check the waveform output only, as the DPP allows to check both the waveform and the spectrum (see the next step). In that case please set the signal parameters accordingly. Note: You can use an oscilloscope as well to check the waveform output. Use 50 Ω termination. The oscilloscope plot of the DT5724 should appear as in the following picture. 45 UM3074 – Digital Detector Emulator User Manual Rev. 1 CAEN Electronic Instrumentation 8. Enable the spectrum amplitude generation Action 1: Change the AMPLITUDE settings by choosing “Spectrum” Action 2: Browse and select a spectrum file on your computer. We provide you some examples. Unzip the downloaded “examples.zip” folder and look for the .csv files inside the “spectra” folder. Select the “cobalt.csv” file. Note: accepted file formats are: .csv (comma separated values), .dat (CAEN spectrum files), .spectrum (digital detector emulator internal spectrum format), .xml (ANSI4242) Action 3: Import the spectrum into the Detector Emulator. Click “Import” to import the spectrum. The spectrum file name should appear into the OneTouch Interface. UM3074 – Digital Detector Emulator User Manual Rev. 1 46 CAEN 9. Electronic Instrumentation Check the spectrum generation with the DT5724 In the oscilloscope mode of the DPP-PHA software you should see the signal amplitude modulated with the input spectrum. If you switch to the Histogram acquisition mode you should see something like in the following figure. 47 UM3074 – Digital Detector Emulator User Manual Rev. 1 CAEN Electronic Instrumentation 8 Software Interface Introduction The Digital Detector Emulator software allows to manage the communication and to set the parameters for the signal generation. This chapter is intended to give to the user a complete description of all the functionalities of the emulator that can be set through the software interface. Installation The Digital Detector Emulator Software is compliant with Windows XP, Vista, 7, and 8 OS, both 32 and 64 bit. Download the standalone Digital Detector Emulator Software revision 1.4.1.8 full installation package on CAEN website in the “Software/Firmware” area of the Digital Detector Emulator page (login is required before the download). Unpack the installation package, login as administrator, launch the setup file, and complete the Installation wizard. See Section Software and Drivers for further details. Note: If the driver installation fails, you can install them manually from the ‘Drivers’ folder in the CAEN Digital Detector Emulator installation folder. The setup automatically creates a link on the PC Desktop. Requirements The software requires Microsoft .NET 4.0 or higher. If the framework is not available on the machine, the Detector Emularor setup will install the framework. Click on “Install” if this message appears: UM3074 – Digital Detector Emulator User Manual Rev. 1 48 CAEN Electronic Instrumentation Notes on XP installation Windows XP (64 bits) may require additional items to be installed: Click on “Install” if this message appears: If a reboot is required in the middle of the installation setup click “Yes”: The setup will conclude the installation after the reboot. Program Execution You can run the program in three ways: The Desktop icon of the program The Quick Launch icon if the program The .exe file in the installation path on your PC. When the program is opened, it automatically lists all available Emulators connected to the system bus with both USB and Ethernet. If the emulator is not listed check the connection and press ‘Scan Now’. 49 UM3074 – Digital Detector Emulator User Manual Rev. 1 CAEN Electronic Instrumentation Check the desired device. If you do not have any hardware connected you can start the software in simulation mode by checking the ‘SOFTWAREEMULATOR’ option. Note: When the hardware device is ready for use the blue leds turn OFF. The software automatically checks if an application update is available. If available the bottom green bar becomes red and a DOWNLOAD button appears. Download the new release setup and follow the installation wizard. Note: Before upgrading the software uninstall the previous version through the function: “Uninstall a Program” of the Windows “Control Panel”. Press “Connect All” to connect to the selected device. Wait for the physical connection attempt to the hardware. The GUI starts as soon as the device is ready for use. The whole operation could take up to 30’’. First Run The first time you run the software, you must import the calibration file for the specific device you are using. The software automatically detects the absence of the calibration file. A pop-up message appears asking for the calibration file, as in the following picture. UM3074 – Digital Detector Emulator User Manual Rev. 1 50 CAEN Electronic Instrumentation You have three options to load the file: 1. “Get it from web”. This is the easiest and recommended way, where the software automatically takes the calibration file from web. 2. “Use default”. Use this option when you do not have an internet connection available, or you do not have the calibration file. The emulator can operate with the default calibration, but the output is not consistent with the set values. 3. “Load”. You can load the calibration file available in the mass storage support delivered. The application restarts when one of these options is selected. Note: To delete a calibration file and restore a new one, go to “File”-> “Restore”->”Delete calibration file to restore it”. User Interface The picture below shows the main panel of the User Interface. The interface is divided into two main distinct areas. Then there is a fast control panel and a report line fixed on the bottom. The button is red when the emulator in not connected or the connection has been lost. When the device is correctly connected this button is green. Click here if you want to connect or disconnect the device. The bottom report line returns the true generation conditions of both channels, labelled as A and B for channel 1 and channel 2 respectively. In particular: In (cps): is the ideal number of events that should be generated in accordance with the programmed statistic. Out (cps): is the number of events actually generated that takes into account possible limitations due to pile-up or saturation of the output analog stage. 51 UM3074 – Digital Detector Emulator User Manual Rev. 1 CAEN Electronic Instrumentation Live (%): is the ratio between the number of pulses that should be generated and the number of events actually generated (IN/OUT). Counts : is the generated event counter that can be reset through the circle button on the side. The circle icon on the side of counter allows to reset to zero the event counter. : is a virtual LED that turns red when the programmed statistic of generation is no more feasible due to pileup limitations or to saturation of the output analog stage. Considering the main GUI, the left side of the display is dedicated to all the settings that initialize and control each channel of the instrument (Setting Area). The right side sows the actual configuration of each channel of the emulator (Display Area). If a red bar appears on the bottom of the Display Area, this means that the firmware inside the device is not up to date and an upgrade firmware is available. Pressing “UPGRADE” the software opens the default web browser to download the latest available firmware. UM3074 – Digital Detector Emulator User Manual Rev. 1 52 CAEN Electronic Instrumentation One Touch Interface The “One Touch” interface is particularly indicated for quickly setting the instrument. Customers that are used to manage with a classical pulser may find this interface quite familiar. The OneTouch Interface enables the generation of analog output according to the method described in Digital RC Section. The user can set the analog output signal rate, the amplitude, the rise and fall time of the exponential shape, and the white noise contribution The main parameters for the signal generation can be set either through the virtual knob, the underlying box, or the green box. Note: The One Touch interface automatically appears when you load the software. Otherwise you can click on the icon on the top left corner of the main display. Frequency The user can choose among two options: “constant rate”, or “Poisson distribution” (random). It is possible to set the rate value (in KHz) either moving the knob pointer or by writing the value in the underlying box. 53 UM3074 – Digital Detector Emulator User Manual Rev. 1 CAEN Electronic Instrumentation Note: The “Exponential” box is green when the signal shape is set to AUTO. Otherwise it becomes red. In that case, just click on the box itself to restore the shape to AUTO. Amplitude It is possible to choose among a “Fixed value” of amplitude, or the load a file with the spectrum samples. The amplitude value can be set by either moving the knob pointer, or by writing the value in the underlying box, or by writing the desired value in Volts in the green box. For details about the available file formats please refer to the Accepted File Formats Section. Note: Whenever you write a value click ENTER to validate it. When the “spectrum” option is enabled, the software opens a folder browser that allows the user to select a file. The spectrum name is then shown on the yellow box. Users can load a new spectrum by clicking on the yellow box. Shape The One Touch interface allows to generate exponential shapes only. The user can set the “rise time” and the “decay time” in µs. Values can be changed by either moving the knob pointer or by writing the value in the underlying box. Note: If you set the Rise Time = 0.00 you are asking for the best the device can provide, i.e. about 6-8 ns (due to the DAC clock). Note: If the “Exponential” box is red, changing the shape settings does not produce any effect on the output. Click to “Exponential” to enable the AUTO shape selection. Noise The noise box allows the user to add a white noise to the output signal. The user can set the sigma of the Gaussian distribution of the noise amplitude by either moving the knob pointer, or by writing the value in the underlying box, or by writing the desired value in Volts in the green box. Copy CH2/CH1 button replicates on the current channel the settings of the other channel. The output button enables the analog output generation. UM3074 – Digital Detector Emulator User Manual Rev. 1 54 CAEN Electronic Instrumentation “Always on top” forces the One Touch window to stay on the top even outside the software application Setting Area The setting area of the main panel has five menus: Main Settings, for the control of the main functionalities of the instrument; CH1, to control the specific settings of Channel 1; CH2, to control the specific settings of Channel 2; AWG, (Arbitrary Waveform Generator) for the management of recorded and pre-defined sequences; Dealy-Correlation, for the definition of delay and correlation properties among events (two channels form factor only). Not all options are shown on the interface at the same time. If some setting is not compatible with others that setting is hidden. 55 UM3074 – Digital Detector Emulator User Manual Rev. 1 CAEN Electronic Instrumentation Main Settings The Main Settings GUI appears as in the following figure. Any box is going to be described as follows. Channel 1 Mode / Channel 2 Mode Both Channel 1 (CH1) and Channel 2 (CH2) can independently operate as “Emulator/Pulser” or “Waveform generator”. In the “Emulator/Pulser” mode, the instrument can generate a sequence of pulses according to programmable statistical distributions of energy, time, and shape. Sections CH1 and CH2 are enabled. In the “Waveform generator” UM3074 – Digital Detector Emulator User Manual Rev. 1 56 CAEN Electronic Instrumentation mode, the instrument works as a waveform generator. The user can load an external file, or use the pre-defined functions from the AWG section. Run / Debug The device can operate either in “free-running” mode (default mode at start-up) or in “step-by-step” debug mode. The free-running emulation is based on the generation of pseudo-random numbers by means of Linear Feedback Shift Registers (LFSR). The randomness of the seed value starting the generation process ensures the emulation of different sequences, even if in agreement with the set statistical characteristics. From the other side, fixing the seed value allows to generate always the same identical sequence. This is at the basis of the step-by-step debug. After setting a value of the seed (this can be done for the “amplitude”, “time”, and “noise” from tabs CH1 and CH2), the generation process starts and evolves either free-running or one step at a time. In the step-by-step mode, by enabling the “LFSR” control flag (as in the picture above), the LSFRs can be stopped and then made switching for one clock cycle. During the LSFRs freezing, the output is still present and corresponds to the last generated pulse that is repeated iteratively. In the meanwhile the LSFRs are paused, the reset command can be used to reset the status of the LSFRs to the initial seed value previously set. After resetting, the same former sequence is re-generated either in free-running or step-by-step mode . Alternatively, by enabling the “Time Base Generator” control flag, the debug procedure stops generators, which operatively means that the generation of pulses is inhibited and can be activated pulse at a time at the output of the emulator. If reset to produce a is asserted when the generation is stopped, the LFSRs are reset and the sequence can be started back from the beginning equal to itself either in free-running pulse the time base or pulse-by- mode. The Multistep mode enables the generation of a programmable number of pulses (16 in the picture above). After that, the instrument enters in stand-by mode with the same possible evolution of the other operative conditions. Note: The Multistep mode can be enabled after pressing the pause command . Energy Calibration The device can be calibrated in energy (KeV). All plots can be then visualized in KeV, and the user can set the output energy directly in energy value, according to the physical source that wants to emulate. The user can two reference values (either in LSB counts, or in Volts), and assign to them the desired value in energy (KeV). Press “Apply” to set the calibration. 57 UM3074 – Digital Detector Emulator User Manual Rev. 1 CAEN Electronic Instrumentation Press “Open Energy Calibration” to open the energy calibration tool. If a spectrum has been previously loaded in one of the two channels (see the Import an Energy Spectrum from File Section), than it appears in the calibration tool as well. The spectrum itself can be calibrated (see also the How to calibrate in KeV Section). In the example above we want to calibrate a Cobalt spectrum. Double click on one of the two peaks. The software asks for the energy to be associated to that peak. “Ref1” marker appears in the plot. Make double click on the second peak to assign the second energy value. allows to change between the first and the second value of energy for calibration. UM3074 – Digital Detector Emulator User Manual Rev. 1 58 CAEN Electronic Instrumentation Allows to select between channel 1 and channel 2, and to choose the unit between LSB and Volts. Values assigned into the spectrum are reported in the table of the main settings. Press Cancel to cancel the calibration, Apply to apply the calibration. The lens allows to zoom out (to zoom in select the region in plot). The user can calibrate the instrument also when the spectrum is imported the first time, or though the “Isotopes Database” tool. For further details see the Generate an Energy Spectrum with Isotopes Database Section. Spectrum Quantization The re-quantization of a spectrum over a different number of bins can introduce distortions in its shape due ultimately to an aliasing effect. The spectrum emulated should have at least the same bin resolution as the device that reconstructs it from the emulated pulses. As a rule, the reference spectrum in the emulator has resolution above the request one. In order to get the matching of bin resolution, a decimation process is implemented in the instrument with three possible processing procedures. “First bin in the window”: the spectrum is automatically divided into bins and only the first value of each bin is considered; “Max in the window”: the spectrum is divided in bins and only the highest value of each bin is considered; “Slice (first part of the spectrum)”: only the lower values of the spectrum are considered, up to a number of bins equal to the target resolution. Connector Router The emulator front-end consists of six configurable I/O analog and digital ports. The picture shows the configuration sheet for I/O digital settings. CAUTION. All I/O gates are LVCMOS compliant. The dynamic range of the analog outputs is 4.4 V. All signals are considered normally in the low LVCMOS state and active in correspondence of transitions to high LVCMOS state. Here the list of the main digital input/output functionalities Digital Input 1 (Digital Input 2): 59 UM3074 – Digital Detector Emulator User Manual Rev. 1 CAEN Electronic Instrumentation Disabled : the digital input is disabled; Trigger Gate 1 / Trigger Gate 2 : the internal trigger of pulses is put in AND with an external signal of trigger; Veto 1 / Veto 2 : the external signal instantaneously inhibits the output signal; Trigger 1 / Trigger 2: the pulse generation is synchronized with the external signal. The uncertainty in the signal generation is 8 ns corresponding to the sampling frequency ; Run/Stop : on/off control of the internal LFSRs (remote control of and from the Run/Debug box); Step Over : generation process advanced by one step (remote control of from the Run/Debug box); Reset LFSR / Restart Memory : reset of the status of the LSFRs that returns to the initial programmed seed value (remote control of the Run/Debug box); Baseline Reset 1 / Baseline Reset 2: reset of the baseline value. Digital Out 1 / Digital Out 2. Outputs are pulses with duration defined in the field Pulse width (ns) of the Connector Router mask (see picture above). The electrical standard is LVCMOS. Disabled : the digital output is disabled; Accepted Trigger: the direct output of the time-base generator that corresponds to the actual generation of the correspondent pulse. This means one Accepted Trigger pulse for any analog pulse at the output; Trigger: the direct output of the time-base generator, independently on its real generation at the output; ON/OFF : state of activation of the channel; UM3074 – Digital Detector Emulator User Manual Rev. 1 60 CAEN Electronic Instrumentation Machine Overloaded: no more availability of generation engines, which means excess of pile-up. The signal is asserted high until the condition persists; Analog Saturation : saturation of the dynamic range of the analog output (below screenshot of Analog Saturation digital signal – green – correspondent to the saturation of the analog output – red) Fig. 8.1: Example of signal saturation. The green trace is on when the analog signal saturates. 61 UM3074 – Digital Detector Emulator User Manual Rev. 1 CAEN Electronic Instrumentation CH 1 / CH 2 The CH1 and CH2 tabs appear as follows. When you enable one of the options, a sliding bar allows to select all the relative options. In the next sections we are going to describe in details all the settings that control the CH1 and CH2 outputs. UM3074 – Digital Detector Emulator User Manual Rev. 1 62 CAEN Electronic Instrumentation General settings Channel Enable. If selected the output is activated. Otherwise the output is fixed to zero with low impedance. Equivalent to the main button OUTPUT ENABLE. Anti-alias filter. Insert a RC filter on the output of the DAC (Digital to Analog Converter) to improve signal shape. The anti-aliasing filter improves the signal shape, and it is strongly recommended to enable it when the device output is used for timing characterization. The filter increases the rising time from 6/7ns to 10 ns, and it has no effect on the noise. th Output filter. Insert an LC 7 order filter (analog Bessel filter) on the output. The can reduce the output noise by a factor of 5 and it can improve the signal shape. Rise time increases from 6/7ns to 15ns. Invert. If selected the polarity of the output is changed. Digital Gain. Digital amplification of the output signal between 0 and 2. It is applied at the end of the processing chain, therefore the whole output is multiplied by the digital gain, including the offset. 16 Digital Offset. Reference offset expressed as a fraction of 2 levels of quantization, i.e. between -2.2 V and +2.2 V. The offset is applied before the gain stage. Pulsed Reset Detector. If selected, the basic output of a pulsed reset detector is emulated, according to the Pulsed Reset (basic) Section. An extended version of the General Settings is opened, as shown in the following figure. Amplitude scaling: corresponds to the maximum number of events that can be generated in the range Vmax – Vmin. Allowed values are 2, 4, 8, 16, 32, 64, 128; 63 UM3074 – Digital Detector Emulator User Manual Rev. 1 CAEN Electronic Instrumentation Minimum value: corresponds to the minimum value of the staircase. Minimum value allowed is -16383 LSB, corresponding to about -2.2 V; Maximum value: corresponds to the maximum value of the staircase. Maximum value allowed is +16383 LSB, corresponding to about +2.2 V. Typical output is shown in the following figure: The output signal is the amplitude integral of each input pulses. When the “maximum value” is reached, the output is instantaneously reset to the “minimum value”. The “amplitude scaling” factor works as follows. The device can generate pulses with amplitude ranging from 0 to about 2.2 V each, and the maximum allowed dynamics goes from -2.2 to +2.2 V. If two consecutive pulses have the maximum amplitude, than they would immediately saturate the output dynamics. Therefore it is more convenient to apply an amplitude scaling before integrate the pulses. The higher is the scale factor, the smaller will be the signal staircase steps. The “amplitude scaling” factor corresponds to the number of events at maximum amplitude that can be fitted in the programmed output dynamics. The maximum energy generated will correspond to 4.4 V / amplitude_scaling. The best amplitude scaling value is a trade-off between the intrinsic resolution and the average number of events in a reset period. For a small scaling factor, the steps will be very large, giving a high signal to noise ratio (SNR). This situation does not always correspond to reality. For higher scaling values the steps will be smaller, up to be compatible with the quantization noise and the intrinsic noise of the device. Indeed each staircase step is described with 16 bit/log2(amplitude_scaling), rather than 15 bit for not pulsed reset emulation. Energy Mode There are three possible emulation modes: Pulser, for the generation of pulses with fixed amplitude and time distributions; RTG – Random Tail Generator, for the generation of pulses with fixed amplitude and pseudo-random statistical time distribution; Emulator of Radiation Sources, for the generation of pulses statistically distributed whose spectrum corresponds to a given starting spectrum. Pulser – Select the flag “Fixed value” and adjust the slider position to regulate the amplitude of the pulses at the output. Energy value can be set in three ways: LSB, Volt and KeV (if the instrument has been previously calibrated in KeV). UM3074 – Digital Detector Emulator User Manual Rev. 1 64 CAEN Electronic Instrumentation -2 In the panel box “Time Distribution” set a constant value of rate, from 10 cps to 11 Mcps (see the Time Distribution Section). RTG – Random Tail Generator – Select the flag “Fixed value” and adjust the slider position to regulate the amplitude of the pulses at the output. Energy value can be set in three ways: LSB, Volt and KeV (if the instrument has been previously calibrated in KeV). In the panel box “Time Distribution” select the flag “Poisson Distribution”. Emulator of Radiation Sources – Select the flag “Spectrum Emulation” of the Energy mode box. Then select “Load File” to load a custom reference energy spectrum. There are four file format accepted: .csv file, ANSI N4242, .dat (Caen Digitizer Output Format), .spectrum (internal file format). See Section Accepted File Formats for more details. When the file is loaded a spectrum preview is available in the top right box of the “Settings CH1” tab of the Settings Control Area. 65 UM3074 – Digital Detector Emulator User Manual Rev. 1 CAEN Electronic Instrumentation Import an Energy Spectrum from File After selecting the spectrum file to be imported, the GUI opens the “Spectrum Import Tool”, that allows to upload the spectrum, to make preliminary operations on the spectrum itself, and to make the calibration. The “Input Spectrum” is the spectrum as read by the selected file. The “Imported Spectrum” is the spectrum as imported by the device. Some operations can be made before importing and the plot “imported spectrum” allows to see in real-time the effect of those operations. “Spectrum Available” works for multiple N4242 spectra, where it is possible to select the desired spectrum. “Number of channels” corresponds to the number of channels of the DAC device, 16384. Under the “Output Spectrum” box it is possible to set a “Scale factor” and an “Offset” values. The first allows to rebin the x-axis of the spectrum. The second allows to set an offset of the x-axis (in number of channels). The tool allows to adjust the dynamic of the input spectrum to the resolution of 16384 bins of the instrument. By checking the “Interpolate” button, the scaling is performed by means of a linear interpolation, otherwise each new bin is created on the basis of the nearest value of the bin on the left. The function of “Adj Peak” sets the highest peak of the input spectrum at the value 65535. It is also possible to calibrate the instrument through the box “Import and Calibrate”. Refer to Chapter How to calibrate in KeV for more details. UM3074 – Digital Detector Emulator User Manual Rev. 1 66 CAEN Electronic Instrumentation How to generate an Energy Spectrum with the internal tool The instrument allows to generate a custom spectrum by adding specific lines and setting their width. It is also possible to select the radioactive lines of specific elements of the periodic table. Select “Preset” to open the Spectrum Editor window. Point the cursor on the diagram, and double click to add a line. The x-axis is in counts unit. In the pop-up write the corresponding value of height. 65535 is the maximum value allowed. 67 UM3074 – Digital Detector Emulator User Manual Rev. 1 CAEN Electronic Instrumentation Alternatively you can write the value of KeV and Volt in the cyan and green box respectively. Select the “Peak type” between “Gaussian” and “Rectangular”. The “Sigma” value corresponds to the classical sigma of the gaussian function in the first case, and to the width of the rectangular in the second. It is espressed in counts unit. The (‘+’) sign allows to add more line, as the (‘–‘) sign to delete them. The tool allows to “Save” the spectrum in its internal file format .spectrum. Specify the file “Name” before saving. A browser is then open to select the destination folder. The spectrum is represented on a scale with maximum resolution of 14 bits, while the resolution of the Emulator is 16 bits. A scale factor is present to adjust the spectrum resolution to the instrument range, e.g. Scale x2 for spectrum with resolution of 14 bits. UM3074 – Digital Detector Emulator User Manual Rev. 1 68 CAEN Electronic Instrumentation Generate an Energy Spectrum with Isotopes Database From the Spectrum Editor select “Isotopes DATABASE” Select from the periodic table one of the element you want to add into the spectrum, as for example the Cobalt (Co). The list of isotopes will then appear. 69 UM3074 – Digital Detector Emulator User Manual Rev. 1 CAEN Electronic Instrumentation Scroll the bar up to the radioactive 60Co, and click on the name to open the “Decay Selector” Window. The Decay Selector shows on the first column the list of 60Co emitted “Gamma Ray”, on the second the list of “X-Ray” lines. The user can select the desired lines and add them to the output spectrum. For example select the 1173 and 1332 KeV Gamma Ray lines, and click “Add”. Click “Remove” to remove undesired lines from the output spectrum. UM3074 – Digital Detector Emulator User Manual Rev. 1 70 CAEN Electronic Instrumentation The column I represents the relative activity of the line of the isotope. The column “I (Edit)” allows the user to edit the activity (relative cps) of the selected line. Columns Activity and Res (eV) can be edited also from the “Output Complex Spectrum” tab The user must take care that the selected lines are in the calibrated range of energy of the Detector Emulator. The energy calibration is performed by setting the energy in keV unit corresponding to 0 V, the energy corresponding to the full scale of 2 V to fit the dynamic of the output spectrum. Changing those values will automatically re-calibrate the device. Press “Auto limit” to find the best calibration for the designed spectrum. Set the desired Gaussian resolution in eV unit for all lines of the spectrum. A resolution equal to 0 eV corresponds to mono-energetic lines. Note: The resolution can be set both from the “Decay Selector” and the “Spectrum Editor” window. This “Import Settings” box allows to select the relative activity of the current isotopes when a complex mixture of isotopes is selected. The activity value acts to all the lines of the current isotope. Click “Import” to import the spectrum with the desired settings, or “Cancel” to cancel it. 71 UM3074 – Digital Detector Emulator User Manual Rev. 1 CAEN Electronic Instrumentation How to modify a spectrum Select “Edit” under the “Spectrum Emulation”. If the spectrum has been previously loaded from file, the “Spectrum Import Tool” will appear; otherwise the “Spectrum Editor” allows to modify the custom spectrum. Select “Remove” to remove the selected spectrum from the “Spectrum Emulation” memory. The picture below shows a screenshot of the output of the emulator initialized as in the example above with the 60 spectrum of the isotope Co. UM3074 – Digital Detector Emulator User Manual Rev. 1 72 CAEN Electronic Instrumentation Energy Mode - Sequence The ‘Sequence’ option allows to load the amplitudes of an a-priori defined sequence of pulses. The same option is in the section ‘Time Distribution’ and allows the loading of the correspondent temporal distances between the pulses. The “Sequence” option allows to emulate repetitively the stored sequence made up to 500 kpulses. Also a partially defined sequence can be stored. The following combinations are available: Load a sequence of amplitudes with constant or Poisson statistical rate; Load a sequence of temporal distances and constant (or statistically generated) amplitudes, as described above. All features of the emulation process (noise, signal shape, …) are active in this option, except the generation of amplitudes from a spectrum. The picture below shows a screenshot of stored amplitude sequence. 73 UM3074 – Digital Detector Emulator User Manual Rev. 1 CAEN Electronic Instrumentation Signal Shape The emulator is able to generate both exponential and arbitrary shape signals. The exponential settings are under the orange line, the custom shape settings under the blue line of the GUI. There are three possible options for the exponential shape: Auto: the system is initialized in the “Auto” operation mode and automatically selects between the two options “Fast (Limited Pileup)” and “Digital (RC)” mode depending on the values of time constant and rise time programmed by the user (if fall time is smaller than 400ns the FAST exponential is automatic selected). Fast: the “Fast” mode uses 16 memories to generate the exponential signal. After setting the time constants of rise and fall of the signal, the system automatically implements the shape and activates the interpolators (if necessary) choosing the most suitable interpolation factor. Refer to Section Custom Shape – Memory Based data-path for more details about the method implementation. Digital (RC): the exponential signal is generated through a cascade of two IIR filters. The first one sets the “Fall Time” of the exponential shape, as the second one adjusts the rise time. For the analogy with an analog pulser, this operation mode is referred as “Digital (RC)”. The maximum number of piled-up events is limited only by the saturation of the analog output stage and the Poisson statistical distribution of the events is guaranteed at any rate (refer to Section Digital RC for more details). Rise-time and fall-time can be adjusted by the user. For values at the limit of the output dynamics there is the warning message: . Note: The block Digital (RC) operates at a frequency equal to half the system clock and is therefore not able to generate correct signals with fall time and/or rise time shorter than 16 ns. The generation of signals of arbitrary shape is realized by means of 16 memories of 4096 points each. The method is the same of the Fast exponential shape. Signals longer than 4096 points can be obtained with a linear interpolator available at the output of each memory. If piled-up events exceed the maximum number of 16, the statistical distribution of the output events is not more Poissonian. In this case the virtual LED that the programmed statistic of generation is no more feasible. on the bottom of the GUI turns RED, showing The output signal of the emulator can be loaded from a file o generated by an integrated shape design tool. Click on “Custom” to enable the option bar. UM3074 – Digital Detector Emulator User Manual Rev. 1 74 CAEN Electronic Instrumentation The shape can be arbitrarily defined over a maximum of 4096 samples. A set of available shapes can be created and the actual shape of the output signal chosen from time to time. Use “Load File” to load a custom .csv files, that can be the result of a measurement, a Matlab© synthesis. The tool is able also to generate some pre-defined shapes. Click on “Preset” to internally generate a shape. Click “Edit” to edit the generated shape, or “Remove” to remove it. The “Shape Preset” window appears as follows. 75 UM3074 – Digital Detector Emulator User Manual Rev. 1 CAEN Electronic Instrumentation On the left the user can select one of the pre-defined functions, choosing among “Delta”, “Pulse”, “Exponential”, “Shaped Exponential”, “Double Exponential”, and “Gaussian”. The characteristic parameters can be adjusted either in samples (LSB) in the white box, Volt in the green box, or us when needed. The user can decide a “Name” for the custom shape, and click on to import the shape, or click on to first save the corresponding file. Left click and drag on the plot to zoom in. Click on to zoom out. In the following the list of available shapes from the device. Delta The formula used for the implementation is: Where A is the AMPLITUDE value, and OFFSET is the position of the Delta function. The user can modify the OFFSET value, the LENGTH of the window, and the AMPLITUDE, both in samples and in us, by modifying the green box value. Note: You can set the maximum value of amplitude, and then rescale it on the main GUI. UM3074 – Digital Detector Emulator User Manual Rev. 1 76 CAEN Electronic Instrumentation Pulse The formula used for the implementation is: Where A is the AMPLITUDE value, OFFSET is the starting position of the Pulse function, and WIDTH is the width of the Pulse function. The user can modify the OFFSET value, the WIDTH of the Pulse, the LENGTH of the window, the AMPLITUDE, the RISE SLOPE, and FALL SLOPE, both in samples and in us or Volt, by modifying the green box value. Note: You can set the maximum value of amplitude, and then rescale it on the main GUI. Note: The Rise and Fall slope are limited by the DAC frequency (i.e. minimum value 8 ns). Exponential The formula used for the implementation is: 77 UM3074 – Digital Detector Emulator User Manual Rev. 1 CAEN Electronic Instrumentation Where A is the AMPLITUDE value, OFFSET is the starting position of the Exponential function, and τ (Tau) is the decay time of the Exponential function. The user can modify the OFFSET value, the LENGTH of the window, the AMPLITUDE, and the Tau both in samples and in us, by modifying the green box value. Note: You can set the maximum value of amplitude, and then rescale it on the main GUI. Note: The Tau is limited by the DAC frequency (i.e. minimum value 8 ns). Shaped Exponential The formula used for the implementation is: where A is the AMPLITUDE value, OFFSET is the starting position of the Shaped Exponential function, τ1 (Tau 1) is the characteristic time used for the rise region, and τ2 (Tau 2) is the characteristic time used for the falling region of the Shaped Exponential function. The user can modify the OFFSET value, the LENGTH of the window, the AMPLITUDE, and the Tau 1 and Tau 2 values both in samples and in us, by modifying the green box value. Note: You can set the maximum value of amplitude, and then rescale it on the main GUI. Note: The Tau is limited by the DAC frequency (i.e. minimum value 8 ns). UM3074 – Digital Detector Emulator User Manual Rev. 1 78 CAEN Electronic Instrumentation Double Exponential The formula used for the implementation is: where A is the AMPLITUDE value, OFFSET is the starting position of the Double Exponential function, τ1 (Tau 1) is the characteristic time used for the rise region, and τ 2 (Tau 2) is the characteristic time used for the falling region of the Double Exponential function. The user can modify the OFFSET value, the LENGTH of the window, the AMPLITUDE, and the Tau 1 and Tau 2 values both in samples and in us, by modifying the green box value. Note: You can set the maximum value of amplitude, and then rescale it on the main GUI. Note: The Tau is limited by the DAC frequency (i.e. minimum value 8 ns). Gaussian 79 UM3074 – Digital Detector Emulator User Manual Rev. 1 CAEN Electronic Instrumentation The formula used for the implementation is: where A is the AMPLITUDE value, MEAN and σ (Sigma) are the characteristic mean and sigma of the Gaussian function. The user can modify the MEAN value, the LENGTH of the window, the AMPLITUDE, and the Sigma values both in samples and in us, by modifying the green box value. Note: You can set the maximum value of amplitude, and then rescale it on the main GUI. Note: The Tau is limited by the DAC frequency (i.e. minimum value 8 ns). Multi-Shape The instrument can be initialized to simultaneously generate signals with different shapes to test pulse shape discrimination. Two different waveforms can be programmed on the same output channel, with programmed probability of occurrence. The option is enabled by checking the “Enable Multi-Shape feature” box. The “Custom Shape” box will be extended as in the following picture. Modify the relative probability of occurrence of the two shapes, by modifying the values in the box, or moving the sliding bar. UM3074 – Digital Detector Emulator User Manual Rev. 1 80 CAEN Electronic Instrumentation Click on the SHAPE A button to enable the assignment, and then click on the shape you want to assign it. Repeat the same to assign the SHAPE B. Shape A and Shape B waveforms are displayed in the system monitor. In case of Multi-Shape operation mode, the resources for the pile-up emulation are shared between the two shapes (see the Pile-up Section). 81 UM3074 – Digital Detector Emulator User Manual Rev. 1 CAEN Electronic Instrumentation Shape Interpolator Since the system clock is equal to 125 MHz, i.e. 8 ns of sampling period, and the compliant signal shapes are at maximum 4096 samples long, the maximum time duration of a signal is 33 us. In order to get signals up to 26 ms of length, the real signal can be ideally divided in two parts, the “rising” and “falling” regions, divided by a “Corner Point”. Each region can be interpolated with different factors. Click on “Ratio on Rise/Fall Time region” to enable the interpolator on the Rise/Fall Time region. The factor value corresponds to the number of points to be added between two consecutive samples (see Section Custom Shape – Memory Based data-path for more details). Write the value of the “Corner Point”, or click on “Auto Detect” to let the algorithm find the actual corner point. Time Distribution There are four options to emulate the time distribution of a setup. -2 Constant Rate: the range of constant rate is from 10 cps to 5 Mcps. It can be changed writing the value in the white box, or moving the sliding bar. The actual generated value is shown under the CURRENT green box. Poisson distribution: click on the option to enable the Poisson time distribution. The average value can be set from the white box, or moving the sliding bar. The actual generated value is shown under the CURRENT green box. The plots below show some screenshots in case of constant (top) and random rate (bottom). UM3074 – Digital Detector Emulator User Manual Rev. 1 82 CAEN Electronic Instrumentation Fig. 8.2: Example of events with constant rate (top) and Poisson (bottom) time distribution. File: the time distribution can be loaded from .csv file (see Section Accepted File Formats) and is considered symmetric with respect to the origin of time. The system modulates a constant rate distribution with the loaded time statistical distribution. The range of variability of the occurrence times of consecutive pulse is between -255 and +255 clock periods (the clock period is 8 ns). The “Scale” factor allows to lengthen the maximum interval between adjacent pulses. Consider for example the exponential time distribution shown in the picture below. Suppose to fix the reference constant rate at 100 kcps, i.e. consecutive pulses distance is 10 us. The resulting distribution of the occurrence times of pulses is exponential and the distances are between And The Scale factor allows to enlarge the distribution. In the same scenario, ‘Scale’=2 implies that the resulting distribution of the occurrence times of pulses is exponential and the distances are between And Sequence: it is possible to load a file with 500 kpulses of time differences among consecutive pulses. This method allows the generation of an a-priori defined sequence of pulses. The picture below shows a screenshot of a temporal distances sequence stored. 83 UM3074 – Digital Detector Emulator User Manual Rev. 1 CAEN Electronic Instrumentation Pile-up The user can set the maximum number of event in pile-up for the “Fast” exponential shape and the “custom” shape choosing a value from 1 (no pile-up) to 15. The “Digital (RC)” option has no limitation of pile-up. If a critical condition of saturation occurs due to excessive pile-up of pulses, the time-base generator continues to calculate new occurrence times but with no actual generation of the corresponding pulses. If this is the case, attention should be paid that the reset and restart of the LFSRs even with the same seed does not correspond to the reproduction of the same pulse sequence. In case of Multi-Shape operation mode, the resources for the pile-up emulation are shared between the two shapes, meaning that only 8 events with the same shape may be piled-up. The maximum number of piled-up events for each shape can be set. Fig. 8.3: Events in pile-up on both output channels (red and blue). The Dead time parameter fixes the minimum distance between two adjacent pulses. Click on “Paralyzable” or “Non Paralyzable” to enable the desired operation mode. In the paralyzable system, if a new event fires during the dead-time interval, the counter of the generation time is reset and re-initialized with a new value. In the non-paralyzable system, an event generated in the dead-time is simply discarded. The pictures show screenshots of the output signal in case of different dead-time specifications, paralyzable on the top, and non-paralyzable on the bottom. UM3074 – Digital Detector Emulator User Manual Rev. 1 84 CAEN Electronic Instrumentation Fig. 8.4: Emulation of events with paralyzable dead-time (top), and non-paralyzable dead-time (bottom). 85 UM3074 – Digital Detector Emulator User Manual Rev. 1 CAEN Electronic Instrumentation Noise Emulation There are several kinds of noise that can be emulated through the device (refer the Section Noise Emulation for more details). Click on the desired option to enable it. Possible choices are: random numbers and flicker, i.e. 1/f, noise, white noise, random walk and shot noise. For each noise it is possible to set the magnitude or the sigma, both in LSB units, or in Volts, by editing the green box. Note: The white noise is a pseudo-white noise since it is digitally generated and limited in band by the 125 MHz sampling frequency of the DAC. The white noise is generated with a 64 bits LFSR. The flicker noise too is generated starting from a custom LFSR and shaped by an array of filters, which corresponds to the following set of available noise corner frequencies. Noise Corner Frequencies (kHz) 0,1 0,5 1 5 10 50 100 500 1000 Interference UM3074 – Digital Detector Emulator User Manual Rev. 1 86 CAEN Electronic Instrumentation To enable the Interference, click on the option “Enable artificial interference”. A folder browser will come out asking to load a file. Select the .cvs file (see Section CSV File Format) corresponding to the desired interference. The user can decide the “Time distribution” of the interference, by selecting “Periodic” or “Random”, and the “Average Period” in us. The interference amplitude can be scaled according to a constant level or to a random varying level. Move the sliding bar up to the desired value. Picture below shows the interference effect from a switching power supply. Baseline Drift Click on “Enable baseline drift” to enable the linear baseline drift. The emulator will sum the desired baseline drift to the signal output. Click on “Editor” to open the “Baseline Editor” window. The system reserves 4096 points for the baseline signal, which are key points for a process of linear interpolation. 87 UM3074 – Digital Detector Emulator User Manual Rev. 1 CAEN Electronic Instrumentation Cells of the left table can be modified as well. The “Sample” value is the x-axis position of the key point, the “Value” is the y-axis position of the key point, “Fast” = 0/1 to select a “fast” or “slow” interpolator factor. Refer to Section Baseline drift emulation for more details. Use (+) and (-) to add or remove key points. Use (x) to remove all the key points. The remaing three symbols allow to “load” a .cvs file with the desired baseline drift shape, “Save” the current configuration, and “Apply” it to the device. The following picture shows an example of designed baseline. Fig. 8.5: Baseline drift emulation. In the table an example of values that the user can set and the corresponding preview. The precision of both interpolation procedures can be regulated by means of the slow and fast interpolation sliders on the “Baseline Drift” box. The reset of the baseline signal can be accomplished: automatically at the end of the sequence representing the signal; manually by means of the ‘RESET TO ZERO’ button; externally by means of a digital signal (for instance from a quenching circuit) connected to one of the digital inputs of the Emulator. The picture below shows the output of the emulator in presence of a linearly varying superposed signal. UM3074 – Digital Detector Emulator User Manual Rev. 1 88 CAEN Electronic Instrumentation LSFR Settings All the LFSRs of each channel can be initialized in terms of the values of the starting seeds. The seeds can be forced for each LSFR by the operator or can be automatically and randomly set by an internal procedure, global or local. Each LFSR can be stopped, reset and activated independently. 89 UM3074 – Digital Detector Emulator User Manual Rev. 1 CAEN Electronic Instrumentation Arbitrary Waveform Generator Arbitrary Waveform Generator The Emulator can be used as a traditional waveform generator, reproducing the output signals loaded as .csv files in a memory of 1 Mpoints (corresponding to the length of 8 ms) for each channel. In order to reproduce longer signals, the physical samples of the loaded waveform can be used as key-points of an 23 interpolation process. The interpolation factor can be fixed in the field “Clock per step” up to 2 . The amplitude of the generated signal can be controlled by the parameter “Gain”. Note: All operation MUST be confirmed by pressing “Apply”. The button “Apply” turns yellow when there is a modification to be applied. Then it turns green when there is no modification to be applied. Function Generator The Emulator can be used also as programmable generator of the following waveform: Sine, Square wave, Ramp, Sawtooth, Pulse, Sinc, Noise, and DC level. Output values are automatically adjusted according to the output impedence. The output impedence must be selected through the panel: UM3074 – Digital Detector Emulator User Manual Rev. 1 90 CAEN Electronic Instrumentation 50 Ohm, and 1 MOhm can be selected using the corresponding buttons. Custom values can be selected writing the value in the white box, and choosing the corresponding unit among R = unit, k = kilo, and M = mega. The output filter can be enabled by selecting the option: Waveforms that can be generated through the “function generator” are: - Sine Amplitude: -4 V a +4 V on 1 MΩ Frequency: 1Hz-10 MHz Offset: -4 V a +4 V on 1MΩ The implemented “Autophase” feature automatically calculates the initial phase in order to minimize the harmonic distortion - Square wave Amplitude: -4 V a +4 V on 1 MΩ Frequency: 1 Hz-10 MHz Offset: -4 V a +4 V on 1 MΩ - Ramp Amplitude: -4 V a +4 V on 1 MΩ Frequency: 1Hz-10 MHz Offset: -4 V a +4 V on 1 MΩ The symmetry of the shape can be adjusted by setting the relative percentage of rising and falling edges. - Saw-tooth Amplitude: -4 V a +4 V on 1 MΩ Frequency: 1 Hz-10 MHz Offset: -4 V a +4 V on 1 MΩ - Pulse Amplitude: -4 V a +4 V on 1 MΩ Frequency: 1 Hz-10 MHz Offset: -4 V a +4 V on 1 MΩ The steepness of the edges referred to the period and the duty cycle are adjustable. - Sinc Amplitude: -4 V a +4 V on 1 MΩ Frequency: 1 Hz-10 MHz Offset: -4 V a +4 V on 1 MΩ The number of zero-crossings of the sine cardinal into a period can be programmed. - DC level Offset: -4 V a +4 V on 1 MΩ - Noise Amplitude: -4 V a +4 V on 1 MΩ Frequency: 1 Hz-10 MHz The generated noise has white spectrum. 91 UM3074 – Digital Detector Emulator User Manual Rev. 1 CAEN Electronic Instrumentation Delay-Correlation Timing Settings Click on “Correlated Channels” to enable the correlation among the two output channels (Dual Channel form factor only). When “Disabled” the two output channels are uncorrelated. The “Correlated Channels” option will open more options for the timing settings, as from the following picture, and the “Statistical Settings” box (see next section). UM3074 – Digital Detector Emulator User Manual Rev. 1 92 CAEN Electronic Instrumentation Two correlated pulses from different channels can be identical or generated according to different statistics. They can be separated in time by a programmable delay from 0 to 32 us with resolution of 11.6 ps. Write in the “AUTOMATIC” box the requested delay in ns and click “SET” to enable it, or write in the “MANUAL” box the number of desired steps of course steps (8 ns), and fine steps (11.6 ps). On the top of the Timing Settings box there is written the “Estimated Delay” as evaluated from the device. Click “SET AS ZERO” to set the current setting as the zero delay between pulses. The “Sweep” button allows to sweep the delay with a programmable “Speed” and “step”. Statistical Settings There are three “Statistical Settings” options to generate correlated channels. “Channel 2 follows exactly channel 1”: CH2 output is the exact replica of CH1, also in terms of noise. The user can set the time delay among the two outputs (as from the picture below). The “CH2” tab is disabled from GUI; “Channel 2 has its own statistic”: the two output channels are only time correlated. All the other settings are uncorrelated. The time correlation is set as a fixed delay between channels. The “CH2” tab is enabled but the “Time Distribution” box; “Only some pulses on Channel 2 and Channel 1 are correlated”: this option allows to completely decorrelate the two output channels, and have a subset of correlated event in the two outputs. 93 UM3074 – Digital Detector Emulator User Manual Rev. 1 CAEN Electronic Instrumentation Note: This option is not compatible with the “Digital RC” or “Auto” shape mode. Click FIX for the settings auto-fix Select the option. The device then enables a third internal channel that can be programmed in energy and time. The third channels inject the same event in both CH1 and CH2. Therefore CH1 and CH2 can be programmed to emulate two uncorrelated background events, as the third channel can be programmed to emulate the same signal events. Note: Remember to randomize the channel 2 LFSR settings. Click FIX to let the GUI auto-fixes the settings. The energy and time distributions of the third internal channel can be programmed from the following boxes. The shape will be the same as channel 1 and channel 2 respectively. For details on how to set the “Energy mode” and “Time Distribution” refer to the Energy Mode and Time Distribution Sections. UM3074 – Digital Detector Emulator User Manual Rev. 1 94 CAEN Electronic Instrumentation It is possible to simulate pile-up among event from the Channel 1 and Channel 2 and the correlated signals but also emulate pile-up among correlated signals. See also Section Correlated event generation for more information. Climatic Operating Condition In order to guarantee the stability of the delay line, a sophisticated compensation of temperature and humidity (optional) conditions is implemented in the Emulator. Click “Set a temperature considering the dew point” to enable the Peltier cell to control the temperature. Write the desired value and click “SET” to set it. Check that the “Delay Line Temperature” moves to the desired value. Click “Override dew point limitation and select the temperature” to select a temperature without considering the dew point. It is strongly recommended to not use this option. The temperature setting may vary on the Peltier cell power itself. 95 Note: All operations MUST be confirmed by the SET button. UM3074 – Digital Detector Emulator User Manual Rev. 1 CAEN Electronic Instrumentation Display Area The “Display Area” of the GUI gives a complete real-time graphical overview of the operating status of the Emulator. It contains five tabs: Settings CH1/CH2 Real-time CH1/CH2 Delay-Correlation Settings CH1/CH2 The “Settings CH1/CH2” tab shows the preview of the programmed settings, as from tab CH1/CH2. The five boxes are: Signal shape – shows the preview of the programmed shape; Energy – shows the preview of the programmed energy distribution; Interference – shows the preview of the programmed interference, as from the loaded file; Baseline – shows the preview of the programmed baseline, as from the loaded file; Time – shows the preview of the programmed time distribution, as from the loaded file. In case of constant or Poisson distributed time, there is no plot. Left click and drag to zoom in a selected area. Use to zoom out. Where possible, the scales of the graphs can be swapped between digital and physical units by means of the command . In particular, in case of the spectrum Channels are converted in Voltage and KeV, otherwise the x-axis Samples are converted in Time and on the y-axis Levels are converted in Voltage. Click on to enable a single plot for the whole area. Realtime CH1/CH2 The “Realtime CH1/CH2” tab enables a real-time view of the generated signals. The real-time is disabled by default. Click on “Enable Realtime” to enable it. UM3074 – Digital Detector Emulator User Manual Rev. 1 96 CAEN Electronic Instrumentation The top plot shows the energy histogram of the enabled output. In the following example a Cobalt spectrum has been loaded. The bottom plot shows the shape preview. It works as a real oscilloscope. Left click on the plot and drag to zoom in the selected area. Click on to zoom out. Click on to enable a single plot for the whole area. Use to reset the spectrum. Use to swap between digital and physical units. Click on to swap between energy and time histograms. Delay-Correlation Shows the third internal channel settings preview. 97 UM3074 – Digital Detector Emulator User Manual Rev. 1 CAEN Electronic Instrumentation Accepted File Formats The accepted file formats are the following: Comma Separated Values (.csv). This file format can be used for any kind of settings of the device. For the energy spectrum only the user can choose also one of the following file formats: CAEN digitizer files (.dat). The histogram data is written in the following format: Number_of_sample_#1 Energy_value_#1 Number_of_sample_#2 Energy_value_#2 …….. Spectrum files (.spectrum). This is the internal spectrum file format. Any spectrum created by the GUI will have this file format. ANSI4242 (.xml). This is the standard ANSI4242 file format. In the next section we are going to see in details the .csv file format for the specific setting. Shape (.csv) Values are organized in column format. Each value begins a new paragraph Value #1 Value #2 Value #3 Value #4 Value #5 Value #6 …….. The values represent the amplitude of the shape and are quantized to 16 bits (from -32768 to 32767 integers). The maximum number of samples of the waveform is 4096, but a lower size can be used. Spectrum (.csv) The values are organized in column format. Each value begins a new paragraph Value #1 Value #2 Value #3 Value #4 Value #5 Value #6 …….. The values represent the probability and are quantized to 16 bits (from 0 to 65535). The number of bins is equal to 16384 (14 bits). If a lower number of bins is inserted, the remaining samples are automatically set to zero. UM3074 – Digital Detector Emulator User Manual Rev. 1 98 CAEN Electronic Instrumentation Time distribution (.csv) Values are organized in row format, and they are separated by commas: Value #1,Value #2,Value #3,Value #4,Value #5,Value #6,…….. The values express the probability that an event occurs at a certain distance in time from the previous one. They are quantized into 8 bits (from 0 to 255 integers). The number of bins must be 256. Each bin represents the distance in clock cycles multiplied by the Scale Factor (see the Time Distribution Section) Interference (.csv) Values are organized in row format, and they are separated by commas: Value #1,Value #2,Value #3,Value #4,Value #5,Value #6,…….. The values represent the amplitude of the interference samples and are quantized into 16 bits (from -32768 to 32767 integers). The maximum number of samples of the waveform is 4096, but a lower size can be used. Signal Generator (.csv) Values are organized in row format, and they are separated by commas: Value #1,Value #2,Value #3,Value #4,Value #5,Value #6,…….. The values represent the amplitude of the interference samples and are quantized to 16 bits (from -32768 to 32767 6 integers). The maximum number of samples of the waveform is 10 , but a lower size can be used. Sequence in Energy Mode and in Time Distribution (.csv) The user must generate two files, one of amplitude of events and one of temporal distances between two consecutive events. For each file, the values are organized in row format. Values are separated by commas Value #1,Value #2,Value #3,Value #4,Value #5,Value #6,…….. The maximum length of the list is 500 kword. The values of the file of amplitudes modulate the amplitudes of the signal shape. The values of the file of temporal distances represent the temporal distances between events as multiples of the clock period 99 UM3074 – Digital Detector Emulator User Manual Rev. 1 CAEN Electronic Instrumentation 9 Calibration The device comes with its own calibration (refer to Section First Run for details on how to get the calibration file). Only if the user needs to perform its own calibration, the tool allows to recalibrate the device. This is an advanced option, and it is recommended that only expert users perform this operation. The “Gain Calibration tool” is located on the bottom of the “Main Settings” tab. Click on the icon to enable the interface tool. The calibration consists in balancing the outputs of CH1 and CH2 to be identical for the same signal. For this purpose a configurable gain is available. Moreover, the correspondence of channels/voltage can be assessed. The calibration is carried out through a multimeter with reading scale down to uV. Operatively, the Emulator produces an output on CH1 and CH2 and the user has to insert the result of the measurement of this output in the boxes labelled “mV”. Automatically the new correction parameters of gain and offset are calculated and permanently stored into the instrument. The output must be terminated at 50 during the calibration procedure. UM3074 – Digital Detector Emulator User Manual Rev. 1 100 CAEN Electronic Instrumentation 10 System Recovery and Update The system recovery and update procedure is fully automatic and no needs human attendance. Even if the Emulator firmware is corrupted, the instruments automatically enters the ‘Firmware Upgrade’ procedure, and the user can restore the firmware. Even if the procedure should be aborted during execution, there should be no consequences for the instrument. Operatively, the configuration consists of three steps. Boot loader mode entrance. After running the procedure through “Program”, the instrument is busy for 20’’ and it responds changing the status of the ‘Boot loader MODE’ in Boot loader. Erasing FLASH. The system FLASH is erased. Programming. The FLASH is initialized with the new firmware and the process is verified in real-time. The update procedure is terminated with the re-start of the Emulator. In case of problem or doubt please contact CAEN support at the following mail addresses: [email protected] (for questions about the hardware) [email protected] (for questions about software and libraries) 101 UM3074 – Digital Detector Emulator User Manual Rev. 1 CAEN Electronic Instrumentation 11 Application Examples Setting up a remote experiment The device can be used with the DT5780 (MCA) to characterize a measurement system (detector and preamplifier) and to reproduce it to fine adjust its settings. It is required to: Acquire a stream of pulses from detector and get the mean shape; Measure the energy spectrum through the digitizer; Measure the signal baseline through an oscilloscope, or the digitizer itself; Acquire the noise shape; Perform a noise characterization through spectrum analyser. That information allows to uniquely configure the Digital Detector Emulator. 1. Load the energy spectrum file as saved from the DT5780. From CH1 interface, select “Spectrum Emulation”, and “Load File”. Select the desired file from the browser. The “Spectrum Import Tool” comes out. UM3074 – Digital Detector Emulator User Manual Rev. 1 102 CAEN Electronic Instrumentation It is possible to calibrate the spectrum. In this example we are using the Cobalt energy spectrum. Double click on the first peak and write the corresponding energy value in KeV. Repeat the same procedure for the second peak. The user can also insert the corresponding value of Volt for the two peaks. Click on “Calibrate” to calibrate the instrument. Click on “Import” to import the spectrum. Refer to Section Energy Mode for more details about the “Energy mode” options. 2. Define the signal shape. Select the exponential shape settings for exponential shape, or use the custom shape settings for nonexponential shapes. A typical signal from preamplifier should have the settings as from the following picture. Being the decay time greater than 0.4 us, the “Auto” option automatically selects the “Digital (RC)” shape option that has no pile-up limitation. See Section Pile-up for more details. 103 UM3074 – Digital Detector Emulator User Manual Rev. 1 CAEN Electronic Instrumentation In case of “Custom Shape” select also the “Shape Interpolation” factor according to the desired length. Refer to Section Shape Interpolator for more details. 3. Define the number of piled-up events. In case of “Digital (RC)” option there is no limitation of pile-up. If the “Fast (Limited pileup)” or “Custom” option has been selected, define the number of pile-up events in the box below: Adjust the dead-time if needed. 4. Set the Time distribution. For a radioactive source select “Poisson distribution”. Set the average time value in kcps units. The green box shows the actual generated time value. 5. Add the noise emulation defining the amplitude of each component. 6. Add the baseline drift. Click on “Editor” to get the “Baseline Editor Tool” UM3074 – Digital Detector Emulator User Manual Rev. 1 104 CAEN Electronic Instrumentation In the example the “slow interpolator” acts on the ramp, as the “fast interpolator” acts on the reset of the baseline itself. Refer to Section Baseline Drift. 7. Enable the channel output 105 UM3074 – Digital Detector Emulator User Manual Rev. 1 CAEN Electronic Instrumentation Operate with pseudorandom generation There are many pseudo-random number generators inside the emulator to reproduce the programmed statistical distributions of signals. A pseudo-random generator has the same properties of a random generator, having a very long white sequence in output. Moreover it is possible to know in advantage the whole sequence, only knowing the starting point, i.e. the seed. The emulator uses 64 bits seed that the user can program for each desired distribution. Once the seed has been set the device generate the sequence of pseudo-random values. If the same seed is used, the same sequence will be reproduced many times. If a different seed is used, an independent statistical distribution will be generated. It is therefore possible to take advantage of this feature, to repeat many times the same sequence of energy, time, noise, etc., mainly for debugging purposes, to check the behavior of different systems, implementations, and algorithms on the same set of data. This is a unique feature of the Digital Detector Emulator. Indeed, even with a very long function generator, with GBs of memory, can only reproduce few seconds of sequences. This usually requires a lot of pc power consumption. Natural processes produce infinite sequences that cannot be reproduced. How to get a new sequence modifying the seeds Go on CH1 tab of the main GUI under the “LFSR settings” box. A different seed controls the “Amplitude”, the “Time”, the “Noise (all noise generator excluded 1/f)”, and the Noise (1/f). For each seed the user can: “Reset” the generator to the current seed; “Stop/Go” the generator. Use “Stop” to stop the sequence and “Go” to generate the following value of the pseudo-random sequence; “Rand” to generate a new random seed. Use “Reset All”, “Go All”, and “Rand All” to reset, go, and randomize all the seeds at the same time. Note: After pressing “Rand” or “Reset”, the LFSRs do not restart automatically. Remember to press GO to restart the sequence. Note: At the software startup the two channels have the same seeds. Therefore they generate the same sequence if also the same settings are applied. To uncorrelate the two channels the user must randomize one of the two channels, by pressing “Rand All”, and “Go All”. Note: In case of Poisson time distribution, if the user “Stops” the Time LFSR, then the event generation will stop. UM3074 – Digital Detector Emulator User Manual Rev. 1 106 CAEN Electronic Instrumentation Note: The user can edit the seeds by pressing “Rand”, or writing the desired seed value. Step-by-step control of the pseudo-random generator The “Run/Debug” box in the “Main Settings” tab allows to control for each output channel the statistical behavior of the seeds. Click on the channel you want to act, of to “BOTH” to apply the same changes on both channels. Use the PLAY button to simultaneously start all the seeds, and PAUSE does not act on the Poissonian generator). The RESET in the LFSR box of each channel. to stop the generators (the PAUSE option button restarts all the seeds to the initial values, as specified How to repeat the same sequence From the Run/Debug box click on “Time Base Generator”. Click on PAUSE to suspend the output generation. In this way no signal is produced, even if the led remains ON. Press RESET to reset the seeds to their initial value. Click on PLAY to reproduce the same sequence. Being the noise generators restarted too, also the noise events will be reproduced equal as before. How to generate a fixed number of events From the Run/Debug box click on “Time Base Generator”. Click on PAUSE to suspend the output generation. In this way no signal is produced, even if the led remains ON. Press RESET if you want to reset the seeds to their initial value. Write in the white box the number of desired events to be generated (“Number of pulses in multistep mode”). Enable the MULTISTEP button 107 to generate the desired number of events. Note: The device generates the selected number of events, considering also those that do not come out from the output due to analog saturation or pile-up saturation. UM3074 – Digital Detector Emulator User Manual Rev. 1 CAEN Electronic Instrumentation Multi-shape The emulator is able to generate two different shapes on the same output channel. This is a useful function to test pulse shape discrimination systems, as in case of neutrons and gamma. Consider the example shown in the following picture, where there is a mixture of 20% of neutron and 80% of gamma. The following procedure allows to emulate a setup as in the figure: 1. Program the energy spectrum and calibrate the device as explained on Section Setting up a remote experiment; 2. Select the “Custom shape” option 3. Enable the “Multi-shape” feature from the “Multi-shape” box. Change the relative percentage of SHAPE A (gamma in the example) and SHAPE B (neutrons in the example); 4. Load two different shapes in the “Custom shape” option; UM3074 – Digital Detector Emulator User Manual Rev. 1 108 CAEN Electronic Instrumentation 5. Press SHAPE A to enable the assignment (a red message notifies that “You are selecting SHAPE A”), then click on the shape you want to assign it. 6. Repeat the same for SHAPE B; 7. The two shapes will appear in the “Settings CH1” of the Display Area as well; 8. Set a pile-up limit equal to 8 for both shapes. 109 Note: It is not possible to select different “Interpolation” factor for the two shapes. UM3074 – Digital Detector Emulator User Manual Rev. 1 CAEN Electronic Instrumentation Correlated event generation 22 + An example of generation of correlated events is the Na, that being proton-rich, undergoes β decay to an excited 22 + state of Ne. The e from the decay annihilates with an electron to produce a pair of 0.511MeV γ rays, which by 22 conservation of momentum should be back-to-back in the center of mass frame. Meanwhile, the Ne emits a 1.275MeV γ in transition to a ground state. The emission of gamma ray pairs can be detected using two opposed scintillation and detectors. The emulator can generate two independent signals on the two output channels, being only some of the events correlated on both channels. Those events emulate the signal events. The scenario is showed in the following picture. We want to emulate a sodium source detected by two detectors placed at distances d1 and d2 respectively. There would be some events coming from the source (correlated signal events) and some uncorrelated background events. Being detected at two different distances, those events coming from the source should have a time delay equal to (d 1-d2)/cr, where cr is the speed of light in the medium. In the following picture there is the diagram of the generation of correlated events. Channel 1 and channel 2 represent the two independent channels, as channel 3 generates the correlated events. Channel 3 injects the same event in both channel 1 and channel 2. They will therefore be the only events correlated in both channels. Only the time and energy distributions of channel 3 can be programmed. For what concern the shape, the noise, and the baseline, each event uses the specific features of its output channel. Indeed the shape, the noise, etc. are related to the specific output channel, and they cannot be independent. Note that it is not possible to use an external trigger (Digital IN connector) to generate events from channel 3. The device will be programmed to emulate an uncorrelated background on channel 1 and channel 2, as from the following picture on the left, and the correlated peak as from the following right picture. UM3074 – Digital Detector Emulator User Manual Rev. 1 110 CAEN Electronic Instrumentation Fig. 11.1: Spectrum for the background emulation to be programmed on channel 1 and channel 2 (left). Spectrum for the signal emulation (blue circle) to be programmed on channel 3 (right). 1. From “Delay-Correlation” tab, under “Timing Settings” enable the “Correlated Channels” option; 2. Set an arbitrary delay between the two channels; It is possible to set the delay in two ways: (i) AUTOMATIC: write the delay in ns (i.e. 1.234 ns) and press SET. The device will reach the closest delay to what has been set; (ii) MANUAL: write the delay in steps of the coarse step (8 ns/step) and the fine step (11.6 ps/step). The final delay is shown in the top of the window, under “Estimated Delay”. Note: The delay line is not calibrated, and the “Estimated Delay” time is relative to the value of 0 step coarse and 0 fine step. For absolute delay value, once you fixed all the cable length, measure the zero value with a TAC (time to amplitude converter) with at least 6 ps of resolution. Then press the “SET AS ZERO” button. 3. From “Delay-Correlation” tab, under “Statistical Settings” select the “Only some pulses on channel 2 and channel 1 are correlated” option; 111 Note: This option is not compatible with the “Digital RC” or “Auto” shape mode. Click FIX for the settings auto-fix UM3074 – Digital Detector Emulator User Manual Rev. 1 CAEN Electronic Instrumentation Note: By default both channel 1 and channel 2 start with the same seed. Remember to randomize the channel 2 LFSR to get uncorrelated distributions. Click FIX to let the GUI auto-fixes the settings. Otherwise go to the LSFR settings of channel 2 and press “RAND ALL”, and “GO ALL”. 4. Program the shapes of channel 1 and channel 2 as explained in Section Signal Shape. For example select a “Fast” exponential with 10 ns of rise time and 100 ns of fall time. 5. Load the background spectra for channel 1 and channel 2 as explained in Section Import an Energy Spectrum from File. Note: You can get the background spectrum in the following way. Connect the two detector outputs to two channels of a CAEN digitizer with proper DPP firmware installed, as the DT5780 with DPP-PHA, or the DT5751/DT5720 with DPP-PSD. Take the spectrum. Then enable the coincidences between the two channels to get the signal spectrum. Subtract the two spectra. The final spectrum is the desired background spectrum. 6. Load the signal spectrum on channel 3. You can take the signal spectrum from the “Isotopes Database”, or use the spectrum from a digitizer with enabled coincidences between channels. 7. Set the time distribution for all channels. You can set for example Poisson distribution for all channels, and set 10 KHz for channel 1 and channel 2 (picture on the left), and 1 KHz for channel 3 (right); 8. Set the number of desired pile-up events for channel 1 and channel 2. By default the software sets the maximum allowed. 9. Enable both CH1 and CH2 output. The activation of channel 1 does not mean that the channel 2 output is enabled as well. UM3074 – Digital Detector Emulator User Manual Rev. 1 112 CAEN Electronic Instrumentation 10. Check in the status bar that the “Out” number of events is greater than the “In”. Indeed channel 3 events are not generated by the channel 1 (2) time base generator; therefore they are not counted into the “In” counter. 11. Check the Detector Emulator output on a CAEN digitizer. Check that enabling the coincidences between channels you get the signal spectrum. If you do not have a CAEN digitizer, you can check this feature using an oscilloscope. Select a fixed energy value for all channels, as for example, 0.5 V for channel 1 and channel 2, and 2 V for channel 3. This will help in the visualization of the oscilloscope. Use the 50 Ω termination of the oscilloscope and check that the output is something similar to the following picture. The yellow marked pulse is common on the two channels, as there are many uncorrelated events on the two outputs. 113 UM3074 – Digital Detector Emulator User Manual Rev. 1 CAEN Electronic Instrumentation Generating artificial spectra with isotopes database The software emulator comes with a database of common isotopes. In the following section we are going to describe 55 how to create an artificial spectrum of the Fe isotope. 1. From “CH1” tab, under the “Energy Mode” box, click on “Spectrum Emulation” and “Preset”; 2. From the “Spectrum Editor” window select “Isotopes DATABASE” UM3074 – Digital Detector Emulator User Manual Rev. 1 114 CAEN Electronic Instrumentation 3. Select the Iron from the “Period Table”; 55 4. Select the Fe isotope from the list on the left; 115 UM3074 – Digital Detector Emulator User Manual Rev. 1 CAEN Electronic Instrumentation 5. Select the specific radioactive lines that you want to add in your spectrum, as for example the X-rays in the range of 5-6 KeV. Click “Add” to add the selected lines on the spectrum 6. Write the resolution value on the “Res (eV)” column. For example we can set a resolution of 127 eV for the 6 KeV lines, and a resolution of 129 eV for the 5 KeV lines. Click on the each cell and write the desired value. If you want to set the same value for all lines write it on the “Resolution (eV)” box under “Import Settings” on the right. 7. Calibrate the instrument writing the values in energy corresponding to 0 V and 2 V. We can write 1 KeV for 0 V, and 10 KeV for 2 V. Note: If the device is already calibrated, the new calibration will override the old one. 8. Press “Import” to import the spectrum. A preview will appear in the “Spectrum Editor” window. 9. Write a “Name” and press “Save” to save and load the spectrum file. UM3074 – Digital Detector Emulator User Manual Rev. 1 116 CAEN Electronic Instrumentation 52 55 Consider the case you want to create a composite spectrum adding lines from the Ma and Fe. Set the Ma activity equal to twice the Fe activity. 1. Import the Fe lines as before 2. Set 20 eV of resolution for all lines. 3. Set the calibration point: 1 KeV for 0 V, and 10 KeV for 2 V. 4. Press “Import”. 5. Then add the Ma lines. Select the X-rays lines as in the following picture. Write in the left box “Import Settings” an activity of 200 % (to set a double activity than the Iron). Click “Add” to add the lines with the modified activity. 117 Note: You can modify the activity also writing the desired value in the specific cell of the “Output Complex Spectrum”. UM3074 – Digital Detector Emulator User Manual Rev. 1 CAEN Electronic Instrumentation 6. Press “Import”. The “Spectrum Editor” window will appear as follows. UM3074 – Digital Detector Emulator User Manual Rev. 1 118 CAEN Electronic Instrumentation How to calibrate in KeV The Digital Detector Emulator can be calibrated in KeV unit, and in Volt. The user can calibrate the device during the spectrum import, or after. Calibrate the DDE during the spectrum import 1. Under “Energy Mode” select “Spectrum Emulation” and “Load File” 2. Select for example the Cobalt spectrum from the “example.zip” folder, available on CAEN website. The “Spectrum Import Tool” will appear. 119 UM3074 – Digital Detector Emulator User Manual Rev. 1 CAEN Electronic Instrumentation 3. Double click on the first peak to calibrate it. A pop-up message will ask you the corresponding value in KeV. Write 1170. 4. Repeat the same for the second peak and write 1330 KeV in the pop-up message. In the “Input Spectrum” plot will appear the two “Reference” line, with the corresponding value of KeV. 5. Verify that in the bottom right “Import and Calibrate” box the correct values are written for the “Energy Output (KeV)” 6. If required write the corresponding values of Volts in the green boxes for the two key points. The spectrum will be adjusted to be compatible with the desired tension. 7. Press “Calibrate” to calibrate the device. UM3074 – Digital Detector Emulator User Manual Rev. 1 120 CAEN Electronic Instrumentation Calibrate the device using an imported spectrum 1. Under “Energy Mode” select “Spectrum Emulation” and “Load File” 2. Select for example the Cobalt spectrum from the “example.zip” folder, available on CAEN website. The “Spectrum Import Tool” will appear. Press “Import” without making any calibration. 3. From the “Main Settings” tab, go to the “Energy calibration” box, and click on “Open energy calibration”. 121 UM3074 – Digital Detector Emulator User Manual Rev. 1 CAEN Electronic Instrumentation 4. The “Energy Calibration Tool” will appear with the specific imported spectrum. 5. Double click on the first peak and insert the value of KeV in the pop-up. UM3074 – Digital Detector Emulator User Manual Rev. 1 122 CAEN Electronic Instrumentation 6. Repeat the same for the second peak (1330 KeV). Check that in the plot the two reference white lines point to the correct value, and that the “Energy 1” and “Energy 2” values are correct 7. Write in the green boxes the desired values of Volt for the two key points. 8. Press “Apply” to apply the calibration. 9. You can use the calibration to write a fixed value of energy in the “Energy Mode” tab. Modify the cyan box writing the desired KeV energy value. 10. In the Display Area you can switch the “Energy spectrum” preview from LSB channels units, to Volt, to KeV, pressing the 123 button. UM3074 – Digital Detector Emulator User Manual Rev. 1 CAEN Electronic Instrumentation 12 Technical support CAEN makes available the technical support of its specialists at the e-mail addresses below: [email protected] (for questions about the hardware) [email protected] (for questions about software and libraries) UM3074 – Digital Detector Emulator User Manual Rev. 1 124 CAEN Tools for Discovery n Electronic Instrumentation CAEN SpA is acknowledged as the only company in the world providing a complete range of High/Low Voltage Power Supply systems and Front-End/Data Acquisition modules which meet IEEE Standards for Nuclear and Particle Physics. Extensive Research and Development capabilities have allowed CAEN SpA to play an important, long term role in this field. Our activities have always been at the forefront of technology, thanks to years of intensive collaborations with the most important Research Centres of the world. Our products appeal to a wide range of customers including engineers, scientists and technical professionals who all trust them to help achieve their goals faster and more effectively. CAEN Tools for Discovery CAEN S.p.A. CAEN GmbH CAEN Technologies, Inc. Via Vetraia, 11 Klingenstraße 108 1140 Bay Street - Suite 2 C 55049 Viareggio Italy Tel. +39.0584.388.398 Fax +39.0584.388.959 [email protected] www.caen.it D-42651 Solingen Germany Tel. +49 (0)212 254 4077 Mobile +49 (0)151 16 548 484 Fax +49 (0)212 25 44079 [email protected] www.caen-de.com Staten Island, NY 10305 USA Tel. +1.718.981.0401 Fax +1.718.556.9185 [email protected] www.caentechnologies.com Electronic Instrumentation Guide UM3074 - Digital Detector Emulator User Manual rev. 1 - 05 May 2014 00117-10-DGT28-MUTX Copyright © CAEN SpA. All rights reserved. Information in this publication supersedes all earlier versions. Specifications subject to change without notice. 125 UM3074 – Digital Detector Emulator User Manual Rev. 1