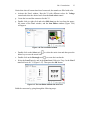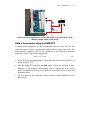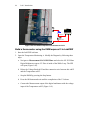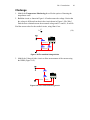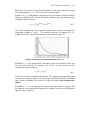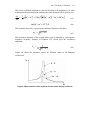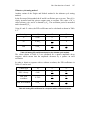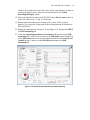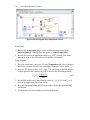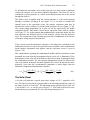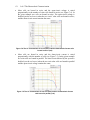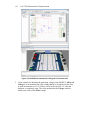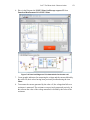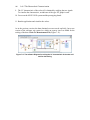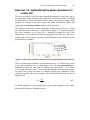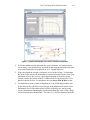
1
NI ELVIS Computer-Based Instrumentation Petru A. Cotfas, Daniel T. Cotfas, Doru Ursutiu, and Cornel Samoila Center for Valorization and Transfer of Competence—CVTC Creativity Laboratory Transilvania University of Brasov, Romania ISBN-10: 1-934891-11-8 ISBN-13: 978-1-934891-11-7 Publisher: Tom Robbins General Manager: Erik Luther Marketing Manager: Brad Armstrong Development Editor: Catherine Peacock © 2012 National Technology and Science Press. All rights reserved. Neither this book, nor any portion of it, may be copied or reproduced in any form or by any means without written permission of the publisher. NTS Press respects the intellectual property of others, and we ask our readers to do the same. This book is protected by copyright and other intellectual property laws. Where the software referred to in this book may be used to reproduce software or other materials belonging to others, you should use such software only to reproduce materials that you may reproduce in accordance with the terms of any applicable license or other legal restriction. Multisim and National Instruments are trademarks of National Instruments. All other trademarks or product names are the property of their respective owners. Contents Lab 1 Introduction Lab 2 Introduction to Testing, Measurement, and Data Acquisition Lab 3 Interfacing Basic Sensors Lab 4 Interfacing Actuators Lab 5 The Study of Vibration Lab 6 Introduction to Control Lab 7 The Photovoltaic Characterization 1 51 65 88 115 139 165 Lab 1 Introduction 1 Lab 1 Introduction A computer-based instrument is assembled inside or outside a computer and uses the computer for data acquisition, processing, measurement, display, and communication. A computer-based instrument consists of the following components: 1. The computer itself, which can be a desktop, laptop, or PXI industrial measurement computer. 2. Hardware for data acquisition and/or instrument communication. This hardware may be a plug-in data acquisition board, GPIB, USB, serial, or wireless device that acquires data from an external source and brings the data into computer memory for processing, display, and communication. The NI ELVIS II workstation is a good example of a USB data acquisition computer peripheral. 3. Computer-based instrumentation software. LabVIEW LabVIEW is a graphical programming environment used by millions of engineers and scientists to develop sophisticated measurement, test, and control systems using intuitive graphical icons and wires that resemble a flowchart. LabVIEW offers strong integration with thousands of hardware devices and provides hundreds of built-in libraries for advanced analysis and data visualization. LabVIEW is a software platform that is scalable across multiple computer targets and operating systems and has been an industry leader since its introduction in 1986. Because LabVIEW is easy to use, interactive, and graphical, it helps users build measurement applications in the shortest amount of time and without requiring them to have a computer science degree. Designed to enhance the productivity of both new and long-time users, LabVIEW gives them the ability to create code from VI Snippet images, globally manage probes, visualize data on new threedimensional graphs, parallelize individual iterations of For loops, reduce memory usage with data value references, and more. In addition to providing increased performance for parallel programming with multi-core processors and field-programmable gate arrays (FPGAs), LabVIEW provides access to the latest wireless technologies and simplifies real-time math by streamlining mathematical algorithm design and deployment to deterministic hardware. 2 Lab 1 Introduction NI ELVIS The National Instruments Educational Laboratory Virtual Instrumentation Suite (NI ELVIS) offers the most frequently used instruments in an electronics laboratory. NI ELVIS eliminates the need for bulky equipment in the lab. It also allows for the design of customized instrumentation that can be used and reused for specific projects. The NI ELVIS system is built using NI hardware and software technology entirely, and it has two main components: 1. The bench-top workstation (NI ELVIS II), which provides instrumentation hardware and associated connectors, knobs, and LEDs. A prototyping board (breadboard) sits on top of the workstation, plugged into the NI ELVIS II platform, and offers hardware workspace for building circuits and interfacing experiments. 2. NI ELVIS II software, which includes Soft front panel (SFP) instruments LabVIEW application programmatic interface (API) Multisim application programmatic interface (API) The APIs offer access to and custom control of NI ELVIS II workstation features using LabVIEW. The bulk of the breadboard is made up of prototyping area holes that are not connected to the data acquisition board. The prototyping board has four areas marked with the +\– sign. Connections inside these areas should be made based on vertical columns. Connections in the three other sections of the prototyping board should be made horizontally. Breadboard areas, which are located at the far left and far right of the workstation, are connected to the following instrumentation signal lines (see Figure 1-1): 1. Analog input signals (AI0 +/–, AI1+/–, AI7+/–, AISENSE, and AIGND) belong to the data acquisition board. Lab 1 Introduction FGEN 1 Scope Breadboard 3 7 2 8 3 DMM 5 4 6 Figure 1-1 The NI ELVIS II platform 2. Programmable function I/O lines (PFI0 to PFI11), belong to the data acquisition board and are used for synchronization of several instruments. 3. DMM/Impedance Analyzers (BASE, DUT+, DUT) belong to the DMM. 4. Analog output lines (AO0 and AO1) belong to the data acquisition board. 5. Function Generator lines (FGEN, SYNC, AM, and FM) belong to the Function Generator board. 6. Power lines for +15 V, –15 V, +5 V belong to the workstation. 7. DIO lines 0 to 23 belong to the data acquisition board. 8. PFI lines for counter and synchronization of DIO tasks belong to the data acquisition board. The NI ELVIS II workstation is populated on its left side with BNC type I/O terminals for the Function Generator (FGEN), the 100MS/sec Oscilloscope (Scope), and digital multimeter (DMM). On the right side, the workstation has two knobs for manual voltage setting in [0; +12 V] or [–12; 0 V], and another set of two knobs for the Function Generator frequency and amplitude settings. 4 Lab 1 Introduction Goal This lab introduces the idea of a computer-based instrument through building a simple instrument using the NI ELVIS II workstation and controlling it with a LabVIEW program. The lab also gives a short tutorial for LabVIEW programming. Required Components Required software includes LabVIEW 2010 NI ELVIS II software Required soft front panels (SFPs) include Digital multimeter (DMM) Digital voltmeter (DMM[V]) Digital ammeter (DMM[A]) Required components include 5.6 kΩ resistor, R1,R2 and R3 LM335 temperature sensor Lab 1 Introduction 5 Introduction to Graphical Computer Programming— LabVIEW LabVIEW, or Laboratory Virtual Instrument Engineering Workbench, is a powerful and flexible instrumentation and analysis software system. LabVIEW has been widely adopted throughout industry, academia, and research labs as the standard for data acquisition and instrument control software. A measurement instrument built using the computer is called a Virtual Instrument (VI) (Figure 1-2). LabVIEW’s intuitive user interface makes writing and using a Virtual Instrument easy and logical. Figure 1-2 A simple Virtual Instrument VI (Advanced Harmonic Analyzer) Graphical Programming “G” LabVIEW departs from the sequential nature of traditional programming languages and instead uses a graphical programming language, called “G.” In a G programming environment, the program is embodied in a front panel that sits on top of a graphical block diagram, which compiles into machine code. The appeal of using LabVIEW is its graphical programming nature. An interesting parallel can be drawn between the success and popularity of LabVIEW and the popularity of the Web. In both cases, it was not so much the underlying technology that was so innovative, but rather the well-designed graphical interface that made it accessible. For LabVIEW, that meant programming by wiring graphical objects together, like building breadboard circuitry. For the Web, it meant a “Web browser” application 6 Lab 1 Introduction that involved little more than just pointing and clicking on images or words that were of interest and were hyperlinked to other places on the Web. Therefore, using LabVIEW to create Internet-enabled applications (Figure 1-3) brings some of the best user interface technologies together. We see exciting possibilities for creating easy-to-use and intuitive networked applications that take virtual instrumentation to another level. Figure 1-3 Server-client application Basic Elements of LabVIEW Programming After you have installed the LabVIEW programming environment, you can start LabVIEW from Start»All Programs»National Instruments»LabVIEW 2010 » LabVIEW. LabVIEW will open its start panel as shown in Figure 1-4. The starting interface is divided into two columns: Files and Resources. The Files column contains three distinct fields: New—allows the creation of a new application or of a new project. Open—offers the possibility of opening an already existing application. This field automatically lists the last projects or applications used. Targets—enables the selection of a required device (e.g., PDA) for which the new project is created. Lab 1 Introduction 7 Figure 1-4 Start panel of LabVIEW application The Resources column contains links to other local or Web “help” type files and to the very useful application “Find Examples,” which offers a set of LabVIEW example programs. Applications that are built in LabVIEW have the extension “VI.” VI stands for “Virtual Instrument,” the basic element of graphical programming. LabVIEW version 8.0 introduced the notion of projects to allow for better management of VIs by executing tasks belonging to the same application. 8 Lab 1 Introduction VI Panel and Diagram When creating a new VI is created in LabVIEW, two windows are opened: the “Panel” and the “Diagram” (Figure 1-5). The Panel represents the user interface. This window enables the introduction of indicators and controls in the program as well as the visualization of the results given by the running of the program. The default color of the Panel is gray, but it can be changed by the programmer. The Diagram represents the source code of the application. In LabVIEW, instructions and commands are called “functions." The standard color of the Diagram is white. Figure 1-5 The Panel and the Diagram of a VI The “Controls” Palette Input data (or input variables) are introduced in the program by using the so-called controls, while output data (or output variables) are retrieved from the program and displayed using indicators. Controls and indicators belong to the VI Panel. The palette that offers access to all available controls and indicators is called “Controls” and is shown in Figure 1-6. Lab 1 Introduction 9 Figure 1-6 Controls and indicators palette called “Controls” The controls palette can be activated from the main menu: View>>Controls Palette or by pressing the right mouse button in the Panel. In the second case, the controls palette can be hidden by pressing the “Esc” key from the keyboard or by clicking the left mouse button while outside the palette. To fix the palette to the Panel, press the “pin” in the left upper corner. When the controls palette is fixed, navigate through the palette by pressing the button that corresponds to the desired libraries or sub-libraries. If the palette is not fixed, navigate by moving the mouse cursor over the desired buttons. The existence of a sub-library is indicated by an arrow placed in the upper right corner of the corresponding button. The following are basic control and indicator types that can be used in LabVIEW (Figure 1-7 and Figure 1-8): Numeric controls Buttons and switches Text controls Numeric indicators LEDs Text indicators Graph indicators 10 Lab 1 Introduction Figure 1-7 Basic controls palettes Figure 1-8 Basic indicators palettes In certain applications, a larger variety of controls and indicators is required. These can be found in the Modern or Classic palettes (Figure 1-9). Lab 1 Introduction 11 Figure 1-9 Supplementary controls and indicators palettes The “Functions” Palette This palette contains all the operations, instructions, commands, and mathematical functions that are implemented in the graphical programming environment. These are grouped either in classes characteristic of the operated data types or by programming methods. The Functions palette contains dozens of functions (Figure 1-10). This is why it is structured into libraries and sub-libraries. The palette’s manipulation and activation mode is similar to the one from the controls palette: from the main menu of the Diagram choose View>>Functions Palette or press the right mouse button in the Diagram. The functions are characteristic to the Diagram. The “Tools” Palette The Tools palette is dedicated to the selection of mouse operating modes (operating tools) required for the application design but also for debugging. The palette and the most frequently used tools are presented in Figure 1-11. If the “Automatic tool selection” button is not pressed, the selection of tools is made manually by pressing the button corresponding to the desired tool or by repeatedly pressing the “Tab” key. If the “Automatic tool selection” button is pressed, the selection is made automatically, depending on the cursor’s position relative to the objects on the screen. 12 Lab 1 Introduction Figure 1-10 The “Functions” palette Symbol Tool Automatic tool selection Operating tool Editing, positioning, and resizing tool Text-editing tool Connecting tool Samples-inserting tool Figure 1-11 “Tools” palette Lab 1 Introduction 13 Aligning, Distributing, and Resizing Objects In order to create a friendly interface, the objects from the panel must be aligned and uniformly distributed. This can be achieved manually, but it requires very meticulous and time-consuming operations. In addition, certain objects must be dimensioned to the same size. Such operations can be done with the help of the buttons situated on the instrument’s toolbox. Aligning objects Distributing objects Resizing objects Reordering objects Setting text features for objects Figure 1-12 Aligning, distributing, resizing, and reordering objects References P.A. Cotfas (2010), Prelucrarea semnalelor. Aplicatii in LabVIEW. Editura Lux Libris, Braşov, Romania. N. Kehtarnavaz & N. Kim, (2005), Digital Signal Processing System-Level Design Using LabVIEW. Elsevier/Newnes, Oxford, UK. D. Ursuţiu, (2001) Iniţiere în LabVIEW Programarea grafică în fizică şi electronic. Editura Lux Libris, Braşov, Romania. “NI LabVIEW Technical Resources,” http://www.ni.com/labview/technicalresources. (2010), “LabVIEW User Manual.” National Instruments, Austin, TX. 14 Lab 1 Introduction Exercise 1-1: Create your first Virtual Instrument in LabVIEW This example will introduce you to graphical programming. The goal is to show how easy is to program in LabVIEW. We will use simple arithmetical operations to solve a first-degree equation. Background A first-degree equation is also known as a linear equation. The form of the firstdegree equation is given by Equation (1): a⋅x+b =0 (1) where a, and b are the coefficients of the equation and x is the equation’s unknown. To find the solution to this equation, rewrite Equation (1) in the following form: x= −b a (2) The uniform rectilinear motion equation is a good example of an application that requires solving a first-degree equation: x = v0 t + x0 (3) where x is the actual position of the material point, v0 is the initial velocity, t is the actual time (we considered the initial time to be equal to zero), and x0 is the initial position of the material point. If we want to know the necessary time (t1) during which the material point moves in the x1 position, we can write x1 = v0t1 + x0 ⇒ v0t1 + x0 − x1 = 0 ⇒ at1 + b = 0 (4) where a=v0 and b=x0-x1. Solving Equation (4) gives the desired time. Building the LabVIEW VI From the start panel of the LabVIEW application (Figure 1-4) select the Blank VI option. This option will open two windows, the Panel and Diagram windows, as shown in Figure 1-5. This is an empty application and is called Untitled.vi. Lab 1 Introduction 15 For the purpose of better understanding how LabVIEW programming is done, it is recommended to arrange both windows in the “tile left and right” format, as in Figure 1-13. This option can be selected from the pull-down menu: Window»Tile Left and Right or by pressing the “CTRL+T” keys. Figure 1-13 The Panel and Diagram windows distributed in the tile left and right format Build your Panel as shown in Figure 1-14. Notice what happened in the Diagram. Figure 1-14 Building the Panel and Diagram for solving a first-degree equation For building this Panel, follow these steps: 16 Lab 1 Introduction a. Open the Controls Palette from the pull-down menu by selecting View»Controls Palette, or press the right mouse button in the Panel window. b. Select a Numeric Control from Express»Numeric Controls, place it on the Panel, and call it b (write the b character in the control label—the black area above the control that contains the “Numeric” word). c. Repeat the preceding step and call the new control a. d. Select a Numeric Indicator from Express»Numeric Indicators, place it on the Panel on the right side of the controls, and call it x. Notice that all three objects from the Panel have a corresponding object in the Diagram. Next, build the application Diagram as shown in Figure 1-15. Figure 1-15 The Diagram for solving a first-degree equation e. Activate the Diagram window by pressing the left mouse button inside of the Diagram window, or select the option Show Block Diagram from the pulldown menu: Window. f. Open the Functions Palette from the pull-down menu View, or press the right mouse button in the Diagram window. g. Select the Negate function from Express»Arithmetic & Comparison»Express Numeric (Figure 1-16) and place it in the Diagram window, as shown in Figure 1-15. h. Select the Divide function from Express»Arithmetic & Comparison»Express Numeric and place it in the Diagram window, as shown in Figure 1-15. Lab 1 Introduction 17 Figure 1-16 Navigating through the Functions palette i. Connect the b icon with the x terminal of the Negate function using the Connecting tool, : Pass over the b icon with the mouse pointer until this pointer takes the connecting tool form. When that happens, press the left mouse button once and move the mouse over the x terminal of the Negate function until the terminal starts blinking. Then press the left mouse button once. If the connection is successful, the wire will have an orange color. j. Connect all terminals as shown in Figure 1-15. When all the connections are successful, the application is finished. Running the application. k. Before running the application it is necessary to introduce the values for the equation coefficients a and b. For this, activate the Panel window by clicking on the left mouse button on the Panel window or by selecting Show Panel from the Window pull-down menu. Pass the mouse pointer over the b control in the . Press on the Panel window until the pointer takes the operating tool form, b control arrows until you receive the desired value. Repeat the operation for the a control. l. Run the application. Press the Run button from the toolbar, results shown in the x indicator. ; Notice the m. Change the values for the b and a, and run the application again. n. Save the application as “First-degree equation.vi” using the Save As option from the File pull-down menu. 18 Lab 1 Introduction Challenge 1. Adapt the application to implement Equation (4) to find the necessary time, t1, it takes the material point to move to the x1 position. 2. Modify the application to study the uniformly accelerated linear motion using Equation (5), which follows: 1 x = x0 + v0 ⋅ t + a ⋅ t 2 2 (5) where a is the acceleration. Graphical Programming As mentioned previously, programming in LabVIEW is very different from programming in one of the classical text-based programming languages. A LabVIEW program is very similar to a logical scheme in which graphical blocks are used instead of text. The Icons Graphical blocks in LabVIEW are called icons. There are several types of icons, such as (Figure 1-17), including Icons associated with objects from the panel which allow only data input or output in/from the program. Icons associated with the functions, which allow the application of simple or complex operations to the data. Icons associated with subVIs, which offer the possibility to modulate and encapsulate the programs (as with the procedures in the classical programming languages). Express icons, which are complex, superior-level VIs that include functions or other inferior-level VIs. Express VIs are very useful to non-programmers because they include a lot of functionality under one icon. The icons of these VIs have a blue background and can be enlarged. Express VIs can be configured either at the first call or by double clicking on them. Configuration is done by selecting parameters. For example, in the case of the express VI for spectral analysis, one can select the type of analysis that needs to be made, the type of window to be used, and so forth. Lab 1 Introduction Controls Icons Indicators 19 Description By the terminal type Icons associated with the objects from the panel By the data type Icons associated with the functions Icons associated with subVIs Express icons Figure 1-17 Icon types Visualization in the Diagram of a VI icon that is associated with a subVI can be made in several ways (Figure 1-18): as icon (limited), as icon extended, or as icon resized extended The icon background is yellow for subVIs and blue for express VIs. 20 Lab 1 Introduction Icon (default) VI Extended Resized Icon express Vis Extended (default) Resized Figure 1-18 Icons’ visualization modes Connecting the Icons Data transfer from one icon to another is made by using connecting wires. The connection is made using the connecting tool (see Figure 1-11). The color and shape of connecting wires differ based on the data type of the data source. Figure 1-19 presents some data types and some connecting wires used in LabVIEW. Wire type Scalar Vector 1D Vector 2D Color Numeric Orange (floating point), Blue (integer) Boolean Green Alphanumeric Pink Figure 1-19 Data types and the wires associated with them in LabVIEW The Data Flow LabVIEW is a programming language based on data flow that goes from left (controls) to right (indicators). Execution of each program node is conditioned by the node receiving all data from its input terminals. After the node is executed, the Lab 1 Introduction 21 data will be found at the output terminals of the node. The data flow in a LabVIEW program is presented in Figure 1-20. Figure 1-20 Data flow in LabVIEW Programming Structures Very much as in the classical programming languages, LabVIEW offers operators for repetitive, decisional, and sequential programming structures. The most wellknown repetitive programming structures are For and While, and decisional structures are If and Case. Programming structures are found in the “Structures” sub-palette (Figure 1-21). Figure 1-21 “Structures” sub-palette 22 Lab 1 Introduction The For Loop For is a repetitive structure that is finite and indexed (Figure 1-22). Code included inside the structure will be repeated N times, where N is the finite terminal loop counter (input) and i is the loop index terminal, which counts the number of iterations that have been executed (output terminal). The For loop is indexed, so all output data from the loop is stored as an indexed array. Figure 1-22 The For loop The While Loop The repetitive structure While is an infinite and non-indexed structure (Figure 1-23). Code that is included inside the While sequence will be repeated until the fulfillment of the stopping condition. The stopping condition logic may be one of the following: stop if true—the execution of the loop stops if the condition becomes true. continue if true—the execution of the loop is ended when the condition becomes false. The While loop is non-indexed; therefore, only values obtained at the execution of the last iteration are memorized. Figure 1-23 The While loop Lab 1 Introduction 23 The Case Structure The Case structure is a decisional structure that can work in two ways (Figure 1-24): 1. Similar to the If decisional structure from classical programming languages, if the “?” structure selector receives Boolean values. 2. Similar to the Case decisional structure from classical programming languages, if the “?” structure selector receives numeric integer values or controls such as “Ring” or “Enum.” The Case structure allows execution of a code variant (window) selected from several variants depending on the value received by the “?” selector. Figure 1-24 Case structure The Sequence Structure The Sequence structure allows sequential execution of code. Execution in sequences may be used to implement certain program logic, synchronization among several parts of the program, debugging, and the like. There are two types of Sequence structures in LabVIEW: 1. Flat sequence—the frames are displayed one after another for a better visualization of the code and data flow (Figure 1-25). 2. Stacked sequence—the frames are overlapped on top of each other. Selection of any of the frames is made by using the selector placed in the upper central part of the sequence. This structure is more compact but less visually clear than the flat sequence (Figure 1-26). The addition of a sequence frame is made by pressing the right mouse button against the sequence border and selecting Add Frame After or Add Frame Before. 24 Lab 1 Introduction Figure 1-25 Flat Sequence structure Figure 1-26 Stacked Sequence structure The Formula Node Structure The Formula Node structure is used for implementing mathematical formulas and expressions in text mode (Figure 1-27). The structure supports MATLAB script and code written in C. Figure 1-27 Formula Node structure The VI Icon and Connector Any LabVIEW VI can be used as a subVI in another LabVIEW application. SubVIs resemble procedures from classical programming languages. The major difference between the classical procedure and a subVI is that the subVI can be used as an independent application that does not need to include a call from another application. For a VI to be used as a subVI, the VI needs to have its own Icon and Connector. The icon is the VI graphical representation (Figure 1-28). Each LabVIEW VI has a default icon and connector associated with it. The user chooses whether he or she wants to customize these or not. The VI icon is displayed in the upper-right corner of the VI Panel or the VI Diagram. When using the VI as a subVI, its icon will be visible in the Diagram. Lab 1 Introduction 25 Figure 1-28 The icon of a VI The connector represents VI inputs and outputs using terminals (Figure 1-29). The number of terminals in a connector depends on the number of input controls and output indicators the VI has. The Execution of a VI Execution of an application is started by clicking the “Run” button from the toolbox or from the menu Operate»Run. The application will execute one time for each click on the Run button. Figure 1-29 The configuration of the connector If the application needs to run multiple times, click on the “Run Continuously” button. The application will run continuously in this case until you click the “Abort Execution” button (Figure 1-30). Run Run Continuously Abort Execution Pause Figure 1-30 Execution buttons in LabVIEW applications 26 Lab 1 Introduction Debugging Applications LabVIEW offers several debugging tools. The simplest verification of a VI is done by running the VI (i.e., clicking on the Run button). If the arrow representing the Run button is interrupted and is gray (Figure 1-32) the application has errors. In order to visualize these errors, you need to click on the “Run” button again. An error window will open and describe the errors in this application (Figure 1-31). Figure 1-31 The error window with the error list Another method for application debugging in LabVIEW is to execute the application in animation mode, by activating the “Highlight Execution” option (Figure 1-32). This option allows visualization of the application’s data flow (values that travel through the connecting wires). You can also use a Probe to visualize data in LabVIEW. The Probe is an indicator of data type corresponding to the investigated wire connection. The Probe is a method that allows for visualization of the data that passes through a wire during application execution. Probe activation can be made either by using the probe insertion tool “Probe Data” (Figure 1-32) or by pressing the right mouse button on the wire to be investigated and selecting the Probe option. Lab 1 Introduction List Errors—displays the list of errors in the application Highlight Execution—animated execution Probe Data—Probe insertion tool Set\Clear Breakpoint—application’s execution breaking points insertion tool Figure 1-32 Buttons for LabVIEW application’s execution 27 28 Lab 1 Introduction Exercise 1-2: Create and use a subVI When a certain task has been coded and will be used more than once in the same program or in other programs, it is a good idea to save that code as a subVI. Applications that use this subVI will be more easily understood. Build an application that simulates reading of a voltage from a source and then converts the voltage into Celsius or another temperature unit (Kelvin or Fahrenheit). Background Let us consider that we have a temperature sensor that gives out voltage that is proportional with the temperature on the Celsius scale. Conversion of the voltage value in Celsius temperature units can be done using Equation (6), which follows: t[ 0 C ] = U [V ] * a + b (6) Building the LabVIEW VIs The Voltage.vi Let us simulate the measurement of a voltage value that is an integer number in the range from 2.9 to 3.2. We will use the Random Number Generator (0-1) function, which generates random numbers in the interval from 0 to 1. If we multiply the generated random number by 0.3 and then add 2.9, the resulting value will be an integer number in the interval from 2.9 to 3.2. Figure 1-33 The Panel and Diagram for the Voltage.vi The following steps must be completed in order to build the Voltage.vi Panel and Diagram (Figure 1-33): a. Open a Blank VI from the start panel of the LabVIEW application. Lab 1 Introduction 29 b. Open the Controls Palette from the pull-down menu; select View or press the right mouse button in the Panel window. c. Select a Meter indicator from Express»Numeric Indicators, place it on the Panel, and name it Voltage. d. Activate the Diagram window by pressing the left mouse button inside the Diagram window or select the option Show Block Diagram from the pulldown menu Window. e. Open the Functions Palette from the pull-down menu View or press the right mouse button in the Diagram window. f. Select the Random Number (0-1) function from Express»Arithmetic & Comparison»Express Numeric and place it on the Diagram window. g. Place the Multiply and Add functions from Express»Arithmetic & Comparison»Express Numeric. h. Select the Numeric Constant function from Express»Arithmetic & Comparison»Express Numeric and place it twice on the Diagram (see Figure 1-33). i. Make all the necessary connections. j. Save the application as “Voltage.vi”. For building the VI icon, please perform the following steps: k. Double click (or right click and select Edit icon) on the icon located in the upper-left corner of the Panel window, and the Icon Editor window will appear (Figure 1-34). Figure 1-34 The Icon Editor window 30 Lab 1 Introduction l. Double click on the Select tool, , to select the entire icon and then press the delete key to erase the actual icon. m. Double click on the Rectangle tool, , to create the icon border. n. Select the Icon Text tab and in the Line1 text field write Voltage (Figure 1-35); then press the OK button. Figure 1-35 The Icon Editor window with Icon Text For building the connector, please go through the following steps: o. Right click on the icon and select Show Connector (Figure 1-36). If the pattern of the connector is not convenient, it is possible to select another pattern (Figure 1-29). Figure 1-36 The Show Connector selection p. Using the Wire tool, connect the right terminal with the Voltage indicator (Figure 1-37). Figure 1-37 Connector editing Lab 1 Introduction 31 q. Right click on the icon and select Show Icon. r. Run the application and see the indication on the Voltage indicator. Run button and see what happens on the Voltage continuously by pressing the indicator. Save the application. The Temperature.vi For this application we consider that the read voltage is proportional to the temperature in Kelvins. We use the following conversion equations for Kelvin scale (7), Celsius scale (8), and Fahrenheit scale (9): t[ K ] = U [V ] * a (7) t[ 0 C ] = U [V ] * a − 273.15 (8) t[ 0 F ] = (U [V ] * a ) *1.8 − 459.67 (9) a. Open a Blank VI from the start panel of the LabVIEW application. b. Select a Numeric Control from the Express»Numeric Controls palette, place it on the Panel, and call it Voltage. c. Select a Numeric Indicator from the Express»Numeric Indicators palette, place it on the Panel, and call it Temperature. d. Select a String Indicator from the Express»Text Indicators palette, place it on the Panel, and call it Scale. e. Extend the Controls palette as shown in Figure 1-38. => Figure 1-38 The extension of the Controls palette 32 Lab 1 Introduction f. Select the Enum control from the Modern»Ring & Enum palette (Figure 1-39), place it on the Panel, and call it Scale Select. Figure 1-39 The selection of the Enum control g. Edit the Enum control following the steps listed here: a. Right click on the Enum control. b. Select the Edit Items… option and introduce the items name in the Items field using the Insert button (Figure 1-40). The used names are Kelvin, Celsius, and Fahrenheit. c. Press the OK button. Figure 1-40 The items editing of the Enum control h. Arrange the panel of the VI as in Figure 1-41. Lab 1 Introduction 33 Figure 1-41 The panel for the temperature application i. Activate the Diagram window. Select the Case Structure from Express»Execution Control and make it a convenient size by pressing and holding the left mouse button and dragging the mouse to the desired size. j. Wire the Scale select icon with the Case selector, . Notice that the selector from the top of the case structure has changed and contains the Kelvin and Celsius options (press on the arrow of the Case structure to see the options). For activating the Fahrenheit option, right click on the case structure border and select the Add Case After option; the result should look like Figure 1-42. Figure 1-42 The case structure with Kelvin, Celsius, and Fahrenheit options k. Select the Kelvin option from the top of the case structure. Select the Multiply function and a Numeric Constant from Express»Arithmetic & Comparison»Express Numeric and place it into the Kelvin case structure. Assign the numeric constant a value of 100. l. Extend the function palette using the arrows, in the same manner as for Control palette. Select a String Constant from Programming»String (Figure 1-43) and place it into the Kelvin case structure. Write into String Constant the “K” value. 34 Lab 1 Introduction Figure 1-43 Selection of the String Constant m. Make the connections as in Figure 1-44. Figure 1-44 Connection of the Kelvin case structure Notice that where the wires pass the case structure border between the Temperature icon and the Multiply function, and between the Scale icon and the String Constant, two tunnels appear. These tunnels have white insides. This means that it’s necessary to connect the wires from all case structure windows. n. Build the following diagrams and make all the necessary connections as in Figure 1-45. Figure 1-45 The Celsius and Fahrenheit case structure windows Lab 1 Introduction 35 Notice that when all connections have been made, the tunnels are filled with color. o. Activate the Panel window. Run the VI with different values for Voltage control and select the desired scale from the Scale select control. p. Create the icon and the connector for this VI. q. Double click (or right click and select Edit icon) on the icon from the upperleft corner of the Panel window, and the Icon Editor window (Figure 1-46) will appear. Figure 1-46 The Icon Editor window r. Double click on the Select tool, , to select the entire icon and then press the delete key to erase the actual icon. s. Double click on the Rectangle tool, , to create the icon border. t. Select the Icon Text tab, and in the Line1 text field write Temp. In the Line2 text field write K C F (Figure 1-47). Then press the OK button. Figure 1-47 The Icon Editor window with Icon Text Build the connector by going through the following steps: 36 Lab 1 Introduction u. Right click on the icon and select Show Connector. If the pattern of the connector is not convenient, it’s possible to select another pattern (see Figure 1-29). v. Using the Wire tool, make the connections shown in the VI diagram in Figure 1-48 and in the Context Help window. Figure 1-48 Editing the Connector w. Right click on the icon and select Show Icon. x. Save the application as Temperature.VI and close the VI. The Temperature measurement.vi Using the two VIs developed previously, we will create an application that simulates the temperature measurements. a. Open a Blank VI from the start panel of the LabVIEW application. b. In the Diagram, choose Select VI… from the function palette. A file explorer window will open. Find the path to the first VI created in this example, Voltage Read.VI, and select it. Place this VI into the Diagram. c. Next, select the Temperature.VI and place it into the Diagram. d. Connect the Voltage output of the Voltage Read subVI with the Voltage input of the Temperature subVI. e. Create a control for the Scale Select input of the Temperature subVI by right clicking on the Scale Select terminal of the Temperature subVI and selecting the Create»Control option (Figure 1-49) from the pull-down menu. Lab 1 Introduction 37 Figure 1-49 The creation of a control from the Diagram f. Create the Temperature and Scale indicators. g. The VI Panel and Diagram are shown in Figure 1-50. Figure 1-50 The Panel and Diagram for Temperature measurements VI h. Save the VI as Temperature measurements.vi. i. Run the application. Change Scale select value and look at the Temperature and Scale indicators. 38 Lab 1 Introduction Exercise 1-3: Using the For and While loops Repetitive loops are very common programming techniques. The “For” and “While” loops are used in LabVIEW just as in text-based programming languages. Build an application that makes a finite number of temperature measurements and gives a graphical representation of the temperature values. Then change the application to monitor the temperature until a Stop button is pressed. The time interval between two measurements can be varied using a control (ex: 1s). Background The finite repetitive structure is called a For loop, and the infinite repetitive structure is called a While loop. Both structures have an index, which is a variable that keeps track of the number of iterations that the loop executes. The For loop has a Terminal Count control, which indicates the number of iterations that need to be executed. The While loop is stopped by a conditional (Boolean) terminal. A graph indicator will be used to give a graphical display for temperature measurements. This indicator can be found in the Express»Graph Indicators controls palette (Figure 1-51). Figure 1-51 The Graph Indicators palette Building the temperature measurement VIs This VI will execute a finite number of temperature measurements. a. Open a Blank VI and build the Panel in Figure 1-52. Lab 1 Introduction 39 Figure 1-52 The finite temperature measurements b. Select the Numeric Control from the Express»Numeric Controls palette, place it on the Panel, and call it No. of Measurements. Right click on this control, and from the opened pull-down menu select Representation»Long option, . This option changes the control into an integer numeric control. c. Select the Waveform Graph from the Express»Graph Indicators palette, place it on the Panel, and call it Temperature measurements. d. From the Express»Numeric Indicators palette select the Numeric Indicator, place it on the Panel, and call it Temperature. In the same manner create the Scale indicator from Express»Text Indicators»String Indicator. e. Arrange the controls and indicators on the Panel using the Aligning, Distributing, and Resizing Objects buttons (Figure 1-12) in the desired positions. f. Activate the Diagram window. Select the For loop structure from the extended Functions palette following the path Programming»Structures (Figure 1-53a). The mouse pointer becomes . Click and drag to create a For loop of the desired size, as shown in Figure 1-53b. g. Choose the Select VI… option from the function palette. A file explorer window will open. Find the path to the first VI created in this example, Voltage Read.VI, and select it. Place it inside the For loop. h. Repeat the previous step, this time selecting the Temperature.VI , and placing it inside the For loop. i. Connect the Voltage output of the Voltage Read subVI with the Voltage input of the Temperature subVI. 40 Lab 1 Introduction a) b) c) Figure 1-53 The For loop structure a) The path for the structure palette b) The drawing of the For loop c) The form of the For loop j. Move the Temperature indicator inside of the For loop using the Editing, positioning, and resizing tool. Make all the connections as shown in Figure 1-54 using the Connecting tool. Notice that the wire between the Scale indicator and the For loop tunnel is broken. This happens because the For loop is an indexed loop. This means that the tunnel output is of array type (i.e., it memorizes all data that arrives at the tunnel during execution time). To fix this problem, right click on the tunnel and select the Disable Indexing option from the opened pull-down menu (Figure 1-55). Figure 1-54 The Diagram of the finite temperature measurements Figure 1-55 Disabling the Indexing of the For loop structure Lab 1 Introduction 41 k. Return to the Panel window and set No. of Measurements to 20. Run the application and see the results. l. Save the VI as Finite Temperature Measurements.vi, and close it. The monitoring temperature VI Modify the Finite Temperature Measurements.vi using the following steps: a. Open the Finite Temperature Measurements.vi. b. Replace the Waveform Graph with a Waveform Chart. Right click on the Waveform Graph indicator and navigate to Replace»Express»Graph and select the Waveform Chart indicator. c. Add a numeric control and call it Delay. d. In the Diagram replace the For loop with the While loop. Right click on the For loop border and select the Replace with While Loop option from the popup menu. e. Delete the wires between Scale, Temperature measurements, and Temperature subVI. Using the Editing, positioning, and resizing tool select the desired wire (click, double click, or triple click) and press the DEL key. Move the Scale and Temperature measurements indicators inside of the While Loop and renew the connections. f. Delete the No. of Measurements control. Click on it and press the DEL key. g. Create the STOP button to stop the While loop. Right click on the Loop condition, , and choose the Create Control option from the pop-up menu. h. Select the Time Delay function from the Express»Execution Control palette and place it inside of the While Loop. Select the Time Delay (seconds) value and press the OK button. Move the Delay control inside of the While Loop and connect it with the Delay Time(s) input of the Time Delay icon. i. Return to the Panel window and select a value for Delay (ex. 1) and run the VI. j. Press the STOP control and notice what happens. k. Save the VI with the name Temperature Monitoring.vi and close it. 42 Lab 1 Introduction Exercise 1-4: Introduction to the NI-ELVIS II workstation The NI ELVIS II platform includes a suite of 12 virtual instruments in a compact form ideal for hands-on learning. By combining the NI ELVIS workstation with different boards and LabVIEW applications, the resulting platforms can be used for different disciplines, including Circuit design Control design, simulation, and mechatronics Digital electronics Microcontroller/embedded systems Telecommunications Renewable energy The NI ELVIS II workstation can be used with its own standalone software suite— the NI ELVIS Soft Front Panels (SFP) (Figure 1-56)—or it can be programmed from LabVIEW using the NI ELVIS express VIs (Figure 1-57). Programming the NI ELVIS II platform Exercise: Implement a voltage divider using the NI ELVIS II and the NI ELVIS SFP, and then build a digital thermometer using an LM335 sensor. Figure 1-56 The 12 virtual instruments Lab 1 Introduction 43 Figure 1-57 The LabVIEW NI ELVIS express VIs Background The voltage divider is a circuit that allows users to divide the input voltage into two parts (Figure 1-58). According to Kirchhoff’s second law, the output voltage, V2 across R2, is as follows: Vcc = V1 + V2 (10) V2 = Vcc − V1 (11) Equation (11) shows that the output voltage is a fraction of the input voltage. Using Ohm’s law we can find the expression of the output voltage: I1 = Vcc R1 + R2 V I2 = 2 R2 (12) But I1 =I2 because they are the same current—the current over the circuit. In this situation we obtain V2 Vcc = R2 R1 + R2 (13) 44 Lab 1 Introduction V2 = R2 Vcc R1 + R2 (14) Building the application a. First connect the NI ELVIS II workstation to your computer using the supplied USB cable. The box USB end goes to the NI ELVIS II workstation and the rectangular USB end goes to the computer. Turn on your computer and power up NI ELVIS II (switch on the back of workstation). The USB ACTIVE (orange) LED turns ON. In a moment, the ACTIVATE LED turns OFF and the USB READY (orange) LED turns ON. b. On your computer screen, click on the NI ELVISmx Instrument Launcher Icon or shortcut. A strip of NI ELVIS II instruments appears on the screen (Figure 1-56). You are now ready to take measurements. c. On the prototyping board build a voltage divider (Figure 1-58a) based on the circuit shown in Figure 1-58b. d. Connect the input voltage, Vcc, to the [+5 V] pin socket. e. Connect the common to the [GROUND] pin socket. f. Connect the external leads to the DMM voltage inputs [VΩ ] and [COM] on the side of the NI ELVIS workstation and the other ends across the R2 resistor. g. Check the circuit and power up the NI ELVIS II prototyping board (switch on the front of workstation, near the prototyping board). Verify that everything has been connected (the three power indicator LEDs, +15 V, –15 V, and +5 V, should now be lit and green in color). h. Start the DMM SFP and press the Run button. Notice the measured voltage. i. Stop the measurements by pressing the Stop button. Power down the prototyping board. Change the R2 resistor and repeat the measurement. Lab 1 Introduction 45 VCC XLV1 5V R1 5.6k Ω V COM A To DMM (VΩ ->-) R2 5.6k Ω To DMM (COM) a) b) Figure 1-58 The voltage divider a) The voltage divider on the NI ELVIS b) The NI Multisim voltage divider circuit design Build a thermometer using the DMM SFP To measure the temperature, a LM335 temperature sensor can be used. For this sensor the output voltage is proportional with the Kelvin temperature scale. The proportionality constant is 100. So, for calculation of the temperature from the measured voltage, use the following equation: t[ K ] = U [V ] *100 (15) a. Power down the prototyping board. Change the R2 resistor with an LM335 as shown in Figure 1-59. b. Start the DMM SFP and press the Run button. Notice the measured voltage. Multiply by 100 manually. The resulting value is temperature in the Kelvin scale. Use Equations (8) and (9) to obtain the temperature in the Celsius and Fahrenheit scales. c. Put your hand on the temperature sensor and notice the modification of the temperature. 46 Lab 1 Introduction V CC XLV1 5V R1 5.6k Ω V COM A To DMM (VΩ ->-) LM335 To DMM (COM) Figure 1-59 The LM335 temperature measurement circuit Build a thermometer using the DMM express VI in LabVIEW 1. Start the LabVIEW software 2. Open the Temperature Monitoring.vi. Modify the Diagram by following these steps: a. Navigate to Measurement I/O»NI ELVISmx and select the NI. ELVISmx Digital Multimeter express VI. Place it inside of the While Loop. The SFP will open (Figure 1-60). b. Delete the Voltage Read subVI and the connection wire between this subVI and the Temperature subVI. c. Stop the DMM by pressing the Stop button. d. Press the OK button and wait until the compilation of the VI is done. e. Connect the Measurement output of the digital multimeter with the voltage input of the Temperature subVI (Figure 1-61). Lab 1 Introduction 47 Figure 1-60 The DMM SFPPower up the prototyping board. Press the Run button and notice the measured voltage. f. Create the Scale select control. Right click on the Scale select input of the Temperature subVI and select the Create Control option. g. Activate the Panel window of the VI. h. Run the VI and see the measured temperature. Put your hand on the temperature sensor and notice the variation. i. Select another temperature scale from the Scale select control and see the values. j. Press the STOP button. Save the VI as Real Temperature Monitoring. 48 Lab 1 Introduction Figure 1-61 The Panel and Diagram of the Real Temperature Monitoring.VI Lab 1 Introduction 49 Challenge 1. Modify the Temperature Monitoring.vi to offer the option of choosing the temperature scale. 2. Build the circuit as shown in Figure 1-62 and measure the voltage. Notice that the voltage is different from that in the circuit shown in Figure 1-58b. Why? Find the new relation between the measured voltage and Vcc and R1, R2 and R3. Find the current value for the studied circuits, using Ohm’s law: I= U R (16) V CC XLV1 5V R1 5.6k Ω V COM A To DMM (VΩ ->-) R2 5.6k Ω R3 5.6k Ω To DMM (COM) Figure 1-62 The modified Voltage divider 3. Modify the Voltage divider circuit to allow measurement of the current using the DMM (Figure 1-63). V CC R1 10k Ω 5V XLV1 R2 10k Ω A To DMM (COM) COM V To DMM (A) Figure 1-63 The current-measuring circuit 50 Lab 1 Introduction Notes Lab 2 Introduction to Testing, Measurement, and Data Acquisition 51 Lab 2 Introduction to Testing, Measurement, and Data Acquisition Instructor’s Notes The lab exercises in this chapter introduce students to LabVIEW-based systems, but do not teach them all about LabVIEW programming. Primarily, LabVIEW is used as an instructor’s aid for developing lab exercises and lab setups that introduce students to testing, measurement, and data acquisition. The overall goal of the labs is to provide students with a general background in taking measurements for scientific and engineering applications. The LabVIEW programs, called virtual instruments or VIs, that accompany the labs allow the students to take measurements without learning a new complex tool, but they do not shelter students from the need to understand fundamental concepts, nor will they prevent errors that can occur with particular measurements. These lab exercises require the students to write (or only run) simple LabVIEW programs. Using these simple introductory exercises, the students will see how easy it is to program in LabVIEW, and they will learn the first steps to building and using simple computer-based instruments. Introduction The labs are organized into subject matter areas, each containing introductory sections entitled Instructor’s Notes, Goal, Required Components, and Background. These sections serve as a preview of the material students are expected to learn in the labs, along with providing the information they will need to complete the labs. If students have done some programming (even very simple programming) before performing these labs, they will get more out of writing their first LabVIEW program. If students have had no previous programming experience, LabVIEW can provide a very good introduction to programming. Visualizing the operation of a program graphically is easier for most people than looking at lines of textual code. As industry adoption of virtual instrumentation for measurement, control and design grows, hands-on training in this area is becoming essential for every engineering and science student. NI ELVIS and LabVIEW help us to incorporate Lab 2 Introduction to Testing, Measurement, and Data Acquisition 52 virtual instrumentation into the curriculum by providing multiple capabilities in one compact, affordable system. With this system, we can give a unique hands-on experience that will help students meet the design challenges they will face after graduation. Goal Students will begin to understand how to build and use computer-based instrumentation. The field of data acquisition (DAQ) and instrumentation encompasses a very wide range of activities. At its simplest level, it involves reading electrical signals into a computer from some form of sensor. In our case we discuss sensors or different devices that interact with NI ELVIS system. Often the data have to be analyzed or processed in some way in order to generate further signals for controlling external equipment or for interfacing to other computers. Required Components Component requirements and software application include: LabVIEW 2010 NI ELVIS II (or NI ELVIS II+) Application VIs DC motor Tachometer Background The National Instruments Educational Laboratory Virtual Instrumentation Suite (NI ELVIS) is a LabVIEW and computer-based design and prototyping environment. NI ELVIS consists of a custom-designed bench-top workstation, a prototyping board, a multifunction data acquisition device, and LabVIEW-based virtual instruments. This combination provides an integrated, modular instrumentation platform that has similar functionality to the DMM, oscilloscope, function generator, and power supply found on the classical laboratory workbench. The development of PC-based data acquisition and control systems using LabVIEW 2010 and NI ELVIS II has revolutionized the way lab work is performed in research establishments, industry, and many educational institutions. Lab 2 Introduction to Testing, Measurement, and Data Acquisition 53 Data acquisition using the computer is now routine; many labs have been set up for complete experiment operation under software control, and today's graduating science and engineering students must be familiar with the concepts and techniques of computerized laboratories. Students need to acquire communication, teamwork, and project skills to be prepared for today's team-based work environment in science and industry. In addition, students need instruction in modern instrumentation, including both plugin data acquisition (DAQ) boards and computer-controlled, standalone instruments. For years, LabVIEW users have found that they can develop applications four to ten times faster than with traditional programming languages. As new technologies have rapidly emerged, LabVIEW has taken advantage of them in a way that users could easily exploit. Now we can add to this the advantages offered by the new NI ELVIS II and NI ELVIS II+ systems. Nowadays, NI ELVIS II and the latest release of LabVIEW 2010 offer a recognized universal platform for education. The aim of any measuring system is to obtain information about a physical process and to find appropriate ways to present that information to an observer or to other technical systems. With electronic measuring systems the various instrument functions are realized by means of electronic components or, in some cases, by virtual instruments (VIs) developed in LabVIEW. A measuring system may be viewed as a transport channel for the exchange of information between measurement objects (in our case sensors or different devices that interact with the NI ELVIS system) and target objects (see Figure 2-1). Three main functions may be distinguished in this structure: data acquisition, data processing, and data distribution, which are described as follows: Data acquisition involves acquiring information about the measurement object (or objects) and converting it into electrical measurement data. More than one phenomenon may be measured, or different measurements may be made at different points, simultaneously, requiring multiple inputs. Data processing involves processing, selecting, or otherwise manipulating measurement data according to a prescribed program. Often a processor or a computer is used to perform this function; in our case, LabVIEW (or NI ELVIS instruments) do this job inside the computer system. Data distribution is the process of supplying of measurement data to the target object. If there are multiple outputs, several target instruments may possibly be present, such as a series of control devices in a process control. In some cases 54 Lab 2 Introduction to Testing, Measurement, and Data Acquisition these targets can be the direct educational results of measurements and process control. Measurement Object Data Acquisitio Data Processin Data Distributi Target Object Figure 2-1 Measuring system structure The entire NI ELVIS system is built on top of National Instruments’s LabVIEW software and hardware and has three main components, as shown in Figure 2-2 and described in the following list: ELVIS software on the PC provides a graphical interface for several electronic instruments. These instruments are discussed in detail throughout the remainder of this guide. The PC connects to the bench-top workstation through the data acquisition board located inside the NI ELVIS II system. This board has both analog and digital input and output lines. The bench-top workstation provides electrical connections for the user to interface with circuits. These provide inputs and outputs for the virtual instrumentation provided by the NI ELVIS software. There is a prototyping board (breadboard) on the top of the workstation with several holes connected through to the data acquisition board. There is also a front interface on the workstation with controls for a few select instruments. Hands-on learning of the kind made possible by NI ELVIS and LabVIEW allows students to achieve what experts call “authentic learning.” “Authentic learning situates students in learning contexts where they encounter activities that involve problems and investigations reflective of those they are likely to face in their real world professional contexts” (Brown, Collins, & Duguid, 1989; Lave & Wenger, 1991). Herrington and Oliver (2000) have identified nine characteristics of authentic learning: 1. Authentic contexts that reflect the way the knowledge will be used in real life 2. Authentic activities that involve complex, ill-defined problems and investigations 3. Access to expert performances enabling modeling of processes 4. Multiple roles and perspectives providing alternative solution pathways Lab 2 Introduction to Testing, Measurement, and Data Acquisition 55 5. Collaboration allowing for the social construction of knowledge 6. Opportunities for reflection involving metacognition 7. Opportunities for articulation to enable tacit knowledge to be made explicit 8. Coaching and scolding the teacher at critical times 9. Authentic assessment that reflect the way knowledge is assessed in real life All of these are well evidenced in our NI ELVIS—LabVIEW context examples. NI ELVIS, connected with LabVIEW and running on one computer, offers to the learner a recognized platform for testing, measurement, and data acquisition. Figure 2-2 The NI ELVIS II Station References Bogdan, M., Panu, M., & Viorel, A. (2007). “Teaching Data Acquisition on a Virtual Laboratory,” The 4th Balkan Region Conference on Engineering Education, ISSN 1843-6730, 12–14 July, Sibiu, Romania. Brown, J.S., Collins, A., & Duguid, P. (1989). “Situated Cognition and the Culture of Learning.” Educational Researcher, 18(1), 32–42. Cerna, M., & Harvey, A.F. (2000). “The Fundamentals of FFT-Based Signal Analysis and Measurement.” National Instruments, Application Note 041. Herrington, J., & Oliver, R. (2000). “An Instructional Design Framework for Authentic Learning Environments.” Educational Technology Research and Development, 48(3), 23–48. 56 Lab 2 Introduction to Testing, Measurement, and Data Acquisition Lave, J., & Wenger, E. (1991), “Situated Learning: Legitimate Peripheral Participation.” Cambridge University Press, Cambridge, UK, Lab 2 Introduction to Testing, Measurement, and Data Acquisition 57 Exercise 2-1: Analog-digital converter resolution Data acquisition systems, as the name implies, are products and/or processes used to collect information to document or analyze some phenomenon. In the simplest form, a technician logging the speed of one DC motor on a piece of paper is performing data acquisition. As technology has progressed, this type of process has been simplified and made more accurate, versatile, and reliable through the use of electronic equipment. Equipment ranges from simple recorders to sophisticated computer systems. Data acquisition products serve as a focal point in a system, tying together a wide variety of products, such as sensors that indicate temperature, flow, level, or pressure. Some common data acquisition terms are shown in the following list (italics indicate how students will encounter these terms in the NI ELVIS II system): Analog-to-digital converter (ADC) (an electronic device that converts analog signals to an equivalent digital form. The analog-to-digital converter is the heart of most data acquisition systems). Like AI0 to AI7 on the NI ELVIS II Prototyping Board. Digital-to-analog converter (D/A) (an electronic component found in many data acquisition devices that produces an analog output signal). Like Analog Outputs AO0 and AO1 in the NI ELVIS II system. Digital input/output (DIO) (refers to a type of data acquisition signal. Digital I/Os are discrete signals that represent one of two possible states. These states may be on/off, high/low, 1/0, and so forth. Digital I/Os are also referred to as binary I/O). Like DIO 0 to DIO 23 in the NI ELVIS II system. Differential input (refers to the way a signal is wired to a data acquisition device. Differential inputs have a unique high and unique low connection for each channel. Data acquisition devices have either single-ended or differential inputs, and many devices support both configurations.) Like AI0+ and AI- on the NI ELVIS Prototyping board. Single-ended input (SE) (refers to the way a signal is wired to a data acquisition device. In single-ended wiring, each analog input has a unique high connection, but all channels share a common ground connection. Data acquisition devices have either single-ended or differential inputs. Many support both configurations). Resolution (refers to the smallest signal increment that can be detected by a data acquisition system. Resolution can be expressed in bits, in proportions, or in percent of full scale. For example, a system can have a 12-bit resolution, one part in 4,096 resolution, or 0.0244 percent of full scale). 58 Lab 2 Introduction to Testing, Measurement, and Data Acquisition Sample rate (the speed at which a data acquisition system collects data. The speed is normally expressed in samples per second. For multi-channel data acquisition devices, the sample rate is typically given as the speed of the analog-to-digital converter (A/D). To obtain an individual channel sample rate, you need to divide the speed of the A/D by the number of channels being sampled.) Interfaces: GPIB, Serial (RS232, RS485), USB, and so forth. NI ELVIS II uses USB for the PC connection. Using the Analog_Digital_Resolution.VI (see Figure 2-3), the student can practice and better understand the ADC resolution. Figure 2-3 Front panel and block diagram for Analog_Digital_Resolution.VI application Lab 2 Introduction to Testing, Measurement, and Data Acquisition 59 Exercise 2-2: Sampling rate (Nyquist rate) The analysis of real-world signals is a fundamental problem for many engineers and scientists, and especially for electrical engineers, since almost every real-world signal (see the case of different types of sensors) is changed into electrical signals. The sampling frequency determines the quality of the analog signal that is converted and analyzed. Higher sampling frequency achieves better conversion of the analog signals. The minimum sampling frequency required to represent the signal should be at least twice the maximum frequency of the analog signal under test (this is called the Nyquist rate). If the sampling frequency is equal to or less than twice the frequency of the input signal, a signal of lower frequency is generated from such a process (this is called aliasing). In the following virtual instrument Nyquist_Aliasing.vi (Figure 2-4), an example of sampling is shown. Students can study Nyquist_Aliasing.vi: and verify the following concepts using the Nyquist theorem: Sampling rate (fs)>2 * highest frequency component (of interest) in the measured signal Nyquist frequency: the highest frequency component allowed to avoid aliasing for a given sampling frequency Effects of various sampling rates when sampling a sine wave of frequency f If a signal is sampled at a sampling rate smaller than twice the Nyquist frequency, false lower frequency component(s) appear in the sampled data (spectrum). This phenomenon is called aliasing 60 Lab 2 Introduction to Testing, Measurement, and Data Acquisition Figure 2-4 Front panel and block diagram of Nyquist_Aliasing.vi application Lab 2 Introduction to Testing, Measurement, and Data Acquisition 61 Exercise 2-3: Simple NI ELVIS control application For this exercise the student can build a simple control system (see Figure 2-5). The following components are required: DC motor (we used a solar kit DC motor with operating voltage 1. 2 V, and operating current 55 mA). One Beckman DC tachometer (6.5 V at 1000 RPM). Figure 2-5 DC Motor connected to the DC tachometer Flexible connection between the motor and the tachometer. This system is presented in Figure 2-5 and can be connected to the NI ELVIS system: The DC motor can be controlled directly by the variable power supply (VPS). The output of the tachometer can be connected to the digital multimeter (DMM) and also to the analog input AI0 (use the NI ELVIS Scope). The final measurement system is presented in Figure 2-6. The student can regulate the motor speed and measure the rotation with the DMM and visualize the signal (and measure it) with the NI ELVIS Scope connected at the AI0. In Figure 2-7 we can see the PC desktop. The following observations apply: The NI ELVISmx Instrument Launcher is at the top of the picture. 62 Lab 2 Introduction to Testing, Measurement, and Data Acquisition Figure 2-6 Measuring system built on NI ELVIS II From the Instrument Launcher the student must start the variable power supply (on the left side of the picture). In addition, the student can launch the NI ELVIS Scope (in the center of the picture) and/or the digital multimeter (right side of the picture). Figure 2-7 The NI ELVIS control and measure system (VPS, Scope, and DMM) Lab 2 Introduction to Testing, Measurement, and Data Acquisition 63 Challenge We presented one conventional method of measuring RPM using a device called a tachometer, which can precisely measure the speed of up to thousands of RPM. There are specifically two types of tachometers— “contact” and “non-contact” tachometers. The contact tachometer is physically attached to the motor shaft (as in our case), thereby reducing the speed and providing an inaccurate RPM reading. The non-contact tachometer utilizes a brightness sensor that detects rotations. For instance, when a motor spins with a black-and-white disc attached to the shaft, the tachometer flashes the rotating disc with an LED and can “see” the varying light reflection, from light to dark, through its brightness sensor. A chip measures the time for a light-to-dark-to-light progression and thus the RPM speed. Students can modify the laboratory exercise and make a new project to build a noncontact tachometer. It is important to be able to interpret the speed of a DC motor besides using RPM units, because as you learn more about electronic technology you will likely come across a different unit of speed for the DC motor. The internationally accepted metric unit for angular velocity is radian per second (rad/s). RPM and rad/s are both used to measure the same thing. In order to convert RPM to rad/s, multiply the RPM by 0.10472(π/30). To convert rad/s back to RPM, multiply the rad/s by 9.54929(30/π). Students can develop the LabVIEW virtual instrument directly to make this conversion when they measure the motor speed. 64 Lab 2 Introduction to Testing, Measurement, and Data Acquisition Notes Lab 3 Interfacing Basic Sensors 65 Lab 3 Interfacing Basic Sensors Instructor’s Notes For measurements, first of all it’s necessary to have a way to convert the physical quantities into electrical quantities that can be digitized using data acquisition systems. Sensors are used for this kind of conversion. Using the NI ELVIS system, many sensors can be studied in order to understand the control and the functionality of the sensors and to determine the sensors’ parameters. Figure 3-1 The NI ELVIS II system used for the study of sensors Goal This lab illustrates how LabVIEW and NI ELVIS II can be used for studying different kinds of sensors (see Figure 3-1). For this lab, a light sensor and a dualaxis accelerometer are used. Required Components The following components and software applications are required: LabVIEW 2010 66 Lab 3 Interfacing Basic Sensors NI ELVIS II platform and NI ELVIS drivers TSL230R—light-to-frequency converter from Parallax, Inc. Memsic 2125—dual-axis accelerometer from Parallax, Inc. Mobile prototyping board Protractor Two 220 Ω resistors Background In the manufacturing process (automation, control, etc.), it is necessary to replace the human senses with systems that serve as extensions to the human senses. These systems are called “sensors.” The sensors allow us to be in direct contact with a phenomenon and to perceive its evolution . Generally, the main role of a sensor is to convert a stimulus (physical, chemical, etc.) into an electrical signal that can be measured by electronic equipment. Sensors can be classified according to their stimulus domains. There are six such domains [S. Soloman 1998]: Radiant signal domain Mechanical signal domain Thermal signal domain Electrical signal domain Magnetic signal domain Chemical signal domain Further classification can be made based on whether the sensor uses an additional external energy source. According to this criterion, there are two kinds of sensors: passive and active. The passive sensors do not require any additional energy source. These sensors transform the input signal (stimulus) directly into the electrical output signal (e.g., thermocouple, photocell). On the other hand, the active sensors need an external energy source for their normal functionality. The additional external energy is modified depending on the stimulus to produce the electrical output signal. Sensors can also be classified into absolute and relative sensors. If the response of the sensors doesn’t need any other references, the sensors are absolute ones; if the response of the sensors is dependent on the external references (e.g., atmospheric Lab 3 Interfacing Basic Sensors 67 pressure for pressure sensors, environmental temperature for thermocouples, etc.), the sensors are relative ones. Light Sensors Light measuring and monitoring are very important for a large number of domains. From public lighting to optical-fiber communication, many industries use light sensors. Light sensors include photoresistors, photodiodes, phototransistors, and solar cells, among others. In this lab we will test a light sensor, TSL230R, which is slightly different from other sensors because it converts light intensity into frequency. The TSL230R Light Sensor The TSL230R light sensor is used for light-intensity measurement and is produced by Texas Advanced Optoelectronic Solutions, Inc. (TAOS). This sensor measures the light intensity that falls on its surface using an array of silicon photodiodes. The measured value of light intensity is converted into a square wave using a current-tofrequency converter. The frequency of the output wave is proportional to the measured value. The photodiodes and the converter are integrated into a single CMOS chip with a PDIP-8 package. The TSL230R sensor comes in three versions: TSL230R−LF, TSL230AR−LF, and TSL230BR−LF, with different absolute-output-frequency tolerances (±5%, ±10%, and ±20, respectively). Because all inputs and outputs are TTL compatible, this sensor can be easily integrated with a microcontroller. The functional diagram is presented in Figure 3-2: Output Light Photodiodes array Current – to – Frequency Converter S1, S2 S2, S3 OE Figure 3-2 The functional diagram of the TSL239R-LF The S0 and S1 inputs represent the sensitivity select inputs, and S2 and S3 represent the scaling select inputs of the output frequency. Table 3.1 and Table 3-2 show the selectable options for S0, S1 and S2, S3 inputs. 68 Lab 3 Interfacing Basic Sensors Table 3-1 Sensitivity selection S1 S0 0 0 0 1 1 0 1 1 Sensitivity Off x1 x10 x100 Table 3-2 Frequency scaling selection S3 0 0 1 1 S2 0 1 0 1 Divide output by 1 2 10 100 The TSL230R Connection Figure 3-3 shows the TSL230R-LF test connection on the NI ELVIS II prototyping board. The connection is based on the diagram shown in Figure 3-4. Figure 3-3 The NI ELVIS II prototyping connection of the TSL230R sensor To demonstrate the TSL230R functionality, the S0-S3 inputs were connected to the digital input/output channels (DIO0-DIO3). Using these channels the TSL230R can be configured according to Table 3.1 and Table 3-2. Lab 3 Interfacing Basic Sensors 69 Figure 3-4 The TSL230R connection diagram Accelerometers Acceleration is the rate of velocity change over time. It is a vector characterized by magnitude and direction. The acceleration measurement unit in the SI is meters per second squared (m/s2). Often, the acceleration is quantified in terms of g-force (g is the acceleration measure for gravity, and is equal to 9.81 m/s2) The accelerometer sensor measures the proper acceleration experienced by an object that has the sensor attached. Therefore, an accelerometer is an electromechanical device that measures acceleration forces. One can distinguish two types of acceleration forces: static forces, which are the gravitational forces and dynamic forces, which are caused by the movement or vibration of the object. Using an accelerometer sensor, movement, tilt, collision, static and dynamic acceleration, rotation, and vibration can all be measured. The structure of an accelerometer is based on a mass damped by a spring. When acceleration occurs, the mass is displaced until the spring compensates for the acceleration. By measuring the displacement, the acceleration can be determined. Based on the types of sensing elements and the principles of their operation, accelerometers can be classified as follows: Capacitive accelerometers Piezoelectric accelerometers Piezoresistive accelerometers Hall-effect accelerometers Magnetoresistive accelerometers Heat transfer accelerometers Today’s accelerometers are based on the MEMS (Micro Electro-Mechanical Systems) technology. This technology allows manufacturers to decrease the 70 Lab 3 Interfacing Basic Sensors dimensions of the sensors to allow for their use in different kinds of applications (e.g., medical, transportation, navigation, and electronics). Important accelerometer specifications include [Introduction to Accelerometers]: Communication—represents the output type (analog or digital). determined by the hardware that is interfacing with the accelerometer. Number of axes—represents the number of directions in which the acceleration can be measured (two axes or three axes). Dynamic range—represents the maximum amplitude that the accelerometer can measure. Typically it is specified in g. Frequency response—represents frequency range where the output of the accelerometer is within a specified deviation (typically +/– 5%). This specification is dependent on the mass, the piezoelectric properties of the crystal, and the resonance frequency of the case. Noise—depends on the sensor electronics (amplifying circuit). Resonance frequency—represents the frequency at which the sensor resonates. In order to avoid this situation, the measurement frequency must be below the resonance frequency of the accelerometer. Sensitivity—represents the variation of the output depending on the force. For the accelerometers with the output as voltage, the sensitivity is given in mV/g. It is Notice: For good results in measurements, the mass of the accelerometers should be significantly smaller than the mass of the system to be monitored. Memsic 2125 Accelerometer The Memsic 2125 (Mx2125) is a dual-axis low-cost thermal accelerometer with a dynamic range of ±3 g. This sensor is provided by Memsic as a surface-mount product, and Parallax mounts it on a PCB, providing all I/O connections in 6-pin DIP package format (Figure 3-5). Lab 3 Interfacing Basic Sensors 71 Figure 3-5 Memsic 2125 dual-axis accelerometer Memsic 2125 Operation The Mx2125 contains a gas chamber with a centered heater and four temperature sensors distributed on each chamber wall. The operation mode of the device is based on heat transfer by natural convection. When the accelerometer is in the horizontal position, the heated gas rises to the top-center of the chamber and the temperature gradient is symmetrical; therefore, the sensors will measure the same temperature. When the accelerometer is tilted, the temperature profile is disturbed and the temperature gradient will be asymmetrical. By measuring the temperature difference between sensors, the acceleration can be detected. The temperature difference between the two pairs of sensors is converted into an output pulse signal for the two axes (Figure 3-6). Figure 3-6 The Memsic 2125 output signal The Mx2125 output signal is a 100 Hz PWM duty cycle signal in which acceleration is proportional to the ratio T1/T2. With 5 V input voltage and zero g, the output is fixed at a 50% duty cycle, and the sensitivity scale factor is set to a 12.5% duty cycle change per g. T2 represents the pulse duration (10 ms, 100 Hz), and T1 depends on the acceleration (at zero g T1 is 50% of T2). To determine the acceleration, Equation (17) must be used. 72 Lab 3 Interfacing Basic Sensors a ( g ) = (T 1 T 2 − 0.5) 12.5% (17) where a(g) is the acceleration. Using the information from the “An-00mx-007” Memsic application note, the sensor output can be converted into angle units. The relationship between the acceleration output and the angle, according to Figure 3-7, is ⎧a x = g sin (α ) ⎨ ⎩a y = g sin (β ) (18) where ax and ay represent the acceleration on X and Y axes measured by Mx2125, g is the gravity acceleration, and α, β are the inclination angles. To determine the angle value, it is necessary to apply the inverse sine function to Equation(s) (18): ⎧ −1 ⎛ a x ⎞ ⎛ ax ⎞ ⎪⎪α = sin ⎜⎝ g ⎟⎠ = arcsin⎜⎝ g ⎟⎠ ⎨ ⎪β = sin −1 ⎛⎜ a y ⎞⎟ = arcsin⎛⎜ a y ⎞⎟ ⎪⎩ ⎝ g⎠ ⎝ g⎠ (19) ⎧ −1 ⎛ a x ⎞ ⎛ ax ⎞ ⎪⎪α = sin ⎜⎝ g ⎟⎠ = arcsin⎜⎝ g ⎟⎠ ⎨ ⎪β = sin −1 ⎛⎜ a y ⎞⎟ = arcsin⎛⎜ a y ⎞⎟ ⎪⎩ ⎝ g⎠ ⎝ g⎠ (20) or if ax and ay are taken in g units. This configuration can be used in applications that don’t require an inclination angle greater than ±600, because for inclination angles greater than 600, very few changes will appear at the accelerometer outputs (because of the sine function). Lab 3 Interfacing Basic Sensors MX 73 MX y x y x g g Figure 3-7 The two axes’ inclination sensing from horizontal Memsic 2125 Connection Figure 3-8 shows the Mx2125 accelerometer connection to the NI-ELVIS II prototyping board based on the connection diagram shown in Figure 3-9. Figure 3-8 The NI ELVIS II prototyping connection of the Memsic 2125 sensor Figure 3-9 The Memsic 2125 connection diagram 74 Lab 3 Interfacing Basic Sensors The three Mx2125 outputs are connected to the analog input channels, as follows: Y out is connected to AI 0+, X out is connected to AI 1+, and Temp output is connected to AI 2+. AI 0–-, AI 1– and AI 2– are connected to the ground. Y out and X out are connected to the AI channels via two 220 Ω resistors. The input voltage is connected to the +5V power, and the ground (pins 3 and 4) is connected to the GND. References “An-00mx-007 Application Note” from Memsic Inc., http://www.memsic.com. J. Fraden (2004) Handbook of Modern Sensors: Physics, Designs, and Applications. Springer-Verlag, New York. “Introduction to Accelerometers,” http://www.omega.com/prodinfo/accelerometers.html. “MXD2125G&M Application Notes” from Parallax, Inc,, http://www.parallax.com. S. Soloman (1998) Sensors Handbook, McGraw-Hill, New York. “TSL230 Datasheet” from Parallax, Inc,, http://www.parallax.com/. Lab 3 Interfacing Basic Sensors 75 Exercise 3-1: Using the TSL230R sensor This exercise about using the TSL230R-LF focuses on understanding its functionality and configuration according to Table 3-1 and Table 3-2. We will use the NI ELVIS II virtual instruments. Figure 3-10 The Digital Writer instrument panel 1. Build the testing circuit shown in Figure 3-3. 2. Power on the NI ELVIS II system and the prototyping board. 3. Start the NI ELVIS II Instrument Launcher. 4. Launch the Digital Writer instrument. Use this instrument to select the status of the S0-S3 inputs (Figure 3-10). 5. Set the DIO0-3 lines according to Table 3.1 and Table 3-2. As one can see from Figure 3-10, the sensitivity is fixed at x1 value (S0→DIO0 = 1 and S1→DIO1 = 0), and the frequency scaling is divided by 10 (S2→DIO2 = 0 and S3→DIO3 = 1). 6. Start the Oscilloscope instruments from the NI ELVIS II Instrument Launcher. Choose the AI0 option for Source and the 2 V value for Scale of the Channel 0 Settings. 7. Notice the obtained values shown in Figure 3-11. Using the sensor responsitivity given in the manufacturer’s datasheet, the irradiance level can be determined [TSL230 Datasheet]. 76 Lab 3 Interfacing Basic Sensors 8. Using a pyranometer such as the Daystar Solar Meter and a light source with adjustable distance from the sensor, its response can be calibrated (Figure 3-12). Figure 3-11 The Oscilloscope instrument panel Figure 3-12 The TSL230R sensor on NI ELVIS II Lab 3 Interfacing Basic Sensors 77 Exercise 3-2: Using the Mx2125 accelerometer The goal of the first exercise with the accelerometer is to understand the functionality of the Mx2125. This exercise focuses on visualizing the output signals of the sensor and the signal modification when the accelerometer is tilted. 1. Implement the testing circuit shown in Figure 3-8 on the NI ELVIS II prototyping board. 2. Power on the NI ELVIS II system and the prototyping board. 3. Start the NI ELVIS II Instrument Launcher. 4. Launch the Oscilloscope instrument (Figure 3-13). Figure 3-13 The Oscilloscope instrument panel 5. Enable Channel 1 using the Enable control. 6. Select AI0 for Channel 0 Source and AI 1 for Channel 1 Source. 7. Set the Scale Volts/Div at the 1 V option for both channels. 8. Choose the 2 ms option for Timebase. 78 Lab 3 Interfacing Basic Sensors 9. Press the Run button and visualize the signals. 10. Tilt the NI ELVIS platform on each axis one at a time and notice the modification in the signal. 11. Activate the cursors using the Cursors On control. 12. Set both cursors on CH 0 or CH 1. Move the cursors in a convenient position to measure the period of the signal, T2, and then move again to measure the T1 time. Calculate the acceleration using Equation (17) for different tilting positions of the NI-ELVIS platform. Lab 3 Interfacing Basic Sensors 79 Exercise 3-3: Mx2125 LabVIEW programming The second exercise with the accelerometer focuses on learning how to program the Memsic 2125 in LabVIEW. For this experiment the same connection will be used, but a mobile prototyping board and a protractor, as shown in Figure 3-14, will also be used. Figure 3-14 The setup for one axis tilting of MX2125 1. To build the setup shown in Figure 3-14. Create a “U” type holder using two 15x0.5x2 cm aluminum flat bars and a 6 cm square made of melamine PAL. On the top of the holder, insert a mobile cross bar for anchoring the mobile prototyping board. Lab 3 Interfacing Basic Sensors 80 Fix the protractor on the mobile cross bar axis in a convenient manner, and fix the positioning gear on the opposite side. Place Mx2125 on the mobile prototyping board. Make the sensor connections for power and output to the NI ELVIS prototyping board. For a feedback check that you can place a bubble level on the mobile prototyping board. 2. Start the NI LabVIEW software and build the application shown in Figure 3-15 and Figure 3-16. Figure 3-15 The Memsic 2125 v1.vi panel Lab 3 Interfacing Basic Sensors 81 Figure 3-16 The Memsic 2125 v1.vi diagram 3. Place in the diagram the NI ELVISmx Oscilloscope express VI from Function»Measurement I/O»NI ELVISmx. 4. Create controls for Channel 0, Channel 1, Device Name, Horizontal, Trigger, and a graph indicator for visualizing the measured signals. 5. Place in the diagram the Pulse Measurements VI from Function»Signal Processing»Waveform Measurement. 6. Create indicators for period, pulse duration, and error out outputs. With the pulse number (1) control one can set up the number of cycles for signal processing to determine the period (T2) and the pulse duration (T1). 7. Using T2 and T1 values, the acceleration values can be calculated using Equation (17). The implemented version of Equation (17) is a ( g ) = (T 1 T 2 − 0.5) * 8 (21) 8. To implement Equation (21), the Divide, Subtract, and Multiply functions from Arithmetic & Comparison»Express Numeric are used. 9. Power on the NI ELVIS II system and the prototyping board. 82 Lab 3 Interfacing Basic Sensors 10. Run the application and visualize the signals. Place the prototyping board in a horizontal position and notice the acceleration values. 11. Tilt the prototyping board once every five degrees using the protractor and record the acceleration values in Table 3-3. Using the recorded values, the sensor can be calibrated in angle units. What kind of dependencies are obtained? For more details consult the Memsic application notes [MXD2125G&M Application Notes] [An-00mx-007 Application Note]. Table 3-3 Dependence of acceleration versus angle Angle α [0] –90 –85 –80 … 0 … 80 85 90 Acceleration [g] Lab 3 Interfacing Basic Sensors 83 Exercise 3-4: Circular level using Mx2125 Based on the application built in Exercise 3-3:, in this experiment a circular level will be developed. 1. Start the LabVIEW software. 2. Build the setup shown in Figure 3-17 as follows: a. Remove the mobile prototyping board from the “U” type holder shown in Exercise 3-3: and dispose of the holder. b. Leave the same connection between the mobile prototyping board and the NI ELVIS prototyping board. Figure 3-17 The circular level setup 3. Start the NI LabVIEW software and modify the Memsic 2125 v1.vi as in Figure 3-18 and Figure 3-19. 4. In the Panel, the 2D Picture, Horizontal Pointer Slide, and Vertical Pointer Slide are used. 84 Lab 3 Interfacing Basic Sensors 5. In the Diagram, the Draw Circle by Radius VI, Inverse sine, and Index Array functions are used. 6. In order to calculate the center of 2D Picture indicator, the Draw Area Size property node is used. Right click on 2D Picture and from the pull-down menu select the option: Create»Property»NodeDraw Area Size. 7. For the Inverse Sine output conversion, from radians into degrees, Equation (22) is used: α (0 ) = α (rad ) ⋅180 0 π (22) 8. For picture representation, the calculated angles must be converted in pixels. For this, Equation (23) is used: DAS *Γ 2 PC = 90 0 () 0 + DAS 2 (23) where PC is Pixel Center, DAS is Draw Area Size of the 2D Picture, and Γ(0) is the cluster of the α and β angles. 9. Save the application with the Circular level name. 10. Power on the NI ELVIS II system and the prototyping board. 11. Run the application and tilt the mobile prototyping board on both X and Y axes. Notice the movement of the blue circle inside of the 2D Picture. When the mobile prototyping board is in the horizontal position, the blue circle must be inside of the green circle. When the mobile prototyping board is in the vertical position, the blue circle must be on one of the borders of the 2D Picture. Lab 3 Interfacing Basic Sensors 85 Figure 3-18 Sensing the inclination of the two axes from horizontal—the Panel Figure 3-19 Sensing the inclination of the two axes from horizontal—the Diagram 86 Lab 3 Interfacing Basic Sensors Challenge Using the Mx2125 accelerometer, develop an application to study a pendulum. Place the Mx2125 in a box (or preferably a ball) that is suspended from a high holder. You can use the Mx2125 connection wires as suspension cord. Fix the cord length and calculate the period of the resulting pendulum using Equation (24): T = 2π l g (24) where T is the oscillating period of the pendulum, l is the length of the pendulum cord, and g is the gravitational acceleration. Modify the Circular level application to visualize the angles also on the graphs (the Waveform Chart can be used). Using the time information from the dynamic data of the NI ELVISmx Oscilloscope Channel 0 and Channel 1 outputs, calculate the pendulum period. Lab 3 Interfacing Basic Sensors Notes 87 88 Lab 4 Interfacing Actuators Lab 4 Interfacing Actuators Instructor’s Notes Actuators are controllable execution elements that transform the input energy (electrical, magnetic, thermal, optic, or chemical) in mechanical work. The conversion of the input energy into effective output energy is realized with electrical and magnetic fields, as a result of physical phenomena such as piezoelectrics, magnetostriction, the shape memory or the bodies’ dilatation with the raising of the temperature, the change of phase, the electroreologic effect, electro-hydrodynamics, and the diamagnetism. The mechanism of the actuator transforms, amplifies, and transmits the movement in accordance with the specific parameters of the technological process. The function of an actuator can have the following schematic representation (see Figure 4–1). Figure 4-1 The schemata of the actuator’s function The main performance characteristics of the actuators according to [Zupan et al., Cuttino et al.] are as follows: The specific course that is obtained by making a ratio between the maximum course and the length of the actuator measured in the direction of the course The efficiency of the actuator represented by the ratio between the mechanical work produced during a complete cycle and the energy consumed per cycle The specific force that is the result of the ratio between the maximum force generated and the transversal section of the actuator The density that is obtained by neglecting the source mass and the peripheral devices and by making a ratio between the actuator’s weight and its volume in the initial shape Lab 4 Interfacing Actuators 89 The coefficient of the work course that is obtained by the ratio between the specific course and the specific force The coefficient of power on cycle, which is the maximum power developed within a cycle The resolution that represents the smallest movement that can be controlled There are several types of actuators. According to the actuators’ functioning principle they can be divided into two categories: classical actuators and special actuators. If we take into consideration the input signal used to control the motion of the active element, the actuators are divided into the following categories: Actuators controlled by a heat flux (thermal) Actuators electrically controlled (by the intensity of the electric field) Piezoelectric actuators, with active elements from crystal, piezoceramics, or piezopolymers, with various applications in the robotics industry, CD-player manufacturing, and other areas Magnetostrictive actuators that function on the basis of the magnetostrictive effect, whereby a ferromagnetic material modifies its dimensions under the action of an exterior magnetic field Actuators controlled by the induction of the magnetic field (magnetic) Actuators based on bimetals Actuators based on alloys with shape memory Actuators commanded optoelectrically or optothermally (optic) Electroreologic actuators Magnetoreologic actuators that use as a base element in their structure the magnetoreologic fluid or the ferrofluid—a dispersion of magnetic particles in a base liquid (Ferrofluids respond instantaneously when near an exterior magnetic field by applying viscosity.) Piro—piezoelectric actuators Actuators chemically controlled Other types of actuators, based on other physical phenomena Lab 4 Interfacing Actuators 90 The actuator has a transducer as a fundamental component, this being defined as a device that transforms the non-electric energy into electric energy and the other way round (see Figure 4-2). Figure 4-2 Defining the actuator Goal The purpose of this set of exercises is to study the behavior of two actuators using the NI ELVIS II platform. The first device that we are going to study is an electromagnetic relay (which transforms electromagnetic energy into mechanical energy). The targets of the lab exercises are: determining the contact resistance of the relay, investigating the variation of the coil voltage at the opening and closing of the relay contact, and investigating the differences of the auto-induced voltage of the relay coil when the relay closes. The second device that will be studied is the stepper motor. In the lab the emphasis will be on the control of the motor. Required Components Component requirements and software application for relays testing are as follows: LabVIEW 2010 NI ELVIS II platform and NI ELVIS drivers One electromagnetic relay Chansin, of 12 V, initial contact resistance 100 mΩ (1A, 24 VDC), contact material silver alloy One transistor BC 177 NPN One transistor BC 107 PNP Two resistances of 100 kΩOne resistance of 1 mΩ One resistance of 1 kΩ One resistance of 2 kΩ Lab 4 Interfacing Actuators One resistance of 10 kΩ; One resistance of 5.19 Ω, 5 W. 91 Component requirements for stepper motor testing include the following: One stepper motor from INEX Innovative Experiment of 12 V, 100 Ω, 7.5 degree/step One integral circuit ULN 2003 which has 7 NPN Darlington pairs Four LEDs Polarized resistors of 1 kΩ 92 Lab 4 Interfacing Actuators Background Relays Relays are generally used in electronic circuits. The purpose of using the relays is to close or open a series of circuits. This is performed by activating the mobile armature of the relay. Electromagnetic relays and electronic relays are among the most widely used. Electromagnetic relays will be presented subsequently. An electromagnetic relay used in electronic circuits usually consists of three main components: the electromagnet, the electric contacts, and the armature. In Figure 4-3 a classical electromagnetic relay is presented. The components of the relay include a fixed armature (1), a mobile armature manufactured from steel (2), a coil (3), and a resort (4). The functioning principle is the following: at the passing of an I current through the coil, the mobile armature is attracted and will close the contact C’ when the current reaches the value I1. This value of the current is compulsory for defeating the force exerted by the resort and is called the threshold value. If we make a comparison with the actuators, it is clearly seen that the output value at relays abruptly varies when the threshold value of the current is reached, while for actuators the variation is continuous, being a function of the input value. To avoid damaging or aging the contacts, the current that passes through them needs to be limited. A capacitor of 0,1 µF in series with a resistor of approximately 100 Ω can be used to provide a supplementary protection of the contacts. These components are used in order to eliminate instantaneous variations of the current in the commutation regime of the relay. For the relay contacts several materials are used, specifically, Ag, which presents a low contact resistance, is relatively cheap, and has very good thermal and electrical conductivity, making it the most widely used material; the AgCu alloy with a good resistance to wear, but with a high contact resistance; AgW, which has a high contact resistance and demonstrates a low resistance to corrosion; and the AgCdO alloy, which demonstrates a higher resistance to melting and has properties of extinction of the electric arc. Lab 4 Interfacing Actuators 93 Figure 4-3 The constructive schemata of an electromagnetic relay The electromechanical relays can be normally opened relays (Figure 4-4 a), normally closed relays (Figure 4-4 b), or dual relays (Figure 4-4 c). The normally opened relays have a switch that remains open until excitation, while the normally closed ones are closed until excitation [Sullivan]. Figure 4-4 Electromagnetic relay types 94 Lab 4 Interfacing Actuators Stepper Motors The stepper motor converts the electric energy into mechanical energy. Its functioning is realized by transforming a digital impulse train into a proportional movement of its axis. As compared to standard DC motors, stepper motors don’t have a “fluid” functioning but instead consist of small steps, taken one at a time. The steps of the motor represent the angular motion of the rotor. The number of steps is a controlled function of the command impulses applied to the phases of the motor. Due to the univocity of the conversion impulses—the number of steps associated with the memory of position—stepper motors have become widely used devices in systems involving position adjustment. Stepper motors can be divided into three major classes: Permanent magnet—there are many types: unipolar, bipolar, and multiphase, and they have two independent windings with or without center taps. Variable reluctance motors—these can have three or four windings. Hybrid motors—these are a combination of the first two types, combining the advantages of both. Unipolar motors are easily controlled. The necessary stepping sequence can be generated by a simple counter circuit, and there is the possibility of designing very simple drivers, such as those having one transistor per coil. A characteristic of unipolar stepper motors is their center-tapped windings. In practical use, to reverse the direction of the field provided by the winding, the two ends of each winding are alternatively grounded, and the center taps of the windings are wired to the positive supply. The number of phases is twice the number of coils, each coil being divided in two. The diagram in Figure 4-5 presents the connection of a 4-phase unipolar stepper motor. If power is applied to the two windings in sequence, a continuous rotation of the motor is obtained. In the diagram that follows, “1” means turning on the current through a motor winding. When the command is set for the motor, the two halves of each winding can’t be excited at the same time. Lab 4 Interfacing Actuators 95 Figure 4-5 Unipolar stepper motor coil setup High-torque and half-step drive sequences are also possible, in addition to the full step drive sequence. In the high-torque sequence, for every motor step two windings are active simultaneously. Approximately 1.5 times more torque is yielded by this two-winding combination than by the standard sequence, but twice the current is drawn. Half-stepping is based on combining the two sequences. One or two of the windings is alternatively activated. Thus the number of steps the motor will advance for each revolution of the shaft is doubled, and the number of degrees per step is reduced to half [Johnson]. Among the characteristic measures of the stepper motors, the most important are enumerated here: The limit frequency of starting is the maximum frequency of the command impulses needed for the MPP to start without losing steps. The step angle is the angle of the movement of the rotor when a command impulse is applied. The limit characteristic of starting determines the domain couple-frequency domain of the limit command of the stepper motor, which starts without losing steps. The angular speed represents the product between the step angle and the command frequency. The limit frequency of functioning is the maximum frequency at which the motor functions for a durable couple. The power at the shaft represents the useful power at the shaft of the motor. 96 Lab 4 Interfacing Actuators References J.F. Cuttino, D.D. Newman, J.K. Gershenson ,& D.E. Schinstock (2000), “A Structured Method for the Classification and Selection of Actuators for Space Deployment Mechanism.” Journal of Engineering Design, Vol. 11, No. 1, March. J. Johnson (1998) “Working with Stepper Motors”. K.R. Sullivan, “Understanding Relays”, Automotive Series. H.A. Toliyat, & G.B. Kliman (2004), “Handbook of Electric Motors”, New York. ISBN: 0824741056; M. Zupan, M.F. Ashby & N.A. Fleck (2002), “Actuator Classification and Selection—The Development of a Database,” Advanced Engineering Materials, 04, No.12. Lab 4 Interfacing Actuators 97 Exercise 4-1: Determination of the contact resistance of the relay Because every conductor has a resistance, a voltage drop appears on this resistance, leading to a decrease in consumer performance. Relays are sometimes presented in scientific literature as ideal devices of commutation, which is with resistance at zero contact and only one transition of commutation. In practical use, however, the contacts of the relays have a contact resistance different from zero, and this rises in time with repeated commutations. The contact resistance is typically situated within an interval from 50 mΩ to 200 mΩ. The purpose of this experiment is to measure the contact resistance of the relays. For some practical applications it is necessary to know exactly the value of this resistance as it is added to the charge resistance. Moreover, another reason for measuring the contact resistance is the fact that with the “aging” of the relay, this resistance changes due to phenomena that appear at the closing and opening of the contacts. To practically realize the experiment, it has to be performed on the prototyping board of the NI ELVIS, as shown in Figure 4-6. The mounting realized is complex and will be used for the entire set of experiments to test the relay. 1. Build the setup shown in Figure 4-6, using the following elements: a. Electromagnetic relay of dc 12 V, Chansin b. The resistance of 5.19 Ω necessary to fix the current in the circuit (≈1A), allowing us to measure the contact resistance. (The resistance used has to be a power resistance (at least 5 W) so that it won’t change its value during measurements because of the thermal effect, thus reducing the measuring error.) c. The transistors needed for the relay control from the DIO ports of the NI ELVIS d. The connection to the ammeter to measure the current in the circuit when the relay is closed 98 Lab 4 Interfacing Actuators Figure 4-6 The setup of relay testing e. The connection to the oscilloscope NI ELVIS via two BNC cables. (For this part of the experiment only one channel is used to measure the voltage.) f. The measured resistance of the contact voltage 2. Using Equation (25) we can find the value of the contact resistance: Rc = Vc Ic 3. The electronic circuit was realized in Multisim as well for an easier implementation (see Figure 4-7). (25) Lab 4 Interfacing Actuators 99 Figure 4-7 The Multisim schema for relay testing 4. Start NI LabVIEW software and build the application that has the Panel and the Diagram shown in Figure 4-8. 5. Place in the Diagram NI ELVISmx Variable Power Supplies express VI, for the relay feeding. 6. Place in the Diagram NI ELVISmx Digital Writer express VI to realize the control of relay opening and closing. 7. Place in the Diagram the NI ELVISmx Oscilloscope express VI from Function»Measurement I/O»NI ELVISmx. 8. Create controls for Channel 1, Device Name, Horizontal, and a numerical indicator for vizualizing the measured contact voltage: Contact Resistance. 9. Place in the Diagram the NI ELVISmx Digital Multimeter express VI from the contact current measurement. 10. Create indicators for the Contact Voltage and the Contact Current. 11. Using the Contact Voltage and Contact Current values, the Contact Resistance values can be calculated using Equation (25). 12. Power on the NI ELVIS II system and the prototyping board. 13. Run the application and visualize the values. 100 Lab 4 Interfacing Actuators Figure 4-8 Panel and Diagram of the Contact Resistance application Lab 4 Interfacing Actuators 101 Exercise 4-2: Monitoring the voltage in the coil For very many industrial applications, it is important to know the opening voltage and the closing voltage of the relay. The following experiment determines the two voltages. The experimental setup used to determine the voltages is the one in Figure 4-6. Because the relay behaves as an LED on a complete cycle, meaning it has a hysteresis, for the monitoring of the voltage one of the many facilities of the NI ELVIS is used, namely the 2-channel oscilloscope. relay. 1. Build on the prototyping board of NI ELVIS the setup shown in Figure 4-6. 2. Start the LabVIEW software. 3. Build the application that has the Panel and the Diagram shown in Figure 4-9. 4. Place in the diagram the NI ELVISmx Digital Writer express VI to realize the control of the system. 5. Place in the Diagram the NI ELVISmx Variable Power Supplies express VI. The excitation of the relay coil is realized using an icon for the triangular signal generation that varies from 0 V to 12 V, with a frequency of 1 Hz and the phase of –90; see the Panel of the application. 6. Place in the Diagram the NI ELVISmx Oscilloscope express VI from Function»Measurement I/O»NI ELVISmx. 7. Create controls for Channel 0, Channel 1, Device Name, Horizontal, and create two indicator graphs for vizualizing the measured signals of the coil voltage and contact voltage. To measure the voltage on the coil we used a voltage divider. This is necessary as the value of the voltage on the coil exceeds the maximum limit of volts that can be measured with the NI ELVIS application. 8. Create a graph indicator for hysteresis representation; on this graph the Contact Voltage versus Coil Voltage are represented. 9. Power on the NI ELVIS II system and the prototyping board. 10. Run the application and visualize the signals. 102 Lab 4 Interfacing Actuators Figure 4-9 Panel and Diagram of the Hysteresis application 11. Activate the cursor for the “Hysteresis” graph and read the values for which the relay closes and opens the circuit. 12. To avoid running the program if an error appears, the While loop conditional terminal can be used. Lab 4 Interfacing Actuators 103 Exercise 4-3: Monitoring the auto-induced voltage The elementary use of a relay is to close and open a circuit. Since it is also one of the most widely used applications, we wish to analyze in this experiment what is happening in the relay in an open-close cycle. Starting from this target it was observed that in the relay there are voltage spikes of hundred of volts, with a limited duration (ms) when a relay is commuted off or on. The appearance of the voltage spikes is explained as follows (see Figure 4-10): When the switch is closed through the circuit, a current flows through the coil from + to –, creating a magnetic field. When the circuit opens, there is no current flow through the circuit, and thus the magnetic field created collapses across the coil, inducing a voltage that has a spike with the reverse polarity of few hundred volts. Figure 4-10 The schemata for the spike voltage These voltage spikes that appear in the relay can lead to a malfunction or even the deterioration of the electronic equipment, so methods must be found to eliminate or reduce these spikes. There are three methods to eliminate the voltage spikes: (1) using a resistance in parallel with the coil of the relay, thus reducing spikes under 100 volts (see Figure 4-11); (2) using a diode instead of the resistance, therefore reducing the spikes completely; and (3) using a capacitor, which is a method less often used. Figure 4-11 The schemata for the de-spike voltage with resistor 104 Lab 4 Interfacing Actuators To focus on the voltage spikes from the relay and to measure their amplitude, the following steps should be taken: 1. Build the setup shown in Figure 4-6. 2. Start NI LabVIEW software and build the application (Panel and Diagram) shown in Figure 4-12. 3. Place in the Diagram the NI ELVISmx Oscilloscope express VI from Function»Measurement I/O»NI ELVISmx. 4. Create controls for Channel 0, Device Name, Horizontal, Trigger and a graph indicator—Coil Voltage—for vizualizing the measured signals. In this experiment it is necessary to use the Trigger option of the oscilloscope to initialize the starting of measurement at the proper moment. The negative slope is also set and at the same time the sampling rate has to be set, as well as the number of samples needed to “catch” the voltage spike. 5. Place in the diagram the NI ELVISmx Variable Power Supplies express VI, needed to feed the relay coil with the voltage of 12 V. 6. Place in the diagram the NI ELVISmx Digital Writer express VI to realize the control of the relay, the opening and closing of the relay being realized using the Connect icon. 7. Power on the NI ELVIS II system and the prototyping board. 8. Run the application and visualize the signals. 9. It is observed that for the relay tested in this experiment, the value of the voltage spike is 60 V. The conclusion that can be drawn is that this relay has a resistance placed in parallel with a coil, not a diode. Lab 4 Interfacing Actuators Figure 4-12 Panel and Diagram of Spike application 105 106 Lab 4 Interfacing Actuators Exercise 4-4: The control of the stepper motor Stepper motors have multiple applications in industrial domains and elsewhere. Their use requires an ability to control the motors. Starting from the stepper motor’s composition—a central shaft that can be a permanent magnet and the four coils that surround it—the control consists of the excitation, one by one, of the coils after a certain sequence. In this experiment we aim to control the stepper motor using an electronic circuit easily realized on the fast prototyping board of the NI ELVIS platform. To develop a good understanding of the control we will set three stages. In the first stage we will rotate the shaft step by step. The second stage consists of changing the shaft rotation direction. As many of the applications need a higher precision, it is necessary that we realize a control half-step by half-step. This technique allows the use of the same motor in more application types; otherwise, it should be changed. In the third part the control will be realized for half a step, with the possibility of changing the direction. To realize the experiment we chose a stepper motor that allows for easy visualization of the shaft rotation and easy checking of the control’s effectiveness. For all three work stages, the same component is used, along with the same positioning of the mounting (see Figure 4-13). 1. Implement the control circuit shown in Figure 4-13 on the NI ELVIS II prototyping board using the following: a. Stepper motor, feeding voltage 12 V, 7.5 degrees per step, coil resistance of 100 Ω b. Polarization resistances of the LEDs of 1 kΩ c. Four LEDs that have a single role in the circuit, namely the visualization of the motor command (LEDs of different colors can be used for each step,) d. The integrated circuit ULN 2003, composed of seven pairs of NPN transistors and a high current that assures the command of the stepper motor (It can be replaced with a set of four transistors.) Lab 4 Interfacing Actuators 107 Figure 4-13 The setup of stepper motor control 2. The electronic circuit was also realized in Multisim for an easier implementation (see Figure 4-14). 3. For the first work stage, the NI LabVIEW software is started and the application is built (Panel and Diagram) as shown in Figure 4-15. 4. Place in the Diagram the NI ELVISmx Variable Power Supplies express VI, which is necessary for supplying the stepper motor with a voltage of 12 V. If a stepper motor of 5 V is used, then the Variable Power Supplies is left out and the motor is supplied directly from the source of 5 V. 5. Create a For loop from Execution Control. 108 Lab 4 Interfacing Actuators Figure 4-14 The Multisim schemata for stepper motor control Lab 4 Interfacing Actuators 109 Figure 4-15 Panel and Diagram of the full step control application 6. Place in the Diagram the NI ELVISmx Digital Writer express VI to realize the control of the stepper motor. The control is realized using the first four DIO ports of the NI ELVIS board. The control sequence of the stepper engine is transformed from base 2 to base 10 (see Table 4-1). Base 2 Base 10 0001 1 Table 4-1 0010 2 0100 4 1000 8 110 Lab 4 Interfacing Actuators 7. To avoid a loss of steps and a repositioning on the motor shaft at a new initialization, the icon Rotate string is used. 8. Create the numerical indicator for elapsed steps. 9. Power on the NI ELVIS II system and the prototyping board. 10. Run the application and visualize the LED and the motor indicator. 11. Using the control No of step, launch the stepper motor to perform 48 steps. By using the indicator on the motor shaft, check that it performed a complete rotation (7.5 x 48 = 3600). 12. The application created makes possible the rotation of the shaft in one direction only. 13. What do we have to change or add in the diagram to realize the movement of the shaft in both directions (CW and CCW)? To realize the direction shift we will use the icon Select (Programming, Comparison). Insert a Boolean control as follows: in direction CW, the icon Select lets the unmodified command sequence pass; in direction CCW, the icon Select will let the reverse control sequence pass (the icon Negate is used) and the rotation direction will be modified (see Figure 4-16). Using the control No of step let the stepper engine perform 24 steps in the direction CW and then 24 steps in the direction CCW. Using the indicator on the motor shaft, check whether the initial position coincides with the final one. 14. The shaft of a stepper motor describes a circular arc with the measure equal to the step. For example, in the case of the motor chosen for the experiment, a circular arc is described with the measure of 7.50; in some applications a positioning with a smaller angle is required (the angle to the center is equal to the measure of the circular arc described). A smaller angle can be achieved by replacing the motor with one that has a smaller step angle, or the same motor can be used in the half-step mode. Lab 4 Interfacing Actuators 111 Figure 4-16 Panel and Diagram of full step control with direction application Although it sounds complicated, the only modification that takes place in the diagram is the use of another control sequence. To realize the control of the stepper motor by half-step, in the diagram the sequence from Table 4-1 will be replaced with the one from Table 4-2 (see Figure 4-17). Base 2 Base 10 0001 1 0011 3 0010 2 0110 6 0100 4 Table 4-2 1100 12 1000 8 1001 9 112 Lab 4 Interfacing Actuators Figure 4-17 Panel and Diagram of half-step control with direction application Lab 4 Interfacing Actuators 113 Challenge 1. Measure the contact resistance of the relay using only tools offered by NI ELVIS: Digital Multimeter VI, Oscilloscope VI, NI ELVISmx Variable Power Supplies VI, and Digital Writer express VI. 2. Realize an application that allows the monitoring of the contact resistance of an electromagnetic relay. One of the possibilities is to stress the electromagnetic relay with a fixed number of pulses applied to the coil and to measure the contact resistance. Thus, the monitoring is continuous. 3. Realize a complex application to test a relay that contains all of the three tested parameters. 4. Realize a complex application to control the stepper motor in full step and halfstep mode, and its rotation direction. 5. For the applications created for the testing of the stepper motor, four DIO ports are used. Realize a control setup that uses only two DIO ports (you can use the notes from http://www.8051projects.net/stepper-motor-interfacing/steppermotor-connections.php). 114 Lab 4 Interfacing Actuators Notes Lab 5 The Study of Vibration 115 Lab 5 The Study of Vibration Instructor’s Notes Vibratory or oscillatory movement occurs when the parameters that describe the system movement alternatively vary in time, around the values corresponding to the reference state. From now on, the movement will be named vibration or oscillation for simplicity. Vibration study has been and still is a research priority since vibrations have to be taken into consideration when Secure buildings have to be realized. The working locations for the human operator are built. High-performance machines are built and are provided with good dynamic stability. Vibrations can be Harmful—they need to be reduced or eliminated if possible. Useful—they need to be used, even amplified if possible. The vibrations can be subdivided according to different criteria. If the dynamics of the vibratory phenomena are taken as a parameter, then the vibrations can be Small variation frequency vibrations, which can occur in building structures, mechanical structures, and in case of earthquake High variation–frequency vibrations, which are encountered in fluid environments (chemical solutions, etc.) due to heat conduction from a body with high temperature to one with a low temperature If the perturbing force value is taken into consideration as a parameter, the variations include Free vibrations, due to an initial impulse, the disturbing force being zero Forced vibrations, in which the disturbing force is different from zero and is applied all through the movement Variable characteristics vibrations, which are due to variation in time of a given parameter, the variation being generated by an interior or exterior cause Lab 5 The Study of Vibration 116 Another criterion for the classification of vibrations is the resistance force or forces from the system; these include Damped vibrations. for which the amplitude drops in time to zero, the drop being caused by the resistance forces that cannot be neglected Undamped vibrations, which is the ideal case, when the resistance forces can be neglected because they are very small Auto vibrations, where the resistance forces (within the system) maintain the vibrations, having the same sign as the elastic force Vibrations can be Harmonic, if they can be expressed by a single function (sin or cos) Nonharmonic, representing more complex vibratory phenomena Nonharmonic vibrations are modulated either in frequency or in amplitude. The vibrations can also be classified as a function of freedom degrees. Functions of this parameter include Vibrations in systems having one degree of freedom Vibrations in systems having two degrees of freedom Vibrations in systems having more than two degrees of freedom Vibrations in systems having infinite degrees of freedom Goal The aim of the exercises in this section is to familiarize students with the theoretical concept, as well as with the applications of ideal harmonic oscillatory movement, damped and forced. Students will learn how to design experiments that validate the theoretical solutions for the differential equations describing the damped and forced harmonic oscillatory movement. The characteristic measures of oscillatory movement will also be highlighted. Required Components Component requirements and software application are as follows: LabVIEW 2010 Lab 5 The Study of Vibration NI ELVIS II platform and NI ELVIS drivers The lamella for the oscillation Accelerometer Analog Devices ADXL325BCPZ Electromagnet used for forced oscillation Support 117 118 Lab 5 The Study of Vibration Background Oscillatory Movement The focus in this section is on the linear undamped harmonic oscillatory movement, which is the simplest vibratory movement. In this case we deal with vibrations in systems having one degree of freedom. The system in Figure 5-1 can be used to describe theoretically the oscillatory movement. It consists of a body of m mass tied with a spring, with the elastic constant k, to a rigid wall. k m k Fe m x Figure 5-1 Mechanical model for harmonic vibration If the system is taken out of the state of equilibrium, it will make an alternative motion around the equilibrium position due to the elastic force. The movement of the body with a mass m will be considered without friction. The motion equation is found using the second principle of dynamics. A differential equation of the second degree is thus obtained: •• m x = − kx (26) where x = x(t) represents the motion and the minus is due to the elastic force opposing the deformation of the spring [Dukkipati et al., Timoshenko]. Equation (26) can thus be written as •• x+ k x=0 m (27) Lab 5 The Study of Vibration 119 Equation (27) is a second-degree differential equation with constant coefficients and is homogenous. k/m is noted as ω2o. The measure noted as ωo is called proper pulsation of oscillatory movement. The solution of the differential Equation (27) is realized by using the characteristic equation attached to it: r 2 + ωo2 = 0 (28) The solutions of the characteristic equation (Equation 28) are r = ± iω o (29) Using the solution of the characteristic equation, the solution of the equation describing the free harmonic oscillatory movement (Equation 27) is x(t ) = C1eiωot + C2e − iωot (30) Equation (30) can be written using the formula eiα = cosα + isinα as follows: x(t ) = (C1 + C2 )cos ωot + (C1 − iC2 )sin ωot (31) If we note C1 + C2 = B and C1 - iC2 = D and we give B as forced factor, Equation (31) becomes D ⎛ ⎞ x(t ) = B⎜ cos ωot + sin ωot ⎟ B ⎝ ⎠ (32) The notation is D/B = ctgφ = cosφ/sinφ. Equation (32) becomes ⎛ ⎞ cos ϕ x(t ) = B⎜⎜ sin ωot + cos ωot ⎟⎟ sin ϕ ⎝ ⎠ (33) By using the trigonometric formulae and by noting B/sinφ =A, Equation (33) can be written as follows: x(t ) = A sin (ωot + ϕ ) (34) where the constants A (movement amplitude) and φ (initial phase of movement) are determined in initial conditions. The measure x(t) is called motion elongation. The amplitude is the maximum elongation of the motion. The initial phase indicates the initial position of the body with a mass m towards the equilibrium position. 120 Lab 5 The Study of Vibration Besides the measures already discussed, the oscillatory motion is also characterized by both the oscillation period and the oscillation frequency. The proper oscillation period represents the time necessary for a complete oscillation. The expression of the proper period is given by the formula T= 2π ωo = 2π m k (35) The oscillation frequency can be calculated by the following equation: υ= k 1 = 2πωo = 2π T m (36) By deriving the function of t, the elongation given by Equation (34), the oscillation velocity is determined—the measure representing the velocity at which a body of m mass approaches or gets away from the equilibrium position: • v = x = Aωo cos(ωot + ϕ ) (37) Because the oscillation can also be defined as the phenomenon during which energy is periodically transformed from one state to another, the total mechanical energy of an oscillator can be calculated as the sum of the kinetic energy and the potential energy: mv 2 kx 2 + 2 2 2 2 2 mA ω o cos (ω o t + ϕ ) mω 2 o A2 sin 2 (ω ot + ϕ ) = + 2 2 2 2 mω o A mω 2 o A2 cos 2 (ω o t + ϕ ) + sin 2 (ω ot + ϕ ) = = 2 2 E = Ec + E p = ( (38) ) As can be observed from Equation (38), the total mechanical energy of the oscillator is conserved, as is shown in Figure 5-2. Lab 5 The Study of Vibration 121 E Em Ec Ep -A A x Figure 5-2 Total mechanical energy of the ideal harmonic oscillator References R.V. Dukkipati & J. Srinivas (2004), Textbook of Mechanical Vibrations. PrenticeHall of India Pvt.Ltd., New Delhi, India. J.S. Rao & K. Gupta (1999), Introductory Course on Theory and Practice of Mechanical Vibrations. New Age International Publishers, New Delhi, India. C. W. de Silva (2007), Vibration Monitoring, Testing, and Instrumentation. Taylor & Francis/CRC Press, Boca Raton, Florida. W.T. Thomson (2003), Theory of Vibration with Applications. Nelson Thomes Ltd, Cheltenham, UK. S. Timoshenko (1937), Vibration Problems in Engineering, Van Nostrand, New York. 122 Lab 5 The Study of Vibration Exercise 5-1. Study of damped harmonic oscillatory movement Given that the undamped harmonic oscillations represent ideal cases, the emphasis in this section will be on damped harmonic oscillations. In the real case, due to friction from the oscillatory system, the motion amplitude continuously drops [de Silva, Rao et al.]. The damping can be either external (i.e., friction takes place between the system elements and the environment) or internal (i.e., friction takes place within the system). The most widely encountered case in practice is emphasized here—namely, when the friction force is proportional to the velocity See Equation (39), which follows: • Ff = − ρ x (39) In this case, Equation (26) can be written as •• • m x + ρ x + kx = 0 (40) If Equation (40) is divided by m, the following is obtained: •• • m x + 2δ x + ωo x = 0 (41) where 2δ =ρ/m and δ is called the damping coefficient. By attaching the equation characteristic to the differential equation with the constant coefficient, we obtain r 2 + 2δr + ωo2 = 0 (42) Equation (42) has the solutions r1, 2 = −δ ± δ 2 − ωo2 (43) By using the solutions obtained for the characteristic equation attached to Equation (41), the following solutions are obtained for the latter: ⎛⎜ −δ + δ 2 −ω 2 ⎟⎞ t o ⎠ x(t ) = C1e⎝ ⎛⎜ −δ − δ 2 −ω 2 ⎟⎞ t o ⎠ + C2 e ⎝ (44) Lab 5 The Study of Vibration 123 Because in the solutions of the attached equation we have free radicals, we must discuss the quantity δ2 – ω2o. Three cases can be distinguished: Case I: If δ > ωo, high damping, the quantity below the radical is positive and the solutions in Equation (43) are real and distinct. Equation (44), the equation of the elongation, can be written as ⎛ x(t ) = e −δt ⎜ C1e ⎝ δ 2 −ωo2 t + C2 e δ 2 −ω o2 t ⎞ ⎟ ⎠ (45) The initial conditions are used in practical applications in order to determine the integrating constants C1 and C2. The motion described by Equation (45) is a nonperiodic motion. The motion trajectory is represented in Figure 5-3. Figure 5-3 Trajectory of nonperiodic motion, for δ > ωo Case II: If δ = ωo, the quantity below the radical equals zero and there will be two real and equal solutions for Equation (42). In this case the solution for the elongation is written as follows: x(t ) = (C1 + C2t )e −δt (46) In this case, too, there is a nonperiodic motion. The elongation asymptotically tends towards zero so that the body moves towards the equilibrium position in minimum time, without oscillating. The motion is in this case called critical nonperiodic motion. Case III: If δ < ωo, low damping, the quantity below the radical is negative, and the solutions to the characteristic equation are complex. In this case, the elongation equation can be written as 124 Lab 5 The Study of Vibration ( x(t ) = e −δt C1eiωt + C2eiωt ) unde ω = ωo − δ (47) By using the Euler formulae (see the undamped oscillatory motion), Equation (47), the elongation equation, becomes x(t ) = A sin (ωt + ϕ ) unde A = Ao e −δt (48) The elongation and amplitude trajectory is shown in Figure 5-4. It can be observed that the amplitude becomes a monotonically decreasing function of time. If the time tends to infinity, then the elongation tends to zero. In this case the body oscillates around the equilibrium position with smaller and smaller amplitude. In order to characterize the decreasing of the amplitude, the measure called logarithmic decrement is introduced. By definition, the logarithmic decrement is a natural logarithm from the ratio of two consecutive amplitudes. See Equation (49), which follows: Δ = ln A(t ) A(t +T ) Ao e −δt = ln = ln eδT = δT −δ (t +T ) Ao e (49) Figure 5-4 Representation of elongation and amplitude in the case of low damping Another characteristic measure of damped harmonic motion is the relaxation time, which is defined as the time in which the mechanical energy drops e times, as in Equation (50): 1 2 −2δt kAo e E(t ) 2 e= = = e2δτ E(t +τ ) 1 kA2e −2δ (t +τ ) o 2 ⇒ τ= 1 m = 2δ ρ (50) Lab 5 The Study of Vibration 125 The experimental setup consists of (see Figure 5-5) the following: a. Stable support for the fixing of the oscillatory system b. An elastic steel lamella that will form the oscillatory system c. An accelerometer from Analog Devices ADXL325BCPZ, with three axes and a maximum range of 5 g d. An electromagnet used for inducing the oscillations in the elastic lamella c d a b Figure 5-5 The setup for the study of damped oscillations Because the accelerometer used has an operating voltage range from 1.8 V to 3.6 V, the supply voltage pin is connected to the variable power supply. The sensor is positioned so that the y axis is on the vibrating direction of the lamella. The Y Channel Output of the sensor is connected to the first analog input channel ACH0+ (borne ACH0, connected to GND). To verify the system’s functionality, the following steps must be taken: 1. Build the testing circuit shown in Figure 5-5. 2. Start the NI LabVIEW 2010 software and build the application shown in Figure 5-6 and Figure 5-7. 126 Lab 5 The Study of Vibration Figure 5-6 The Damping Vibrations Panel Figure 5-7 The Damping Vibrations Diagram 3. Place in the Diagram the NI ELVISmx Variable Power Supplay express VI from Function»Measurement I/O»NI ELVISmx. Right click on the Device Name input and choose the Create»Control option. Repeat the operation for the Supply+ (V) input, create a constant, and choose the 3 V value (maximum 3.6 V so as not to damage the accelerometer). Also create a constant for error in input. 4. Next, add in the Diagram the NI ELVISmx Oscilloscope express VI from Function»Measurement I/O»NI ELVISmx. In the configuration window Lab 5 The Study of Vibration 127 choose for Channel 0»Source option AI0. Connect the Device Name input to the Device Name control, created previously. Right click on the CH0 Enable input, choose the Create»Constant option, and choose for the created constant the True value. Repeat the operation for the Trigger and Horizontal inputs, choosing the Create»Control option. 5. Add Extract Single Tone Information.vi from Function»Signal Processing»Waveform Measurements. This VI allows the determination of measured signal frequencies (Detected Frequencies output). By extracting the first element from the vector Detected Frequencies output, by the function Index Array, the vibration frequency of the system under study is determined and displayed in the indicator Detected frequency. 6. By using the function Get Waveform Components from Function»Mathematics»Probability & Statistics, the following components are extracted: Y (data values of the waveform) and dt (the time interval in seconds between data points in the waveform). 7. The acceleration sensor generates a signal proportional to the vibration motion of the system around half of the feeding voltage (~1.5 V). In order to eliminate this “offset,” the mean value of the Y signal can be determined and subtracted then from the signal. The mean signal is determined by Mean.vi from Function»Mathematics»Probability & Statistics. 8. By using Get Waveform Time Array.vi from Function»Programming»Waveform, the array of waveform time stamps is obtained. By subtracting the first element from this vector, the array of relative time is obtained. By using the bundle function, the zero offset signal is built as a function of relative time. 9. By using Peak Detector.vi from Function»Signal Processing»Signal Operation the maximum amplitudes are determined for each oscillation of the system. 10. The envelope curve of the signal is obtained by tracing the fitting curve among these points. A number of consecutive peaks N (N=25) is extracted (consecutive maximum amplitudes) with the function Index Array within a For loop (Figure 5-7). The logarithmic decrement, ∆, is determined by using Equation (49) and by calculating the mean of the results obtained. The damping coefficient, δ, can also be determined using Equation (49), and from Equation (50) the relaxing time, τ, is determined. 11. By multiplying the Location output of the Peak Detector.vi with the time interval between data points in the waveform, dt, the positions in relative time are obtained for the maximum amplitudes of the signal. The envelope curve of 128 Lab 5 The Study of Vibration the signal is found by graphically representing the maximum amplitudes function of the positions obtained (black curve on the Vibration Graph from Figure 5-6). 12. In the Panel, fix the values for Horizontal and Trigger controls as shown in Figure 5-6. 13. Power on the NI ELVIS II system and the prototyping board. 14. Run the application and manually give an elastic impulse to the lamella. 15. Visualize the values (see Figure 5-6). Lab 5 The Study of Vibration 129 Exercise 5-2. Study of forced harmonic oscillatory motion In many practical situations the use of vibrations is helpful—for example, the selection of certain materials, looms, vibration testing for machines, and aluminum artificial aging. As in the real case, the oscillatory motion is a damped motion; to be able to use the vibrations’ benefits, they have to be forced. In order to maintain the vibrations, external forces need to be applied (perturbing). For the practical applications it is interesting to have a look at the case when the external force, Fe, being applied is a force of periodic type (see Equation (51), which follows [Rao et al., Thomson]: Fe = Fo sin ωet (51) The equation describing the motion in case of perturbing force application, Fe, is •• • m x + ρ x + kx = Fo sin ωet (52) Equation (52) can be written as •• • x + 2δ x + ωo2 x = q sin ωet (53) where δ and ωo, are previously defined constants, and q =Fo/m. Equation (53) is a nonhomogenous second-degree differential equation with constant coefficients. The solution of the nonhomogenous equation is given by the sum of the homogenous equation solution— xo(t), (Equation 41)—and a particular solution xp(t). x(t ) = xo (t ) + x p (t ) unde xo (t ) = A sin (ωt + ϕ ) cu A = Ao e −δt (54) The particular solution is built starting from the term that gives its nonhomogeneity; thus, a sinusoidal solution is chosen for which we must determine the constants Ae and φ. x p (t ) = Ae sin (ωet − ϕ ) (55) As xp(t) is a solution of Equation (53), it has to be verified; therefore, we obtain 130 Lab 5 The Study of Vibration − Aeωe2 sin (ωe t − ϕ ) + 2δAeωe cos(ωe t − ϕ ) + + Aeωo2 sin (ωe t − ϕ ) = q sin ωe t (56) For each value of t Equation (56) must be verified. As there are two unknown quantities, Ae and φ, two values will be considered for ωet to facilitate calculations. The values taken are 0 and π/2. For these values, Equation (56) becomes − Aeωe2 sin (− ϕ ) + 2δAeωe cos(− ϕ ) + Aeωo2 sin (− ϕ ) = q sin 0 (57) π ⎛π ⎞ ⎛π ⎞ ⎛π ⎞ − Aeωe2 sin⎜ − ϕ ⎟ + 2δAeωe cos⎜ − ϕ ⎟ + Aeωo2 sin⎜ − ϕ ⎟ = q sin 2 ⎝2 ⎠ ⎝2 ⎠ ⎝2 ⎠ (58) By elementary calculations, the preceding equations become ( ) (59) ) (60) − Ae ωo2 − ωe2 sin ϕ + 2δAeωe cosϕ = 0 ( − Ae ωo2 − ωe2 cos ϕ + 2δAeωe sin ϕ = q Equation (59) is used to calculate the expression for φ, and therefore, tgϕ = 2δωe ωo2 − ωe2 (61) The amplitude of the forced oscillation is obtained by summing up Equations (59) and (60), previously having been squared Ae = q (ω 2 o ) − ωe2 + (2δωe ) 2 2 (62) By analyzing Equation (62) it is observed that the amplitude of forced oscillation is constant in time, and between the elongation of the forced oscillation and the perturbing force, there is a phase shift. Moreover, the oscillation frequency is equal to the frequency of the perturbing force. This phenomenon can also be verified experimentally. Resonance is a very important phenomenon that appears in the case of forced oscillation. It consists of the appearance of the maximum forced oscillation amplitude. Lab 5 The Study of Vibration 131 The forced oscillation amplitude is a derived function of the pulsation ωe, in order to determine the maximum point, and then the result obtained will be equal to zero. [( ) 2 1 2 = − q ωo2 − ωe2 + (2δωe ) ωe 2 dAe ] [2(ω 3 2 ( 2 o ) − ωe2 (− 2ωe ) + 8δ 2ωe ] ) 4ωe ωo2 − ωe2 + 2δ 2 = 0 (63) (64) The resonance frequency is given by the solution of Equation (64) and is ωrez = ωo2 − 2δ 2 (65) The resonance amplitude of the system under study is obtained by replacing the resonance frequency obtained in Equation (62), which gives the oscillation amplitude Arez = q 2δ (ω 2 o −δ 2 ) (66) Figure 5-8 shows the resonance curves for different values of the damping coefficient δ. Figure 5-8 Representation of the amplitude function of the damping coefficient 132 Lab 5 The Study of Vibration The following steps must be taken to study the forced vibrations: 1. Connect the electromagnet to the Function Generator BNC output (see Figure 5-5). In function of the used electromagnet a power amplifier is chosen. If a power amplifier is chosen, it should be interposed between the electromagnet and the Function Generator. 2. Modify the application in the preceding exercise as shown in Figure 5-9 and in Figure 5-10. 3. Place the Diagram into a Case Structure the NI ELVISmx Function Generator express VI from Function»Measurement I/O»NI ELVISmx. Create controls for Frequency (Hz) and Amplitude (Vpp) inputs and a constant for Signal Route input by right clicking on these inputs, and choose the Create»Control and Create»Constant options respectively. Choose the FGEN BNC value for the Signal Route constant. 4. Create a Boolean control for the case structure and call it Update In Panel; set the values for Horizontal and Trigger controls as shown in Figure 5-9. 5. Power on the NI ELVIS II system and the prototyping board. 6. Run the application. Modify the values of Frequency and Amplitude controls and press the Update FG button. Visualize the values. 7. It can be observed that the vibration frequency of the lamella is double in comparison with the one generated by the functions generator. This happens because the lamella is attracted by the electromagnet on each signal change. 8. Observe that by changing the frequency with small values for a short period of time, the phenomenon of hammering appears. It is caused by the composition of two harmonic vibrations of close frequencies. When the frequency generated by the generator is modified, the initial vibrations of the lamella are composed with the newly induced vibration by the electromagnet (see Figure 5-11). Lab 5 The Study of Vibration 133 Figure 5-9 The Forced Vibrations Panel Figure 5-10 The Forced Vibrations Diagram The resonance phenomenon The application can be modified as in Figure 5-12 and Figure 5-13 in order to find the resonance curve. The application permits the induction on a lamella of a force of variable frequency contained within the domain Start Frequency and Stop Frequency. 1. Remove Case Structure, Update FG button, and Frequency control. 134 Lab 5 The Study of Vibration 2. Create two new controls and call them Start Frequency (Hz) and Stop Frequency (Hz). 3. Set the frequency Function Generator to the value Actual Frequency, determined by raising the previous frequency with the step of 0.184 between the values Start Frequency (Hz) and Stop Frequency (Hz). Figure 5-11 The hammering phenomenon 4. Time Delay express.vi is introduced between NI ELVISmx Function Generator express.vi and NI ELVISmx Oscilloscope express.vi. The value for Delay Time (s) must be chosen so that the system vibrates with a new frequency given by the electromagnet. Figure 5-12 The Resonance Vibration Panel Lab 5 The Study of Vibration 135 Figure 5-13 The Resonance Vibration Diagram 5. The Feedback Node, alongside Build Array, was used to visualize the raising of the resonance curve point by point. The graphical representation is realized on the XY Graph, called Resonance (see Figure 5-12). 6. In the Panel, set the values for Start Frequency (Hz), Stop Frequency (Hz), and Horizontal and Trigger controls as shown in Figure 5-12. 7. Power on the NI ELVIS II system and the prototyping board. 8. Run the application and visualize the values (see Figure 5-12). 9. The resonance frequency of the system is the frequency for which the maximum amplitude is obtained. 136 Lab 5 The Study of Vibration Challenge 1. Design an experiment to determine the oscillation system. Indication: The system created for the other experiments is created as well, with the modification shown in Figure 5-14. On the elastic lamella, slates with various mass values are placed in turn—the first with a mass of 2 g, then 4 g, 6 g, 8 g, and 10 g. Starting from Equation (67) ωo2 = k = 4π 2υ 2 m (67) and using the first slate with the mass of 2 g, the following system of equations is obtained: ⎧ k = 4π 2υ 2 m ⎨ 2 2 ⎩k = 4π υ1 (m + 2 ) (68) where υ is the oscillation frequency of the system without the mass applied and υ1 is the oscillation frequency of the system with the slate of 2 g applied on the elastic lamella. a Figure 5-14 Configuration to determine the oscillation system mass where “a” represents the slates Lab 5 The Study of Vibration 137 The mass of the oscillation system is determined by solving Equation system (68), where υ and υ1 are determined by measurements; see Equation (69), which follows: 2υ12 m= 2 υ − υ12 (69) Several determinations will be made using the other masses attached to the elastic lamella, in order to obtain a real value of the oscillation system mass. The mass of the system will be determined in this case as a mean of the masses found. 2. Determine the elastic constant of the lamella. 138 Lab 5 The Study of Vibration Notes Lab 6 Introduction to Control 139 Lab 6 Introduction to Control Instructor’s Notes In order to control a system, it is necessary to manage, command, or regulate the response of the system. This can be achieved with a device or a set of devices. The control can be done in an open loop or in a closed loop system (Figure 6-1). Desired value Ideal system a) Desired + Σ value - Control System Real system Output value Sensors b) Figure 6-1 Types of control systems a) The open-loop control system b) The closedloop control system To illustrate the concepts of open-loop and closed-loop systems, consider the following examples. If a man stands with his hands raised sideways, holding a pencil and tries to touch his nose with the pencil tip while keeping his eyes closed, this movement becomes very difficult. The difficulty derives from the fact that the man doesn’t know the exact location of the pencil tip. This is open-loop control. Any change in his movement will lead to an increased chance of error because he has no feedback for correction. If he opens his eyes, though, he will see the pencil tip and will make the necessary adjustments to correct the error. This is closed-loop control. Another example of a control system is the furnace of a house. In normal conditions, if the system works at x% of its capacity, the temperature in the house will be yoC. If it’s necessary to increase the temperature to y2oC, then the furnace must work at x2% of its capacity. When a disturbing factor appears (such as a window opening), the system will not react, because there is no mechanism for feedback. In order to close the loop, a temperature sensor should be used to control Lab 6 Introduction to Control 140 the furnace. The temperature sensor will ensure that any change in the house temperature will be noticed, and then the furnace would be controlled accordingly. Widely used control algorithms include PID algorithms, fuzzy logic algorithms, neural networks algorithms, and others. The most frequently used algorithm is the proportional integral differential (or three terms)—the PID algorithm. Goal This lab is designed to enhance the understanding of the control system concept. The PID algorithm is used to create the control system. This algorithm is applied to control the speed of a DC motor and the temperature of a heater. Required Components Components requirements and software applications are as follows: LabVIEW 2010 NI ELVIS II platform and NI ELVIS II drivers NI LabVIEW PID and Fuzzy Logic Toolkit DC motor Tachometer IRF530 MOSFET transistor 1N4007 semiconductor diode LM335 temperature sensor 27 Ω, 5 kΩ, and 5.6 kΩ resistors Lab 6 Introduction to Control 141 Background Introduction Automation of the manufacturing process requires control of all of the involved machines and processes. Components of such a control system include an input, an error signal (representing the difference between the desired values—known as the SP or set point—and the feedback signal), and an output that provides a signal to modify the system. The simplest control system algorithm is the on–off algorithm. If there is an error signal at the control system input, the correcting device is switched on, and when the error signal ceases, the correcting device is switched off. The performance capabilities of such a system are limited. It is used only for control systems where the precision doesn’t have to be very accurate. PID Controller A more advanced algorithm for control is the PID algorithm. It is known also as the Three-Term Controller. The three terms are Proportional, Integral, and Derivative. The PID controller is described by Equation (70): t u (t ) = K p e(t ) + K i ∫ e(τ )dτ + K d 0 d e(t ) dt (70) where u(t) is the output of the controller (also known as the control signal); e(t) represents the tracking error; and Kp, Ki, and Kd are the PID coefficients. The tracking error is calculated as the difference between the set point SP (the desired value) and the process variable PV (the system output value). The diagram of this algorithm is shown in Figure 6-2. 142 Lab 6 Introduction to Control K p e(t ) P t Set point e(t) Σ + PV K i ∫ e(τ )dτ I d e(t ) dt D Σ u(t) 0 Kd Real system Process variable PID controller Figure 6-2 The PID diagram Interpreting the Terms Proportional In order to understand the terms’ effect, only one at a time will be considered. In the first step, the Ki and Kd have to be maintained at zero. So, from Equation (70), only u(t) = Kpe(t) remains, meaning that the control is proportional to the current error value. The proportional control can be accredited with the present term. The proportional term (P term) is sometimes called gain and is sometimes noted as Kc. If the error is high, the control signal is high; if the error is small, the control signal is small. If the system is closer to the set point, the response of the controller is negligible. Thus, if the system drifts a bit from the set point, the control does almost nothing to bring it back. Using the proportional control, an offset between the SP and PV will remain (see Figure 6-3). The offset is a function of the proportional gain Kp and the process gain. offset Figure 6-3 The Proportional control Lab 6 Introduction to Control 143 The effect of Kp increasing over the offset is shown in Figure 6-4. One can see that the offset decreases as Kp increases. But increasing the value of Kp, can make the controller unstable. In addition, from Figure 6-4 one can see that the controller reaches the set point faster. Figure 6-4 The effect of Kp increasing over the offset Integral The integral term (I term) is defined by Equation (71): t u (t ) = K i ∫ e(τ )dτ (71) 0 If the error is not zero, the summation of this integral is proportional to both the error’s magnitude and its duration. So, summing the error over time, the control signal becomes larger, forcing the system to react in the direction of eliminating the residual offset that occurs with just a proportional controller. The accumulated error is multiplied by Ki (the integral gain) and is then added to the controller output. Because the integral term accumulates the values of the error, the integral control can be accredited with the past term. Since the integral term is dependent on the accumulation of the past errors, it will lead to the process variable overshooting the set point value (Figure 6-5). The integral term is often related to the proportional gain by Ki = where Ti is the integral time. Kp Ti (72) 144 Lab 6 Introduction to Control Generally the integral controller is not used by itself. It is used together with the proportional controller, giving the PI controller. Figure 6-5 The effect of Ki increasing As can be seen in Figure 6-5, the integral term tends to slow down the system reaction. Derivative From Equation (70) the derivative term (D term) can be extracted as: u (t ) = K d d e(t ) dt (73) where Kd is the derivative gain. The derivative term is determined by the rate of error change. The derivate represents the slope of the error curve, so the derivate term indicates the future tendency of the error. Due to this feature of the derivative term, we can think about it as a future term. Because the derivate increases once with the sharp transition, it has the tendency to amplify any high-frequency noises. If the system noise or the derivative gain is sufficiently large, the system can become unstable. Similar to the integral term, the derivative term can be related to the proportional gain by K d = K pTd where Td is the derivative time. (74) Lab 6 Introduction to Control 145 The effect of the derivative term is to decrease the time necessary for the controller to reach the set point (Figure 6-6). This is obtained by slowing the rate of change of the controller output, especially around the set point. Figure 6-6 The effect of Kd increasing Combining the three terms, good controller stability can be obtained. The most frequently used combinations of these three terms are P, PI, PID, and more rarely PD. PID Tuning The PID controller is based on three coefficients, Kp, Ki, and Kd, as was shown previously. The stability of the system depends on the selection of the coefficients. The process of adjusting the PID coefficients to optimum values in order to obtain the desired control response represents the controller tuning. There are many methods to find the coefficients’ optimum values. The method with the lowest performance is the manual method. This method attempts to find the PID coefficients without using any math rules (trial and error). It is an online method and requires experienced personnel. The first non-manual method for PID tuning was proposed by Ziegler and Nichols in 1942. Two variants of the Ziegler and Nichols method are widely used: the process reaction method and the ultimate cycle method. The process reaction method This method is based on the system’s reaction in an open loop, when a test signal is applied. The test signal is a step signal. The step size, OP, can be as large as possible but without endangering the process. The system’s response is plotted on a graph. The resulting graph is called a process reaction curve (Figure 6-7). This curve can be described through effective lag or dead time, represented as L, and the 146 Lab 6 Introduction to Control time constant T. The dead time L represents the time elapsed from the moment when the signal test was applied and a noticeable modification in the process output is observed. The time constant, T, is the time interval between t1 and t2, where t1 is the time coordinate of the intersection point, A, of the tangent drawn through the inflection point of the curve with the time axis, and t2 is the time coordinate of the intersection point, B, of the tangent with the final value line OP (see Figure 6-7). System output Curve tangent at POI B OP process reaction curve point of inflection - POI A O L t1 T t2 t Figure 6-7 The process reaction curve Knowing the L and T parameters, Ziegler and Nichols propose the rules shown in Table 6-1 to calculate the PID coefficients. Table 6-1 Setting the PID coefficients based on the process reaction method Control type P PI PID Kp T L T 0.9 L T 1.2 L Ti Td 0 0 L 0.3 0 2L 0.5 L The Ki and Kd coefficients can be calculated using Equations (72) and (74). Lab 6 Introduction to Control 147 Ultimate cycle tuning method Another variant of the Ziegler and Nichols method is the ultimate cycle tuning method. In the first step of this method, the Ki and Kd coefficients are set to zero. Then, Kp is slowly increased until the process output starts to oscillate. This value of Ki is called ultimate gain, and it is denoted by KU. The oscillation period is measured and is denoted by PU. Using KU and PU values, the PID coefficients can be calculated as shown in Table 6–2. Control type Kp Ti Td P 0.5KU 0 0 PI 0.45KU PID 0.6 KU PU 1.2 PU 2 0 PU 8 Table 6-2 Setting PID coefficients based on the ultimate cycle method The values shown in Table 6-2 are calculated for a quarter amplitude decay response, which means that the amplitude decreases by a quarter on each oscillation. In order to obtain a response with or without overshoot, the PID coefficients in Table 6-3 can be used. Control type Kp PID, ¼ decay 0.6 KU PID, with overshoot 0.33KU PID, no overshoot 0.2 KU Ti Td PU 2 PU 2 PU 3 PU 8 PU 3 PU 2 Table 6-3 Setting PID coefficients for a response with or without overshoot 148 Lab 6 Introduction to Control In industry, the PID tuning is made using dedicated software packages, and the manual calculation methods presented previously are no longer used. For more information about PID tuning, the references below can be studied. References W. Bolton, (2004) “Instrumentation and Control Systems,” Elsevier, LabVIEW PID and Fuzzy Logic Toolkit User Manual, http://www.ni.com/pdf/manuals/372192d.pdf “PID Controller,” http://en.wikipedia.org/wiki/PID_controller “PID Theory Explained.” http://zone.ni.com/devzone/cda/tut/p/id/3782 A. Wolfgang, (2005), Practical Process Control for Engineers and Technicians. Elsevier Linacre House, Jordan Hill, Oxford, UK. Lab 6 Introduction to Control 149 Exercise 6-1: The PID algorithm in speed control Controlling the speed of a DC motor can provide an example of the PID control application. The aim of this experiment is to understand how the PID algorithm can be used for speed control. The experimental setup consists of a DC motor coupled with a tachometer as a feedback sensor for the motor’s speed. This setup should be performed on the prototyping board of the NI ELVIS II as shown in Figure 6-8. The DC motor is connected to the variable power supply, and the tachometer output is measured using the DMM. Figure 6-8 The setup for DC motor speed control The voltage output specified by the manufacturer of the tachometer is 6.5 V/1000 RTM. The input voltage of the DC motor is 5 V. At the maximum input voltage, the speed of the motor is –3000 RPM. This means that, at full speed, the output voltage of the tachometer is ~ –18 V. To measure this voltage it is necessary to set up the range of the DMM at 60 V. In order to verify the system’s functionality, the following steps must be taken: 150 Lab 6 Introduction to Control 1. Build the testing circuit shown in Figure 6-8. 2. Power on the NI ELVIS II system and the prototyping board. 3. Start the NI ELVIS II Instrument Launcher. 4. Launch the variable power supply (VPS). Use this instrument to set the voltage applied to the DC motor (see Figure 6-9). 5. Launch the digital multimeter (DMM) used for measuring the output voltage of the tachometer (see Figure 6-9). 6. Modify the voltage applied to the DC motor between 0 V and 5 V (the maximum values for DC motor input—see the DC motor datasheet) and read the voltage generated by the tachometer (this depends on the tachometer type— see the tachometer datasheet). Figure 6-9 The DMM and VPS Panels 7. Close the DMM and VPS application and the NI ELVIS II Instrument Launcher. Lab 6 Introduction to Control 151 8. Start the NI LabVIEW 2010 software and build the application shown in Figure 6-10 and Figure 6-11. Figure 6-10 The PID Control Speed Pane 9. Place in the diagram the NI ELVISmx Digital Multimeter express VI from Function»Measurement I/O»NI ELVISmx. Right click on the Device Name input and choose the Create»Control option. Repeat the operation for the DC Voltage Input, create a constant, and choose the 60 V value. 10. Place in the diagram the PID VI from Function»Control Design & Simulation»PID. In order to use this VI it is necessary to first install the NI LabVIEW PID and Fuzzy Logic Toolkit. The PID VI implements Equation (70). Create the controls for output range and PID gains inputs. 11. To increase the performance of the controller, a filter is applied to the feedback measurements. This filter is applied using the PID Control Input Filter VI from Function»Control Design & Simulation»PID. 12. To control the voltage applied to the DC motor, the NI ELVISmx Variable Power Supply express VI from Function»Measurement I/O»NI ELVISmx is used. 152 Lab 6 Introduction to Control Figure 6-11 The PID Control Speed Diagram 13. In order to convert the measured voltage U[V], generated by the tachometer, into the motor speed v [RPM], Equation (75) is used: v= U [V ] ⋅ 1000 6.5 (75) 14. Because the DC motor has its moving start point near 2.1 V, we set the minimum voltage of the controller that is applied to the DC motor at 2.2 V. We also limited the upper values at 4.4 V, which means that the maximum speed of the motor will be approximately 2500 RPM. In order to increase the controller resolution we use the 0–100% range for the controller output CO[%], after which the conversion in voltage that is applied to the motor UO[V] is made. These features are implemented using Equation (76): U O [V ] = CO[%] ⋅ 2.2 + 2.2 100 (76) 15. Using the Wait Until Next ms Multiple VI, the time interval for iterations can be set. 16. Create a property node for Speed chart. Right click on the Speed chart icon on Diagram and chose the option Create»Property Node»X Scale»Offset and Multiplier»Multiplier and connect it with dt PID VI output. This feature allows scaling of the Speed chart depending on the iteration time. 17. In the panel place a Knob control, call it Set Point [RPM], add a Gauge indicator, and call it Actual Speed. Right click on the Actual Speed indicator and choose the Add Needle option. This will allow visualizing of the Process Lab 6 Introduction to Control 153 Variable (PV) and the Set Points (SP) values on the same indicator. In order to visualize the digital values, right click on both and choose the Visible Items»Digital Display option. 18. Choose the right device name for NI ELVIS II on the Device Name control as well as the values for Kp, Ti and Td coefficients. 19. Run the application and see the reaction of the system. (If the system is unstable, try to apply the Ziegler and Nichols tuning methods to find the best PID coefficients). 20. Modify the application as in Figure 6-12 and Figure 6-13. Replace the PID VI with PID Autotuning VI. 21. Create the autotuning parameters and autotune? (F) controls for the PID Autotuning VI. Create a local variable for the PID Gains control. Right click on the PID Gains control icon on the Diagram and choose the Create»Local Variable option. Connect it to the PID Gains out output of the PID Autotuning VI. Figure 6-12 The PID Control Speed Panel with autotuning 154 Lab 6 Introduction to Control Figure 6-13 The PID Control Speed Diagram with autotuning 22. Design the Panel and run the application. Press the autotune? (F) control. A new window appears (see Figure 6-15). Follow the instructions in order to find the optimum PID coefficients for your system. Figure 6-14 The autotuning of the PID control interface Lab 6 Introduction to Control 155 Exercise 6-2: Pulse-width modulation in the PID algorithm for DC motor speed control A modern method used for delivering energy to a system is based on Pulse-Width Modulation (PWM). This technique means controlling the on time of a pulse wave. The pulse wave is characterized by the period T, amplitude A, and the duty cycle DT (see Figure 6-15). The period represents the time interval that verifies Equation (77): y (t ) = y (t + T ) (77) where y(t) is the signal wave. The duty cycle DT represents the on time interval. In general, DT is expressed in percentages. Amplitude T DT Figure 6-15 The pulse-wave parameters The PWM concept follows from the fact that the output of a system is switched quickly between fully on and fully off, modulating the pulse width. The frequency used in switching a system from on to off is between a few hundred Hz and a few hundred kHz. Using PWM, the power amount delivered to the system can be regulated at desired values. The regulation is based on the fact that the average power delivered to the system is proportional to the modulation duty cycle. Using passive filters, the pulse waves can be smoothed in order to recover the average voltage value. In order to obtain the average value of a pulse wave, Equations (78) and (79) are used: 156 Lab 6 Introduction to Control 1 y= T y= 1 T t +T ∫ y(t )dt = t t +T ∫ y(t )dt 1 1⎡ y (t )dt = ⎢ ∫ T0 T⎣ T (78) t ⎤ ∫ y (t )dt ⎥⎦ = T − DT T 0 T − DT ∫ ymin (t )dt + max 1 [ymin ⋅ (T − DT ) + ymax ⋅ (T − T + DT )] = T 1 = [ y min ⋅ (T − DT ) + ymax ⋅ DT ] T = (79) If ymin=0, then the average value of the pulse wave becomes y = y max ⋅ DT T (80) Figure 6-16 shows average values of the pulse waves obtained for different duty cycle values. Figure 6-16 Average values of the pulse waves The PWM technique is used in many applications, such as: controlling the voltage generated by a computer power supply, controlling the speed of a DC motor, controlling the temperature of a heater, and so forth. This exercise is dedicated to the application of the PID control using the PWM for controlling the speed of the DC motor used in the first exercise. To use the PWM control it is necessary to change the electronic circuit for powering the DC motor. The schema is presented in Figure 6-17 and is based on a Lab 6 Introduction to Control 157 MOSFET transistor. The pulse wave is generated with the NI Function Generator set on the square waveform. In order to generate only positive pulses, an offset is added. Figure 6-17 The circuit of the PWM control application in Multisim The PID output will act upon the duty cycle of the square wave. The output of the NI Function Generator will command the MOSFET. The MOSFET is completely open when a voltage larger than 5 V is applied on its gate terminal. In order to verify the system’s functionality, the following steps must be taken: 1. Build the testing circuit shown in Figure 6-17, Figure 6-18, and Figure 6-19. 2. Start the NI LabVIEW 2010 software and modify the first application as shown in Figure 6-20: a. Replace the NI ELVISmx Variable Power Supply express VI with NI ELVISmx Function Generator express VI from Function»Measurement I/O»NI ELVISmx. b. Create constants for the Frequency, Offset, and Amplitude terminals. Set the frequency value at 1000 Hz, the offset value at 3.5 V, and the amplitude value at 3.5 V. In this manner the generated pulses will be only positive and the amplitude will be equal to 7 V (the MOSFET will be open). c. Connect the PID Autotuning VI output to the duty cycle terminal of the NI ELVISmx Function Generator express VI. 158 Lab 6 Introduction to Control 3. Run the application and set the PID coefficients to proper values using the autotuning methods described in the first exercise in this chapter. Figure 6-18 The 3D schema of the PWM control application in NI Multisim Lab 6 Introduction to Control 159 Figure 6-19 The circuit for the PWM control of the DC motor speed on NI ELVIS Figure 6-20 The diagram of the PWM control application of the DC motor speed 160 Lab 6 Introduction to Control Exercise 6-3: The PID algorithm for temperature control This third exercise is dedicated to understanding how the PID algorithm is applied in the area of temperature control. We will use a power resistor (5 W) in the heater role. As feedback sensor we will use a LM335 sensor (see Chapter 1). The positive supply of the variable power supply (VPS) is used as heater supply. The maximum current of the VPS is 500 mA, so the minimum resistance of the heater that can be used is calculated using Ohm’s law, as follows: Rmin = U max 12V = = 24Ω I max 0.5 A (81) For VPS safety it is recommended to use a bigger resistance. In this exercise we use a 27 Ω resistor. In order to implement the PID algorithm for temperature control, the following steps must be taken: 1. Build the testing circuit shown in Figure 6-21 and Figure 6-22. 2. Start the NI LabVIEW 2010 software and modify the application built in the first exercise as in Figure 6-23 and Figure 6-24. Figure 6-21 The circuit for PID temperature control in NI Multisim Lab 6 Introduction to Control To DMM Heater (R=27Ω) LM335 Figure 6-22 The circuit for PID temperature control on NI ELVIS Figure 6-23 The Panel of the temperature control 161 162 Lab 6 Introduction to Control Figure 6-24 The Diagram of the temperature control In the Panel: 3. Replace the Actual speed gauge control with thermometer control from Modern»Numeric control palette and rename it Actual Temperature. 4. Rescale the set point to appropriate values (e.g., 800C). Double click on the maximum value of the scale and write 80 and then click outside. In the Diagram: 5. Place the temperature conversion VI called Temperature VI built in Chapter 1 and create a constant for the Scale select input. Chose the Celsius option. 6. Keep the PID output at the 0–100% range. The conversion of the PID output to voltage applied to the heater by the VPS is based on the following equation: U O [V ] = CO[%] ⋅ 11V 100 (82) 7. Set the PID coefficients to the following values: KC=21, TI=0.8, and TD=0.15 and run the application. Notice the results. 8. Press the autotuning button and follow the steps to obtain the optimum PID coefficients. 9. Let the heater cool down and then restart the application. Lab 6 Introduction to Control 163 Challenge 1. Using both setups described in this chapter, try to apply the Ziegler and Nichols tuning methods to determine the PID coefficients. 2. In the same configuration, using the autotuning application, calculate the optimum PID coefficients. Compare the results. 3. Control the systems using the P, PI, and PID algorithms and compare their performances. 4. Find the PID coefficients using the control specification from the autotuning parameters cluster set on the values normal, fast, and slow. Notice the differences in the system’s response. 164 Lab 6 Introduction to Control Notes Lab 7 The Photovoltaic Characterization 165 Lab 7 The Photovoltaic Characterization Instructor’s Notes The term photovoltaic combines the Greek word for light, “photos,” with “volt,” the name of the electromotive force unit (the force that causes the motion of electrons). The volt was named after the Italian physicist Alessandro Volta, the inventor of the battery. The photovoltaic effect consists of the occurrence of an electromotive voltage when the cell is illuminated. The direct conversion of light into electric energy involves the photovoltaic effect, where photon energy is used to change an electron from its ground state into an excited state [Spanulescu, Green]. Ideally, there should be a one-to-one relationship between light and electric current; each photon that strikes the device delivers its energy to an electron, which in turn transports the energy to an electrical load connected to the terminals of the device. The most important photovoltaic effects take place in the p-n homojunction and heterojunction regions and at the metal–semiconductor contact, that being the place where a potential barrier and an electric field appear. The solar cell has the capability to convert solar energy directly into electrical energy by a process called photovoltaic conversion. The cell is essentially a large-area p-n junction diode (or rectifier) made from two pieces of silicon that are fused together. The general configuration of a simple cell (and a challenging one) is presented in Figure 7-1. The main part of a solar cell is represented by the p-n junction, which converts light into electrical power. The contacts are realized from highly conductive metals. The back contact covers the whole area of the cell, and the front contact is realized with the shape of fingers. For the more challenging cells an antireflective coating is added to these components, with the purpose of reducing the reflection from the front surface. SiO2 and Ta2O3 can be used as antireflective coatings, their thickness being carefully chosen [Kazmerski]. Lab 7 The Photovoltaic Characterization 166 Figure 7-1 Schematic view of a PV-cell, which shows the basic semiconductor layers a) and b). Goal The purpose of this set of exercises is to study the behavior of some types of solar cells and mini solar panels, using the NI ELVIS II platform. The first goals of the lab exercises include the raising of the I-V characteristic of the solar cell, the determination of some solar cell parameters, and investigating the variation of the short-circuit current Isc and open-circuit voltage Voc function of illumination. An additional goal is to study the behavior of the cells if they are bound in series or in parallel, thus creating mini solar panels. For the mini solar panels the I-V characteristic is also raised and interpreted. Required Components Component requirements and software application for relays testing include the following: LabVIEW 2010 NI ELVIS II platform and NI ELVIS drivers 1 MOSFET transistor IRF2907z 1 resistance of 5.6 kΩ 1 resistance of 0.1 Ω One solar cell, 0.5 V/400 mA, dimensions (L x W) 76 x 46 mm, operating temperature –20 to 800C Two solar cells, 0.51 V/200 mA, dimensions (L x W) 50 x 23mm, operating temperature –20 to 800C Lab 7 The Photovoltaic Characterization One halogen bulb, 35 W, 12 V The power supply, 12 V, 4 A 167 168 Lab 7 The Photovoltaic Characterization Background The Solar Cell The solar cell is the “heart” of a photovoltaic system. In order to create an optimum photovoltaic system, the cells that it comprises must be carefully chosen. The internal and external parameters of the cells must be determined in order to make this choice. In a panel only the so-called twin cells must be used, meaning the cells that have very close parameter values. Figure 7-2 The I-V Characteristic for solar cells The main study method for solar cells’ parameters uses the current-voltage characteristic I-V (see Figure 7-2). The main parameters that must be taken into account for measuring the solar cells’ performance are: short-circuit current (Isc), open-circuit voltage (Voc), maximum power (Pmax), fill factor (FF), efficiency, and internal parameters. These parameters are briefly described in thefollowing list: The open-circuit voltage (Voc) is the voltage generated by the solar cell when the current is zero (high impedance) I = 0. This quantity is related to the bandgap of the semiconductor used Voc = ⎞ kT ⎛ I ph ln⎜⎜ + 1⎟⎟ q ⎝ Io ⎠ (83) where k is the Boltzmann constant, T is the temperature of the solar cell, q represents the elementary load of the electron, Iph is the photogenerated current of the cell, and Io is the reverse saturation current. Lab 7 The Photovoltaic Characterization 169 The short-circuit current (Isc) is the current generated by the solar cell if the voltage across the device is V = 0. The current increases proportionally to the illumination level and the surface of the cell. For the current, the current density is also used, denoted by Jsc, representing the ratio between the current generated by the cell and its area. The maximum power Pmax produced by the device is reached when the product I*V is maximum. This is shown graphically in Figure 7-2, where the position of the maximum power point represents the largest area of the rectangle shown. The fill factor (FF) corresponds to the ratio of the maxim power that can be generated by the solar cell to the product of Voc * Isc (see Equation (84)). This factor is related to the curvature of the I-V characteristic. FF = Pm Voc × I sc (84) The cell efficiency can be determined from these three external parameters and from the area of the cell (see Equation (85)). These parameters can be determined through direct measurements as well as by subtraction from the I-V characteristic. η= Pm Voc × I sc × FF = Pin incident solar power (85) The shunt resistance and the series resistance are two of the internal parameters, also called parasite resistances. The latter is determined by the series resistance of the base, by the resistance of the metal–semiconductor contacts of the electrodes, and by the resistance of the diffused layer from the illuminated surface of the cell. The other internal parameters are the reverse saturation current, the ideality factor of the diode, and the photo-generated current. Many methods can be used to determine the parameters of the solar cells. The measurements can be performed in the lab as well as in natural light conditions. When the measurements are performed in the lab, the parameters can be determined both in illuminated conditions and in the dark. To be able to create the mathematical model that describes the behavior of the solar cell, its equivalent circuit has to be used. In Figure 7-3 the equivalent circuits of the silicon solar cell are presented, from the simplest to the most complex. The equations that mathematically describe the phenomena that take place within the solar cell are also presented. 170 Lab 7 The Photovoltaic Characterization a) b) c) d) Figure 7-3 The equivalent circuit and mathematical model of the solar cell a) The ideal circuit; b) The circuit with parasite resistance; c) The circuit for the twodiode model; d) The circuit for the three-diode model Lab 7 The Photovoltaic Characterization 171 To determine the equivalent circuit of the solar cells in a static regime (continuous current) the analyses will start from simplified hypotheses. The solar cell can be considered a current generator Iph, with a current that decreases due to the current through the diode Id. The diode is thus in parallel with the current generator. I is the current passing through a resistance of charge R (see Figure 7-3, a). In order to consider the internal losses in the equivalent circuit, the parasite resistances must also be included: the series resistance, Rs and the shunt resistance, Rsh (see Figure 7-3 b)). The current-voltage dependence for a solar cell can be expressed by the double exponential model. This model is based on an equivalent circuit with two diodes (see Figure 7-3, c)). In the equation that mathematically renders the model, the first term represents the diffusion process of the minority carriers from the depletion layer. The second term of the equation represents the recombination of the carriers in the space charge region of the junction. If the current caused by thermionic emission is also taken into consideration, the mathematical model as well as the equivalent circuit modifies. In the mathematical model another exponential term appears, and the equivalent circuit is given in Figure 7-3 d). The considerations regarding the mathematical models and the equivalent circuits presented here start from the presumption that the solar cell is illuminated. If the performances of the solar cell in the dark are under observation, Iph disappears from the mathematical models. The most general mathematical model for most of the solar cells studied in the dark becomes Equation (86), where the third term can be neglected, given that the recombination component is much higher than the thermionic component [Stutenbaeumer, Mesfin]. ⎛ ⎛ ⎛ q (V + IRs ) ⎞ ⎞ ⎛ q (V + IRs ) ⎞ ⎞ V + IRs ⎟⎟ − 1⎟ + I or ⎜ exp⎜⎜ ⎟⎟ ⎟ + I = I od ⎜⎜ exp⎜⎜ ⎟ ⎜ ⎟ m kT m kT Rsh 1 2 ⎝ ⎠ ⎠ ⎝ ⎠⎠ ⎝ ⎝ (86) The Solar Panel A Si solar cell generates a typical open-circuit voltage of 0.6 V, regardless of its area. The short-circuit current is proportional to the area and generally has values in the range from 30 to 40 mA/cm2. The maximum power generated by the solar cell is lower than Voc*Isc, as can be seen in Figure 7-2. This leads to the need to raise the maximum power generated. We can raise the generated power if 172 Lab 7 The Photovoltaic Characterization More cells are bound in series and the open-circuit voltage is raised proportionally to the number of solar cells bound in series (see Figure 7-4). In the given example two cells are bound in series. The open-circuit voltage is doubled (see the red curve) when the two “twin” solar cells are bound in series, and the short-circuit current remains the same. Figure 7-4 The I-V characteristic for a cell (blue) and the characteristic for two cells bound in series (red) More cells are bound in series and the short-circuit current is raised proportionally with the number of cells (see Figure 7-5). In the given example two solar cells are bound in parallel. The short circuit debited by the system is doubled (see the red curve) when the two twin solar cells are bound in parallel and the open-circuit voltage remains the same, Figure 7-5 The I-V characteristic for one cell (blue) and the characteristic for two cells bound in parallel, (red) Lab 7 The Photovoltaic Characterization 173 A number of cells can be bound in parallel and then in series, the effect obtained in this case being a combination of the two. By these methods of binding the solar cells in series and in parallel, the solar panels are obtained. The typical panels are obtained by binding in series 36 or 76 cells. To obtain even higher generated powers, solar panels arrays are built, as shown in Figure 7-6. Figure 7-6 The array system References D.T. Cotfas, P.A. Cotfas, S. Kaplanis, & D. Ursutiu (2008), “Results on Series and Shunt Resistances in a c-Si PV Cell. Comparison Using Existing Methods and a New One.” Journal of Optoelectronics and Advanced Materials, Vol. 10, No. 11, pp. 3124–3130. D.T. Cotfas, P.A. Cotfas, D. Ursutiu, & Cornel Samoila (2010), “Current-Voltage Characteristic Raising Techniques for Solar Cells. Comparisons and Applications.” 12th International Conference on Optimization of Electrical and Electronic Equipment, Optim 2010. M.A. Green (2002), Physica E, Vol. 14, No. 11. L.L. Kazmerski (1997), “Photovoltaics: A Review of Cell and Module Technologies.” Renewable and Sustainable Energy Reviews, Vol. 1, pp. 71– 170; 174 Lab 7 The Photovoltaic Characterization I. Spanulescu (1983), “Celule solare,” Editura Stiintifica si enciclopedica, Bucharest, Romania. U. Stutenbaeumer & B. Mesfin (1999), “Equivalent Model of Monocrystalline, Polycristalline and Amorphous Silicon Solar Cells.” Renewable Energy, Vol. 18, pp. 501–512. Lab 7 The Photovoltaic Characterization 175 Exercise 7-1: Raising the I-V characteristic for a solar cell The importance of raising the I-V characteristic of the solar cell was described previously. In this experiment the method to obtain this characteristic will be described, as well as the work conditions that must be taken into account. The raising of the I-V characteristic can be performed in natural light conditions under solar radiation as well as in lab conditions. In the lab the characteristic can be obtained when the cell is illuminated, as in Figure 7-2, or when it is not illuminated (dark condition), as in Figure 7-7. Figure 7-7 The dark semi-logarithmic I-V caracteristic for the solar cell There are several methods for the raising of the I-V characteristic. Some of them include using the electronic load, using a capacitor as a variable charge [Cotfas D, Cotfas P.], using a MOSFET, and using a variable resistance (a digital potentiometer can be used). In order to be viable for raising the I-V characteristic of the solar cell, a device has to fulfill the following conditions: It must be accurate. It must be fast, because the parameters of the cell modify with the temperature of the solar cell. For example, the open-circuit voltage drops with 2 mV/0C. If the characteristic is raised in a few tens of seconds, use of a thermostat is compulsory. The measurements obtained must be repeatable. 176 Lab 7 The Photovoltaic Characterization The number of points on the characteristic must be large in order to facilitate a fitting in good conditions. The parameters of the solar cells can be obtained by fitting the characteristic. The additional resistances introduced in the circuit must be reduced to the maximum when the circuit is realized. The same environmental conditions must be kept when the measurements are performed. Using the facilities of the fast prototyping board and the tools of NI ELVIS, the requirements listed can be satisfied if the capacitor or the MOSFET is used for raising the I-V characteristic of the solar cell. The MOSFET was chosen because the circuit required is much simpler, even if it has two minor disadvantages— namely, that it is a little slower and a smaller number of points can be obtained on the characteristic, in comparison with what is obtained with the capacitor. To practically realize the experiment on the prototyping board of the NI ELVIS, the mounting presented in Figure 7-8 must be made. It is relatively simple to make and will be used for the entire set of experiments. 1. Build the setup shown in Figure 7-8. The parts are labeled as follows: a. The monocristalline Si solar cell, 0.5V/400 mA b. The halogen light bulb of 35 W, fed from a source of 12 V and 4 A and mounted on a frame that permits the variation of the distance between the light bulb and the solar cell. By realizing this movement, the illumination on the cell can be varied without modifying the spectrum of the light radiation. The variation of illumination can be performed if there is a source with a variable voltage available. By varying the voltage between 10 and 12 V, a variation of the cell illumination can be achieved without significantly modifying the spectrum of light radiation. c. As the acquisition board permits only the measuring of the voltage, a resistance is used to measure the current R = 0.1 Ω, 1 W. The measured voltage is divided in the program to the value of the resistance, previously precisely measured. A low-value resistance is used because the characteristic starting from the point V = I*R is closer or further from the current axis function of the value of this resistance. It is preferable that the starting point of the voltage be as close to 0 as possible. The value of the resistance can’t be greatly reduced because finally the measurements could Lab 7 The Photovoltaic Characterization 177 be performed under the resolution of the board; thus, the noise will in fact be measured. b c a d e Figure 7-8 The setup of raising the I-V characteristic of the solar cell d. To realize the characteristic, a MOSFET transistor will be used, IRF2907z, with a low resistance Rds(on)of 4.5 mΩ (Static Drain-to-Source OnResistance). It is useful to use such a transistor in order not to raise the resistance in the measurement circuit. e. The polarizing resistance of the MOSFET transistor, with the value of 5.6 kΩ. 2. The electronic circuit was realized in Multisim, as well, for an easier implementation (see Figure 7-9). 3. Start the NI LabVIEW software and build the application that has the Panel and the Diagram shown in Figure 7-10. 4. Place in the Diagram NI ELVISmx Variable Power Supplies express VI, for the relay feeding. 178 Lab 7 The Photovoltaic Characterization Figure 7-9 The Multisim schemata for raising the I-V characteristic 5. Create controls for adjusting the polarizing voltage of the MOSFET, Offset and Voltage. For the transistor used, the voltage that has to be applied on the Gate to open the transistor is of 2 V (offset), and it can be raised to 9 V when the transistor is completely open. The value attributed to the Voltage control is added to the value of the Offset voltage. Lab 7 The Photovoltaic Characterization 179 6. Place in the Diagram the NI ELVISmx Oscilloscope express VI from Function»Measurement I/O»NI ELVISmx. Figure 7-10 Panel and Diagram of I-V characteristic for the solar cell 7. Create graphic indicators for measuring the voltage and the current debited by the solar cell, their values having been previously mediated using the icon Mean. 8. To measure the current generated by the solar cell, the voltage that falls on a resistance is measured. The resistance was previously measured precisely. In the software the value of the voltage measured is divided by the value of the resistance. 180 Lab 7 The Photovoltaic Characterization 9. The I-V characteristic of the solar cell is obtained by unifying the two signals. To visualize the characteristic, an indicator of the type XY graph is used. 10. Power on the NI ELVIS II system and the prototyping board. 11. Run the application and visualize the values. As in the previous version, the data obtained were not saved explicitly, but a new version of the software was created, to which an express icon was added for the writing of the data: Write To Measurement File (Figure 7-11). Figure 7-11 The software Diagram for raising the I-V characteristic of the solar cell and for data saving Lab 7 The Photovoltaic Characterization 181 Exercise 7-2: Determining the series resistance for a solar cell The series resistance is one of the most important parameters of solar cells. Due to the importance of this parameter, researchers have realized more than 25 methods for determining it. There are methods both in dynamic and in static regimes. Most methods are realized in the static regime and under illumination. Within this experiment the two-characteristics method will be presented. The influence of the series resistance upon the I-V characteristic of the cell—and at the same time upon its efficiency—is presented in Figure 7-12. With the raising of the series resistance of the solar cell, a translation towards the left of the characteristic is to be observed, leading to a dropping of the fill factor. The excess raising of the series resistance can lead to transforming the solar cell from a current generator into a consumer. Rs = 20mΩ Rs = 50mΩ Rs = 75mΩ Rs = 125mΩ Figure 7-12 The series resistance influence on the I-V characteristic of the solar cell The two-characteristics method is a method that uses two I-V characteristics raised at the same temperature for two illumination levels. The two characteristics are translated one from the other with the quantities ΔIsc and ΔIscRs = ΔV1 (Figure 7-13) on the directions y and x. Two corresponding points from the characteristics are moved away from each other at a distance equaling the translations of the coordinates system. The series resistance will be thus determined from the ratio in Equation (87): Rs = ΔV1 ΔI sc (87) To obtain Equation (87), the starting point is given by the equations for the singlediode model for the two illumination levels: 182 Lab 7 The Photovoltaic Characterization + Rs I1 ⎛ V1mV ⎞ I1 = I sc1 − I 0 ⎜ e T − 1⎟ ⎜ ⎟ ⎝ ⎠ (88) ⎛ V2 + Rs I 2 ⎞ I 2 = I sc 2 − I 0 ⎜ e mVT − 1⎟ ⎜ ⎟ ⎝ ⎠ (89) Taking into consideration Equation (90) as V is an independent variable V1 + I1R s = V2 + I 2 R s (90) And the translation for the current (91) I 2 = I1 − ΔI sc (91) Equation (87) is obtained. Figure 7-13 I-V curves used to determine the series resistance To practically realize the experiment, the following steps must be taken: 1. Build on the prototyping board of NI ELVIS the setup shown in Figure 7-8. 2. Start the LabVIEW software. 3. Build the application that has the Panel and the Diagram shown in Figure 7-14. The new version of the software used for Exercise 7-1 is used to raise the characteristic I-V of the solar cell. The data for two I-V characteristics are saved for two illumination levels of the solar cell. The illumination levels can be realized either by varying the voltage drop on the bulb or by varying the distance between the bulb and the solar cell. Using the software series resistance Rs (see Figure 7-14), the saved data are read using the express icon Read from Measurement File. Lab 7 The Photovoltaic Characterization 183 Figure 7-14 Panel and Diagram of the series resistance application 4. As for the method used to determine the series resistance, two characteristics are necessary; two identical lines are made for the program that permit the data to be read in turn and to be displayed on an X–Y graph indicator. 5. From each signal the current is extracted, as well as the voltage. To determine the short-circuit current, the maximum is extracted from the current vector. The maximum value of the vector is a good approximation of the short-circuit current, because the portion of the I-V characteristic for the interval 0-0.1V is parallel with the Ox axis. To obtain this, the icon Array Max & Min is used. 6. To obtain the necessary values in Equation (87), the following procedure will be put into practice: the short-circuit current of the characteristic for the lower illumination level of the characteristic will be divided by two, and by using reverse interpolation (changing the axis between them) the value of the voltage will be found for this characteristic. The value Isc1/2 will be subtracted from the 184 Lab 7 The Photovoltaic Characterization short-circuit current of the characteristic obtained for the higher illumination level, and using the reverse interpolation the corresponding voltage value is found. For the interpolation the icon used is Interpol 1d, the path being Functions, Mathematics, Interpolation & Extrapolation. 7. Create indicator Rs for series resitance. 8. Power on the NI ELVIS II system and the prototyping board. 9. Run the application and visualize the signals. Lab 7 The Photovoltaic Characterization 185 Exercise 7-3: The study of the solar panel The realization of the photovoltaic system begins with the building of the solar panel. To obtain the panel the cells are generally bound in series, but they can also be bound in parallel or in a mixed pattern. Table 7-1 contains the modifications made to the important parameters when the cells are bound in parallel and in series (np representing the number of cells bound in parallel and ns standing for the number of cells being bound in series). Table 7-1 No 1 2 3 4 5 6 The solar cell Isc I0 VT = mkT/q Rs Rsh Voc The solar panel np x Isc n0 x Isc VT = (mkT/q) x ns Rs x (ns/np) Rsh ns x Voc Figure 7-15 presents the building steps from the solar cell to the mini panel or solar panel. To perform the experiment in optimum conditions the whole panel must be uniformly illuminated. If some cells are illuminated partially or not at all, they can become consumers. A solar mini panel was used instead of the solar panel for an easier performance of the experiment. It is composed of two twin solar cells bound at first in series and then in parallel. The area of these solar cells was chosen so that they would be uniformly illuminated. Another problem that appears if the panel under characterization is a 36-cell panel, bound in series, is the fact that the generated voltage is 21 V, surpassing the measurement capabilities of the board. A voltage divider can be used tosolve this problem. The experiment consists of raising the I-V characteristic of the solar mini panel. The I-V characteristic is graphically compared with the short-circuit current, the open-circuit voltage, and the series resistance of the cell, when the cells are bound in series and in parallel. The steps in realizing the experiment are as follows: 1. Build the setup shown in Figure 7-16 to include (a) the halogen bulb; (b) the two solar cells; (c) the command circuit, which is similar to the one used for raising the characteristic of a solar cell; and (d) a different positioning of the 186 Lab 7 The Photovoltaic Characterization a) b) c) Figure 7-15 From the solar cell to the solar panel a) The solar cell; b) The mini panel; c) The solar panel (72 solar cells) wire; the cells are bound in series or in parallel, or the second cell can be shunted. 2. Start NI LabVIEW software and build the applications (Panel and Diagram) shown in Figure 7-10 and Figure 7-11. These applications permit the raising of the I-V characteristic and the data saving for a single state. 3. To realize the comparison of the data obtained, a program structure is used (see Figure 7-17) permitting the raising of the I-V characteristics on the same graph. The current-voltage characteristic for one single cell is blue in color. What can be observed? In comparison with the red curve that represents the characteristic for two cells bound in series, it can be said that the short-circuit current is the same, and the opencircuit voltage is twice as big. For the binding in parallel, the current rises two times, with the voltage remaining the same. An improvement in the program can be achieved by making the experiment for the determination of the series resistance an interpolation, and numeric indicators can be created for the short-circuit current as well as for the open voltage. Lab 7 The Photovoltaic Characterization d 187 a b c Figure 7-16 The setup of solar mini panel characterization 4. Another application that can be realized with the mounting already made and with the software used for Exercise 7-2 is the determination of the series resistance and its variation when the cells are bound either in parallel or in series. 5. It can be observed in Figure 7-18 that, when the cells are bound in series, the series resistance rises, and when they are bound in parallel, it decreases in comparison to the value of the series resistance for one solar cell. A major advantage of the educational platform NI ELVIS can be observed here— namely, with only a few parts and medium-level programming knowledge, extremely attractive experiments can be created for students. 188 Lab 7 The Photovoltaic Characterization Figure 7-17 Panel and Diagram of the series resistance application Lab 7 The Photovoltaic Characterization Figure 7-18 The series resistance comparison 189 190 Lab 7 The Photovoltaic Characterization Challenge 1. By modifying the program in Exercise 7-1: for raising the I-V characteristic of the solar cell, create a program that permits a. The raising on the same graph of both the current-voltage characteristic and the power-voltage characteristic (see Figure 7-19). Figure 7-19 The I-V and P-V characteristics of the solar cell b. Using as a possible example the interpolation from Exercise 7-2, determine the maximum power debited by the solar cell, determining at the same time the current and the voltage corresponding to the maximum power point. c. With the results obtained in list item b. and using Equation (84), create a program permitting the determination of the fill factor, FF. The short-circuit current, Isc, can be determined by extracting the maximum value from the current vector, and the open-circuit voltage, Voc, can be similarly extracted from the voltage vector. 2. Realize an application that permits the determination of the ideality factor of the diode, m. Equation (92), which follows, can be used to this purpose: m= Voc1 − Voc 2 KT ⎛ I sc1 ⎞ ⎟ ln⎜ q ⎜⎝ I sc 2 ⎟⎠ (92) The open-circuit voltages, Voc1 and Voc2, can be determined from the two I-V characteristics raised at different illumination levels using the icon Array Max Lab 7 The Photovoltaic Characterization 191 & Min. The proceedings are similar for the short-circuit currents Isc1 and Isc2. T represents the cell temperature, and with a good enough approximation the room temperature can be taken into consideration. If a more precise measurement is desired, a temperature sensor can be used (see the previous labs). The elementary charge q and the Boltzmann constant k are both constant, and the values are q = 1.6*10-19C and k = 1.32*10-23J·K-1. The theoretic value of m is 1, in the case of the diffusion mechanism. The real values are situated within the interval (1, 2). 3. The fitting of the I-V characteristic can be performed in order to determine the cell parameters. Realize an application that permits this. The single-diode model is used for this purpose (see Figure 7-3, b)). For the fitting, the icon Nonlinear Curve Fit. Vi can be used, along with the path Functions/Mathematics/Fitting. The fitting is realized using the algorithm Levenberg-Marquardt (see Figure 7-20). The model must be introduced for the fitting, the single-diode model in our case, and the initial fitting parameters. For the cell used in Exercise 7-1, the initial parameters can be seen in Figure 7-20. By fitting, it is also possible to determine: the short-circuit current Isc = a, the reverse-saturation current Io = b, the ideality factor of the diode m = c*k*T/q, and the shunt resistances Rsh = 1/d. Figure 7-20 The Panel and Diagram for Levenberg-Marquardt fitting 192 Lab 7 The Photovoltaic Characterization Notes