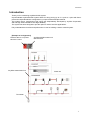
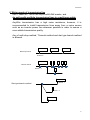
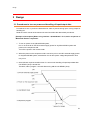
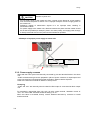
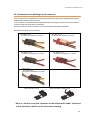
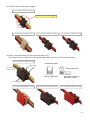
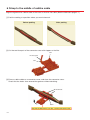
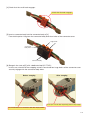
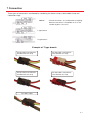
1
Anywire Corporation AnyWireASLINK System Technical Manual First edition Small and Fewer Points Sho-Haisen Transmission System Responds to On-site “Diagnostics” May 28, 2015 AnyWireASLINK system PMA-11032A Precautions Precaution related to this manual 1. This manual describes the overall concepts of the AnyWireASLINK system. Make sure to read the individual “User’s Manual” before use and understand the specifications and handling of the respective product. 2. Reprint or duplication of part or all of this Manual without permission is prohibited. 3. Contents of this Manual may be subject to future changes without prior notice. Safety precautions (Make sure to read before use.) When using this product, please carefully read this Manual and the related Manuals introduced in this Manual, and pay sufficient attention to safety in order to handle this product properly. The precautions in this Manual describe only matters related to this product. Refer to the User’s Manual of the CPU unit for safety precautions as a sequencer system. This “Safety precautions” ranks the safety precaution items into “ WARNING” and “ CAUTION.” Improper handling may cause a dangerous situation and can result in WARNING death or serious injury. CAUTION Improper handling may cause a dangerous situation and can result in moderate injury or minor injury or is assumed to result in property damage only. In addition, Matters described in CAUTION may lead to serious consequences depending on the situation. All describe important contents, therefore, make sure to observe the cautions and warnings. Carefully store this Manual so as to access it whenever necessary, and deliver this Manual to the end user. [Precautions for design] CAUTION ● The AnyWireASLINK system has high noise resistance, however, keep transmission lines and input/output cables 100mm or more (as a guide) away from high-voltage cables or power lines. A malfunction may result. ● Incorporate an emergency stop circuit and an interlock circuit for safety into an external circuit other than the AnyWireASLINK system. [Precautions for installation] CAUTION ● Use the sequencer in the environment of the general specifications described in the User’s Manual of the CPU unit. Use in any environment out of the range of the general specifications may result in electric shock, fire, malfunction, damage or deterioration of the product. i ● Securely insert the protrusion for fixing the unit into the fixing hole of the base unit to mount the master unit for the sequencer using the unit fixing hole as a support point while holding the lever for the mounting unit at the lower part. Improperly mounted unit may result in malfunction, failure or dropping. When using in a heavy vibrating environment, tighten the unit with screws. Tighten the screws within the specified torque range. Loose tightening may result in dropping, short-circuit or malfunction. Excessively tightening screws may cause damage to the screws or unit, resulting in dropping, short-circuit or malfunction. ● Make sure to shut off all phases of the external supply power used in the system for installation and removal of the unit. Unless all phases are shut off, the product may be damaged. ● Do not directly touch the conductive sections and electronic components of the unit. This may result in malfunction or failure of the unit. [Precautions for wiring] CAUTION ● Tighten the terminal screws within the specified torque range. Loose tightening of the terminal screws may result in short-circuit, fire or malfunction. Excessive tightening of the terminal screws may cause damage to the screws or unit, resulting in dropping, short-circuit or malfunction. ● Be careful to prevent foreign matter such as cutting chips and wiring offcuts from entering into the unit. Fire, failure or malfunction may result. [Precautions for wiring] CAUTION ● In order to prevent foreign matter such as wiring offcuts from entering into the unit at the time of wiring, an entry prevention label is attached on the upper part of the master unit. Do not remove this label during wiring work. Make sure to remove this label to discharge heat when operating the system. ● Improper wiring may damage the equipment. Be careful with regard to the label length and layout so that connectors and electric wires are not disconnected. ● When connecting wires with terminal blocks, do not solder. A contact failure may result. ● If power voltage for the remote slave unit becomes insufficient due to a drop in the power-supply line voltage, connect an external supply power to ensure the specified voltage. ● Do not turn on the 24V DC power source before completing wiring and connections of the whole AnyWireASLINK system. ● Use a 24V DC direct current stabilized power supply for AnyWireASLINK system devices. ● Do not bind the control wire and communication cable with the main circuit or power line, or do not bring them close to each other. Noise may result in malfunction. ● Make sure to put electric wires and cables to be connected to the unit into ducts or fix them with clamps. Unless cables are put into ducts or fixed with clamps, drift, movement or careless tensioning of a cable may result in damage to the unit or cable, and a connection failure of a cable may result in malfunction. ● When removing cables connected to the unit, do not hold the cable section by hand when pulling. Remove the cable equipped with a connector by holding the connector on the connection part of the unit. To remove cables connected to the terminal blocks, loosen the terminal screws on the terminal block. When cables are pulled while they are connected to the unit, malfunction or damage of the unit or cable may result. ii [Precautions for startup and maintenance] WARNING ● Do not touch the terminals while the power is on. Electric shock or malfunction may result. ● To clean or to re-tighten the screws on the terminal block and the unit mounting screws, make sure to shut off all phases of the external supply power used in the system. Unless all phases are shut off, electric shock may result. Loose tightening of the screws may result in short-circuit or malfunction. Excessive tightening of the screws may cause damage to the screws or unit, resulting in dropping, short-circuit or malfunction. CAUTION ● Do not disassemble or remodel each unit. Failure, malfunction, injury or fire may result. ● Make sure to shut off all phases of the external supply power source used in the system for installation and removal of the unit. Unless all phases are shut off, Failure or malfunction of the unit may result. ● Install and remove the unit, base and terminal block 50 times or less after use of the product. (Compliance with JIS B 3502) If 50 times are exceeded, malfunction may result. ● Before touching the unit, make sure to touch grounded metal to discharge static electricity charged to the human body. Unless static electricity is discharged, failure or malfunction of the unit may result. [Precautions for disposal] CAUTION ● Dispose of this product as industrial waste. ●About application of product ● When using the sequencer of Mitsubishi Electric Corporation, make sure to observe the content regarding “About application of product” specified by Mitsubishi Electric Corporation. If you have any questions regarding the sequencer, make sure to contact the service department of Mitsubishi Electric Corporation. iii Contents 1 2 QUICK START .............................................................................................................................. 1-1 1.1. INSTALLATION ............................................................................................................................ 1-1 1.2. TEMPORARY OPERATION (WHEN TURNING ON POWER FOR THE FIRST TIME) ................................... 1-2 1.3. FULL OPERATION........................................................................................................................ 1-3 ANYWIREASLINK ........................................................................................................................ 2-1 2.1. FEATURES ................................................................................................................................. 2-1 2.2. SPECIFICATIONS ......................................................................................................................... 2-1 2.2.1. General specifications ................................................................................................... 2-1 2.2.2. Performance specifications........................................................................................... 2-2 2.2.3. Cycle time ........................................................................................................................ 2-3 2.2.4. RAS functions ................................................................................................................. 2-3 2.3. 2.3.1. System configuration ..................................................................................................... 2-4 2.3.2. Types of master unit ...................................................................................................... 2-4 2.3.3. Types of slave units ....................................................................................................... 2-4 2.3.4. Number of slave units connected ................................................................................. 2-5 2.3.5. Connection of slave unit ................................................................................................ 2-5 2.4. 3 TRANSMISSION LINE (DP-DN) ..................................................................................................... 2-6 2.4.1. Connection mode ........................................................................................................... 2-6 2.4.2. Transmission distance................................................................................................... 2-9 2.4.3. Transmission cable type and precautions................................................................. 2-10 2.4.4. Transmission line supply current value..................................................................... 2-11 2.4.5. Terminator ..................................................................................................................... 2-12 2.5. ANYWIRE FILTER...................................................................................................................... 2-13 2.6. ADDRESS SETTING (REFERENCE) .............................................................................................. 2-16 2.7. MONITORING FUNCTION ............................................................................................................ 2-17 2.8. AUTOMATIC ADDRESS IDENTIFICATION OPERATION..................................................................... 2-17 2.9. ID DUPLICATION DETECTION ...................................................................................................... 2-18 2.10. INSTALLATION OF DEVICES .................................................................................................... 2-19 2.11. 2-WIRE TYPE, 4-WIRE TYPE SLAVE UNIT ................................................................................. 2-21 DESIGN ........................................................................................................................................ 3-1 3.1. PROCEDURES TO TURN ON POWER AND HANDLING OF INPUT/OUTPUT DATA................................... 3-1 3.2. EXAMPLE OF PROGRAM .............................................................................................................. 3-2 3.3. POWER SUPPLY .......................................................................................................................... 3-3 3.3.1. How to supply power ..................................................................................................... 3-3 3.3.2. Power supply common .................................................................................................. 3-6 3.4. iv PRODUCT OUTLINE ..................................................................................................................... 2-4 ANYWIRE FILTER........................................................................................................................ 3-7 4 5 6 CONNECTION OF TRANSMISSION LINE ................................................................................... 4-1 4.1. REMOVAL OF CONNECTOR .......................................................................................................... 4-1 4.2. TRANSMISSION LINE BUILDING BY LINK CONNECTOR ..................................................................... 4-3 TRANSMISSION REQUIRED TIME.............................................................................................. 5-1 5.1. IN THE CASE OF INPUT................................................................................................................. 5-1 5.2. IN THE CASE OF OUTPUT ............................................................................................................. 5-1 TROUBLESHOOTING .................................................................................................................. 6-1 6.1. VISUAL CHECK ........................................................................................................................... 6-1 6.2. CHECK WITH BUFFER MEMORY (EXAMPLE OF QJ51AW12AL) ..................................................... 6-1 6.3. LED STATE OF MASTER UNIT ...................................................................................................... 6-2 6.4. LED STATE OF THE SLAVE UNIT .................................................................................................. 6-4 6.4.1. Display and contents of each model ............................................................................ 6-6 7 WARRANTY ................................................................................................................................. 7-1 8 CHANGE HISTORY ...................................................................................................................... 8-1 v Introduction Introduction Thank you for considering AnyWireASLINK system. Unprecedented AnyWireASLINK system allows for wiring saving up to IO 1 point to 1 point with fewerpoint and multiple-distribution configuration by unique full double-duplex method. This system uses a “transmission chip” which was independently developed by AnyWire Corporation, and has high noise resistance and high reliability. This system has been designed to provide optimum sensor level bus applications. Fully understand the functions and performance in use for building a sensor network system. [Example of configuration] Mitsubishi Electric Corporation MELSEC-Q series AnyWire transmission line AnyWireASLINK master unit QJ51AW12AL Slave unit Terminator 1 Introduction Terms This manual uses the following terms in its explanation unless otherwise specified, Terms Description QJ51AW12AL Abbreviated name of AnyWireASLINK master unit QJ51AW12AL MELSEC-Q series Abbreviated name of Mitsubishi sequencer MELSEC-Q series Sequencer CPU Abbreviated name of MELSEC-Q series CPU unit Intelligent function unit Master unit Slave unit Engineering tool GX Works2 GX Developer Bridge gateway Terminator Transmission cycle time Transmission delay time Unit to control data link system, one unit is required for one system Unit to communicate input/output data with master station Generic name of GX Works2,GX Developer Product name of MELSEC sequencer software package Buffer memory AnyWire base unit for connection with OpenBus Waveform shaping module Repetitive transmission time of actual data transmitted Time taken until data changes by transmission Memory of intelligent function unit to store data (such as set value, monitor value) received from or transmitted to CPU unit ASLINKER Remote IO (2 points) of AnyWireASLINK system ASLINKTERMINAL Remote IO (8 points) of AnyWireASLINK system ASLINKAMP ASLINKSENSOR DP-DN 2 Units of Q series other than CPU unit, power unit and input/output unit mounted on base unit AnyWire Corporation’s sensor amplifier used for AnyWireASLINK system AnyWire Corporation’s sensor used for AnyWireASLINK system Transmission line of AnyWireASLINK (power superimposition) Introduction Items to be followed for use 1. Usable cable for transmission signals (DP, DN) ・ General-purpose cabtire cables: Wire diameter 0.75mm2 ~ 1.25mm2 ・AnyWire dedicated flat cable Wire Number Model diameter of cores FK2-125-100 2 1.25mm2 FK4-125-100 4 FK2-075-100 2 0.75mm2 FK4-075-100 4 Use example DP, DN DP, DN, 24V, 0V DP, DN DP, DN, 24V, 0V The above cables can be used. Basically, use unshielded cable. 2. Transmission line and power supply ・ Transmits transmission signals (DP, DN) only. →Use 2-core cables ・ Transmits transmission signals (DP, DN) + terminal and DC power supply (24V, 0V) for connection load drive as a batch. →Use 4-core cables. Any of the above methods is allowed. Use a stabilized power supply for 24V DC. Provide a power supply unit dedicated for AnyWire, or provide a line to directly feed power from power supply terminal. When conforming with UL standards, make sure to use an NEC Class2 24V DC stabilized power supply. Voltage fed to all AnyWire devices should be within a range of 21.6V ~ 27.6V. 3 Introduction 3. Transmission distance, wire diameter and allowable supply current This system transmits by power superimposition method. DP, DN allowable supply current varies depending on wire diameter and total extension used, therefore use wires within a range shown in the table. Transmission distance DP, DN allowable supply current Shorter than 50m Exceeding 50mm, shorter than 100m Exceeding 100m, shorter than 200m Shorter than 50m Exceeding 50m, shorter than 100m Exceeding 100m, shorter than 200m Less than 2A Less than 1A Less than 0.5A Less than 1.2A Less than 0.6A Less than 0.3A Wire diameter 1.25mm 2 0.75mm2 Consider transmission distance on the basis of total extension (total cable length including branch). Cable length coming out from the unit is included in total extension. “Total extension” means total of cable length used for transmission line. 4. Connecting units Max. 128 units However, it is necessary that ・ number of units in which total of DP-DN consumption current of connected slave units is in a range of allowable supply current and ・ number of occupied input/output respective points of slave units is the number of units in a range of transmission points set by the master. 5. Voltage drop (reference) When transmitting transmission signals and power as a batch, observe the following formula in consideration of voltage drop. R (Ω) × 2 × L (m) × I (A) 2.4 (V) R: Wire resistance L: Length of longest wire I: Required current Wire resistance 0.75mm2: 0.025Ω/m Wire resistance 1.25mm2: 0.015Ω/m If the voltage is deviated from this condition, provide local power supply. 4 Introduction 6. Wiring mode of transmission line Use 1 cable for 1 unit in the AnyWireASLINK master, and do not bundle multiple transmission lines in a multi-core cable. AnyWire transmission has a high noise resistance, however, it is recommended to install transmission lines away from a noise source such as an inverter power line wherever possible in order to ensure a more stable transmission quality. Any of multi-drop method, T-branch method and star type branch method is allowed. Multi-drop method No branch T-branch method Branch···1 Branch···1 Star type branch method Branch···2 Branch···3 5 Introduction 7. Transmission line configuration This connection example is a mixture of a 4-wire type terminal and 2-wire type terminal. This example shows that a main line is 50m or longer in 4-wire (transmission line, power line). 6 Introduction 8. ASLINK filter When DP, DN, 24V, and 0V lines run longer than 50m in total length in the supplying power supply system, serially connect “ASLINK filter [Type ANF-01]” or “COSEL CO., LTD [Type EAC-06-472]” to 24V and 0V at the position where all of the lines start to run. In addition, when conforming with CE standards, insert the “ASLINK filter [Type ANF01]” regardless of installation method and distance. 7 Quick Start 1 Quick start Outline of procedures to use AnyWireASLINK system and recommended conditions to operate in a more stable state are described. Refer to the contents described in chapter 2 and later for details on each item. [Example of description] When using interface “QJ51AW12AL” for Q series sequencer of Mitsubishi Electric Corporation 1.1. Installation 1. Wire material of transmission line → (See P2-10, 2.4.3 “Transmission cable type and precautions”) It is possible to lay with general-purpose VCTF cabtire cable 2-core (transmission line only) or 4core (transmission line + power line). 2. Wire diameter of transmission line → (See P. 2-10, 2.4.3 “Transmission cable type and precautions”) 0.75mm2 ~ 1.25mm2 3. Number of slave units connected → (See P. 2-5, 2.3.4 “Number of slave units connected”) Up to 128 units 4. Power supply → (See P. 2-13) Install power supply dedicated for AnyWire (or power line directly branched from power unit). Transmission signals and power can pass through either separate cables or through a bundled cable. If a voltage drop is taken into consideration, local power supply is recommended. Voltage of power supply to QJ51AW12AL Voltage within 24V±0.5V is recommended Voltage of power supply to slave unit Voltage should be within 21.6V to 27.6V. 5. Setting to sequencer Attach QJ51AW12AL to the predetermined sequencer slot position to set number of transmission points. Perform this setting in “Intelligent function unit switch setting” of QJ51AW12AL by “GX Developer” and “GX Works2.” Set assignment destination for the system information and I/O data, etc., of this unit. 1-1 Quick start 6. Address setting → (See P. 2-19) Address (head number to assign into transmission frame) setting is required for each slave unit. Use a dedicated address writer to perform address setting. The set address number is placed at the head, and area for number of points is occupied for each slave unit. (What part of buffer memory in the master unit the data is assigned is determined by this setting.) Area to be occupied should not exceed the range of number of transmission points set in 5. 7. Wiring Connect between the transmission line terminals (DP, DN) of the master unit and the slave unit. Branch wiring is allowed, however, wiring should be as short as possible. 8. Terminator → (See P. 2-12) Make sure to connect one terminator to the transmission line end farthest from the master unit. If there is any branch of 40m or longer, also connect it to the end. A transmission waveform shaping circuit is incorporated, and there are polarities (DP, DN), so connect it correctly. 1.2. Temporary operation (when turning on power for the first time) 1. The master unit is classified for operation on the sequence. QJ51AW12AL is classified as “Q Bus intelligent function unit.” For use of QJ51AW12AL, check that “I/O unit, intelligent function unit switch setting” on the sequencer side is correctly set. 2. Follow the power-on procedures and after turning on the external supply power and turning on the power for the sequencer body, handle data by FROM/TO and automatic refresh function. 3. Check the following. → (See P. 6-3) QJ51AW12AL display Each slave unit Terminator (polar) RUN lights up, LINK flashes, SET lights off, ALM lights up LINK flashes, ALM lights off Display LED lights up (low intensity) 4. Automatic address identification operation → (See P. 2-20) Hold the “SET switch” of QJ51AW12AL, and release when the “SET” LED lights up. When the “SET” LED lights off, automatic address identification operation is completed. Even if this operation is not performed, I/O is transmitted. 1-2 Quick Start 5. I/O check Check whether there is any difference in correspondence of mapping between I/O of the slave unit and I/O of the sequencer. When I/O is handled, improper input/improper output may occur, therefore, observe the following power sequence. 5-1. QJ51AW12AL requires transition time of one second up to input/output data handling after turning on power for the sequencer body. Therefore, do not perform access related to this unit (X, Y, FROM/TO, etc.) for two seconds after turning on power for the sequencer. → (See P. 3-1) 5-2. Follow the power-on procedures for the sequencer and turn on power in the order of external supply power and power for sequencer body. → (See P. 3-1) 5-3. Depending on how to supply from external supply power, transmission power voltage drop error (Xn3) may occur, and DP-DN disconnection error (Xn4) may be on and then ALM may occur at the time of initialization. → (See P. **) 1.3. Full operation If there is no problem with temporary operation, move to full operation. 1-3 AnyWireASLINK 2 AnyWireASLINK 2.1. Features AnyWireASLINK system is a Sho-Haisen (wiring saving) system equipped with small and fewer-point multi-distribution units suitable for wiring saving on sensor level. This system covers bundling of minimum 1 point to 8 points in a compact unit, therefore, it can bundle even in a narrow device in which BOX is not placed. In addition, “Digital Link Sensor” in which sensing function and wiring saving function are incorporated is proposed. This sensor can be directly connected to transmission line, and offers ultimate wiring saving which uses no remote terminal. And, not only ON/OFF information, but also information such as sensing level and disconnection are transmitted to the controller side. It is possible to monitor the operating state, prevent momentary stop and significantly reduce cause investigation time at the time of failure. Various setting items which the Digital Link Sensor has can be read and written from the higher side, and man-hours to adjust individual device are also significantly reduced. 2.2. Specifications 2.2.1. General specifications Operating ambient temperature 0°C ~ 55°C Storage ambient temperature -25°C ~ 75°C Operating ambient humidity Storage ambient humidity Operating atmosphere *1 Operating altitude Degree of pollution 10% ~ 90%RH, no condensation No corrosive gas 0 ~ 2000m *2 2 or lower *1 Do not operate or store the AnyWireASLINK equipment in an environment pressurized above atmospheric pressure at an altitude of 0m. Malfunction may result. *2 This is an index showing the degree of generation of conducting substance in an environment where the equipment is operated. Pollution level 2 means generation of non-conducting pollution only. However, temporary conduction may occur by accidental condensation in this environment. 2-1 AnyWireASLINK 2.2.2. Performance specifications Transmission clock Transmission distance/ 27kHz Wire diameter 2 1.25 mm supply current value 2 0.75 mm Connecting units Transmission method Connection mode Transmission protocol Error control Number of connecting IO points DP-DN allowable supply current 50m or less Less than 2A Exceeding 50m, shorter than 100m Less than 1A Exceeding 100m, shorter than 200m Less than 0.5A Shorter than 50m Less than 1.2A Exceeding 50m, shorter than 100m Less than 0.6A Transmission distance Exceeding 100m, shorter than 200m Less than 0.3A Max. 128 units DC power supply superimposed total frame/cyclic method Bus form (Multi-drop method, T-branch method, tree branch method etc.) AnyWireASLINK protocol Double check, checksum *1 Up to 512 points (Input 256 points/output 256 points) Transmission line disconnection detection function, transmission line short-circuit detection function, transmission circuit drive RAS functions power drop detection function, ID (address) redundant/non-setting detection function General-purpose 2-wire/4-wire cable (VCTF, VCT 0.75 to 2 1.25mm , rated temperature 70ºC) 2 General-purpose electric wire (0.75 to 1.25mm , rated Electric wire used temperature 70ºC) 2 2 Dedicated flat cable (0.75mm /1.25mm , rated temperature 90ºC) Circuit: (Supplied from a sequencer, bus side) Voltage +5[V] ± 5% Current 0.2[A] max. Transmission line driver: (Supplied to a front panel terminal) Voltage 24[V] DC +15 to -10% (21.6 to 27.6[V] DC), Ripple Master power supply 0.5[V]p-p max. Current 0.1[A] (when 128 slave units are connected, not including load current) Voltage 24[V] DC+15 to -10% (21.6 to 27.6[V] DC), Ripple 0.5[V]p-p max. Bridge power Current 0.1[A] (when 128 slave units are connected, not Gateway power including load current) *1: This varies with the AnyWireASLINK master unit. ◆ Refer to the user’s manual for specification details. 2-2 AnyWireASLINK 2.2.3. Cycle time Transmission I/O point number 64 points (Input 32 points) (Output 32 points) 128 points (Input 64 points) (Output 64 points) Transmission cycle time 2.3ms 3.5ms 256 points 512 points (Input 128 points) (Input 256 points) (Output 128 points) (Output 256 points) 5.9ms 10.6ms Transmission cycle time is the time to update input and output data of the master unit and all slave units. In actuality, “transmission delay time,” twice of transmission cycle time is generated by influence of the double check function. Transmission cycle time is a value between one cycle time and two cycle time. In order to securely make input signal respond, issue an input signal longer than two cycle time. Setting range of transmission frame varies with the master unit. Refer to the user’s manual of each master unit for details. Transmission speed of the AnyWireASLINK system is fixed. 2.2.4. RAS functions Transmission line disconnection detection function Transmission line short-circuit detection function Transmission circuit drive power drop detection function ID (address) redundant/non-setting detection function When there is no response from slave of ID memorized on the master unit side, the master unit detects this and notifies an error, and at the same time, lights up the master unit side ALM lamp. When the transmission line is short-circuited, the master detects this and immediately stops transmission, and notifies an error, and at the same time, lights up the master unit side ALM lamp. When voltage of 24V DC power supplied to the master unit drops, the master detects this and immediately stops transmission, and notifies an error, and at the same time, flashes the master unit side ALM lamp. A function is equipped to recognize an address (ID) set for the connected slave unit and notifies an error if there is any redundant or non-set unit. 2-3 AnyWireASLINK 2.3. Product outline 2.3.1. System configuration AnyWireASLINK system consists of master unit, slave unit and peripheral devices. Master unit Slave unit Terminator For output For input For output For input 2.3.2. Types of master unit Use master unit for AnyWireASLINK system. There are the following types of master units. Name Master unit for sequencer Bridge for field bus connection Gateway for field bus connection Details of compatible models MELSEC Q, L, F CC-Link, CC-Link IE Field Devicenet, PROFIBUS, EthernetIP Master unit and bridge unit for sequencer are jointly-developed products of Mitsubishi Electric Corporation. AnyWireASLINK system can be established below the sequencer and CC-Link of MELSEC Q series by using these units. ◆ Confirm the model name and type by the separate “AnyWireASLINK system catalog.” 2.3.3. Types of slave units Use slave units for AnyWireASLINK system for the above master unit. There are the following types of slave units. Example of devices to Name Details be connected ASLINKER (Input 2 points, output 2 points, General-purpose switch, input/output 1 point, 1 point) Input/output unit sensor, LED, solenoid ASLINKTERMINAL valve, relay, etc. (Input 8 points, output 8 points, input/output 4 points, 4 points) Relay output AC drive load, etc. 8 point relay output (G2R relay mounting terminal type) Dedicated manifold For solenoid valve manufactured by Manifold driver CKD General-purpose input ASLINKSENSOR Digital link sensor head ASLINKAMP (ASLINKAMP) 2-4 AnyWireASLINK ◆ Confirm the model name and type of the master unit and slave unit by the separate AnyWireASLINK system catalog. 2.3.4. Number of slave units connected Number of slave units which can be connected to one line of AnyWireASLINK system is maximum 128 units. (* It is necessary that sum of slave unit occupying point number and sum of consumption current for transmission line meet both conditions of maximum transmission point number or less and allowable supply current or less.) 2.3.5. Connection of slave unit There are roughly two types of methods for connection of slave unit of AnyWireASLINK. One method is the “2-wire (non-insulation) type” and the other method is the “4-wire (insulation) type. This depends on the slave unit. Any configuration of 2-wire type only, 4-wire type only and mixture of 2-wire type and 4-wire type can be used as a combination. Type 2-wire (non-insulation) 4-wire (insulation) ASLINKER Cable type M12 connector type ○ ○ ○ × ASLINKTERMINAL ASLINKAMP ASLINKSENSOR × ○ ○ × ○ × Legend: ○ With, × Without For basic configuration, connection with 2-wire type is assumed, and not only the transmission signals but also power to operate the terminal and equipment on the load side are superimposed on those 2-wire. When current capacity of the load side exceeds the upper limit of the transmission line supply current value in the AnyWireASLINK system consisting of 2-wire type, use 4-wire type. 2-5 AnyWireASLINK 2.4. Transmission line (DP-DN) “AnyWireASLINK protocol,” which is a low speed transmission clock, realizes a high speed effective transmission clock and is compatible with broad cable characteristics, therefore, various transmission cables and general-purpose electric wires can be used as a transmission channel. 2.4.1. Connection mode AnyWireASLINK Bus allows for various connections such as T-branch, multi-drop, and tree-branch. T-branch Multi-drop Branch line Tree branch ■ T-branch method The T-branch method is a connection method to branch out a cable from an insulation displacement connector or terminal stand to connect the slave unit. Actual wiring is shown below: 2-6 AnyWireASLINK ● When an insulation displacement connector is used A flat cable is branched using an insulation displacement connector as described below: ● When a terminal stand is used: A cable can be branched as follows using a store-bought terminal stand (a terminal stand with which terminal stands face to face are internally connected). ● Branching between cabtire cables ● Conversion to a dedicated flat cable 2-7 AnyWireASLINK ■ Multi-drop method The multi-drop method is a way to connect slave units directly to cables. When applying this method, neither new cables nor non-cable connecting equipment is required. In the actual wiring, as shown below, the signal lines of transmission cables from one side and those of transmission cables from the other side are integrated and connected to the slave unit. ■ Tree-branch method The tree-branch method is a way to re-connect the T-branched stay line using the T-branch method or multi-drop method. Actual wiring will be the same as the T-branch method or multi-drop method. ■ Star-branch method The star-branch method is a way to connect the master unit and lay cable radially from a certain branching point to connect the slave unit. This method allows for bundling transmission channels easily. On the other hand, it tends to cause reflection easily. AnyWire is not susceptible to reflection by a transmission method with a low-speed transmission clock, however, lay cables at the shortest distance with the minimum number of branches as possible. 2-8 AnyWireASLINK 2.4.2. Transmission distance All Transmission Distances described in AnyWire refer to “total extension” of a cable. Total length is the total cable length to be used including branches. Wiring of AnyWireASLINK system can be established by only 2 transmission lines (DP, DN). 2 transmission lines (DP, DN) address maximum 200m in total extension. (See P. 2-2) This total extension also includes the length of the cable coming out of the slave unit. ● In case of basic type Master unit L Set transmission distance (Total extension) L Terminator Slave unit ● In case of branch Master unit L1+L2+L3+L4 Set transmission distance (Total extension) L2 Terminator L1 L3 L4 Slave unit 2-9 AnyWireASLINK 2.4.3. Transmission cable type and precautions General-purpose cabtire cables, twist pair cables and specifically-made flat cables, etc., can be used for transmission cable. Use the following electric wires. - General-purpose 2-wire/4-wire cable (VCTF, VCT 0.75 to 1.25mm2, rated temperature 60ºC) - General-purpose electric wire (0.75 to 1.25mm2, rated temperature 60ºC) - Dedicated flat cable (0.75 mm2/1.25mm2, rated temperature 70ºC) CAUTION Shield cable Do not use shield cable because this system employs the power superimposition transmission method. When a strong noise source is laid in the periphery of the transmission line in such a case that the transmission line runs along with an inverter output line, servo output line and high frequency power line, take measures for noise such as shielding with a conductor plate. CAUTION Transmission cable - Be careful to prevent the voltage from lowering below the lower limit of the allowable voltage range due to voltage drop by cable. Lowering below the lower limit may result in malfunction. If there is a large voltage drop, install a local power supply. - Do not connect soldered wires directly to the terminal. The wire may loosen, resulting in a contact failure. 2-10 AnyWireASLINK ■ Reference example of electric wire Type Photo 300V vinyl cabtire cable (VCTF) Specifications Dedicated flat cable (HKV) Model:FK4-075-100 (100m winding) JIS C3306 Cross section area: 0.75mm² Allowable current: 7A (30°C) Conductor resistance: 25.1Ω/km (20°C) or less Insulation resistance: 5MΩ/km (20°C) or more Cross section area: 0.75 mm² Allowable current: 5A Maximum conductor resistance: 25Ω/km Dedicated flat cable (HKV) Model:FK4-125-100 (100m winding) Cross section area: 1.25 mm² Allowable current: 5A Maximum conductor resistance: 15Ω/km 2.4.4. Transmission line supply current value AnyWireASLINK system is allowed to be established with two wires. Not only transmission signals but also power for the slave unit and on the load side connected thereto are superimposed on these two wires. Allowable supply current (transmission line supply current value) from transmission line varies depending on wire diameter and total wiring distance, therefore, it is necessary that the total of consumption current of DP-DN connected (consumption current of slave unit itself + consumption current on load side connected to 2-wire slave) does not exceed this allowable current value. ■ Transmission line supply current value Wire diameter of transmission line (DP-DN) Length of transmission line 1.25mm2 0.75 mm2 Total extension: shorter than 50m MAX 2.0A MAX 1.2A Total extension: 50 ~ 100m MAX 1.0A MAX 0.6A Total extension: 100 ~ 200m MAX 0.5A MAX 0.3A 2-11 AnyWireASLINK 2.4.5. Terminator This unit incorporates a circuit which shapes a transmission waveform inside, and functions to reduce a situation where the transmission waveform is disturbed depending on an external environment. Properly connect to the transmission line because it has a polarity. (D:Red, G: Black) Reverse connection may result in transmission failure. The line extended from the master unit (line wired to the very end) is called a trunk line, and the line wired branched from the trunk line is called a stay line. A terminator for 1 master unit must be connected at the very end of the trunk line. When extending stay lines branched from the trunk line, if the length of the stay lines is more than 40m, one terminator must be connected at the end of the stay line. It is possible to omit terminators if the length of the stay line of the transmission line is less than 40m, however, it is recommended to connect a terminator to long stay lines of the system. Master unit Basic type Trunk line 30m or longer Terminator Slave unit Master unit Trunk line 30m or longer One branch, stay line less than 40m Terminator It is allowed to omit terminator Stay line 40m or less Slave unit Terminator Master unit Stay line 40m or longer Two branches, stay line 40m or longer Terminator Stay line 40m or less AnyWireASLINK system allows up to three terminators to be connected. 2-12 AnyWireASLINK 2.5. AnyWire filter If any of the side-by-side lines of DP, DN, 24V and 0V exceeds the total length of 50m in a power supply system to be supplied, serially connect the “ASLINK filter [Type ANF-01]” or “filter of COSEL Co., Ltd. [Type EAC-06-472]” to 24V and 0V in the starting position of the side-by-side lines. This will improve noise resistance, reduce the impact of crosstalk by transmission signals and stabilize the signals. In any case of power supply to the entire system from the master driving power supply or power supply from the local power supply, insert a filter. Insert the “ANF-01” regardless of installation method and distance when complying with CE Standards. ■ Filter allowable power current Model Type Allowable power current ASLINK filter ANF-01 MAX 10A/24V DC Filter of COSEL Co., Ltd. EAC-06-472 MAX 6A/24V DC 2-13 AnyWireASLINK ■ Connection example of ASLINK filter (ANF-01) for power supply to the entire system 2-14 AnyWireASLINK ■ Connection example of ASLINK filter (ANF-01) for local power supply 2-15 AnyWireASLINK 2.6. Address setting (reference) “Address setting” of slave unit determines from what number of bit in AnyWireASLINK transmission frame each slave unit is associated. Each terminal occupies the area of its own point number (with the set address number placed at the head) from the position. Address can be freely set from “0 to 254” respectively for input and output. Example) 8 point terminal: When address is “0” “0 to 7 bits” are occupied in transmission frame. Transmission frame No. 0 No. 7 No. (254) Set address so as to avoid bit interference. Example) 8 points Address “0” “No. 0 to 7” are occupied in transmission frame. 8 points Address “8” “No. 8 to 15” are occupied in transmission frame. Address of slave unit is handled by decimal number. Write a value you want to set in the slave unit by the dedicated address writer (ARW-04, ARW-03). Address of slave unit is set to “255” before shipment. The slave unit does not operate in this state. Before use, write any value other than “255” when turning on power for the first time. There is no problem if “255” is included in the occupied numbers. Example) Set address “254” to 2 point occupied terminal and use “254” and “255.” It is necessary to take into consideration so that the area which the slave unit occupies does not exceed the transmission point number setting set on the master side. 2-16 AnyWireASLINK 2.7. Monitoring function The slave units of the AnyWireASLINK have their own ID (addresses), and a slave unit which has an ID (address) sent from AnyWireASLINK master unit responds to the ID (address), so that it detects for disconnection and checks for existence of a connected slave unit. The AnyWireASLINK master unit stores an address of the slave unit which is connected at that time by the automatic address identification operation into EEPROM. This information is stored even if the power is turned off. 2.8. Automatic address identification operation This operation is intended to use the DP-DN disconnection function correctly. Make sure to perform this operation when starting up the system for the first time and after changing the system configuration of AnyWireASLINK. To perform automatic address identification, there are methods to hold the SET button on the master unit body, and issue automatic address identification command output (Refer to each user’s manual for details.). CAUTION:This operation is not intended to transmit I/O data. I/O data is transmitted when the power is turned on regardless of this operation. For a slave unit which is still in a connection state at the time of disconnection, I/O data is continuously transmitted. When any error occurs during operation, do not perform automatic address identification operation. Disconnection information will be lost. 2-17 AnyWireASLINK 2.9. ID duplication detection The master unit of AnyWireASLINK identifies ID (address) set to the connected slave unit, and notifies duplication and non-set state as an error. ID Description 0000H ~ 00FFH ID of output slave unit 0200H ~ 02FFH ID of input slave unit or input/output mixing slave unit ALM is also displayed (alternately flashes with LINK) on the associated slave side. [Details] When the master unit performs automatic address identification operation, it detects ID duplication or ID not-set slave unit if the unit is connected. This function works only when the master unit performs automatic address identification operation. When ID duplication and ID not-set slave unit is detected, slave unit alarm signal X(n+1)2 is turned ON. Detected error code (ID duplicate error: 0190H, ID not-set error: 0191H) and error ID are stored in the buffer memory. (Related items) Buffer memory address Decimal Hexadecimal number number Item 9984 2700H Alarm ID number information 9985 ~ 2701H ~ 10112 2780H 10256 2810H Latest error code storage area * Note 1 10257 2811H Latest error occurrence ID storage area Alarm ID information storage area * Note 1: If some errors simultaneously occur, a high priority error code is stored. This state can be cleared by turning the power for the AnyWireASLINK system OFF and ON, or turning the error flag clear command (Yn0) OFF, ON and OFF. The LINK LED and ALM LED alternately flash on the associated slave unit side. This state is kept until the address is changed or the power is turned OFF. Even if ID duplication is detected, operation of the slave unit is not limited. (Input/output are normally received/transmitted.) The ID non-set slave unit does not operate. 2-18 AnyWireASLINK 2.10. Installation of devices (1) Use the AnyWireASLINK master unit according to the installation standards of each sequencer. (2) AnyWireASLINK devices are as follows. [1] ASLINKER, ASLINKTERMINAL (Relays are excluded) - When they are directly installed, there is no limit to the installing direction. - When installing DIN rail, install it so that the horizontal or fixing hook is placed upward. 2-19 AnyWireASLINK [2] ASLINKTERMINAL(Relay is mounted) - When it is directly installed, there is no limit to the installing direction. - When installing DIN rail, install it so that fixing hook is placed upward. However, prevent acceleration from being applied in the contact opening/closing direction for any case. [3] ASLINKAMP - When installing DIN rail, install it so that the horizontal or fixing hook is placed upward. [4] ASLINKSENSOR (Photoelectric sensor is excluded) - There is no limit to the installing direction. [5] ASLINKSENSOR (Photoelectric sensor) - Install it so that light receiving/emitting surface is not subject to direct sunlight. 2-20 AnyWireASLINK 2.11. 2-wire type, 4-wire type slave unit There are roughly two types of methods for connection of slave units on AnyWireASLINK. One method is the “2-wire (non-insulation) type” and the other method is the “4-wire (insulation) type.” AnyWireASLINK system employs the “power supply superimposition transmission” method which superimposes power onto the transmission signals, and the connected slave unit can receive not only the transmission signals but also power to operate the slave unit itself and devices on the load side from the transmission signal line, and this is basic to this system. “2-wire (non-insulation) type” slave unit is used to receive not only the transmission signals but also power to operate the slave unit itself and devices on the load side from transmission signal line to control. “4-wire (insulation) type” slave unit receives transmission signals and control power for the slave unit itself from the transmission signals and can drive power for operating input/output circuit and devices on the load side by local power supply. When current capacity on the load side exceeds the upper limit of the transmission line supply current value in AnyWireASLINK system consisting of 2-wire type system, or when there is also power supply on the connected side, use the “4-wire (insulation) type.” Any configuration of 2-wire type only, 4-wire type only and mixture of 2-wire type and 4-wire type can be used as a combination. ■ AnyWireASLINK slave unit power supply source Type 2-wire (non-insulation) 4-wire (insulation) Control power Power for load connected DP-DN DP-DN DP-DN 24V-0V Example of load connected Devices for closed circuit such as sensor, switch, relay, LED I/O having large consumption current load, separate power supply ■ 2-wire (non-insulation) type, 4-wire (insulation) types, and type of terminal ASLINKER Type Cable type M12 connector ASLINKTERMINAL ASLINKAMP ASLINKSENSOR × ○ ○ × ○ × type 2-wire (non-insulation) 4-wire (insulation) ○ ○ ○ × Legend: ○ With, × Without 2-21 AnyWireASLINK ■ Image of power supply [2-wire (non-insulation) type] 2-22 [4-wire (insulation) type] Design 3 Design 3.1. Procedures to turn on power and handling of input/output data Procedures to turn on power are determined in order to prevent wrong input / wrong output for handling I/O. Read the user’s manual of the master unit used and follow the determined procedures. [Example of description] When using interface “QJ51AW12AL” for Q series sequencer of Mitsubishi Electric Corporation 1. To turn on power for AnyWireASLINK system, turn on in the order of 24V DC external supply power for AnyWireASLINK system and power on the sequencer side. Turn off the power in the reverse order. 2. When the power on the sequencer side is turned on prior to 24V DC external supply power for AnyWireASLINK system, transmission circuit drive power voltage drop detection error may occur. 3. QJ51AW12AL requires transition time of 1 second until handling of input/output data after unit READY (Xn0) is turned ON. Therefore, start a program 1 second after turning ON the unit READY (Xn0). 3-1 Design 3.2. Example of program This program example assigns I/O of AnyWireASLINK system to sequencer devices by FROM/TO command. [Example of description] When using interface “QJ51AW12AL” for Q series sequencer of Mitsubishi Electric Corporation X00 ~ X1F Y00 ~ Y1F I/O address [Equipment configuration] Power supply CPU Y20 ~ Y2F QJ51AW 16 point 12AL output unit Slot 2 ~ 4 vacant Insert user program in this space. Each signal corresponds to device as follows according to the above program. Type of signal Corresponding device Input (256 points) X100 ~ X1FF Output (256 points) Y100 ~ Y1FF 3-2 Design [Reference] BMOV command Format [ BMOV A B C ] A : Head input/output number of QJ51AW12AL B C (Designation with upper two digits when head input/output number is expressed in three digits of hexadecimal number) and head address of data read=Buffer memory address : Device head number of storage destination to store read-out data : Number of transfer data Function : Batch transfers 16 bit data at C point from the device designated at A to the device designated at B. 3.3. Power supply AnyWireASLINK system uses a stabilized 24V DC power supply. Required power conditions are as follows. - Ripple - Master unit transmission circuit drive power - Insulation type slave unit drive power → 0.5Vp-p or less → Supply voltage 21.6 DC ~ 27.6V (24V DC -10 ~ +15%) Recommended voltage 26.4V DC (24V DC +10%) → Allowable voltage range 21.6 DC ~ 27.6V (24V DC -10 ~ +15%) - Power for load connected to slave unit When conforming with UL standards, make sure to use an NEC Class2 stabilized power supply. 3.3.1. How to supply power AnyWireASLINK system allows for both of a method to drive master unit and slave unit (insulation type) respectively by separate power supply and a method to drive them by batch power supply. And, when driving them by batch power supply, this system allows the transmission line and power line to be wired as a bundle in a 4-core cable.* * When a 4-core cable is used, wire diameter and distance of the power line should be the same as those of the transmission line. Prevent supply voltage to the slave unit from dropping below the lower limit of the allowable voltage range (21.6V). 3-3 Design [Example of description] When using interface “QJ51AW12AL” for Q series sequencer of Mitsubishi Electric Corporation ■ Concept of capacity for batch power supply and local power supply Description of power supply Cable used Master side power supply 0.1A /24V DC + Slave total load current (for drive circuit) / Batch power 4-wire cable 24V DC supply Dedicated flat cable + Total external load current 24V DC, 100 AC etc. Master side power supply 0.1A /24V DC 2-wire cable (power supply) Slave total load current (for drive circuit) / Local power 24V DC supply 2-wire cable (power + supply) Total external load current 24V DC, 100 AC etc. 3-4 Design ■ Example of batch power supply Slave unit Slave unit Slave unit Slave unit ■ Example of local power supply Signals on the terminal block are as follows. D Signal transmission line G Signal transmission line 24V Connect +24V of 24V DC stabilized power. 0V Connect 0V of 24V DC stabilized power. Connect D, G, 24V and 0V to D, G, 24V and 0V of the slave unit respectively. * Example when local power is supplied by dedicated flat able Local power supply Local supply power range 3-5 Design CAUTION Position of power unit Do not supply power to the master unit from a power source placed at a local position such as out of the panel as shown in the “Improper example of how to supply power to the master unit.” Reference voltage of transmission signals is in an improper state, resulting in transmission failure. For power supply to the master unit, distance between the power and the master should be as short as possible (for example, place in the same panel), and supply power through a directly branched wire from the power terminal whenever possible. ■ Example of improper power supply to master unit Slave unit Slave unit 3.3.2. Power supply common Wires with the same symbol are internally connected by pins and terminal blocks in the slave unit. “COM” terminals among them are prepared in place of power crossover for input/output load to be connected and connected with power terminals in advance before shipment. Refer to the instruction manual for details on each product. Example) “COM” and “24V” are internally short-circuited for NPN output in screw terminal block output unit. For particularly unspecified slave unit such as relay output terminal, allowable current of “24V,” “0V” and “COM” terminals should be totally up to 1A. When this value is exceeded, directly connect between terminals by crossover or install another terminal. 3-6 Design 3.4. AnyWire filter If any of the side-by-side lines of DP, DN, 24V and 0V exceeds the total length of 50m in a power supply system to be supplied, serially connect the “ASLINK filter [Type ANF01]” or “filter of COSEL Co., Ltd. [Type EAC-06-472]” to 24V and 0V in the starting position of the side-by-side lines. This will improve noise resistance, reduce the impact of crosstalk by transmission signals and stabilize the signals. In any case of power supply to the entire system from the master driving power supply or power supply from the local power supply, insert a filter. Insert the “ANF-01” regardless of installation method and distance when complying with CE Standard. ■ Filter allowable power current Model Type Allowable power current ASLINK filter ANF-01 MAX 10A/24V DC Filter of COSEL Co., Ltd. EAC-06-472 MAX 6A/24V DC 3-7 Design ■ Connection example of ASLINK filter (ANF-01) for power supply to the entire system 3-8 Design ■ Connection example of ASLINK filter (ANF-01) for local power supply 3-9 Connection of Transmission Line 4 Connection of transmission line 4.1. Removal of connector When removing “AnyWireBus side connector,” check that the fixing screws on both ends are definitely loosened (removed from the socket), and pull it out. If the connector is forcedly removed when it is hooked, the equipment may be damaged. When installing, check that there is no short-circuit due to removal or looseness of element wires, and securely tighten the screws on both ends. (Tightening torque 0.5N·m) Fixing screw DP DN 24V 0V LG [AnyWireBus side] AnyWireBus transmission line connection part of this unit has easily removable connector terminals. Model : MSTB2.5/5-STF-5.08AU (Manufactured by PHOENIX CONTACT) 2 Connectable electric wire : 0.2 ~ 2.5mm (AWG24 ~ 12) Tightening torque : 0.5 ~ 0.6N·m Terminal name DP DN 24V 0V LG Type of signal Transmission signal + side. Transmission signal - side. Supplies 24V DC stabilized power supply. Connected to neutral point of noise filter. Ground when there is a malfunction due to 24V based power noise. When grounding, ground with the functional ground terminal (FG) of the sequencer at one point. 4-1 Connection of transmission line Connect DP and DN with DP and DN of the terminal respectively. (Refer to the instruction manual of each unit.) MONITOR connector Connector for connecting maintenance dedicated monitor. CAUTION Do not connect anything other than the above monitor. CAUTION Do not send multiple transmission lines (DP, DN) in a multicore cable bundled. If sent bundled, the equipment will malfunction due to crosstalk. 2 2 The thickness of the transmission line shall be 0.75mm or 1.25mm . The lower limit of the power voltage shall be 21.6V or more for transmission distance of 200m or less and 24V for transmission distance over 200m. Watch out for voltage drop by cable. Voltage drop will cause the equipment to malfunction. If the voltage drops significantly, supply power on the terminal side. (Local power supply) Do not solder wires connected to the connector terminal. The wires may loosen, resulting in a contact failure. 4-2 Connection of Transmission Line 4.2. Transmission line building by link connector Branch and removal of equipment can be easily performed by using the AnyWireASLINK system dedicated flat cable and link connector. Link connector is a female and male integrated unique crimp type connector and can be coupled with each other using the same configuration. And link connector can be crimped to the end of the cable and middle of the cable. ■ Example of branch by link connector Flat cable 4-core 2 / for electric wire diameter of 0.75mm Flat cable 2-core 2 / for electric wire diameter of 0.75mm Flat cable 4-core 2 / for electric wire diameter of 1.25mm Flat cable 2-core 2 / for electric wire diameter of 1.25mm Cabtire cable - Flat cable 2-core / for electric wire diameter of 0.75mm2 When cable end is used When the middle of cable is used Refer to “How to crimp link connector to flat cable/cabtire cable” at the end of this manual for details on link connector crimping. 4-3 Transmission Required Time 5 Transmission Required Time 5.1. In the case of input Because the master side does not update data (double collation) unless the same data consecutively continues two times, the transmission cycle time requires transmission time of a minimum one cycle time and maximum two cycle time. Signals of two cycle times or less may not be captured depending on the timing. Therefore, in order to ensure a response, provide an input signal of two cycle times or longer. Minimum transmission cycle time Case of minimum transmission cycle 1 cycle time Input data update Change in input data Maximum transmission cycle time Case of maximum transmission cycle 2 cycle times Change in input data Input data update 5.2. In the case of output Because the slave unit side performs double collation, it requires transmission time of a minimum one cycle time and maximum two cycle times similar to the case of input. Terminology Cycle time: Repeated transmission time of actual data transmitted Maximum transmission delay time: Processing time on master side+ Transmission cycle time + Signal delay time on slave side Response delay time is as shown in the following diagram. Input and output equipment Input Output [1] Input equipment response time AnyWire system Master unit [9] Output equipment response time [8] Slave side signal delay time [2] Slave side signal delay time [3] Transmission cycle time [7] Transmission cycle time [4] Master side processing time [6] Master side processing time Maximum transmission delay time Maximum transmission delay time [5] Processing time 5-1 Troubleshooting 6 Troubleshooting 6.1. Visual check Each unit has a state display function with LED, and error related to operating state of the unit and communication can be narrowed down by checking this function. When any LED displays an error, review the setting and wiring to modify. (1) Check LED state of master unit 1. Check the “RUN” LED on the master unit. The “RUN” LED lights up → Normal When it does not light up, perform the following troubleshooting. → P. 6-3 2. Check the “LINK” LED on the master unit. The “LINK” LED flashes → Normal When it does not flash, perform the following troubleshooting. → P. 6-3 3. Check the “ALM” LED on the master unit. The “ALM” LED lights off → Normal When it flashes or lights up, perform the following troubleshooting. → P. 6-3 (2) Check LED state of the slave unit 1. Check the “LINK” LED on the slave unit. The “LINK” LED flashes → Normal When it does not flash, perform the following troubleshooting. → P. 6-4 2. Check the “ALM” LED on the slave unit. (in case of 4-wire type slave unit) The “ALM” LED lights off → Normal When it does not light off, perform the following troubleshooting. → P. 6-4 6.2. Check with buffer memory (Example of QJ51AW12AL) (1) Check error detail information Error code of the master unit is stored in the latest error code storage area (Un¥G10256). (2) Check error ID area Error ID number is stored in the error ID number information (Un¥G8192), and ID information is stored in the error ID information storage area (Un¥G8193 to Un¥G8320). (3) Check alarm ID area Number of slave units on which error occurs is stored in the alarm ID number information (Un¥G9984), and ID information is stored in the alarm ID information storage area (Un¥G9985 to Un¥G10112). 6-1 Troubleshooting (4) Check error detail information of the slave unit Error contents of the slave unit are stored in the status details (Un¥G12327) of the parameter storage area. Refer to the QJ51AW12AL user’s manual for details. 6.3. LED state of master unit (1) When “RUN” LED does not light up even when power is supplied Check items Description of measures Check unit mounting and connection state. Remove the unit, and mount and connect it again. Check internal consumption current of the entire system. Re-consider system configuration, and limit the internal consumption current below the rated output current of the power unit. Refer to the following manual for how to calculate consumption current of the system. * User’s manual of the CPU unit used (Hardware design, maintenance and inspection edition) * MELSEC-L CC-Link IE field network Head unit user’s manual Check error of the sequencer with a programming tool. Check error contents by PC diagnosis of the programming tool to take measures. (2) When “LINK” LED on the master unit does not flash Check items Check error of the sequencer with a programming tool. Description of measures Check error contents by PC diagnosis of the programming tool to take measures. (3) When “ALM” LED on the master unit lights up or flashes [1] “ALM” slowly flashes (period of one second): DP-DN short-circuit error Check items Description of measures Check that transmission line (DP, DN) is not short-circuited. Check that the transmission line (DP, DN) is not short-circuited. Be careful not to mistake pin assignment when crimping the link connector. Check wiring of terminal block. Check that there is no contact of the transmission line (DP, DN) and no improper wiring on the terminal block in the master unit or the slave unit. Check that consumption current of the AnyWireASLINK system meets the specification. Modify cable (wire diameter, total extension) and unit (type, number of connections) so that consumption current of all of the slave units is less than transmission line supply current value of the master unit. 6-2 Troubleshooting [2] “ALM” quickly flashes (period of 0.2 seconds): Transmission circuit drive voltage drop error Check items Description of measures Check voltage drop of 24V DC external supply power. Make adjustments so that power voltage of the 24V DC external supply power does not exceed the rating. (21.6 to 27.6V DC) Check that the power line is not shortcircuited (24V, 0V). Check that the power line (24V, 0V) is not disconnected and not short-circuited. Be careful not to mistake pin assignment when crimping the link connector. Check wiring on the terminal block. Check that 24V DC external supply power is properly wired to the master unit and the slave unit. Also be careful of wiring short-circuit, improper wiring or insufficient tightening. [3] “ALM” lights up:DP-DN (transmission line) disconnection error Check items Description of measures Check that the transmission line (DP, DN) is not disconnected. Check connection parts and continuity between lines. Check wiring on the terminal block. Check that there is no improper wiring. Perform address identification operation. The AML lights up at the start of continuity. Perform address identification operation. (4) When “LINK” does not flash Check error contents by PC diagnosis of the programming tool to take measures. LED display part 6-3 Troubleshooting 6.4. LED state of the slave unit The slave unit also has a status display function by display LED. Display status and primary causes are respectively described. (1) When “LINK” lights up The slave unit does not receive transmission signals. (Transmission waveform error) If normal, voltage of approximately 17V to 18V is observed when measurement is made between transmission lines (DP-DN) in DC mode of a tester. When the measured voltage is the same as the power voltage, check that there is no improper wiring of the transmission line. Also check that there is no error in the master unit. (2) When “LINK” lights off The slave unit does not receive transmission signals. (Transmission signal disconnection error) Check that there is no contact failure such as looseness on the connections parts of the transmission line (DP-DN). Check that power is supplied to the master unit. Check that the transmission signals reach the terminal of the transmission line (DP-DN). If normal, voltage of approximately 17V to 18V is observed in DC mode of a tester. When the transmission line is disconnected, etc., the position can also be identified by difference in “LINK” display of the terminal. Example) Flash Lights off Lights off × Failure location (3) When “ALM” lights up The I/O side of the output slave unit is short-circuited, so eliminate the failure. The display is automatically returned. (4) When “ALM” flashes The signal voltage of the transmission line (DP-DN) is low. Check that the master unit supply voltage of the system is within the allowable voltage range. Check that the connection unit and load capacity are appropriate for total extension of the transmission line and allowable supply current. (5) When “LINK/ALM” alternately flashes The master unit of this system has duplicated ID (address), or performs no initial setting on this unit, therefore check presence/absence of address and initial setting, and set them again. 6-4 Troubleshooting (6) When “ALM” lights up, and “LINK, I/O” flashes in synchronization The connection cable of 2-wire type sensor connected to this unit is disconnected. * For 2-wire type sensor only, disconnection can be detected. Check presence/absence of disconnection on the common side and I/O side. 6-5 Troubleshooting 6.4.1. Display and contents of each model ■ ASLINKER ■ASLINKTERMINAL 6-6 Troubleshooting ■ ASLINKIAMP (fiber) ■ ASLINKAMP (photoelectric, proximity) 6-7 Troubleshooting ■ASLINKISENSOR 6-8 Troubleshooting Checklist by symptom Symptom Check items Master unit side Data cannot be input and output ALARM LED (Red) lights up ALARM LED slowly flashes ALARM LED quickly flashes (Red) (Red) Power is supplied to the master unit. Address is properly assigned and program properly corresponds to. It accesses buffer memory. Slave unit side Power is supplied to the slave unit. Address of the slave unit is correctly set. Slave unit of the same specification and setting like that of the master unit (such as number of input and output) is used. DP, DN lines are not disconnected. Automatic address identification operation was correctly performed. Screws on the terminal blocks are not loosened. DP, DN lines are not short-circuited. DP does not contact 24V The voltage of 24V DC power supplied to the master unit is normal. 6-9 Warranty 7 Warranty ■ Warranty period The warranty period of a delivered product shall be one (1) year after delivery at the place specified by an orderer. ■ Scope of Warranty In the event that a failure occurs under normal use conditions within the product specification range in accordance with this user’s manual during the warranty period above, the failed portion of that equipment shall be replaced or repaired without charge. However, in the case where a delivered product falls under any of the following, it shall be excluded from the scope of warranty: (1) In the case where the failure was caused by improper handling and use by the customer. (2) In the case where the failure was caused by a reason other than the delivered product. (3) In the case where the failure was caused by alteration or repair by a person other than supplier. (4) In the case where the failure was caused by a natural disaster and others for which the supplier has no responsibility. “Warranty” in this section means the warranty of a single delivered product and we assume no responsibility for any damages caused by a failure of the delivered product. 7-1 Change History 8 Change History Version First edition Date May 28, 2015 Change Description Released 8-1 [Reference] How to crimp link connector to flat cable/cabtire cable 1 Introduction Link connector is a male and female integrated crimp type connector and allows for “additional coupling” and “branching” connection with connectors having the same number of poles to dedicated flat cable and cabtire cable. This connector can basically be crimped using pliers, however, dedicated tools are also sold in addition to pliers. In the case of operation using pliers, keep in mind that the finish condition (coupling and contact of housing) may vary depending on number to be processed and level of skill. Thus, we recommend a method with a dedicated tool which allows for a constant operating condition even if multiple wires are processed regardless of the level of skill, and describe the method here. Please read this manual as an additional reference separate from the “Pliers crimping operation” which is a general operation method for link connectors described in our technical manual and installation manual. 2 Combinations to be covered Product specifications Details Model 2-core flat cable (AWG16 (1.25sq)×2-core, insulating coating outer diameter φ2.5±0.1mm) FK2-125-100 (Conductor resistance 0.027Ω/m・Allowable current 5A) 2-core flat cable (AWG18 (0.75sq)×2-core, insulating coating outer diameter φ2.5±0.1mm) FK2-075-100 4-core flat cable (AWG16 (1.25sq)×4-core, insulating coating outer diameter φ2.5±0.1mm) FK4-125-100 4-core flat cable (AWG18 (0.75sq)×4-core, insulating coating outer diameter φ2.5±0.1mm) FK4-075-100 LP connector (10 connectors included) *Crimp type link connector (Allowable current 5A) 2 pole type Flat cable (100m winding) Body color Red: for wire diameter size 1.25sq Black: for wire diameter size 0.75sq Gray: for wire diameter size 0.5sq White: for wire diameter size 0.3sq Crimping tool for LP connector CAUTION 4 pole type (The image shows 2 pole type) For 2-core flat cable (1.25sq) (Coating outer diameter φ2.54mm Cover: Black Body: Red) LP2-BR-10P For 2-core flat cable (0.75sq) (Coating outer diameter φ2.54mm Cover: Black Body: Black) LP2-BK-10P For cabtire cable (Coating outer diameter φ1.8 to 2.1mm Cover: yellow Body: Gray) LP2-YEG-10P For cabtire cable (Coating outer diameter φ1.4 to 1.7mm Cover: Pink Body: White) LP2-PWH-10P For 4-core flat cable (1.25sq) (Coating outer diameter φ2.54mm Cover: White Body: Red) Pin protector type LP4-WR-10P For 4-core flat cable (0.75sq) (Coating outer diameter φ2.54mm Cover: Black Body: Black) LP4-BK-10P For 4-core flat cable (0.75sq) (Coating outer diameter φ2.54mm Cover: White Body: Black) Pin protector type LP4-WH-10P For cabtire cable (Coating outer diameter φ1.1 to 1.4mm Cover: White Body: White) LP4-WW-10P For cabtire cable (Coating outer diameter φ2.1 to 2.4mm Cover: Orange Body: Black) LP4-OR-10P For cabtire cable (Coating outer diameter φ1.8 to 2.1mm Cover: Yellow Body: Black) LP4-YE-10P For cabtire cable (Coating outer diameter φ2.1 to 2.4mm Cover: Orange Body: Gray) LP4-ORG-10P For cabtire cable (Coating outer diameter φ1.8 to 2.1mm Cover: Yellow Body: Gray) LP4-YEG-10P Crimping tool dedicated to LP connector (The connector can be crimped by pliers, etc., however, a dedicated tool is recommended) LP-TOOL Do not use in any combination other than the above. Contact failure may result in trouble. * If 2-core and 4-core electric wires are mixed, they can be mutually connected by using an LP connector (link connector) for a 4-core electric wire even with a 2-core electric wire. 1-1 3 Crimp to flat cable end Signal assignment for a flat cable is as shown in the following table (★) according to the AnyWire standard identification color. Pin No. Signal name 4-core Wire color Black Red (Brown in case of electric wire diameter of 1.25sq) Black Red (White spiral on red in case of electric wire diameter of 1.25sq) White Green Signal name 2-core Wire color This relationship between color combination and signal is a base for connection of devices. [1] Prepare a connector cover. For 4-core/electric wire diameter of 0.75sq For 4-core/electric wire diameter of 1.25sq For 2-core [2] Place a flat cable on a connector cover, and close the connector cover. For 4-core/electric wire diameter of 0.75sq Small hook * If 2-core and 4-core electric wires are mixed, they can be mutually connected by using an LP connector (link connector) for a 4-core electric wire even for a 2-core electric wire. In that case, also set electric wires so that the black electric wire is on No. 1 of the connector cover, and connect wires as No. 3/4 are kept blank. So that the black wire is on No. 1 of the connector cover Black For 4-core/electric wire diameter of 1.25sq -1 For 2-core/electric wire diameter of 0.75sq For 2-core/electric wire diameter of 1.25sq [3] Check that the cable end face is not deviated from the connector cover, and the small hook engages. For 4-core/electric wire diameter of 0.75sq Cable shall be inserted to the end face. Hook shall engage. For 4-core/electric wire diameter of 1.25sq For 2-core/electric wire diameter of 0.75sq For 2-core/electric wire diameter of 1.25sq [4] Insert a connector body into the connector body of [3]. Four electric poles rising from the connector body enter four holes of the connector cover. For 4-core/electric wire diameter of 0.75sq Connector body hole Connector body Connector cover Large hook Large hook Electric pole part Hole where electric pole part enters Connector body For 4-core/electric wire diameter of 1.25sq For 2-core/electric wire diameter of 0.75sq For 2-core/electric wire diameter of 1.25sq - [5] Swage in the state of [4] with a dedicated tool (LP-TOOL). In that case, check that the snapping sound is heard and four large hooks of the connector cover securely engage with the connector body holes. Before swaging After swaging For 4-core/electric wire diameter of 0.75sq Use of the dedicated tool is recommended to obtain stable crimping condition. Hooks (two on both sides respectively) shall securely engage. For 4-core/electric wire diameter of 1.25sq For 2-core/electric wire diameter of 0.75sq For 2-core/electric wire diameter of 1.25sq - [6] Now, crimping is completed. * It is not allowed to disassemble the connector after crimping and re-use it at the time of failure and layout change, etc. For 4-core/electric wire diameter of 0.75sq For 2-core/electric wire diameter of 0.75sq For 4-core/electric wire diameter of 1.25sq (Viewed from front) (Viewed from side) For 2-core/electric wire diameter of 1.25sq - 4 Crimp to the middle of flat cable Signal assignment for flat cable is the same as that in the previous section. (See the table ★ in page 2-1.) [1] Prepare a connector cover. Cut the end face part at the tip end with nippers or the like. For 4-core/electric wire diameter of 0.75sq End face part For 2-core For 4-core/electric wire diameter of 1.25sq CUT CUT [2] Place a flat cable on a connector cover, and close the connector cover. For 4-core/electric wire diameter of 0.75sq Small hook * If 2-core and 4-core electric wires are mixed, they can be mutually connected by using an LP connector (link connector) for a 4-core electric wire even for a 2-core electric wire. In that case, also set electric wires so that the black electric wire is on No. 1 of the connector cover, and connect wires as No. 3/4 are kept blank. Black So that the black wire is on No. 1 of the connector cover For 4-core/electric wire diameter of 1.25sq -1 For 2-core/electric wire diameter of 0.75sq For 2-core/electric wire diameter of 1.25sq [3] Check that the small hook engages. For 4-core/electric wire diameter of 0.75sq Check that the hook engages. For 4-core/electric wire diameter of 1.25sq For 2-core/electric wire diameter of 0.75sq For 2-core/electric wire diameter of 1.25sq [4] Insert a connector body into the connector body of [3]. Four electric poles rising from the connector body enter four holes of the connector cover. For 4-core/electric wire diameter of 0.75sq Large hook Connector body Connector body hole Connector cover Electric pole part Hole where electric pole part enters Connector body For 4-core/electric wire diameter of 1.25sq For 2-core/electric wire diameter of 0.75sq For 2-core/electric wire diameter of 1.25sq - [5] Swage in the state of [4] with a dedicated tool (LP-TOOL). In that case, check that the snapping sound is heard and four large hooks of the connector cover securely engage with the connector body holes. Before swaging After swaging For 4-core/electric wire diameter of 0.75sq Use of the dedicated tool is recommended to obtain stable crimping condition. Hooks (two on both sides respectively) shall securely engage. For 4-core/electric wire diameter of 1.25sq For 2-core/electric wire diameter of 0.75sq For 2-core/electric wire diameter of 1.25sq - [6] Now, crimping is completed. * It is not allowed to disassemble the connector after crimping and re-use it at the time of failure and layout change, etc. For 4-core/electric wire diameter of 0.75sq For 4-core/electric wire diameter of 1.25sq For 2-core/electric wire diameter of 0.75sq For 2-core/electric wire diameter of 1.25sq - 5 Crimp to cabtire cable end Signal assignment for cabtire cable is the same as that for flat cable. (See the table ★ in page 2-1.) [1] After peeling the coating at the cable end, place a cabtire cable on a connector cover, and close the connector cover. Check that the hooks have entered the grooves without deviating. Small hook Black So that the black wire is on No. 1 of the connector cover [2] Check that the cable end face is not deviated from the connector cover, and the small hook engages. Check that the hook engages. Cable shall be inserted to the end face. [3] Insert a connector body into the connector body of [2]. Four electric poles rising from the connector body enter four holes of the connector cover. Large hook Connector body hole Connector body -1 [4] Swage in the state of [3] with a dedicated tool (LP-TOOL). In that case, check that the snapping sound is heard and four large hooks of the connector cover securely engage with the connector body holes. Before swaging After swaging Hooks (two on both sides respectively) shall securely engage. Use of the dedicated tool is recommended to obtain stable crimping condition. [5] Now, crimping is completed. * It is not allowed to disassemble the connector after crimping and re-use it at the time of failure and layout change, etc. - 6 Crimp to the middle of cabtire cable Signal assignment for cabtire cable is the same as that for flat cable. (See the table ★ in page 2-1.) [1] Peel the coating at a position where you want to branch. Before peeling After peeling [2] Cut the end face part of the connector cover with nippers or the like. CUT End face part CUT [3] Place a cabtire cable on a connector cover, and close the connector cover. Check that the hooks have entered the grooves without deviating. Small hook Black So that the black wire is on No. 1 of the connector cover -1 [4] Check that the small hook engages. Check that the hook engages. [5] Insert a connector body into the connector body of [4]. Four electric poles rising from the connector body enter four holes of the connector cover. Large hook Connector body hole Connector body [6] Swage in the state of [5] with a dedicated tool (LP-TOOL). In that case, check that the snapping sound is heard and four large hooks of the connector cover securely engage with the connector body holes. Before swaging After swaging Hooks (two on both sides respectively) shall securely engage. Use of the dedicated tool is recommended to obtain stable crimping condition. - [7] Now, crimping is completed. * It is not allowed to disassemble the connector after crimping and re-use it at the time of failure and layout change, etc. - 7 Connection Three types of connections are allowed by combining the above crimps (cable middle crimp and cable end crimp). Addition * For link connectors, any combination of coupling between connectors is acceptable as far as the number of poles is the same. T-type branch H-type branch Example of T-type branch For flat cable 4-core/electric wire diameter of 0.75sq For flat cable 4-core/electric wire diameter of 1.25sq For flat cable 2-core/electric wire diameter of 0.75sq For flat cable 2-core/electric wire diameter of 1.25sq For cabtire cable 6-1 Anywire Corporation Headquarters: 1 Babazusho, Nagaokakyo-shi, Kyoto 617-8550 JAPAN Website: http://www.anywire.jp E-Mail inquiry: [email protected]