1
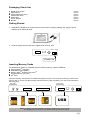
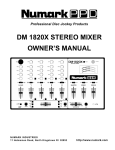
User Manual
English
15 ” Digital Photo Frame
Model: DPF150A
Rev:1.04
Introduction
Congratulations on your purchase of the Multimedia Digital Photo Frame! We appreciate your business!
Before operating the unit, please read this manual thoroughly and retain it for future reference. This manual
will help you to learn many of the exciting and useful features of your new Digital Photo Frame and make
viewing more enjoyable.
The Digital Photo Frame lets you view digital pictures directly from your camera's memory cards. You will
be able to create a slideshow using multiple transition effects or display one picture at a time. No computer
required.
The Digital Photo Frame is compatible with the following popular memory card formats: SD™,
MultiMediaCard™, CompactFlash®, Microdrive™, Memory Stick®, Memory Stick PRO®, and xD®.
Main Features
Displays digital pictures (JPEG) without a computer.
Simply insert a compatible memory card into the digital frame to show photos, play MP3 music.
Compatible memory cards include Secure Digital Card (SD), MultiMedia Card (MMC), Memory Stick,
Memory Stick Pro, Compact Flash (CF) & xD, USB Disk.
Instantly plays MP3 music with the integrated speakers.
Digital picture slide Show with MP3 background music.
Displays digital camera's stored JPEG images.
Supports up to 16 Mega Pixels image files (JPEG format).
Supports AVI (M-JPEG/MPEG-4/DIVX/XVID/), MPEG-1 @VGA
Full screen display for clock&calendar and Alarm function.
Two way to control: main function buttons on body; infrared remote control.
Bright TFT active matrix LCD screen @ 1024x768 Pixels.
USB2.0 high speed connection to connect to your PC.
USB1.1(Host) for connecting to your digital camera or USB disk.
Built-In Memory Flash ( 256MB ). ------- Optional !
Precautions & Maintenance
This Digital Photo Frame is for indoor use only.
To reduce the risk of fire or electric shock, do not expose this appliance to rain or moisture.
Do not block the ventilation holes on the back of the digital photo frame at any time.
Keep your Multimedia Digital Photo Frame out of sunlight. Direct sunlight may cause damage.
Always use the eject buttons on the memory storage cards slots to remove the memory storage cards.
Do not open the case of the Multimedia Digital Photo Frame. There is a risk of electric shock and there
are no user serviceable parts inside. Opening the case will void your warranty.
Do not use the Digital Photo Frame if conditions could allow condensation to occur, or damage may
result.
Cleaning the LCD Screen
Treat the screen gently. The screen on the Multimedia Digital Photo Frame is made of glass and can be
scratched or broken.
If fingerprints or dust make the LCD screen dirty, we recommend using a soft, non-abrasive cloth such
as the camera lens cloth to clean the LCD screen.
If you use the LCD Cleaning Kit sold on the market, do not apply the cleaning liquid directly to the LCD
screen. Clean the LCD screen with cleaning cloth moistened with the liquid.
WARNING
THE UNIT IS LCD BY-PRODUCT,DO NOT STRIKE BY ANY HARD OBJECT.
TO AVOID THE RISK OF FIRE OR ELECTRIC SHOCK,DO NOT EXPOSE THIS
PRODUCT TO RAIN OR MOISTURE.
[1]
Packaging Check List
Digital Photo Frame
User Manual
Infrared Remote Control
Audio/Video cable
USB Cable
Power Adapter
Bracket
1 piece
1 piece
1 piece
1 piece
1 piece
1 piece
1 piece
Getting Started
1. Assemble the Digital Photo Frame bracket on the back for propping stability, then plug the power
adapter into an electrical outlet.
2. Push the power switch at the end of digital photo frame to “ON”.
ON
OFF
POWER SW
Inserting Memory Cards
The Digital Photo Frame is compatible with the following memory cards or USB Disk:
Secure DigitalTM Card (SD)
MultiMediaTM Card (MMC)
Memory StickTM & Memory Stick ProTM
CompactFlashTM (CF) Card
xD® Card
Insert the memory card with the front label facing away from you. Do not force the memory card into the
memory slot. If you are not able to easily insert the memory card completely, you may have inserted it in
the wrong way.
Right Side
HP
Bottom Side
AV
SD/MMC/MS/xD
CF CARD
USB
Note:The Digital Photo Frame will ONLY recognize digital pictures stored in JPEG
format. Digital pictures stored in other formats will be ignored by the device.
[2]
You will see the following screen if you insert the memory card correctly. Make sure you have at least one
picture stored on the memory card. The frame will not function properly without a stored picture.
Please select the memory card, press ENTER button from the unit or remote control to enter the following
screen. Notice: If no built-in memory in DPF, the [Please insert card!] icon will not be displayed!
PHOTO
Enter the photo play mode directly
MUSIC
Enter the music play mode directly
VIDEO
Enter the Video play mode directly
FILE
Enter the file play mode directly
Viewing Photo
1. You can use either the remote control or the on-board buttons to control the Digital Photo Frame.
2. Remove the plastic battery insulator (if any) on the bottom of the remote control and make sure the
remote control has a battery installed. See “Installing and replacing battery” section if you need a new
battery.
3. Use the remote control to highlight and select the Photo folder (Use the direction keys Right, Left on
the remote control to navigate and press Enter to select).
4. Highlight a picture and press Enter to view the picture.
5. Press
button to view the picture sequential.
6. When you press “SLIDE SHOW” button, it will start the slide show and also play the MP3 files in the
background.
[3]
Key Control & Remote Control
Key function operation instruction
ESC
ENTER
DPF Control Keys:
[ ESC ]
[
]
[ ENTER ]
[
]
[
]
Exit interface and return, Press this key 3sec enter SETUP menu
Move the cursor left/right, Press this key 3sec for VOL-/+
Enter and play, Press this key 3sec enter SLIDESHOW mode
Move the cursor up/down, Press this key 3sec for BRT+/Indicator for Power,Green-Normal / Orange-Standby [Optional!]
Remote Control Operation
[ POWER ]
[ CLOCK ]
[ BRIGHTNESS ]
[ SETUP ]
[ EXIT ]
[
]
[ ENTER ]
[ VOL+ / VOL- ]
[
]
[
]
[ MUTE ]
[
]
Enter standby mode
Display CLOCK & CALENDAR on screen
Enter the Display parameter setup function
Enter the basic parameter setup function
Return to forward interface
Move the cursor up/down/left/right
Confirm and enter
Adjust the volume add or reduce
Pause / Play
Stop the current playing
Mute the music
Play the previous or next program
[ ROTATE ]
In the photo view state, press this key to rotate,
rotating 90 degrees Per time
[ ZOOM ]
In the photo view state, press this key to zoom in
[ SlideShow ]
In the photo view or music playing state, press it
to display photos With the MP3 background
music
Installing and Replacing the Remote Control Battery
1.
2.
3.
4.
Place the Remote Control with the control buttons facing downward.
While pressing down on the ridged area of the battery cover pull the tray out.
Place a “CR2025” lithium battery on the tray with the positive “+” end facing toward you.
Close the tray.
+
[4]
Listen MP3 music
Before you are able to listen to the MP3 music, you must first store MP3 music files on the memory card or
the on-board memory (see Q&A section for more information).
1. Use the Remote Control's Right and Left direction key highlight and select the Music folder.
2. Highlight and select the music file you want to play by pressing the UP/DOWN keys and the Enter
button.
3. Adjust the volume by using VOL+ / VOL- keys on the Remote Control.
4. Fast forward or rewind by pressing the key on the Remote Control.
5. Press Up and Down direction key to select a different music file.
Watching Video
The Multimedia Digital Photo Frame supports the following video formats:
Divx/Xvid MPEG-4 (AVI) : This video format from other video format converted by Video Encoder software.
For example: [xilisoft video converter 3] with settings: Divx AVI/640*480/2000kbps
Before you are able to watch video, you must first store video files on the memory card or Flash memory.
1. Highlight and select the Video folder.
2. Highlight and select the video you want to watch by pressing the direction keys and the Enter button.
3. Adjust the volume by using VOL+ / VOL- key on the Remote Control.
4. Press Previous or Next key [
] to select a different video file.
[5]
Speaker Connection & TV OUT
Connect speakers or headhpone to the headphone jack located on the right side of Digital Photo Frame
(Cable not included). You can also connect TV or monitor to the AV JACK and press [TV/DPF] key on the
remote control.
Viewing Photo + MP3 Background Music (SLIDE SHOW)
1. On the main menu, select the Photo folder.
2. Press Slideshow on the remote control or press [Enter] key on unit hold 3 sec to play photo and music.
3. Press Exit or ESC key to stop playing.
File Operating On DPF
1. Under the "Photo Mode", you have to use the remote control (up down left right) keys to select the file first,
then press the [setup] key on remote control or press ESC key on unit hold 3 sec to into the menu,
then select the "COPY/DELETE" to copy or delete the file.
The screen will prompt “Are you sure, ” select “Yes' or No” to save or delete the file.
2. Under the "Music Mode", follow the instructions
listed above to copy/delete files.
3. Under the "File Mode", follow the instructions
listed above to copy/delete files.
Display CLOCK & CALENDAR
1. Press CLOCK key on remote control enter COLCK&CALENDAR mode,see following screen cutting picture:
2. Press CLOCK key again return to main menu.
Note: Clock and Alarm settings at the setup interface!
[6]
Photo & System settings:
Photo
Music
Video
System
Reset Settings
Exit
Image Size
Slide Show Shuffle
Slide Show Effect
Slide Show Speed
Slide Music
Clock
Language
Auto Play
Set clock
Clock Mode
Auto Slide Show
Auto Power On
Auto Power Off
Calendar
Auto Play Photo
Auto Play Photo+Music
Auto Play Movie
Off
English
Deutsch
Francais
Italiano
Espanol
Off
On
Off
Fade
Shuffer
Cross Comb
Mask
Brick
Dissolve
Bar
Random
Fast
Normal
Slow
Off
On
File Copy & Delete:
Photo
Music
Video
System
Copy File
Delete File
Reset Settings
Exit
Copy One
Copy All
Delete One
Delete All
SD/MMC Card
MS Card
CF Card
NAND Flash
Are you sure?
Yes
No
Note: In File Copy Operation, FAT16 not supported!
Question & Answers:
This chapter will introduce some solutions to deal with the potential problems you may experience. Please
consult this section first to correct the problem. If you also cannot solve the problem, please contact the
local dealer to ask for help. Please don't try to take apart the machine by yourself at any time.
Question
What photo and music formats are
supported by the Multimedia Digital
Photo Frame?
Answer
Photo: DCF JPEG & Photoshop’s Baseline JPEG
Music: MP3 @ 128K/44.1KHz
Video: Divx/Xvid MPEG-4 @ 640x480/2000kbps
[7]
What memory cards are compatible
with the Digital Photo Frame?
Secure Digital Card (SD)
MultiMedia Card (MMC)
Memory Stick & Memory Stick Pro
CompactFlash (CF) Card
xD Card
USB Disk
How do I store music files?
Using a personal computer and a popular audio editing software
such as MusicMatch to covert your music to MP3 format.
Transfer the MP3 file to the memory card using a Memory Card
Reader.
My memory card is not compatible
with the Multimedia Digital Photo
Frame. What can I do?
You should be able to buy a memory card adapter that is compatible with one of the supported memory cards. For example, if
you own a xD memory card, you can buy a xD to CF memory
card adapter, and use the adapter to connect the frame to the xD
memory card.
What is the maximum picture size
the digital frame can display?
The digital frame is able to display pictures up to 16 Mega Pixels.
What is the best picture resolution
displayed on the screen?
The Picture's best resolution is 1024x768 pixels.
Ca n I ad ju st t he co lo rs o f t he
picture?
No. All color settings are preset at the factory. You can only
adjust the brightness and contrast of the screen.
Specifications:
Display
TFT LCD Resolution: 1024x768 @ 16.2M Colors [24Bits]
Memory
16MBx16Bits DDR SDRAM. 1MBx16bits NOR FLASH
External I/O
AV JACK. SPEAKER(ST.). 2 USB PORT BY TWO USB CABLE.
Control
6 keys on DPF & 23 keys Remote control
Power Supply
Switching AC Adapter: Input AC100-240V. Output 12V 3A
Environmental
Operation: Temperature: 0 ~ 45℃ , Humidity: 0 ~ 85%
Storage: Temperature: -20 ~ 60℃ , Humidity 10 ~ 90%
Included Accessories:
Power Adapter
Remote Control
USB Cable
AV Cable
[8]
2007-7-25