1
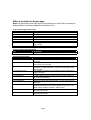
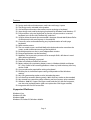
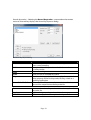
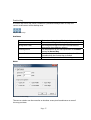
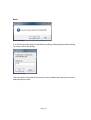
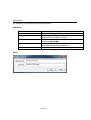
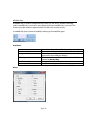
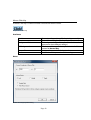
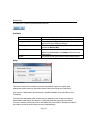
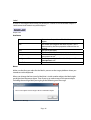
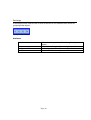
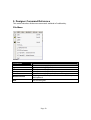
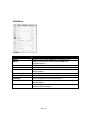
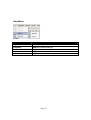
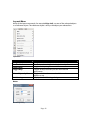
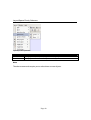
Freefloat Key version 2.1 User’s Manual Contacting Freefloat .......................................................................................................... 5 1. What is Freefloat Key? .................................................................................................. 6 What is included in the package ...............................................................................................7 Features ..................................................................................................................................................8 Supported Platforms ..................................................................................................................8 2. Getting Started................................................................................................................ 9 Overview .....................................................................................................................................9 Starting the runtime keyboard with a pre-defined keyboard ................................................9 Starting only the runtime ........................................................................................................10 Starting the Designer ...............................................................................................................10 Creating a simple keyboard layout .........................................................................................11 Adding a second canvas to your keyboard layout ................................................................................17 3. Working with the Mouse .............................................................................................. 18 Selecting, Moving, and Resizing a Single Object...................................................................18 Select Several Objects ..............................................................................................................18 Deselecting Objects ..................................................................................................................19 Selecting Objects Using a Selection Rectangle ......................................................................19 Selecting Sub-Objects ..............................................................................................................19 4. Object Reference .......................................................................................................... 21 Object Hierarchy......................................................................................................................21 Keyboard ..............................................................................................................................................21 Canvas ..................................................................................................................................................23 Battery Bar ...........................................................................................................................................28 Battery Label........................................................................................................................................29 Canvas Position Label..........................................................................................................................30 Image ...................................................................................................................................................31 Indicator ...............................................................................................................................................32 Normal Key..........................................................................................................................................33 Position Key .........................................................................................................................................37 Exit Key ...............................................................................................................................................38 Launch Key ..........................................................................................................................................40 Modifier Key........................................................................................................................................41 Mouse Click Key .................................................................................................................................42 Sticky Key............................................................................................................................................43 Switch Key ...........................................................................................................................................44 Label ....................................................................................................................................................46 Rectangle .............................................................................................................................................48 Transparent Area ..................................................................................................................................49 5. Designer Command Reference .................................................................................... 50 File Menu ..................................................................................................................................50 Page 2 Edit Menu .................................................................................................................................51 View Menu ................................................................................................................................52 Keyboard Menu........................................................................................................................53 Canvas Menu ............................................................................................................................54 Layout Menu ............................................................................................................................56 Layout/Align Submenu ........................................................................................................................57 Layout/Move Submenu ........................................................................................................................58 Layout/Make Same Size Submenu ......................................................................................................59 Layout/Space Evenly Submenu ...........................................................................................................60 Layout/Center in Parent Submenu .......................................................................................................61 Window Menu ..........................................................................................................................62 Help Menu ................................................................................................................................63 6. Command File .............................................................................................................. 64 6.1 Commands ..........................................................................................................................65 7. Keyboard Shortcut Reference ...................................................................................... 67 Default Actions .........................................................................................................................68 8. Logon Keyboard ........................................................................................................... 70 Windows 2000/XP ....................................................................................................................70 Technical Details .................................................................................................................................72 Windows Vista/7/8....................................................................................................................72 Ctrl-Alt-Delete .....................................................................................................................................72 Set a keyboard as the logon keyboard ..................................................................................................72 Install the logon service .......................................................................................................................74 Troubleshooting ...................................................................................................................................74 Security considerations ........................................................................................................................75 Auto detecting locale for logon keyboard ..............................................................................76 9. Specify Keyboard Layout on Startup ........................................................................... 77 Command Line .........................................................................................................................77 Registry Key .............................................................................................................................77 Locale ........................................................................................................................................78 Interactive .................................................................................................................................79 10. Multiple Instances ...................................................................................................... 80 11. Key Click Sound ......................................................................................................... 80 12. Windows CE ............................................................................................................... 81 Installation ................................................................................................................................81 Pre-defined Keyboard Layouts ...............................................................................................83 Running Freefloat Key as an Input Method ..........................................................................83 Limitations ...........................................................................................................................................83 Page 3 Appendix A. Screen dump of canvases ........................................................................... 84 Appendix B. Default Key Look ........................................................................................ 84 Appendix C. Version History ........................................................................................... 85 Page 4 Copyright © 2006–2012 Freefloat AB Contacting Freefloat Support Web E-mail http://support.freefloat.com/ http://www.freefloat.com/ mailto:[email protected] Page 5 1. What is Freefloat Key? Freefloat Key is a configurable virtual keyboard that runs on Windows 2000/XP/Vista/7. It also runs on Windows CE 4.x and 5.x and variations of these operating systems like Pocket PC, Windows Mobile. It consists of two major parts, a design tool and a runtime module. Page 6 What is included in the package Note! The Application Data Folder and Common Application Data Folder are located at different places in Windows 2000/XP and Windows Vista. User-selected Application Folder File Description Designer.exe Design tool Keyboard.exe Runtime keyboard Manual.pdf User's manual KeyRec.dll Support module for keystroke recording ExitPassword.exe Support module for password control of runtime module Licenser.exe Support module for licensing k1service.exe Windows Service module used for starting Freefloat Key on logon screen Uninstall.exe Uninstaller program Common Application Data Folder File Description FFK1_100.LIC Contains the license-number when registered Application Data Folder File Click.wav LocaleInfo.txt Layouts\SVGA-xx.key Layouts\XGA-xx.key Layouts\QVGA.key Layouts\SIP.key Layouts\Big Numeric.key Layouts\Multi.key Platforms\ARMV4 Platforms\MIPSII Platforms\x86 Description Sound file used when buttons are pressed on a Freefloat Key keyboard Control file for selecting different keyboard layouts depending on the system's current locale Full QWERTY keyboard layout suitable for SuperVGA (800x600) or higher resolution. xx denotes the language code for the layout. Full QWERTY keyboard layout suitable for XGA (1024x768) or higher resolution. Layout suitable for QVGA devices. Layout suitable for QVGA devices when running Freefloat Key as an IM (Input Method). Sample numeric keyboard with big keys Sample keyboard with reduced alpha, numeric and function key canvases. Executable modules for running Freefloat Key on ARM-based Windows CE devices. The same modules can be used on all ARM variants (ARMV4, ARMV4I, ARMV4T etc.) Executable modules for running Freefloat Key on MIPSII-based Windows CE devices Executable modules for running Freefloat Key on x86-based Windows CE devices Page 7 Features Design tool with multi-document, multi-view with copy & paste The design tool is included in the product Grid and layout functions that makes it easier to design a keyboard Same design tool used for designing keyboards for Windows and Windows CE Fully emulates a physical keyboard. In practice, all you can do on a normal keyboard you can do with Freefloat Key, and more Small resource demands (the executable is between 50 and 100 KB, data file for a full keyboard with some bitmaps is about 80 KB) Canvases can be anchored allowing easy implementation of multi-page keyboards Multi monitor-aware The user needs to press and hold before the keyboard can be moved on the screen, avoids inadvertent moving of the keyboard Each keyboard canvas has its own independent window External applications can be launched Modifiers can be set to be private so if for example Shift is left down it won't affect other applications Blending (see-through) supported Fade-in and fade-out effect of canvases Battery objects for monitoring battery status in Windows Mobile and laptop PC's. Very useful in full screen applications where any built-in battery icon may not be visible A password can be required for exiting a keyboard Each key has its individual repeat settings independent of the Windows settings Keys can generate keystrokes and/or Unicode characters Low-level key recorder allowing nearly 100% of all key strokes to be recorded Key recorder can record key delays allowing real-time macros to be recorded Windows 2000/XP: Support for logon screen and the Ctrl+Alt+Del sequence, non-intrusive implementation (does not replace the GINA logon module) Integration API via UDP or text files Supported Platforms Windows Vista Windows XP/XPe Windows 2000 Windows CE/Pocket PC/Windows Mobile Page 8 2. Getting Started Overview When you install Freefloat Key, shortcuts are created on the Start menu. From the Start menu you can start the Designer, this manual, the Runtime Keyboard or one of the pre-designed national keyboard layouts. Starting the runtime keyboard with a pre-defined keyboard Navigate to the Freefloat Key folder on the Start menu and then select the subfolder Keyboard Layouts. Click on one of the keyboard layouts, for example English. The runtime now starts and loads the keyboard layout: English SuperVGA Keyboard Layout Start Notepad or a similar program that accepts text input and try using Freefloat Key to input some text. Page 9 Starting only the runtime Navigate to the Freefloat Key folder on the Start menu and then click on the shortcut Runtime Keyboard. A dialog box appears, asking you to choose which keyboard to load: Select Keyboard Dialog Note! Since version 1.0.14 this dialog won't appear unless you have removed the file LocaleInfo.txt or made a special distribution of Freefloat Key. Starting the Designer Click on the shortcut Designer in the Freefloat Key start menu folder. The Designer appears: Designer Page 10 Creating a simple keyboard layout Start the Designer if it isn't already running. Set the canvas size to 150 pixels wide and 80 pixels high by selecting the command Size... from the Canvas menu: Canvas Size Enter the width and height into the edit boxes and click on OK. Now add a range of keys by selecting the Canvas menu, then Add, then Key, and then the command Key Range...: Add Key Range Page 11 Enter the text A,B,C as displayed above and click on OK. Your keyboard should now look like this: Sample Key Range Adjust the position of the three newly added keys until you are satisfied. Now add an Exit key to the canvas by selecting Canvas/Add/Key/Exit Key. Move the Exit key by first selecting it with the left mouse button and then dragging it to a position below the three other keys. Center the Exit key horizontally on the canvas by first selecting the Exit key, then selecting the command Layout/Center In Parent/Horizontally. The keyboard should now look roughly like this: Sample Exit Key Enlarge the size of the Exit key slightly by selecting the Exit key, the click and hold the middle sizing handle on the right side of the key, then drag to the right making the key about 50 pixels wide. Click on the canvas area to make sure no object is selected. Then hold down the Shift key on your physical keyboard and click with the left mouse button on the text E. This is how sub-objects are selected. A sub-object is an object which is contained within another object. When the text E is selected, press Enter on your keyboard. The following dialog is displayed: Page 12 Label Text Enter the text Exit and click on OK. As you can see the font of the Exit text is too large. Now hold down Shift, and then right click on the text Exit with your mouse. Select the command Font... from the context menu that appears: Label Context Menu The font dialog is displayed: Page 13 Font Dialog Change the Font style to Regular and the Size to 12. An important thing to remember about keys, they have two different appearances, the released appearance and the pressed appearance. To display the pressed appearances of all keys, select the command Toggle Keys on the Layout menu: Pressed Appearance As you can see, the change in text, font style, and size only affected the released appearance of the Exit button. Hold Shift and left click on the E text to select it. Then select the Delete command on the Edit menu. The pressed appearance of the Exit key should now be empty. Toggle back to the released appearance of the keys by selecting Layout/Toggle Keys again. Right click on the Exit key and select the command Clone Appearance on the context menu. All the objects in the released appearance are now copied to the pressed appearance and moved slightly down and right. Press the key K on your keyboard several times to change between released and pressed appearances. Page 14 Adjust the height of the Exit key to 26 pixels and center the key horizontally again: Center Key Save your keyboard in a folder of your choice (just remember where) giving it the name Getting Started.key: Save As Dialog As you can see in the picture above, you don't have to enter .key after the name of the keyboard. Select the Run command from the Keyboard menu to try out the keyboard you have just created. The keyboard should appear in the top left corner of your screen, change this to be the lower middle position of you screen by using the command Position... on the Canvas menu. Stop the running keyboard by clicking the Exit button. Then start it again by using the Run... command to test the new startup position of the keyboard canvas. Please note that if you forgot to add an Exit key to a keyboard, the keyboard can be exited by holding down Ctrl, Shift, Alt and clicking on a canvas with the middle mouse Page 15 button. Another way to exit the keyboard is by terminating the process Keyboard.exe. Page 16 Adding a second canvas to your keyboard layout To add a new canvas to a keyboard layout you select the command Add from the Canvas menu. Do this, and then select the Canvas menu. Note that at the end of the canvas menu, all the keyboard's canvases are listed. These can be used to switch to a different canvas that you want to edit. Some notes on the windows in the Designer You can have several keyboard layouts open in the Designer (handy when copying/pasting object from one keyboard to another). You can have several canvases of the same keyboard open in separate windows at the same time. A new window can be created by choosing Window/New Window. Two windows in the Designer can display the same canvas (don't be confused!). By default, only the first canvas is displayed in the Designer, but there might be more canvases in the keyboard layout. Check the list of canvases at the end of the Canvas menu. Change the size of the new canvas to the same as the first (150x80). Choose Run on the Keyboard menu. The newly added canvas should appear in the top left corner of the screen and it should be empty. Try dragging it to another position by clicking and holding the left mouse button down for one second. After a second the mouse cursor changes to four arrows. The canvas can now be moved. If you don't want a delay before moving of a canvas is activated, choose the command Move Delay on the Canvas menu and set the move delay to 0 (zero). Note that this property is specific for each canvas. Page 17 3. Working with the Mouse In the Designer, the mouse can be used to select and move objects. Selecting, Moving, and Resizing a Single Object Use the mouse to point at an object. Then left-click to select the object. When an object is selected, selection handles are displayed: Also note that the mouse cursor icon is changed to indicate that you can move the object. To move the selected object, press and hold down the left mouse button while dragging the object to a new position. When pointing at one of the black selection markers, the cursor icon is changed into a two-headed arrow indicating that the object can be resized: To resize an object, left-click on one of the black selection markers and move the mouse. Select Several Objects To select more than one object, hold down the Ctrl key while left-clicking on the objects: If you have one or more objects selected and left-click on a new object without holding down the Ctrl key, the previously selected objects will be deselected and the new object will be selected. Page 18 Deselecting Objects To deselect all selected object, left-click in an empty area on the canvas. Selecting Objects Using a Selection Rectangle Left-click on an empty area of the canvas and hold down the left mouse button while moving the mouse to create a selection rectangle. Include the objects you want to select in the rectangle. Note that you don't need to entirely enclose the objects to select them. If there are no empty canvas area available (the entire canvas surface is covered with objects), you can hold down the Alt key to force the selection rectangle to be used: To add objects to the current selection, hold down the Ctrl key while selecting with the selection rectangle (the Ctrl and Alt modifier keys can be combined). Note! It is only possible to select top-level object using the selection rectangle. Selecting Sub-Objects Sub-object, objects within other objects, can be selected by holding down the Shift key while left-clicking on the sub-object: Page 19 If you need to select multiple sub-objects, combine the Shift and Ctrl keys. Note! You can only select multiple sub-objects if they are within the same parent object. Also, only sub-objects on the same nesting level can be selected. Page 20 4. Object Reference This section describes all the different objects in Freefloat Key. Object Hierarchy A Freefloat Key keyboard contains one or more canvases. Each canvas can contain one or more objects. Most object types can themselves contain sub-objects. Each canvas corresponds to a window at runtime. Keyboard The keyboard is the central object that contains all other objects. The keyboard has no visual appearance itself. Attributes Exit Password Inactivity Control Use at Logon Screen Private Modifiers If a string is given for this attribute, the user must enter that string before he/she is allowed to exit the runtime keyboard. Specifies which canvases should be shown and which should be hidden after the specified inactivity time. When set, the runtime keyboard, when first used, will install itself as the logon screen keyboard. When set, modifier keys are not simulated until just before and just after a normal key is pressed which means while if modifier are left in a depressed state, it won't affect other applications. Page 21 Notes Exit Password Dialog Inactivity Control Dialog Page 22 Canvas A canvas corresponds to (mostly) a rectangular area in which all visual objects are contained. A keyboard may contain one or more canvases. Sample Canvas with Objects Attributes Position Size Background Color Name Visible Blend Fade Move Delay Anchored Canvases Border Determines the screen startup position of the canvas. The width and height of the canvas in pixels. The background color of the canvas. The name of the canvas. Used, for example, by Switch keys to reference canvases. Determines whether the canvas should be visible at startup. The amount of alpha blending the canvas should have (see-through style). 0 means no blending and at 255 the canvas will be totally transparent, in other words, invisible. The time used for fading in and fading out canvases when they are shown and hidden respectively. The amount of time the canvas needs to be held (with touch screen or left mouse button) before it switches into move mode. This can be used to avoid inadvertent moving of canvases. Tells Freefloat Key to move these canvases when the current canvas is moved. This can be used to create a fold-out canvas feature. The border of the canvas. If the Line Width of the border is set to zero, no border is drawn. Page 23 Notes Set Canvas Startup Position Dialog Size Dialog Edit Canvas Name Dialog Page 24 Fade Dialog Blend Dialog A Transparent Canvas If you use Fade or Blend, make sure you test the keyboard on the target platform. The performance of both Fade and Blend depends on the graphics hardware capabilities. Page 25 Move Delay Dialog Page 26 Anchored Canvases Dialog Background Color Dialog Note that all dialogs where you can select a color look the same. Border Line Width Dialog Canvas Names – When using Switch keys, make sure you enter the canvas names exactly as they are named. In other words, CaNvAs 1 is not the same as Canvas 1. Removing a Canvas – Take care when removing a canvas. All objects on the canvas will also be removed. Page 27 Battery Bar A Battery Bar is an object that can be put directly on a canvas or inside another object. A Battery Bar object can contain sub-objects. Battery Bar and Battery Label objects only work on PC's and Windows CE devices that run on batteries AND supports the appropriate API's. On regular Windows, the API is called GetSystemPowerStatus and on Windows CE devices it is called GetSystemPowerStatusEx2. Sample Battery Bar Note! For a non-reversed vertical bar, the bar is drawn in the foreground color from the bottom (0%) and to the top (100%). The default direction for a horizontal bar is left to right. Attributes Position Size Vertical Reverse Foreground Color Background Color Border Determines the position of the battery bar in its parent object. The width and height of the bar in pixels. When checked the bar is vertically oriented, otherwise it is horizontally oriented. Reverses the direction of the bar. Also swaps the width and height of the bar. Example: A reversed vertical bar grows from the top (0%) towards the bottom (100%). The foreground color of the bar. Used to indicate how much capacity of the battery that is left. The background color of the bar. The border of the bar. Page 28 Battery Label A Battery Label is an object that can be put directly on a canvas or inside another object. A Battery Label object can't contain any sub-objects. Note! This type of object can be used at the same time as a Battery Bar, giving the user both a graphical view of the battery status as well as an absolute figure. Sample Battery Label Attributes Position Font Transparent Background Color Text Color Determines the position of the label in its parent object. The font of the label. Whether the background of the label should be transparent or not. The background color of the label. Only used if Transparent is off. The text color. Page 29 Canvas Position Label A Canvas Position Label is a text object that displays the current canvas position. Sample Canvas Position Label Attributes Position Font Transparent Background Color Text Color Determines the position of the label in its parent object. The font of the label. Whether the background of the label should be transparent or not. The background color of the label. Only used if Transparent is off. The text color. Notes The coordinate displayed in a Canvas Position Label is the screen position in pixels of the canvas on which the label has been placed. This object type is intended to be used by keyboard designers. It is helpful when there are no other tools available to determine a screen position, for example on a handheld device. If the designer wants to use a Mouse Click Key to simulate a mouse click somewhere on the screen, this object can be used to find out the coordinate for the click. Page 30 Image An image can be placed directly on a canvas or inside another object. To place an image inside another object, first add it to the canvas, then cut and paste it into the object. Images inserted into a keyboard are embedded in the keyboard layout file so you don't have to copy all the images to the target platform. Freefloat Key supports the Windows bitmap format in all different color depths (2 to 32-bit) and types of compression (RLE/RGB). The JPEG format is supported through automatic conversion to bitmap format. Sample 3D Look Bitmaps on a Canvas Attributes Position Size Transparency Color Border Determines the position of the image in its parent object. The width and height of the image in pixels. Note! This may be smaller or larger than the actual image data. The image is scaled to the size of the image object. Specifies the color where the bitmap should be made transparent. Can be used to create the appearance of round or non-rectangular shaped bitmaps. Tip! Use a bitmap drawing program, such as Paint in Windows, to find out the exact RGB values of the color that is used as the transparency color. The border of the image. Line Width is by default set to zero for image objects. Page 31 Indicator An indicator is used to indicate the status of the keyboards LEDs, Num Lock, Caps Lock, and Scroll Lock. The default appearance of indicators is a borderless rectangular area, 10x5 pixels in size with a dark green background color in the released appearance and a light green background color in the pressed appearance. The released appearance is used when the corresponding physical indicator is off and the pressed appearance is used when the indicator is on. In practice, indicators have the same visual features as a normal key. In other words, it can contain sub-objects (bitmaps, labels, and so on) on both its released and pressed appearances. Sample Indicators Attributes Position Size Background Color Indicator Type Border Determines the position of the indicator in its parent object. The width and height of the indicator in pixels. The background color of the pressed and released appearance (two different settings). Specifies whether the indicator should reflect the status of Num Lock, Caps Lock or Scroll Lock. The border of the pressed and released appearance. Notes Toggle the keys to edit/preview the released and pressed appearances of key objects. Indicator Type Dialog Page 32 Normal Key A normal key is used to simulate ordinary keys on a keyboard. Apart from its appearance, it has a sequence of keystrokes associated with it. The pressed appearance of a key is used when the key is held down, otherwise the released appearance is displayed. Sample Keys Attributes Position Size Background Color Fill Background Keystrokes Repeat Show & Hide Border Determines the position of the key in its parent object. The width and height of the key in pixels. The background color of the pressed and released appearance (two different settings). Can be turned on or off. See explanation in the Notes section below. The sequence of key presses the key should generate when clicked on. See the Notes section below for more information. Key repeat settings. Optionally shows/hides canvases. The border of the pressed and released appearance. Notes Automatic Keystrokes – When adding a normal key, the Designer asks for a key text. If the text is "0" to "9", "A" to "Z", "F1" to "F24", "Return", or "Enter" the corresponding key sequence is automatically added to the key. Please note that this feature is only fully compliant with QWERTY keyboard layouts. If you are uncertain, record the key manually in your locale. Fill Background – This attribute controls whether the pressed and released appearances draw their background. This makes the key appear transparent and the canvas background shines through on areas not occupied by objects within the key. Most useful when creating a key containing bitmaps with a transparent color set. Page 33 Records Keystrokes – Selecting the Record Keystrokes... command on the context menu of a normal key displays the Record Key Sequence dialog: The Record Key Sequence Dialog Buttons New Add Stop Clear Play Insert Ctrl+Alt+Del Remove Apply Insert Character Removes all previous information in the keystroke list and starts a new recording Records additional keystrokes and adds them to the current list of keystrokes Stops a recording Clears the list of recorded keystrokes Simulates the keystroke list, add a couple of seconds in the Delay property of the first keystroke, hit Play, switch to a receiving application This sequence of keys cannot be recorded, use this button to insert the sequence into the keystroke list Removes the selected keystroke or Unicode entry from the keystroke list Applies changes to a keystroke or Unicode entry Inserts an empty Unicode entry into the keystroke list Page 34 Recording Options Ignore Key Repeats Filter Keys During Recording Record Delays When set, key repeats are ignored and not stored in the keystroke list When set, the keys you press during recording. If not enabled, for example recording the Escape would not be possible (since it would close the dialog) Set this if you would like to record a real-time keyboard macro The Keystroke Properties user interface elements are displayed when selecting a keystroke in the keystroke list. Keystroke Properties Virtual Key Code Scan Code Delay Extended Injected Alt Down Up Unicode Unicode Shifted The internal Windows key code The physical key code (the code that the keyboard sends to the computer) The amount of milliseconds to wait before sending this keystroke. Normally zero, but bear in mind, Windows Terminal Services is known to have problems with too fast key simulations in full screen mode. The keystroke is from an extended key (like Home, End, etc.) This keystroke was recorded from an application generating the keystroke programmatically The Alt key modifier was held when the keystroke was recorded The keystroke is the up event of a key being released The hexadecimal constant of the Unicode character the key should generate. Tip! Use Character Map application in Windows to find out the Unicode value of the special character you want to use. New for version 1.0.19! The hexadecimal constant of the Unicode character the key should generate when Shift is down or Caps Lock is on. Page 35 Repeat Dialog Page 36 Position Key A Position key moves the canvas window to a predetermined position or snaps the canvas at the corners of the desktop area. Sample Position Keys Attributes Position Size Background Color Fill Background Canvas Position Border Determines the position of the key in its parent object. The width and height of the key in pixels. The background color of the pressed and released appearance (two different settings). Can be turned on or off. See explanation in the Notes section for Normal Key. Specifies the position the canvas window should be moved to then the Position key is clicked. The border of the pressed and released appearance. Notes Set Canvas Position Dialog The canvas window can be moved to an absolute screen pixel coordinate or to one of the snap positions. Page 37 Exit Key An Exit key exits the keyboard. If the keyboard has an exit password set, you need to enter the correct password. Sample Exit Key Attributes Position Size Background Color Fill Background Confirm Exit Border Determines the position of the key in its parent object. The width and height of the key in pixels. The background color of the pressed and released appearance (two different settings). Can be turned on or off. See explanation in the Notes section for Normal Key. When set, the user has to confirm before Freefloat Key is exited. The border of the pressed and released appearance. Page 38 Notes Confirm Exit Dialog If an Exit Password has been set, the following dialog will be displayed when clicking Yes in the Confirm Exit dialog: Exit Password Dialog The user needs to enter the correct exit password. Freefloat Key itself can be used to enter the exit password. Page 39 Launch Key A Launch key is used to launch external applications. Attributes Position Size Background Color Fill Background Application Border Determines the position of the key in its parent object. The width and height of the key in pixels. The background color of the pressed and released appearance (two different settings). Can be turned on or off. See explanation in the Notes section for Normal Key. The full path to the application's executable and any command line arguments to pass to it The border of the pressed and released appearance. Notes Launch Key Dialog Page 40 Modifier Key A Modifier key is used to simulate the keys Shift, Ctrl, Alt, Alt Gr, and Win. Normally when a modifier key is pressed, it stays down until a non-modifier key is pressed. This makes it possible to enter sequences like Ctrl+Alt+A on a touch screen. A modifier key press can be canceled by clicking on the modifier again. Sample Modifier Keys Attributes Position Size Background Color Fill Background Modifier Key Type Border Determines the position of the key in its parent object. The width and height of the key in pixels. The background color of the pressed and released appearance (two different settings). Can be turned on or off. See explanation in the Notes section for Normal Key. The type of modifier the key simulates. The border of the pressed and released appearance. Notes Modifier Key Type Dialog Page 41 Mouse Click Key A Mouse Click Key is used to simulate a mouse click on the screen. Sample Mouse Click Key Attributes Position Size Background Color Fill Background Mouse Click Border Determines the position of the key in its parent object. The width and height of the key in pixels. The background color of the pressed and released appearance (two different settings). Can be turned on or off. See explanation in the Notes section for Normal Key. The type of mouse click the key simulates. The border of the pressed and released appearance. Notes Modifier Click Key Properties Dialog Page 42 Sticky Key A Sticky key is used to lock modifiers. In other words, Modifier keys are not released when a non-modifier key is pressed. This makes it possible to enter key sequences such as: Shift [down], A, B, C, Shift [up]. A Sticky key stays pressed until it is pressed again. Releasing a Sticky key also releases any locked modifiers. Sample Sticky Key Attributes Position Size Background Color Fill Background Border Determines the position of the key in its parent object. The width and height of the key in pixels. The background color of the pressed and released appearance (two different settings). Can be turned on or off. See explanation in the Notes section for Normal Key. The border of the pressed and released appearance. Page 43 Switch Key A Switch key is used to switch between canvases. Sample Switch Keys Attributes Position Size Background Color Fill Background Show & Hide Border Determines the position of the key in its parent object. The width and height of the key in pixels. The background color of the pressed and released appearance (two different settings). Can be turned on or off. See explanation in the Notes section for Normal Key. Determines which canvases should be shown and which should be hidden. See Notes section for more information. The border of the pressed and released appearance. Notes Show & Hide Dialog The Show Canvases box contains a comma separated list of canvas names and determines which canvases should be shown when you click on the Switch key. Hide Canvases determines which canvases should be hidden when you click on the Switch key. Canvases that are hidden with a Switch key are added to a list of canvases that has been hidden, and then if you click on a Switch key with the option Restore Hidden Canvases selected, all the canvases in the hidden list are restored. This feature makes it possible to minimize and restore canvases independently. Page 44 Page 45 Label A Label is a text object that can be put directly on a canvas or inside another object. A Label cannot itself contain any other objects. Sample Label Attributes Position Size Text Font Transparent Background Color Text Color Determines the position of the label in its parent object. The width and height of the label in pixels. This is determined by the font properties and can't be set directly. The text of the label. The font of the label. Whether the background of the label should be transparent or not. The background color of the label. Only used if Transparent is off. The text color. Notes Make sure the font you select for the label is present on the target platform where you intend to use the keyboard. When you change the font size of a label that is inside another object, the label might get larger than the parent object. Then if you try to make a copy of the parent object including the too large label you might get the following error message: Copy/Paste Error Message Page 46 The above message can also be displayed if you try to copy other objects that won't fit into a canvas or another object. Page 47 Rectangle A Rectangle can be used to make an area of the canvas in a different color and/or for grouping other objects. Rectangle with Some Keys Attributes Position Size Background Color Border Determines the position of the rectangle in its parent object. The width and height of the rectangle in pixels. The background color of the rectangle. The border of the rectangle. Page 48 Transparent Area A Transparent Area is used for creating a hole in the canvas. In the Designer, the Transparent Area is shown as a checkered rectangle. If a canvas has one or more transparent areas, the application or the desktop behind the canvas will be visible in those areas. Transparent Area Attributes Position Size Determines the position of the transparent area in its parent object. The width and height of the transparent area in pixels. Note A transparent area cannot contain other objects. If you try to paste objects into a transparent area the following message is displayed: Copy/Paste Error Message Page 49 5. Designer Command Reference This section describes all the menu commands available in Freefloat Key. File Menu File Menu Commands New Open... Close Save Save As... Recent File List Exit Creates a new empty keyboard. Opens an existing keyboard. Close the current keyboard. Saves the current keyboard. Saves the current keyboard with a new filename. Selecting one of the keyboards in the recent file list opens that keyboard. Exits the Designer. Page 50 Edit Menu Edit Menu Commands Undo Open... Cut Copy Paste Paste Image Delete Select All Select Next Select Previous Undoes the last action. Note! Not implemented yet. Redoes the previously undone action. Note! Not implemented yet. Cuts the selection and puts it on the clipboard. Copies the selection and puts it on the clipboard. Pastes the contents of the clipboard into the currently selected object. Pastes the image on the clipboard. Deletes the currently selected objects. Selects all objects on the current canvas. Selects the next object on the same level as the currently selected object. Selects the previous object on the same level as the currently selected object. Page 51 View Menu View Menu Commands Object List Properties Toolbars/Standard Toolbars/Layout Status Bar Note! Not implemented yet. Note! Not implemented yet. Toggles the standard toolbar. Toggles the layout toolbar. Toggles the status bar. Page 52 Keyboard Menu Keyboard Menu Commands Exit Password... Inactivity Control... Use at Logon Screen Private Modifiers Run Displays the Keyboard Exit Password dialog. Displays the Inactivity Control dialog. Determines whether the keyboard is a logon keyboard or not. Determines whether modifier keys are private or not. Starts the current keyboard in the runtime to test a keyboard layout. Note! You do not need to save the keyboard first. Page 53 Canvas Menu Canvas Menu Commands Add Remove Position... Size... Background Color... Edit Name... Visible Blend... Fade... Move Delay... Anchored Canvases... Border Add Adds a new empty canvas to the current keyboard. Removes the current canvas from the keyboard. Sets the canvas startup position. Sets the size. Sets the background color. Sets the name. Determines whether the canvas should be displayed when the keyboard is loaded by the runtime. Note! Make sure at least one canvas has the Visible attribute set. Sets the blending attribute. Sets the fade speed. Sets the move delay time. Sets the canvases that should be anchored with the current canvas. Sets the border attribute. Adds various objects to the current canvas. Page 54 Canvas List The names of the canvases are displayed here. By selecting one of the canvases from this list changes the canvas to edit in the active window. Page 55 Layout Menu Many of the layout commands, for example Align Left, use one of the selected objects as a reference object. The reference object is always the object you selected last. Layout Menu Commands Bring To Front Send to Back Toggle Grid Toggle Keys Move Objects by Mouse Grid Settings Brings the selected objects in front of other objects. Sends the selected objects behind other objects. Toggles the layout grid on and off. Toggles all keys between pressed and released appearance. Toggles whether the mouse should be used to move objects or not. Displays the Grid Settings dialog. Notes Grid Settings Dialog Page 56 Layout/Align Submenu Layout/Align Submenu Commands Left Horiz. Center Right Top Vert. Center Bottom Aligns the left edges of the selected objects. Centers the selected objects horizontally. Aligns the right edges of the selected objects Aligns the top edges of the selected objects. Centers the selected objects vertically. Aligns the bottom edges of the selected objects. Page 57 Layout/Move Submenu Layout/Move Submenu Commands Left Right Up Down Moves the selected objects one pixel left. Moves the selected objects one pixel right. Moves the selected objects one pixel up. Moves the selected objects one pixel down. Page 58 Layout/Make Same Size Submenu Layout/Make Same Size Submenu Commands Width Height Size Resizes the selected objects to the same width as the last selected object. Resizes the selected objects to the same height as the last selected object. Resizes the selected objects to the same size as the last selected object. Page 59 Layout/Space Evenly Submenu Layout/Space Evenly Submenu Commands Across Down Evenly spaces the selected objects horizontally. Evenly spaces the selected objects vertically. Note The above commands require you to select three or more objects. Page 60 Layout/Center in Parent Submenu Layout/Center in Parent Submenu Commands Horizontally Centers the selected objects horizontally in their parent. Centers the selected objects vertically in their parent. Vertically Centers the selected objects in their parent. Both Page 61 Window Menu Window Menu Commands New Window Cascade Tile Window List Opens a new window for the current keyboard. The canvas selected in the current window will also be the current canvas in the new window. Then you can switch canvas by selecting another canvas from the canvas list on the Canvas menu. Arrange windows so they overlap Arrange windows so they don't overlap. Selecting a window from the list makes that window active. Page 62 Help Menu Help Menu Commands About Designer... Displays the About dialog. Notes About Designer Dialog Page 63 6. Command File From version 1.2.0, Freefloat Key has a command file API. Using this API, an application can control Freefloat Key. To activate the command file API, a command folder needs to be specified for the keyboard layout. You do this by opening the keyboard layout in the Designer and then selecting the command Command Folder on the Keyboard menu. The Designer does not check if the folder exists since the target may be a Windows CE device. When a command folder has been set, the Freefloat Key runtime will look for the command file in that folder. The name of the command file is key-command.txt. When Freefloat Key finds the command file, it opens the file and executes the commands contained in it. Multiple commands are supported. All Freefloat Key commands gives a response. Responses are written to the file keyresponse.txt. The command format is as follows: <command>,<parameter 1>,<parameter 2> Example: setCanvasPosition,3,100,100 Page 64 6.1 Commands Command getNumberOfCanvases Parameters getCanvasName getCanvasXPos getCanvasYPos getCanvasPosition canvas canvas canvas canvas getCanvasWidth getCanvasHeight setCanvasPosition canvas canvas canvas, xpos, ypos snapCanvas canvas, position isCanvasVisible canvas showCanvas hideCanvas showAllCanvases hideAllCanvases setCanvasLabel canvas canvas canvas, label, text isKeyboardVisible showKeyboard hideKeyboard toggleKeyboard showMouseCursor hideMouseCursor stop sleep update delay Page 65 Comment Returns the number of canvases in the keyboard layout. Returns the name of the canvas. Returns the x-position of the canvas. Returns the y-position of the canvas. Returns the x- and y-position of the canvas. Returns the width of the canvas. Returns the height of the canvas. Moves the canvas to the specified position. Snaps the canvas to the specified location. Returns 0 or 1 depending on whether the canvas is visible or hidden. Shows the canvas. Hides the canvas. Shows all canvases. Hides all canvases. Sets the label text. canvas and label are zero-based indices. It is only possible to set the text of labels that are directly placed on a canvas. Returns 0 or 1 depending on whether the keyboard is visible or not. Shows the keyboard. Hides the keyboard. Toggles the keyboard. Displays the mouse cursor Hides the mouse cursor Terminates Freefloat Key. Pauses command execution. Causes Freefloat Key to refresh canvases during execution of multiple commands. • • • • Commands that do not have any return values return OK if the command was executed or Error followed by an error message if the command or one or more of its parameters were invalid. The canvas parameter is the name of a canvas or a zero-based index. If a keyboard layout has three canvases, valid canvas indices are 0, 1, and 2. The delay parameter is specified in milliseconds. Command responses are written to the command response file. Page 66 7. Keyboard Shortcut Reference Menu Command or Action File Menu New Open Save Exit Key Sequence Ctrl + N Ctrl + O Ctrl + S Alt + F4 Edit Menu Cut Copy Paste Paste Image Delete Select All Select Next Select Previous Ctrl + X Ctrl + C Ctrl + V Shift + Ctrl + V Del Ctrl + A Tab Shift + Tab Keyboard Menu Run Ctrl + F5 Canvas Menu Add/Image Add/Indicator Add/Normal Key Add/Label Add/Rectangle Add/Transparent Area F2 F3 F4 F5 F6 F7 Layout Menu Align/Left Align/Horiz. Center Align/Right Align/Top Align/Vert. Center Align/Bottom Ctrl + Left Arrow Shift + F9 Ctrl + Right Arrow Ctrl + Up Arrow F9 Ctrl + Down Arrow Move/Left Move/Right Left Arrow1 Right Arrow1 Page 67 Move/Up Move/Down Up Arrow1 Down Arrow1 Make Same Size/Size S Space Evenly/Across Space Evenly/Down A D Center In Parent/Horizontally Center In Parent/Vertically Center In Parent/Both H V C Bring To Front Send To Back Toggle Grid Toggle Keys Toggle Move Objects by Mouse F B G K M Misc Font Dialog for selected label(s) Ctrl+F 1 Shift + Arrow key moves a selected object by 10 pixels Default Actions Pressing Enter when an object is selected executes a default action that depends on the type of object. Not all object types have a default action. Object Battery Bar Battery Label Image Indicator Normal Key Position Key Exit Key Launch Key Modifier Key Sticky Key Switch Key Label Rectangle Default Action No action No action No action Indicator Type Record Keystrokes Canvas Position No action Application Modifier Key Type No action Show & Hide Text No action Page 68 Transparent Area No action Page 69 8. Logon Keyboard There are differences between Windows 2000/XP and Windows Vista/7/8 in how logons are done. Please refer to the appropriate section below for how to install Freefloat Key as a logon keyboard. Windows 2000/XP Freefloat Key can be configured to start a runtime keyboard on the logon desktop screen. This is useful if the target computer doesn't have a physical keyboard and the organization doesn't allow automatic password-less logins. Please note that you need to be logged in as a user with administrator rights to be able to install a logon keyboard. To set a keyboard as the logon keyboard: • • • • Open the keyboard layout in the Designer Select the option Use at Logon Screen on the Keyboard menu Save the keyboard layout Open the keyboard layout in the runtime. The following dialog is displayed: Install Logon Keyboard • • Click on Yes. Logout and login in again to test the keyboard on the logon desktop screen. Page 70 A Keyboard on the Logon Desktop Screen Page 71 Technical Details When a keyboard is installed to run on the logon desktop screen, a Windows service is installed (k1service.exe). The only purpose of the service is to launch the installed keyboard on the logon screen. A shortcut, called Remove Logon Keyboard, is created in Freefloat Key's Start menu folder. Use this to remove any installed logon keyboard. When uninstalling Freefloat Key, any installed logon keyboard is also removed. Please note that Freefloat Key does not replace the GINA (the logon module) since this is known to create problems with systems using alternate GINAs. Windows Vista/7/8 Ctrl-Alt-Delete If the domain policy requires Ctrl-Alt-Delete, the so called SAS sequence, before the user enters his/hers username and password, you need to enable software simulated SAS. To do this, use the Group Policy Editor (gpedit.msc) and navigate to the setting: Computer Configuration/ Administrative Templates/ Windows Components/ Windows Logon Options/ Disable or enable software Secure Attention Sequence Enable this setting and set the value to Services. Note! Sas.dll is used by Freefloat Key when simulating the SAS sequence. In Windows Vista, Sas.dll is not available natively. You must download the Windows 7 version of the Microsoft Windows Software Development Kit (SDK) to use this function. Set a keyboard as the logon keyboard • • • • Open the keyboard layout you wish to use in the Designer Select the option Use at Logon Screen on the Keyboard menu Save the keyboard layout Open the keyboard layout in the runtime (for example by double-clicking on the layout file in Explorer). The following dialog is displayed: Page 72 Install Logon Keyboard • Click on Yes. The file C:\ProgramData\Freefloat Key\LogonKeyboard.txt is created. The contents will be similar to this: "C:\PROGRA~2\FREEFL~1\FRA49B~1\Keyboard.exe" -logon "C:\ProgramData\Freefloat Key\XGA-en.key" The service (which you will install later on) uses this information to find the Freefloat Key runtime module (keyboard.exe) and which layout to load on the logon screen. • The following message is displayed when the logon keyboard information file was created successfully: Page 73 Install the logon service Start an administrator command prompt and run the command displayed in the image below: Note! On a 64-bit Windows the path should be C:\Program Files (x86)\Freefloat\Freefloat Key. Make sure you use k1service7.exe and not k1service.exe. The service can be stopped and removed by using the option -remove. The name of the Freefloat Key logon keyboard service is FFKeyLogonService. Restart Windows to verify the logon keyboard is started on the logon screen. Troubleshooting To enable logging in the logon keyboard service, create a file called "logging" (no file extension) in the folder C:\Program Files\Freefloat\Freefloat Key. The log will be written to: C:\ProgramData\Freefloat Key\Servicelog.txt Page 74 Security considerations When the installation is finished and tested, the access rights for the file C:\ProgramData\Freefloat Key\LogonKeyboard.txt must be limited for regular users to read-only. If not, any user can modify it to launch a program on the secure desktop, for example, a command prompt, with Local System rights. Page 75 Auto detecting locale for logon keyboard Note! The information below also applies to Windows Vista/7/8 but instead of a registry key and value you need to modify the file C:\ProgramData\Freefloat Key\LogonKeyboard.txt. If you configure a keyboard layout to be used as a logon keyboard according to the instructions in the beginning of this section, a registry key is created. The string value LogonKeyboard in the key HKEY_LOCAL_MACHINE\ Software\Freefloat\Key is set to the following (Note! The actual layout and paths may be different on your system): "C:\PROGRA~1\FREEFL~1\FR3DD2~1\Keyboard.exe" -logon "C:\Program Files\Freefloat\Freefloat Key\Layouts\logon.key" To make Freefloat Key automatically load the keyboard layout corresponding to the current locale, edit the registry key and remove the keyboard layout. The value should now look like: "C:\PROGRA~1\FREEFL~1\FR3DD2~1\Keyboard.exe" -logon Page 76 9. Specify Keyboard Layout on Startup There are three different ways of how tell Freefloat Key which keyboard layout should be used upon startup. The priority order of how Freefloat Key determines which keyboard layout to load is: 1. 2. 3. 4. Command Line Registry Key Locale Interactive each of which is explained below. Command Line If you give the full path to a keyboard layout on the command line when starting Freefloat Key, that keyboard layout will be loaded when Freefloat Key starts. This alternative has priority over the keyboard layout registry key. Registry Key If the string value Layout exists in the registry under the key, HKEY_LOCAL_MACHINE\Software\Freefloat\Key that value is used as an absolute path to the keyboard layout file. In Windows CE, under the same registry key, the value called SIPLayout is used for the keyboard layout for Freefloat Key when it is running as an input method (IM). Page 77 Locale When neither command line nor registry key is given/exists Freefloat Key looks for a file called LocaleInfo.txt. This contains a mapping between the current locale and the keyboard layout file. Here is an example of such a mapping: [1024x768] 00000419=SVGA-ru.key 0000041d=SVGA-sv.key 00000407=SVGA-de.key default=SVGA-en.key When this file is used on a German Windows, the file will be scanned for the German locale identifier (00000407). Freefloat Key will find and use the layout SVGA-de.key. If the current locale can't be found, the layout specified as default will be used. In LocaleInfo.txt there are different sections for display resolutions. The file LocaleInfo.txt should be placed in the same folder as keyboard.exe. When a keyboard layout has been found in LocaleInfo.txt, Freefloat Key tries to find it in: 1. The current folder. 2. The same folder as keyboard.exe. 3. The subfolder Layouts (subfolder to the folder where keyboard.exe is). If you need to find out the current locale of a PC, start keyboard.exe with the command line option -showlocale. For Windows CE, the functionality of a particular platform is determined by the original equipment manufacturer (OEM) and some devices may not support the API used to determine the locale. Page 78 Interactive If you start Freefloat Key without any parameter on the command line and the keyboard layout registry key (see below) doesn't exist, the Select Keyboard dialog will be displayed allowing you to select which keyboard layout to load. Page 79 10. Multiple Instances If the DWORD value BlockMultipleInstances exists and is set to 1 under the registry key, HKEY_LOCAL_MACHINE\Software\Freefloat\Key it isn't possible to run more than one normal instance of Freefloat Key at the same time. Running Freefloat Key on the logon desktop, from the Designer in preview mode, or in API mode, does not count as a normal Freefloat Key instance. 11. Key Click Sound If you want a key click sound for better user feedback, simply put a standard Windows wave sound file named click.wav in the same folder as Freefloat Key. Page 80 12. Windows CE Freefloat Key can be used on Windows CE devices and has been tested on the following variants of Windows CE: Windows CE 4.1 Windows CE 4.2 Windows CE 5.0 Windows Mobile 2003 Windows Mobile 2003 Second Edition Windows Mobile 5.0 Freefloat Key has very little dependencies and will probably work on versions other than the above mentioned. Freefloat Key has been adapted for and tested on various screens, for example QVGA, VGA, and SVGA. Three different CPU types are supported on the CE platform, ARMV4 (and successors), MIPSII, and x86. Blending is not supported by Freefloat Key on Windows CE because there is no support for blending in Windows CE itself. Installation Installation of Freefloat Key on a Windows CE device is done by simply copying program and data files from your PC to the device. You can use either a portable memory card/stick or via an ActiveSync connection. We recommend that you install Freefloat Key in a folder that is backed up by persistent memory (Flash). Some examples of flash folder names are "Flash File Storage", "Storage", "Flash", "BACKUP" etc. The name varies between Windows CE versions and device manufacturers. Please refer to the documentation for your device if you are uncertain. After installing Freefloat Key on your PC, the CPU specific files for Windows CE devices end up in the program data folder. Which folder it is depends on the version of your PC's operating system. Windows XP C:\Documents and Settings\All Users\Application Data\Freefloat Key\Platforms Windows Vista/Windows 7 C:\ProgramData\Freefloat Key\Platforms Page 81 Copy the files for the correct CPU type to an appropriately named folder on your device. Please note that you also need to copy one or more keyboard layouts to the same folder on your device. The easiest way to specify which keyboard layout that should be loaded when you start Freefloat Key is by putting a text file called LocaleInfo.txt in the same folder as the Freefloat Key program files and layout file. The following example makes Freefloat Key load the layout file SVGA-en.key: [default] default=SVGA-en.key If you launch Freefloat Key from a shortcut and you want to specify the layout on the command line, please make sure you specify the full path to the keyboard definition on the command line, for example: \FLASH\Key\Keyboard.exe \FLASH\Key\QVGA.key Page 82 Pre-defined Keyboard Layouts In the folder where you installed Freefloat Key, there is a subfolder called Layouts. There you will find QVGA.key and SIP.key. SIP.key has been adapted for use when running Freefloat Key as an input method (IM). QVGA.key is suited for running Freefloat Key in a standalone fashion. For Windows CE with SVGA (800x600) or XGA (1024x768), the SVGA-xx.key/ XGAxx.key layout files can be used when running Freefloat Key as an input method. Just copy and rename the layout to SIP.key. Also remember to use the Designer to remove the Minimized canvas and any Minimize buttons. Running Freefloat Key as an Input Method Please note that you need to run Freefloat Key in standalone mode (Keyboard.exe) at least once when you register the product on the device. It is not possible to run Freefloat Key as an input method in demo mode. To install/uninstall Freefloat Key as an input method, use the supplied RegSIP.exe and UnregSIP.exe programs. Limitations All canvases need to have the same width and height. Only one canvas can be active/displayed at the same time. Whether the keyboard can be moved or not depends on a registry key setting for the SIP. Position keys have no function because an input method cannot control its own placement. Exit keys doesn't work since there is no way for an input method to quit. Page 83 Appendix A. Screen dump of canvases In version 1.2.0 and later it is possible to create bitmap files, screen dumps, of all canvases in a keyboard. You need write permission to the folder C:\KeyDumps on your pc. Start Freefloat Key, hold down Ctrl, Alt and Shift and then right-click on the currently visible Freefloat Key canvas. Freefloat Key will display every canvas in the keyboard and save an image of the canvas. When all canvases have been saved, Freefloat Key exits. Appendix B. Default Key Look In version 1.2.0 of Freefloat Key, the command Save As Default Key Look, was added. It is displayed on the context menu for normal key objects. When you issue this command for a key, the key’s size, background color, label font and its size, border widths, and border colors are saved to a file. The look of the key saved will be used for all key objects created. The default look for keys are saved in the common application data folder for Freefloat Key (usually C:\ProgramData\Freefloat Key). The filename is key.<version>.default. Page 84 Appendix C. Version History Version 1.0.0 Changes First release Date 2006-11-01 1.0.1 A lot of minor fixes and adjustments. 2006-11-03 Splash window added (so product version can be determined). Document icon and .keyone file type registration. MFC memory leak fixed. Fixes for logon keyboard on Windows 2000. 1.0.2 Bitmap support (2-24 bit), JPEG supported though automatic conversion. 2006-11-20 New keyboard document version, handles 1.0.1 documents. Fill Background option on keys to allow keys with bitmaps to have transparent areas. 1.0.3 Added the Clone Appearance command on keys in the Designer. 2006-11-27 Added new keyboard layouts, now the following layouts are included: Danish English French German Italian Norwegian Portuguese Spanish Swedish/Finnish 1.0.4 Two layout commands used the same shortcut key (H). 2007-01-10 Fixed some minor drawing problems in Designer. Completed the manual. Re-worked all default keyboard layouts so they use bitmaps for special symbols instead of labels in the Wingdings 3 font since that font isn't always present in all targets. 1.0.5 Added Undo/Redo in the Designer. Added mouse selection rectangle. Page 85 2007-02-14 1.0.6 Refined Windows CE support (high-DPI platform etc). 2007-03-01 Splash window and license dialogs simplified and made smaller to make them usable on more screen sizes both in landscape and portrait modes. Finalized input method version. Tested on various Windows CE devices. Files can now be opened in the Designer by dragging and dropping files from File Explorer. 1.0.7 New sample keyboard layouts added (Big Numeric and Multi). 2007-03-20 1.0.8 Added the Private Modifier option. 2007-05-08 1.0.9 Added support for the MIPSII platform. 2007-05-16 The keyboard layout that should be loaded on startup can now be specified in a registry key. Added registry key for blocking multiple instances. 1.0.10 A lot of changes done when integrating Freefloat Key into Access*One. 2007-06-05 Added an API from which Freefloat Key can be controlled. Not documented yet. 1.0.11 Added click sound feature. 2007-10-03 1.0.12 Version 1.0.8 to 1.0.11 can't open layouts created with versions prior to 1.0.8. This version addresses that issue. 2007-11-01 1.0.13 Solved an issue with accounts that had read-only access to a registry key. Only applicable for OEM versions. 2007-11-22 1.0.14 Added automatic selection of keyboard from the current locale. 2008-02-12 1.0.15 Fix for running a layout from within the Designer. 2008-02-19 1.0.16 Made it possible to use automatic selection of keyboard from the current locale when using Freefloat Key on the logon screen. 2008-02-22 1.0.17 Fix for problem with list box in licenser module. 2008-03-28 1.0.18 Minor adjustments to national keyboard layouts. 2008-04-15 Fix for Undo in Designer, it erroneously set the visible attribute of the canvas. Added Apply for all canvases in Blend dialog. Added the toggle Layout/Move Objects by Mouse in Designer. Page 86 1.0.19 Added the new objects Battery Bar and Battery Label. 2008-05-09 A normal key with a Unicode value can now be used to create a key that generates a lower case international character and the upper case variant when Shift is down, for example å Å. Fill Background property (off) now working correctly for the following object types: Exit Key, Modifier Key, Position Key, Sticky Key, and Switch Key. 1.0.20 It is now possible to modify common properties when multiple objects are selected in more cases than before. Bug fixed a third-party component that crashed in in Windows Vista. This only affected the Designer. 1.0.23 Adjustments made for Windows Vista (install folders changed to make Vista UAC happy). Some layouts did not have shortcuts in the Start Menu. Fix: When running Freefloat Key as a SIP on Windows CE the layout could not be specified via LocaleInfo.txt. Update made to the API for external programs. 1.0.24 Updated the instructions for installing on Windows CE to reflect changes to install folder. Added XGA layouts. 1.0.21 1.0.22 2008-08-26 2008-08-28 2008-09-09 2008-10-01 2009-07-16 Added the Launch key object. 1.0.25 Updated the format of LocaleInfo.txt. It now supports sections for different display resolutions. The menu command for changing the border line width of a canvas was the same as the context menu of selected objects. Split into two different commands to avoid confusion. 2009-10-07 An object could be added more than once to the selection which resulted in a crash if the selected objects were deleted. 1.0.26 1.0.27 1.1.0 The sound for key clicks, click.wav, is now being searched for in the same folder as the runtime executable. Install folder changed for layouts changed to "C:\ProgramData\Freefloat Key" (Win 7) and C:\Documents and Settings\All Users\Freefloat Key" (Win XP). Modified layouts for a specific OEM version. Rebuilt because 1.0.26 had a bug that caused Freefloat Key to stop working when used in Access*One. Standalone there was no problem. Added the object types Canvas Position Label and Mouse Click Key. Updated the licenser module to enable different licensing models. Page 87 2010-04-21 2010-06-24 2010-12-13 1.2.0 Bug fix: The font properties of a battery label could not be modified. Added the Command File feature. 2011-09-21 Added feature for dumping canvases to bitmap files. Switching from one canvas to another can now be done with the normal key object. The switch key still exists for backwards compatibility. 2.0 2.1 Added the command Save As Default Key Look. New product name, Freefloat Key. Added support for logon keyboard for Windows Vista/7/8. Page 88 2012-10-25 2013-04-29